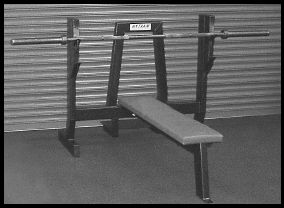
Five forms of the bench press will be described:
barbell bench press
dumbbell bench press
close-grip bench press
incline barbell bench press
incline dumbbell bench press
Main muscles worked
pectorals, deltoids, triceps
Capsule description
lie on your back, bar in your hands, arms vertical, elbows locked; lower the bar to your chest, then push it up
Set-up
This exercise is done supine, lying on your back on a horizontal bench. Use a straight barbell, not one with bends or cambers in it. Bench press inside a four-post power rack with pins and saddles correctly positioned, and securely in place.
Alternatively, bench press between sturdy squat stands together with spotter (or safety) bars or racks, or use a half rack, or use a combination bench-and-weight-stands unit together with spotter bars. Some bench-and-stands units have built-in, adjustable spotter bars. Set the safety bars at the appropriate height, and position yourself on the bench so you won’t miss the safety bars if you need to set the barbell on them.
If there are no spotter or safety bars to stop the bar getting stuck on your chest if you fail on a rep, you must have an alert and strong spotter in attendance.
Center a sturdy, stable bench between the weight supports. In a power rack, if possible, mark where the bench should be, to be centered. Use a tape measure to ensure correct centering. The rack and bench should be level—have them checked, and corrected if necessary.
Depending on the bench press unit you use, the bar saddles may be adjustable. Position them neither too high, nor too low.

A combination bench-and-weight-stands unit, but without spotter bars. An assistant must be used as a spotter with this type of unit. There’s a raised platform here for the spotter to stand on, for easier handling of the barbell by the spotter. An unloaded barbell is shown resting across the unit’s upper bar saddles.
Positioning on the bench
Position yourself on the bench so that you won’t hit the uprights of the rack or stands with the bar during the bench press ascent, but also so that you minimize the horizontal movement of the bar during the unracking and racking of the bar. The bar, when racked, may, for example, be directly above your nose. The set-up varies according to individual body structure, height of the bar holders, and depth of the saddles. Experiment with a bare bar, to find what works best for you. Make a note of where your eyes are, relative to the bar, when you’re on the bench with the bar in the saddles, ready to unrack the bar to start a set.
Lie on the bench with your feet, hips, back, and head all in position. Your heels should be on an imaginary vertical line drawn from your knees, or slightly in front of it. If your heels are behind this line (that is, pulled toward your pelvis) that will lead to exaggerated arching of your lower back. Avoid that. Although some arching in the lower back is normal, don’t exaggerate it. Some trainees exaggerate the arch, to raise their chests as much as possible in order to reduce the distance the bar has to move before it touches their chests, to increase the weights they use. This technique has injured many trainees.
Establish a strong base, with your feet flat on the floor wider than shoulder width. Don’t place your feet close together on the floor, and don’t place them on the bench in any manner—both placements would reduce your stability. Never lift your heels off the floor during the bench press. If you have short lower limbs and can’t keep your feet flat on the floor, raise your feet a few inches using low blocks, or plates stacked smooth side up.
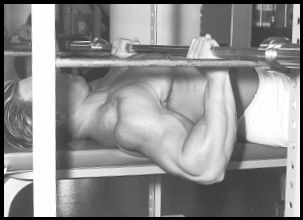
Set the rack’s pins, or whatever safety bars you use, an inch below the height of your inflated chest when you’re in position on the bench. A length of hose or tubing may be put over each safety bar, to soften contact with the barbell. If you fail on a rep, lower the bar to your chest, exhale, and set the bar on the supports.
Grip
While the bar is at the line of your lower pecs, your hand spacing should put your forearms in a vertical position when viewed (by an assistant) from the side and from your feet. Your elbows should be directly under your wrists. Adult men should use a grip with 21 inches or 53 centimeters between their index fingers as a starting point. Women should use a grip four inches or ten centimeters narrower. Fine-tune from there to find the grip that gives you the proper forearm and elbow positioning. Once you find your optimum grip, have someone measure the distance between your index fingers, and make a written note of it.
Don’t use a thumbless grip, because it reduces your control over the bar. Wrap your thumbs under and around the bar.
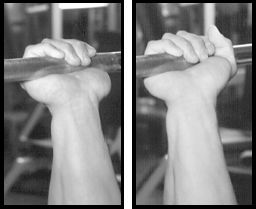
The thumbless or false grip on the left, and the correct grip on the right.
Grip with your hands equidistant from the bar’s center. Be sure you’re not even a fraction of an inch off center. Before a set, know precisely where your hands should be—use a tape measure if necessary.
If the back of your hands, wrists and forearms is in a straight line during the bench press, or any pressing movement, the bar will fall out of your hands. Your hands must move rearward sufficiently so that you can grip the bar securely. But don’t allow the bar to extend your hands to the maximum, because that can mar your lifting technique, and injure your wrists. (The bar should be gripped firmly, because the slacker the grip, the less the actions of the flexors on the palm side of the forearm, which translates to less muscular counteraction to the rearward bending.) Once the bar is in a secure position in your hands, keep your wrists rigid for the duration of each set.
Performance
Get in position on the bench, hands in place on the bar, with a spotter or training partner standing directly behind you. Have the spotter or training partner give you a hand-off as you fully straighten and lock out your elbows. Pause until the bar is steady above your chest, inhale fully to fill your chest, pull your shoulders back, then immediately lower the bar under control. The full inhalation, and pulling back of the shoulders, help to produce the required tight, full torso. Take at least two to three seconds for the descent.
Lower the bar to a point below your nipples, at about the bottom line of your pectoral muscles. Find the precise point that’s best for you. When the bar is on your chest, your forearms should be vertical when viewed from the side and the front (or rear, depending on where the viewer is). If they aren’t, your hand spacing is incorrect.
Never bounce the bar off your chest. Touch your chest with the bar, pause there for one second, then push it up. Stay tight at the bottom with a full chest and firm grip—don’t relax.
The ascent of the bar should be vertical, or slightly diagonal if that feels more natural—with just three or four inches of horizontal movement toward your head. Try both, and see which works best for you. Keep your forearms as vertical as possible during the ascent. Do this through keeping your elbows directly beneath your wrists. Exhale during the ascent.
Check yourself on a video recording, or have someone watch you from the side. What you may think, for example, is a vertical movement, may be angled slightly toward your feet. Practice until you can keep the bar moving correctly.
The ascent, just like the descent, should be symmetrical. The bar shouldn’t tip to one side, both hands should move in unison, and you shouldn’t take more weight on one side of your body than the other.
After locking out the bar, pause for a second or until the bar is stationary, inhale fully, pull your shoulders back, then again lower the bar slowly to the correct position on your lower chest.
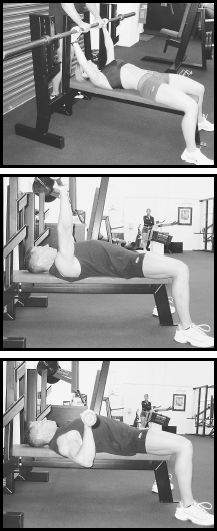
The hand-off to start a bench press set (top), the top position prior to the descent of a rep (middle), and the bottom position at the lower pectoral line (above).
Common errors—DANGER
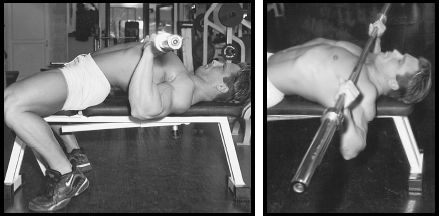
Two of the most common bench pressing errors. Left, exaggeration of the arch in the lower back—from having the feet behind the knees, and from not keeping the feet flat on the floor. NEVER DO THAT. It has injured the lower backs of many trainees. Right, bench pressing to the upper chest. NEVER DO THAT. It has injured the shoulders of many trainees.
Other tips
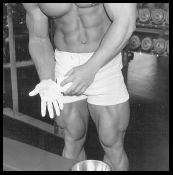
When applying chalk, cover each hand, including the area on the inside of your thumb and index finger.
Keep your head flat on the bench. Never turn your head while you’re lifting or lowering the bar. If you do, the bar may tip, and then your groove would be marred, and you could injure yourself.
Don’t drive your head back into the bench, or otherwise you’ll risk injury to your neck.
Use chalk or rosin on your hands to improve your grip on the bar, but keep the knurling clean.
Once you’ve learned correct technique in the bench press, drill yourself on a fixed set-up and approach-to-the-bar procedure.
Once you’ve mastered bench pressing technique, give 100% attention to ensure that you deliver correct technique on every rep. Even a slight slip of concentration can lead to lowering the bar slightly out of position, or having one hand out of step with the other. Either of these will ruin your groove. This will make the weight feel heavier, make your reps harder, and risk injury.
Spotting
A hand-off to get the bar out of the saddles to start the set, is the first function of a spotter. During a set, as soon as the bar stalls or tips, or one hand gets forward of the other, the spotter must act to prevent the rep deteriorating further and causing injury.
The spotter must use both hands and provide sufficient assistance to keep the bar horizontal and moving correctly, centered above the lifter.
Even if the spotter doesn’t need to assist during a rep, he should guide the bar back into the weight saddles after the final rep. At the end of a hard set of bench presses, you’ll be tired. Without a guiding pair of hands on the bar from a spotter, you may miss getting the bar into the weight saddles. Throughout spotting, the spotter must not round his back, to protect his back.
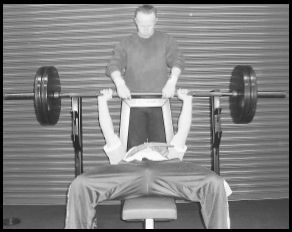
How a single assistant should spot the bench press. This bench press unit has a platform for the spotter to stand on, for more efficient spotting.
Two pectoralis muscles
“Pectorals” and “pecs” refer to the pectoralis MAJOR—the large, flat muscle on each side of the upper rib cage. There’s also the pectoralis MINOR, a much smaller muscle that’s BENEATH the pectoralis major.
The pec minor protracts the scapula forward, as when a person reaches for something. The pec major is a prime mover of the humerus, as when a person bench presses, for example.
The pec minor isn’t the upper pec, and doesn’t make any significant contribution to chest development. What’s considered to be the upper pec is the clavicular portion of the pectoralis major.
Technique recordings
Periodically, use a camcorder and record your exercise technique, for analysis later. A video camera can be an outstanding tool to help you to improve your exercise technique.
Main muscles worked
pectorals, deltoids, triceps
Capsule description
lie on your back, dumbbells in your hands, arms vertical, elbows locked; lower the dumbbells to your chest, then push them up
The bench press can also be done with dumbbells, again from a supine position on a horizontal bench. Once the ’bells are in pressing position, the technique is similar to the barbell version.
There are some advantages of the dumbbell version. First, provided there are suitable dumbbells available, you can probably dumbbell bench press whenever you want, and avoid having to wait your turn at the barbell bench press stations. Second, the dumbbell bench press doesn’t require a power rack or other safety set-up, but a spotter is still required. Third, the ’bells provide more potential than a barbell does for optimizing hand and wrist positioning—a barbell fixes the hands into a pronated position.
The disadvantages of the dumbbell bench press are several. First, getting two heavy dumbbells into and out of position is difficult—and potentially dangerous—unless you have at least one competent assistant. Second, there’s a greater chance of overstretching on the lowering phase than with a barbell. Third, balance is tricky, and if control is lost over one or both dumbbells during a set, you could sustain serious injury. In addition, the floor and equipment could be damaged if the dumbbells are dropped. Of course, the barbell bench press can be dangerous unless done correctly, inside a power rack with pins properly positioned.
Performance
To get into position for dumbbell bench pressing, have a spotter hand you the ’bells one at a time while you’re in position on a bench (as you would be for the barbell bench press).
Alternatively, get the dumbbells into position by yourself. Sit on the end of a bench with the ’bells held vertically on your thighs. Center your hands on the handles. Keep your elbows bent, chin on your chest, back rounded, and, with a thrust on the ’bells from your thighs, roll back on the bench and position your feet properly, like for the barbell bench press. With your forearms vertical, and hands lined up with your lower pecs, inhale fully to fill your chest, pull your shoulders back, and immediately begin pressing.
Press in a similar pathway as in the barbell version. Keep the ’bells moving in tandem, as if they were linked. Don’t let them drift outward from your torso, or let one get ahead of the other.
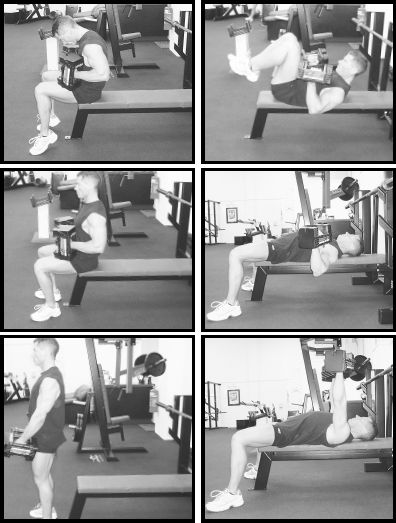
Clockwise, from the bottom left, how to get into position, without assistance, for the dumbbell bench press, and the first ascent of the set.
With dumbbells you don’t have to hold your hands as if holding a barbell. Use a parallel grip, or one somewhere in between that and the barbell-style pronated grip. You can change your wrist positioning during the course of each rep.
If the back of your hands, wrists and forearms is in a straight line during the dumbbell bench press, or any pressing movement, the dumbbells will fall out of your hands. Your hands must extend rearward sufficiently so that you can grip the dumbbells securely. But don’t allow the dumbbells to extend your hands to the maximum, because that can mar your lifting technique, and injure your wrists. (The dumbbells should be gripped firmly, because the slacker the grip, the less the actions of the flexors on the palm side of the forearm, which translates to less of a muscular counteraction to the rearward bending.) Once the dumbbells are in a secure position in your hands, keep your wrists rigid for the duration of each set.
Don’t seek an exaggerated range of motion. Keep your hands near to the spacing that was recommended for the barbell bench press. Don’t use a wider grip so that you can get your hands lower at the bottom of the exercise. Descend to a point no deeper than you would on a barbell bench press. Pause at the bottom for a second, then ascend smoothly, under control. Pause for a second at the top, or until the dumbbells are stationary, then smoothly perform the next rep.

From the top, the last descent of a set of dumbbell bench presses, and the return to the seated position.
Your control may be poor at first, but with practice you’ll develop control over the dumbbells.
Adding weight
Fixed-weight dumbbells usually increase in increments of 5 pounds (or 2.5 kilos). Going up in dumbbells usually means a total increase of 10 pounds, which is large. Stick with a pair of dumbbells until you can comfortably do several reps more than your target count, before going up in weight the next time you dumbbell bench press.
If you use adjustable dumbbells, you can use smaller increments than 5 pounds provided you have small discs. Even if you use fixed-weight dumbbells, you can attach two small discs to each dumbbell. Use strong adhesive tape and ensure that the discs are securely attached. Over time, build up to the weight of the next pair of fixed-weight dumbbells. To ensure proper balance, attach the small discs in pairs to each dumbbell, one at each end. A better choice is to use magnetic small plates.
Spotting
A spotter should crouch behind your head, ready to provide assistance. One hand should apply force under each elbow. But this is strictly for assisting a lifter to get a tough rep up in correct technique. A single person can’t simultaneously take a pair of ’bells from someone who fails on a rep. Two spotters are needed, then.
Don’t push this exercise to failure. Even when you’re training hard, stop this exercise one rep short of failure, so you don’t risk losing control. Losing control could cost you an injury. Even an alert spotter may not be able to prevent loss of control of both dumbbells.
A spotter, or better still two spotters, can take the dumbbells off you at the end of a set. Alternatively, get off the bench while holding the dumbbells. Here’s how, as illustrated on the left: Lower the ’bells to your lower torso, keep your forearms, arms, shoulders and chest tight, and lift your bent knees as high as you can. With the ’bells touching your thighs, and your chin on your chest, immediately throw your feet forward and roll into a seated position. This is especially easy to do if a spotter places his hands under your shoulders and helps you to roll up.
A spotter should be careful not to round his back while spotting you, to protect his back.
Main muscles worked
triceps, pectorals, deltoids
Capsule description
lie on your back, bar in your hands with a shoulder-width grip, arms vertical, elbows locked; lower the bar to your chest, then push it up
This exercise is similar to the standard barbell bench press. The principal difference is the grip spacing. The closer grip increases the involvement of the triceps. The section on the barbell bench press should be studied together with this one.
Set-up and positioning
The commonly seen close-grip bench press has the hands touching, or very close together. This is harmful for the wrists, and the elbows. The safe close-grip bench press is not very close. Make it about five inches or 13 centimeters closer than your regular-grip bench press. Depending on torso girth, and forearm and arm lengths, about 16 inches or 41 centimeters between index fingers will probably be fine for most men, and about 12 inches or 30 centimeters for women. Find what feels most comfortable for you. If in doubt, go wider rather than narrower. Apply the bench press rule of keeping your forearms vertical—vertical as seen from the front and from the sides.
Position yourself on the bench like in the standard bench press, and don’t use a thumbless grip.
Performance
Take your grip on the bar and get a hand-off to help you to get the bar out of the saddles. Keep your elbows straight, move the bar into the starting position above your lower chest, and pause briefly. Inhale fully and fill your chest, pull your shoulders back, keep a tight torso, and start the descent. Bring your elbows in a little as you lower the bar, to keep your elbows beneath your wrists.
The bar should touch your chest at the line of your lower pecs, or a little lower. Never bounce the bar off your chest. Touch your chest and pause there for one second, then push the bar up. Stay tight at the bottom, with a full chest and firm grip—don’t relax. Exhale during the ascent.
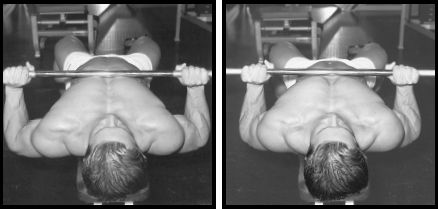
The hand spacing of the standard bench press (left) and a safe close-grip bench press (right). In this case the difference is only about five inches or 13 centimeters. The bar is at the lower pectoral line in both cases. The elbows should be directly beneath the wrists. In the illustration on the right, the hands could be brought in a little further provided the elbows follow. A shoulder-width grip is ideal.
The ascent of the bar should be vertical, or slightly diagonal if that feels more natural—with just a few inches of horizontal movement toward your head. Try both, and see which works best for you.
During the ascent of the bar it may be natural for your elbows to move outward a little, prior to their return to a line directly beneath your wrists as you near the top position. This especially applies if there’s any horizontal movement during the ascent.

Hand positioning this close is dangerous, especially for the wrists and elbows.
Other tips
The narrowed grip relative to the standard bench press can cause excessive extension of the shoulders, especially in long-limbed, lanky trainees. If the close-grip bench press bothers your shoulders, and you’re doing the exercise as described here, modify the movement.
Do the exercise in a power rack with pins set so that you reduce the range of motion by a few inches. That will reduce the extension of your shoulders, and make the exercise safer.
Fatigue occurs suddenly in the close-grip bench press. Use a set-up that will safely catch the bar if you have to dump it—see the set-up guidelines for the standard barbell bench press. Terminate a set as soon as your elbows start to drift out of position despite your best efforts to keep them in position.
Spotting
See the guidelines for the standard barbell bench press. Similar guidelines for spotting apply here. But because fatigue occurs more suddenly in the close-grip bench press, your spotter must be especially alert. He must be ready to help you when the bar stalls, or when your elbows start to drift out of position.
Even if exercise technique is correct, rep speed is controlled, and the handling of weights is faultless while setting up equipment, an exercise can still cause problems if, for a given individual, training is excessive in terms of frequency or volume, or if the adding of weight to the bar is rushed.
Main muscles worked
pectorals, deltoids, triceps
the incline bench press may place more stress on the upper pectorals (clavicular head) than does the horizontal, supine version
Capsule description
lie on your back on an incline bench, bar overhead; lower bar to your chest, then push it up
Set-up
Use a heavy-duty, adjustable bench, preferably one that has an adjustment for tilting the seat—to prevent the user slipping out of position. Use a low-incline bench that has an angle no greater than 30 degrees with the horizontal. Most incline benches are set too upright for this exercise.
Ideally, do the exercise in a power rack, with pins properly positioned for safety. Alternatively, do the exercise in a purpose-built, incline bench press unit. If you do the exercise outside the safety of a power rack, have a spotter standing by in case you get stuck on a rep. The spotter is also needed to help you to get the bar out of the saddles safely, and return it to the saddles after the set is over.
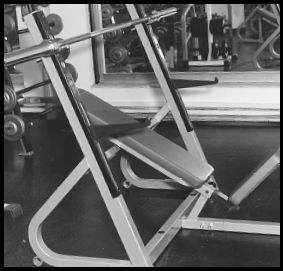
An incline bench press unit, with built-in (black) adjustable safety bars. An unloaded barbell is shown resting across the unit’s bar saddles.
Grip, and bar placement
Start with the same grip as in the standard bench press, and fine-tune if necessary. Don’t use a thumbless grip, but wrap your thumbs around the bar properly. Furthermore, as in the bench press, your hands must extend rearward sufficiently so that you can grip the bar securely. But don’t allow the bar to extend your hands to the maximum, because that can mar your lifting technique, and injure your wrists. Grip the bar firmly, to help keep your wrists in the right position. Once the bar is in a secure position in your hands, keep your wrists rigid for the duration of each set.
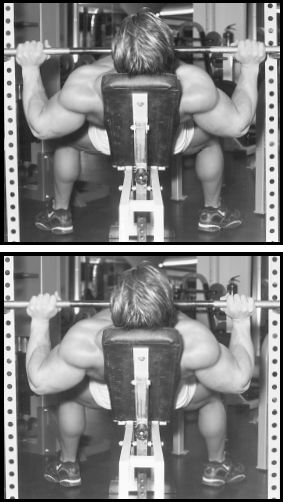
Top, hand spacing a little too wide. Bottom, better hand spacing, elbows directly beneath the wrists.
Don’t lower the bar as low on your chest as in the regular bench press. Because of the inclination of the bench, a low position of the bar on your chest would lead to excessive and unsafe extension of your shoulders. Nor should you lower the bar to your neck or clavicles—that positioning is also dangerous for your shoulders.
Rather than wonder where to place the bar on your chest at the bottom of the incline press, look at it in terms of your forearms and arms. Your forearms should be vertical at the bottom—vertical when viewed from the side and from the front. (Get the help of an assistant.) At that position your arms should be at about a 45 to 60 degree angle to your rib cage. The precise angle will vary from individual to individual, largely because of forearm and arm lengths, and torso girth variations. Get your forearms in the right position, and you should automatically find the ideal placement of the bar on your chest.
Performance
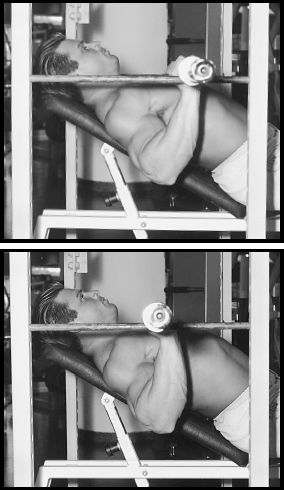
Your forearms should be vertical when viewed from the side. Top photograph, bar too low on the chest, which produces excessive shoulder extension. Above, correct positioning.
Position yourself on the incline bench, and plant your feet solidly on the floor, or on a foot brace if one is provided. Keep your feet fixed in position. Don’t lift or shuffle them. Your feet should be flat on the floor, wider than shoulder width. Feet positioned close together reduce stability.
With a hand-off, take the barbell out of the stands. Straighten your elbows, pause for a second, then lower the bar under control. Touch your chest at the position explained earlier, and pause for a second. Keep yourself tight during the pause, with your abdominal muscles, buttocks, and lats contracted. Then smoothly press up and slightly back. After straightening your elbows, pause for a second, or until the bar is stationary, then lower it for the next rep.
Use the same breathing pattern as in the regular bench press.
Spotting
See Bench press. The same guidelines apply to spotting the incline barbell press. In addition, the spotter needs to be elevated, to apply assistance with least difficulty. For the spotter to avoid injury, he must maintain a slightly hollowed lower back, and get as close to the trainee as possible.
Caution
When you incline press, don’t exaggerate the hollow in your lower back. With your feet flat on the floor, keep your heels directly beneath or slightly in front of an imaginary vertical line drawn through the middle of your knees. If your feet are behind your knees, the arch will probably be exaggerated, and the risk of injury increased.
But, if the seat of the bench is too high and can’t be adjusted, or if you have short lower limbs, this strategy won’t work well. A nonslip, low block or platform under each foot will be required. A wide single platform would also do the job. The wider your feet, the greater your stability.
When preparing to unrack the bar from behind your head to get ready for the first rep of a set of the incline barbell bench press, don’t draw your elbows behind your wrists, or even in line with your wrists. If your elbows are drawn back, then as you unrack the bar the stress on your shoulders will be increased greatly, and unnecessarily. Keep your elbows in front of your wrists while you unrack the bar. But provided you use a spotter, you won’t have to take much of the strain from unracking the bar while getting set up for the first rep.
Main muscles worked
pectorals, deltoids, triceps
the incline bench press may place more stress on the upper pectorals (clavicular head) than does the horizontal, supine version
Capsule description
lie on your back on an incline bench, with the dumbbells overhead; lower the dumbbells to your chest, then push them up
The incline bench press can also be done with dumbbells. Once the dumbbells are in position for pressing, the technique is basically the same as in the barbell version.
A big advantage of dumbbells is that you can use whatever wrist positioning is most comfortable, rather than have your wrists fixed by a barbell into a pronated position. But there are handling difficulties getting the ’bells into position. See Dumbbell bench press for the main pros and cons of dumbbell bench pressing.
As in other pressing movements, your hands must extend rearward sufficiently so that you can grip the dumbbells securely. But don’t allow the dumbbells to extend your hands to the maximum, because that can mar your lifting technique, and injure your wrists. Grip the bar firmly, to help keep your wrists in the right position. Once the dumbbells are in a secure position in your hands, keep your wrists rigid for the duration of each set.
To perform the dumbbell incline bench press, you require a method for getting the dumbbells into position ready for pressing. See Dumbbell bench press for how to do this.
During the pressing, pay special attention to keeping the dumbbells from drifting out to the sides, go no deeper than in the barbell version, and keep the ’bells moving in tandem. You’ll probably need a few workouts to get the feel for the exercise, and to find the wrist positioning that best suits you.
See Dumbbell bench press for tips on how to progress gradually from one pair of fixed-weight dumbbells, to the next.

Spotting
See Dumbbell bench press. The same guidelines apply to spotting the incline dumbbell bench press, but in the latter there’s no need for the spotter to crouch.
With any type of dumbbell pressing, key markers of technique deterioration are the ’bells drifting out to the sides, and one hand getting above, in front of, or to the rear of the other. Don’t push this exercise to failure. Stop a rep short of failure, so that you don’t risk losing control of the ’bells.
Caution
Don’t exaggerate the hollow in your lower back. See Incline barbell bench press.