Four forms of the deadlift will be described:
basic or conventional deadlift
parallel-grip deadlift
partial deadlift
sumo deadlift
The basic, or conventional deadlift, is what’s usually meant by the deadlift. Any specification of basic, or conventional, for example, isn’t usually used. This can, however, lead to confusion, because there are several forms of deadlifting.
Properly done, variations of the deadlift are among the most effective strength-training exercises. But use poor technique, abuse low reps, overtrain, or try to lift weights that are too heavy for you, and you’ll hurt yourself with any form of the deadlift.
Before you can deadlift with correct technique, you need to be flexible enough to adopt the necessary positioning. You especially need to have supple calves, hamstrings, thigh adductors, and buttocks.
If you’ve had a serious back injury, don’t deadlift without the clearance of a chiropractor. If you’ve had any minor back injuries, still get a chiropractor’s clearance.
“Flat back” confusion
The spine is curved when seen from the side. This curvature is the natural, strong structure for absorbing and distributing stress efficiently. When the curves are lost, the strong, load-bearing capability is diminished.
“Keep a flat back” is a common admonition when lifting a weight, and one that I used in my earlier writing. It’s not, however, an accurate one. What it really means, is, “Don’t round your lower back.” Although it may look like the lower back is flat at the bottom of a correctly performed deadlift or squat, as examples, this is an illusion. When contracted, the spinal erectors, if sufficiently developed, may fill the required slight hollow in the lower back’s profile at those bottom positions, giving an impression that the lower back is flat, but the actual lower spine should be slightly concave, or hollow.
It’s the strong contraction of the lumbar musculature that produces the desired, concave lower back, to create a bracing effect. The strong contraction of the muscles on both sides of the spine not only prevents the forward rounding of the back, but helps prevent sideways, asymmetrical bending as well.
If the lower spine is truly flat, the upper back will be rounded, which is a dangerous position when lifting a challenging weight (or even a light one in many cases). A spine that’s intentionally straightened while under heavy load bearing is a weakened one that’s exposed to an increased risk of injury. A spine that’s naturally straight suggests pathology.
When lifting a weight, inside or outside of the gym, keep your shoulders retracted, hips pushed back (extended), and lower back slightly hollowed. There are exceptions, however. For example, during the back extension the back should round, and during crunches the lower back shouldn’t be hollow—keep it flat against the floor.
How to improve your ability to deadlift
To be able to deadlift competently in any of the four variations described in this book, you need to work at deadlifting technique and the essential supportive work. (For most trainees, the conventional deadlift is the most technically demanding of the four variations, and the partial deadlift the least.) There are three major components of good deadlifting ability:
| 1. | The flexibility to be able to adopt the correct body positioning. |
| 2. | The back strength to be able to maintain the correct back positioning. |
| 3. | Correct exercise technique. |
You need sufficient flexibility in the major musculature of your lower body. Follow the flexibility program in this book. If any of the muscles have anything less than at least a normal, healthy level of flexibility, deadlifting technique will probably be compromised, with a reduction in safety and productivity. Deadlift correctly, or not at all.
You need sufficient strength throughout your back—lower, middle, and upper—to be able to hold your lower back in the required slightly hollowed position during the deadlift. This is critical for safety. The back must not round while deadlifting. Four key back exercises— deadlift itself, back extension, row, and shrug—will help build the required back strength if they are worked with correct form, and progressive resistance.
It may take several months before correct deadlifting technique can be implemented, even with minimal weight. Don’t be frustrated to begin with. As your flexibility and back strength improve, and your ability to use them, so will your deadlifting ability. Until you can adopt the correct technique, keep the resistance very light.
As your deadlifting weight grows, so should your strength in the back extension, row, and shrug, to help you maintain correct back positioning.
Footwear reminder
Especially for deadlifts, squats, and overhead presses, you should not wear shoes with thick or spongy soles and heels.
Get yourself a sturdy pair of shoes with good grip to the floor, arch support, and which minimizes deformation when you’re lifting heavy weights. No heel elevation relative to the balls of your feet is especially important for deadlifts and squats.
CRITICAL note for ALL forms of deadlifting
The greater the extent of the forward lean, the greater the risk to the back because of the increased chance of losing the concave lower spine that’s essential for safe deadlifting. To try to minimize the risk from deadlifting, keep your maximum forward lean to about 45 degrees from an imaginary vertical line. There has to be forward lean in order to heavily involve the back musculature, but excessive forward lean must be avoided. A concave lower spine must be maintained.
Main muscles worked
spinal erectors, multifidii, buttocks, quadriceps, hamstrings, latissimus dorsi, upper back, forearms
Capsule description
with knees well bent and positioned between your hands, and a slightly hollowed lower back, lift the resistance from the floor
Set-up
Once you have the required strength, deadlift using a bar with a 45pound or 20-kilo plate on each end. Until you have this strength, or if you have to use smaller-diameter plates, set the plates on blocks of wood so that the height of the bar from the floor is the same as it would be if it was loaded with full-size plates. Alternatively, use a power rack and set it up so that the bar, when set across the pins, is at the height it would be if it was loaded with full-size plates on the floor or platform.
For best control of the bar, don’t train on a slick surface or bare concrete, or the bar will move around when set down, and there’s also the chance that your feet will slip. Deadlift on non-slip rubber matting, or construct a simple deadlifting surface through affixing hard-wearing, non-slip carpet to the top side of a 7-foot x 3-foot x 1-inch piece of wood.
Stance
Place your feet about hip-width apart, with toes turned out somewhat. Your hands should just touch the outside of your legs at the bottom of the exercise. Fine-tune the heel spacing and degree of toe flare to find the stance that helps your lifting technique the most. A slightly different stance may help you to deliver more efficient deadlifting technique, because of improved leverage.
Find a foot placement that spreads the stress of the deadlift over your thighs, buttocks, and back. Don’t try to focus most of the stress on a single body structure. You must deadlift without your lower back rounding, or your torso leaning forward excessively. Your feet should be firmly planted to the floor, with your heels flat against it. You should feel stable at all times, with no tendency to topple forward or rearward. And push largely through your heels, not the front of your feet. Furthermore, your knees should point in the same direction as your feet. Don’t let your knees buckle inward as you ascend.

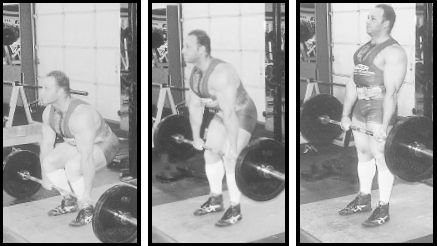
Start, midpoint, and finish of a correctly performed basic or conventional deadlift.
Neither stand too far from the bar, nor too close. If you pull the bar into your shins on the ascent, you probably started too close to it. If you’re too far from the bar, it will travel away from your shins and you’ll place excessive strain on your lower back, risk losing the rep and, perhaps, injure yourself. Position yourself so that the bar brushes against your legs and thighs throughout the ascent. Find the foot positioning that has the bar touching your shins when your knees are bent at the bottom position. But when you’re standing erect before descending to get set for the first rep, your shins may be a little away from the bar.
Closely related to how near you stand to the bar, is your arm positioning. Your arms and forearms should hang in a vertical line, and there should be no bending at your elbows. Your arms and forearms should be vertical or near vertical throughout the lift—they link your torso to the bar.
For symmetrical technique you must have symmetrical foot positioning. Each foot must be exactly the same distance from the bar. Even if one foot is just slightly ahead or behind the other, relative to the bar, this will produce an asymmetrical drive and a slight twisting action.
The bar must be parallel with a line drawn across the toes of your shoes. If the bar torques slightly and touches one lower limb but is an inch or two in front of the other, the stress on one side of your body increases substantially, as does the risk of injury.
Grip
A secure grip is especially important for all forms of the deadlift. To aid your grip, use bars with knurling. Smooth bars hinder the grip.
A reverse grip produces asymmetrical distribution of stress, and torque. A correct pronated grip produces symmetrical stress, but isn’t as secure as a reverse grip. A bar slipping out of one hand, regardless of the grip used, can result in a lot of torque. If you can’t hold onto a bar, don’t try to lift it.
As a beginner, a pronated grip should be fine. Use of chalk or rosin on your hands, when required, will help strengthen your grip. If, despite this action, your grip still isn’t adequate, use a reverse grip and continue to use chalk or rosin. Use a reverse grip only for your work sets, and alternate from set to set which way around you have your hands. For one set, have your left hand under and right hand over, and the next set have your right hand under and your left hand over. In this way you’ll avoid applying the asymmetrical stress in the same way, so that both sides of your body get their turns.
The start
With your feet and the bar in the correct positions, stand and get ready for the first rep. Straighten your elbows and place your hands at your sides ready to drop down into position on the bar. Pull your shoulders back, take your final breath, hold it, and lock your back. Descend with a synchronized bend of your knees and forward lean of your torso. Sit down and back, and push your hips to the rear. Maintain a slightly hollowed back. Descend until your hands touch the bar (on the knurled area). Keep your bodyweight primarily over your heels, but don’t rock back and lose your balance.
If you have to fiddle to get your grip spacing right on the bar, you risk losing the rigid torso and slightly hollowed lower back required for a safe pull. Learn to get your grip right without fiddling around. To help here, get two pieces of garden hose about an inch long each. Slice them open and tape one in the correct position on each side of the bar so that when your hands brush against them, your hands are in the right position. In this way you won’t need to look down and then have to re-set your back before the ascent. Instead, descend, keep your head up and torso rigid, immediately place your hands into position, stay tight, then start the ascent.
At the bottom position, your knees should be bent, hips much lower than your shoulders, bar against your shins, head up, and your bodyweight felt mostly through your heels. The deadlift is done by the thighs and back together.
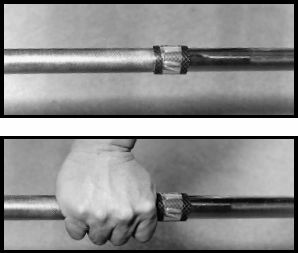
Two pieces of hose appropriately placed on a deadlift bar enable each hand to be positioned without having to look down to check. See text. Here’s one of those pieces of hose. For clear viewing, the legs were kept out of the photographs.
If you start the deadlift primarily with your thighs, your knees will straighten too quickly and your back will then bear the brunt of the load. If you start the deadlift with little thigh involvement, you won’t get far unless it’s a light weight for you.
Hold the relative positions of your head, shoulders, and hips during the lift—keep your back slightly hollowed throughout, and shoulder blades retracted. Never round your back. Leading with your head and shoulders helps to maintain the proper back positioning.
Ascent
The first part of the ascent is to shrug your shoulders vertically against the bar. Although you won’t lift the bar unless it’s light, this shrug helps to lock your back into the right position for the pull. Stick your chest out, too. Then squeeze the bar off the floor through simultaneously pushing with your thighs—mostly through your heels—and pulling with your back. When you pull, make it smooth and slow. Don’t yank at the bar.
Yanking at the bar leads to bending your elbows, moving you forward, raising your hips too quickly, and increasing stress on your back. Your hips must not rise faster than your shoulders.
Once the bar is off the floor and moving, accelerate its speed a little. Push through both your feet with equal force. If you favor one limb, you’ll produce a dangerous corkscrew-like motion. Think of pushing your feet through the floor. Keep your shoulders pulled back, scapulae retracted, and chest pushed up and out.
Critical reminder
Photographs alone can’t explain correct form. Please don’t skip any of the text.
Never look down as you initiate the pull from the floor. Keep your jaw parallel with the floor, and look forward or slightly up. Don’t look down during the course of a rep.
Keep the bar moving next to your legs, or thighs. If necessary, wear something over your shins to prevent abrasions. Never let the bar move away from you—this is critical.
Over the final few inches of the ascent, keep your shoulders pulled back, and chest pushed up and out. If your shoulders slump, your back will round, stress on your spine and its musculature will increase greatly, and you’ll set yourself up for a serious injury. Part of the reason why the shrug should be included in your training program is to help you to develop the strength required to keep your shoulders pulled back even under stress.
Remain vertical at the top of the lift. If you lean back at the top of the deadlift, that would cause dangerous compression of your intervertebral discs.
As you stand, keep your scapulae retracted, lower back hollowed slightly, weight felt mostly through your heels, and your shoulders, hips, and ankles lined up. Pause for a second, then start the descent.
Exhale on the ascent, and inhale at the top or during the descent.
Descent with the bar
Lowering a straight bar can be awkward, depending on your body structure. Keep your shoulder blades retracted, and chest pushed up and out, as you lower the bar slowly and symmetrically, with a synchronized bend of your knees and forward lean of your torso. Sit down and back, and push your hips to the rear. Always maintain a slightly hollowed back.
For the descent with a straight bar, slide the bar down your thighs to your knees, through bending at your knees and leaning forward. Lean forward the minimum required to get the bar around your knees. Then bend further at your knees and lower the bar to the floor. As soon as the bar is below your knees, keep it as close to your shins as possible, to reduce stress on your lower back. Descend slowly, to keep correct control over the bar—take three to four seconds for the descent.
Once the weight gently touches the floor or platform, immediately start the next rep through shrugging hard on the bar just prior to trying to push your feet into the floor.
Once you’ve built up the weight so that it’s challenging, take a pause for a couple of seconds at the bottom of each rep. But keep your hands in position, torso tensed and tight, lower back slightly hollowed, and eyes looking forward. Breathe as required, then begin the next rep.
Other tips
While experimenting to find your optimum stance, and while using a very light weight, stand on cardboard when you deadlift. When you’ve settled on your stance, draw around your feet with a marker. Then next session, stand on your footprints and you’ll know where you were positioned last time. If you revise your positioning, draw a new pair of footprints. Eventually, you’ll settle on a stance that works best for you. Mark that position on cardboard, and refer to it when required.
For work sets once the weight becomes demanding, use chalk or rosin on your hands to improve your grip on the bar, and use a bar with deep knurling. Then through combining specialized grip work and gradual weight increases in the deadlift, you should be able to hold securely any weight you can deadlift. Wrist straps are crutches that promote a weak grip—avoid them.
Always deadlift with collars on the bar. This is critical for keeping the plates in position, and a balanced bar.
Don’t bounce the weights on the floor. Gently set the weights on the floor or platform. If you rush the reps, you’ll risk banging the floor with the plates on one or both sides. This will disrupt your balance, produce asymmetrical pulling, and stress your body unevenly. This is dangerous.
Never turn your head while you lift or lower the bar, or otherwise the bar will tip somewhat, your lifting groove will be marred, and you could hurt yourself.
If you can’t complete a rep without your shoulders slumping, dump the weight. End the set of your own volition before you get hurt.
Common errors—DANGER
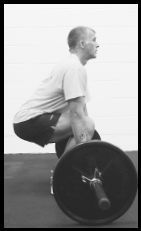
Hips too low in the set-up position.
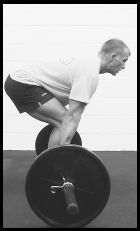
Hips too high, excessive forward lean, loss of correct back set.
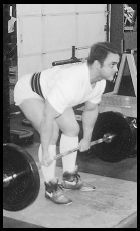
Hips have moved too fast in the ascent, and the degree of forward lean has been exaggerated.
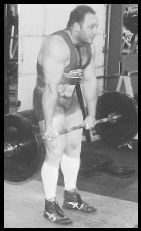
Loss of back set during the lockout.
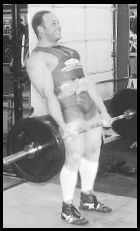
Leaning back during the lockout.
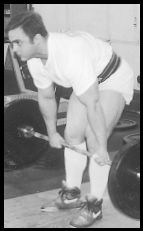
Loss of back set, and rounding of the back.
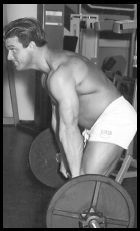
More exaggerated rounding of the back.
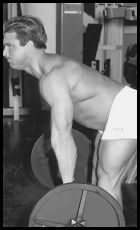
Legs have locked out too fast, and the bar has drifted away from the legs.
Warning
The photographs on these two pages illustrate common errors that turn the deadlift from one of the most effective exercises, to one of the most dangerous. Deadlift correctly, or not at all.
Never drop the weight, even if you have to dump it because you feel your back about to start rounding. Protecting the equipment and floor is only part of the reason for lowering the bar with control. A bar slamming on the floor or platform, or rack pins, can injure your back, shoulders, elbows, or wrists. Lowering the weight too quickly can also lead to rounding the back and losing the important slightly arched lower back.
Once you’re training hard, never work the deadlift to failure. Keep the “do or die” rep in you.
Don’t deadlift while your lower back is still sore from an earlier workout, or heavy manual labor. Rest a day or two longer, until the soreness has gone.
As seen from the side view, get feedback from an assistant, or record yourself with a video camera. Discover your actual hip, shoulder and head positions. The technique you think you use may not be what you actually use.
Once you’ve mastered deadlifting technique, don’t become overconfident. Just a slight slip of concentration can lead to lowering the bar slightly out of position, for example This will mar your groove, make the weight feel heavier, make the reps harder, and risk injury.
Deadlifts cause callus buildup on your hands. If this is excessive, your skin may become vulnerable to cracks and tears. Both may temporarily restrict your training. Avoid excessive build-up of calluses. Once a week, after you’ve showered or bathed, use a pumice stone or callus file and gently rub the calluses on your hands. Don’t cut the calluses with a blade or scissors. Keep the calluses under control so that they don’t cause loss of elasticity on the skin under and around them. To help maintain the elasticity of the skin of your palms and fingers, consume enough essential fatty acids.
Spotting
Spotting isn’t required in the deadlift—never perform assisted or forced reps in this exercise, or negative-only reps. An alert and knowledgeable assistant can, however, critique your technique, and help keep it correct.
Use of a belt
Two of the men shown in this section are powerlifters, and wear lifting belts out of habit because they use them when they compete in meets. A lifting belt isn’t required for training, however, and some powerlifting competitions don’t allow belts or any other support gear.
Build your own natural belt through a strong corset of muscle. Train without a belt. Not wearing a belt HELPS your body to strengthen its core musculature.
Main muscles worked
spinal erectors, multifidii, buttocks, quadriceps, thigh adductors, hamstrings, latissimus dorsi, upper back, forearms
Capsule description
with knees well bent, and a slightly hollowed lower back, lift the resistance from the floor
Properly done, the parallel-grip deadlift is one of the most effective exercises—a big, multi-joint exercise that works most of the musculature in the body, namely the thighs, buttocks, and back. There are a number of pieces of equipment used for performing parallel-grip deadlifts, primarily the trap bar, shrug bar, and dumbbells. The dumbbells are the trickiest to use—they get in the way of the lower limbs, constrain stance width and flare more than the one-piece bars, may prohibit ideal foot positioning, and thus hamper technique. Furthermore, many gyms don’t have dumbbells heavy enough for trainees other than beginners. Consequently it’s the technique of deadlifting with a one-piece, parallel-grip bar that’s described in this section.
Before you can parallel-grip deadlift with correct technique, you need to be flexible enough to adopt the necessary positioning. You especially need flexible calves, hamstrings, thigh adductors, and buttocks.
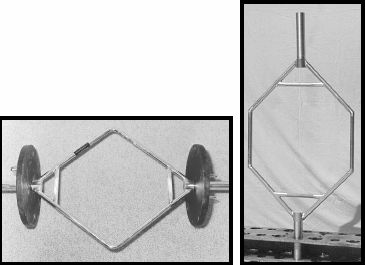
Two examples of parallel-grip bars: the trap bar (left), and the shrug bar.
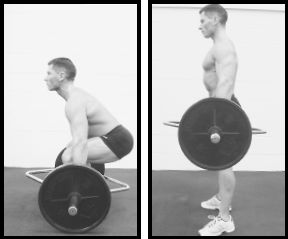
The parallel-grip deadlift. At the bottom position the inward curvature of the model’s lower spine is filled with contracted erector spinae muscle, presenting the appearance of a flat back. The trap bar is tipping here, but should be horizontal to the floor.
Set-up
With the parallel-grip deadlift you can involve more knee flexion than in the regular deadlift, hand spacing is determined by the bar’s gripping sites (about 22 to 24 inches apart, or 56 to 61 centimeters, depending on the manufacturer), and the bar doesn’t drag against your thighs. The pathway of an imaginary straight line joining the ends of the parallel-grip bar can run through your body, rather than in front of it like with a straight bar.
Stance
As a starting point, use a hip-width heel spacing, with your toes turned out about 20 degrees on each side. Fine-tune this to suit you—a little wider, or a little closer. Your legs must fit inside your hands when your hands are on the handles, but without your knees moving inward. Your knees must be in the same plane as your feet. If your feet are too wide, your knees will travel inward to make room for your hands and forearms during the lower part of each rep.
If you can’t use this constrained stance safely, the parallel-grip deadlift isn’t suited to you. The more roomy inside area of the shrug bar, compared with the trap bar, may provide greater stance options.
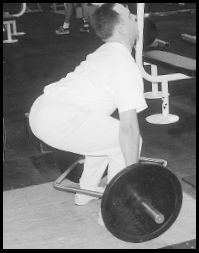
The ability to adopt the correct back set is determined primarily by flexibility, back strength, and technique. These take time to develop, for all variations of the deadlift. Progress gradually, as explained in the text.With time, you may be able to adopt a greater range of motion WITHOUT losing the correct back set. It’s not necessary to extend the head as much as is shown in this illustration.
With the spacing of your heels determined, place your feet inside the bar in the best position for you. As a starting point, place your feet so that the center of the ends of the bar runs through the bony prominence in the center of the outside of each of your ankles, as you stand with your knees straight.
Although this foot positioning will suit some trainees, for others it may not be ideal. Try it with a light weight, and see. Then, for example, move your feet back an inch, and see how that works. And try an inch forward of the original positioning, too.
Optimal foot positioning is affected by your body structure, and degree of knee flexion. You may need several workouts of practice, and trial and error, before you settle on the optimum foot positioning for you. If you’re positioned too far to the rear, you’ll probably be bent forward too much and the bar may swing as you lift it off the floor. If you’re positioned too far to the front, the bar will probably also swing as you lift it off the floor. There should be no swinging of the bar.
Once you know the foot positioning that works best for you, use a reference point so that you can adopt the right set-up each time. With the trap bar, for example, you could use ankle position relative to an imaginary line running through the ends of the bar. Or, you could use the position of the front rim of your shoes relative to the front of the rhombus. Your eyes must, however, view from the same point each time. For example, as you stand upright, cast your eyes down and perhaps the front rim of your shoes is directly below the inside edge of the front of the rhombus. Perhaps it’s an inch inside.
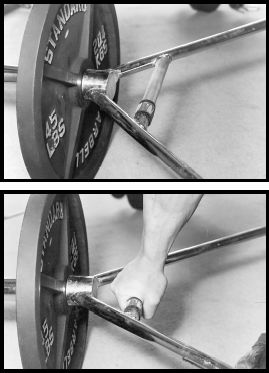
A piece of garden hose of the right size, and appropriately positioned, permits hand centering on a parallel-grip bar’s handle without having to look down to check. See text. The legs were kept out of the photographs so as not to obstruct viewing.
Grip
Use a parallel-grip bar with knurling. A smooth bar hinders the grip.
If your hands are off center on the handles, the parallel-grip bar will tip. If only one hand is off center, dangerous rotational stress may result. Keep both hands correctly centered, and the bar parallel with the floor.
Here’s how to center your hands on the handles without having to look down and lose the tensed torso and correct get-set position: Slice open two pieces of garden hose, and slip them over each handle, flush against the front bar. Cut the length so that when you feel your hand touching the edge of the hose, your hand is centered. Slip the lengths in position prior to when you parallel-grip deadlift.
Performance
Most of the performance guidelines in the Basic or conventional deadlift section apply to the parallel-grip deadlift, including the “Other tips.” Please review that material before parallel-grip deadlifting.
Common errors
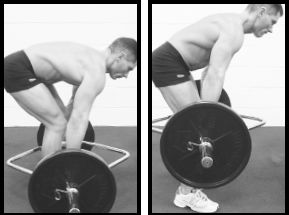
Left, hips are too high for the starting position, producing excessive forward lean, and loss of the correct back set. Right, following a correct start (not illustrated here) the hips have moved too fast, producing loss of back set, and rounding of the back. The errors illustrated in the previous section, for the conventional deadlift, also apply to the parallel-grip deadlift except for hip depth in the starting position. For the parallel-grip deadlift the hips can safely start at a lower position, provided the back is correctly set, and the range of motion is safe for the knees.
With the conventional deadlift, the problem of getting a straight bar around the knees is what produces the increased forward lean and reduced knee flexion compared with the parallel-grip deadlift. With the latter, you’re inside the bar as against behind it with the straight-bar deadlift. This is what permits the reduced forward lean and increased knee flexion in the parallel-grip deadlift, and potentially makes it a safer exercise.
Here’s the torso set you need to fight to maintain throughout the parallel-grip deadlift: While standing, take a big breath, keep a high chest, tense your upper-back muscles, and rotate your shoulders back into a military posture. This will tend to push your arms out away from your body, as your lats will be hard. Your lower back will be slightly hollowed, or concave.
Start the descent with a synchronized bending of your knees and forward lean of your torso. Sit down and back, and push your hips to the rear. Always maintain a slightly hollowed lower back, and keep your shoulder blades retracted.
Guide the bar, don't just lower it. With a straight-bar deadlift, the bar should brush your shins or thighs throughout the movement, but in the parallel-grip deadlift, here’s the general guideline: Your hands should follow a line along the center of your femurs and, further down, along the center of the sides of your calves. When your hands are at knee height, they should also be in line with your knees. If your hands get behind that line, you risk being too upright. Your hands may, however, be a little forward of that line.
At the bottom of each rep, rather than pull on the bar, focus on trying to push your feet into the floor while maintaining the correct torso set.
The parallel-grip deadlift can increase thigh involvement further if it’s done from a raised surface. The two critical provisos are that your lower back can be kept slightly hollow in this extended range of motion, and you have no knee limitations. To try a raised surface, start with no more than one inch. If, after a few weeks, all is well— correct technique maintained, with no knee or back problems— perhaps try a further half inch, and so on, up to a maximum of two to three inches.
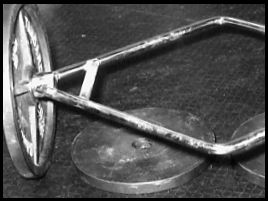
Two 15-kilo plates, smooth sides up, can be placed side-by-side under a parallel-grip bar, to produce a raised, stable surface from which to deadlift for increased quadriceps involvement provided that the correct back set is maintained, and the increased range of motion is safe for the trainee.
Use of dumbbells for the parallel-grip deadlift can work provided you have access to dumbbells heavy enough to provide adequate resistance. But if the dumbbells are touched to the floor or platform on each rep, there’s a potential problem because of the small-diameter plates—increased range of motion relative to that with a trap bar or shrug bar with 45-pound or 20-kilo plates on it. Elevate the dumbbells on strong boxes or crates so that the range of motion isn’t excessive for you. Never descend beyond the point where your lower back loses the required slightly hollowed position.
Performing the parallel-grip deadlift in an exaggeratedly upright manner, to further increase stress on the quadriceps, should be avoided, because of the overly limited back involvement and increased knee stress, which may lead to knee problems. A natural spread of work between the thighs and back produces a balanced division of the stress.
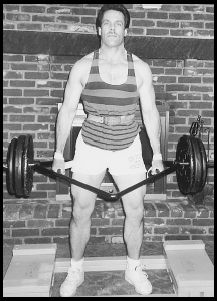
This home-gym trainee is using plates of smaller diameter than the usual 20-kilo or 45-pound ones. Such plates lead to an exaggerated range of motion that’s unsafe for many trainees. By using a pair of platforms—for example, as illustrated—the range of motion can be reduced as required.
Elevated handles
Some parallel-grip deadlift bars have raised handles, which reduce the range of deadlifting motion when compared with a bar with regular handles (like in the illustrations) and if both bars are loaded with the same diameter plates. The elevated handles may suit you if you can't safely use the full range of motion with 45-pound plates on a regular parallel-grip bar. If you can safely use the full range of motion, but only have access to a bar with raised handles, elevate yourself on a sturdy, non-slip surface the same height as the elevation of the handles, or use smaller-diameter plates.
Main muscles worked
spinal erectors, multifidii, buttocks, hamstrings, latissimus dorsi, upper back, forearms
Capsule description
with a slightly hollowed lower back, straight elbows, and slightly bent knees, lift a bar from knee height
The partial deadlift described here is a variation of what’s commonly called a stiff-legged deadlift. Importantly, the variation is done with a reduced range of motion. Some people may call it a Romanian deadlift.
The partial deadlift is often used as a substitute for the conventional deadlift for trainees who have safety concerns for their backs because of the greater range of motion of the regular deadlift. Substantial back, buttock, hamstring, and grip involvement remain, but quadriceps involvement is minimized.
Performance
In a power rack find the pin setting that puts the bar at just below your kneecaps when your knees are slightly bent. That’s the bottom position. Alternatively, set a loaded bar on boxes at the height so that the bar’s starting position is the same as in the rack set-up.
Stand with your feet under the bar, heels about hip-width apart, and feet parallel with each other, or flared a little. Take a shoulder-width or slightly wider overhand grip. For just the first rep, bend your knees more than slightly, to help ensure correct back positioning. Hollow your lower back slightly and, with straight elbows, shrug against the bar and pull your shoulders back, and push your chest up and out. The bar won’t move unless the weight is light, but the shrug will lock your lower back into the required, hollowed position. Now, while looking forward or upward, simultaneously pull with your back and straighten your knees, to move the bar.
During subsequent reps, bend your knees only slightly. Your knees should straighten as you complete the lift, and bend slightly once again during the descent. Keep your head up at all times, shoulder blades retracted, and chest pushed up and out. During the descent, push your hips rearward, to help keep your lower back in the correct hollowed position. The bar should brush your knees or thighs. Don’t lean back at the top. Stand straight, pause for a second, keep your scapulae retracted and lower back hollowed (without exaggeration), then lower the bar to the pins through bending your knees slightly and simultaneously leaning forward.
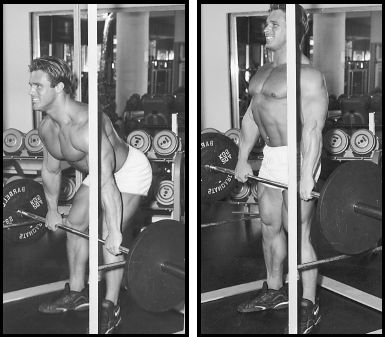
Don’t rest the bar on the pins or boxes at the bottom position. Instead, pause for a second just above the pins. Maintain a locked, hollowed lower back, with your shoulders pulled back. Smoothly move into the next rep.
Exhale during the ascent, or at the top. Either inhale and make the descent, or inhale as you descend.
Lift and lower symmetrically, and don’t turn your head. Furthermore, don’t let your shoulders round. If your shoulders start to slump, and you can’t pull them back, dump the bar instantly but with control.
The exercise can be done with a straight bar, or a parallel-grip bar such as a shrug bar. With a parallel-grip bar, it has to be done from boxes, because the bar isn’t long enough for use inside a power rack unless the bar has elongated ends.
Even with chalk or rosin on your hands, and a well-knurled, straight bar, you may eventually be forced to use a reverse grip. If so, alternate which way around you have your hands from set to set.
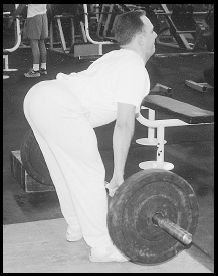
A lower position for the bottom of the partial deadlift, illustrated outside of a power rack. This trainee—because of his flexibility, strength, and technique—can maintain the correct back set even at this degree of forward lean, and range of motion. But most trainees can’t, and thus for safety should use a lesser range of motion like that shown on the previous page. Individual leverages— torso and limb lengths, and their relative proportions—affect performance in deadlift variations, and other exercises. Some trainees are better constucted to perform a given exercse than are other trainees.
It’s not necessary to extend the head as much as is shown in this photo.
FULL-RANGE, stiff-legged deadlift—DANGER
The full-range, stiff-legged deadlift is hazardous. Instead, use less risky but effective exercises for your hamstrings, buttocks, and back, which are the primary areas worked by the full-range, stiff-legged deadlift. The recommended exercises employed for these areas are the conventional deadlift, parallel-grip deadlift, partial deadlift, sumo deadlift, leg curl, and back extension. Of course, these exercises must be performed correctly if they are to be safe.
The further the torso leans forward, the more difficult it is to maintain the proper set position of the back, where the lower back is slightly hollowed. The full-range, stiff-legged deadlift takes the forward lean to an extreme, where the lower back rounds. This massively increases the stress on the various structures of the back, and greatly increases the risk of injury. Back rounding is important for working the spinal musculature, but it should take place in back extensions, not in any form of the deadlift, whether with bent knees or straight knees.
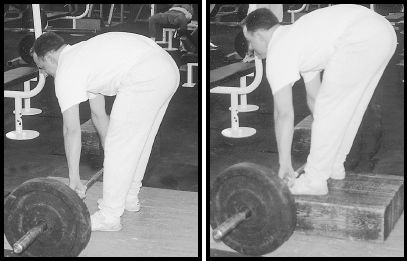
The stiff-legged deadlift to the floor, and the stiff-legged deadlift while standing on a box. The former is the most common form of the full-range, stiff-legged deadlift, but it’s sometimes done on an elevated surface for an even greater range of motion. For safety, BOTH SHOULD BE AVOIDED. Notice the back rounding, and severe loss of back set. But the partial, stiff-legged deadlift described on the previous pages is a safe, effective exercise if performed correctly.
Main muscles worked
spinal erectors, multifidii, buttocks, quadriceps, thigh adductors, hamstrings, latissimus dorsi, upper back, forearms
Capsule description
with knees well bent and positioned outside your hands, and a slightly hollowed lower back, lift the resistance from the floor
The sumo deadlift uses a straight bar, but because of the widened stance relative to that used in the regular deadlift, and the hands positioned between the legs, the back may be more upright in the sumo deadlift when comparing the two styles on the same trainee. There’ll probably be more knee flexion to balance the more upright torso. Although the back is heavily involved in the sumo deadlift, the buttocks and thighs take relatively more stress.
The sumo and conventional deadlifts are similar in performance and pathway of the bar. It’s the different stance that distinguishes the sumo deadlift. The grip used in the sumo deadlift may be a little closer.
Your knees may be less of an obstacle to get around in the sumo deadlift, which is why you’ll probably bend forward to a lesser degree in the sumo deadlift than in the conventional style.
Sumo-style powerlifters may benefit from an extreme width of stance that has their feet almost touching the plates. This reduces the range of motion to the minimum. But for general training, an extreme stance isn’t desirable. Use a moderately wide stance.
For example, if you’re about 5-10 tall, use a stance with about 22 to 24 inches or 56 to 61 centimeters between your heels as the starting point, with your toes turned out at about 45 degrees. Fine-tune from there. Try the same flare but a slightly wider stance. Then try a little less flare but the same stance. Keep fine-tuning until you find what helps your technique the most. After a few weeks of experience you may want to fine-tune your stance further.
Find the foot positioning relative to the bar that, when your knees are bent at the bottom position, has the bar touching your shins. But when you’re standing erect prior to descending to take the bar for the first rep, your shins may be a little away from the bar.
For the first descent, follow the same format as given for the conventional deadlift. Descend until your hands touch the bar, then take your grip. Don’t grip the bar so closely that your hands are on the smooth part of the bar. Use a hip-width grip as a starting point, with your hands on the knurling, and fine-tune from there. If your grip is too close, you’ll find it difficult to control the bar’s balance.
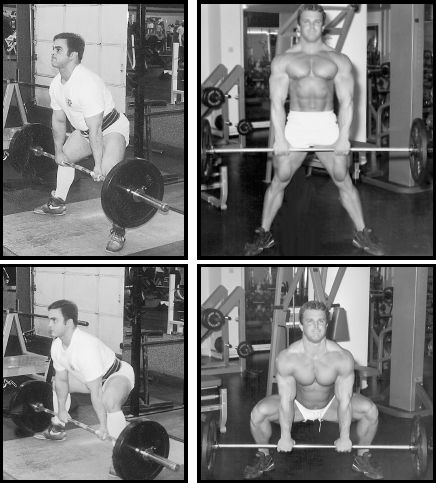
Bottom and midpoint of the sumo deadlift (left), and bottom and top position of the sumo deadlift (right). The former shows a wider stance than the latter.
For the drive from the floor, ascent, lockout, descent, and breathing, follow the same guidelines as in the conventional deadlift.
Don’t immediately introduce intensive, wide-stance deadlifting, because that would be a road to injury. Take several weeks to progressively work into the wide stance, using a weight that doesn’t tax you. Stretching for your thigh adductors, hamstrings, and buttocks may be needed, to give you the flexibility to adopt your optimum stance. Once you’ve mastered the technique, then progressively add resistance.