Main muscles worked
pectorals, triceps, deltoids, latissimus dorsi
Capsule description
while on parallel bars, lower and raise yourself through bending at your elbows
Most trainees can dip safely if they use correct, controlled technique. If you’ve had shoulder problems in the past, and the dip bothers you no matter how careful you are, you may still be able to use the machine version safely.
Men who have the most difficulty with dips are frequently heavy. Other factors that lead to difficulty with dips are rounded shoulders, and shortened pectoral muscles. If you’re tight in those areas, work for a few weeks on gradually increasing your shoulder and pectoral flexibility before you start dipping.
Female beginners usually have difficulty with the dip, but can prosper on the machine version. The orthodox dip has bodyweight as the minimum resistance; but with the machine dip, resistance starts from almost nothing.
Set-up
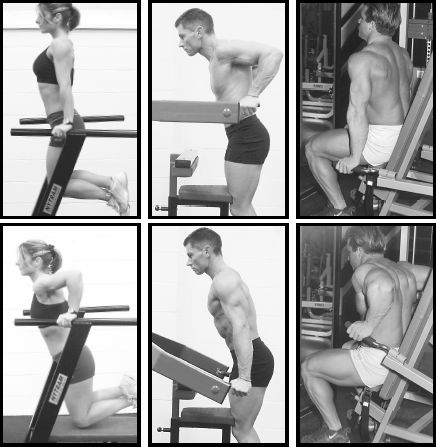
If there are multiple pairs of parallel bars, or an adjustable pair, try various width positions. About 22 inches or 56 centimeters between the centers of the bars is a good starting point for most men. Women and slender or small men will be more comfortable with closer bars. Big men may prefer wider bars. Try v-shaped bars to find the optimum hand spacing for you. Face the part of the unit where the v-shaped bars come together, not where they fan out. Another option is to use a power rack. If its uprights are suitably spaced, position a bar on saddles on the front uprights, and another bar on the rear uprights. Set the height of the bars at what’s ideal for you.
Some v-shaped bars have thick handles, which enable the load to be spread over a bigger area of the hands, and produce greater comfort than regular-thickness bars. The thick handles also permit fine-tuning of hand positioning, for greater comfort.
Regardless of the type of set-up, the bars must be securely fixed so that they can’t wobble as you dip.

Three set-ups for the parallel bar dip: unit with V-shaped bars (left), standing machine, seated machine.
Positioning
Find the strongest, most comfortable, and natural dipping position for you. Distribute the stress from the dip over all the involved muscles. Don’t try to focus the stress on any one particular area.
Stand on a box or bench of the right height so that you can easily get into the elbows-locked-out position. When you bend your knees and descend into the dip, your tibias just below your kneecaps should graze the box or bench when you’re at your maximum safe depth. For most trainees, this is where the rear arm is parallel with the floor, or a little beneath that point. Some trainees can safely dip below the parallel position, whereas others need to stop a little above parallel.
To find a depth marker to suit you, try various benches or boxes. To fine-tune, place something of the correct thickness on top of the best-fit bench or box, preferably something with a soft surface.
Dipping so that your tibias graze something at your maximum safe depth isn’t just to prevent overstretching. It ensures accurate record keeping. Without a marker to ensure consistent rep depth, there’s a tendency to shorten the reps at the end of a set.
Performance
Never bounce (or pre-stretch as it’s sometimes called) at the bottom of the dip, and avoid doing reps rapidly. Go down slowly, pause for a second at the bottom, and push up in a controlled, smooth manner. Never relax at the bottom.
Keep your elbows in the same plane as your wrists, or slightly to the outside of that plane. Take a pause for a second between reps at the top position, but don’t let your shoulders slump as you hold yourself on locked elbows. Keep your head and shoulders up high, and stay tight. Women in particular may find it uncomfortable to lock out fully. In such cases, stop the ascent just short of the fully locked out position.
Don’t let your lower limbs swing as you dip, and neither thrust your head forward nor throw it back. Furthermore, keep your chest stuck out to help keep your shoulders pulled back and safe.
Never descend on a deflated chest. Inhale before you descend, then exhale during the ascent. Going into the bottom position of the dip on a deflated chest increases the risk of injury, so keep your chest full during the descent and early part of the ascent.
Other tips
To warm up for the dip, start with floor push-ups. Then from the upright position of the dip, perform partial reps as you gradually work into your bottom position. Then you would be ready for a work set. If you use a dip machine, matters are simpler, because you have full control over resistance.
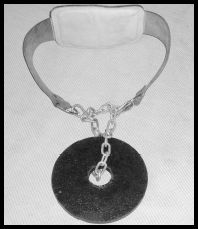
For the non-machine dip, find a method of attaching weights comfortably and securely. Use of a purpose-made weight belt for the parallel bar dip is the most common option. An alternative, at least for attaching small weights, is to wear any strong, leather belt normally used for trousers, and put a dumbbell inside it through having the ’bell vertical and the belt across the handle. Another option is to use a piece of strong rope to attach a dumbbell or plates to your belt. Let the resistance hang at the front of your thighs. If that’s uncomfortable, try suspending it from the rear. The resistance must not hang so low that it touches your depth marker before you reach your bottom position.
Strength permitting, add weight slowly and in small increments. To work from one fixed-weight dumbbell to the next, attach one or more small discs, or use an adjustable dumbbell. Alternatively, use individual weight plates, with a belt fitted through them before being buckled.
With the machine dip, a slight change in torso or wrist position can produce significant improvement in comfort, and the range of movement can be easily controlled. In addition, because resistance starts at little or nothing, the machine unit can be used by trainees who don’t yet have the strength to do regular parallel bar dips.
Spotting
The main markers of technique deterioration are swinging lower limbs, throwing the head back, back arching, elbows wobbling, and stalling. The spotter should stand behind you. If you dip on bars attached to a wall, dip facing the wall so that your spotter has plenty of room. The spotter should place his hands under your shins—with your knees bent—and apply the minimum of assistance that’s necessary if you require help to complete a rep.

Purpose-made weight belt with attachments, for the parallel bar dip.
A shoulder harness isn’t illustrated, but is the preferred option—for safety, and comfort—if a substantial poundage is to be attached to a suspended body. A substantial poundage attached around the waist or hips may apply an unsafe load on the spine during the parallel bar dip because the body is suspended and the forces pulling on the vertebrae may be excessive.