There are two types of pullover—the muscle-building one that requires a machine, and the type that may have potential for enlarging the rib cage. Both involve moving resistance from behind your head. The former has your elbows bent, whereas the other keeps your elbows straight or almost straight.
Main muscles worked
latissimus dorsi, pectorals, triceps, abdominal wall
Capsule description
move resistance from behind your head, with bent elbows
Use a machine, not a barbell, single dumbbell, or pair of dumbbells. Some pullover machines are better than others. If you find a machine that suits you, exploit it. It will enable you to train your lats without your elbow flexors, and grip, limiting you. Most other exercises for the lats require substantial involvement of the elbow flexors, and grip.
Some pullover machines have the user apply force through the elbows or rear arms, which are positioned against pads. Other machines require the user to apply force solely against a bar that’s held by the hands. The former is the pick of the two machines. If only the other type is available, use the pulldown, chin-up, or pull-up instead.
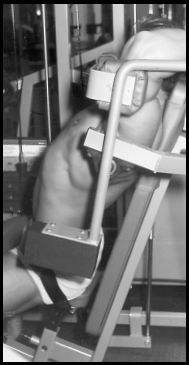
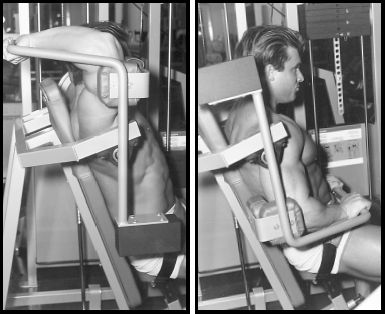
Some pullover machines, like the one shown in the photographs, have pads for the arms and a bar for the hands. Here, focus on applying force through the arms against the pads.
Set-up and positioning
Find the best set-up for you according to your torso and arm lengths. Follow the manufacturer’s set-up guidance, and fine-tune the adjustments to find the body and arm positioning that enables you to work hard without producing any joint soreness. Depending on the machine, you may have to adjust the height of the seat, and the range-of-motion limiter. The machine must have a belt, to restrain your pelvis.
Your shoulder joints should line up with the pivot points of the machine, or perhaps be an inch or so below the pivot points. Sit with your hips and back firmly against the back support, and have an assistant view the pivot points from the height of your shoulders, to determine the correct positioning. Move the seat height accordingly.
Some pullover machines have a foot pedal or bar that’s used to assist with proper set-up, and to transfer the resistance to and from the user. Once the resistance has been selected, and the trainee is seated and belted into position, the pedal must be depressed so that the elbows can be positioned on the pads of the movement arm. Removing the feet from the pedal transfers the resistance to the trainee, for the first rep. After the set is finished, the foot pedal is depressed again, to unload the resistance so that the elbows can be removed from the movement arm.

A dangerous starting position for the pullover. Note the exaggerated arch in the lower back.
The danger in the pullover primarily comes from an excessive range of motion for the shoulders in the top, stretched position. Set the seat at the right height for you, push your hips as far back on the seat as possible, and strap yourself in tightly. Then with a very light weight on the machine, discover how far back you can take your arms before your back starts to come off the back support. Your starting position should be about an inch short of the point where your back starts to come off the back support. Set up the machine accordingly. Then keep your back against the machine’s back support.
If even this less-than-full-range of motion irritates your shoulders, reduce it until there’s no irritation. Over the first few weeks of use, however, your shoulder flexibility may increase, and thus you may be able to increase your range of motion a little.
If the machine you use doesn’t have a built-in range-of-motion control to delimit the top, stretched position, you can do it manually if it has a weight stack. See Leg curl for details.

A reduced and safer range of motion in the machine pullover.
Over the first few times you use the pullover, you may need to fine-tune the set-up to find the one that feels the most comfortable for you.
Make a note in your training log of the settings you use.
Performance
Focus the exercise on your back musculature, not your arms. Mentally connect with your back musculature and direct the work there, consciously maximizing the contraction and involvement of your back.
Move out of the stretched position slowly. Move smoothly and under control at all times. Allow (but don’t force) your neck to flex as you move into the contracted position. Keep your back against the back support throughout each rep. Only lightly hold the bar or handles with your hands. Focus on trying to crush the pads with your arms. Hold the fully contracted, bottom position for a second, and contract your lats hard.
As you return to the stretched, starting position, slow down. Pause in the starting position for a second, then smoothly move into the next rep. To protect your shoulders, don’t relax them in the stretched, starting position. Keep your shoulders tensed.
This exercise has a large range of motion. You should take three to four seconds for each phase, plus the additional second for the hold in the contracted position, and another second for the pause at the starting position. Inhale as your arms move back, and exhale during the positive (or contraction) phase.
Although not essential, use a spotter once you’re training hard. As soon as a rep grinds to a halt, the spotter should apply a tad of help. This will keep the rep moving, and help ensure correct technique.
Adding weight
Selectorized cable units, and selectorized machines in general, commonly have weight increments of 10 pounds or 5 kilos, and larger in some cases. This is too much weight to progress by in a single jump. Where you train may have special weights of 5 pounds or 2.5 kilos—and perhaps smaller ones, too—designed to fit on the top of a weight stack. If it doesn‘t, you may be able to get your own from an exercise equipment store. Use them to help you to work from one pin setting to the next.
Alternatively, place the weight selection pin through a small barbell weight plate before the pin goes into the weight stack. Although a pin that holds a plate won’t go fully into the weight stack, it should go through enough to hold the plate securely and select the resistance, too.
Magnetic small plates are another option for adding small increments of weight to a stack.
Whichever option you choose, check that the set-up is secure before you perform a set.
Books on strength training and bodybuilding usually provide skimpy descriptions of exercise technique. But exercise technique isn’t a simple matter. The exercises need to be described in detail. Please take the time to study the exercise descriptions. In order to train safely and effectively, it’s critical that you MASTER exercise technique.
Main structure worked
rib cage
Capsule description
move resistance to and from behind your head, with straight elbows
This is a stretching and forced breathing exercise that may enlarge your rib cage, deepen your chest, and help to improve your posture. It may be especially effective for teenagers, and trainees in their early twenties, but is worth a try at any age. There’s no science to confirm this, however. I believe the breathing pullover helped me, and other people have reported benefits, too.
Use no more than 10 pounds to begin with—a short and unloaded bar, a pair of small dumbbells, a single dumbbell, or a barbell plate. (The pullover machine shouldn’t be used for the breathing pullover.) After a few months you may increase to 15 pounds, and later on to 20 pounds if you’re a large man, but no more. Don’t use progressive resistance in this exercise. The use of heavy weights will defeat the purpose of the exercise, as well as risk harm to your shoulders. If in doubt over which weight to use here, select the lighter one.
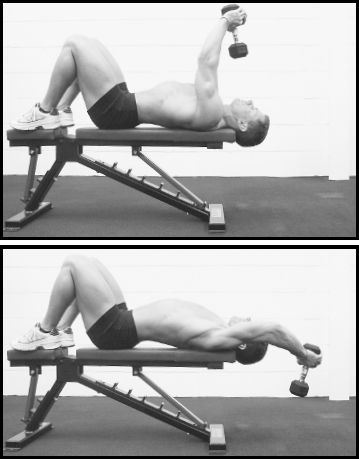
Hold the resistance and lie lengthwise on a bench, not across it. Keep your feet on the bench. This will prevent excessive arching of your back, and excessive stretching of your abdominal wall. Hold the resistance above your upper chest, with straight elbows. Take a shoulder-width grip, or closer if you’re using a single dumbbell, or weight plate. Keep your elbows stiff and straight throughout, slowly lower the bar and simultaneously inhale as deeply as possible. Don’t inhale in one gulp, but in a steady stream. Spread your ribs as much as possible. Lower your arms until they are parallel or only slightly below parallel with the floor. Don’t go down as deep as possible. At the bottom position, take an extra gulp of air. Pause for a second, then return to the starting position, simultaneously exhaling. Repeat for at least 15 slow reps. Focus on stretching your rib cage.
Experiment with a different positioning. Do the exercise with your head just off the end of the bench, as illustrated. This may produce a better effect on your rib cage.
Keeping your elbows completely straight may irritate them. If so, bend your elbows slightly. Keep this to the minimum, however, or you’ll reduce the potential expansion effect on your rib cage.

Elbow irritation may come from using more weight than has been recommended, or from not introducing the exercise into your program carefully enough. Elbow irritation may also come from using a straight bar, whereas a parallel grip on a weight plate, or dumbbell(s), may be safe.
The breathing pullover is traditionally done immediately after an exercise that gets you heavily winded, such as the squat, especially when the latter’s done for higher reps.
Go easy at the beginning. The forced and exaggerated breathing may make you feel dizzy unless you work into it progressively over a few weeks. Your chest may get sore, too, if you don’t work into the exercise gradually.
The Rader chest pull is an alternative to the breathing pullover.