
Two forms of the barbell squat will be described. The front squat has the bar held at the front of the shoulders, whereas the back squat has the bar held at the back of the shoulders. The front squat always has the front qualifier, whereas the back squat is usually called the squat without the back qualifier.
Properly done, by trainees without physical limitations or restrictions, the barbell squat is safe and highly effective. But use poor technique, abuse low reps, overtrain, or try to lift a too-heavy weight, and you’ll hurt yourself. Learn to squat correctly before you concern yourself with weight, then add weight slowly while maintaining correct technique.
Before you can barbell squat with correct technique, you need to be flexible enough to adopt the necessary positioning, and have sufficient back strength to be able to maintain the correct back positioning. You especially need flexible calves, hamstrings, thigh adductors, and buttocks. Women who usually wear shoes with high heels are likely to have tight calves. You also need flexible shoulders and pectorals in order to hold the bar in the right position with ease.
If you’ve had a major back injury, get the clearance of a chiropractor before you barbell squat. If you’ve had any minor back injuries, still get a chiropractor’s clearance.
Two non-barbell forms of the squat will be described: the ball squat, and the hip-belt squat. Neither use a barbell, or resistance on the shoulders.
How to use a power rack
A power rack, correctly used, is perfect for self-spotting, and safety, and can be found in some gyms. A power rack is especially useful for barbell squats, barbell bench press and its variations, deadlifts, and barbell presses. For example, position the pins—or safety bars—an inch or two centimeters below your bottom point of the squat. Then if you can’t perform a rep, lower the bar under control to the pins, get out from under the bar, remove the plates, and return the bar to its holders.
The uprights of power racks typically have about two inches or five centimeters between successive holes. If one setting is too high, and the next too low, raise the floor. For the squat, place non-slip rubber matting of the right thickness throughout the floor space within the rack (so that there’s no chance of tripping on the edge of the matting).
“Flat back” confusion
The spine is naturally curved when seen from the side. This curvature is the natural, strong structure for absorbing and distributing stress efficiently. When the curves are lost, the strong, load-bearing capability is diminished.
“Keep a flat back” is a common admonition when lifting a weight, and one that I’ve used in my earlier writing. It’s not, however, an accurate one. What it really means, is, “Don’t round your lower back.” Although it may look like the lower back is flat at the bottom of a correctly performed squat or deadlift, as examples, this is an illusion. When contracted, the spinal erectors, if sufficiently developed, may fill the required slight hollow in the lower back’s profile at those bottom positions, giving an impression that the lower back is flat, but the actual lower spine should be slightly concave, or hollow.
It’s the strong contraction of the lumbar musculature that produces the desired, concave lower back, to create a bracing effect. The strong contraction of the muscles on both sides of the spine not only prevents the forward rounding of the back, but also helps prevent sideways, asymmetrical bending.
If the lower spine is truly flat, the upper back will be rounded, which is a dangerous position when lifting a challenging weight (or even a light one in many cases). A spine that’s intentionally straightened while under heavy load bearing, is a weakened one that’s exposed to an increased risk of injury. A spine that’s naturally straight, suggests pathology.
When lifting a weight, inside or outside of the gym, keep your shoulders retracted, hips pushed back (extended), and lower back slightly hollowed. There are exceptions, however. For example, in the back extension, the back should round during the course of this flexion-extension exercise; and during crunches, the lower back shouldn’t be hollow—keep it flat against the floor.
Squats, knees, and lower back
Forward travel of the knees is inevitable in squatting, but should be minimized, to reduce stress on the knees. A common guideline for squatting is, during the descent, to avoid the knees traveling forward beyond an imaginary vertical line drawn from the toes. I, too, have recommended this guideline, but few people can follow it for barbell squatting unless they perform partial squats only. The fullest, safe range of motion—safe for the lower back, and the knees—is recommended, and this usually means that the knees will travel forward of the toe line during the barbell squat. Some competitive powerlifters squat with almost vertical shins. They can do this because they have favorable leverages for the squat, use a wide stance, and exaggerate the involvement of their lower backs, and hips. Their goal is to increase their one-rep maximum performances.
The general rule recommended in this book for barbell squatting is to descend until about two inches or five centimeters above the point at which your lower back would start to round. Your back must never round while squatting. For most trainees, provided that controlled rep speed and correct technique are used, this range of motion is safe for the lower back and the knees. For some trainees, this range of motion will mean that the upper thighs will descend to below parallel with the floor, while for most trainees the thighs will descend to parallel with the floor, or a little above parallel.
While learning to use this safe range of motion, it may mean, initially, using a reduced depth of descent. With practice, improved flexibility, and increased strength of your back, you may be able to increase your safe range of motion. Start with just the bare bar when learning how to squat correctly, and progress in resistance gradually.
Correct technique to minimize forward travel of the knees while squatting, includes:
| 1. | Wearing a pair of shoes with no heel, or only minimal heel. |
| 2. | Not elevating your heels on plates, or a board. |
| 3. | Using a medium-width or wider stance—not a close stance. |
| 4. | Turning the toes of each foot out at least 20 degrees from the feet-parallel-to-each-other position. |
| 5. | Keeping the stress of the weight mostly over your heels—not the balls of your feet. |
While applying these guidelines, maintain a slight hollow in your lower back, and minimize forward lean of your torso. Some forward lean of your torso is, however, necessary while barbell squatting.
To minimize forward travel of the knees while squatting, and to keep the back vertical or near vertical, the ball squat, or the hip-belt squat, can be employed. They may be safer forms of the squat for trainees who have knee or back problems when barbell squatting. Properly performed, the ball squat and the hip-belt squat involve little or no loading of the spine.
Knee or lower-back problems may, however, be correctable, with the right therapy.
Footwear reminder
Especially for squats, deadlifts, and overhead presses, you should not wear shoes with thick or spongy soles and heels.
Get yourself a sturdy pair of shoes with good grip to the floor, arch support, and which minimizes deformation when you’re lifting heavy weights. No heel elevation relative to the balls of your feet is especially important for squats and deadlifts.
Main muscles worked
quadriceps, thigh adductors, buttocks, hamstrings, spinal erectors, multifidii
Capsule description
hold a bar over your shoulders, squat, then stand erect
Set-up
Always squat inside a four-post power rack with pins and saddles correctly and securely in place. Alternatively, use a half rack, sturdy and stable squat stands together with spotter racks or bars, or squat rack unit that combines stands and safety bars. Should you fail on a squat, you must be able to descend to the bottom position and safely set the bar down on supports. Make no compromises—safety comes first. Ideally, you should have spotters standing by in addition to the aforementioned safety set-up.
There have been terrible injuries among trainees who squatted without a safety set-up, or spotters standing by. When they failed on a rep, they got crushed by the weight before they dumped it, or they toppled forward and severely injured their backs.
A straight bar is fine for squatting, but most trainees may find that a cambered squat bar is better. A cambered bar is bent like that of a yoke. Relative to a straight bar, the bent bar is easier to hold in position, sits better on the upper back, and is less likely to roll out of position. Encourage the management of where you train to get a cambered squat bar. (A skilled metal worker can put a camber in a straight bar.) Straight or cambered, the bar you use for the squat should have knurling around its center, to help you keep it in position during a set.

Cambered squat bar (top), and a straight barbell.
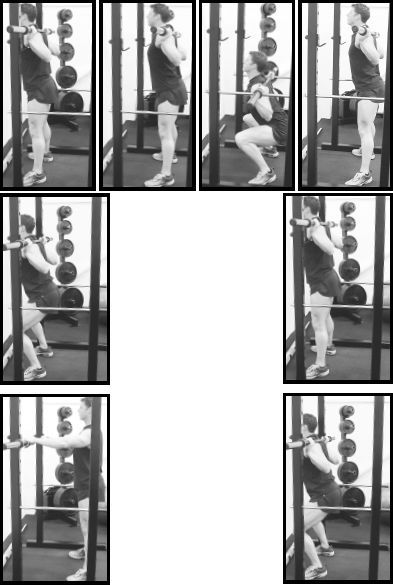
The photograph third from the left on the top row shows the error of shifting stress from over the rear two thirds of the feet (but mostly over the heels), to mostly over the balls of the feet. This has resulted in heel lifting, reduced stability, and exaggerated load on the knees. The model is wearing shoes with thick heels, which has contributed to the technique error.
From the bottom left, the sequence for the first rep of a set of squats. The final two photographs (bottom right) show the return of the bar to the rack’s saddles at the end of the set.
Safety bars/pins
The safety pins (horizontal bars) have been positioned just above where the barbell is lowered to at the safe, bottom position of the squat for this trainee. Thus, should he fail on a rep—usually during a tough work set—he would lower the barbell to the safety pins, and escape.
If you can’t squat well with a straight bar, a bent bar will probably not make enough difference to warrant the investment. But if you can squat well with a straight bar, you may be able to squat even better with a cambered bar.
Set the bar on its saddles at mid- to upper-chest height. If the bar is too low, you’ll waste energy getting it out. If it’s too high, you’ll need to rise on your toes to get the bar out. The too-high setting is especially dangerous when you return the bar after finishing a hard set of squats.
If you’re used to squatting with a straight bar, and move to a cambered bar, you must lower the position of the saddles, and that of the pins or safety bars set at the bottom position of the squat. The ends of a cambered bar are about three inches or eight centimeters lower than the central part that rests on your upper back.
Use little or preferably no padding on the bar. If you’re a training novice you’ll probably have little visible muscle over and above your shoulder blades. After a few months of progressive training that includes deadlifts and shrugs, you’ll start developing the muscular padding required on your upper back. Then the bar can be held in position more comfortably.
The more padding that’s around a bar, the more likely that the bar will be incorrectly positioned, or that it will move during a set. Wear a thick sweatshirt rather than a thin T-shirt, to provide acceptable padding to cushion the bar. If more padding is needed, wear a T-shirt and a sweatshirt.
Bar positioning
Before you center the bar on your upper back you must hold the bar properly, with your shoulder blades crushed together. This creates a layer of tensed muscle on your upper back over and above your shoulder blades. Position the bar on the muscle just above the center of the top ridge of your shoulder blades. This is lower than what’s typically used by most trainees.
This bar position is essential—to avoid metal to spine contact, and to provide a greater area of contact than that from a higher position. This yields greater bar control.
Practice correct bar positioning until you can do it automatically. What will initially feel awkward, will become relatively comfortable after a few weeks of practice.
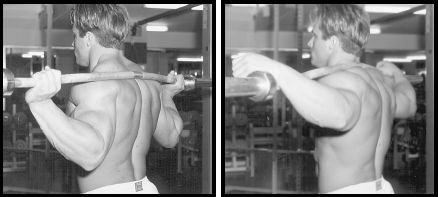
Good bar placement for the squat (left). Bar too high and hands not holding it properly (right). A cambered bar may not drape over your shoulders properly (left) unless there’s weight pulling on it.
Grip
Hold the bar securely in your hands, not loosely in the tips of your fingers. Don’t drape your wrists over the bar, or hands over the plates. Furthermore, each hand must be the same distance from the center of the bar.
The width of grip depends on your torso size, forearm and arm lengths, and shoulder and pectoral flexibility. For the best control over the bar, use the closest grip that feels comfortable. But if your grip is too close, it will be hard on your shoulders and elbows.
If your grip is too wide, you’ll risk trapping your fingers between the bar and the safety supports or rack pins at the bottom of the squat. Place your hands so that there’s no chance of your fingers getting trapped.
Stance
Following experimentation using a bare bar, find your optimum width of heel placement, and degree of toe flare. As a starting point, place your feet hip-width apart and parallel with each other, then turn out the toes on each foot about 30 degrees. Perform some squats. Then try a bit more flare and the same heel spacing. Next, try a slightly wider stance, and the initial toe flare. Then try the wider stance with more flare.
The combination of a moderate stance and well-flared toes usually gives plenty of room to squat into, helps to prevent excessive forward lean, and lets you squat deeper without your lower back rounding. But too-wide a stance will restrict your descent. Experiment until you find the stance that best suits you. Individual variation in leg and thigh lengths, torso length, hip girth, and relative lengths of legs and thighs, contribute to determining the squat stance that’s ideal for you. Tall trainees usually need a wider stance than trainees of average height.
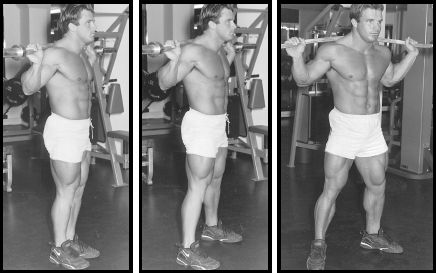
Left, feet too close. Middle, feet well spaced but with insufficient flare. Right, this stance for the squat, or something close to it, will work well for most trainees. The bar is positioned too high in these photos, and the back isn’t properly set.
Find a foot placement that spreads the stress of the squat over your thighs, buttocks, and back. Squat without your lower back rounding, your torso leaning forward excessively, or your heels coming off the floor. There should be no tendency to topple forward. Keep forward movement of your knees to a minimum, and keep your knees pointing in the same direction as your feet. Don’t let your knees buckle inward.
If you have a stance that’s too close, or has insufficient toe flare, then buckling of your knees may be inevitable when you squat intensively.
It may take a few workouts before you find the best stance for you. With just a bare bar over your upper back, stand on some cardboard, adopt your squat stance, and check it out. After tinkering with your stance, once you’re sure it’s correct, and while keeping your feet in position, get someone to draw the outline of your feet on the card. Then you’ll have a record of your stance for when you want to refer to it. Practice repeatedly until you can adopt your squat stance automatically.
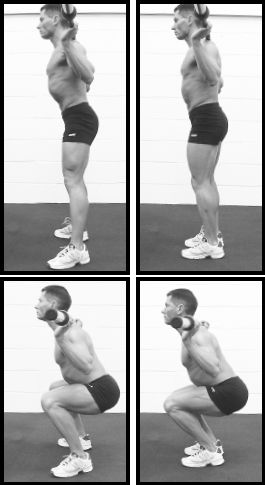
The left-side pair of photographs shows the correct stance—heels well spaced, and toes flared. The right-side photographs show an incorrect stance—feet close together, and parallel with each other. Notice how the incorrect, cramped stance increases forward travel of the knees, and forward lean of the torso.
The bar is positioned too high in these four photographs.
Initial performance
Face the bar so that you have to walk backward from the saddles before taking your squatting stance. Take your grip on the bar, and get under it as it rests on the weight saddles or stands. Don’t lean over to get under the bar. Bend your knees, and get your torso and hips underneath the bar. Your feet can either be hip-width apart under the bar, or split. If split, one foot will be a little in front of the bar, and the other will be a little behind the bar. Pull your scapulae together, tense the musculature of your back, and position the bar correctly.
Your lower back should be slightly hollowed, and your hips directly under the bar. Look forward, tense your entire torso, then straighten your knees. The bar should move vertically out of the saddles or stands.
Stand still for a few seconds. Check that the bar feels correctly centered. If it feels heavier on one side than the other, put it back on the saddles. If it felt a little unbalanced, stay under the bar as it rests on the saddles, reposition the bar, and try again. If, however, it felt considerably lopsided, get out from under the bar, check that you loaded the bar correctly, and make any necessary corrections. Then get under the bar again, position it properly, and unrack it.
Never walk out of squat stands with a bar that doesn’t feel properly centered on your upper back.
Step back the minimum distance so that you don’t hit the uprights of the rack or squat stands during the ascent. Don’t step forward after you’ve taken the bar out of its supports. If you do, you’ll have to walk backward and look to the rear to return the bar to its supports. This is more hazardous than returning the bar forward to its supports.
Slide your feet over the floor as you walk with the bar. This keeps both of your feet in constant contact with the floor. Put your feet in the stance you’ve drilled yourself to adopt. Don’t look down. At all times while standing with the bar, whether stationary or moving into your stance, maintain a natural degree of lower-back inward curve. Never slouch. Maintenance of the natural strong curves of your spine is critical for back health, when bearing weight.
Keep your jaw parallel with the floor—during and between reps. Your eyes should look straight ahead or slightly up, but not down. Fix your eyes on one spot throughout a set.
The weight should be felt mostly through your heels, not the front of your feet, but don’t rock back on your heels and lose your balance.
Descent
With the bar, center of your hips, and heels in a vertical line, weight felt mostly through your heels, unlock your knees and sit down and back. The knee and hip breaks should be simultaneous. Maintain a tight, tensed back, with your shoulder blades retracted, and make a deliberate effort to tense your back further as you descend. Push your chest out as you descend, and push your hips to the rear. Doing all of this will help to maintain the slightly hollowed lower back, which is essential for safe, effective squatting.
Descend symmetrically, under control, with the weight felt mostly through your heels. Take about three seconds to descend to your bottom position.
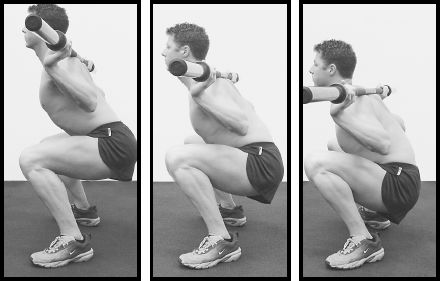
Left, squat to a depth where the upper thighs are parallel with the floor. The lower spine is still slightly hollowed, albeit the hollow is filled with muscle. This is the maximum safe depth for this trainee. Middle, the increased depth has caused the lower back to round. Right, severe rounding or flexion of the lower spine. DANGER: never allow your back to round in the squat. The right photograph also illustrates the incorrect shift of the stress from the exercise to mostly over the balls of the feet, and exaggerated forward travel of the knees, whereas the left-most photograph illustrates stress mostly over the heels.
Some forward movement of your knees and shins is necessary, but keep it to the minimum. Keeping the weight felt mostly through your heels helps to maintain correct leg positioning. Provided that correct technique is used, how much forward movement there is of your knees largely depends on your body structure and how deep you squat.
Depth of descent
With poor squatting technique, your lower back will round earlier in the descent than it would had you used correct technique. With correct set-up and technique, as described here, and just a bare bar, find the depth of descent at which your lower back just starts to round. An assistant must watch you from the side, with his eyes level with your hips at your bottom position.
Set your squatting depth at two inches or five centimeters above the point where your lower back just starts to round. Position the safety bars of the power rack, or squat stands, at that depth.
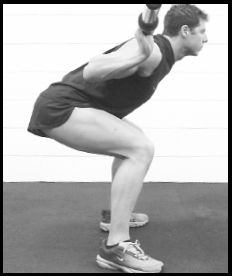
When the hips rise faster than the shoulders, the torso tips forward excessively, and stress is greatly exaggerated on the lower back—DANGER. Your hips must not rise faster than your shoulders.
Ideally, descend until your upper thighs are parallel with or just below parallel with the floor. If your lower back starts to round before you reach the parallel position, you mustn’t squat to parallel. Most trainees who are flexible enough, and who use correct technique, can squat to parallel without their lower backs rounding. Don’t reduce your squatting depth except for safety reasons. The deeper you squat, the less weight you’ll need to exhaust the involved musculature.
Although some trainees can squat safely to well below parallel, they belong to a minority. You may belong to that minority. Squatting to below parallel is called the full squat.
Ascent
Don’t pause at the bottom position. Immediately start the ascent. Ascend while pushing mostly through your heels. Push with equal force through both feet. If you favor one side, you may produce asymmetrical motion in your ascent, which is dangerous. Take two to three seconds for each ascent.
During the ascent, the bar as seen from the side should move vertically. It mustn’t move forward before it moves upward. If you tip forward at the bottom of the squat, the bar will go forward before it starts to go up. This is a common mistake, and has produced many lower-back injuries.
Your hips must not rise faster than your shoulders.
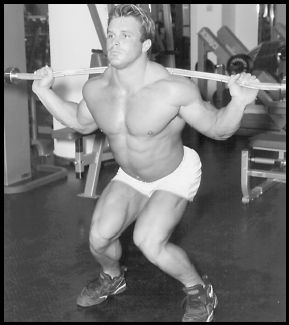
Knees coming in on the ascent is a common symptom of set-up flaws in the squat. Insufficient toe flare, and heels too close, are common flaws responsible for buckling of the knees. Tight thigh adductors may also contribute.
Heel elevation—DANGER
Squatting with the heels elevated is a mistake. Some trainees elevate their heels under the belief that they will isolate certain areas of their quadriceps. Others do it to maintain their balance, to compensate for insufficient flexibility, or poor squatting technique.
Safe squatting involves distributing the weight over the rear two thirds of each foot, and pushing primarily through the heels on the ascent. When the heels are elevated, the balls of the feet take more of the weight, forward travel of the knees is increased unnecessarily, and the hips and knees shift forward, which corrupts the balanced spread of stress over the thighs, buttocks, and back. The result is unnecessarily increased knee stress, with potentially harmful consequences.
The flexibility work recommended in this book will help address the insufficient flexibility that’s often at the root of trainees’ desire for heel elevation while squatting. When adequate flexibility is combined with good squatting technique—including the right width of stance, and degree of toe flare—the heels will stay where they belong: on the floor.
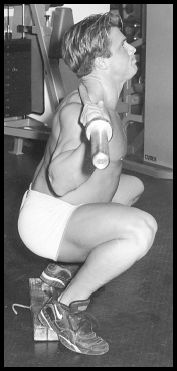
Never squat with a board, plate, or block under your heels. Raising your heels produces a more upright torso, but distorts the balanced spread of stress over the thighs, hips, and back. The result is unnecessarily increased knee stress, with potentially harmful consequences.
Focus on pushing mostly through your heels. This will help you maintain the proper ascent. Pushing through the front part of your feet will almost inevitably tip you forward, and ruin your ascent. Make a special effort to keep your shoulder blades pulled back, your chest pushed out, and hips pushed to the rear, to help you keep your ascent in the right groove.
The ascent, like the descent, should be symmetrical. The bar shouldn’t tip to one side, and you shouldn’t take more weight on one side of your body than the other.
While standing
Pause briefly to take one or more deep breaths, then move into the next rep. While standing between reps, don’t sway at your hips, don’t rock the bar on your shoulders, don’t take more of the weight on one foot than the other, and don’t rotate your hips. Stay rigid, with the weight distributed symmetrically, and maintain the natural inward curve in your lower spine. If you move your hips forward during the pause between reps, you’ll flatten the curve at the bottom of your spine and greatly weaken your back.
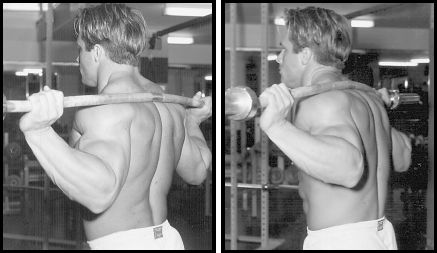
While standing between reps, preserve the natural curves of your spine (left). Don’t round your back (right).
Racking the bar
At the end of a set, rack the bar. While sliding your feet so that you always have both feet in contact with the floor, shuffle forward until the bar is directly above the saddles or stands. Check that you’re not going to miss the bar holders with the bar, and ensure that your fingers aren’t lined up to be trapped between the bar and its holders. Then bend your knees and set the bar down.
The bar should be returned to its holders in a vertical motion. A common error is to stop short of the saddles or stands and lower the bar through leaning forward while keeping the knees straight. This is dangerous. It leads to reduced control over the bar, and excessive stress on a tired back.
Other tips
Don’t squat in a sweaty shirt. Change your shirt before you squat, if need be. Don’t squat with a bare torso, because it reduces the stability of the bar on your back.
Before you get under the bar for a work set, put chalk or rosin on your hands, and perhaps get someone to put chalk or rosin on your shirt where the bar will rest. This may help the bar to stay in position.
Increasing your shoulder and pectoral flexibility will help you to hold the bar in position with less difficulty.
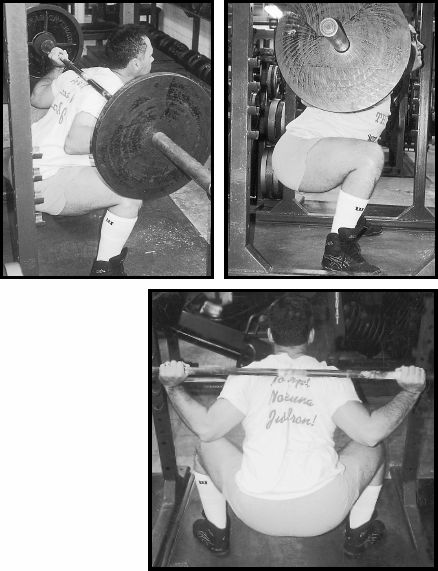
Good squatting form—down to parallel while maintaining good back positioning, and minimal forward travel of the knees.
Practice, practice, and practice again, with just a bare bar, until you can get into your correct squatting stance without having to look down or fiddle around to get your feet in the right position.
Never turn your head while you’re squatting. If you do, the bar will tip slightly, your groove will be spoiled, and you could hurt yourself.
The orthodox breathing pattern when squatting is to take one or more deep breaths while standing, descend, and then exhale during the ascent. If you’re squatting for 10 or fewer reps, then one or two deep breaths before each rep should suffice. For longer-duration sets, take three deep breaths before reps 11 through 15, and three or four deep breaths before reps 16 through 20.
Don’t squat to a bench, box, or chair, as that would cause compression of your spine because your vertebrae would get squeezed between the weight up top and the hard surface down below. You could, however, squat to a soft object of the right height for you, such as a large piece of soft packing foam. When you feel the foam brushing against your buttocks or hamstrings, depending on where the foam is placed, you’ll have reached your maximum safe depth but without risk of spinal compression.
To help you to improve your squatting technique, record yourself with a video camera, from the side view. Watching yourself in a mirror isn’t adequate alone.
Once you’ve mastered the technique, give 100% attention to ensure that you deliver correct technique on every rep. Just a slight slip of concentration can lead to lowering the bar out of position, one hand getting ahead or in front of the other, or one thigh taking more load than the other.
Don’t squat if your lower back is sore from an earlier workout, or heavy manual labor. Wait until you’ve recovered. Furthermore, don’t perform any form of deadlift before you squat. Don’t fatigue your lower back and reduce its potential as a major stabilizer for the squat.
Don’t use a lifting belt. It’s not required.
Spotting
As soon as the bar stalls, moves laterally, tips, or the squatter starts to twist to one side, the spotter or spotters must act to prevent the rep deteriorating further. If there are no spotters, set the bar down immediately (under control) on the safety bars. Don’t try to complete a squat unassisted when your technique has started to break down.
If two spotters are involved, there must be excellent communication and synchronized action. If one spotter shouts “Take it!” the other must respond even if the latter thinks the assistance could have been delayed. Assistance needs to be applied equally to each side, to maintain a horizontal bar.
If one spotter is involved, he should stand directly behind the trainee. Assistance is given by the spotter standing astride the trainee, grabbing him or her around the lower rib cage, maintaining bent the trainee is exhausted. It is, however, a quick way of injuring the spotter because he’ll end up leaning forward and heavily stressing his lower back. A single spotter shouldn’t even try to help you up if substantial assistance is needed. Instead, the spotter should help you to lower the bar safely to the rack pins or safety bars.
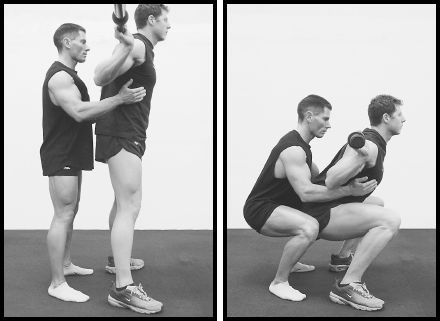
Spotting for the squat.
Even if the spotter doesn’t need to assist during a rep, he should be alert to help guide the bar back into the weight saddles after the final rep. At the end of a hard set of squats, you’ll be tired. Without a pair of guiding hands on the bar from a spotter you may miss getting the bar into the weight saddles.
Patience
It may take time for the squat to feel natural. Don’t lose heart if you find that squatting with the bare bar feels awkward, and you wobble a lot. But don’t go adding a lot of weight prematurely. Build up gradually, and be confident that the exercise will feel better later than it does at first.
How to improve your ability to squat
Only a small proportion of trainees are naturally gifted for back squatting and front squatting, largely because of their body proportions and leverages. Most trainees need to work at squatting technique and the essential supportive work, to make themselves into competent squatters.
There are three major components of good squatting ability:
| 1. | The flexibility to be able to adopt the correct body positioning. |
| 2. | The back strength to be able to maintain the correct back positioning. |
| 3. | Correct exercise technique. |
You need sufficient flexibility in the major musculature of your lower body, along with the required shoulder flexibility to hold the bar in position correctly. Follow the flexibility program in this book. If any of the muscles have anything less than at least a normal, healthy level of flexibility, squatting technique will probably be compromised, with a reduction in safety and productivity. Squat correctly, or not at all.
You need sufficient strength throughout your back—lower, middle, and upper—to be able to hold your lower back in the required slightly hollowed position during the squat. This is critical for safety. Your back must not round while squatting—there must be no back flexion. Four key back exercises—deadlift, back extension, row, and shrug—will help build the required back strength provided that they are worked with correct technique, and progressive resistance.
Having the required flexibility and back strength is one thing, but learning to use the flexibility and strength during the squat is something else.
It may take several months before correct squatting technique can be implemented, even with minimal weight. Don’t be frustrated to begin with. As your flexibility and back strength improve, and your ability to use them, so will your squatting ability. Until you can adopt the correct squatting technique, keep the resistance very light—perhaps just the bare bar. Thereafter, as your squatting weight grows, so should your strength in the deadlift, back extension, row, and shrug, to help you to maintain the correct back positioning.
The Smith machine
Smith machine squats give only an illusion of safety relative to the barbell squat. With the Smith machine, the bar is locked into a fixed pathway so you don’t have to be concerned with balance; and you don’t have to take a barbell from stands, step back to perform your set, and step forward at the end of a set in order to return the bar to the stands. But when you look further into the Smith machine squat, there are perils.
Don’t squat in the Smith machine. Its use is loaded with dangerous compromises. It forces you to follow the bar path dictated by the machine, but the bar path should be dictated by your body.
If you put your feet forward in the Smith machine squat, to prevent your knees travelling too far forward at the bottom of the movement relative to your feet, you would put your lower back at risk. If your feet are well forward, you would lose the natural, required slight hollow in your lower back—including at the bottom of the movement—because your hips would be forward of their ideal position. Although your knees may be spared some stress, it would be at the cost of a back injury, sooner or later.
If you bring your feet back so that they are directly beneath your shoulders, all may look well until you descend. Then your knees would travel forward excessively, the load would shift more to over the balls of your feet, the stress on your knees would be exaggerated, and the risk of injury would increase.
When used for full-range movements such as the squat, bench press, incline bench press, and overhead press, correct exercise technique is corrupted by the vertical bar pathway that the Smith machine enforces. This will set you up for injuries.
Used correctly, free-weights provide the freedom required to move through pathways that are natural for your body.
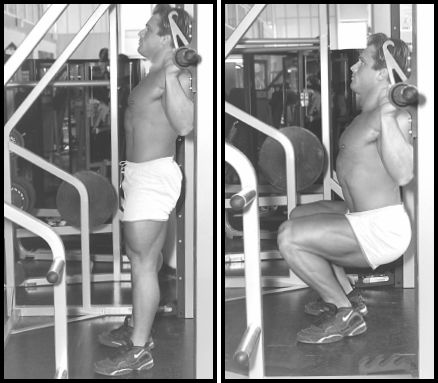
Don’t squat in the Smith machine because the rigid, vertical pathway corrupts natural squatting technique. This is hostile to the back and the knees.
Main muscles worked
quadriceps, thigh adductors, buttocks, hamstrings, spinal erectors, multifidii
Capsule description
hold a bar at the front of your shoulders, squat, then stand erect
Set-up
Always front squat inside a four-post power rack with pins and saddles correctly and securely in place. Alternatively, use a half rack, sturdy and stable squat stands together with spotter racks or bars, or a squat rack unit that combines stands and safety bars. Should you fail on a front squat, you must be able to descend to the bottom position and safely set the bar down on supports. Make no compromises—safety comes first. Ideally, you should have spotters standing by in addition to the aforementioned safety set-up.
Position the bar saddles so that the barbell (straight, not cambered) is set at mid- to upper-chest height. If the bar is too low, you’ll waste energy getting it out. If it’s too high, you’ll need to rise on your toes to get the bar out. The too-high setting is especially dangerous when you return the bar after finishing a hard set of front squats.
Wear a thick sweatshirt rather than a thin T-shirt, to provide padding to cushion the bar where it rests on your deltoids next to your clavicles. Some of the weight will end up on your clavicles, but not all—minimize it, to prevent excessive discomfort. If more padding is needed, wear a T-shirt and a sweatshirt.
Bar positioning
To find where the bar should sit during the front squat, lift your left arm out in front so that your left elbow is higher than your left shoulder. Then with your right hand find the groove where your left front deltoid meets your left collar bone. That’s the groove where the bar should sit—mostly on the deltoid, not the clavicle. Place a bare bar there, to get the feel for it.
To keep the bar in position, cross your hands on the bar—left hand over the bar on your right side, and right hand over the bar on your left side. The bar should be just in front of your windpipe. Keep your hands firmly on the bar, and elbows higher than your shoulders. This elbow positioning is critical, to maintain a sufficiently upright torso to prevent the bar falling forward and out of position. If your elbows drop, your technique will crumble.
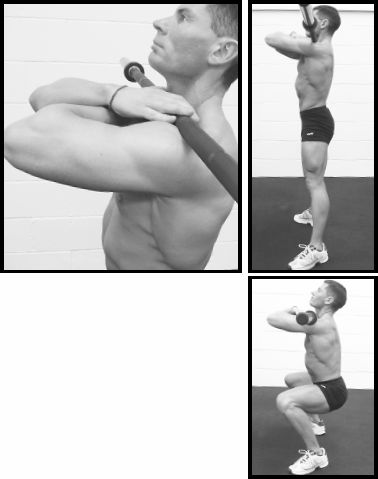
Because of the use of a closer hand spacing in the front squat than the back squat, a shorter bar than an Olympic one may be easier to handle. If you have a shorter bar available, and the stands to support it between sets (or assistants to help you), try that for the front squat.
Stance
Following experimentation using a bare bar, find your optimum width of heel placement, and degree of toe flare. As a starting point, place your feet hip-width apart and parallel with each other, then turn out the toes on each foot about 30 degrees. Perform some front squats. Then try a bit more flare and the same heel spacing. Next, try a slightly wider stance, and the initial toe flare. Then try the wider stance with more flare.
Too close a stance will hamper stability, and too wide a stance will restrict your descent. Experiment until you find the stance that best suits you. Individual variation in leg and thigh lengths, torso length, hip girth, and relative lengths of your legs and thighs, contribute to determining the front squat stance that’s ideal for you. The stance you settle on may be a little closer than what you would use in the back squat.
Find a foot placement that provides stability, the fullest safe range of motion, no rounding of your lower back, and minimal forward lean. Your heels must remain fixed to the floor. You need to be stable, with no tendency to topple forward. Never put a board or plates under your heels.
Keep your knees pointing in the same direction as your feet. Don’t let your knees buckle inward.
If your stance is too close, or has insufficient flare, then buckling of your knees may be inevitable when you front squat intensively.
Fine-tune your stance, and keep working on your buttock, hamstring, and calf flexibility. As you loosen up over a few weeks, along with fine-tuning your stance, your front squatting technique will improve. Don’t lose heart if it’s difficult to begin with.
It may take a few workouts before you find the best stance for you. When you’ve got it, stand on some cardboard, and adopt your front squat stance. Get someone to draw the outline of your feet on the card. Then you’ll have a record of your stance for when you want to refer to it. Practice repeatedly until you can adopt your front squat stance automatically, without having to look down to check where your feet are.
Initial performance
Face the bar so that you have to walk backward from the saddles before taking your squatting stance. Get under the bar as it rests on the weight saddles or stands. Don’t lean over to get under the bar. Bend your knees and get your hips underneath the bar. Place your feet directly beneath the bar, side-by-side a bit wider than shoulder-width apart. Pull your scapulae together, tense the musculature of your back, keep your lower back slightly hollowed, then position the bar. Remember, the bar should sit mostly on your deltoids, not your clavicles.
Cross your hands on the bar—left hand over the bar on your right side, and right hand over the bar on your left side. Hold your head and neck upright, to prevent the bar jamming into your windpipe. This will take time to adapt to, and require a number of workouts. At all times, keep your hands firmly on the bar, and elbows higher than your shoulders. Fight to do it. Then your control will be good.
With the bar in position, your lower back slightly hollowed, scapulae pulled together, and your hips directly under the bar, look forward, tense your torso, then straighten your knees. The bar should move vertically out of the saddles or stands. Don’t unrack the bar in an inclined pathway. Stand still for a few seconds, without moving your feet. Check that the bar feels correctly centered. If it feels heavier on one side than the other, put it back on the saddles, reposition it, and try again. If it felt considerably lopsided, get out from under the bar, check that you have loaded the bar correctly, and make any necessary corrections. Then get under the bar again, position it correctly, and unrack it.
Step back the minimum distance so that you don’t hit the uprights of the rack or squat stands during the ascent. Don’t step forward after you’ve taken the bar out of its supports. If you do, you’ll have to walk backward to return the bar to its supports. This is more hazardous than returning the bar forward into the rack saddles or squat stands.
Slide your feet over the floor as you walk with the bar. This keeps both your feet in constant contact with the floor. Then put your feet in the stance you’ve drilled yourself to adopt. Don’t look down.
At all times, keep your hands firmly on the bar, and elbows higher than your shoulders. Fight to do it. Then your control of the bar should be good.
Keep your jaw parallel with the floor—during and between reps. Your eyes should look straight ahead or slightly up, but not down. Fix your eyes on a spot throughout the set.
The weight should be felt mostly through your heels, but don’t rock back on your heels and lose your balance.
Caution—bar tipping
Because the hands are closer in the front squat than the back squat, and because the bar may rest on a narrower area in the former, the bar tips more readily in the front squat than the back squat. Although the bar should be horizontal for every exercise—for symmetrical distribution of stress—special care is required to maintain it in the front squat.
Descent
With the bar, center of your hips, and heels in a vertical line, weight felt mostly through your heels, unlock your knees and sit down and back. The knee and hip breaks should be simultaneous.
Maintain a tight, tensed back, with your shoulder blades retracted, and make a deliberate effort to tense your back further as you descend. Stick your chest out as you descend, and push your hips to the rear. Doing all of this will help to maintain the slightly hollowed lower back, which is critical for safe, effective front squatting.
At all times, keep your hands firmly on the bar, and elbows higher than your shoulders. Fight to do it. Then your control of the bar should be good.
Descend symmetrically, under control, and with the weight felt mostly through your heels. Take about three seconds to descend to your full, safe, front squatting depth.
Some forward movement of your knees is a necessity, but keep it to the minimum. Provided that correct technique is used, how much forward movement there is of your knees largely depends on your body structure, and how deep you squat.
Depth of descent
With poor front squatting technique, your lower back will round earlier in the descent than it would had you used correct technique. With correct set-up and technique, as described in this section, and just a bare bar, find the depth of descent at which your lower back just starts to round. An assistant must watch you from the side, with his eyes level with your hips at your bottom position.
Set your depth at two inches or five centimeters above the point where rounding of your lower back just starts. Position the safety bars of the power rack, or squat stands, at that depth.
Ideally, descend until your upper thighs are parallel with or just below parallel with the floor. Most trainees who are flexible enough can front squat to parallel or a bit below without their lower backs rounding.
Don’t reduce your front squatting depth except for safety reasons. The deeper you front squat, the less weight you’ll need to exhaust the involved musculature. Most trainees can front squat deeper than they back squat before their lower backs start to round.
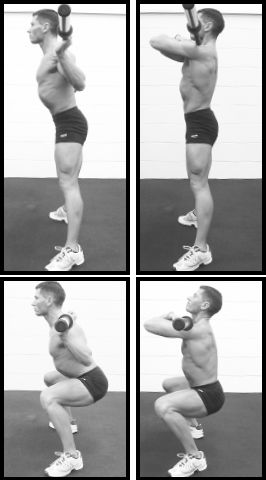
Comparison of the back squat (left) and front squat (right) with the identical stance—heels well spaced, and toes flared. Notice how the back is more vertical in the front squat, but the knees travel forward more.
The increased forward travel of the shins in the front squat should be safe for healthy knees provided the stress from the exercise is felt mostly through the heels, not the balls of the feet.
Ascent
As soon as you reach your bottom position, push up in a controlled manner, with equal force through the heels of both feet. If you favor one side, you may produce an asymmetrical ascent, which is dangerous. Take two to three seconds for each ascent.
At all times, keep your hands firmly on the bar, and elbows higher than your shoulders. Fight to do it. Then your control of the bar should be good.
During the ascent, the bar, as seen from the side, should move vertically. It mustn’t move forward before it moves upward. If you tip forward at the bottom of the front squat, the bar will go forward before it starts to go up. This is a common mistake that causes loss of bar control, which produces lower-back injuries, and other problems. Your hips must not rise faster than your shoulders. Lead with your head and shoulders.
Focus on pushing mostly through your heels. This will help you to maintain the proper ascent. Pushing through the front part of your feet will almost inevitably tip you forward, and ruin your ascent. Make a special effort to keep your shoulder blades pulled back, chest stuck out, and hips pushed to the rear, to help you keep your ascent in the right groove.
The ascent, like the descent, should be symmetrical. The bar shouldn’t tip to one side, and you shouldn’t take more weight on one side of your body than the other.
While standing
Pause briefly to take one or more deep breaths, then move into the next rep. While standing between reps, don’t sway at your hips, don’t rock the bar on your shoulders, don’t take more of the weight on one foot than the other, and don’t rotate your hips. Stay rigid, with the weight distributed symmetrically, and maintain the natural inward curve in your lower spine. If you move your hips forward during the pause between reps, you’ll flatten the curve at the bottom of your spine, and greatly weaken your back.
Once again . . . keep your hands firmly on the bar, and elbows higher than your shoulders. Fight to do it. Then your control of the bar should be good.
Racking the bar
At the end of a set, rack the bar. While sliding your feet so that you always have both feet in contact with the floor, shuffle forward until the bar is directly above the saddles or stands. Check that you’re not going to miss the bar holders with the bar, and ensure that your fingers aren’t lined up to be trapped between the bar and its holders. Then bend your knees and set the bar down.
The bar should be returned to its holders in a vertical motion. A common error is to stop short of the saddles or stands and lower the bar through leaning forward while keeping the knees straight. This is dangerous. It leads to reduced control over the bar, and excessive stress on a tired back.
Other tips
Never turn your head while you’re lifting or lowering the bar. If you do, the bar will tip slightly, your groove will be spoiled, and you could hurt yourself.
The orthodox breathing pattern when front squatting is to take one or more deep breaths while standing, descend, and then exhale during the ascent. Alternatively, breathe freely.
Consolidating front squatting technique takes time and patience. With a bare bar, practice on alternate days for as many sessions as it takes until you master the technique. Then build up the resistance slowly and carefully.
Expect awkwardness with the positioning of the bar. You must persist with the front squat. Don’t give up after a brief trial. With a bit of practice you will adjust—you’ll find the precise position for the bar that will work for you. A small adjustment in bar position can make a big difference. What may have felt impossible to begin with may, a few weeks later, feel fine.
If, however, after six weeks of persistence, holding the bar in position still feels too uncomfortable, use a little padding between the bar and your deltoids additional to what you get from your clothing. Tightly wrap a small towel around the bar before putting the bar in place on your shoulders or, better yet, slip a thin strip of compressed foam tubing over the center of the bar. Don’t use a large towel or thick piece of foam (whether soft or compressed), as both lead to incorrect bar positioning, and bar movement on your shoulders during a set, which will ruin your technique.
One last time: Keep your hands firmly on the bar, and elbows higher than your shoulders. Fight to do it. Then your control of the bar should be good.
As observed from the side view of the front squat, get feedback from a training partner. Alternatively, record yourself with a video camera. Watching your reflection in a mirror isn’t adequate for analyzing your front squatting technique.
Once you’ve mastered the technique, give 100% attention to ensure that you deliver correct technique during every rep. Just a slight slip of concentration can lead to lowering the bar out of position, the elbows dropping beneath shoulder height, or one foot taking more load than the other. Any of these will spoil the pathway of the bar, make the weight feel heavier, make your reps harder, cause frustration, and risk injury.
Don’t front squat to a bench, box, or chair, as that would cause compression of your spine because your vertebrae would get squeezed between the weight up top and the hard surface down below.
Don’t front squat if your lower back is sore from an earlier workout, or heavy manual labor. Wait until you’ve recovered. Furthermore, don’t perform any form of deadlift before you front squat. Don’t fatigue your lower back and reduce its potential as a major stabilizer for the front squat.
Don’t use a lifting belt. It’s not required.
Safety reminders
Always back and front squat inside a four-post power rack with pins and saddles correctly and securely in place. Alternatively, use a half rack, sturdy and stable squat stands together with spotter racks or bars, or a squat rack unit that combines stands and safety bars. Use a set-up so that should you fail on a squat, you can descend to the bottom position and safely set the bar down on the supports. There must be no compromise here—safety comes first. Ideally, you should have spotters standing by in addition to the aforementioned safety set-up.
To demonstrate exercise technique clearly, the models sometimes didn’t wear shirts, and weight stands and safety bars were often not used. This was for illustration purposes only. When you train, wear a shirt, and take proper safety measures.
Main muscles worked
quadriceps, thigh adductors, buttocks, hamstrings
Capsule description
stand with a ball between your hips and a wall, squat, then stand erect
The ball squat, also called the wall squat, is an alternative to the barbell squat that doesn’t heavily involve the lower back. It’s technically easier than the back squat and front squat, and requires minimal equipment.
Set-up and positioning
Obtain a soft, exercise or stability ball 12 to 16 inches (or 30 to 40 centimeters) in diameter. Stand on a non-slip surface, parallel with an area of a smooth wall that has no objects mounted on it, facing away from the wall. Position the center of the ball between your hips and the wall. Stand upright, with the ball snugly in place, and your heels about hip-width apart. Next, move your feet forward four to five inches, and turn your toes out about 30 degrees on each side.
You may need to try several exercise balls to find one that works best for you. The ideal size of the ball varies according to the size of the individual. A large person will require a larger ball. The degree of preferred softness may vary, too.
Performance
Keep your torso vertical, head up, eyes forward, shoulders retracted, and lower back slightly hollowed, and take about three seconds to sit down to the point where your upper thighs are approximately parallel with the floor. Pause for a second, then smoothly ascend to the starting position, pushing only through your heels. Pushing only through your heels minimizes the stress on the knee joints. Again, keep your torso vertical, head up, eyes forward, shoulders retracted, and lower back slightly hollowed. And keep your shoulders directly above your hips throughout each rep. Take two to three seconds for each ascent. At the top of each rep, either gently fully straighten your knees, or keep them slightly bent. Pause for a second at the top, then descend into the next rep.
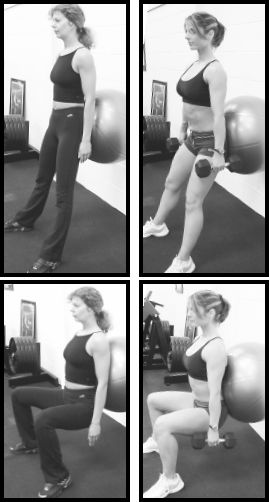
Your knees should point in the same direction as your toes. Don’t allow your knees to move inward.
As you descend and ascend, the ball will move up and down your back. Keep the ball centered on your back. And keep your body moving symmetrically. Lean against the ball the minimum amount—just enough to maintain balance and correct positioning.
Fine-tune the set-up position so that during each descent your shins remain vertical, or close to vertical, and your knees and hips feel comfortable. Minimize forward travel of your knees. Depending on your height and body proportions, you may need to move your feet forward a little further, widen your stance a little more, and turn out your toes a little further. You may also benefit from fine-tuning the ball position—probably by lowering its starting position. And remember to push through your heels on the ascent.
Make one change at a time, and perform a few reps following each change. Perform one or two sets, ten reps per set, each rep to approximately parallel with the floor.
If, the following day, you have no negative reaction in your knees or hips, try a greater range of motion the next workout—descend to below the parallel position, but not so low that your lower back rounds. Find the maximum range of motion for you that keeps your lower back slightly hollowed, and is comfortable for your knees and hips. This range of motion will probably be greater in the ball squat than in the back squat or front squat.
If, however, you had a negative reaction in your hips or knees, don’t increase your range of motion. Instead, once your joints feel fine, test the exercise again, but adjust your foot positioning to try to find a safer set-up.
Once you’ve found a safe set-up, and maximum range of motion for you, gradually increase your performance. When you can perform three sets of 15 reps, start to use additional resistance. Hold a dumbbell in each hand as you perform the ball squat, with your palms parallel with each other. Keep your forearms and arms straight and vertical—consider them as links to the dumbbells.
The ball may ride up your back during the set, and need to be lowered. If so, and if you’re holding additional resistance, get an assistant to lower the ball quickly while you stand upright.
Lean the minimum amount against the ball—just enough to maintain balance and correct positioning. Excessive leaning into the ball changes the dynamics of the exercise, and may increases stress on your knees.
The orthodox breathing pattern when squatting is to take one or more deep breaths while standing, descend, and then exhale during the ascent. Alternatively, breathe freely.
Other tips
Take the dumbbells from the floor at the bottom of the first ball squat, or from low bases. Thereafter keep hold of the dumbbells until the bottom position of the final rep, when you would return them to their starting positions. When you’re at your maximum, safe, bottom position of each rep, the dumbbells should just brush the floor or elevation. Whether you’ll need bases will depend on your limb and torso lengths, and their relative proportions, depth of squatting, and size of the dumbbells. If the dumbbells would be too low for you when on the floor, elevate each of them on one or more plates, smooth sides up.
In some cases, the dumbbells may strike the floor before the trainee has reached the bottom position. In this case, the lifter needs to be elevated sufficiently—for instance, on a side-by-side pair of large weight plates turned smooth sides up—so that the dumbbells are in the correct position on the floor for taking at the bottom of the first rep.
Don’t lean to one side to pick up a dumbbell. Keep yourself symmetrical. Furthermore, don’t descend deeper than your usual depth to get the dumbbells on your first rep.
With weighty dumbbells, use chalk or rosin on your hands. If the dumbbell handles have sharp knurling, that will help your grip greatly, especially if you have chalk or rosin on your hands, too.
An alternative to using a pair of dumbbells is to suspend securely a single dumbbell, or weight plates, from a chain or rope attached to a belt around your hips. The belt could be the same one used for parallel bar dips—a purpose-made weight belt. You’d probably need to stand on two stable platforms so that the suspended dumbbell or weight plates don’t hit the floor before you reach your bottom position.
The squat with suspended resistance but without use of a ball for support, is called a hip-belt squat, and is described next.
Main muscles worked
quadriceps, thigh adductors, buttocks, hamstrings
Capsule description
stand with resistance suspended from your hips and between your legs, hold a support, squat, then stand erect
The hip-belt squat is another alternative to the barbell squat that doesn’t heavily involve the lower back if done correctly. It provides tremendous work for the thighs and buttocks. It usually permits a deeper squat than can be safely tolerated in the barbell squat because with the hip-belt squat there’s rearward movement of the torso, little or no forward lean of the torso, minimal involvement of the lower back, and reduced forward travel of the knees.
Set-up and positioning
Find or make two sturdy, broad, non-slip platforms, to stand on. If there’s any wobble of the platforms, wedge shims under one or more of the corners. The platforms should be at least 15 inches tall, preferably over 20. The lower the resistance hangs from your body, the more comfortable the set-up may feel, but the more easily the weight will swing. Use a rep speed slow enough to prevent the weight swinging.
Until you’re using about 125 to 150 pounds (57 to 68 kilos), a belt for attaching weight for the parallel bar dip can substitute for a hip belt. But beyond that weight, or earlier in some cases, a proper hip belt—a heavy-duty weight belt with special attachments—is recommended, for comfort and safety. A supplier of such a hip belt is www.ironmind.com.
With a hip belt the weight stack may be attached by straps or chain to the front and rear of the belt, and there may be reduced friction between your body, belt, and attachments compared with other belts. If front and rear attachments are used, the length of the one between the rear of the belt and the loading pin will be longer than that of the front one, maybe by three to four inches. Some trainees may prefer to attach the loading pin to the front of the hip belt only, rather than the front and the rear.
Some trainees may fix the attachments to the hip belt using carabiners (spring clips), but others may fix them directly to the hip belt, and use a carabiner only to make the connection with the loading pin. Multiple carabiners, perhaps of different sizes, could be linked to fine tune the total length of an attachment. If chains are used as attachments, and they are loose near the belt, use an additional carabiner to pull them together.
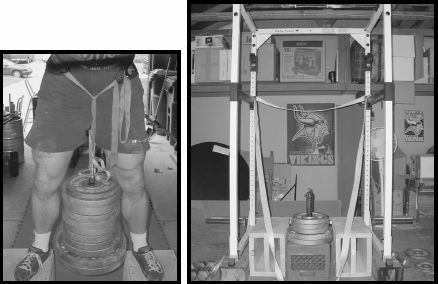
A safety-first, heavy-duty set-up for the hip-belt squat.
Safety is paramount. Whatever belt and attachments you use, they must not fail you. They must be strong enough to hold the weight. And all carabiners must be heavy duty, and secure. There must be no risk of them opening during a set.
Rest the belt on your hip bones and upper buttocks. Don’t cinch it around your waist. Experiment to find the most comfortable position for you. Depending on the belt, and the attachments, you may need to use padding such as a folded towel between the belt and your hips, and perhaps between the chains or straps and your body, too.
Place the platforms next to a power rack, or a stable, stationary object that’s secured to the floor. Space the platforms so that there’s just room for a 35-pound or 15-kilo plate on a loading pin to travel up and down without striking the platforms. To accommodate a larger plate you would need to use a wider stance—perhaps too wide. This wouldn’t be necessary unless you had a full stack of 35-pounders and needed to use 45-pounders. Another alternative would be continued use of the smaller plates but with a taller loading pin, and taller platforms.
As an alternative to the loading pin, at least to begin with, you could suspend plates or a dumbbell directly from your belt.
You’ll be tethered to the rack or other stationary object, so it must be steadfast. If the rack isn’t fixed to the floor, load it with sufficient weight on the opposite side to you, so that it can’t topple when pulled. Alternatively, have someone pull on the opposite side to you, for counterbalance. There must be no chance of the rack (or other stationary object) moving while you hip-belt squat, or of your feet slipping.
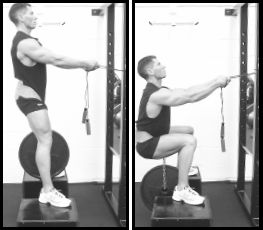
A simple, introductory set-up for the hip-belt squat, using a belt designed for applying resistance for the parallel bar dip, and a strong band. The band should be looped around the hands before being grasped in the hands. A slight hollow should be maintained in the lower back at all times. The right photograph shows some rounding of the lower back—avoid this.
Loop a strong length of towing strap or rope securely around the rack or other stable object, at about the height of your hips when you’re standing on the platforms, or lower if the attachment point on the rack is further than about four feet or one meter from the platforms. There must be no risk of the strap snapping, or slipping out of position.
If the strap is fixed on the support at chest height or higher, it will probably lead to your torso leaning forward during the descent.
Strap may be preferable to rope, because the latter may cut into your skin. Alternatively, use rope and wear gloves. You’ll need about five meters if you loop the strap around the posts of a rack. The ends of the strap must be within easy reach when you’re on the platforms.
Wrap the ends of the strap or rope snugly around your hands next to your thumbs rather than around the knuckles at the base of your fingers. Grip the ends securely, so that when you stand on the platforms your elbows are almost straight, and the strap is taut. There must be no chance of losing your grip.
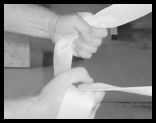
The loading pin should be placed on a sturdy crate or box that’s temporarily positioned on the floor between your feet. The pin is loaded while on the crate or box. The loading pin needs to be elevated so that you don’t have to squat down far to attach your belt to the loading pin.
Performance
Without a belt or weight, familiarize yourself with the exercise. Stand with the towing strap around your hands and pulled taut, elbows straight or slightly bent, heels hip-width or a little wider, and each foot flared about 30 degrees. Reposition the platforms if need be.
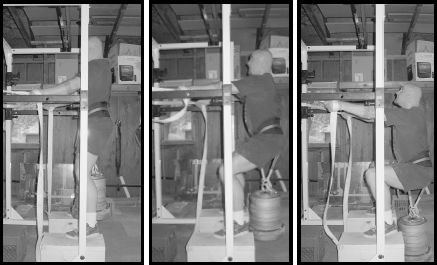
The heavy-duty set-up for the hip-belt squat. Regardless of the type of belt used, note the position of the torso with respect to the rack uprights. The torso must move down and back, not merely down.
Keep your torso vertical, head up, eyes forward, shoulders retracted, and lower back slightly hollowed. As you descend, move your torso and hips to the rear, allow but minimize forward travel of your knees, and keep your back vertical.
If the strap is too short, or the platforms are too far from the rack, you’ll lean forward as you descend. If you lean forward, your lower back will round earlier than it would otherwise, which would reduce the safe range of motion for your thighs. Keep your torso vertical. Configure the set-up accordingly.
Take about three seconds for the descent. Descend as low as is safe for your knees and back—ideally to below the point where your upper thighs are parallel with the floor. Pause for a moment, stay tight, then smoothly ascend to the starting position—push only through your heels. Pushing only through your heels minimizes the stress on your knees. Take about three seconds for each ascent. At the top of each rep, either gently straighten your knees fully, or keep them slightly bent. Pause for a second at the top, then descend into the next rep.
During each rep, don’t tug on the towing strap, or bend your elbows more than just slightly. The purpose of the strap is to help you to avoid forward lean of your torso, and minimize forward lean of your shins.
Perform several reps, then try a slightly wider stance, and different degrees of toe flare, to find what feels most comfortable for you. And experiment with the length of the strap, to find what works best.
When you’re familiar with the exercise, try it with a belt and one plate on the loading pin. Load the pin while it’s on the crate. Then grab the towing strap and stand in position on the platforms. Dip the short distance required to connect the attachment(s) from your belt to the loading pin, using a carabiner. Now, pull your shoulders back, slightly hollow your lower back, and stand. When the weight is significant, push your hands on your thighs to help you safely into the starting, upright position. Then get an assistant to move the crate away. While standing upright on the platforms, loop the strap around your hands until it’s taut, and get set for your first rep.
As you descend, the plates should move down and to the rear, as should your hips and torso.
Although there’s no compression on your back from the hip-belt squat, still keep your back slightly hollowed, for safety. Never round your back, flatten your back, or slump forward. If you can’t maintain the right positioning, you may be holding a strap that’s too short, and you may be descending too far. Adjust the length of attachment between your belt and the loading pin so that at your bottom position the resistance is about an inch above the floor, and you’re about two inches above the point at which your lower back would start to round.
Get the feedback from an assistant, who should assess you from the side view, to help you to find the right set-up configuration, and to master the performance of the exercise.
Finish each set in the standing, upright position. Then get an assistant to reposition the crate. Set the weight on the crate, release the belt, stand and then rest in order to get ready for any subsequent set.
Don’t set the resistance on the floor between reps. If, however, you get stuck on the ascent, descend further than normal, set the weight on the floor, and release the belt. For the next set, reposition the crate under the weight. Strip the loading pin before repositioning it on the crate, and reloading it. But, as much as possible, avoid failing on a rep like this, because releasing the belt is awkward when you’re in a full squat, as is getting off the platforms. Both may irritate your knees.
The orthodox breathing pattern when squatting is to take one or more deep breaths while standing, descend, and then exhale during the ascent. Alternatively, breathe freely.
Once you know your set-up configuration, be consistent. Always put the platforms the same distance from the rack and same space apart, place the belt around your hips in the same position, use the same attachments between the belt and loading pin, use the same tethering strap and fasten it to the rack at the same height, grip the strap the same distance from the rack, loop it the same number of times around your hands, and so on.
If you’ve tried the technique as described, started very light with low intensity, and built up the poundage and intensity gradually, but still experienced knee irritation, try modifications. Wait until the knee irritation has healed, then reduce the range of motion so that your upper thighs don’t descend further than where they are parallel with the floor. If that doesn’t correct the problem, adjust the technique further while still not descending beyond the parallel position. When your shins are vertical, or almost vertical, there may be excessive stress on your knees. If a little more forward lean of your shins is allowed, that may increase involvement of your hip musculature, and hamstrings, and perhaps reduce stress on your knees. Try it with a reduced poundage to see if it’s safe for you. If it is, try it with a greater range of motion, too.
Find the greatest, safe range of motion for you, and then gradually build up the poundage.
Especially for men, wear elasticated, giving briefs and shorts (or tracksuit bottoms) while performing the hip-belt squat, or otherwise the tension of the attachments against the clothing around your groin area may produce excessive discomfort.
It may require several workouts of experimentation before you find the hip-belt squat set-up and performance that works best for you. And initially you may find that your lower-back and hip musculature tires quickly once resistance is loaded. Be patient but persistent while you familiarize yourself with the exercise, and adapt to it. The hip-belt squat has the potential to be a safe, highly effective exercise, and especially valuable if you can’t safely back squat, front squat, parallel-grip deadlift, or leg press. It’s worth the time investment required to master it.
The hip-belt squat described here is based on that reported in the article “Safe and Heavy Hip-Belt Squats,” by Nathan Harvey, published in HARDGAINER issue #89. Nathan reported the methods of Ed Komoszewski. Photographs from that article have been reprinted here.