A flexible body is a requirement for the performance of correct exercise technique. If, for example, your hamstrings (rear of your thighs) are tight, that will proscribe correct squatting technique because it will lead to premature rounding of your lower back. A flexible body is also required for youthfulness, regardless of age.
Although flexibility is an important factor behind the ability to perform the major exercises correctly—for instance, the squat, and the deadlift—there are other important factors, including technique, practice, and inherited leverage factors.
Most people lack sufficient flexibility because of inactivity, or limited activity. Bodyweight and leverages also affect flexibility. A fat person, for example, may be inflexible because of the excess fat getting in the way.
While strength-training exercises can help improve flexibility where suppleness may be lacking, specific stretching is needed, too. Stretching is an important part of a complete exercise program.
Stretching elongates muscles, not tendons or ligaments. Tendons and ligaments are almost inelastic. Muscles need to be lengthened only a little to produce significant improvement in a joint’s range of motion.
After a few months of regular use of a balanced program of stretches, you may increase your flexibility substantially. Thereafter you’ll need to keep stretching in order to maintain your improved flexibility.
Introductory guidelines
Ideally, stretch immediately after you’ve done some resistance training, or immediately after a stint of aerobic exercise. Then your muscles will be warm, and many of your joints will be lubricated with synovial fluid. This will help to develop flexibility more quickly, reduce discomfort during the stretches, and decrease the chance of injury. When you stretch at another time, warm up first with five or more minutes of low-intensity work on, for example, an exercise bike, treadmill, or ski machine. Alternatively, go for a brisk walk, walk up and down a few flights of stairs, or do some easy calisthenic exercises for a few minutes. Stretch in a warm room, and keep yourself covered.
Sometimes it’s necessary to stretch before you train with weights. This would follow the general warm-up work that should open every strength-training workout. If some muscles are tight, especially on one side of your body only, stretch to remove that tightness. If you don’t get both sides equally pliable, you may promote asymmetrical exercise technique, which would increase the risk of injury. For example, assume that your right hamstring muscles are tighter than those on your left. When you squat, the less flexible right hamstrings may stop lengthening while the left ones keep lengthening. That would lead to asymmetrical exercise technique.
Especially prior to squatting and deadlifting, check for flexibility imbalances between the two sides of your body, and invest time in additional warming up and stretching to rectify imbalances. If you’re equally stiff on both sides of your body, you may not set yourself up for asymmetrical technique, but you should still invest the time to get yourself loosened up to your normal state of flexibility. During the strength-training routines in this book, specific stretching is recommended immediately prior to squatting and deadlifting.
How to stretch
Stretching is dangerous if done incorrectly. If you try to rush your progress, you’ll get hurt. Never force a stretch. Work progressively—within a given workout, and from week to week—until you reach the level of flexibility that you’ll maintain. Never bounce while stretching. And avoid holding your breath—breathe rhythmically.
Don’t move immediately into your usual level of flexibility for a given stretch. Work into that over several progressive stretches, each one taking you a little further than the previous one. You should feel only slight discomfort as you stretch.
Unless a different procedure is described for a specific stretch that follows, do the minimum of three reps of 20 to 45 seconds for each stretch. Be cautious—do more rather than fewer progressive stretches before getting to your current limit stretch.
As you hold each rep of a stretch, you should feel the muscular tension diminish. Depending on the stretch, and the individual, you may need to hold a stretch for up to 45 seconds (and perhaps even longer) before you feel this slackening. The easing of tension is the signal to relax for a few seconds, then move further into the stretch in order to make the muscle(s) feel tight again. If you don’t feel the tension diminishing even after a hold of 45 to 60 seconds, let the stretch go for a few seconds, then slowly move into the next rep.
Never force yourself to feel pain, but you must feel tension during each stretch. Never have anyone force you into a stretch. And never be in a hurry.
Some days you’ll be less flexible than on others, so don’t expect to stretch equally well every session.
Stretching is a pleasure, if done properly. Enjoy it!
Here are essential stretches for preparing your body for the resistance training promoted in this book. Perform the stretches on three non-consecutive days per week.
Some stretches are performed on the floor. Be careful how you get up from lying supine, or you may irritate your lower back. Don’t sit up with straight knees. While on your back, bend your knees and, with your knees held above your chest, briskly roll off your back into a sitting position. As an alternative, roll to one side and, using your hands for assistance, push into a sitting position.
1. Calves
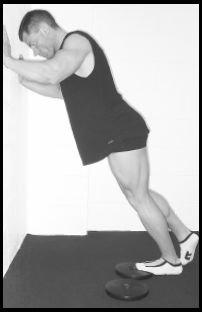
Stand near a support such as a door frame, or a wall. Place the balls of your feet on a book, board, or side-by-side weight plates about half an inch or one centimeter thick, and your heels on the floor. Stand upright, with straight knees, and feel the tension in your calves. You may feel more tension in one calf than the other. After the tension has eased, lean forward until you again feel tension in your calves. After the tension has eased, lean forward a little more, until you feel tension once again. Keep your heels on the floor throughout this stretch.

The stretch may also be done one foot at a time, as illustrated.
Develop symmetrical flexibility.
As the weeks go by, you may need to increase the thickness of the board or plates, to produce the required tension in your calves. If you feel tension behind your knees, you’re overstretching or rushing the stretch, and you should ease back.
If your calves are tight, you may not need any elevation to begin with. Work onto the elevation after a few weeks, as your calves increase in flexibility.
This stretch is for the calf muscle, not the Achilles tendon. As noted already, tendons are almost inelastic.
2. Groin muscles and thigh adductors
Sit with your torso vertical and back resting against a wall. Bend your knees while keeping your feet on the floor. Put the soles of your feet against each other at a comfortable distance from your hips, and rest their outside edges on the floor. Your legs and thighs should form a rhombus.
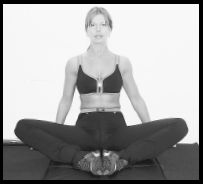
Let gravity gently pull your knees toward the floor. You may feel tension more in one thigh than the other. Hold for about a minute, straighten your knees, adopt the stretch again, and gravity will pull on a more supple lower body.
Keep your torso upright, with your back and head against the wall. Don’t round your back, lean forward, bounce, or push on your knees. Haste or incorrect technique may produce a groin injury. You shouldn’t feel tension in the area in front of your pubic bone, because that can lead to injury. If there is tension at your pubic bone, move your feet outward, and progress at a slower pace.
Develop symmetrical flexibility.
After at least a month, rest your hands on your knees for added resistance, and after no less than a further month, push downward very gently. But don’t force your knees downward.
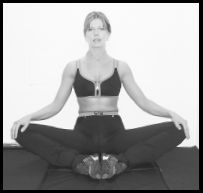
To progress in flexibility, bring your heels gradually closer to your hips. Progress will be slow, however, so be patient. But before you bring your heels closer to your pelvis, you should be able to place your outer legs flat on the floor at your current foot positioning. The trainee demonstrating this stretch should increase her flexibility at the illustrated foot positioning before moving her heels inward.
Breathe continuously as you stretch. Don’t hold your breath.
3. Hip flexors (over the front of the pelvis)
Stand next to a stable box or bench no more than a foot or 30 centimeters tall. Bend your left knee and place your left foot flat on the top surface, with the front of your right foot on the floor about 12 inches (30 cms) behind an imaginary line drawn through the heel of your left foot. Keep both feet pointing straight ahead. Gently and slowly move forward by bending more at your left knee, just enough to produce a slight stretch at the front of your right hip. Keep the heel of your right foot flat on the floor, and your right knee straight. Hold the stretch until the tension eases. Repeat on the other side, then return to the first side once more, and so on.
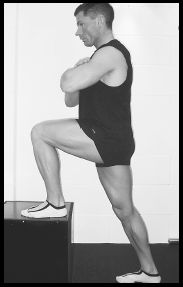
If you feel the stretch more in your calf than the front of hip, you probably have your rear foot too far back.
Develop symmetrical flexibility. Take great care, and progress slowly. This stretch will involve muscles you may never have stretched before, which may currently be tight. Don’t arch your back during the stretch, or bend forward at your waist. Your torso must be straight, and upright, for the required effect on your hip flexors.
If your feet are turned outward, that will increase the involvement of your thigh adductors. Keep both feet pointing straight ahead. If the rear foot is turned inward a little, that may help focus the stretch on the hip flexors even more.
As your suppleness increases, you’ll be able to bend more at your raised knee. Once you can comfortably bend your knee until its shin is vertical or slightly beyond vertical, increase the height of the elevation. Do this half an inch or a centimeter at a time—for example, put a weight plate on the box, or under it. Progress can also be made by gradually increasing the distance between the elevation and your rear foot, up to a maximum of about two feet or 60 centimeters.
Assisted stretch for the hip flexors
After at least a couple of months on the aforementioned hip-flexor stretch, add the following stretch:
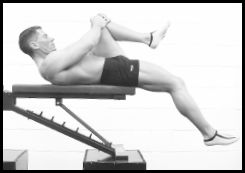
Lie on a bench with your hips approximately lined up with the edge, and both knees held toward your chest. Lift your head and shoulders off the bench, and put both hands around your left upper shin. Press your lower back onto the bench, and move your right leg and thigh forward so that they hang loosely off the bench, with your right knee bent only slightly. Let gravity pull on the limb until you feel the tension ease. Repeat for the other side. Perform three stretches for each side. Keep your lower back pressed onto the bench at all times. If your lower back comes off the bench, you risk injuring your back.
You may need to elevate the bench as your flexibility increases, so that you have a greater range of motion.
Develop symmetrical flexibility.
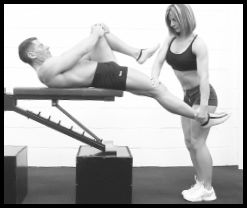
After two months of letting gravity alone pull on your hip flexors, get the help of an assistant. On an elevated bench—to make it easier for the assistant, and to provide sufficient range of motion for you—get in the same position as for the unassisted version. The assistant should hold your ankle with one hand, and your lower thigh with the other hand, and your knee should be only slightly bent. The assistant should apply just sufficient, steady pressure to your thigh so that you feel tension in your hip flexors. Wait until the tension eases, then work the other side. Perform three stretches for each side.
Your assistant must be immediately responsive to your feedback. Never force the stretch. And keep your lower back pressed onto the bench at all times.
4. Hamstrings (rear thigh)
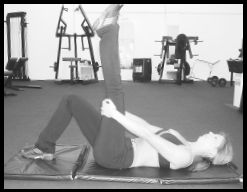
Lie on your back with both feet flat on the floor, and knees bent. Straighten your left knee, and lift that limb as far from the floor as is comfortable. Keep your right foot flat on the floor, and your right knee bent—this helps to reduce rotation of your pelvis. And keep your lower back pressed against the floor. Hold your left limb at the rear of your thigh, or knee, with both hands, and pull gently. Hold this position until the tension in your hamstrings eases, then relax, and repeat. This time you should be able to pull a little further, but still keep your knee straight. Hold this position until, again, the tension eases, then relax, and repeat once more. Stretch your right hamstrings in the same manner.
There should be no tension behind your knee—there’s no hamstring muscle behind the knee. If there is tension behind your knee, reduce the tension until it’s felt in your hamstrings.
To progress in flexibility, incrementally bring your leg nearer to your face. To help with this, gradually move your hands toward your feet.
For another form of control, use a towel, strap, or belt, and loop it stirrup-like over the arch of your foot, and gently pull on it. Keep your toes above your heel. Don’t pull on the ball of your foot, because that would cause your calf to tighten, and mar the stretch for the hamstrings. The calf muscle should be relaxed.
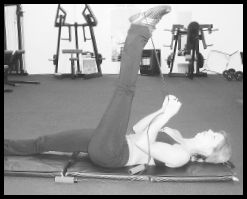
The knee nearest the floor should be bent, not straight as shown here, to reduce rotation of the pelvis. Note how the lower back and the hip bones are pressed against the floor, to prevent the lower back rounding and creating just an illusion of hamstring flexibility.
If this stretch is too difficult, start with the wall stretch. Lie on the floor with your heels against a wall, and knees bent a little. Position yourself close enough to the wall so that you feel slight tension in your hamstrings. Hold this position until the tension eases, then relax, and repeat. This time, straighten your knees to increase tension. To further increase tension, move your hips closer to the wall.
Develop symmetrical flexibility.
Symmetrical flexibility
You may find that muscles of one limb, or on one side of your torso, are less flexible than those of the opposite side. If so, perform additional reps of each relevant stretch on the less flexible side in a one-sided stretch such as Stretch 3; or place greater emphasis on the less flexible side in a two-sided stretch such as Stretch 2. Be patient, and persistent. Over time this should yield symmetrical left-right flexibility unless there are physical restrictions that require treatment—see the box on the next page.
Kneeling—caution
Avoid compression on your kneecap during any activity. Kneecap compression can produce tendinitis, and damage to the underside of the kneecap and the articular cartilage of the thigh bone. This can lead to chondromalacia. When kneeling, don’t apply pressure to the kneecap. Keep the pressure on the top part of the shinbone just beneath the kneecap, and even then, minimize the time spent in that position.
5. Buttocks
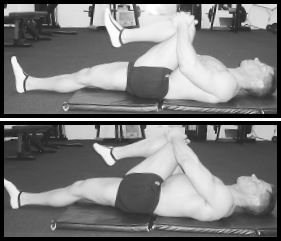
Lie on your back with your left knee bent. Put your hands over your shinbone just beneath your knee cap, or over your hamstrings just behind your knee if that’s more comfortable. Pull your knee toward your chest until you feel slight tension in your left buttock. Hold that position until the tension eases. Next, without leaning to one side, pull your bent, left knee toward your right side until, again, you feel tension in your left buttock. Hold until the tension eases. Repeat on the other side, before returning to the first side. Press your lower back firmly against the floor at all times. Perform three stretches for each side. Develop symmetrical flexibility.
Especially to begin with—and this is not illustrated—you may prefer to keep your resting knee slightly bent.
Difficulty stretching?
If you have difficulties with these stretches, and don’t progress in flexibility as the weeks go by, or don’t progress symmetrically, you may have scar tissue, adhesions, or other restrictions in your muscles. These need to be treated so that your muscles can return to their normal, supple, efficient, discomfort-free operation.
As an illustration, I struggled with the quadriceps stretch—Stretch 7—for several years, and was never able to progress at it. Then following non-invasive, soft-tissue work (Active Release Techniques®) to remove the restrictions in my thighs—including the removal of adhesions between my right vastus lateralis and right iliotibial band (thigh tissues)—the flexibility in my quadriceps increased instantly. Only then did the quadriceps stretch become effective. A few weeks after treatment I was able to sit on my ankles, which I hadn’t been able to for many years.
6. Spine extension
Lie prone with your arms and forearms outstretched. Pull your arms back so that your hands are alongside your head. Raise your head and shoulders sufficiently so that you can rest your forearms on the floor with your elbow joints roughly at right angles. Hold for about 20 seconds, then return to the floor. Relax for a few seconds, then repeat and hold a little longer.
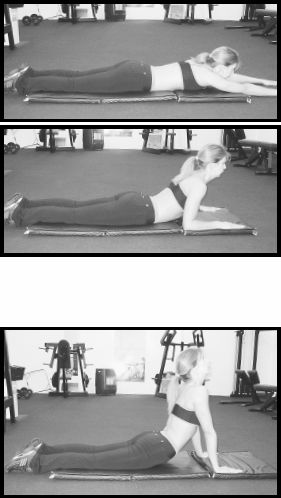
The above photograph shows an extended neck AND an extended back. For most people, a NEUTRAL neck only is the safest position during this stretch—neither then flexed nor extended.
Next, while still on your front, put your hands alongside your chest, or shoulders, depending on your flexibility. Then slowly push yourself up so that your back arches and your elbows straighten. Don’t force it. Relax your lower body so that it sags. Hold for only a few seconds to begin with, then return your torso to the floor. Do several reps. Over a few sessions, build up the duration of how long you hold the sag, the degree of sag, and the number of reps. Work into this carefully and progressively.
Spine extension can be great therapy for back discomfort. It can also help to prevent back pain. Doing this stretch daily can help maintain the natural curves of your spine, which tend to flatten with age.
7. Quadriceps (front thigh)
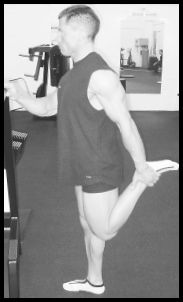
Stand with your right hand braced on a fixed object. Bend your left knee and lift your left foot behind you. With your left hand, grab your left ankle or leg, not your foot. If you hold your foot you’ll load the tendons of your toes, and mar the stretch for your quadriceps. Keep your torso vertical.
Pull on your ankle until you feel tension in your quadriceps. And push your hips forward a little during the stretch. Hold the stretch until the tension eases, then relax. Repeat on the other side, and so on.
Develop symmetrical flexibility.
If you hold your left ankle with your right hand, the stretch is applied differently. The femur would be rotated, which would take the quadriceps out of their ideal functional alignment.
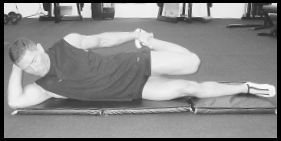
The quadriceps stretch can be done lying. Lie on your right side, with your legs, thighs, and torso in a straight line. Grab your left ankle with your left hand, and follow the same guidelines as for the standing version.
8. Shoulders and chest
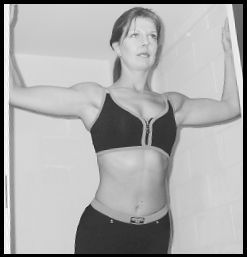
Stand upright with your toes about three inches or eight centimeters from the center of a doorway. Place your hands flat against the wall or wooden frame around the doorway. Your palms should face forward, and your arms should be parallel with the floor. The elbow joint is maintained at an angle determined by the width of the doorway and the length of your arms. This is about a right angle for a typical doorway and an average-size adult. Gently and slowly lean forward, and feel the stretch in your shoulders and pectorals. Don’t overstretch. Don’t force your shoulders forward. As your torso leans forward, your shoulders will move forward, too. Keep your heels on the floor, and don’t allow your body to sag.
To progress in flexibility as the weeks go by, step back a little from the doorway, but maintain your hand placement. Then there’ll be more tension in your shoulders when you lean forward.
Stretch #9, additional tips
For stability during this obliques and spinal musculature stretch, distribute the stress over your feet in a 50-50 split. And while you bend to the side you should take more of the stress on the inner sides of your feet than the outer.
9. Obliques (sides of your torso), and spinal musculature
Stand with your feet together, or almost together, and knees straight. With your hands resting on your hips, push your hips to your left and simultaneously lean your torso to your right. Lean to the point where you feel slight tension in your left side. Hold until the tension eases, then return to the upright position. On the return, lead with your torso and let your hips follow—don’t bring your hips back first, because that could cause irritation or injury. Repeat on the other side. Perform three stretches for each side.
All movement should be lateral. Don’t lean forward, or backward.
After a few sessions, perform the stretch with your forearms crossed on your chest. The raised hands will increase the resistance. After a few more sessions, or when you’re ready, put your hands on your head, to increase resistance further. Later on still, perform the stretch with your arms straight overhead, hands together—reach out with your hands as far as possible while you lean to the side.
A wider stance may provide greater stability, but a less effective stretch. If stability is a problem, use a hip-width stance to start with, then after a few sessions, as you improve your stability, gradually reduce the width of your stance.
This isn’t just a stretch. It will also strengthen your obliques, and some of your spinal musculature.
Develop symmetrical flexibility. But take great care—progress slowly. This stretch will involve muscles you may never have stretched before, and which may be tight currently.
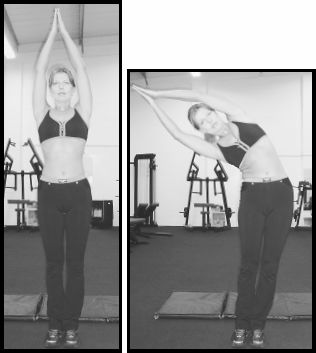
The illustrations show the advanced form of this stretch. See the text for the less demanding versions.
10. Neck, back, and obliques
Sit sideways on a chair that doesn’t have arms, as illustrated. (In a gym, you could use an adjustable bench that can be set at a high incline, to simulate a chair.) Keep your knees bent at about a right angle, and feet flat on the floor about shoulder-width apart. Rotate to your right and grab the back of the chair with both hands. This is the starting position.
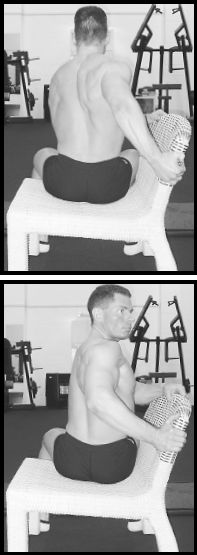
Rotate your torso and neck further to your right. Gently rotate your spine. Stay upright—don’t slouch—and keep your buttocks and thighs on the seat. Rotate to the point where you feel slight tension in your back, obliques, and neck. Hold until the tension eases, then return to the starting position. Pause for a few seconds, and repeat. Perform three stretches for each side.
Develop symmetrical flexibility.
But take great care—progress slowly. This stretch will involve muscles you may never have stretched before, and which may currently be tight.
11. General knee flexibility test, and lower-body stretch

A general test of knee flexibility is the ability to sit on your heels while kneeling on the floor with your thighs and feet together. If you can’t do this comfortably, you may not, yet, have the required flexibility or knee health to squat safely and effectively. Sit on your heels for 15 to 30 seconds, two or three times, as part of your stretching routine.
If you can’t sit on your heels, perform the stretch with two or more stacked, thick books on the floor between your heels. (Your feet would have to be spaced accordingly.) Sit on the books. As your flexibility increases, incrementally reduce the height of the stack of books. It may require a few weeks of regular stretching, or longer, before you can sit on your heels. Make progress gradually.
A good preparatory exercise for this stretch, is Stretch 7.
12. Post-workout spine stretch
After every workout (once you’re training in a gym), and especially after deadlifting and squatting, gently stretch your spine, to help keep it healthy. Hang from an overhead bar, or some other support, with a shoulder-width grip, and relax your lower body so that it gently pulls on your spine, to relieve compression from your vertebrae. Bend your knees a little, then raise them a few inches, or about ten centimeters, for a better stretch. Start with ten seconds per hang, and build up over a few weeks to 30 seconds per rep.
If you have shoulder or elbow problems, be careful, because the hanging could aggravate the problems. Don’t relax your shoulders. Keep them tight.
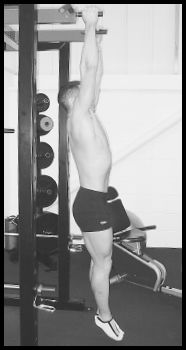
Rather than perform this stretch with straight legs, as illustrated, bend your knees a little, then raise them a few inches, for a better stretch.
If you have purpose-built inversion-therapy equipment available (not illustrated), use it as an alternative to the overhead bar. But don’t invert yourself for longer than one minute at a time, and work into that progressively over several weeks. Longer periods of inversion may irritate your spine rather than help it.
An alternative to purpose-built inversion-therapy equipment is the use of a back extension apparatus. You can use the 45-degree apparatus, or the traditional set-up.

Use of the traditional back extension apparatus for inversion therapy (left), and the 45-degree set-up (above).
Another possibility is to use bars designed for the parallel bar dip. Get in position with your elbows straight, and your shoulders tight (don’t slouch), and then relax your lower body. Done correctly, you’ll feel a gentle stretch in your spine. Start with ten seconds per stretch, and build up over a few weeks to 30 seconds per rep
As well as one of these three spine stretches, perform Stretch 6 after each workout.

Implementing the stretching routine
This routine, with three reps for each stretch, can be completed in 15 to 30 minutes, depending on how long you hold each rep.
Don’t consider the stretching as a burden on your time. It’s an investment. When done properly, it’s an injury-proofing, health-promoting, and enjoyable supplement to your training program.
Recommended reading
THE STARK REALITY OF STRETCHING (1997, The Stark Reality Corp.), fourth edition, by Dr. Steven D. Stark
More on stretching
Stretching increases the length of muscle fibers. The lengthening occurs through individual muscle fibers growing in length within a muscle because of the addition of sarcomeres—tiny contractile units. Additionally, the connective tissue in and around the muscle is expanded, including the fascia that surrounds the bundles of muscle fibers, and the wrappings of individual fibers. Fascia is a band or sheath of connective tissue, and it also supports, binds, covers, and separates muscles and groups of muscles, and organs, too.
Nerves also respond to stretching. Nerves don’t take a straight course through the tissues that surround them. When stretched, the nerves are pulled straight somewhat. Beyond that lengthening, the meandering path of the individual fibers within a nerve can also be straightened in response to a stretch. Furthermore, the enveloping connective tissue has sufficient elasticity to accommodate some additional stretch without damaging the enclosed nerve fibers.
Strength training that uses full ranges of motion can help to promote flexibility, but there are some motions that strength training doesn't typically cover. Furthermore, some strength-training exercises can’t be performed over the fullest possible ranges of motion because, under the load of progressive resistance, those exercises are dangerous for most trainees. A good stretching routine can, however, cover those ranges of motion safely.
A supple body isn’t valuable merely to help enable correct performance of strength-training exercises. Without a supple body, movements in general become restricted, there’s reduced resilience or give in the body to withstand sudden movements safely, dynamic balance is impaired, and the loose connective tissue of the body loses its lubricating properties. (Loose connective tissue fills the spaces between muscle, nervous, and epithelial tissue, and between bone and cartilage, tendons and ligaments, and joints and joint capsules.) Therefore, without a supple body, muscles lose some of their elasticity and ability to function smoothly, and tendons, ligaments, and joint capsules become brittle. Tissues in general become more susceptible to injury, and the body ages at an accelerated rate.
Should there ever be excessive flexibility, which is extraordinary, ease back on stretching. The muscles will get shorter, and the connective tissues will soon follow suit.
Hatha yoga
After a few weeks of following this stretching routine, consider expanding it. Then, hatha yoga postures are recommended. But if done incorrectly, these postures will produce injury. Employ warm-ups followed by a sequence of main postures intermingled with rest postures and compensation (or counter) postures, selected by an expert teacher. And make progress slowly.
Hatha yoga is one of the eight branches of yoga—the best known branch in the West. Hatha yoga is an ancient system of exercise that’s revered by millions of people. The practice of hatha yoga develops flexibility, and promotes many other health benefits. Physical postures comprise the main part of hatha yoga.
Hatha yoga doesn’t require freak-show flexibility, and doesn’t have to have anything to do with chanting, gurus, or religion. You don’t need to learn any strange jargon, Sanskrit names, or New Age philosophy. And hatha yoga is for women and men. Some top athletes in professional sports have discovered the benefits of hatha yoga.
For an introduction to hatha yoga, and to find out about how some star athletes use it as part of their program for peak performance, see John Capouya’s book. See the other book for a deeper introduction to yoga.
REAL MEN DO YOGA (2003, Health Communications), by John Capouya YOGA FOR DUMMIES (1999, Wiley), by Georg Feuerstein, and Larry Payne