CHAPTER SEVEN
Advanced Extraction Techniques
PERCOLATION EXTRACTS, FLUID EXTRACTS, AND SOXHLET EXTRACTS
The techniques described in Chapter Six produce reasonably good herbal extracts. In this chapter we’ll cover making more potent extracts, including percolation extracts, fluid extracts, and Soxhlet extracts. All of these techniques require more equipment and setup than macerations and teas, but they are not so technical that you can’t do them at home.
PERCOLATION EXTRACTS
Percolation is the process of passing a solvent (such as alcohol) through plant material. As the solvent drips through coarsely powdered plant material, active constituents of the herb are extracted while inert components of the plant are left behind. Drip coffeemakers are a great example of a percolation extraction. The coffeemaker slowly drips hot water (the solvent) through coffee grounds to produce coffee. Making herbal percolation extracts is a very similar process, usually using a combination of water and alcohol as a solvent.
Percolation extracts became popular in the mid-nineteenth century, and directions for making them can be found in older pharmaceutical texts. Herbalists favor percolation extracts over regular tinctures for a number of reasons:
▪ Experience suggests that for many herbs percolation results in a more complete and potent extract.
▪ Percolation extracts are usually ready in 2 days. Macerations take a minimum of 2 weeks.
▪ Percolations don’t require pressing or straining to extract the liquid.
▪ Percolations allow greater flexibility in deciding the strength of the extract. If you make a 1:3 percolation and decide that you want more tincture, you can pour fresh menstruum through the herb and turn it into a 1:4 or 1:5 extract.
There are some drawbacks to making percolation extracts. You can’t use this technique to extract gums, resins, or herbs that contain a lot of mucilage; nor can you percolate fresh plant material. Making a percolation extract requires more hands-on time than a regular maceration or tincture.
It is difficult to describe the process of percolation in words. In addition to the instructions below, you can watch a video demonstration at our website, modernherbalmedicine.com.
EQUIPMENT NEEDED
To make a percolation extract you will need the following equipment:
Percolation cone. Search for “percolation cone” online to find retailers who sell them, or you can make your own. To make a percolation cone, use a glass cutter to cut off the bottom of a thick glass water bottle such as Perrier or San Pelligrino. Keep the screw-top lid so you can control the drip rate of the percolation. You can also use a wine bottle with a silicon stopper and a brass needle valve to control drip rate (instead of the bottle cap).
Wide-mouth, half-gallon mason jar. This jar is used to hold the percolation cone and to collect the finished extract.
Packing rod. You will need a long instrument with a broad end to tamp down the powdered herbs inside the percolation cone. Wooden dowels (muddlers) and large granite pestles work well.
Filter. Use an unbleached coffee filter or cotton balls. These are used on the bottom of the percolation cone to hold the powder inside the cone, and coffee filters are also placed on top of the powdered herbs. Don’t use funnel-style coffee filters, which are glued together at the bottom. If you do, the alcohol will dissolve some of the glue and you’ll wind up with glue in your extract. Cotton balls can be inserted into the neck of the bottle and are the easiest filters to use.
Weight. A small weight is needed to hold down the top filter. Marbles work very well for this purpose. Early texts called for washed sand, but we don’t recommend that. Whatever you use for a weight needs to be clean and nonporous.
Lid. You will need a lid to cover the top of the percolation cone to prevent evaporation and contamination. A wide-mouth mason jar lid will fit most glass bottles, or you can use a plastic bag secured with rubber bands.
Once you have all of these items, assemble the percolation cone as shown. Now it’s time to percolate.

PREPARING THE PLANT MATERIAL
You will need coarsely ground (powdered) dried herb for your percolation. A uniform powder allows the solvent to flow through evenly. If you grind the plant material yourself, pass it through a sieve with at least 30 holes per inch (#30 sieve) to get an even powder.
In any tincture or extract using dried herbs, some of the solvent will remain in the plant material when you are finished. If you put 1,000 milliliters of solvent into a percolation cone without premoistening, less than 900 milliliters will come out. This throws the weight-to-volume ratio off considerably. Before starting the percolation, you need to moisten the powdered herb with a small amount of menstruum.
There are two ways to calculate the amount of solvent needed to moisten the plant material. The first method is to weigh the plant material and add 75% of that weight in solvent. For example, 100 grams of plant material requires 75 milliliters of solvent to moisten it, and 100 ounces of plant material requires 75 fluid ounces of solvent.

The second calculation method is more accurate. Pack the powdered plant material into a liquid measuring container to determine its volume, adding a little bit of the herb at a time and tamping it down to ensure it is evenly packed. For instance, 100 grams (or ounces) by weight of plant material might take up 120 milliliters (or fluid ounces) of volume. Add the amount of solvent the herb displaces by volume: In this example, add 120 milliliters or 120 fluid ounces of solvent.
Mix all of the menstruum at once. This includes the desired final volume of the tincture plus the amount you calculated to moisten the herb. If you are preparing a 1:5 percolation with 100 ounces of herb, and the herb takes up 120 ounces by volume, you need 500 ounce s plus 120 ounces of total menstruum.
Slowly add menstruum to the plant material to moisten it. When the powder is properly moistened, it should be damp enough that it sticks together when you pinch it between your fingers, like wet sand. You can always add more liquid, but if you add too much you’ll have to add more powdered herbs, which will really throw off your calculations. You may end up with menstruum left over from the amount that you calculated; add this to the rest of the menstruum. If you calculated 120 ounces to moisten the herb and only used 100 ounces, add the remaining 20 ounces to the 500 ounces of menstruum that you are using for the percolation. Once the powdered herb is properly moistened, set it aside in an airtight container for 1–12 hours.
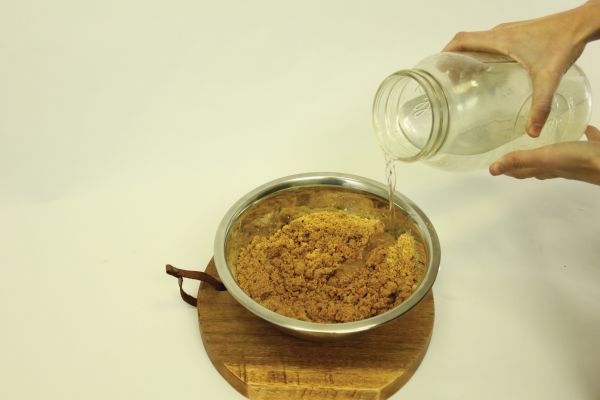
PACKING THE PERCOLATION CONE
Once the powdered herb has had time to properly absorb the menstruum, it’s time to prepare the percolation cone.
Learning to pack a percolation cone requires practice. Use the cheapest herbs you can find for your first few tries. Licorice root is a good herb to practice with; not only is it inexpensive, but it packs well, and it’s always nice to have on hand.
Step one: Put a filter at the bottom of the percolation cone. Many people use a coffee filter cut to size. Putting two organic cotton balls in the neck of the bottle works just as well and it’s a lot easier. After you put the cotton balls in, put your cap on loosely or put your stopper in, leaving your valve open.


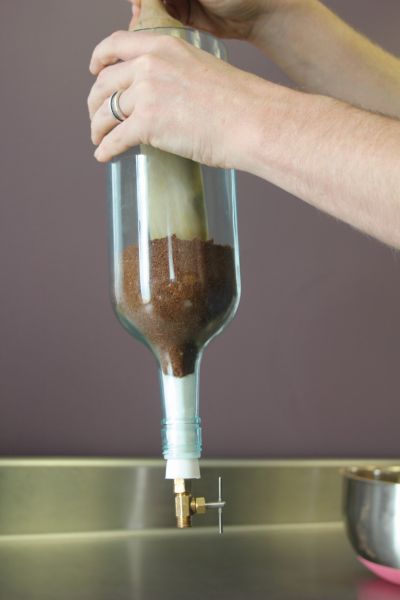
Step two: Fill the cone with the moistened herb powder. Divide the premoistened plant material into three equal parts. Put the first third of the powder in the cone and tamp it down evenly with the packing rod. Add the second third of the plant material and pack it down, and then add the remaining powder and tamp it down too. This is another skill that you will get better at with practice and experience. Don’t pack the plant material too tight or too loose: too tight and the menstruum won’t be able to get through; too loose and the menstruum won’t flow evenly through the powder.
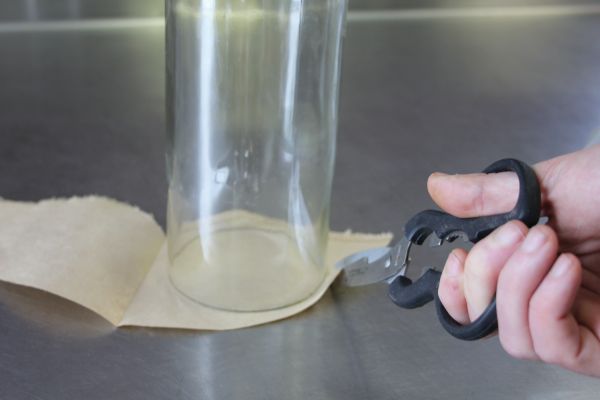
Step three: Cut a coffee filter so that it is slightly larger than the opening to the percolation cone. Set the coffee filter on top of the herb powder to prevent the packed plant material from being disturbed as you pour your menstruum on it. Put the washed weight on top of the filter to hold it in place.
Step four: Set the percolation cone in the mason jar or in the stand, and add the menstruum to the cone. Cover the top of the percolation cone with a lid. Allow the menstruum to seep through the plant material and cotton balls so that it drips a few times. Then tighten your cap or close your valve. Letting the menstruum flow all the way through forces out air, and prevents an air bubble from burping up through your packed herb powders. Let this sit (macerate/digest) for 24 hours.
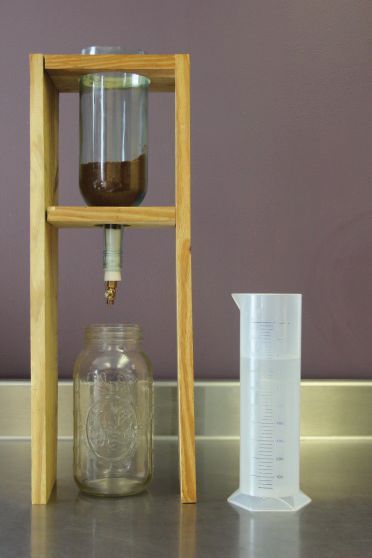

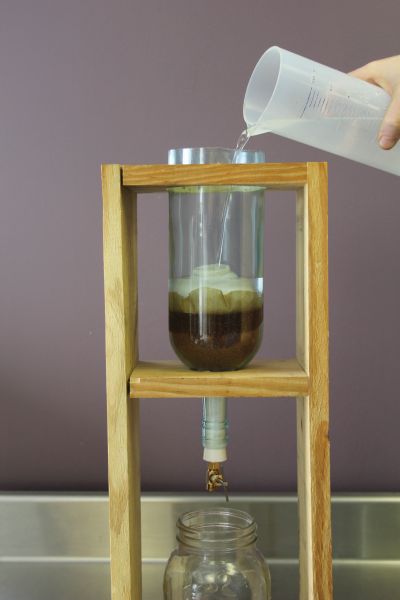
Step five: After 24 hours, slightly loosen the cap of the percolation cone to allow a slow, steady drip of menstruum. About 1 drip every 3–5 seconds is ideal. Let the menstruum percolate through the marc until the menstruum stops flowing out of the percolation cone.
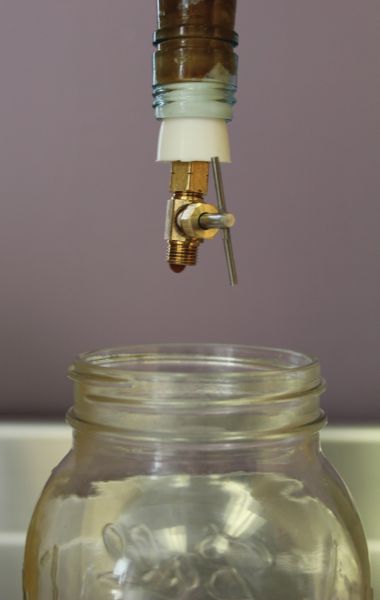

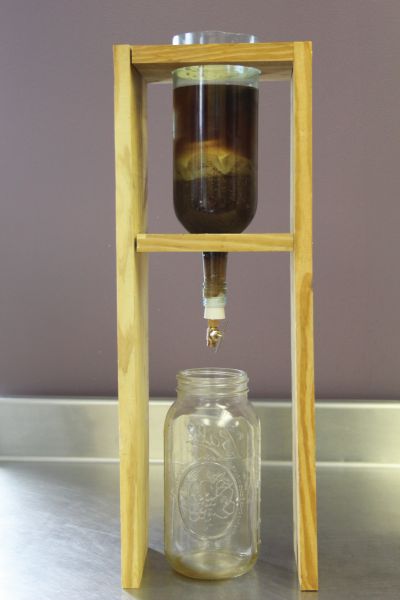
Step six: Let the extracted liquid sit for 24 hours to allow precipitates to settle to the bottom. Decant the liquid, leaving the precipitates behind, and bottle the finished tincture.
RE-PERCOLATION AND DUAL PERCOLATIONS
Some of the old pharmacy texts recommend running the finished tincture back through the plant material a second time. This dual extract throws the weight-to-volume ratio off slightly and there isn’t a good formula to account for the difference. Dual extraction seems to increase the potency of the extract for many herbs, but doesn’t make a difference with others. Experiment and decide for yourself if these extra steps are worth it.
Step seven: Once all of the menstruum has run through the percolation cone, set the extracted liquid aside in a covered container and put the percolation cone into a fresh mason jar. Remove the cap at the bottom of the cone and slowly pour boiled water through the cone. When the liquid dripping out of the cone is clear and tasteless, remove the cone and set it aside.
Step eight: Put the water extract that percolated through the cone into a stainless steel or enamel pot. Simmer over low heat until the liquid is reduced by 90% of its original volume (1,000 milliliters of water extract would be reduced to 100 milliliters, or 100 fluid ounces to 10 fluid ounces).
Step nine: Add the concentrated water extract back to the original percolation extract and mix them together. Let the mixture sit for 24 hours, then decant the liquid, leaving the precipitates behind. Bottle the finished tincture.
FLUID EXTRACTS
Fluid extracts are tinctures that are concentrated to a ratio of 1:1. They are made by percolation, with some added steps.
To make a fluid extract, use the standard 1:5 weight-to-volume ratio but increase the volume of alcohol by 20%. If the herb is normally extracted using 50% alcohol, this means increasing the percentage of alcohol to 70%. The added alcohol makes up for the water that will be added later during the process.
Set up the percolation and allow the equivalent of 75% of the weight of the herb to percolate through. If you used 100 grams of herb, you would allow 75 milliliters to percolate through; if you used 10 ounces of herb, that would be 7.5 fluid ounces. Set this liquid aside.
Continue percolating the remaining menstruum, then loosen the cap on the percolation cone and flush the marc with boiling hot water. Transfer the remaining percolated menstruum and the water to a shallow pan and evaporate in a food dehydrator or in an oven on low heat until the liquid is reduced to 25% of the volume of herb. Using the above examples, that’s 25 milliliters or 2.5 fluid ounces. Combine this 25% reduction with the 75% percolated menstruum that you set aside earlier. You now have a 1:1 fluid extract.
FLUID EXTRACTS STEP-BY-STEP
Here’s a step-by-step guide to making a 1:1 fluid extract of calendula.
Step one: Calendula is normally tinctured using 70% alcohol. Add 20 to 70% to get 90%. Prepare a menstruum that is 90% alcohol and 10% water.
Step two: Calculate the amount of menstruum based on a 1:5 ratio. For example, 5 ounces of calendula would need 25 fluid ounces of menstruum. (The final product will yield 5 fluid ounces of a 1:1 fluid extract of calendula.)
Step three: Calculate 75% (by volume) of the weight of the herb. For instance, 75% of 5 fluid ounces is 3.75 ounces. Measure out 3.75 ounces of water and pour it into the jar you will be using to catch the percolated menstruum. Use a permanent marker to mark the water level on the outside of the jar, then empty the water from the jar. (We’ll call the marked jar Container A.)
Step four: Set up the percolation cone and start the percolation process, using Container A to catch the percolated liquid. When the liquid in Container A reaches the line that you marked in step three, tighten the cap on the percolation cone to stop the flow. Transfer the 3.75 ounces of liquid into another container (Container B) and set aside.
Step five: Return Container A to its place under the percolation cone and continue the percolation. When the menstruum has finished dripping through, loosen the cap on the cone. Flush water-soluble constituents out of the marc by pouring boiling hot water through the percolation cone until the water runs clear.
Step six: Calculate 25% of the desired final volume of the fluid extract. In our example, 25% of 5 ounces is 1.25 ounces. Follow the instructions in step three to mark this volume on a shallow container (Container C).
Step seven: Transfer the liquid from Container A to Container C. Put Container C in a food dehydrator or an oven set on the lowest temperature. Check the liquid frequently until it has evaporated to the mark you made, leaving you with 1.25 fluid ounces of extract.
Step eight: Combine the liquids from Container B (3.75 fluid ounces) and Container C (1.25 fluid ounces). You now have 5 fluid ounces of an extract made from 5 ounces of calendula, which means you have a 1:1 extract. Congratulations! You have made a fluid extract.
Only a few herbs respond well to concentration without changing the relative ratio of constituents, and most herbs are not given in such a big dose that concentration is necessary. Some herbs that do work well as fluid extracts include Corydalis yanhusuo, calendula, turmeric, Echinacea angustifolia root, eleuthero, licorice, black walnut, passionflower, Jamaican dogwood, willow bark, prickly ash, kava kava, dandelion, and barberry.
SOXHLET EXTRACTION
The Soxhlet extractor is a piece of lab equipment that was developed in 1879 to facilitate the continual extraction of plant material and create very concentrated extracts. In a Soxhlet extractor, the menstruum is boiled, evaporated, and allowed to condense. As it condenses, it drips through the plant material to extract constituents. This extract returns to the heated container, where it is boiled, evaporated, and condensed again to drip through the plant material and extract more constituents.

A Soxhlet extractor with a 500 milliliter boiling flask will hold about 100 grams of plant material. One run through the extractor will produce a standard 1:5 tincture. If you replace the exhausted marc with 100 grams of fresh plant material and extract that using the original menstruum, you get a 1:2.5 extract. Repeat the process a third time to get a 1:1.25 extract.
It takes a day or two for a Soxhlet extractor to make such a concentrated extract, but once you’ve set it up it requires only occasional monitoring.
MATERIALS FOR MAKING SOXHLET EXTRACTS
A high-quality, American-made Soxhlet extractor can set you back $500. You can sometimes find cheaper, Chinese-made Soxhlet extractors on eBay for less than $100. Cheaper glassware means thinner glass, which means you’ll have to be more careful when handling it. With the less-expensive glassware, you can set up a complete Soxhlet extractor for around $200. You should be able to find all of the components on the internet. Here’s what you’ll need.
▪ A lab stand to hold the Soxhlet extractor, with a heavy base for stability. Look for a cast iron support ring stand.
▪ Lab clamps to secure the Soxhlet extractor to the lab stand. Get the kind with three prongs.
▪ A submersible recirculating pump is used to pump ice water into the condenser at the top of the Soxhlet extractor. A submersible pump like a fish tank pump that can pump 3.8 liters is sufficient.
▪ A DC power supply to run the pump (unless you get a 110-volt pump).
▪ Plastic tubing to connect the pump to the condenser on the Soxhlet extractor. You can get tubing from any hardware store. Make sure to get hose clamps as well.

▪ An insul ated container to fill with ice water and connect to the tubing.
▪ A heat source to put under the Soxhlet extractor to boil the menstruum. The safest (and most expensive) option is a heating mantle with a magnetic stirrer. Prices start at $200. A $20 fondue cooker filled with vegetable oil will hold the temperature within a few degrees of where you want it.

▪ Boiling stones ensure an even boil of the menstruum. They go in the boiling flask that holds the menstruum. Look for stones that are 4–6 millimeters in diameter.

▪ A digital or laser thermometer to monitor the temperature of the oil bath in the fondue cooker.
SOXHLET EXTRACTION STEP-BY-STEP
Step one: Prepare the heat source. If you are using a fondue cooker, fill it with vegetable oil. (Oil doesn’t evaporate, so it requires less watching than a water bath.) The oil can be reused to make multiple batches of extracts. It will start to smell rancid after a few uses, but you can add 1 drop rosemary essential oil to mask the smell.
Step two: Moisten the plant material using the same method described for percolations earlier in this chapter. Allow the moistened powder to sit for at least 4 hours before beginning the extraction.
Step three: The plant material goes in the middle section of the Soxhlet extractor. Put a filter at the bottom of this middle piece. Try different types of filters: Some options include lab filter paper, organic unbleached cotton balls, and organic unbleached facial cleansing pads.

Step four: Spoon the moistened plant material on top of the filter in the middle piece of the Soxhlet extractor. Clamp the middle piece of the Soxhlet extractor to the lab stand.

Step five: Fill the flat-bottomed boiling flask 80% full with the menstruum. This can be straight alcohol or a mixture of alcohol and water. Add a teaspoon of boiling stones to the flask.

Step six: Grease all of the joints on the Soxhlet extractor with a thin layer of shea butter, cocoa butter, or a natural oil. Lubricate both of the pieces that are joined together to prevent the pieces of glass from getting irreversibly stuck together.

Step seven: Slide the boiling flask into place below the Soxhlet extractor, and fit the joints together. Lower the Soxhlet extractor into the oil bath or heating mantle. Attach the condenser to the top of the extraction chamber. (Make sure the joints are greased!)


Step eight: Connect the plastic tubing to the condenser. The input line attaches at the bottom of the condenser, and the output line attaches at the top. Use hose clamps to secure the tubing connections.
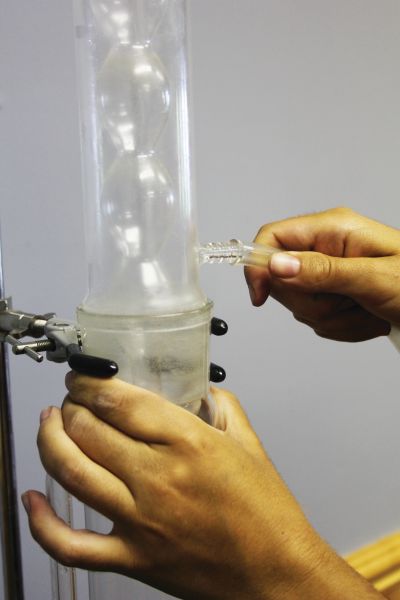
Step nine: Put the loose end of the output line from the condenser in an insulated container filled with ice water. Run a line from the insulated container to the input line of the water pump. Connect the input line from the condenser to the output line of the pump. Turn the pump on to start circulating ice water through the condenser.

Step ten: Turn the heat source on. If you are extracting alcohol-soluble constituents, set the temperature at 195°. To extract both alcohol- and water-soluble constituents, set the temperature at 220°. Check the temperature occasionally while the Soxhlet extractor is running, adjusting as needed to keep it within 5° on either side of the optimal temperature.
Step eleven: Check the ice water bath every few hours, adding ice packs as needed to keep the temperature below 45°.
Step twelve: Once the menstruum runs clear through the reflux tube, turn the heat source off and let everything cool down. Disassemble the Soxhlet extractor and replace the exhausted plant material with fresh material. Set the exhausted marc aside in a separate container and keep it covered in the refrigerator until the extraction is complete.
Step thirteen: Put the Soxhlet back together and start the oil bath again. Repeat the process. You can do this as many times as you need to until you reach the desired concentration.
Step fourteen: To extract water-soluble constituents, put all of the exhausted marc into a pot and decoct it. Strain the decoction and then simmer it to concentrate it down to about 2 ounces. Add this back to the alcohol extract to produce the finished Soxhlet extract.
Soxhlet extraction in some cases doesn’t produce better tinctures than percolation or maceration. It seems to work best when a plant has difficult-to-extract alcohol-soluble compounds and lipids. Calamus, angelica, lemon balm, spearmint, and blue vervain all make exceptional Soxhlet extracts.
Making percolation extracts, fluid extracts, and Soxhlet extracts is more complicated than making a standard alcohol tincture, but these techniques produce more potent extracts, so you get more value from the same amount of plant material and you can use smaller doses. Don’t be afraid to experiment.