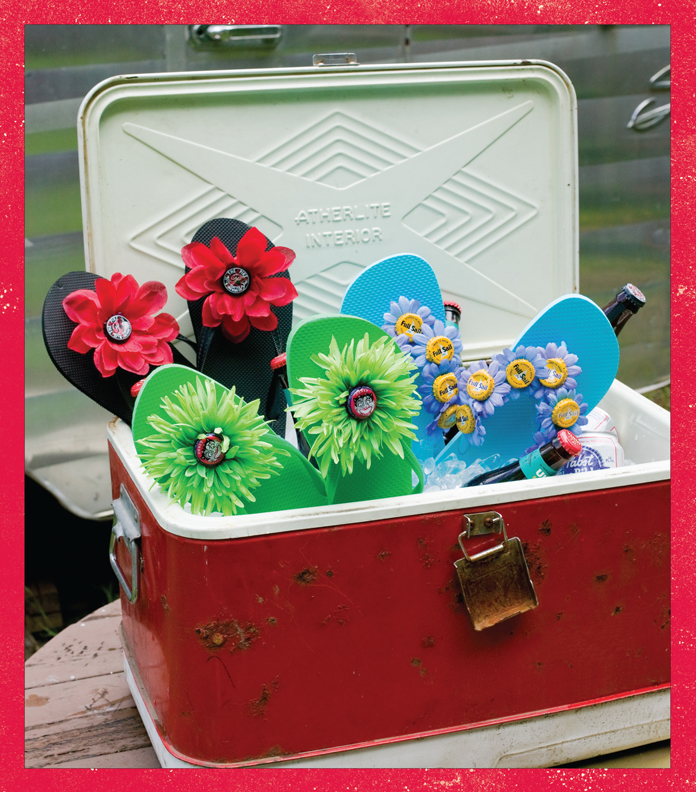

When summer time rolls around, there is nothing I like more that cracking a cold one by the pool and giving my little piggies some fresh air. My flip-flops see a lot of wear, and rather than pitch them out when they get to looking shabby, I like to give them a face-lift. Fake fabric flowers from the thrift store and a bottle cap center are the perfect upcycle to refresh my waterside wardrobe. Steer clear of the plastic flowers, they don’t take to the hot glue well, becoming melty and distorted.
SUPPLIES

HOT GLUE GUN
2 BOTTLE CAPS
2 FAKE FLOWERS made of fabric
1 PAIR FLIP-FLOPS
SCISSORS
1 SMALL SHEET OF FELT

1 Fill the caps with hot glue and let cool.
2 Your flowers will probably have some type of plastic base to them, and a plastic center part holding the flower together. Remove the flowers from the stems and take them completely apart.
3Cut a small circle of felt about the size of a half-dollar. You don’t need to be too precise on this because the felt will be hidden under your flower.
4Position the felt on the inside of your flip-flop, where you’d like your flower cap arrangement. Hot glue into place.
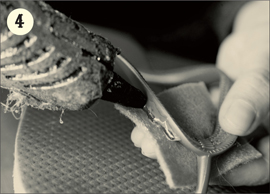
5Glue your flower to the top of the shoe, onto the felt. With your flower disassembled, you may need to glue each petal layer in place individually.
6Glue the bottle cap to the center of the flower.
7Open a fresh beer and admire your hard work.


An awesome craft for hot summer evenings, empty cans are filled with water and frozen overnight. The ice inside the can keeps it from denting when you punch in your design, using a thumbtack or small nail. When all the work is done, let the ice melt out and drop a candle inside to illuminate your awesomeness. You can either use the template provided or trace your own illustration onto your can to make a glowing masterpiece.
SUPPLIES
1 BEER CAN
CAN OPENER
PAPER HOLE PUNCH
1 SMALL TOWEL
1 THUMBTACK OR SMALL NAIL
18-INCH LENGTH OF WIRE, for hanging the lantern
PLIERS
TEA LIGHT OR VOTIVE CANDLE
1Open a beer and empty the can.
2With the can opener on the inside of the lid, then remove the top of the can.
3Use the hole punch to make two holes on opposite sides of the can for attaching the hanging wire.
4Fill the can three-quarters of the way full with water. Don’t fill it to the top, or your can will explode.
5Place the can in the freezer for several hours, until frozen solid.
6Lay the can on its side on top of a towel. Following the illustration provided, or your own design, make holes with a thumbtack or small nail, following the punch marks. You can tape the illustration to the can to make it easier.
7Let the ice melt, then dry the can.
8Thread one end of the wire through one of the two holes you punched in the top of the can. Use the pliers to twist and secure the end. Thread the other end of the wire through the other hanging hole and use the pliers to twist and secure the end.
9Drop the tea light or votive candle inside. If some of your holes aren’t large enough, blow out the candle and insert a slightly larger nail into the holes.


More practical than bell-bottom jeans, and more high tech than an eight-track player, beer cans are a sweet blast from our past making a big comeback—and they’re better than ever.
Unlike bottles, cans keep all the light out and seal in the oxygen, giving beer that creamy, straight-from-a-keg taste, and new polymer coatings on the inside of many cans act as a barrier from the aluminum, so there are no metal flavors either. For many breweries, especially small start-up companies, cans are the most economical choice for getting new premium beers into stores. Mobile canning companies even come to them on packaging day so they don’t have to set up their own expensive production lines or ship the beer out.
How does this translate to the savvy beer crafter? Not only do you get a huge variety of new beers to sample in cans, from watermelon wheats to full-bodied Imperial stouts, but you also get bold packaging designs and an abundant supply of colorful aluminum to choose from.
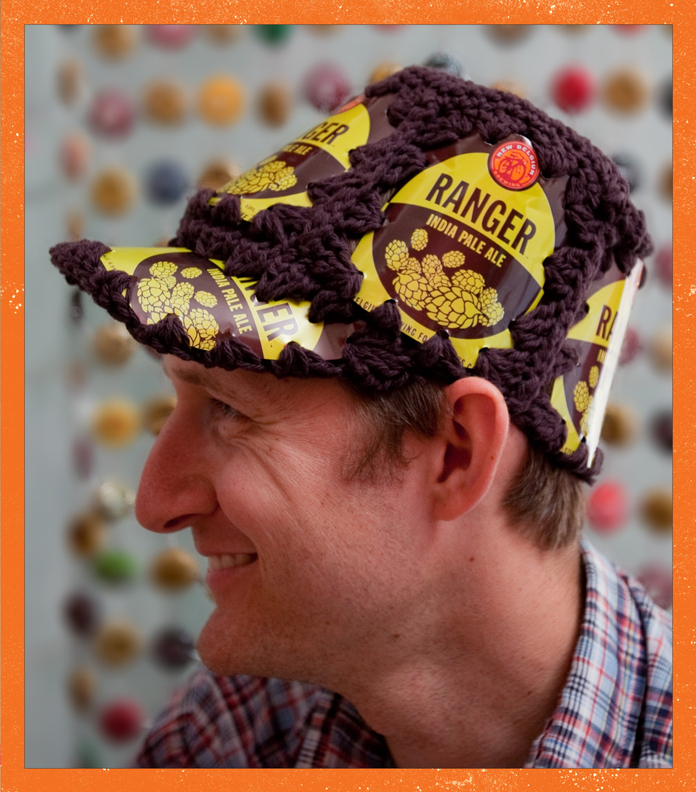
Taking its cue from the beer can revolution, this crocheted baseball hat is updated, too. It uses cotton yarn and an aluminum visor, and it’s completed with a row of crochet under the brim for support and style points, keeping the sun out of your eyes, and you cool inside, just like that brewski in your hand.
SUPPLIES
SCISSORS
6 BEER CANS
PAPER HOLE PUNCH
SIZE H (5 MM) CROCHET HOOK
5 OZ / 142 G / 236 YD / 212 M WORSTED-WEIGHT LION BRAND COTTON YARN IN 152 ESPRESSO
PHOTOCOPIER
FELT-TIP MARKER
1First, use the scissors to deconstruct your beer cans by removing their top and bottom, then cutting five aluminum panels, 31/2 x 31/2 inches wide each, and one panel that is 71/2 inches wide to make the brim. Use scissors to trim the corners to round the edges.
2With the hole punch, punch out four equidistant holes on the top and bottom of one panel and five on each side. (See here.) Repeat with the four similar panels.
3Using the crochet hook and the yarn, sl st into the hole in the top right corner of a can, ch 3 (counts as 1 dc), dc 2 into the same hole, dc 3 into the next two holes, dc 5 into the left corner of the can. Repeat around the can, working 3 dc in the holes along each straight edge and 5 dc in the corners until you have worked the last 3 dcs and arrive back at the start. Work 2 more dc into the starting corner, sl st into second ch of the ch 3, and tie off.
4Repeat this beer can granny stitch on the four other panels.
5To make the main body of the hat: Place two panel pieces together with the wrong sides facing. Insert your crochet hook into the side sts and sc the seams together all the way across. Tie off.
6Repeat the seam stitching for all the remaining panels, until the hat is joined all the way around.
7To make the top of the hat: Ch 4. Sl st into the first chain to form a loop.
8Rnd 1: Ch 3 (counts as first dc here and throughout). Work 9 dc into the ch-4 loop (10 dc total). Sl st into the first dc (third ch of ch 3).
9 Rnd 2: Ch 3, dc into the same st. Work 2 dc into the next st and each st around. Sl st into the first dc.
10Rnd 3: Ch 3, dc into the same st and into the next st. *Work 2 dc into the next st. Dc into the next st. Repeat from * around. Sl st into the first dc.
11Rnd 4: Ch 3, dc into the same st, dc into each of the next 2 sts. *Work 2 dc into the next st, dc into each of the next 2 sts. Repeat from * around. Sl st into the first dc.
12Rnd 5: Ch3, dc into the same st, dc into each of the next 3 sts. *Work 2 dc into the next st, dc into each of the next 3 sts. Repeat from * around. Sl st into the first dc.
13Rnd 6: Ch3, 2 dc into the same st, dc into the next 4 sts. *Work 2 dc into the next st, dc into the next 4 sts. Repeat from * around. Sl st into the last dc. Tie off.
You should have 60 stitches around the top of the hat and 60 stitches around the crown. If your count is off, you may add an adjustment row of single crochet stitches. Make adjustments by skipping stitches if you are over, or adding stitches if you are under, making sure to spread out the changes along the round so they will be less noticeable. Continue with the pattern as written.
14Place the hat top along the top edge of the main body, matching up the stitches. Insert your hook into the edge stitches of both pieces and sc the seams together all the way around. Sl st into the starting st and tie off.
15To make the brim: Copy the brim pattern. Cut out the pattern and use the marker to trace it onto the flattened beer can brim panel. Use the hole punch to add holes as shown in the illustration.
16Crochet as for the other panels, with 5 dc into the corners and 3 dc into all other holes.
17With right sides facing, line up the brim where you want it. Rather than joining the brim at the bottom edge, you may want instead to attach it higher into the hat body, into the lower granny stitches. This will help your brim face forward, baseball cap style, rather than point straight down. Sl st into the corner st of the brim and join to the hat edge using sc stitches all the way across. Tie off.

Download a PDF of template HERE.

Download a PDF of template HERE.
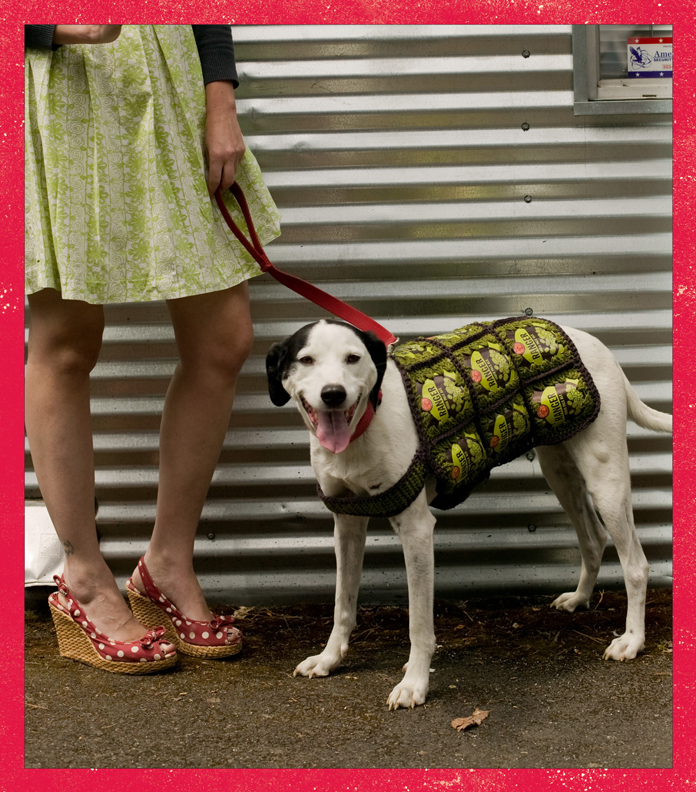

When they talk about man’s best friend (ahem, and women’s, too) most folks are referring to their pooch, and I suppose I am, too, though a cold six-pack runs a close second. The winning answer would be a dog who can fetch my beer. My dog is loyal but not that smart, and she’s got pretty short hair that leaves her shivering in our cold, rainy winters. To keep her cozy, I crocheted her this stunning jacket that matches my fetching Baseball Cap. She might not bring me my beer, but at least she’ll look good wearing it.
Sierra is a medium-size dog weighing in around thirty pounds and standing twenty-one inches at the shoulders, with a twenty-seven-inch waist. Depending on the size of your canine pal, you may want to adjust the pattern.
SUPPLIES
SCISSORS
15 BEER CANS
PAPER HOLE PUNCH
SIZE H (5 MM) CROCHET HOOK
5 OZ / 142 G / 236 YD / 212 M WORSTED-WEIGHT LION BRAND COTTON YARN IN 134 AVOCADO (A)
5 OZ / 142 G / 236 YD / 212 M WORSTED-WEIGHT LION BRAND COTTON YARN IN 152 ESPRESSO (B)
SAFETY PINS
FELT-TIP MARKER
2 BOTTLE CAPS
HOT GLUE GUN
2 SHANK BUTTONS (the kinds with a loop in the back for sewing on)
SMALL NAIL (optional)
NEEDLE AND HEAVY THREAD

1First, use the scissors to deconstruct the beer cans as described here. You’ll need fifteen panels, each 31/2 x 3 inches wide. Throw your dog a bone while you’re at it, as this might take a while.
2Use the scissors to trim the can corners slightly to give them a round edge.
3With the hole punch, punch out four equidistant holes on the top and bottom of each panel and five holes on each side.
4Using the crochet hook and yarn A, sl st into the hole in the top right corner of a can, ch 3 (counts as 1 dc), dc 2 into the same hole, dc 3 into the next two holes, dc 5 into the left corner of the can. Repeat around the can, working 3 dc in the holes along each straight edge and 5 dc in the corners, until you have worked the last 3 dcs and arrive back at the start. Work 2 more dc into the starting corner, sl st into the second ch of the ch 3, and tie off.
5Repeat this beer can granny stitch on the other fourteen can panels.
6To join the panels: Place two panel pieces together with the wrong sides facing. Using yarn B, insert your hook into the top left corner and sl st, then sc all the way across. Tie off. Repeat with three more panels to make the first row.
7Make a second and third row of panels as described in step 6.
8Attach all three rows together at the top and bottom of the panel, using sc stitch.
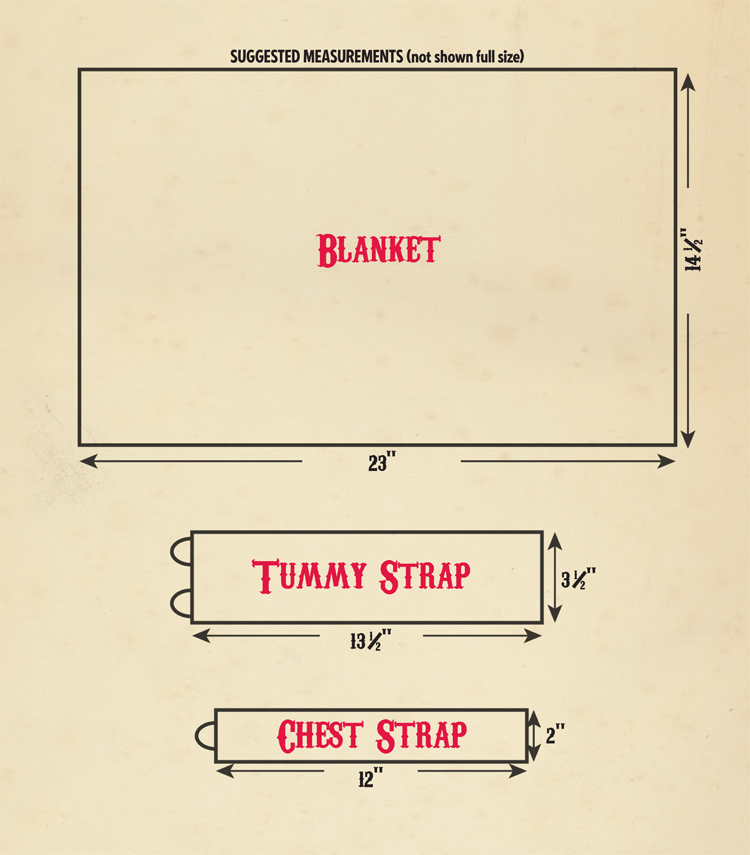
9You should now have a 141/2 x 23-inch blanket of squares.
10With yarn B, sl st in any hole on the outside of the jacket and ch 3, then dc into next hole and the rest of the holes all the way around until you return to beginning. Sl st into the ch 3 and tie off.
11Make the tummy strap: Ch 12 using yarn A.
12Rnd 2: Sc into the second stitch from hook and next 10 sts to the end of the row. As you are turning, remember to add a single chain stitch at the end of each row or the beginning of each new row.
13Continue until the strap is the desired length for your dog. My pattern measures 131/2 inches.
14 Using yarn B, sc around the top (long edge), right (short edge), and bottom (long edge) of the strap. On the left (short edge) of the strap, sc into the first hole, ch 8, skip two holes, sc 3, ch 8, sc, and sl st into the first sc of the contrast row. Tie off.
15Make the chest strap: Using yarn A, ch 7.
16Rnd 2: Sc into the second st from the hook and next 5 sts to the end of the row. As you are turning, remember to add a single chain stitch at the end of each row or the beginning of each new row.
17Continue until the strap is the desired length for your dog. My pattern measures 12 inches.
18Using yarn B, sc around the top (long edge), right (short edge), and bottom (long edge) of the strap. On the left (short edge) of the strap, sc 2, ch 6, skip one stitch, sc2, and sl st into the first sc of the contrast row. Tie off.
19Position the jacket on your dog and check the strap fit. The tummy strap should fit underneath just behind the front legs. Use a safety pin on the left-facing edge to hold it in place temporarily. Use the marker to mark (on the right-facing side) where on the cans the buttons should be placed. In a similar fashion, check the chest strap. It should ride in the middle of the chest area, well beneath the dog’s throat. Temporarily secure it with a safety pin on the left-facing side and mark the button placement on the right-facing side.
20Attach the straps to the jacket on the left sides, using sc stitch into the back of the loops.
21Make the buttons: Fill the bottle caps three-quarters of the way with hot glue and let cool. Add a bit more glue and place the buttons front side down in the hot glue. Let cool.
22Attach the buttons: Find your marked points. If they’re on aluminum, pierce the can with small nail and push the button shank through to the other side. Use the needle and heavy thread to sew the button loop to the nearest yarn. Use a little hot glue to seal it. If the button is to be placed over the crocheted area, simply sew in place.
Download a PDF of template HERE.