Copyright © 2009 by Amy Stein. Click here for terms of use.
Do this program of exercises to treat any musculoskeletal pain in the abdomen, back, thigh, hip, genital, or pelvic region and/or any pain or abnormal symptoms associated with urination or defecation, or with sexual activity. This may include the following:
In Both Men and Women
• Tailbone pain: spasm or tension in butt or pelvic floor muscles
• Pudendal neuralgia: irritation or pain that typically worsens with sitting and is felt along the nerve pathways from the lower back to the rectal area, the genital area, and/or the bladder
• Pain in the lower back, sacroiliac joint, hip, groin, and/or pelvis
• Interstitial cystitis/painful bladder syndrome
• Irritable bowel syndrome and/or colitis (including constipation and diarrhea)
• Urge urinary or bowel incontinence (strong, sudden need to evacuate with leakage)
• Urinary or bowel urgency, frequency (including nighttime frequency, or nocturia), retention, or difficulty with initiation
• Feeling of fullness, abdominal pressure and/or pain
• Urethral or rectal spasms, burning, pain, or itching
• Pelvic pain from muscle spasm, nerve irritation, or adhesions
• Decreased libido due to pain and/or contracted or tight pelvic floor muscles
• Difficulty achieving orgasm due to pain and/or contracted or tight pelvic floor muscles
• Genital hyperarousal
• Any other disorder listed in Appendix A that causes any of the symptoms listed here
In Women Only
• Vaginal pain
• Vulvar vestibulitis: irritation and/or inflammation of vestibule to the vagina
• Vaginismus: muscle tension preventing penetration of the vagina
• Dyspareunia: pain during intercourse, superficial or deep, or postcoital pain
• Prenatal or postpartum pelvic pain
• Endometriosis or other pelvic infection or inflammation
• Dysmenorrhea (painful menstrual periods)
• Difficulty with conception: infertility due to pelvic congestion or scarring
In Men Only
• Erectile dysfunction or postcoital pain
• Prostatodynia or nonbacterial prostatitis (pain in or around the prostate)
The main key to healing your pelvic floor disorder the natural way is to end the pain or discomfort. The program for doing so is in three parts and must be accompanied by the massage therapies described in Chapter 5.
In Part 1 of the End-the-Pain routine, you'll learn to let go—to relax your muscles, relieve them of any tension and strain, let them pause and come to rest. A routine of 11 simple exercises will help you do all that—the essential first step toward healing the disorder at your core.
In Part 2, you'll concentrate on strengthening your core with four other exercises added to the routine.
In both Parts 1 and 2, you'll also undertake some basic cardiovascular activity as a way of maintaining overall fitness and keeping your immune system strong.
Then in Part 3, you'll begin integrating some of your normal recreational or athletic activities back into your life, monitoring how it feels and what impact, if any, it has on your pain or symptoms.
How long will each part last? That depends entirely on you—on how bad your pain and other symptoms are, on their underlying cause, on your general level of health and fitness, and of course on how you respond to the program of exercises. Keep in mind that you are an absolutely unique individual in every way, including in what works for you in terms of your body.
In general, however, it might take anywhere from one month to as many as four months for the Letting Go exercises of Part 1 to make a difference. That sounds like a long time, but the truth is that it isn't easy to learn to relax the muscles, especially muscles that you may have automatically been clenching for some time. In other words, it took a long while to tighten and shorten those muscles, and it's going to take some time to loosen and lengthen them as well.
Still, once you do achieve the letting go and begin to feel relief from your symptoms, things move more swiftly. You'll start seeing the benefits of the strengthening exercises of Part 2 in one or two months. Do not do the advanced exercises in Part 2 until you are free from pain and need a challenge.
And so long as you ease back into your recreational activity and keep a close watch on your progress, you may feel the rewards of Part 3 in a matter of weeks. If, however, your symptoms do not improve or if they improve but are still present after six months of this routine, see a specialist in pelvic floor dysfunction.
I know you're eager to begin, so let's start letting go.
You have to work at relaxing. That sounds ironic, of course, but it's true.
The reason is that tensing our muscles may be an automatic reaction. We do it so often, so spontaneously, for so long that the tension settles into our bodies and the tightness becomes the norm. We don't even know we're tense.
Ever have one of those days when you didn't even realize how keyed up you were till your friend or spouse or maybe a considerate coworker started kneading your neck and shoulder muscles? Wow! You could almost feel the tension flowing out of you, and it felt delicious.
The truth is you tend to tense your muscles throughout the course of the day. We all do. It's a subconscious response to the various stresses, strains, and annoyances we encounter—to the sheer tumult of daily life. Maybe you tense your shoulders and end up with a stiff neck and clenched jaw. Maybe you feel the stress in your lower back. Or maybe, like so many of us, the tension tends to settle in the bottom of your core, right in the muscles of the pelvic floor. The tensing shortens the muscles, and that weakens them. Result? That vicious circle of pelvic floor pain and dysfunction is set in motion.
The key to healing, therefore, is to let go of the tension so we can stretch and elongate the pelvic floor muscles, then strengthen the muscles around them. This strengthening of the surrounding muscles provides support to the pelvic floor muscles so they don't have to work so hard. That's why most of the Letting Go exercises are about stretching, and it's why most of the stretches focus on the external muscles of the hip, back, pelvic, and abdominal areas. The reason? Tightness and weakness in these muscles can make it difficult to do the simplest activities—walking, for instance—and that, in turn, can throw you off balance. Being off balance, of course, just tightens and weakens the muscles further, and pretty soon, you're caught in the vicious circle of pelvic floor pain and disorder.
Stretching increases the flexibility of the tissues being stretched. It helps to loosen the tension in your muscles, de-stresses them, and thus helps you manage your mental stress as well. But there is a right way to stretch and a wrong way, and it's essential to do the stretches of the Letting Go exercises the right way.
The right way is the simple way. The key is to stretch in a relaxed manner—as you breathe. You want to be relaxed because overstretching or stretching too hard may actually injure the muscles further and can even irritate the nerves, causing even more pain. This is especially true if your muscles are knotted to begin with; in that case, your best bet is to massage away the knots first—see Chapter 5. In all cases, you want to breathe as you stretch in order to increase the blood flow and the supply of oxygen to the tissues of the muscles you're stretching.
As you continue to do these stretches, you will begin to notice that you are able to stretch farther. It means your muscles are loosening and lengthening. It means the exercises are working and the healing is beginning.
Done in sequence in a relaxed manner, the Letting Go exercises take less than half an hour. Do the exercises in conjunction with the sore points self-massage you'll learn in Chapter 5; this will only add a few minutes to your total time. Start every day with this routine, making it as automatic a part of your morning as brushing your teeth.
In addition, repeat the exercises at intervals during the day. Two of the first four—deep breathing and the pelvic drop—can be done pretty much anywhere without drawing undue attention to yourself. The pelvic floor stretch, the thigh press, and Steps 5 through 11, however, will require a quiet, preferably private environment.
Again, don't go at these exercises like a hard-charging fullback in a football game. Don't do more than is asked; stick to the recommended number of seconds to hold a stretch and don't do more than the recommended number of repetitions. If you are in severe pain, you may even be well advised to start with fewer repetitions and to hold each for fewer seconds than recommended. Sometimes, less really is better. Be good to your body; it deserves it.
In addition to doing the 11 exercises daily, it's important for you to undertake some form of cardiovascular exercise every day. Cardiovascular exercise is any exercise that increases the flow of blood the heart is pumping—essential to making the healing process as effective as possible. The exercise you choose is up to you. Maybe you're a Rollerblader, or like to work out on the elliptical machine at the gym, or enjoy taking a bike ride. All are great exercises, although if you find it painful to sit, the bike ride may not work out.
Perhaps the simplest as well as one of the best cardiovascular exercises is walking. I don't mean strolling, and I don't mean the walking you do as you struggle home from the store with your arms loaded with packages. I mean walking that you set out to do as an exercise—at a steady pace that is fast but comfortable, for at least five and up to 60 continuous minutes. Five minutes is a good start if you have not been doing any exercise lately, but if you're a fairly active person, half an hour is a good beginning, and you can work your way up from there. If you can't do 30 minutes all at once, by all means do less, but walk twice a day so that you build up your endurance. In due course, you'll be taking a 30-minute walk and feeling fine about it.
In addition to the walking or any other cardio exercise routine, keep the heart pumping and the blood flowing by regularly standing up from your desk or turning off the laptop or putting the baby down for a nap and walking around for a few minutes—purposefully and at a good pace. Do this at least three times a day—five times is better—to get the blood flowing back into the legs, buttocks, and pelvis. And as you do your cardio or any other form of exercise, remember to breathe. Learning how is the first step toward letting go, ending your pain, and healing your pelvic floor disorder.
Not just breathe: deep-breathe. That is a very different thing from the unthinking taking in and letting out of air that every living being does willy-nilly. Very often, such spontaneous breathing is just shallow breathing: typically only the upper part of the lungs is being put to work, and not enough oxygen gets into the system.
Even some so-called deep breathing can be shallow. When the doctor tells you to "take a deep breath," do you suck in your stomach and lift up your shoulders? If so, you're breathing shallowly.
To see what I mean, picture the lungs as a two-part bladder with an upper and lower chamber. When you suck in your belly to take that deep breath the doctor ordered, you're actually creating a partial vacuum in the lower chamber of your lungs, sweeping all the air into the upper chamber. That's why you have to raise your shoulders. But all you've really taken in is enough air to fill the upper chamber. Your lungs are half full.
Here's how to do true deep breathing:
1. Inhale. Expand your belly outward and your ribs to the sides, and "open" your pelvic floor, without lifting your chest. Feel the air filling the "receiving area" of your lungs, making one big chamber.
2. Exhale. Obviously, you'll do the reverse as you exhale. Start from the top. Let the air out of your upper lungs, then relax your ribs, your belly, and your pelvic floor, so that the air just gradually flows out of you.
Try it. The breathing should be slow and deep. Take three to five seconds to perform the inhalation, then pause for one second. Take even longer—four to six seconds—to do the exhalation, and again, pause for one second. Do it five times.
Start every day with five deep-breathing repetitions, and practice it throughout the day every day—during a work break, before you turn the key in the ignition, at the mall. In time, deep breathing will become automatic. But do deep breathing consciously to start your day—and certainly as you perform your pelvic floor exercises and stretches.
The drop is really a breathe-and-drop combination, but the key to it is what is called the pelvic floor drop. If the term sounds a little odd, it's actually something you already know how to do. In fact, this step is as much an intellectual or mental exercise as it is physical, for what you do to drop your pelvic floor is to copy in a conscious way a feeling that is universal to us all—namely, the sensation you feel as you urinate and the urine streams out. You know what it's like: you feel the urge to urinate, but there is nowhere to go until you get home or arrive at the office or turn off the interstate to find a gas station with a working lavatory. The feeling I'm talking about is that moment of relief when you have reached the bathroom; you can finally relax the muscles and let go.
That's the feeling you'll consciously copy in doing the pelvic floor drop.
How do you perform this copycat act? The key is visualization, but deep breathing helps it happen. Here's how:
1. Stand, sit, or lie down—whatever works for you; you may need to try varying positions before you find the one that suits you. Relax your body as much as possible. Close your eyes.
2. Do a conscious deep-breathing inhalation—for three, four, five seconds.
3. Start your exhale. As you do, visualize your breath descending the chambers of your lungs and being pressed downward and out from your pelvis as you simply drop those pelvic floor muscles and let go. Don't push or strain; just drop. Breathe out for four to six seconds. Do five repetitions, throughout the day.
If this visualization doesn't work right away, here's a tip: the next few times you urinate, try to remember to capture the feeling you feel when the stream begins to flow. That is the feeling you want to recall and reproduce for this exercise.
The pelvic floor drop is an absolute prerequisite of a healthy pelvic floor. Do it every morning, of course, in combination with your deep breathing, but don't stop there. Do the drop any time and at all times throughout the day—at the office, waiting for the train, while window-shopping, when you feel the urge to void. If there's any tension anywhere in your body, this will help release it.
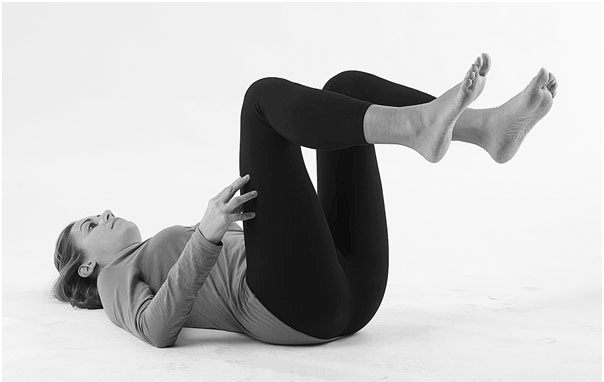
This simple and very gentle isometric exercise works wonders in helping relax the pelvic floor muscles and calm bladder or bowel urgency and frequency. Over time it helps alleviate pain. But you'll need a private, quiet place to do it.
Lie down on your back—preferably on the floor on a blanket or mat or towel; if not, on your bed if the mattress is firm, with your head resting on a thin pillow. Your knees should be bent; your arms should rest along your sides. Lift your lower legs till they are straight out in front of you, parallel to the floor. Now just raise your hands and place your fingertips atop your thighs, slightly to the outside of the thigh. Very gently, press your fingertips into the thighs; at the same time, let your thighs resist the pressure. Hold
the two-way pressure for five seconds. Relax. Repeat the exercise five times, and do the five reps two to four times a day.
The pelvic floor stretch is a great way to ignite the power of your body's core. It helps open, loosen, and begin to lengthen the pelvic floor—a good foundation for the healing process. There are two ways to do the pelvic floor stretch. If your knees, hips, and back are supple and strong, try it the deep squatting way; if you have trouble squatting or if your butt muscles are knotted, there's an alternate method you can do on your back. Either way you do the pelvic floor stretch, be sure to breathe deeply as you do it.
Here's how to do the squatting stretch:
1. Stand with your legs apart, feet extending a few inches beyond the shoulders, toes turned slightly outward.
2. Keeping your back as straight as possible, squat down till your rear is three to five inches off the floor.
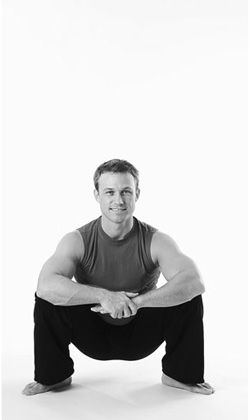
3. Relax into the squat as you do six to eight deep breaths. Your arms should rest inside your thighs, with your hands together or relaxed to the floor.
4. Again keeping your back straight, place your hands on your knees and push yourself up.
5. Hold the stretch for 30 to 60 seconds. Do three repetitions, two to four times a day.
Here's how to do the stretch lying down:
1. Lie on a firm surface—on a mat on the floor or on a hard mattress, as with the thigh press. Bring your knees up to your chest and then let them relax and rotate out to the side so that they flare outward. Use your hands to hold your knees in this position.
2. Stretch as you deep-breathe for six to eight breaths. Do not bounce, and do not push hard. Just stretch gradually and progressively as you fill and empty your lungs.
3. Hold the stretch for 30 to 60 seconds. Do three repetitions, two to four times a day.
Hip rotator muscles do exactly what their name suggests—they enable you to rotate your hip so you can bend and turn. Short, tight hip rotator muscles don't just put stress on your pelvic floor—they also restrict your range of motion. That's why this gentle, steady stretch is so important. Here's how to stretch your hip external rotators:
1. Lie on your back, with both knees bent, both feet flat on the floor, and your head resting on a thin pillow.
2. Raise your left knee and rest your left ankle on the right thigh.
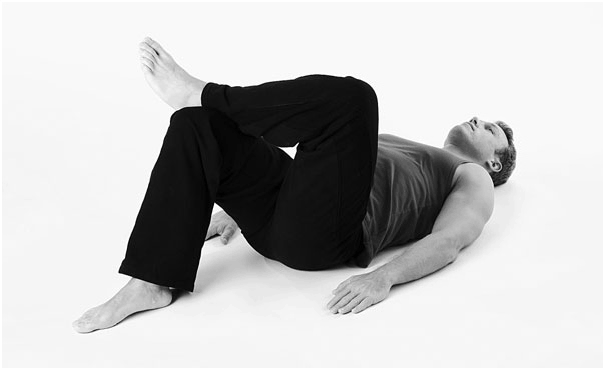
3. Raise your right leg and wrap both hands around the back of your right thigh.
4. Slowly and gently pull your right thigh toward you; you should feel the stretch in the back of your left buttock and
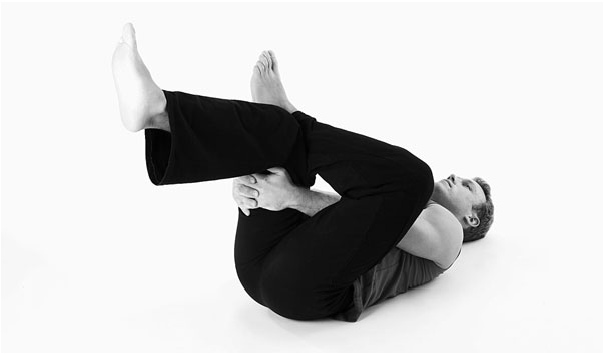
in the hip region. Hold the stretch for a minimum of 30 seconds, maximum of 60 seconds.
5. Repeat with the right leg: right ankle on left thigh, left leg raised, pull left thigh toward you, hold for 30 to 60 seconds, and feel the stretch in your right buttock and hip region. Do three repetitions on each side, two to four times a day.
Like the external hip rotators, the hip flexors enable you to raise your thigh up to your abdomen, to bend, and to flex, as their name suggests. Here's how to stretch these muscles:
1. Stand straight with feet hip-width apart.
2. Step forward two to three feet with your right foot. The length of the step forward depends first on how tall you are—shorter individuals will take a shorter step—and on how tight your muscles are.
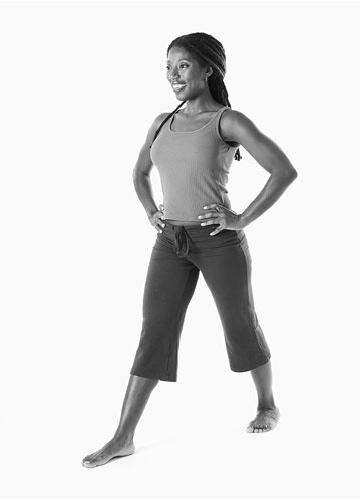
3. Using a chair for balance if you like, and keeping your pelvis square and straight ahead, bend your right knee into a lunge position, making sure that your right knee does not extend over the toes; that will strain your knee. You should feel a stretch in the front of the left thigh and hip region. If you don't feel a stretch in the front of the left thigh, try extending your right foot farther forward for a deeper lunge, remembering to keep your pelvis square and straight ahead. Hold the stretch for a minimum of 30 and a maximum of 60 seconds.
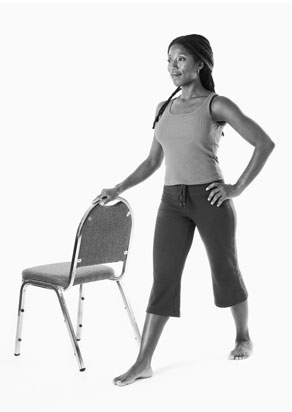
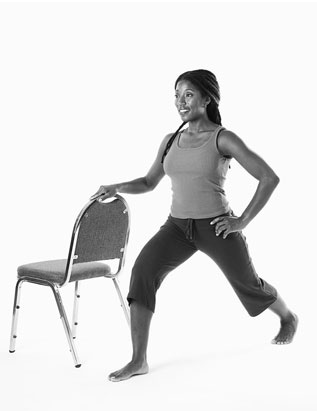
4. Repeat the stretch on the opposite side: step forward with the left foot, bend the left knee into a lunge, feel the stretch along the front of the right thigh. Do three repetitions, two to four times a day.
Everybody wants washboard or six-pack abs. The following stretch has a different aim. It's targeted at stretching and lengthening the abdominal muscles that are located just above the pelvic floor and that help support the back. There are two ways to do this stretch—lying flat or standing up. Here's how to do the stretch from a prone position:
1. Lie flat on your stomach on a mat or blanket. Bring your hands up next to your shoulders, palms down.
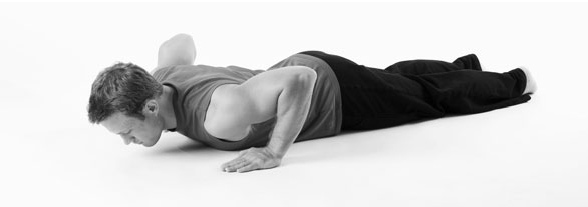
2. Do a deep-breathing inhale.
3. As you exhale, push up slowly on both hands, lifting your upper body, while your hips and legs remain flat. Straighten your arms as much as possible. Hold for 30 to 60 seconds.
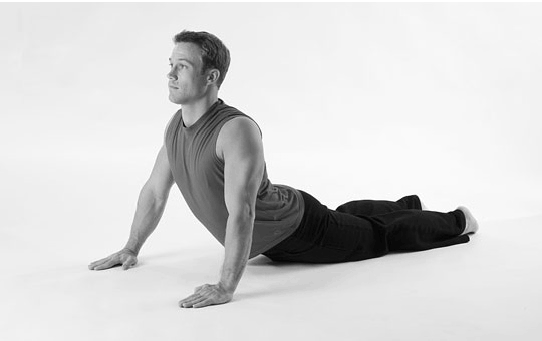
If it's hard for you to straighten your arms, or if you have shoulder, wrist, or elbow problems, try the standing version of the exercise:
1. Stand straight with feet hip-width apart and knees slightly bent. Place your hands on either side of your lower back.
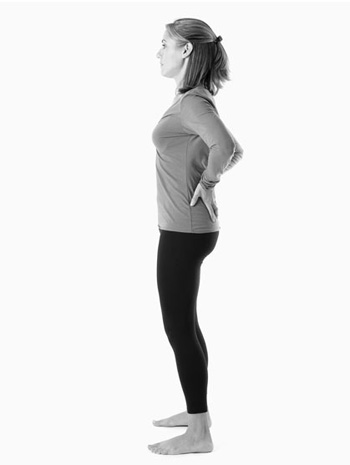
2. Do a deep-breathing inhale.
3. As you exhale, slowly bend your torso backward until you feel a slight stretch in your abs—and possibly in the upper part of your thighs. Hold the stretch for 30 to 60 seconds. Do three repetitions, two to four times a day.
No wonder your back muscles feel tired: you use them nearly all the time. Walking, bending, turning, sitting down, standing up, and of course every sport or physical activity use the back muscles, so these muscles often tighten through sheer fatigue. What's more, the back is a place where tension tends to settle, tightening the muscles even further. There are two ways to stretch, loosen, and lengthen your back muscles, one standing and one lying down. Do whichever one is most comfortable for you, but if you have knee or hip problems, you should not do the lying-down version. Here's the standing version:
2. Cross your right foot in front of your left foot.
3. Lift your left arm up over your head. Without twisting your back, bend to the right side as far as you can.
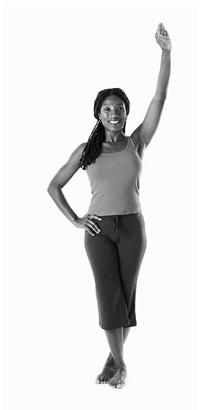
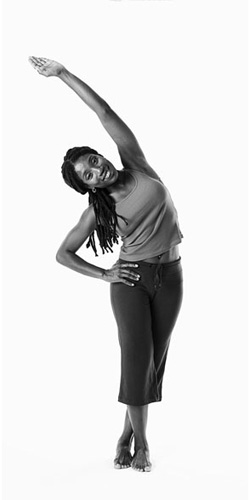
4. Reverse: cross left foot over right foot, raise right arm, bend to the left side. Hold the stretch for 30 to 60 seconds. Do three repetitions on each side, two to four times a day.
And here's the lying-down version:
1. Kneel and then lower your torso so that you are face down with both knees tucked under.
2. Stretch both arms straight out in front of you.
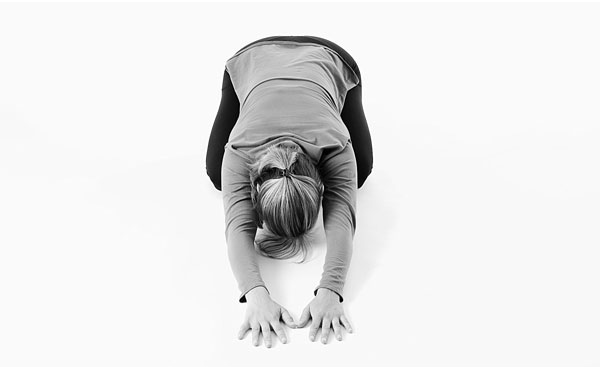
3. Slowly "walk" your hands to the right, curving your torso as you do until you feel a stretch on your left side. Hold the stretch for 30 to 60 seconds.
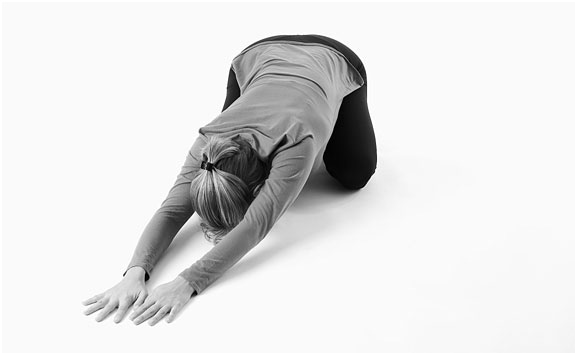
4. Reverse. Walk your hands left till you feel a stretch on your right side.
5. Do three repetitions on each side, two to four times a day.
The hamstrings are those long muscles behind the knee on the back of the thigh that act on two important joints—your knee and your hip. The hamstrings help those joints extend and flex and are thus crucial in walking, running, jumping, even controlling your torso. So it's important to keep them loose. Here's how:
1. Lie flat on your back with legs straight out in front of you.
2. Raise your left leg straight up and grasp the back of the left thigh with both hands. (Alternatively, wrap a towel around the bottom of your left foot and hold the ends with both hands.)
3. Slowly pull your left leg toward you until you feel a light stretch behind the left thigh. If the stretch hurts, bend the left knee slightly. Hold the stretch for 30 to 60 seconds.
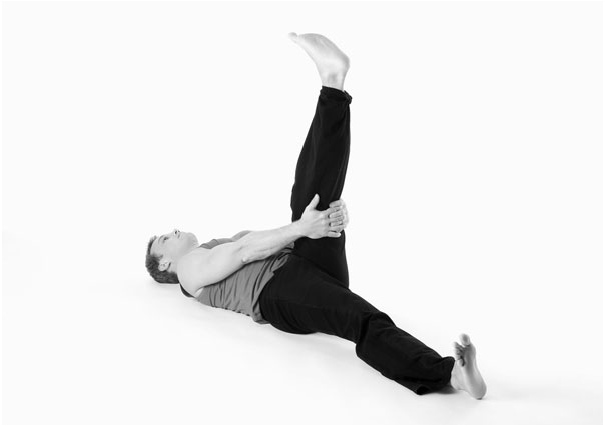
4. Reverse. Raise the right leg and pull it toward you till you feel the stretch behind the right thigh. Do three repetitions on each side, two to four times a day.
The muscles of the inner thigh are called adductors, meaning they draw the legs in toward the center of the body. These muscles start at the pelvic bone and attach down the thigh, which is why they provide so much power and stability to the hip area—and why it's so important to keep them flexible. Here's how:
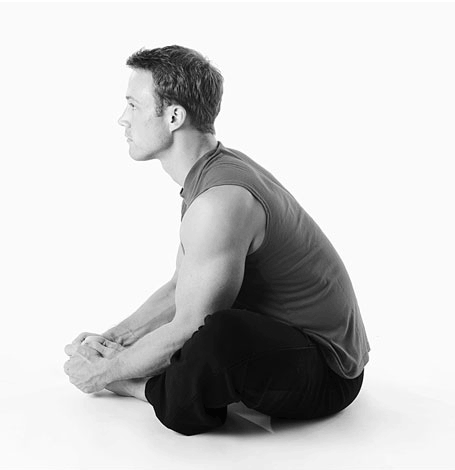
1. Sit on the floor. It might help to sit where your back can line up against a wall behind you, but this is not necessary.
2. With your back straight, draw the balls of your feet together, bending your knees and flaring them outward.
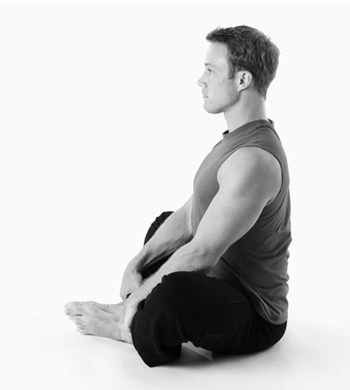
3. Keeping your back straight, slowly lean forward at the hips and press your knees gently toward the floor. Do not overstretch; in time, as you continue to do this stretch, your muscles will lengthen and you will be able to press your knees closer and closer to the floor (only gymnasts, dancers, or extremely mobile people can get their knees all the way to the floor). Do the usual three reps, holding the stretch for 30 to 60 seconds. Repeat two to four times a day.
In a society where most of us spend most of our time sitting down, the gluteal muscles—the muscles of the buttocks—tend to grow weak. That's bad, for these are power muscles that help us extend and rotate the hip and torso. Moreover, tension in the gluteal muscles may spread to the lower back and pelvic floor, weakening those muscles, throwing our posture off-kilter, and causing pain. So here's how to loosen and lengthen the gluteal muscles:
1. Lie flat on your back with both legs straight.
2. Bend your right knee up to your chest.
3. With both hands, gently pull the leg closer against your chest. Hold for 30 to 60 seconds.
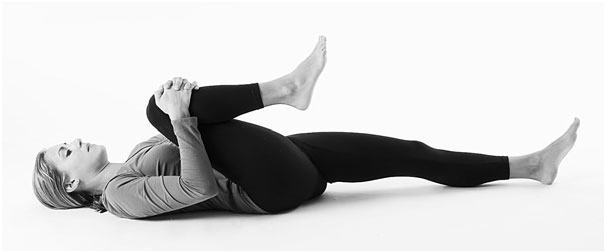
4. Reverse. Bend your left knee and pull it closer against your chest. Do three repetitions on each side, two to four times a day.
Don't forget to accompany these exercises with some cardiovascular activity at least once a day. Such exercise—walking, running, biking, climbing, skiing, swimming, aerobics, treadmill workouts, spinning class, and the like—increases the body's blood flow, and that's what helps to keep the organs, tissues, and muscles everywhere in the body healthy.
Cardio exercise also reduces stress and diminishes tension, which can also ease your pain. How? It's called a "natural high." The exercises gets your blood flowing well, and a good flow of blood to the brain increases your production of endorphins, the so-called "natural pain killers" that provide a sense of well-being.
Cardiovascular exercise has many other benefits as well, of course, and these are well known. It can speed up your metabolism, which helps prevent or relieve constipation. It certainly helps control weight, which makes you healthier both physically and emotionally.
The important thing about doing cardio during the Letting Go routine in Part 1 is that it be purposeful, sustained, and done regularly. By purposeful, I mean that your walk or bike ride or aerobics routine shouldn't be part of anything else; carve out a special time and devote the time to the exercise. Set a good pace and keep at it steadily. And make sure you do the exercise for at least 5 and up to 60 continuous minutes at least once a day; that is, if you could only exercise for five minutes try to do your five-minute exercise three times a day—for example, before each meal.
As it gets easier, slowly increase your cardio time, although not beyond 60 minutes. Also, if it hurts, stop.
The 11-step Letting Go exercises should be an integral part of your day. In fact, over time, you should try to extend the Letting Go exercises—that is, make your stretches even longer and increase the amount of time you spend doing cardio and the pace of your cardio exercise. Work up to an hour of brisk, sustained cardiovascular activity at least three times a week, preferably five times a week.
Here are my suggestions for making these exercises an integral part of your life:
• Start the day with your half-hour of Letting Go exercises, then take a brisk walk or do a cardio workout—for at least five minutes, preferably 30 or more—before breakfast.
• Do Steps 1 and 2—breathe and drop—throughout the day whenever and wherever you can.
• Then do the 11-exercise routine again, if possible, before lunch, before dinner, and before bed.
• End your prelunch and predinner exercise routines with a brisk walk or other cardio exercise.
• Stick to this schedule, and I'm sure that you'll soon begin to notice your muscles loosening and lengthening and your overall fitness and sense of well-being increasing. Above all, you'll feel relief from your pain—more and more relief each day and week that you do the routine. It means the healing has begun.
• Give it some time to work. Keep track of your progress by filling out the Symptoms Monitor at the end of Chapter 2 once every four weeks. Set a date and time for this: every first Tuesday morning or Saturday afternoon of the month, for example. Only by "keeping score" regularly can you really gauge your progress. Once your pain has gone down by at least 50 percent and your symptoms have improved, you're ready for Part 2 of the End-the-Pain routine.
Letting Go exercises: on awakening, before lunch, before dinner, before bed
Cardio: aim for 60 minutes a day, start with at least five.
Breathe and drop exercises: repeatedly throughout the day
Once you've loosened and lengthened your muscles sufficiently, it's time to begin to strengthen them. A strong core is a healthy core and is your best bet to help prevent further pelvic floor dysfunction in the future.
Strengthening isn't just about getting hard muscles, either. Strength affects several aspects of your overall health. Strong muscles improve your posture, and a body that is better aligned works better. Moreover, strong muscles assist in healthy circulation. Your metabolism is increased, your system—including your digestive system—works more efficiently, and toned muscles make you feel better emotionally and may increase your confidence. So the four exercises you'll do in this part are an important step toward your general well-being as well as toward a healthier pelvic floor.
It's important to note that you'll be adding these exercises to the Letting Go exercises of Part 1, not replacing anything. In fact, you can make these next four exercises a part of your cardio routine.
But the four are aimed specifically at easing your pain by strengthening your core. Start with five repetitions of each exercise, and as your symptoms improve and the exercises get easier—probably in a month or two—work your way up to 30 reps of each. When the 30 reps become as easy as a walk in the park, you can add weights or try some other techniques for making the exercises more challenging. I'll offer recommendations for how to do that at the end of each section.
For now, however, keep it simple, and take it easy as you begin the exercises to strengthen your core. Remember that if you start Part 2 and you find that your symptoms are back, you have probably moved too quickly to the Part 2 exercises. It happens frequently: you start to feel better, and you're so eager to move on that you do so before you're fully ready. If that happens, don't be discouraged; just go back to Part 1, get those symptoms well improved, then move on to Part 2.
Don't forget to breathe while exercising.
The transverse abdominus is a muscle deep in the abdomen that wraps around your lower abdomen above your pelvis, like a corset. In strengthening the transverse abdominus, you also help to stabilize your core. Here's how.
1. Lie on your back, bend your legs at the knee with the knees hip-width apart, and make sure both feet are flat on the floor.
2. As if you were zipping up a tight pair of jeans, tighten your navel down toward your spine, keeping your spine in a neutral position. Don't "suck in" your belly; just contract it so that you feel the muscles in your lower abdomen tighten. Do not tilt your pelvis up or down. Do not bear down on or tighten the pelvic floor muscles. All of that is counterproductive to what this exercise sets out to do.
3. Hold the contraction for five seconds, relax for five seconds, then repeat for the full five repetitions.
4. Over time, increase the hold to 10 seconds with 5 seconds of relaxation between reps.
Advanced Version. There are two ways to make this exercise more challenging and more fun.
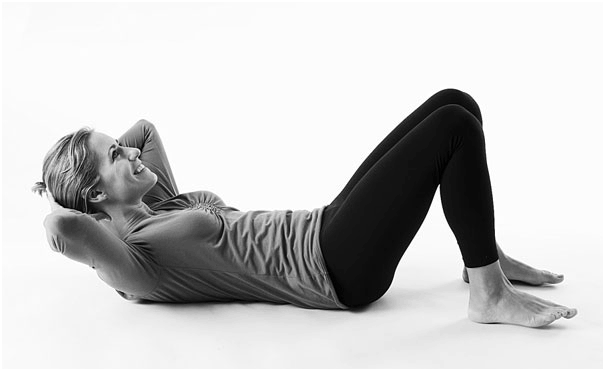
• Add a head lift. Place both hands gently behind your head and lift your head about 12 inches, making sure to keep your chin tucked in. Start by doing 25 basic tight abs exercises and five with head lifts. Then gradually increase to 30 with head lifts.
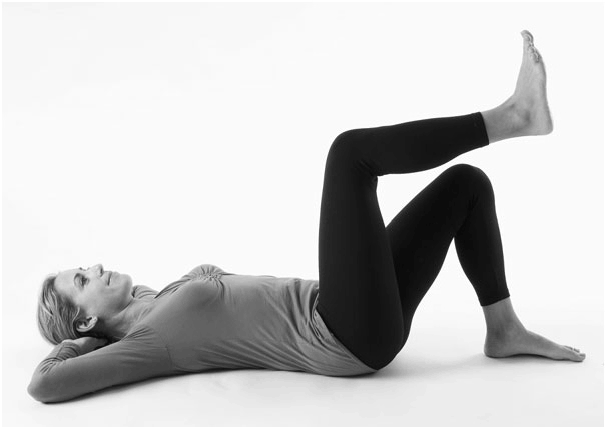
• Add a knee lift. While keeping your abs tight, slowly lift one foot about 20 inches and lower. Switch legs. Again, start by doing five of these in addition to 25 basic tight abs moves, then gradually increase to 30 with knee lift.
One important caution before you undertake the abdominal exercises: if you have diastisis recti, you will need to perform a corrective exercise first. Diastisis recti is a fairly common disorder in which the right and left muscles of the abdomen, specifically the rectus abdominus, which are attached to one another with connective tissue, have become separated. Common causes of the separation are chronic straining, pregnancy, obesity, and more. To test for diastisis recti, lie down on your back, knees bent, feet on the floor or bed. Place two fingers about an inch directly below the navel and lift your head to contract the abdominal muscles. Then place two fingers about an inch directly above the navel and lift your head to contract the abdominal muscles. If you feel a separation of more than two fingers in either location, chances are you have diastisis recti, in which case I recommend you see a physical therapist or healthcare provider for a proper diagnosis.
The bridge exercise targets your quadriceps muscles on the top of your thighs, your hamstrings, your lower back and abdomen, and the gluteal muscles of your butt. But take care: if you have pain when you sit, or if your pain symptoms increase when doing this exercise, stop! Move on to the next exercise in the routine.
You can count out the bridge in sequences of seconds: three, three, three, and five.
1. Lie on your back with both knees bent, hip-width apart, and with both feet flat on the floor. Your arms should be alongside your body. As in Step 1, tight abs, tighten your transverse abdominus muscle.
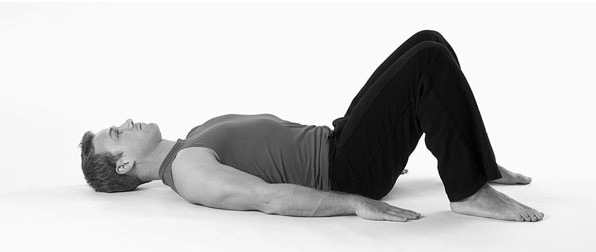
2. Take three seconds to slowly raise your pelvis.
3. When you reach the top of the "bridge," hold the position for three seconds.
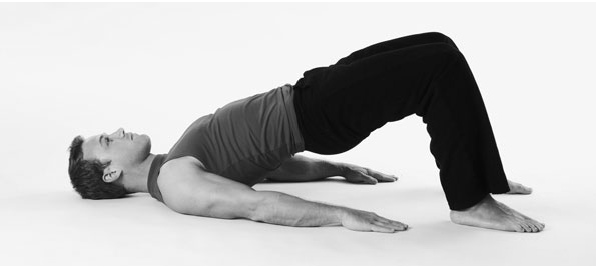
4. Lower slowly for a count of three seconds.
5. Back at the starting position, relax everything for five seconds, then repeat for the full five repetitions.
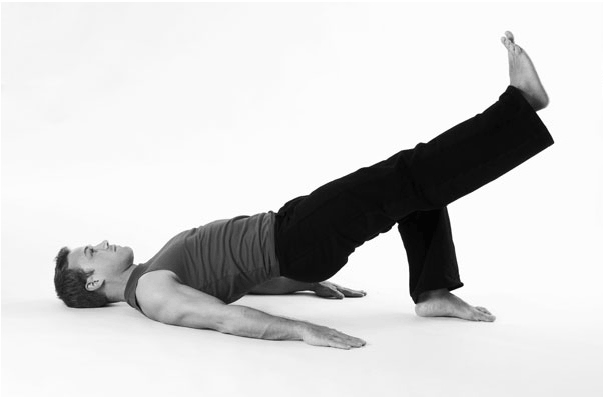
Advanced Version. Try doing a one-legged bridge. Start with the basic position, then straighten one leg. Tighten the abdominals and keep your pelvis square as you raise your buttocks off the ground with one leg. Repeat five times on one side and five on the other. Slowly increase the reps as the exercise gets easier.
For this exercise, we go back to prehistoric times before we humans stood upright. If it hurts to sit or if you have tightness in the gluteal muscles of your butt, only do the arm portion of this exercise. Otherwise, this down-on-all-fours exercise strengthens your back, shoulder muscles, gluteal muscles, hamstrings, and abdominal muscles. (If you find you cannot lift the opposite arm and leg simultaneously, start by lifting the arm and leg separately, holding each for three seconds, until you can manage to raise both at the same time.)
1. Get down on all fours on your hands and knees. Hold your head in a straight line with your spine, with your chin tucked in.
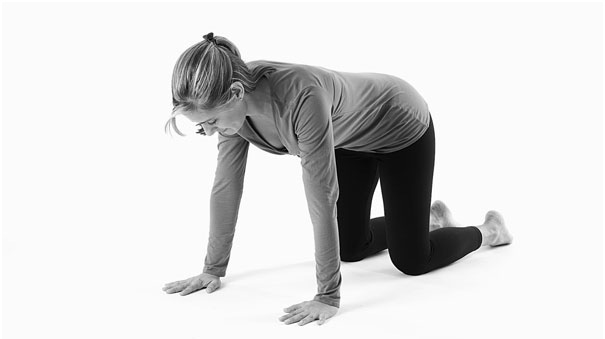
2. Keeping your back and neck straight, tighten your navel up to your spine, contracting your transverse abdominus muscle just as you did in the tight abs exercise. It may help to imagine that there is a pole resting on your back and you have to make sure it doesn't roll off.
3. Still holding the abdominal muscle tight, lift your left leg and right arm simultaneously while keeping your pelvis square to the floor. Hold for three seconds, then lower both arm and leg. Relax.
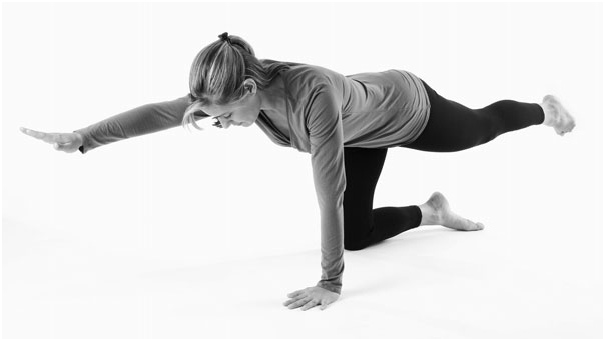
4. Tighten the transverse abdominus again, and now raise your right leg and left arm.
5. Hold for three seconds, lower, relax. Repeat five times on each side.
Advanced Version. Add a half-pound weight to your ankle as you do the exercise. Slowly increase the weight to five pounds.
Alternatively, add a half-pound hand weight. Slowly increase the weight. Eventually, you can add both ankle and hand weights.
Not to be attempted by anyone with knee problems (except under the guidance of a trained professional), squats can nevertheless strengthen the abdominals, quads, hamstrings, lower back, and glutes. The important thing to remember, however, is that your knees should not extend beyond your toes. Here's the right way to do squats:
1. Stand with feet hip-width apart and feet slightly forward of the line of your shoulders, toes turned slightly out. Tighten your abs.
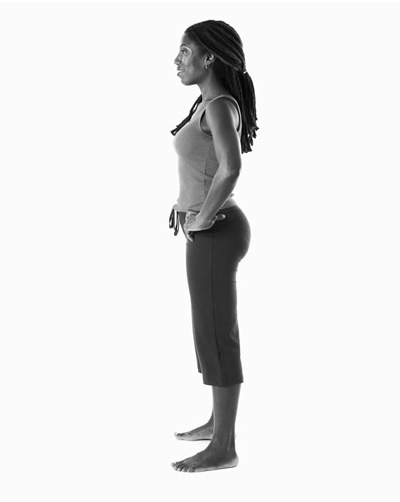
2. Slowly, on a count of three seconds, bend your knees as you lower your buttocks to a maximum of a 45-degree angle—or as close as possible. Lean forward slightly as you do this, but keep your back straight. The action is what you would do if you were about to sit down on a chair. Look carefully at the photo to see what I mean.
3. Rise back up to a standing position, also on a three-second count.
4. Relax for five seconds, and repeat five times.
Advanced Version. Hold a one-pound weight in each hand for the full 30 reps. In due course, you may increase the amount of weight.
Add Part 2 exercises to Part 1 routine: do daily in conjunction with your cardio routine, and slowly increase the reps of each exercise to 30.
Your own body is the best judge of when you should resume your favorite recreational activities. When the pain has diminished, when you're feeling strong enough, when both the Letting Go and the strengthening exercises, including your cardio exercise activity, have become second nature, that's when you should think about going back to your preferred sport.
But whenever you do so, the key is to ease into it. And the warning is that if you don't, you can not only undo the good you've done, but you may actually set yourself back even further. So whatever the activity is, start off slowly and lightly, work your way up, level by level, take plenty of breaks, and don't tire yourself out. Fatigue is a fast route to injury.
The key is to monitor yourself and your pain as you return to the activity, and to think of your return as occurring in three parts, as follows:
• Beginner Part 3. Start out doing one-tenth of what you would "normally" do—a tenth as much as you used to do before your pain or discomfort made the activity no fun at all. Go at one-tenth the speed, do one-tenth the distance, spend one-tenth the time. If your typical hike was five miles, start out with a half-mile trek. Instead of a full day on the slopes, start with two hours, and stick to the easier slopes.
• Intermediate Part 3. Slowly increase the variables by a tenth. Slowly. Take two weeks' worth of half-mile hikes before you try a walk of a mile. Spend two weeks skiing for two hours a day only before you add the third hour. Yes, this seems slow, and you may find it frustrating, but surely a little frustration is worth it to avoid the backsliding that can happen so quickly if you overdo your return to activity.
• Advanced Part 3. Finally, when you have incrementally worked your way back to your full capacity, practice performing at full capacity for short intervals only, making sure to take plenty of breaks. That means that instead of taking on a tennis match against the kid with the killer serve, bat the ball around with a friend for a set or two, a friend who will understand that you might have to quit playing suddenly—best of all, a friend who might remind you that you need to pay attention to your body, watch for negative symptoms, and take it easy.
Keep in mind that you may not feel the increased pelvic pain for a day or two—which is all the more reason to take it slowly. All of this pretty much means that team sports are out for now. When teammates are relying on you, you feel you have to give your all, and giving your all right now is just about the last thing you need to do. So stay on the sidelines, practice your sport as an individual, and wait till you can give it everything you've got before you re-up as a starter.
That still leaves you lots of leeway for sports and recreational activity.
Is Rollerblading your thing? Start off with a short, easy ride on a level surface in a nearby park. Aim for just getting back the feel of being on skates, not for speed.
Maybe you're a hiker. If so, get back into hiking by taking a little walk in the woods carrying a lightweight pack. Don't start off with a four-day trek into mountainous wilderness, even if that was the last thing you did before your pain or disorder made it impossible to do anything at all.
Yoga is your preferred form of exercise? Just because it's famous for being a healthy way to increase flexibility doesn't mean that the twisting called for in some of its postures won't send you back to square one. Be gentle with yourself, and if you feel any pain at all, stop! Start off with restorative yoga, and slowly work your way up to the more advanced practices.
If you're a skier, stay off the black diamond trail for the present. You may not need to go back to the bunny slope, but think about starting off on a flat blue trail this season.
After all, the one thing worse than going back to basics in your favorite sport or recreational activity would be going back to the incapacitating pain that made you stop the activity in the first place. It bears repeating: for your return to sports and recreation, ease into it. Take it slowly, and be careful.
Although it's essential to start any exercise program slowly and modestly, it's equally essential to build up to a point where the exercises are doing you the most good. But how do you know when to move to the next step?
Here's a simple formula: When the last three repetitions have become easy, you're ready to add another five. That means if you have started with five reps of an exercise, and after a week or so, reps 3–5 are a piece of cake—and assuming always that there is no increase in pain or other symptoms—start doing 10 reps. When you've been doing 10 for a while and reps 8–10 have become a breeze, move up to 15.
If you need the strengthening exercises to be more difficult, go back and add the advanced exercises to your routine. For purposes of this toning program, I'm not recommending that you go beyond 30 repetitions of any exercise.
If eventually you find that 30 reps of each exercise, even with challenging variations and weights added, is just too easy, you are probably ready to move to another level of exercise—providing, of course, that you are symptom-free. In that case, consult with a licensed physical therapist or exercise physiologist so you can be sure you're not undertaking anything that could injure what you've spent all this time and effort healing.
| |
Step 1: Tight Abs | Do 5–30 reps daily. |
Step 2: Bridge | Do 5–30 reps daily. |
Step 3: Quadruped | Do 5–30 reps daily. |
Step 4: Squats | Do 5–30 reps daily. |