The appeal of fly fishing provides an interesting study in tastes. For most, including myself, it is the satisfaction of catching fish. For others, it is the pleasure of fly tying or equipment collecting—or just plain casting. Whatever the area of one’s interest, though, the elegance of the gear adds to the mystery and beauty of the sport.
Unfortunately, because rods come in a full array of sizes and flexes, reels in different designs and dimensions, lines in different densities and tapers, and leaders in different diameters, the novice angler can easily become confused about which equipment to buy. Then, too, there’s the matter of price: Fly fishing equipment can range from the suspiciously cheap to the outrageously expensive. In general, price reflects quality. You don’t need to spend the family fortune on equipment, but you shouldn’t skimp on it either. The better the equipment you buy, the longer it should last and the more enjoyment it can give you. Many fine old reels and rods, passed down through generations, are still functional today because the quality was good when purchased.
In short, when buying gear, go for the best you can afford. You won’t be disappointed.
A fly rod is to the fisherman what a hammer is to the carpenter, a club to the golfer and a racket to the tennis player: a basic tool. Centuries ago in England, where modern fly fishing got its start, fly rods were made from various species of either indigenous or imported woods. Because in those days flies were dabbed, not cast, rods were enormously long, sometimes 18 or 20 feet. Fly casting, or “delivering” the fly, would come later and rod lengths would shorten considerably.
Today, fly fishing rods come in various materials, with bamboo, fiberglass, graphite and boron the substances used most often. Each has its own qualities and drawbacks, so before purchasing rods made of any of these materials, you’d be wise to learn about each.
Split bamboo or split cane is one of the oldest fly rod materials still in use. First developed in 1845 and later commercialized by Hiram Leonard in the 1870s, bamboo is still considered one of the finest materials for fly rods and the one against which all subsequent rod-making substances have been measured. It is both strong and durable, and in casting, it exhibits a smoothness and “feel” that has not been perfectly duplicated even by our most modern synthetic materials.
The basic design and “lay-up” of the rod has not changed dramatically in a hundred years. The first rods were made from Calcutta cane, later to be replaced by Tonkin cane, from the plant Arundaria amabilis, grown in the Kwangsi Province of southern China.
To construct a cane rod today, the rod maker splits a culm or stock of bamboo into strips, planing and tapering each one into a long triangular shape. He then laminates or glues the strips together to form the rod. Early rods were of three- or four-strip construction, but most modern versions follow Hiram Leonard’s six-strip derivation. Aside from the guides and fittings, the only difference 100 years has made is that most of today’s rod makers use synthetic glues for the laminations and sophisticated mitering saws rather than hand planes for more precise cuts.
Bamboo rods.
Though beautiful and functional, they can also be heavy and expensive.
As beautiful and functional as bamboo rods are, they do have their drawbacks. Because of the nature of the material, the rods are heavy, especially compared to today’s synthetic models. Bamboo rods more than eight-and-a-half feet long can be tiring to use over a full day’s casting. In addition, there is the expense. A quality bamboo rod fetches about $500 or more, putting it somewhat out of the budget range of many fishermen.
Synthetic fiberglass and resins were actually discovered in the early 1900s, but not until World War II did fiberglass come into its own as a material for making fishing rods. While doing work in tubular fiberglass research for the military, Dr. Art Howald happened to break his bamboo fly rod. He adapted a crudely developed tubular fiberglass piece to replace the tip portion—and immediately recognized the great potential of his casual experiment. A few years later, in 1946, the Shakespeare Rod Company developed the “Wonder Rod,” the first fiberglass rod to be offered commercially. These initial fiberglass products were expensive, but as production techniques were refined, prices dropped drastically, making a rod affordable to all anglers. Fiberglass soon outsold even the less expensive bamboo models, and the sport was flooded with new anglers.
Fiberglass fly rods are constructed of a woven fiberglass cloth impregnated with resins, rolled around a highly machined core called a mandrel, then wrapped with a cellophane material to hold the shape. The resin-impregnated cloth is cured in a special oven, the mandrel is afterwards removed, and the blank is sanded and finished. The addition of guides and fittings completes the rod.
The advantages of fiberglass are many: Besides being inexpensive, the rods are lightweight and extremely strong. For some applications, such as saltwater, they are still preferred to any other material. Fiberglass has some disadvantages, but they are fairly minor. Because of the power and flex recoverability (stiffness) inherent in the material, rods designed for very light fly lines are difficult to produce. Furthermore, fiberglass has a tendency to oscillate or vibrate during and after the cast and thus has never truly matched the smoothness of bamboo.
Just as fiberglass rods were becoming highly refined, the seventies brought a new material that would displace both bamboo and fiberglass—graphite.
In 1973,1 had the opportunity to cast the first prototype fly rod made of carbon graphite fiber by the Fenwick Rod Company of Westminster, California. That first experience was both enlightening and mystifying. The rod was as light as a feather, yet so incredibly powerful that a full 90-foot fly line could be cast with virtually no effort. What was this magic material, I wondered, and how was it made?
Graphite is a synthetic fiber—chemists call it polyacrylonitrile—that is subjected to a series of heat treatments, starting at 200 degrees and ending at about 2800, finally, in an oxygen-free environment. Under these conditions, instead of burning, the fibers carbonize, then graphitization takes place forming crystals, which are stretched into fibers. The fibers are then laid side by side, and wrapped on a mandrel similar to that used for fiberglass rods. The result is an enormously strong, lightweight material with a power-to-weight ratio far superior to that of any other material that has ever been used in fly rod construction.
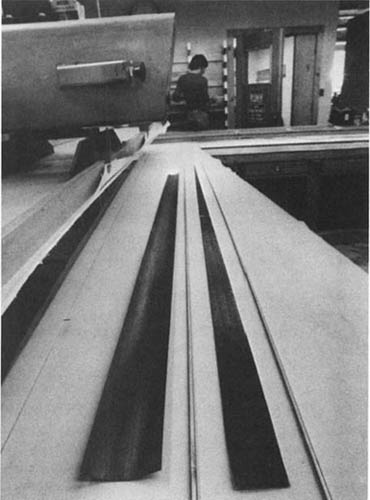
Graphite rod construction.
Here, sheets of graphite await wrapping around aluminum mandrels. After the graphite is cured, the mandrel is removed, and the hollow graphite blank is fitted with various rod hardware.
The first graphite rods were almost too powerful for everyday trout fishing, but were perfect for salmon and steelhead angling, which require long casts. The recovery flex factor was so great that early rods did not fish especially well with fine leaders; they constantly separated fly and leader from the fish when the angler tried to strike and set the hook.
In order to dissipate this power, the next generation of graphite rods were made lengthier than those of conventional fiberglass, adding flexibility and softness to the rod. Today, further refinement has resulted in short rods that will also handle very light fly lines.
The first of the graphites were very expensive (at least by 1974 dollars), but the rods’ quickly won popularity has brought the price of many down from the $250 range to the $60 range. Indeed, graphite has generally replaced fiberglass as the fly rod of choice. Because graphite has come the closest to duplicating the feel of bamboo, it has also made inroads into the traditional bamboo market. For my money, a good graphite rod is a sensible—though not essential—investment.
With the introduction and development of graphite, manufacturers quickly moved on to explore other new synthetics, particularly boron. As a material for fly rods, boron, although exotic, has not enjoyed the general acceptance that graphite received when it appeared on the market.
The fiber used in boron fly rods is made from a compound, deposited as a vapor upon ultra-fine tungsten wire. The resulting filament is not only delicate and light but also extremely strong. The strength-to-weight ratio of the material has allowed manufacturers to reduce the diameter of a fly rod by about 20 percent, resulting in a much lighter rod.
So far, the advantages of boron have been demonstrated only in the rods used on big rivers or for working sizable sea-run fish, such as steelhead or salmon. Because the material is so much more powerful even than graphite, it has not as yet been successful in rods designed to handle very light lines. Also, to date, boron rods are uniformly expensive (between $375 and $450).
Without question, graphite, boron, and very possibly other as yet undiscovered Space Age materials will be used to make the fly rods of the future. With each new development comes a more powerful yet lighter, more responsive rod. I can’t wait to see what will be next.
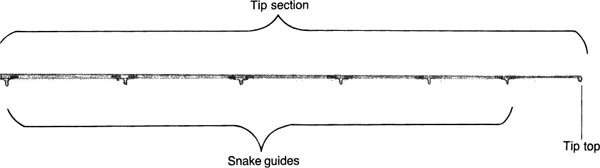
The standard medium-sized trout rod purchased today is generally eight to eight-and-a-half feet long and throws a six-weight line (more on line weights later), and it is against these variables that you can choose lighter and shorter or heavier and longer equipment. If you fish primarily small or delicate water (narrow, shallow streams or still pools), then a rod of seven-and-a-half to eight feet, throwing a four-weight or five-weight line, may be appropriate. If your interest lies with bigger water (wider, deeper streams), bass fishing, lake fishing, and/or light steelhead fishing, a rod in the eight-and-a-half to nine-and-a-half foot range, throwing a seven- to ten-weight line, should be used. And, finally, if you are mainly after steelhead and saltwater fish, a rod of nine-and-a-half to ten feet that throws an 11-, 12-, or 13-weight line is a must. Note: Today, rods that throw three, two, or even one-weight lines are also available, though not terribly practical for most fishing situations.
This is only a general guide. As you begin to shop for equipment, you’ll find that manufacturers make a full array of rods and lengths, with most being capable of throwing several different line sizes.


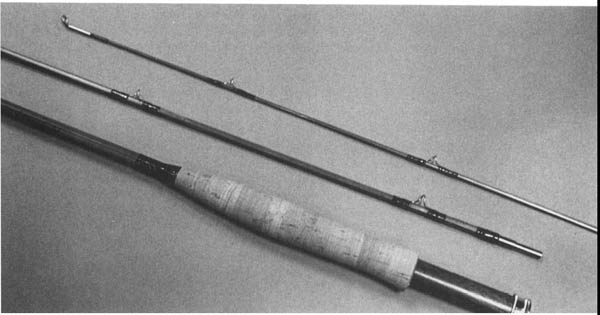
A rod’s length and line specifications are usually marked either above the handle or on the butt. This three oz. rod is eight feet long and designed to throw a seven-weight line.
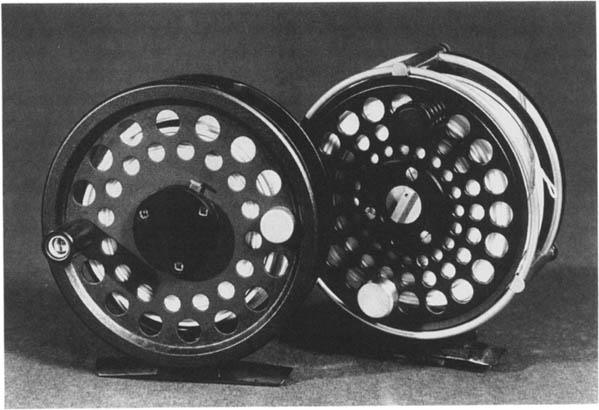
There is evidence in fly fishing literature that fly reels constructed of hardwoods were in use in England in the late 1700s. But it wasn’t until well into the 1800s that the fly reel’s development really took off. Early reels were made of wood, evolving to solid brass, and were quite different from today’s reels, which are fashioned from alloys of aircraft aluminum or graphite.
To many people the fly reel has just one function, to store line. Granted, storage is a primary function, but a quality modern reel has other features that also should be considered when shopping for the right model. The fly reel you choose should have an adjustable drag, enabling you to set the tension commensurate with the leader you are using and the size of fish you intend to catch. The drag function also prevents the spool from overrunning and letting out too much line, eliminating backlash problems.
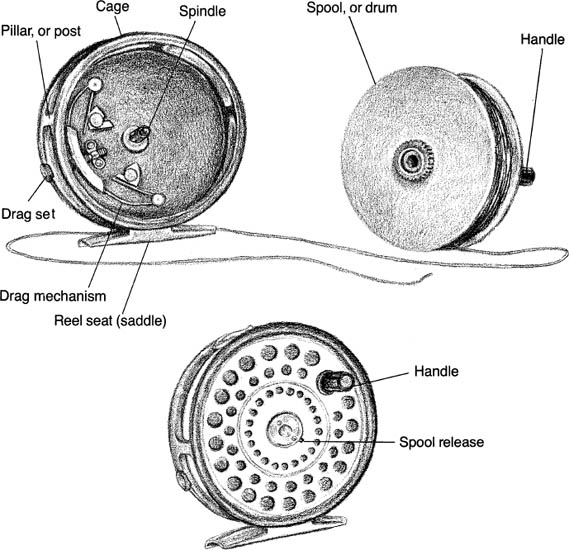
In addition to lightness and an adjustable drag, there are other features that should be considered in a fly reel. Fly reel spools should be perforated. Although not essential to the reel’s performance, this feature does help to evaporate and eliminate moisture when the line is stored on the reel, and to reduce the reel’s weight. Some reels come with either an exposed or a flanged rim on the spool itself. This can aid the fisherman when he wants to “palm” the reel (place the palm of his hand over it) for additional drag. Although they work very nicely, I have found them to be rather temperamental, for if they are dropped on a hard surface they have a tendency to either dent or misalign themselves, which causes rubbing on the reel cage. Finally, any reel you buy should have available additional spools that fit your particular model. There is nothing worse than buying a reel and not being able to find extra spools when additional fly lines are needed, and these days, with enormous numbers of reels being introduced and discontinued, this problem is more severe than I can ever remember.
Fly rods don’t generally wear out; they are much more likely to get broken underfoot or in car doors. That is not the case with fly reels, however. Inexpensive reels with plastic internal parts can wear out. Consequently, to avoid having to buy replacement reels, it’s better to spend the extra money for a good reel initially. Good reels aren’t cheap—generally $100 to $200—but the best are likely to last a lifetime.
There is a wide assortment of fly reels available, with widely varying prices. Let’s examine the different types.
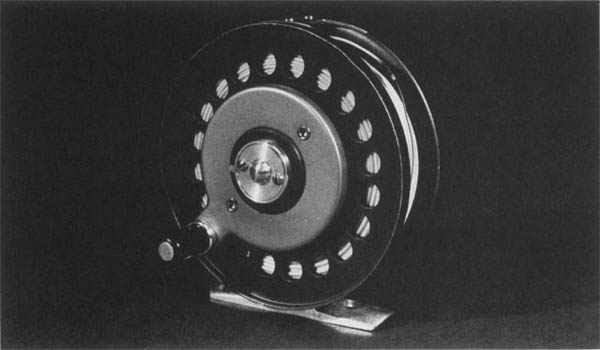
The single action reel is the most popular type of fly reel on the market today. It is the one I recommend to all anglers, because of its ease and reliability. “Single action” refers to the reel’s one-to-one ratio: One revolution of the handle turns the spool one revolution. The construction is simple. A cage houses the simple drag mechanism, and the spool or drum is inserted in it. All single action fly reels can be adjusted and mounted on the rod for either right-hand or left-hand winding. Additional spools can and should be purchased to accommodate different types of fly lines. Also, various reel sizes are available, enabling you to balance the reel to the rod and to allow for greater line capacity when you are pursuing large fish.
Single-action fly reels.
The advantage of the single action reel is its simplicity and generally its lightness. The main weakness is its susceptibility to wear, especially among the cheaper models. Remember, good ones cost more but they can last a lifetime.
The automatic fly reel has been around for years. Often called “the reel of the President,” because Warren G. Harding used it, its design features a coiled spring system surrounding a center spindle. The spring is tightened either by a screw cap or by stripping line off the reel. Instead of turning a handle, the angler activates a trigger, which releases the spring, retrieving the line.
This reel has some strong advocates—and some serious faults. It is heavier than a single action reel, and the spool has a limited capacity, which prevents a fisherman from using additional fly line backing with his fly line (more on lines and backing in a moment). Because of the spring tension, the fine drag setting (needed to prevent fine leaders from breaking when a fish is on) is almost nonexistent. And because the spool is not easily removed, the reel lacks the useful interchangeable spool function. I used an automatic reel once and the experience convinced me that single action reels are better and more versatile.
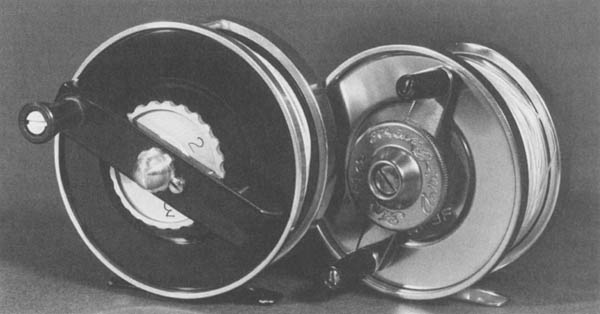
The multiplying fly reel is essentially a single action reel with added gears that allow you to reel up line at a rate up to two-and-a-half times faster than with a single action reel. It is not especially popular for normal trout fishing, but it can be a real help to those regularly casting long distances. The disadvantages? The gearing system adds extra weight and bulk, and in the cheaper models, the gears’ levers sometimes bind up when a large fish is hooked. That happened once to a client of mine when he hooked a very large rainbow. The reel froze and the leader and fly line instantly separated. I have been wary of multiplying reels ever since.
A multiplying fly reel.
When you venture into salt water you need a rugged reel because of the size and strength of the fish. Saltwater fish are very strong, and a reel with a sophisticated drag system to handle their devastating runs is called for. Most saltwater reels are hand machined of barstock aluminum to infinitely precise tolerances. The drag is generally a pressure type, much like that used in automotive disc brakes, and is designed to withstand the heat buildup that occurs when the line spins off the spool at high speeds.
There are many new saltwater reels on the market, and most are expensive—$350 to $450. But if you are earnestly going to fish salt water you will need one, and, believe me, it’s money well spent.
Typical saltwater fly reels.
Now that you know something about rods and reels, it is time to choose an appropriate reel size to meet your fishing needs. Regardless of your chosen equipment, the most important selection factor is balance. First, you need a rod to fit the style of fishing you wish to do and, second, a reel that balances to that rod. Balancing the rod and reel requires no mathematical formula. Mount a reel on a rod and hold it in your hand. If it balances nicely with the rod remaining level, you have a match. Remember that adding fly line to the reel will increase the weight slightly.
Though the fly rod initiates the cast, it is the fly line that actually delivers the fly to its target. This differs from both spin and bait cast fishing, in which the weight of the lure pulls the line off the reel to its eventual target.
Early fly lines were woven from horsehair, later to be replaced by woven silk. Silk lines were beautiful to cast but were rather troublesome and inconvenient. Each night the fisherman had to remove the line from the reel for drying. The following morning he would then stretch and dress the line with an oil paste so that it would float. The remains of old line-drying racks are still found around many old fishing camps and lodges.
The 1950s saw silk replaced by synthetic fly lines, which completely revolutionized the fly fishing industry. Modern lines consist of a polyvinyl chloride material applied to a thin synthetic core. They are impervious to the rot that silk invited and require little maintenance. Since those designed to float do so naturally, a dressing is applied only to clean the line, rather than to add buoyancy. Dirt can cause a line to sink and will inhibit smooth casting.
By design and function, all fly rods have a certain action, or flex. Some are very stiff and powerful. Others are soft and flexible. The proper fly line is one that balances or works within the flex of your rod. If the line is too heavy or too light the rod will not function optimally. Fortunately, fly lines come in different weights to meet standards dictated by different rods.
Silk lines were measured in diameter, with an obvious weight relationship. As the diameter got bigger so did the weight. Each diameter was assigned a letter, the largest being “A” and progressing to the smallest, “I,” in 0.005-inch increments. If an angler bought a double-tapered silk line, he chose that combination of diameters that fit his rod flex. For example, “HCH” might appear as the line size, indicating that the line started at 0.025 inches (H), widened to a diameter of .050 (C) and then tapered back to .025 (H). To the novice angler this classification method was confusing at best.
Because of the synthetic material used, modern fly line is no longer measured in diameter but in grain weight. The first 30 feet of line is weighed and the line is then assigned a number from 2 (the lighest line) through 13 (the heaviest). The system is standardized throughout the fly line industry, and rod manufacturers helpfully indicate the correct line sizes to be used for any rod.
Fly lines come in a variety of tapers designed to facilitate casting and presentation of the fly. As a line is cast, the energy that initiated the cast diminishes, for there is no such thing as perpetual motion. To provide less resistance at the end of a cast as this energy dissipates, fly lines are tapered. There are several configurations.
Starting at one end, the line gradually widens for approximately 20 feet, maintains the widened diameter for 50 feet, then gradually narrows to its original diameter over the final 20 feet.
Double taper is the most popular type of fly line and can be used for most kinds of trout fishing. It is easy to operate, presents the fly delicately, and its nicest feature is revealed when one end of the line becomes cracked and broken: It can be reversed.
A weight forward fly line was designed for long casts, windy conditions, or big (fast-flowing) water. Today, weight forward is used in all types of fishing. In fact it has become almost as popular as double taper, and I recommend it to beginners and those seeking the greatest fly line versatility. In principle, the bulk of the line weight is at one end, and it is this weight that actually carries or “shoots” the line out. The weighted front portion is approximately 30 feet, and because it is tapered somewhat, the line works well for normal fishing distances.
Bass bug and saltwater taper is essentially a weight-forward fly line with a shorter, bulkier front taper, which helps to turn over the large, wind-resistant flies that bass and saltwater fishing often require.
A shooting head is designed for extremely long casts. Basically, it is a tapered 30-foot line (versus the normal 90 feet) spliced to a special running line of monofilament or small-diameter fly line. Because of this small, slick-running line, which is attached to the reel, a shooting head can obtain a cast of 120 ft or more. Monofilament as a running line can create problems, however. Its lightness and limpness make its drift difficult to control, which in turn limits control of the fly. If you’re going to use a shooting head, (and I don’t recommend it to beginners), stick to a small diameter fly line as the running line.

Weight forward.
Specially designed weight forward line with long slender front taper for delicate presentation of small flies. Weight distribution of body section allows extra distance when required.

Bug taper.
Weight forward line with short front taper to “turn over” heavier, wind resistant cork and hair body bugs. The most practical choice for bass popping bugs.

Double taper.
Traditional line for handling trout flies, streamers and small popping bugs with finesse. Identical tapers on both ends—can be reversed as an economy measure. Perfect for roll casting.

Shooting taper.
For specialized long distance casting. 30 foot head with factory installed loop for easy attachment of monofilament or floating running line.

Level line.
For live bait fishing and when delicate fly presentation or long casts are not essential. An economy line.
Regardless of what line weight or taper you choose, fly lines come in different densities, from floating types for most fishing situations, to sinking types for subsurface fishing. A floating fly line is the most versatile and is used for perhaps 80 percent of fishing applications, and therefore it is the first type of line you should acquire. Sinking lines come in four densities: slow sinking, fast sinking, high density, and super high density. Today, even lead core lines are available. Miserable to cast, they do reach the bottom quickly.
There are also special purpose nymph lines, called sink tips and wetheads. The sink tip lines allow the first 10, 20, and 30 feet of line to sink while the rest floats. This feature lets you both control and mend the line, facilitating easier pick-up of the line off the water for recast. For deeper water situations “wetheads” or 30-foot sink tips are indicated: the first 30 feet sink and the remainder floats. The sinking portions of both wetheads and sink tips come in different sink rates.
DT6F, WF6F, WF6S, WF6F/S
The above fly line descriptions, appearing on boxes containing line, would be read from left to right, as follows: Double Taper size 6 Floating; Weight Forward size 6 Floating; Weight Forward size 6 Sinking; Weight Forward size 6 Float/Sink (or sink tip). The labeling on sinking type lines will also tell you the sink rate.
Fly lines are usually 90 feet in length, and because a large fish can easily run out this amount of line it is imperative that we first place on the reel a braided Dacron line, called backing, which attaches to the fly line itself. Besides providing more overall line length, backing takes up space on the reel spool, allowing the fly line to be reeled in more quickly and stored on the spool in larger loops. Never use monofilament as a backing material since its tendency to stretch can cause reel-spool damage. How much backing you use depends on the size of the reel, the length and taper of line you are using, and the type of fishing you are doing. For most trout fishing, 50 to 100 yards of backing is adequate, while saltwater fishing requires 250 to 300 yards.
Years ago, fly leaders were made of silkworm gut drawn from the internal silk sac of the Spanish silkworm. When dry, gut was brittle and would not stretch out its coiled memory. Fishermen could maintain the leaders’ pliancy only by 41 keeping the leaders dampened in a metal container.
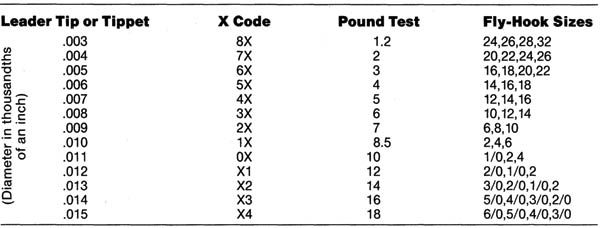
Today’s leaders are made of combinations of extruded nylons and polymers, providing far greater tensile strength than gut was ever capable of. Like fly lines, leaders are tapered to ease their casting. A heavy butt section attached to the fly line tapers through a mid-section called the body, and finally to an 18- to 24-inch section, called the tippet, at the end of which the fly is attached. Leaders are measured by the diameters of their tippets, and as you might guess, there is a close correlation between a tippet’s diameter and its tensile strength. Larger diameter tippets are less susceptible to breakage, while smaller diameter tippets are less visible and less an encumbrance to the fly, making them the better choice against selective fish in clear, smooth waters. There are nine standard diameters, each classified with an X-code according to its size. Regardless of manufacturer, 8X represents a leader with a tippet diameter of .003 inches; 7X, one of .004 inches and so on, through OX (8.5) inches to X4 (.015) inches. European leaders have the same X-classification, but diameters are measured in millimeters rather than inches.
Most leaders come pre-tapered or knotless from the manufacturer, although you can buy leader kits and tie your own compound leaders. Manufactured leaders usually come in seven-and-a-half-, nine-, and 12-foot lengths. Seven-and-a-half foot leaders are easiest for the novice to operate; they are also good for dry fly, wet fly, and nymph fishing in tight conditions. Nine-foot leader is the standard for most types of fishing, and 12-foot leaders are used for smooth, clear waters such as spring creeks, where distance between the fly line and the fly is critical. For super-delicate water a 16-foot leader can be used, although for many anglers it is difficult to cast and turn over. Very short leaders of six feet or less are often used for sink tip or full sinking fly line, enabling the leader to sink quickly and more uniformly (more on these terms in the next chapter).
LEADER TIPPET AND CORRESPONDING FLY SIZE
Over the years, I have become convinced that I am hired as a guide not to teach fly fishing, but to tie knots for people who have never taken the time to learn how. The easiest way to learn is to sit down and do them. Cocktail hour—if one doesn’t imbibe too much—tends to be an especially convenient time to pick up a few pieces of monofilament and put in that essential practice time. The following are the basic knots that all fly fishermen should know:
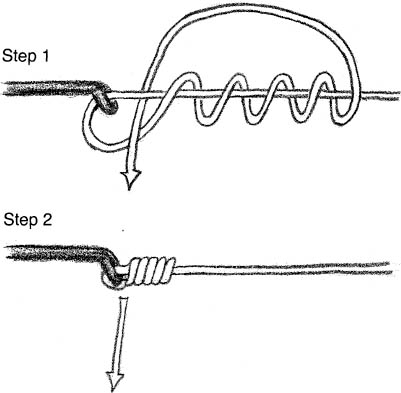
The nail knot is for attaching fly line to backing, and leader to fly line. To tie it, lay the leader parallel with the fly line and a narrow finishing nail, being sure to leave enough of the leader hanging free. Now wrap this short end of the leader five times around the fly line, nail, and leader material itself. Next, run the end back up through the middle of all the lines, remove the nail, and tighten the knot. If you’ve wound the leader correctly, and not let the windings overlap, you should have a nice small knot. Snip away its ends and coat the knot with either contact cement or—my preference—clear nail polish. Nail knots create a smooth transition between line surfaces.
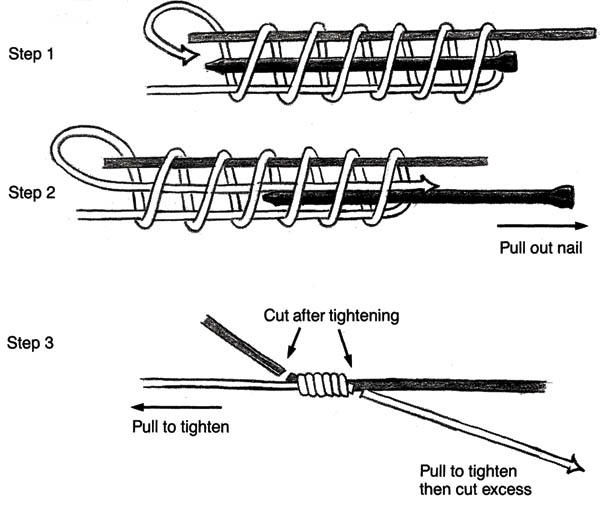
The nail knot.
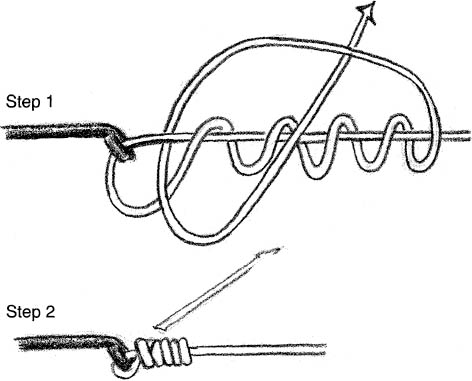
The blood knot or barrel knot is designed to attach two pieces of monofilament together and is especially useful in attaching additional tippets to leader body. Since tapered leaders have only so much tippet material on them, in lieu of replacing the entire leader, you can attach an additional length of the desired-size tippet to the leader itself, using spools of tippet material, available at most fly fishing dealers. To make this attachment, the blood knot is one of the knots of choice.
Cross two pieces of monofilament. Wrap one end five turns down the long side of the other piece of mono. Bring the piece over and place it in the crotch or middle of the knot. Repeat the process with the other end of mono, bringing it back up through the hole, or crotch, formed by the other piece. Five turns with either end guarantees optimum holding strength and knot-seating. Now, wet the knot with your mouth and, holding the long lengths, slowly pull the knot tight. Clip the short ends to the base of the knot, and your blood knot is complete.
The blood knot, or barrel knot.
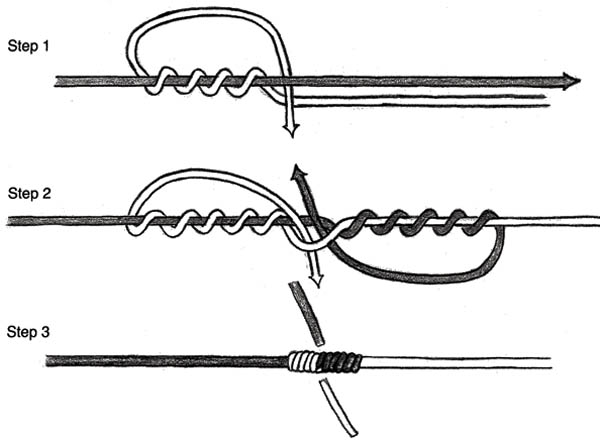
The surgeon’s knot also attaches two pieces of monofilament, and because of its ease, it is now preferred by many anglers to the blood knot. Essentially, it is a double overhand knot in which both pieces of monofilament are brought through the tying loop twice instead of once. It can be tied quickly and is very, very strong. Again, wet before tightening.
The surgeon’s knot.
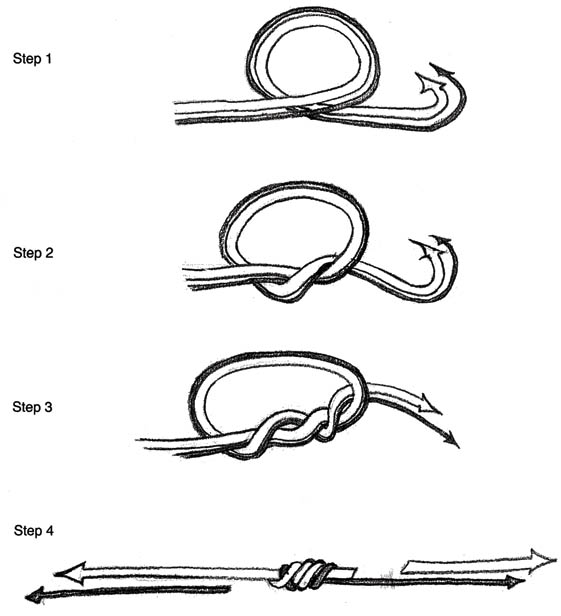
The clinch knot—also known as the cinch knot—is for fastening the leader to the fly. To start the clinch knot, thread the leader either up through or down through the eye of the hook. Wrap the end of the leader at least five times down its main length, and come back up through the gap between the eye and the wraps. Holding the fly and the main length of leader, moisten the knot and tighten. For an “improved” clinch knot, after you have gone through the gap between the eye and the wraps, continue to bring the short leader piece through the formed main loop. The key in tightening either knot is to pull on the main leader—do not pull on the small portion of leader, for the knot will not seat tightly against the hook.
The clinch knot.
The improved clinch knot.
You now know something about rods, reels, lines, leaders, and backing. The methods for attaching backing to reel spool, fly line to backing, leader to fly line are as follows: 1) To attach backing to the reel: Thread line around the spool, and make an overhand knot around the reel spindle and another overhand knot at the end of the short piece (see diagram). Pull tightly and the knot should set against the spool with no slippage. After winding on backing, 2) attach the fly line to the backing with a nail knot, then wind it on.
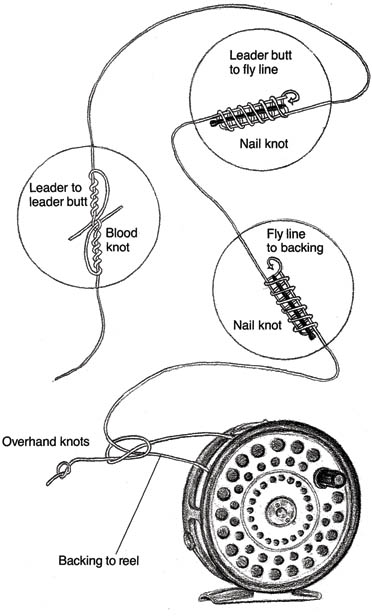
Reel-line setup.
3) After the fly line is on reel, many fishermen tie on a heavy, 12-inch piece of 0.023” monofilament known as a butt section. This is done for easier attachment of the leader and to prevent continual cutting back of the fly line. Again, the nail knot is used to attach the monofilament to the fly line. A tapered leader is then attached to the butt by means of a blood or surgeon’s knot (4).
Now that you have placed the appropriate backing, fly line, and leader on the reel, and have mounted it on the rod, it’s time to string the rod for actual fishing. There is no real wrong way to accomplish this final task, but there is a generally accepted method to eliminate aggravation. In threading the line through the rod guides, double over the fly line itself instead of using the leader tippet, which is often difficult to see and manipulate. A doubled over fly line is easier to see and handle and will not slide back though the guides if the line slips from your fingers.
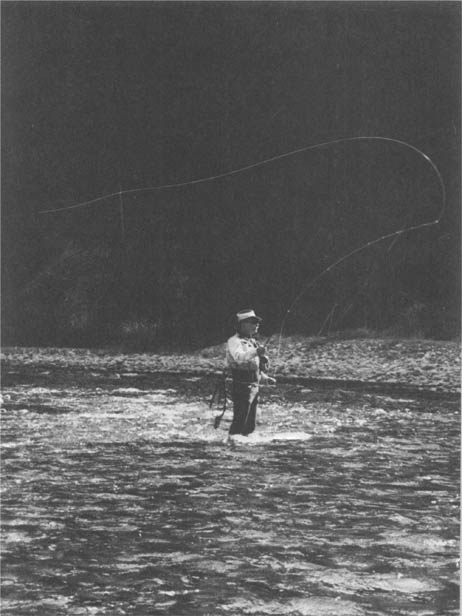
Now that your fly rod is strung and ready to go, you’re ready to learn how to fly cast.
Doubling the line (A) makes threading it through the rod’s guides easy (B). In addition, the line can’t slip back.
Solid, efficient fly casting is merely a means to an end—catching fish.