Amazing Props and Tools
I stand in the center, slathering shortening over the four-foot poppet; two hundred people have eyes trained on me. The fire fills the wide pit and is roaring. We lay the poppet on the pentacle of heavy wire, and sing our spell to grow our community in the balance. As we gather close around it quickly heats. Pop, pop, pop, popcorn starts flying out everywhere and the people dance trying to catch it! Faces are joyous with wonder—how can this be? The corn is done popping and the wax catches flame. A fire on top of a fire starts over the poppet, a swirling vortex of flame leaping into the night. The spell is done!
Stone Soup ritual (The Jiffy Poppet Ritual)
Great ritual can take place in an open field or a bare room indoors without a single physical object besides the ritual team and your participants. It is difficult, but it can be done! As you seek to enhance the engagement of participants, you will find the need for more. More stuff, more decorations, more sensory stimulus, more definition of your sacred space. In this chapter, we offer tools, tips, props, and tricks to add to your rituals, and to do so with the most reliable results and least amount of cost and effort. Many items will need to be mounted or positioned just right.
As a ritualista you will need your own physical toolkit as well, essential items that will be invaluable as you set up your ritual space. We include here items that you can find at thrift, surplus, hardware, or farm supply stores, items you can purchase cheaply and have on hand. A visit to your ritual location, whether indoor or outdoor, is important to assess the site, but having a trunk or tote with supplies and tools will help cover what you forget or don’t notice!
For indoor rituals, most often you are limited as to what can be placed or hung without any impact on the room structure or finish. Always carry both duct tape (stronger hold) and painter’s tape (non-marring removable adhesive). A two- or three-step foldable stepladder fits in a car and is invaluable in even an 8-foot-ceiling room. We carry a bag of small squeeze clamps, which can attach cloth, lights, banners, or information sheets to any surface edge. Get a package of poster putty, a pliable, sticky gum that won’t mar or stain surfaces, to hang lightweight items.
Mistress Judy’s ritual kit!
- • Sunhat, sunglasses, sunscreen; for ritual setup, rehearsal, or performance in full sun
- • Umbrella, rain poncho
- • Big ball of string and a compass; useful for circle setup
- • Almanac or moon phase app; useful for timing sunset and moonrise
- • Farmer’s (strike anywhere) matches in a zip-lock bag; these always light
- • Alcohol and Epsom salts; one cup to one handful burns for about 20 minutes
- • Index cards and Sharpie pen; for those who are worried about forgetting their lines
- • Pitch pipe, voice recorder
- • Scissors
- • Flashlight
Many indoor sites won’t allow an open flame, so all your plans for candles, even in a secure holder or enclosure, may be out the window! Consider picking up some tiny LED battery-operated candles. They are not a great replacement but may be the only alternative in some spaces. A few strands of string lights can be taped in place to offer a soft lighting alternative to commercial fluorescent lighting. These are available as battery-operated LED versions if electric power is limited or not in a convenient location. A couple of clamp-on lights with a spotlight bulb installed can draw the visual focus to a particular area. Need a campfire? Electric campfires and tabletop flames are available at reasonable prices. They echo the feeling of humans gathered around a fire, and some are pretty visually compelling.
Indoors, cloth coverings for room contents (or walls) may be important to simplify or reduce visual distractions. Thrift store flat bedsheets can be dyed a pleasant color, and a collection of theme-decorated cotton wall tapestries are great to carry along for last-minute coverings. If you work often indoors, it may be worth investing in a roll of photography backdrop paper. You can get large-width rolls of almost any length. With care, even paper can be rolled back up and used multiple times.
Gateways can be created with decorative additions to the actual room door. Freestanding gates need to be very secure and usually involve a wooden structure. Design something that can be disassembled with a screwdriver or with hand-tightened fittings for easy transport. A trick to make a lightweight structure more stable is to provide attachment points for several gallon jugs near the bottom. These you can fill with water or sand (and empty) at the site and cover with a decorative cloth. We have a whole tote of thrift store imitation vines, plants, and flowers. Even if a little tacky, they provide a visual reference to nature and will spruce up a room, gate, or altar. Many garden centers sell freestanding metal gate arches you can assemble on site. These are a good investment if you work indoors often.
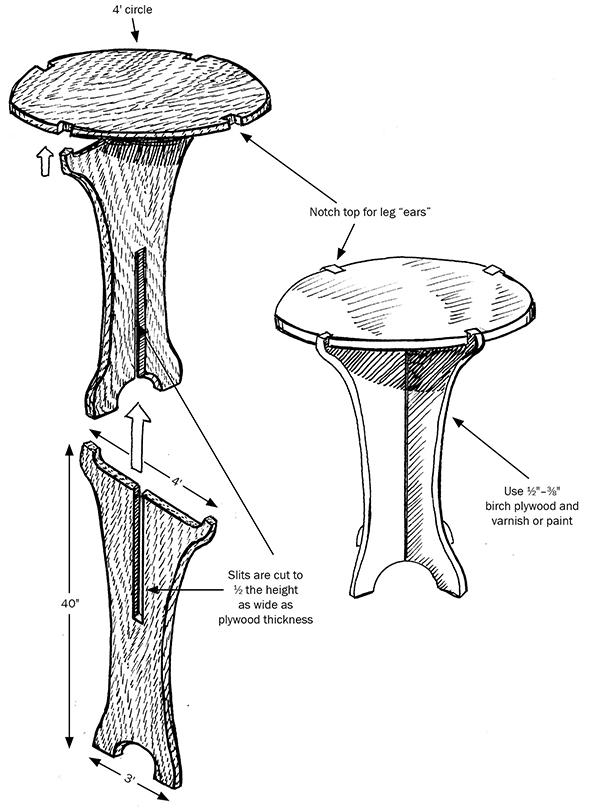
Indoors and out, ritualistas often need one or more altars. We carry most ritual items in flat-topped totes, and these can be covered and serve as a low altar, or stacked. A good set of “TV tables” can be a thrift store purchase. They fold and are lightweight. Outdoors we sometimes rope them to a stake beneath them for more stability. The premier ritual table is the plastic folding table, about four feet by two feet. They are sturdy but can be bulky to transport. If you are handy with woodworking tools, it is useful to have one collapsible round table. Legs can be formed by interlocking plywood sheets to hold a round surface at any height you choose. It breaks down into three easy-to-carry sheets.
Mounting Systems
We have tried many options for mounting cloth gateways and directional banners or to hang items outdoors. Wind is a powerful force, and a completely solid cloth creates strong resistance even in a light breeze. First, consider anchoring a banner only at the top. This can be visually distracting but reduces wind drag considerably. In some designs cloth can have slits cut through it to stay fixed on all sides and still allow wind to pass through. Even the sheerest of fabrics can still generate significant force on mounting systems.
By far the best mounting system is one driven into the ground. We have acquired a selection of 4-foot-tall metal T shaped farm fenceposts for creating gateways and mounting banners. These are best installed with a post-pounding tool, a heavy metal tube with side handles and one welded metal end. You just slip it over the post and lift and drop until the post is a foot or more in the ground. We use PVC pipe sized to slide over the post to reach heights up to 10 feet tall. Secure crosspieces can be added by drilling holes to receive wooden dowels, or you can use tie wire (look at a farm supply store) to mount any type of wooden piece horizontally. If transporting length is an issue, PVC pipe can be purchased in various diameter sizes that slide into each other to create a telescoping length made from several pieces. Most PVC pipe also has plastic elbow and tee fittings to build a structure if you wish. If wood (1 x 2 or 2 x 2-inch sizes) is a preferred material, we still anchor it to a metal post whenever possible. Both wood and PVC can be painted or wrapped in cloth for a more decorative look. Be sure you have permission to drive stakes or posts or do any digging outdoors. A search for underground electric or telephone lines that may not be apparent can be requested free from most utility companies and often is required by law.
A freestanding gate or hanging post can be used outdoors, but must have a secure and broad base and be heavily weighted (with water jugs) or anchored/guy-wired with rope and camping stakes or leaning support posts. This may be your only choice if you’re on cement or a surface you cannot anchor or drive stakes into, but unless it is very secure, we have found this method troublesome!
Outdoors, the ritualista gains a lot of advantages setting up a ritual space. You may have a site already decorated by nature. A park, meadow, grove clearing, or desert can all provide the ritual backdrop. In urban locations you might want to visually screen offensive views, but it is far easier to choose a pleasing location right off. We have completely screened off a ritual area with secure posts and cloth banners, but if you need this level of privacy, finding a more suitable location is preferred.
Ground Marking
You may want to make markings on the ground either to define the border or walking paths of your ritual space or to create ritual art or decoration. On hard surfaces, sidewalk chalk is designed for just this purpose. We use the art of Rangoli to create thematic designs to enhance many rituals.31 Traditionally rice flour and spices such as cumin, turmeric, cayenne, and paprika are used on smaller designs. Brightly colored powders made for this purpose are also available from ethnic Indian specialty food stores. The design is, in effect, a prayer that blesses the site as participants walk it into the earth.
For larger scale, and for any border definition, our primary material is garden lime. It is a fine white powder and cheaply available, at just a few dollars for a 50-pound bag. For colored lines we use white silica sand, which can be colored with a small amount of powdered tempera paint. These substances are nontoxic and biodegradable; however, they both contain small particles unhealthy to breathe when airborne. Use of a cloth mask is advisable while laying the powder in any quantity.
This lime-laying tool is made from a recycled screwtop plastic lemonade jar. Just duct-tape it securely to a 3-foot wooden stick a few inches off the ground, drill multiple ¼-inch holes in the bottom, and test it out to make a lime “shaker.”
Clay Bead Necklace Gift
Many items for use as a ritual gift can be gathered or purchased cheaply. Creating a gift allows for the addition of words or images directly inspired by and connected to your ritual intent. Paper, wood, metal, and most craft media can be used. We have specialized in clay beads, as we have the resources to produce these, but you can contact a local pottery or ceramic shop and usually find someone excited and willing to help you with materials and firing for this project. Clay has the advantage of being directly from the earth, able to display intricate details, and easily produced using press molds.
We usually make prototypes, and from them molds, in low-temperature red clay. It is fine-grained and retains the detail. We like to keep the bead design fairly flat for ease of firing and reduced weight. Working with the wet clay, make the basic shape you desire, and using fine tools (even a toothpick), add any words or detailed images. You are making the original, so make it exactly as you want it to appear (note that it will shrink about 15 percent after drying and firing). Plan for the hanging hole in both location and direction; you want it to hang well on the neck. You can pierce the hole as you make the beads.
Once you have the original made, let it air-dry thoroughly or in a 200-degree oven overnight. Take it to a ceramic shop and ask them to fire it to “bisque” hardness. Now you need to make your actual bead molds from the original. Make half-inch slabs and cut them to the outline shape of your bead. Press the original you made into the wet clay, one for front and back if you have designs on both sides. The clay will flatten out as you press the original into it, so you may have to trim them back to size. We usually make several molds so we can pick out the best and have several people making beads. Again, air- or oven-dry these, and once dry, use a needle or other fine tool to refine any detail that has been lost. Make another trip to the ceramic shop and get your molds fired to the same hardness.
Now you are ready to press-mold the beads. Take a small amount of wet clay, about the size you want the finished bead, and roll it in your hands into a smooth globe shape. Press it between your front and back molds (or just into the front if one-sided). Holding it between the molds, run a fine-bladed knife around the edge to make your finished shape. Carefully pull apart the molds and your bead will appear!

Photo by Nels and Judy Linde
Back of bead mold, front of bead mold, original bead for molds, finished flame-fired bead (top left, clockwise).
Gently remove and set to dry. When the air-drying beads start to change color (about half dry), pierce the hanging hole using a tiny metal rod, plastic tube, or a drilling motion with a tiny V-shaped point. Once the beads are completely dry, use a knife to scrape off any sharp edges and around the hanging hole. Make as many as you need, and when dry, back to the ceramic store for another firing, and your beads are complete!
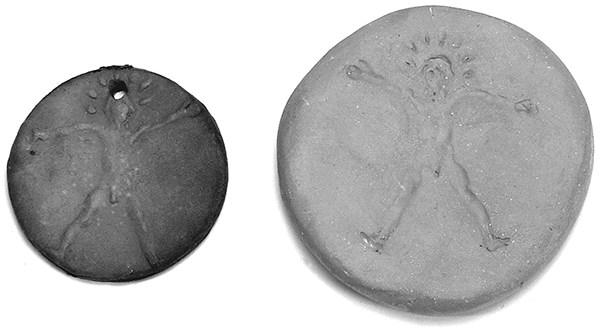
Photo by Nels and Judy Linde
A simple mold made by pressing a charm into wet clay (right).
Finished Enki bead, embossed design, flame flashed (left).
For a raised, embossed-style design, you can press an existing item into the mold shape, and fire that to use as a mold to make beads directly. The bead for the Enki ritual was made by pressing a small metal charm of a human figure directly into the disk mold shape. This eliminates the step of making an original to make the mold from, but realize any words added will need to be in reverse when working directly on a bead mold.
There are air-drying and oven-fired clays available in craft stores that can be used for this same process. The result is less durable and detail is hard to incorporate, but for a small quantity of ritual gifts, it’s worth a try.
We typically make all our originals and molds using a red clay for strength and detail, and then make the actual beads using a raku clay. This is a coarser low-fire clay designed to take thermal shocks. After the beads have been kiln-fired to bisque hardness, we fire them again in a ritual fire. Place a 4-inch stone in the center of your fire pit, and use wood chips (small-animal bedding) to cover a small area around it. Lean all your beads on edge radiating outward from the center stone, and cover the beads in more wood chips. Now cover it all with aluminum foil, tucking the outside edges downward to the ground. Place a barbecue grate over the top and build your ritual fire on top of that. After burning for a few hours, the coals will ignite the wood chips surrounding your beads. Starved for air by the foil barrier, the smoke created will “flash” black markings randomly on the beads, creating a fire-touched look. Play archaeologist once the fire has cooled and retrieve your beautiful beads!
Mirrors are a handy prop to use in ritual. They can be used to reflect light and the image of participants back to themselves. This trick makes great use of them. Buy some brown cloth gardening gloves, gather some 3- or 4-inch round mirrors, and hot-glue them to the palms of the gloves. That’s it! Now your team can move or dance around participants and strategically offer a mirror for reflection.
Hourglass Timer
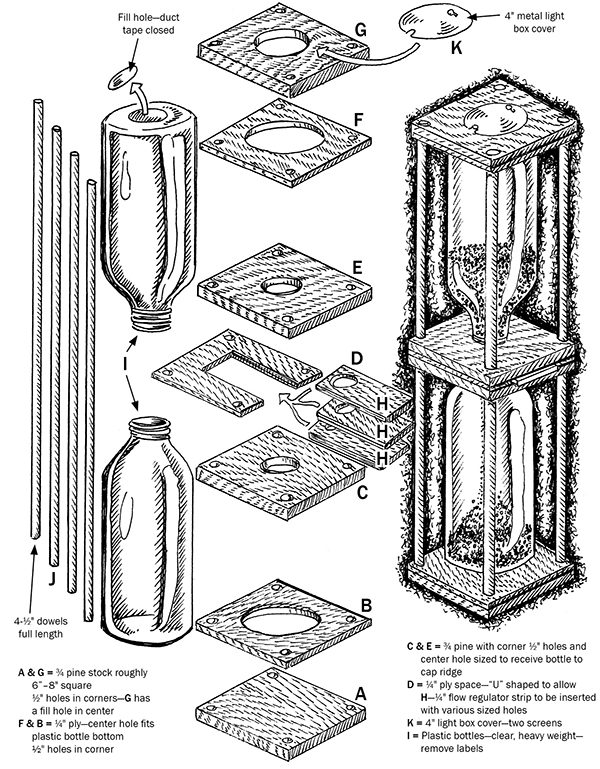
This is an easy-to-build, adjustable timer hourglass, large enough to be easily seen and used to regulate events that need a defined time in ritual. It is built with a few scraps of wood, some dowels, and two liter-size, heavy, clear plastic bottles. There is an openable end to add sand and in the middle between the two bottles is a slot to slide in a strip of wood to regulate flow times (various size holes in each strip).
You will need to custom design this to fit your plastic bottles, so collect them first. We use sturdy flat-bottomed water bottles with a narrow top (liter soda bottles usually have a curved bottom shape and are too lightweight for sand). Then purchase four 3-foot-long half-inch dowels and gather a few square feet of ¼-inch plywood, and a few square feet of ¾-inch plywood or pine stock. Plan to cut most of your squares at least three inches larger than the diameter of your bottles; you will need room to drill half-inch holes in each of the four corners outside of the bottle diameter. Once you lay out one square with the corner holes, you can use it as a template to drill the rest. Cut three ¼-inch squares and four ¾-inch squares and get all your dowel holes drilled in the corners. Then with a circle drill bit or saber saw, cut the center holes in the squares:
- • (A) ¾-inch ply, no center hole
- • (B) and (F) ¼-inch ply, center hole to fit water bottle bottom diameter
- • (C) and (E) ¾-inch ply, center hole to fit water bottle top, snug to stop at cap ridge
- • (D) ¼-inch ply with a 2-inch slot cut to receive flow regulator strips
- • (G) ¾-inch piece, 2-inch diameter fill hole. (Cut a hole in the bottom of one bottle bottom, too!)
- • (H) Several ¼-inch ply strips, 2-inch wide with holes from 1⁄8 to 3⁄8 inch lined up to allow sand to pass between the bottles and regulate sand flow rate
Slide all the pieces together on the dowels as in the diagram, and once you know it all fits, glue and tack nail it all together. Fill the top bottle two-thirds full with sand through hole (G), tape the hole with duct tape, and add a 4-inch round metal electrical-box cover over the fill hole for security. Try it out and time it with different size regulator strips (H).
This lightbox creates the illusion of infinite depth below you. The photo doesn’t do it justice; the human eye can detect five or six layers of light rectangles receding into an immense depth!
Constructed with a wood frame of a 2 x 10-inch stock and a salvaged piece of ¾-inch-thick solid tempered glass, it can safely support a 600-pound person. Most urban areas have at least one glass manufacturer, where small reject panes can be bought and the box designed around the glass size, as we did (you cannot cut it!). The mirror is slightly angled to face a bit toward the direction of entry. This way you see the receding rectangles of lights before you are actually over them. It is powered by battery or 110-volt small LED string lights, and part of how it works is to shield them toward the glass so they are only seen reflected in the mirror.
This prop needs complete darkness to work well. Outdoors, we build a dark passageway made from a heavy tarp or black plastic thrown over a rope, with the bottom edges spread apart to form a triangular tunnel. The rope is either stretched between two tree branches or between staked poles. Add a door flap on each end to create total darkness. Indoors, a well-darkened room works fine.
The box is about a foot deep and for best effect outdoors we bury it to ground level and surround the ground around it with black cloth. A stepping stone, set back a few inches, will increase the step downward onto the glass. This is a good effect and keeps people from trying to step past the glass. Indoors, you need a small platform surrounding it with enough room to step onto and off of the lightbox. For this height you also need a short step at each end. Even when you absolutely know it is an illusion, most people have a difficult time making this “leap of faith”!
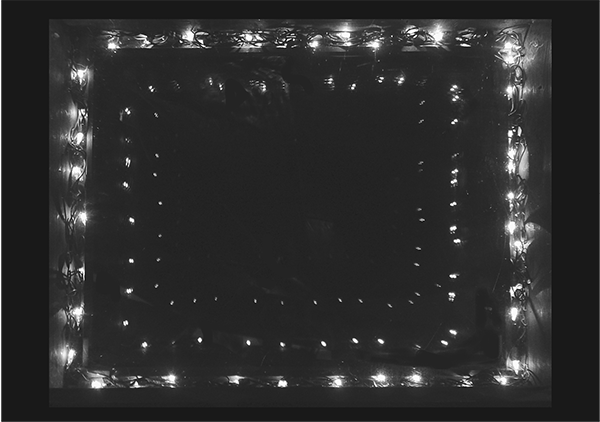
Photo by Nels and Judy Linde
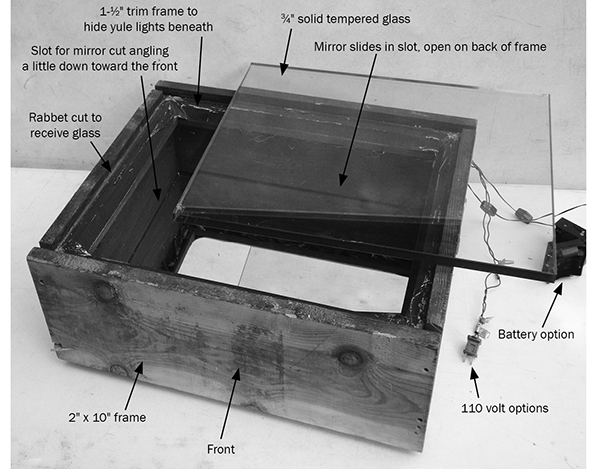
Photo by Nels and Judy Linde
Step into the Abyss and Infinity Box construction detail (top to bottom).
Grapevine and willow are present in hardwood forests and marshes across most of the United States. Wild grape is considered an invasive species, and many landowners are happy to have it harvested. Both are flexible and can be bent and wrapped to create a freestanding gateway that can accept many thematic additions and decorations for ritual.
You will need a pile of willow or grapevine in various lengths and thicknesses. Save the six heaviest and longest pieces (at least 6 to 8 feet long) to form the two tripod legs. To join pieces use either a strong biodegradable cord or tie wire. First, make six circles by bending the lighter weight material—two each of 3-foot, 2-foot, and 1-foot diameter—and tie each in several places to keep them a circle. You may need several layers so it is built like a cable circle. Then lay out your six heaviest pieces in groups of three, and create the tripod bases by joining the legs to the circles at one, two, and three feet from the bottom, so by four feet your tripod legs can join together. Stand your two tripods up and, with help in steadying them, join them to form an arch with additional overlapping pieces. If you have sturdy material and tight construction it will stand freely, but you can also add two “T” metal fence posts in the center of each leg tripod for support, or stake each leg down to aid stability. Once you have it up, wrap the entire structure with lightweight material, joining with ties as needed. Add ribbon, flowers, paper, or cloth and even add a top mirror or emblem for additional decoration.
Participant Potato Printed Gateway
You can use this design to mask acrylic panels, have ritual participants print theme images on them, then reveal a hidden design underneath and transform the panels into a ritual exit gateway.
We purchased two 2 x 6-foot pieces of acrylic. These worked great because the size was right for creating male and female outlines, and because acrylic comes with a clear plastic protective sheeting, perfect for creating a stencil mask. Secure enough 2 x 2-inch stock to create frames for your acrylic. Make the frames so the inside dimension is about a half-inch smaller than the acrylic. A saw kerf cut down this surface allows the acrylic to slide in and be held securely as the frame is assembled. On each long side outer edge are mounted two pipe straps to fit half-inch pipe.
To make the frames into outdoor work tables, we cut six 1 x 4-inch stakes with a notch near the top to support the frame while participants printed the acrylic. Two 6-foot pieces of half-inch rebar were driven into the ground, ready to receive and support each panel frame vertically when slid down through the pipe straps. We placed the two frames about four feet apart so printing helpers could stand between them holding the paint trays and potato print blocks. You can install the rebar posts at the ends of the panels just in advance so they are in place ready to make the gateway but not in the way of the ritual.
We carefully cut male and female outlines on the acrylic coating with a razor knife and peeled off the portion within the outline. Participants used half potatoes with designs cut into them to print over the whole acrylic surface, unable to see the stencil. As the ritual progressed and the paint dried, the stencil was carefully removed from around the shapes, revealing them as the printed surface. At the ritual ending, we raised the panels to vertical, slid them onto the rebar posts, and removed the support stakes to form an exit gate.
You can use two PVC pipe frames to suspend steel pipes cut to a pentatonic scale as a sound gateway to enter a ritual. Hank Knaepple designed and built this one. Once you have a bass note pipe cut, you can get other notes close in length and then fine-tune them. Use Internet resources for length proportions of wind chimes, or if you have an engineer in the team use the Fourier theorem 32 to compute them.
|
Photo by Nels and Judy Linde |
Photo by Nels and Judy Linde |
Use 3-inch PVC pipe to build two support structures: two 8-foot legs are joined with a 6-foot crosspiece with elbow fittings and slid onto heavy “T” fence posts to support each bank of pipe gongs. You can add angled support ropes anchored to side stakes for additional stability if needed. For the best sound, suspend the pipe gongs from a rope that crosses the pipe diameter through holes drilled about a quarter of the way down from the top. To stabilize the pipes from excessive swinging while being played, stretch a light cord twice between the frame legs, weaving it alternately between the pipes near their bottom. Play them with a rubber mallet!
Create colorful sheer fabric flags that double as path-working gateways when mounted on rebar support poles. These large sheer flags moving, almost floating, around and over participants can be a great tool during energy raising. We have found these quick to install and remove as gateways, and versatile for many purposes. Eight-foot-tall, half-inch rebar is easily driven into the ground and removed. These have a welded bump (or a wrap of tape or wire will work) an inch from the top to catch and support a 1 x 2-inch crosspiece drilled with a 5⁄8-inch hole. Use an 8-foot 1 x 2-inch pine board for the flag handle, and a crosspiece and staple through a strip of light cardboard to affix the sheer fabric.
Initially developed and offered around the world by the EarthSpirit Community,33 “web weaving” rituals use a pole with many strings stretched from the top to the ground, creating the spokes of a web for participants to weave prayers into. This derived variation used a 4-foot wheel mounted to spin atop an 8-foot-tall four-by-four with twine spokes connected to perimeter poles, creating an 80-foot-in-diameter canopy. The perimeter poles were lowered so participants could weave a web of horizontal twine and then tie their leaf-shaped wishes to it. Lifting the perimeter poles, the canopy could be raised to eight feet so participants could fully walk under it. By walking the perimeter poles in a circle, the whole web rotated above participants, and then by stopping the wheel rotation, the whole web was drawn into a central fire and offered as an energy raising.
The wheel part of this prop can be built many ways, but integral to how it spins is a metal rebar point mounted into the end of the support 4 x 4-inch pole. Building the wheel around a 1-foot threaded pipe allows for a flange on one end to mount to the wood, and a cap on the other end gives a rounded surface under the cap for the point to rotate upon. The wheel adds a dramatic touch, a giant canopy rotating above the participants, but the same canopy effect can be achieved with a stationary center pole, just without the rotation. To have a fire surrounding the central pole, we sunk it four feet into the ground and then shielded the first three feet aboveground by putting a piece of 8-inch stovepipe around the pole and filling it with sand.
This is a design for a poppet figure in which participants add popcorn. It was then laid over a fire for a tasty energy raising!
An inch-thick beeswax poppet shape was cast onto a 4-foot sheetmetal circle. This sheet was reinforced with a pentacle of tack-welded ¼-inch steel rod on the underside. We used wet clay lined with aluminum foil to make a 1-inch raised outline of the shape on the support sheet to pour the beeswax into, and then removed the clay, leaving a aluminum foil edge. After pouring in the beeswax and letting it harden, we drilled hundreds of ¾-inch holes into the poppet.
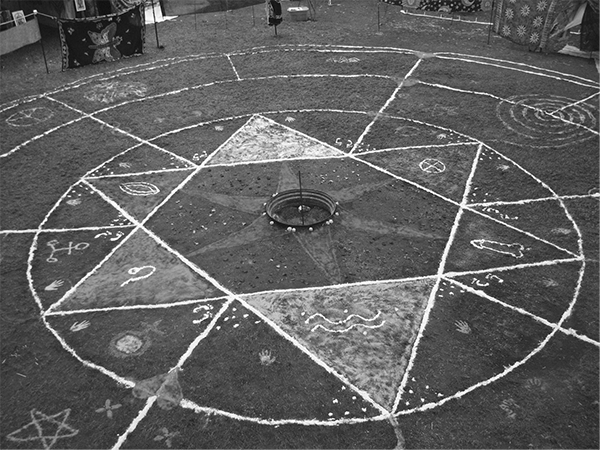
To install the support circle and poppet over the fire, we drove five heavy metal fence posts evenly spaced around a 4-foot fire pit. Between them we stretched heavy wire forming a pentacle, just above the large fire. Participants added popcorn kernels to the poppet holes, and then the top was slathered in shortening. With a full-width raging fire just below the support wire, the poppet was added, and within a minute, popcorn explosion! An experiential energy raising that can be adapted for any image design.
This is a large multiple-person walking snake puppet with glowing eyes. The technique can create whatever length puppet you need: a dragon, peacock, dragonfly, etc. Papier-mâché can work for the head, but it is more fragile to carry.

Photo by Nels and Judy Linde
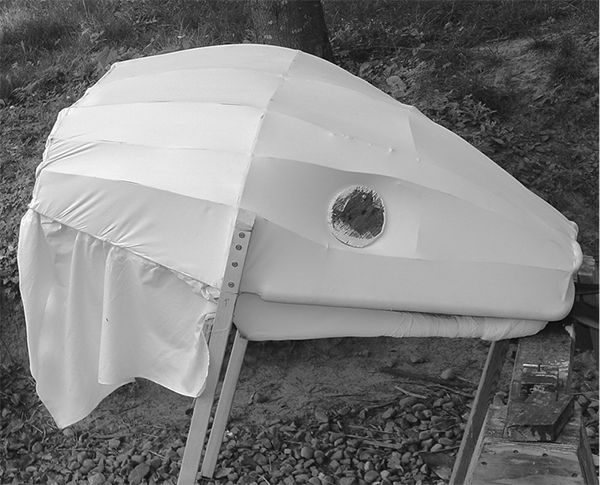
Photo by Nels and Judy Linde
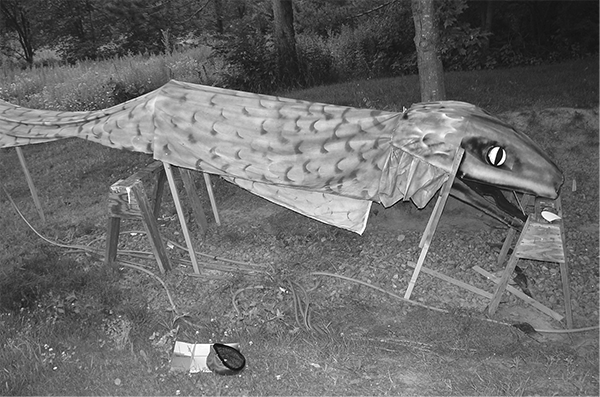
Photo by Nels and Judy Linde
Constructing the snake head, the muslin-covered snake head, and the completed
snake walking puppet with tail and supports (left to right, top to bottom).
We used a lightweight plywood base structure, adding shaping with heavy wire supports to create the finished shape. Muslin was then stretched tight over the form and stapled. Latex paint further stretched and hardened the fabric. We added a spring-loaded lower jaw with a tire inner tube rubber tongue that bounced as we walked. The glowing eyes were two battery-operated closet dome lights masked with black electrical tape. A sturdy 2 x 2-inch removable walking handle was added to each side, steadied by a half-inch plywood brace. These two carrying handles could be dropped into two 7-foot by 3-inch PVC pipes (mounted over “T” fence posts) to form a gateway. The same design brace and double handles had a curve of heavy wire arching the top to support the body cloth, and ties were sewn into the cloth. The tail was supported by a single 2 x 2 with a circle of heavy wire to give it shape.
Shadow Screen
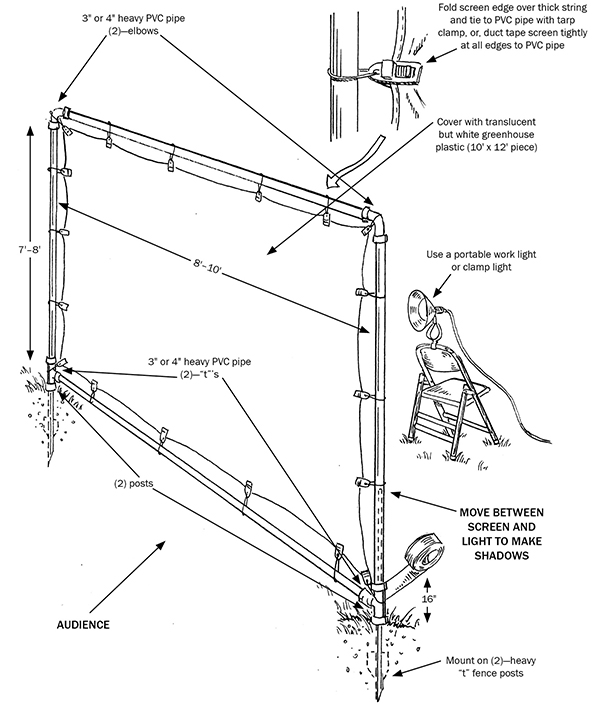
Create a display screen to perform behind and create a shadow display for your audience. The concept can be used indoors with a projector screen lit from behind. Your ritual dramas will be enhanced when you display just the shadows of the characters, using the imagination.
For a large outdoor screen, we used 4-inch PVC pipe and fittings. Two 7-or 8-foot pieces make the height, and 8-or 10-foot pieces make the top and bottom width. Join as shown with elbows at the top and “T” fitting at the bottom, and secure with duct tape. Cover it with a large white cotton sheet to give softened shadows (as in the photo). Translucent white greenhouse-cover plastic will give very sharp, crisp shadows. Duct tape your covering tightly to the PVC frame and slide the whole frame down upon heavy “T” fence posts. A portable halogen shop light works best for illumination, but even a clip-on type reflector light mounted on a chair back will work.
This is an easy-to-build-and-test device to make a fire appear to start spontaneously. The design is a completely hidden outdoor foot switch and safe ignition system. The timing must be intuitively guessed, aided by testing. It takes 20 to 30 seconds for ignition once the switch is tripped, allowing time to move away from the fire and switch area.

Photo by Nels and Judy Linde

Photo by Nels and Judy Linde
The magic remote fire starter (detail in top photo).
A small wooden box is built with scrap lumber just large enough to accommodate a square 12-volt battery and a household light switch. The box lid is designed with a piece that, when stepped on, flips the switch. Dig a post hole (8-inch diameter) deep enough to hold the top of the box at the base of the existing grass sod bottom, then remove any excess dirt and cover the lid with the removed sod from digging the hole. Remove any excess dirt, and with a hatchet cut a gash trench 1 inch deep along a 10- to 15-foot path from the box to the fire center. Light-gauge “doorbell” type two-strand wire is placed and covered in the trench.
One wire runs directly from the positive battery post to one end of the igniter. The second wire connects the negative battery post, through the switch, and onto the other end of the igniter. To build the igniter, remove the lead from a pencil about three inches long, and carefully wrap each bare wire end tightly around each end of the graphite. Then take about six stick matches and twister-seal them with the heads tightly pressed surrounding the center of the graphite rod. When the electricity is passed through the graphite, it quickly heats until the matches catch fire. Once the switch is completely concealed underground, I mark it with a small colorful tack or golf tee, so I can easily find it in ritual. Understand, you do all this in private, and do not allow participants or ritual team members to wander around the fire area once it is laid.
For the fire to start quickly, use more matches, finely shredded newspaper, and finely split pine or cedar kindling to make a “nest” for the igniter. We put a small pine stake in the center and clothespin the igniter up a bit so air is readily available and the kindling is lightly surrounding it on all sides and above. Using bone-dry wood, continue to lay a sound log cabin or tipi-style campfire structure around your ignition “nest” to completely conceal it, but loose enough to not restrict air into the igniter. In ritual, hit the switch and intuit and count in your mind to know exactly when to turn the focus to the fire lighting!
The True Mirror
We see ourselves as a reflection daily in our mirrors, but how can we see ourselves truly as others see us? We all have imperfections and asymmetry in our faces, one ear lower than the other or a smile lifted on one side. When we see a double-reflected image, we may not even recognize ourselves!
This true mirror uses acrylic mirrors and is designed for two people at a time to use, one on each side. For it to work you must be directly at eye level, have the perpendicular mirrors placed at precisely 90 degrees, and look at it from a position 45 degrees out from the mirror intersection, directly into the intersection. The mirror reflects our split face to the opposite side of a flat reflection so we see ourselves as we appear to others. Lettering reflected appears normal, not mirror-reversed. We are so used to looking in mirrors that if we move our hand to touch our right ear or face we are shocked to see our left reflected hand do the touching (as it would appear for someone looking right at us)!

Photo by Nels and Judy Linde
The True Mirror (with detail).
This double true mirror is built to break down and store away, and to be as lightweight as possible. The base is of ¾-inch plywood cut 24 x 48 inches long. One corner of each base end is cut at a 45-degree angle, and that is where participants will look into the mirror from. A 48-inch saw kerf cut 1⁄8-inch deep runs down one edge to receive the single 2 x 4-foot acrylic mirror along the back. A 24-inch saw kerf, equal to two mirror thicknesses, is cut 1⁄8-inch deep, dividing the base into two 2 x 2-foot squares (with one corner angled at the viewing corner). The front brace and top brace are similarly kerf cut and made to be perpendicular with triangles of ¼-inch plywood as support. To assemble, place the base on a tall 4-foot draped table, set in the mirrors, and hold them in place as the top and front braces are added and connected at the front top corner, holding the mirrors tightly together and perpendicular in each direction.
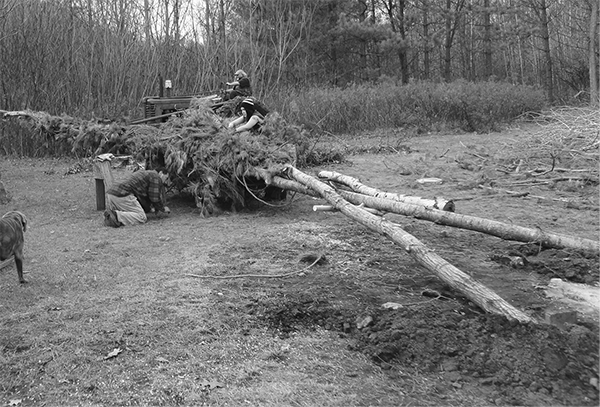
We have built more than 25 of these over the years, and you can use the same principles to build one on a smaller scale. It starts with two large poles of green-cut poplar laid in an “X” with the top ends on sawhorses. Securely screw and wire all the framing together. Add a pelvis just below the crosspoint and a collarbone piece above it using more poplar. Add fingers using deck screws to make hands on the top ends and wrap the arms with evergreen trimmings to fill them out. The head form is a globe made of wild grapevine, mounted on a pole and fastened to the collarbone and the main “X” crosspoint. To reduce ladder time, wrap the chest with grapevine and stuff it full of small dried brush before you are ready to lift the structure. Dig two post holes 3 to 4 feet deep with room for a “kick board”—a board inserted in each leg hole to keep the legs from sliding past the hole as you lift.

Photo by Nels and Judy Linde
Raising the roughed-in fire effigy frame.
For these large effigies we use a tractor loader to raise it, but you can use muscle and get the chest end lifted as high up as you can reach, and then brace it in place with a “V”-topped pole lodged into the chest. We have people holding guy ropes to keep it steady as the tractor (or car, or muscle) gets on the other end and, with a rope tied to the collarbone, pulls it the rest of the way until it drops in the post holes. For more leverage for lifting the structure to vertical, you can use a “gin” pole, a tripod-anchored derrick pole with a pulley or a block and tackle on top. Now pull out the kick boards and tamp the legs in place, filling their holes with stones and dirt. Add sticks surrounding the leg until they each become a cone of brush. Once that is done, it should be sturdy enough to lean a ladder on. From there it’s all “more sticks!” as you fill it out using ladders, wrapping occasionally with wire as needed, until you like the form. We spend a whole day just finishing the face and covering the whole skin with corn husks, wrapping occasionally with twine. Light with a torch, and stand back!
Location: Sacred Harvest Festival, 2005
© Judith Olson Linde and Nels Linde
Ritual intent
Community magic lays the seed for future growth. Raise the power, be reborn, and feed the self.
Ritual description
Our community magic lays the seed for future growth. What do we offer, what can we bring? What do you have? When we build together, we reap the rewards. Raise the power, be reborn, plant the seed, and feed the self.
Ritual context
This ritual’s opening was used for several rituals offered over a week’s time with the unifying theme “Folk Magick.” This had the effect of creating a unifying element between the rituals and evoking the feelings experienced in the previous one. It also had the advantage of allowing us to put increased effort into refining one good opening, and then having it ready for the next ritual in advance. It allowed participants to focus on the rite knowing already how the space is made sacred. The entire series of rituals was written in rhyme.
Ritual setup and supplies
At the circle center was a fire with five metal fence posts around it. Heavy wire was stretched taut between the five posts in a pentacle shape just above the fire. On one side of the fire was a large cast-iron cauldron, with a smaller one (filled with vegetable soup) inside it, lidded and covered with a cloth. On the other side of the fire waited a 4-foot beeswax poppet, supported by a sheet-metal circle with metal carrying poles. The beeswax poppet was an inch thick and covered with ¾-inch drilled holes to the base. (See chapter Twelve for details on making this poppet.) At the gate was an array of baskets, each holding a different item participants could choose to add to the “soup.” These items were symbolic of energies that benefit a community, such as toy soldiers for protection, seeds for new growth, feathers for freedom or dreams taking flight, play money for financial support, safety pins for safety, keys for new opportunities, and paper clips for organization.
Team members
Ritualista, 4 elementals, 12 ritual helpers, Bard storyteller. The ritual team in the opening was dressed in flowing skirts or baggy pants and all had folk-style head scarves.
Ritual script
The song for the procession to the ritual area gate was “Behold (There Is Magic)” by Abbi Spinner McBride. A core of 12 team members led the procession in a “spirit canoe” formed by six pairs standing shoulder to shoulder with their inside hand on the inside shoulder of the person in front of them. Their outside hands became paddles for the canoe, swung back in cadence to the festivants’ clapping and drumbeats, and in time with the song.
At the gate, the spirit canoe folk took up the baskets of symbolic items. Two team members smudging at the gate acted as regulators into the circle. The Ritualista whispered to each as they approached the baskets: “If you could contribute anything freely to your community, what would it be? First you must take it!” Festivants chose what items to take and entered the ritual area.
Standard folk ritual opening
The festivants entered through the gate and formed a circle. Four elemental team members wandered around outside the circle as if no one was there. They carried a potato fork (N), broom (E), scythe (W), and staff (S). Entering the circle, they took their respective places in front of altars facing into the circle. The Ritualista entered the circle with a rhyming chant:
“In a clearing on a moonlit [cloudy, twilight] night, illuminated by firelight,
Assembled here we circle round, to see what blessings can be found
In the company of other folk, and what magic we may invoke.”
The Ritualista paused at each direction and signaled with a tambourine, saying a simple rhyming call:
(East) “Where the moon rises and dawn breaks the day, on scented breeze newness wafting our way.”
(South) “To the South lie the sands of fire, choices made, the loin’s desire.”
(West) “In the West the misty shore, rainbow’s end, the ocean’s roar.”
(North) “To the North the mountains of stone, caves of my ancestors, antler, bone.”
As the Ritualista mentioned each direction, each elemental team member turned to their altar, lit their candle, blew a kiss to their direction, and then turned back toward the inside of the circle. Rotating slowly in the center with her arms out, the Ritualista continued:
“The Lord and the Lady are present here too, and spirit, as always, within each of you.”
The Ritualista now pointed out the cauldron near the fire:
“This empty pot will feed no kin, without your gift we can’t begin.
Can you offer a smile, an open door? We build with trust, love at the core.
We learn from those who came before.”
Team member regulators were at each altar. The Bard began the folk story of Stone Soup (see chapter Three), with four pauses included in his tale. At each pause, an elemental team member brought the festivants in his or her quarter into the circle, beginning with the North–East group (the people between the North altar and the East altar). The festivants traveled by the cauldron and added their objects. As they passed to return to their place in the circle, their elemental team member gave each a few popcorn kernels and asked this question:
“What seeds can you plant to ensure that our community grows?”
The story ended after the last quarter (West to North section) of festivants added their contributions. The team members then moved to the cauldron, and as the soup was transformed, the Ritualista said:
“From what we contribute, with value unknown,
a hearty broth of strength has grown.”
The soup cauldron was lifted out of the bigger cauldron and taken around the circle. The thick soup, still warm, was distributed to each participant in tiny paper cups. When the soup givers were about a quarter of the way around, the Ritualista called for everyone’s attention and said:
“How can we ensure this bounty for tomorrow?
A sense of belonging, from which our children can borrow.
For continued growth, you must plant your seeds,
and harvest your intent with deeds.”
The poppet, on its support circle, was carried around the circle by two team members as festivants poked popcorn into the drilled holes in the beeswax. The fire tender kept stoking to make the central fire roar. When the poppet had completed the circle, it was carried to the center near the fire. A team member seductively smeared Crisco all over the poppet by hand, and then it was laid on the wire pentacle over the fire to be “popped.”
The Ritualista said:
“With the sweetness of magic, with fire transformed,
join power and hands! Make our image reborn!”
Drumming and the song “We Are Your People,” by Beverly Frederick, began, and the team members gathered in the circle to dance around the fire as the popcorn began to pop. The song faded away as the drumming and dancing overtook the participants and the poppet burst into flames. The Ritualista clanged the Stone Soup kettle to signal the circle’s close. The elementals closed the circle, extinguishing their candles as the song returned for a final energy raising, and the Ritualista bowed to the center. The spirit canoe re-formed and led the group to the exit gate and back to the gathering spot.
