Chapter 3: How Do I Use My Photos and Share Them with Others?
After importing and editing your photos, you’re ready to share them with others. iPhoto makes it easy to create compelling slide shows, either in just moments by using standard settings or taking your time to customize each photo’s settings. You can easily share your photos on your local network with other iPhoto users; on Web sites such as MobileMe, Facebook, and Flickr; or in the applications you use. You can create books, cards, and calendars; you can also use your photos in several ways within the Mac OS X user interface, as desktop backgrounds, account icons, or the background of a folder in Finder.
Creating Powerful Slide Shows
Sharing Your Photos with Others
Using Your Photos within Mac OS X
Creating Powerful Slide Shows
iPhoto lets you create attractive slide shows in moments, complete with music and transition effects if you like. You can either create a slide show quickly, using the same setting for each photo, or spend the time to create a customized slide show that plays exactly the way you want it to.
Running a quick slide show
Here’s how to run a quick slide show without saving it:
1. In iPhoto, select the photos you’ll use in the slide show. If you want to quickly review your most recent photos, click Last Import in the Source list.
2. Click the Slideshow button on the toolbar. iPhoto displays the first photo full screen and opens the Slideshow dialog with the Themes tab at the front, as shown on the opening page of this chapter.
3. Click the Classic box or the Ken Burns box. The Ken Burns Effect — zooming and panning over the photos — adds visual interest, but you’ll want to turn it off when you’re just checking out your latest photos.
4. Click the Music tab to bring it to the front of the dialog (see Figure 3.1).

3.1 You can accompany your slide show with music from GarageBand or iTunes, or stick with the theme music that iPhoto offers.
5. Select the Play music during slideshow check box if you want music with the slide show. If you prefer peace, deselect the check box and skip the next step.
6. Choose the song you want to play from the Theme Music folder, your GarageBand compositions, or your iTunes library. You can search by using the Search box and preview music by clicking Play.
7. Click the Settings tab to bring it to the front of the dialog (see Figure 3.2).
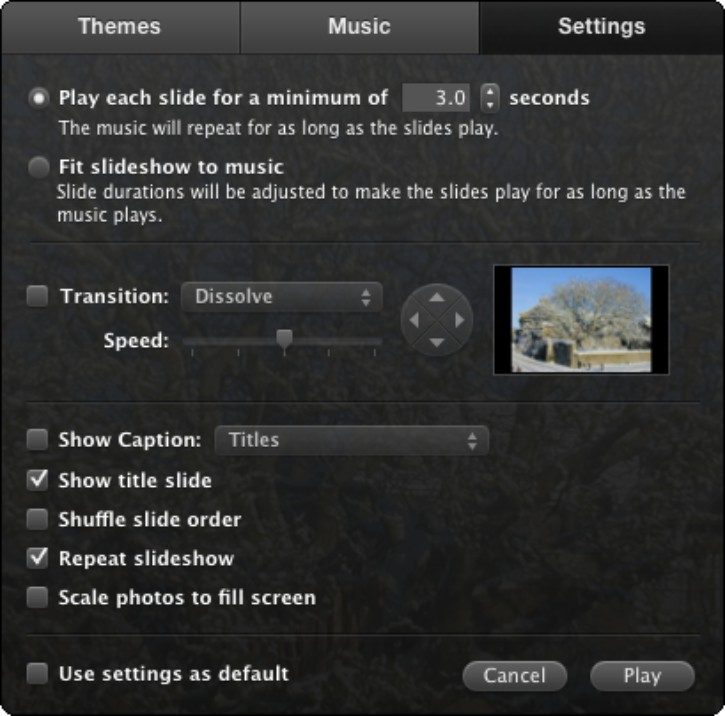
3.2 Choosing settings for a slide show.
 If you choose to let the music control the length of the slide show, remember that you’ll need to experiment with the right number of photos to avoid the show dragging or strobing.
8. In the Play each slide for a minimum of box, choose how many seconds to dwell on each slide. If you prefer to use music to control the length of the slide show, you can select the Fit slideshow to music option instead.
 If you want to create a playlist just for this slide show, select the Custom Playlist for Slideshow check box. iPhoto displays an extra box at the bottom of the Music tab. Drag songs into this box, and then drag them into the order in which you want them to play.
9. If you want to use transitions between slides, follow these steps:
• Select the Transition check box.
• In the Transition pop-up menu, choose the transition. None is a good choice when you’re simply reviewing your photos and don’t need extra pizzazz. For consistent changes, choose a transition such as Dissolve, Flip, or Twirl. If you feel more adventurous, choose Random to have iPhoto pick a different transition for each change.
• Look to see whether the four direction buttons are available (the arrows are white) or not available (the arrows are gray). If two or more are available, click the direction you want to use for the transition.
• Drag the Speed slider to set the speed of the transition.
10. Choose other options to suit your preferences:
• If you want to include captions, select the Show Caption check box. In the pop-up menu, choose the text: Titles, Descriptions, Titles and Descriptions, Places, or Dates.
• Select the Show title slide check box if you want to have a title slide at the beginning of the show.
• Choose whether to shuffle the slides, repeat the slide show at the end, and scale the photos to fill the screen.
• Select the Use settings as default check box if you want to make these settings the default for future slide shows.
11. Click Play. iPhoto closes the Slideshow dialog and starts the slide show full screen.
Use the slide show controls and navigation miniatures (see Figure 3.3) toward the bottom of the screen to navigate the slide show or to adjust the slide show settings. You can summon these controls at any point by moving the mouse pointer. To end the slide show, click the X button on the control bar or press Esc.
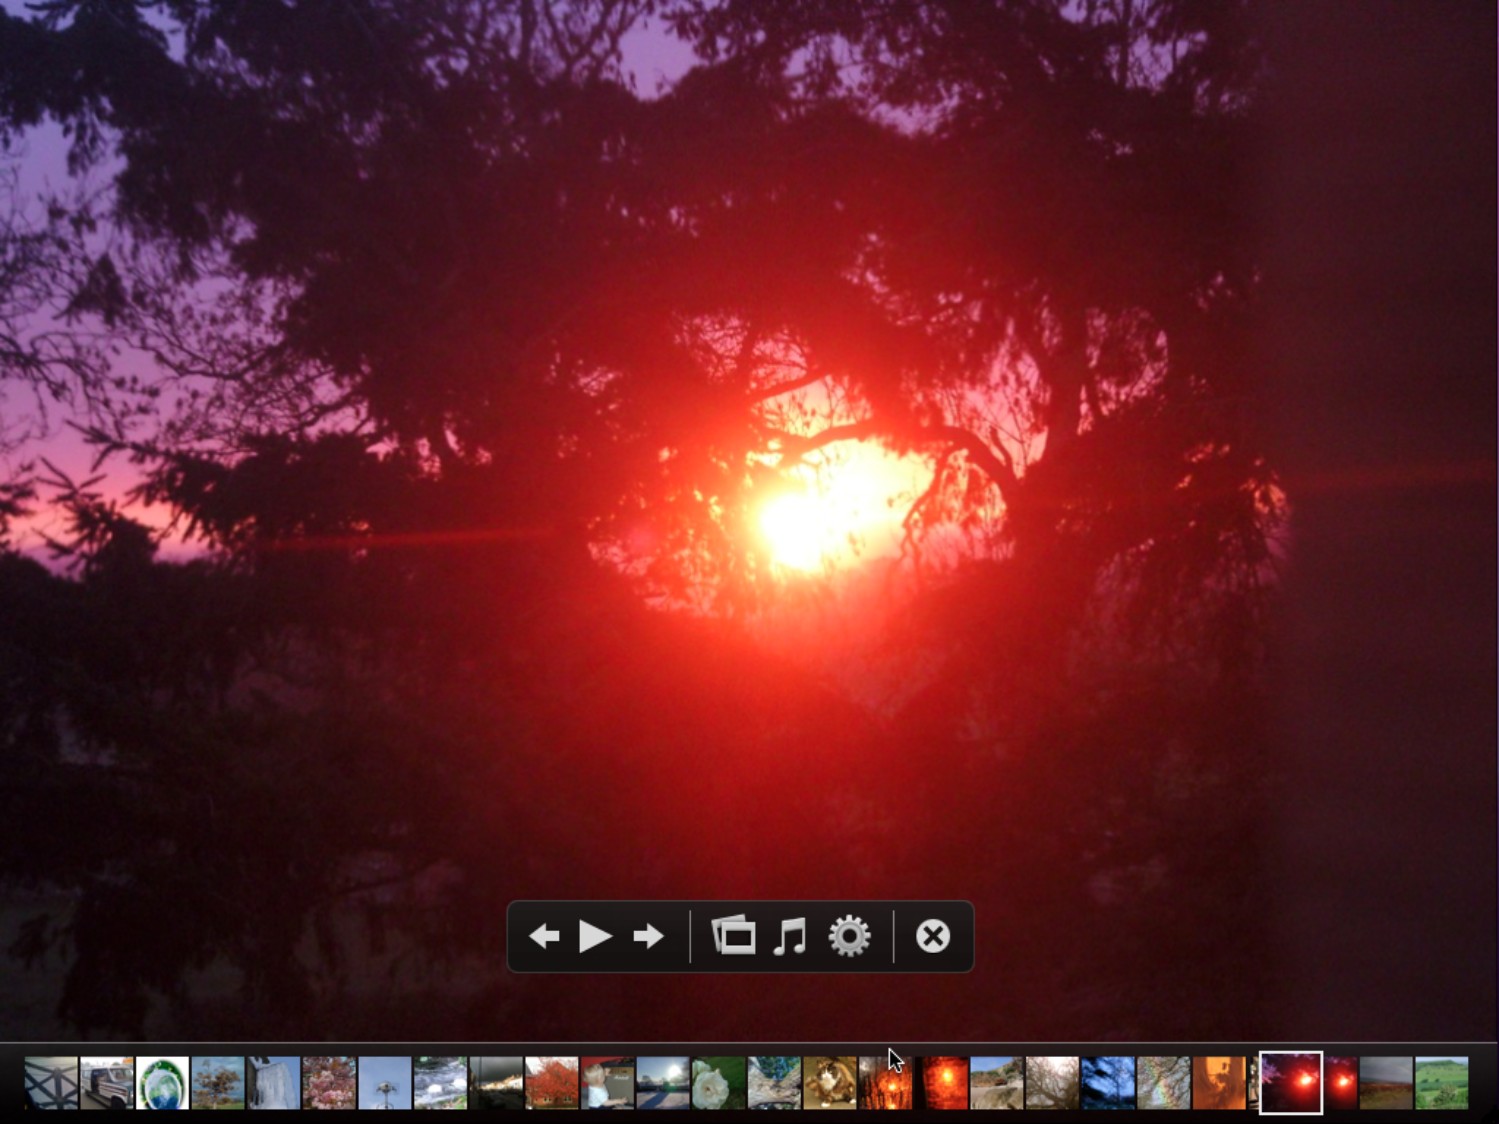
3.3 Move the mouse to display the slide show controls and navigation miniatures.
Creating and saving a slide show
If you want to create a slide show and save it for future use, follow these steps:
1. Click the album on which you want to base the slide show, or select the photos you want to use.
2. Click the Create button on the toolbar, and then click Slideshow on the pop-up panel. iPhoto creates a new slide show, adds it to the Slideshows category in the Source list, and displays the Slideshow toolbar (see Figure 3.4).

3.4 Creating a slide show with custom settings.
3. Type the name for the slide show over the default name that iPhoto suggests. iPhoto automatically selects the default name for you, so you can type the new name over it. Press Return to apply the name.
4. Choose the theme for the slide show. Click the Themes button; choose Classic, Ken Burns, or another theme in the Choose a Slideshow Theme dialog; and then click Choose. The Choose a Slideshow Theme dialog is like the Themes tab of the Slideshow dialog (shown on the opening page of this chapter).
5. Choose the music — or lack of it — for the slide show:
• Click the Music button to display the Music Settings dialog, which closely resembles the Music tab of the Slideshow dialog (shown earlier in this chapter).
• If you want music, select the Play music during slideshow check box, and then select the song. To build a custom playlist for the slide show, select the Custom Playlist for Slideshow check box, drag songs into the box that the Music Settings dialog displays, and then drag the songs into the order in which you want them to play.
• Click Choose to close the dialog.
6. Choose default settings for the whole slide show:
• Click the Settings button to display the Slideshow Settings window (see Figure 3.5). Make sure the All Slides tab is at the front.
3.5 Choosing default settings for a slide show on the All Slides tab of the Slideshow Settings window.
• Choose how long to display each slide for, or select the Fit slideshow to music option if you want the slide show to play for the same length of time as the music you chose.
• To use transitions, select the Transition check box. Choose the transition in the pop-up menu, and pick a direction if the direction buttons are available. Drag the Speed slider to set the default speed. Watch the Preview box to see how the transition looks.
• Choose whether to show captions (and if so, select the text) and a title slide.
• Choose whether to repeat the slide show and scale the photos to fill the screen.
• In the Aspect Ratio pop-up menu, choose This Screen if you want to display the slide show on your Mac’s screen. Otherwise, choose the HDTV (16:9) format for HDTV or widescreen displays, the iPad/TV (4:3) format for an iPad or a TV, or the iPhone (3:2) format for the iPhone and iPod touch.
• Leave the Slideshow Settings window open for the moment.
7. In the filmstrip at the top of the iPhoto window, drag the pictures into the order in which you want them to play. Put the first slide on the left. If your slide show contains more photos than will fit in the filmstrip, you’ll need to drag to the left to reach the starting position.
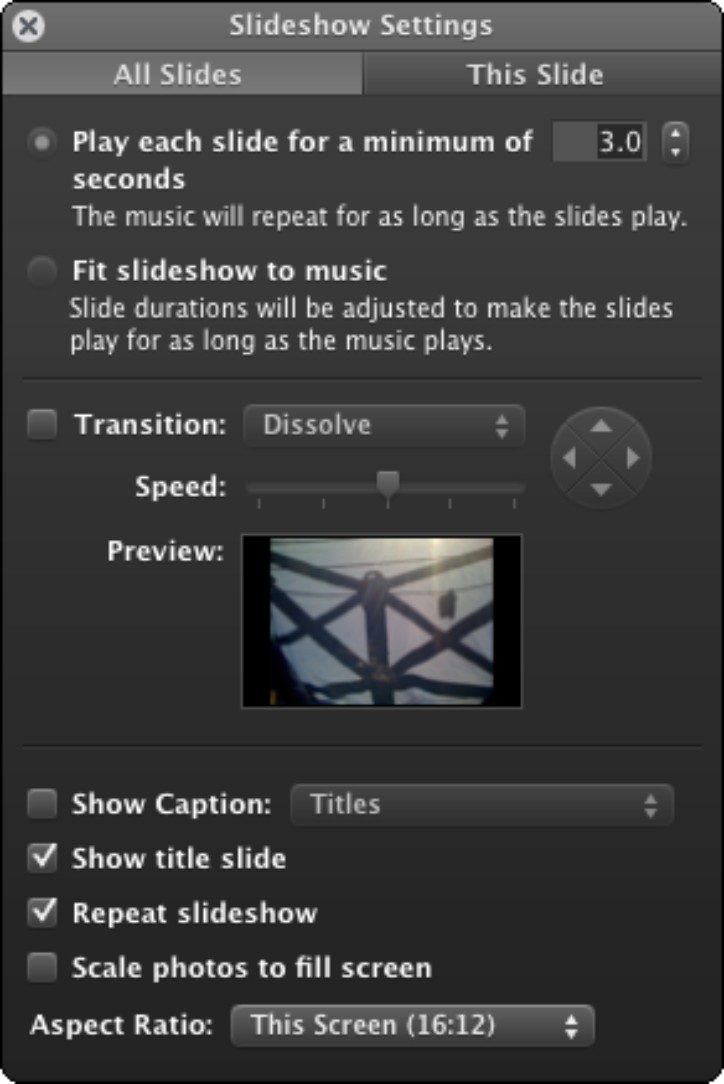
8. Click the first picture, click the This Slide tab in the Slideshow Settings dialog (see Figure 3.6), and then choose settings for the slide:
• Effect. To apply an effect, click Black & White, Sepia, or Antique.
• Duration. Select the Play this slide for check box, and then set the number of seconds. This setting overrides the setting you applied to the slide show as a whole.
• Transition. Choose the transition from this slide to the next. Select the Transition check box to use a transition, and choose it in the Transition pop-up menu.
To change the direction (for a transition that supports different directions), click the appropriate direction button; to change the speed, drag the Speed slider until the preview in the Preview box changes at the speed you want. Again, you’re overriding the setting applied to the slide show as a whole.
• Ken Burns Effect. Select the Ken Burns check box if you want to use the panning and zooming effect. If necessary, zoom in by dragging the Size slider in the main iPhoto window, and then drag the picture to where you want its starting position. Move the Start/End switch to the End position, and then zoom and drag to set the end position.
• In the main iPhoto window, click the Preview button to preview the effect. Make any changes needed in the Slideshow Settings dialog, and then preview it again until it’s right.

3.6 The This Slide tab of the Slideshow Settings dialog lets you apply an effect to the slide, control how long it appears for, add a transition, and apply the Ken Burns effect.
 iPhoto automatically saves the changes you make to your slide show, so you don’t need to save them manually.
9. Repeat Step 8 for each of the other slides in the slide show.
10. Click Play when you’re ready to view your slide show.
11. To create a version of the slide show you can use on an iPad, iPhone or iPod, Apple TV, computer, or a MobileMe gallery, click the Export button on the toolbar, and then follow the export process.
Sharing Your Photos with Others
To get the most enjoyment out of your photos, you’ll likely want to share them with other people. iPhoto lets you share photos in several ways: directly with other iPhoto users on your local network, via your Gallery on Apple’s MobileMe service, on Facebook or Flickr, through your Web site or your applications, or even via video chat. You can also go old-school and order hard-copy prints of your photos, photo books, cards, or calendars.
Sharing your photos with other iPhoto users
iPhoto makes it easy to share your photos with other Macs on your local network. After you set up sharing, as described in Chapter 1, your iPhoto library (or the albums you’ve chosen to share) appears under the shared name you chose in the Shares category in the Source list in iPhoto running on other Macs on the network.
iPhoto doesn’t give you any indication when someone connects to your shared library or albums. The only way to find out is by quitting iPhoto, which warns you (see Figure 3.7) that you’re about to disconnect all sharing users (it doesn’t tell you how many). Click Disconnect Sharing Users if you want to quit iPhoto anyway.
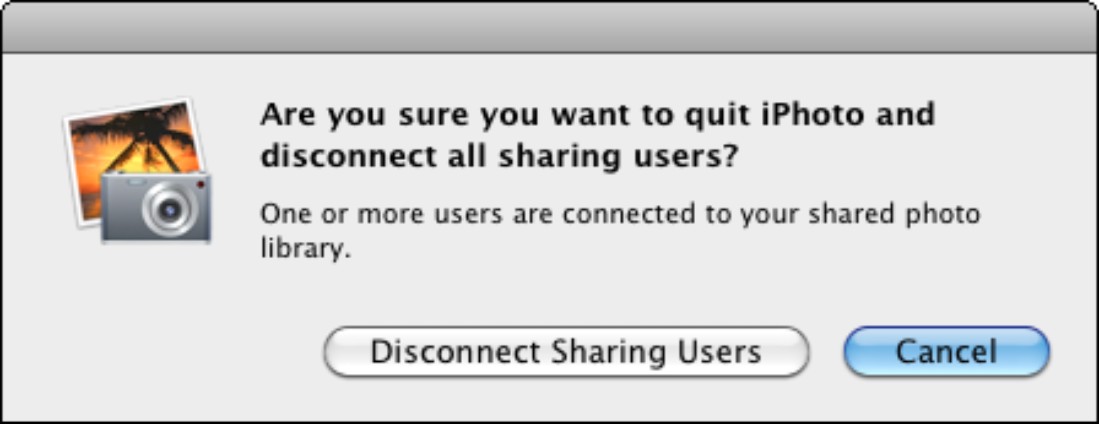
3.7 When you go to quit iPhoto, the application warns you if other users are connected to your shared photos.
Viewing and copying other people’s shared photos
If you selected the Look for shared photos check box in iPhoto’s Sharing preferences, iPhoto shows other people’s shared photo libraries in the Shared category in your Source list. To view the contents of a library, follow these steps:
1. Click the library you want to view.
2. If iPhoto displays the Photo Library Password dialog prompting you for the password, type the password.
3. Click OK.
4. After you connect to someone else’s library, you can browse through it much as you can your Mac’s own library.
5. Click the library’s gray disclosure triangle to display the list of shared albums, and then click the album you want to display.
Because the photos are on someone else’s Mac, you can’t change them. But you can copy photos to your library by dragging them from the shared library to your Photos library or an album in the Source list. You can also drag an album from the shared library to your library.
When you finish using the shared library, click the Eject button to the right of the shared library’s name in the Source list to disconnect from the shared library. You can also disconnect by quitting iPhoto.
Exporting your photos to your MobileMe Gallery
If you have a MobileMe subscription, you can share your photos with a wider audience by publishing an album to your MobileMe Gallery. You can make an album public so that anybody can access it, limit access to only the people you choose, or keep it to yourself.
Follow these steps to export an album to your MobileMe Gallery:
1. Get the album ready for publishing. Edit the photos so that they look just the way you want them, and add any names and descriptions needed.
2. Click the album in the Source list to display its photos.
If you’ve already set up accounts in iPhoto’s Accounts preferences, the Share pop-up panel may show your account names (for example, Chris Smith) rather than the service names (for example, MobileMe). The symbol to the left of each account name indicates the type of account: a white cloud on a blue background for MobileMe, a blue dot and pink dot for Flickr, a lowercase f on a blue background for Facebook, and a stamp for e-mail.
3. Click the Share button on the toolbar to display the Share pop-up panel (see Figure 3.8), and then click MobileMe Gallery.

3.8 Click MobileMe Gallery on the Share pop-up panel to start exporting an album to your MobileMe Gallery.
4. If iPhoto displays the Log in to MobileMe dialog, type your username and password, and then click Log In.
5. In the MobileMe Galleries pop-up panel that iPhoto displays, click the New Album button. iPhoto displays the dialog for publishing to your MobileMe Gallery, as shown in Figure 3.9.
6. In the Album Name text box, change the album name if necessary.
7. In the Album Viewable by pop-up menu, choose who may view the album:

3.9 Publishing an album to your MobileMe Gallery.
• Everyone. Anyone on the Web can view the album.
• Only me. You keep the album to yourself — good for personal or work photos.
• Public. Anyone who knows your MobileMe public password can view the album.
• Edit Names and Passwords. To add the name of a person or group and assign a password, click this item, and work in the dialog that appears. Click OK when you finish.
8. Choose options in the Allow area:
• Select the Downloading of photos or entire album check box if you want visitors to be able to download high-quality versions of the photos. Click the Show Advanced button (changes to the Hide Advanced button) to display the hidden section at the bottom of the dialog and choose the quality you want in the Download quality pop-up menu. Choose Optimized if you want to provide high-quality images with reasonably small file sizes. Choose Actual Size when you need to provide the full-quality photos. These will take longer to upload to your Gallery (and longer for visitors to download).
Clearing the Downloading of photos or entire album check box doesn’t prevent visitors from downloading the photos in your album: Users can still right-click a photo in their Web browsers and save it to a file on their computers. The difference is that they get only the photo displayed on their screen, not the higher-resolution version that your MobileMe Gallery enables you to provide.
• Select the Uploading of photos via web browser check box if you want visitors to be able to add photos to the album using a Web browser.
• Select the Adding of photos via email check box if you want to be able to add photos by e-mail from any computer or from an iPhone or iPod touch.
9. Choose options in the Show area:
• Select the Photo titles check box if you want to include titles in the Gallery. Usually, having the titles is helpful.
• If you chose to allow uploading via e-mail and want to let visitors to the Gallery see the address, select the Email address for uploading photos check box. A visitor can then click the Send to Album icon in the Gallery to display the address.
10. If you want to hide the album on your Gallery page, click the Show Advanced button, and then select the Hide album on my Gallery page check box.
Hiding an album so that it doesn’t appear on your MobileMe Gallery page is good for when you need to share different albums with different people. Instead of needing to password-protect a gallery to keep out people you don’t want to see it, you can simply prevent the album from appearing and give the album’s URL to the people who need to be able to access it.
11. Click Publish. iPhoto publishes the album to your MobileMe Gallery and displays an icon to the right of the album’s name in the Source list. After making changes online or in iPhoto you can synchronize the album by clicking this icon.
Adding photos to a Gallery from an iPhone, iPad, or iPod touch
If you have an iPhone, iPad, or iPod touch, you can add photos to a MobileMe Gallery directly from the device. This is great both for when you take a photo on the iPhone that you need to share immediately and for when you want to share one of the other photos you’re carrying on the device.
Here’s how to add a photo to a MobileMe Gallery from the iPhone, iPad, or iPod touch:
1. On the iPhone, iPad, or iPod touch, open the photo. For example, open the Camera Roll on the iPhone and touch the picture.
2. Touch the leftmost button on the toolbar (the button with the curving arrow).
3. Touch the Send to MobileMe button on the panel that appears. The device displays the Publish Photo dialog box (see Figure 3.10).

3.10 In the Publish Photo dialog, type the photo’s name and (optionally) a description, choose the MobileMe album to put it in, and then touch the Publish button.
4. In the first box, type the name you want to give the photo.
5. In the Description box, optionally type a description for the photo.
6. In the list of albums, touch the album you want to place the photo in.
7. Touch the Publish button. The device publishes the photo to your MobileMe Gallery.
8. The device displays a dialog saying that the photo was published. Touch the View on MobileMe button to check that the photo appears as you want it to, touch the Tell a Friend button to start a boilerplate e-mail message to one or more friends telling them where to find the photo, or click the Close button to close the dialog without taking either action.
Adding photos to a Gallery from your Web browser
If you selected the Uploading of photos via web browser check box when exporting an album to your Gallery, any visitor can upload photos to the album by clicking the Upload button and using the form that appears.
Even if you deselected this check box, you can add photos and edit your albums from a browser by logging into MobileMe, clicking the Switch Apps button on the toolbar, clicking the Gallery icon on the switching bar, and then working with the Gallery tools.
Sharing your photos on Facebook
If you have an account on the Facebook social networking site, you can use the iPhoto Uploader to upload photos directly from iPhoto. This is a great way to publish your photos quickly.
To publish photos to Facebook, follow these steps:
1. Select the photo or photos you want to upload. When publishing to an album, you can use multiple photos. When publishing a profile picture or to your Wall, you can use only a single picture.
2. Click the Share button on the toolbar, and then click Facebook on the pop-up panel. This item may be called Facebook or it may have the name of your Facebook account. iPhoto displays the Facebook Albums pane, as shown in Figure 3.11.
If you haven’t yet set up iPhoto to use your Facebook account, iPhoto displays the Login to Facebook dialog. Type your e-mail address and password, select the I agree to Facebook’s terms check box, and click Login. iPhoto validates your login information and then displays the Facebook Albums pane.

3.11 In the Facebook Albums pane, choose whether to publish the photo to your profile picture, a new album, your Wall, or an existing album.
3. Choose where to put the photos:
• Click the New Album button if you want to create a new album. iPhoto displays the confirmation dialog shown in Figure 3.12. Type the album name, choose who may view the photos — Everyone, Friends of Friends, or Only Friends — and then click Publish.

3.12 Confirm that you want to publish your photos to Facebook, and decide who’s allowed to see them.
• Click Wall if you want to put the photos on your Facebook Wall. iPhoto displays the dialog shown in Figure 3.13. Type your comment for the photo in the Comment box, and then click Publish.

3.13 Click Publish to publish the photo to your Wall in Facebook.
• Click the Profile Picture item if you want to use the photo as your Facebook profile photo. iPhoto displays the confirmation dialog shown in Figure 3.14. Click Set to use the picture.
• Click an existing album to place the photo or photos in that album. iPhoto doesn’t display a dialog — it just goes ahead and publishes the photo or photos to the album.

3.14 Click Set to use the photo as your profile picture in Facebook.
4. Click Publish. iPhoto publishes the photo or photos to the Facebook area you chose.
Sharing your photos on Flickr
If you have an account on the Flickr photo-sharing site, you can publish photos directly to Flickr. Follow these steps:
1. Select the photo or photos you want to publish.
2. Click the Share button on the toolbar, and then click Flickr on the pop-up panel. This item may be called Flickr or it may have the name of your Flickr account. iPhoto displays the Flickr Sets pane (see Figure 3.15).

3.15 In the Flickr Sets pane, choose whether to publish the photo to a new set, to your photostream, or to an existing set.
If you haven’t yet set up iPhoto to use your Flickr account, iPhoto displays the Do you want to set up iPhoto to publish to Flickr? dialog. Click the Set Up button to launch your Web browser and display the Flickr site. Follow through the process of giving the iPhoto Uploader permission to access your Flickr account, as discussed in Chapter 1. When you complete the process, choose Share→Flickr from the toolbar again; this time, iPhoto displays the Flickr Sets pane.
3. Choose where to put the photos:
• Click the New Set button if you want to create a new photo set. iPhoto displays the dialog shown in Figure 3.16.
• Click the Photostream button if you want to publish the photos to your photostream. iPhoto displays a confirmation dialog that has the Photos Viewable by pop-up menu and the Photo size pop-up menu but not the Set Name text box.
• Click an existing set if you want to add the photos to that set. iPhoto displays a confirmation dialog that has the Photos Viewable by pop-up menu and the Photo size pop-up menu but not the Set Name text box.

3.16 Confirm that you want to publish your photos to Flickr, choose who may view them, and select the size.
4. For a new photo set, type the name in the Set Name text box.
5. In the Photos Viewable by pop-up menu, choose who may view the photos: Only You, Your Friends, Your Family, Your Friends and Family, or Anyone.
6. In the Photo size pop-up menu, choose the size at which to publish the photos: Web (for viewing on-screen), Half Size, or Actual Size. The Half Size and Actual Size options are available only for Flickr Pro accounts.
7. Click Publish. iPhoto publishes the photos on Flickr and adds the album to the Flickr category in the Source list.
Exporting your photos to a local Web site
If you have your own Web site, you can quickly create Web pages containing photos from your iPhoto library. iPhoto creates an index page containing a thumbnail version of each picture, and a detail page containing the full photo.
To export photos to Web pages, follow these steps:
1. Select the photos you want to export.
2. Choose File→Export to open the Export dialog, and then click the Web Page button to display the Web Page tab (see Figure 3.17).
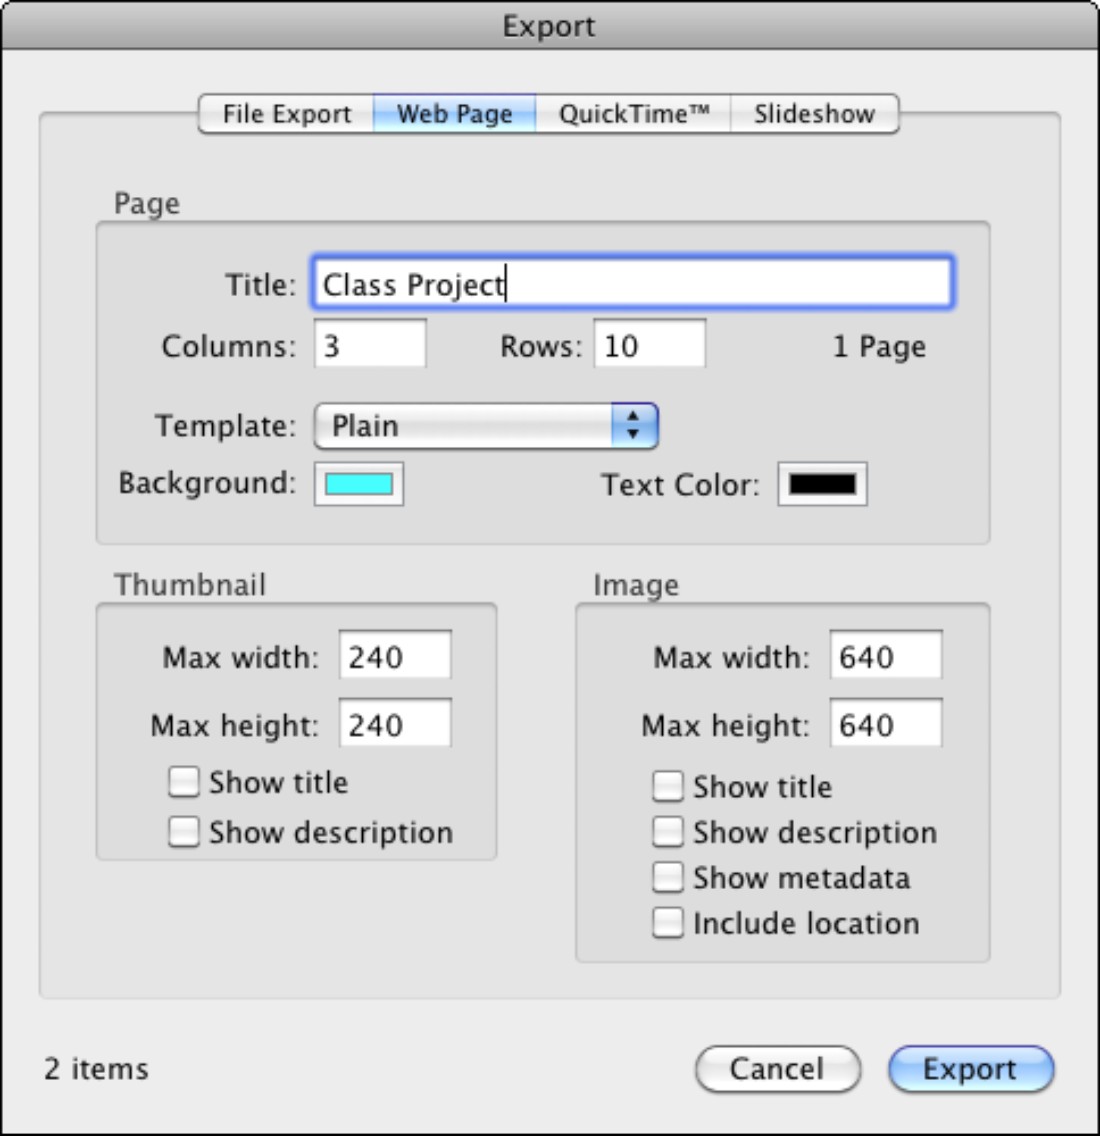
3.17 Use the Web Page tab of the Export dialog to create Web pages containing your photos.
3. In the Page area, choose the details for the index page:
• Title. Type the title you want to give the page. This appears at the top of the page and in the browser’s title bar.
• Columns and Rows. Choose how many rows and columns to create. Watch the readout that shows the number of pages.
• Template. Choose Plain for unadorned photos. Choose Framed to include a frame around each photo.
• Background and Text Color. Pick the colors you want for the page background and the text.
4. In the Thumbnail area, set the size and text for the thumbnails on the index page. Set the maximum height and width, and choose whether to include the photos’ titles and descriptions.
5. In the Image area, set the size and text for the photos on their individual pages. Set the maximum height and width, and choose whether to include the photos’ titles, descriptions, metadata, and location. Titles are usually helpful; descriptions are sometimes helpful; metadata is usually overkill; and locations can be fascinating, an invasion of your privacy, or both.
6. Click Export, choose the folder in which to store the pages, and then click OK. iPhoto suggests storing the pages in the Sites folder in your Home folder, but you may prefer to use a folder on a shared drive.
To view the pages you’ve created, open a Finder window to your Sites folder or the folder you chose, open the site’s subfolder, and then double-click the index.html file. Mac OS X opens the index page in your Web browser.
Exporting your photos for use in other applications
If you need to use your photos in other applications, you can export them from iPhoto like this:
1. Select the photo or photos you want to export.
2. Choose File→Export to open the Export dialog, and then click the File Export tab (see Figure 3.18) if it’s not displayed.

3.18 The File Export tab of the Export dialog lets you choose the format, size, and naming convention for the photo files you export.
3. In the Kind pop-up menu, choose the format to use for the exported files:
• Original. The format in which you imported the files (typically JPEG or RAW if you imported the files from a camera).
• Current. The format in which iPhoto is storing the photo (JPEG unless you’ve set iPhoto to store RAW files in TIFF format to preserve quality).
• JPEG. The best choice for general use, although you lose quality. Choose the quality in the JPEG Quality pop-up menu: Low, Medium, High, or Maximum.
• TIFF. A good choice for use in publishing.
• PNG. The high-quality choice for general computer or Web use.
4. Select the Titles and keywords check box and the Location information check box if you want to include these details in the files. These options aren’t available for PNG files.
5. In the Size pop-up menu, choose the size: Small, Medium, Large, Full Size, or Custom. For Custom, an extra section of the dialog appears that lets you choose the maximum dimension and the orientation.
6. In the File Name pop-up menu, choose how to name the files: Use title, Use filename, Sequential, or Album name with number. If you choose Sequential, type the text in the Prefix for sequential box. For example, type House to get files named House 01, House 02, and so on.
7. Click Export, choose the folder in which to save the photos, and then click OK. iPhoto exports the files and then closes the Export Photos dialog.
Sharing your photos via video chat
When you need to discuss your photos with someone across the Internet, you have several options, such as sending photos via e-mail, posting them on a sharing site, or creating an album on your MobileMe Gallery. But here’s another great option: Share the photos via iChat Theater with another Mac user, so you can both view the photos at the same time and talk them over.
To use iChat Theater to share photos, follow these steps:
1. Launch iChat from the Dock or from the Applications folder.
2. Choose File→Share iPhoto With iChat Theater to open the iPhoto dialog.
3. Choose the album or Event you want to share, and then click Share. iChat displays a dialog telling you that iChat Theater is ready to begin and prompting you to invite a buddy to a video chat.
4. Click your buddy in the main iChat window, and then click the Start a Video Chat button on the toolbar at the bottom of the window. iChat establishes the connection and starts displaying the photos.
Getting high-quality prints of your photos
iPhoto has a built-in connection to Apple Photo Services that makes it easy to order prints online and pay via your Apple account. Select the photos, and then choose File→Order Prints to open the Order Prints dialog, which makes the ordering process simple.
When you order large prints, double-check that the Order Prints dialog isn’t showing a yellow exclamation icon next to the size. This means that this photo’s resolution is too low for getting good results at the size you’ve chosen.
Given that the resolution of digital cameras keeps increasing, resolution is usually a problem these days only if you crop your photos heavily.
When you need to get prints made more quickly than Apple Photo Services can deliver, use the File→Export command to export the photos to a memory card that you can take to your local photographic specialist.
Creating books, cards, and calendars
iPhoto also makes it easy to create books, cards, and calendars from your photos. To do so, follow these steps:
1. Select the photos you want to use.
2. Click the Create button on the toolbar to display the Create pop-up panel, and then click Book, Card, or Calendar, as appropriate. iPhoto displays the control screen for that type of item. Figure 3.19 shows the control screen for creating a book.
3. Choose options for the book, card, or calendar. For example, for a book, click the Hardcover button, Softcover button, or Wire-bound button at the top of the screen to choose the binding. Then click the book layout (the arc of books), the size (XL or L, in the lower-left corner), and the paper color (in the lower-right corner).
4. Click Create. iPhoto displays a screen on which you can start the process of paying for the item.

3.19 iPhoto lets you use your photos to create picture books, cards, or calendars.
Using Your Photos within Mac OS X
To get the greatest enjoyment from your photos, you’ll probably want to use them as widely as possible within Mac OS X. For a quick and easy use of a photo, you can put a single photo on your desktop; for a more entertaining background, you can use a sequence of photos. Better yet, you can create custom screen savers, make a personal icon for your user account, and display a photo as the background in a Finder window for that custom touch.
Put a photo on your desktop
To put a photo on your desktop, click the photo, and then choose Share→Set Desktop from the menu bar. Your desktop displays the photo immediately; you don’t need to make any choices.
Put a sequence of photos on your desktop
Instead of having a single, unchanging photo on your desktop, you may prefer to display a sequence of photos. You can do this easily, too:
1. In iPhoto, select the photos you want to use. You have several options:
• Select the photos by clicking the first and then  +clicking each of the others.
• Select an existing album. Alternatively, create a new album.
• Flag the photos you want. This is a handy way of picking desktop photos from more than one Event or album without adding the photos to an album.
2. Choose Share→Set Desktop from the menu bar. iPhoto applies the first photo to the desktop and sets the others to change periodically. (The interval depends on the last settings you’ve used for multiple pictures in Desktop & Screen Saver preferences. I’ll show you how to change this next.)
To adjust how your sequence of pictures runs as a background, follow these steps:
1. Control+click or right-click the desktop and click Change Desktop Background to display the Desktop & Screen Saver pane in System Preferences with the Desktop tab at the front (see Figure 3.20).
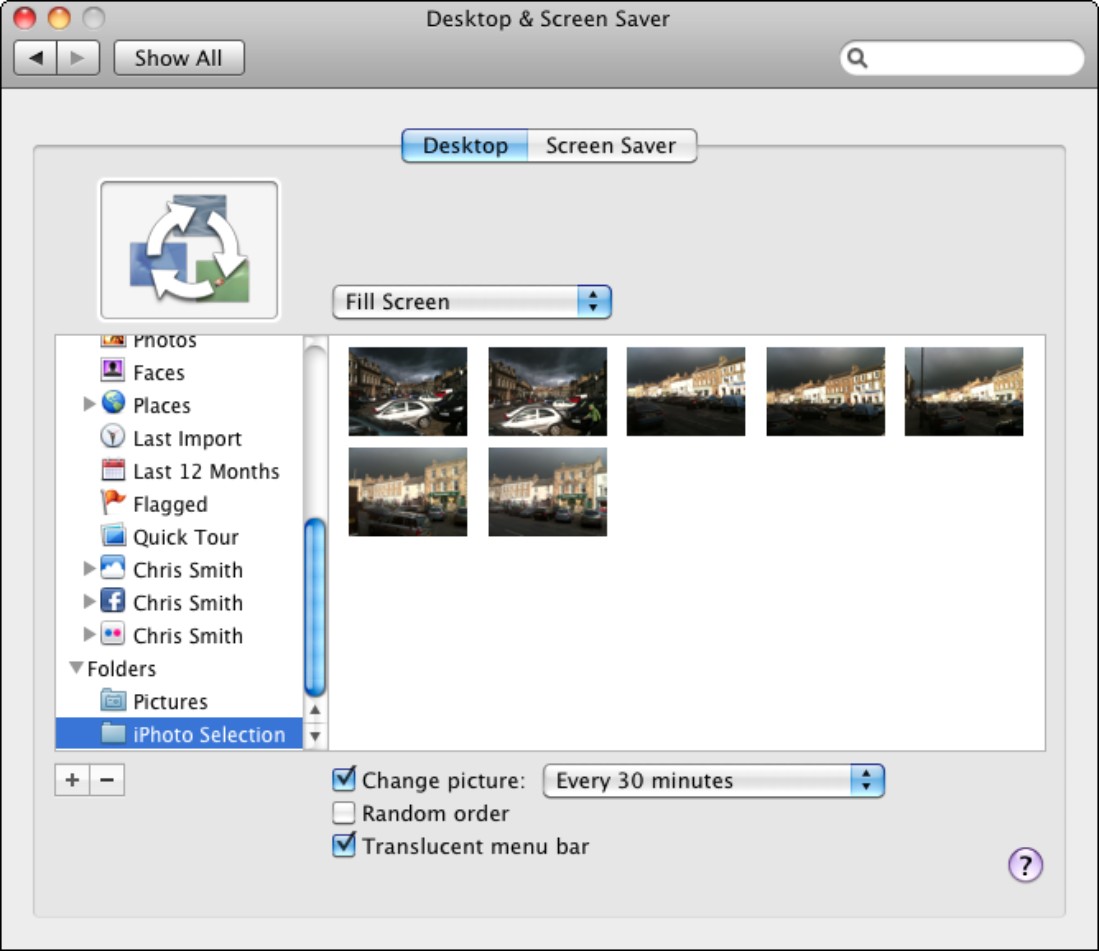
3.20 Use the Desktop tab in Desktop & Screen Saver preferences to control how a sequence of photos on your desktop runs.
2. If you’re using flagged photos, expand the iPhoto Albums list and then click Flagged. If you’re using photos you selected, expand the Folders item and then click iPhoto Selection. Your photos appear in the box on the right.
3. In the pop-up menu, choose how to display the photos:
• Fill Screen. Fills the screen with the picture, hiding any parts that are too large to fit.
• Fit to Screen. Displays the photo at the largest size where the whole photo fits on the screen. You can choose a background color for the uncovered parts of the screen by clicking the color swatch and working in the Colors window that appears.
• Stretch to Fill Screen. Changes one of the photo’s dimensions as needed to make the photo fit the screen exactly. Stretching a photo often makes it look wrong.
• Center. Displays the photo centered in the screen. You can choose a background color for the uncovered parts of the screen by clicking the color swatch and working in the Colors window that appears.
• Tile. Uses multiple instances of the photo to cover the screen. This setting is good for small photos or patterns.
4. Select the Change picture check box and choose the frequency of change in the pop-up menu. You can choose intervals from every 5 seconds to every day, or have the photo change when you log in or when you wake your Mac from sleep.
5. Select the Random order check box if you want to go through the photos in random order rather than in sequence.
6. Select the Translucent menu bar check box if you want the desktop background to show through the menu bar.
7. Press +Q or choose System Preferences→Quit System Preferences to quit System Preferences.
Now the photos will change automatically in the background as you work or play on your Mac.
Making screen savers from your photos
A great way to enjoy your photos full screen on your Mac is to make a screen saver from them. Here’s what to do:
1. In iPhoto, create an album or Smart Album containing the photos you want to use. If you already have a suitable album, you’re all set. Alternatively, you can use an existing category (for example, Last Import or Flagged) or even your whole library if you want.
2. Control+click or right-click the desktop and choose Change Desktop Background to display the Desktop & Screen Saver preferences pane.
3. Click the Screen Saver tab to display its contents.
4. In the Screen Savers box on the left, expand the Pictures section if it’s collapsed. Then click the album or item that contains the photos. The Preview box displays the first of the photos (see Figure 3.21), showing the effect of the screen saver with its current settings.
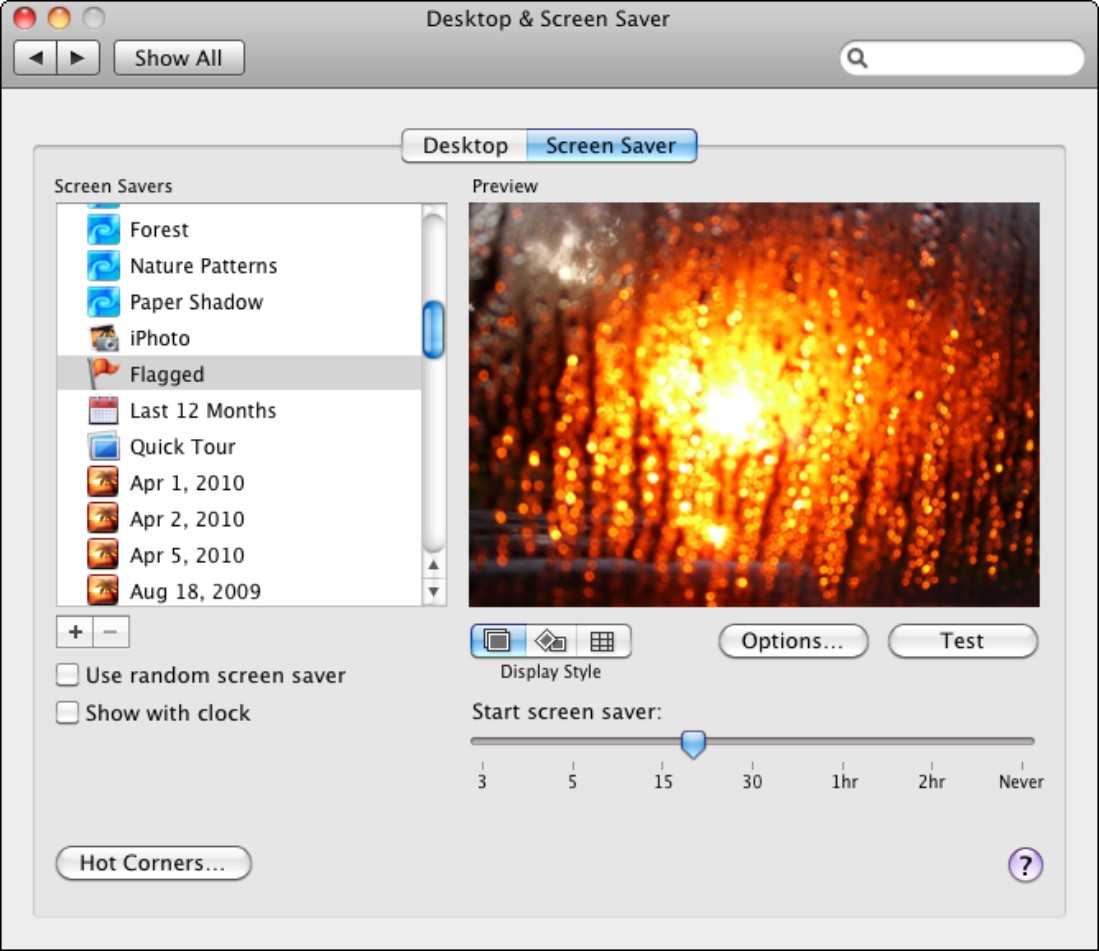
3.21 You can easily create custom screen savers that use the photos in your iPhoto library.
5. Choose the display style for the screen saver by clicking one of the three Display Style buttons:
• Slideshow. The screen saver shows each photo for a few seconds. You can choose whether to use cross-fading transitions and panning across the photos (the Ken Burns Effect).
• Collage. The screen saver spins in each photo in turn, adding it to those already there to make a collage. You can display the titles and comments on the photos if you want.
• Mosaic. The screen saver slowly zooms out to form a mosaic that shows all the photos in miniature. It repeats the photos as necessary to fill the whole screen.

3.22 For a Slideshow screen saver, you can use cross-fades, zooming, and cropping. For a Collage screen saver, you can choose the style and whether to use random order. For a Mosaic screen saver, you can choose the number of rows, set the speed, and decide whether to use random order.
6. Click Options and choose options in the dialog that appears. Apart from an option for presenting the slides in random order, the options are different for the Slideshow (see Figure 3.22), Collage, and Mosaic screen savers:
• Slideshow. Choose whether to cross-fade between slides, zoom back and forth, crop the slides to fit the screen, and keep the slides centered.
• Collage. Choose between a Classic-style (unadorned) slide show or one annotated with the filenames and dates.
• Mosaic. Choose the number of rows to include in the mosaic and the speed at which to generate it.
The Mosaic screen saver is visually entertaining, but you don’t get much of a view of the photos. The Collage screen saver, on the other hand, is good for getting an overview of the photos in the album or collection — and seeing their titles and comments if you choose.
7. Click Test to test the screen saver. Move the mouse to end the test. Change your settings as needed, and test again until satisfied.
8. Drag the Start screen saver slider to tell Mac OS X how soon to start the screen saver when you leave your Mac inactive.
9. Select the Show with clock check box if you want to include a clock on the display.
10. Select the Main screen only check box if your Mac has multiple screens but you want to use only the main one. This check box appears only if your Mac has two or more screens.
11. Press +Q or choose System Preferences→Quit System Preferences to quit System Preferences.
Creating an account icon from a photo
Another fun use of a photo is to create a custom icon for your user account in Mac OS X. This is a great way of personalizing the Mac OS X login screen, either with portraits of the users — flattering or distorted, whichever you like — or simply with photos you and the other users like.
If you’ve changed your user account icon before, you can quickly return to a picture you’ve used before by opening the Recent Pictures pop-up menu at the top of the Edit Picture dialog and choosing the picture you want from the panel.
Here’s how to create a custom icon for your user account:
1. Click the System Preferences icon on the Dock or choose Apple menu→System Preferences to open the System Preferences window.
2. Click Accounts (in the System section) to open the Accounts preferences.
3. Click your existing account picture (to the left of the Change Password button), and then click Edit Picture on the pop-up panel that appears (see Figure 3.23).

3.23 Click Edit Picture on the pop-up panel to start creating a custom icon for your user account.
4. In the Edit Picture dialog that appears (see Figure 3.24), add a picture in one of these three ways:
• Click the Take photo snapshot button to take a picture using your Mac’s iSight or another webcam you’ve plugged in. If no camera is available, the Edit Picture dialog displays a prompt to plug in a camera instead of the Take photo snapshot button.
• Click Choose, select the picture in the Open dialog that appears, and then click the dialog’s Open button to close the dialog box and apply the picture.
• Drag a photo from iPhoto or from Photo Booth. Open iPhoto or Photo Booth, position the application so that you can see the System Properties window as well, and then drag the photo you want to the Edit Picture dialog.

3.24 The Edit Picture dialog lets you take a video snapshot of yourself or choose a photo either from a folder or directly from iPhoto or Photo Booth.
5. If you want to use only part of the picture, click and drag the Size slider to zoom in.
6. After zooming, or if the photo is bigger than the icon area, you can click in the preview and drag to change the part of the photo that appears.
7. Click Set to close the Edit Picture dialog and apply your new icon to the Accounts window.
8. Press +Q or choose System Preferences→Quit System Preferences to quit System Preferences.
Displaying a photo as the background in a Finder window
Icon view in the Finder is a great way of getting an overview of your files — and you can make it even better by adding one of your own photos as the background in the Finder window.
You can set a different photo as the background in any folder. This is a handy way of making your key Finder windows easier to recognize, especially when they’re displayed in miniature on the Dock. For example, if you give the Documents folder a background photo with a predominantly blue color, and the Macintosh HD folder a background with a predominantly green color, you’ll be able to distinguish the miniature icons even at a glance.
Folder background pictures appear only in Icon view, not in List view, Columns view, or Cover Flow view.
Here’s how to set a photo as the background for a folder:
1. Click the Finder icon on the Dock to open a Finder window. Navigate to the folder in which you want to display the photo.
2. Make sure the folder is displayed using Icon view. If it’s not, choose View→As Icons or click the Icons button on the toolbar (the leftmost of the four View buttons).
3. Choose View→Show View Options to open the View Options window.
4. Select the Always open in icon view check box to make the folder use Icon view every time you open it (so that you can see the background picture).
5. Select the Picture option in the Background area, and then click the picture placeholder (it appears at first with the text Drag image here) to open the Select a Picture dialog.
6. Select the picture you want to use.
• To go straight to your iPhoto library, expand the Media category in the sidebar, and then click Photos. You can then choose a photo much as you would in iPhoto itself — for example, from an Event, an album, or your Last Import.
• To choose a picture from a folder, simply navigate to the folder.
7. Click Select to close the Select a Picture dialog. The Finder window displays the photo as its background.
8. Close the View Options dialog by clicking the red button (the Close button) on the window or choosing View→Hide View Options.