Chapter 4: How Do I Import Video into iMovie?
iMovie not only packs a huge amount of power but it also includes lots of great features that enable you to create, edit, and share movies quickly and easily. If you’ve wanted to get started with iMovie but felt daunted by its complexity, start at the beginning of this chapter. If you’re ready to go ahead and start importing your video from your DV camcorder or another source, jump in at the middle of the chapter. And if you’ve already imported video and want to review and sort it, go directly to the end of the chapter.
Navigating the iMovie Interface
Choosing Preferences to Make iMovie Work Your Way
Starting a Movie Project
Importing Video
Reviewing and Sorting Your Video Clips 120
Navigating the iMovie Interface
Start iMovie by clicking the iMovie icon on the Dock. The first time you start iMovie, you see an introductory screen that highlights the application’s new features. From here, you can click the Video Tutorials button to see walkthroughs of iMovie’s main features, or simply click OK to close the introductory screen and get right to iMovie itself.
 If the iMovie icon doesn’t appear on the Dock, click the desktop, choose Go→Applications, and then double-click the iMovie icon. Once iMovie is running, Control+click or right-click the iMovie icon on the Dock and choose Options→Keep in Dock to make it stay there.
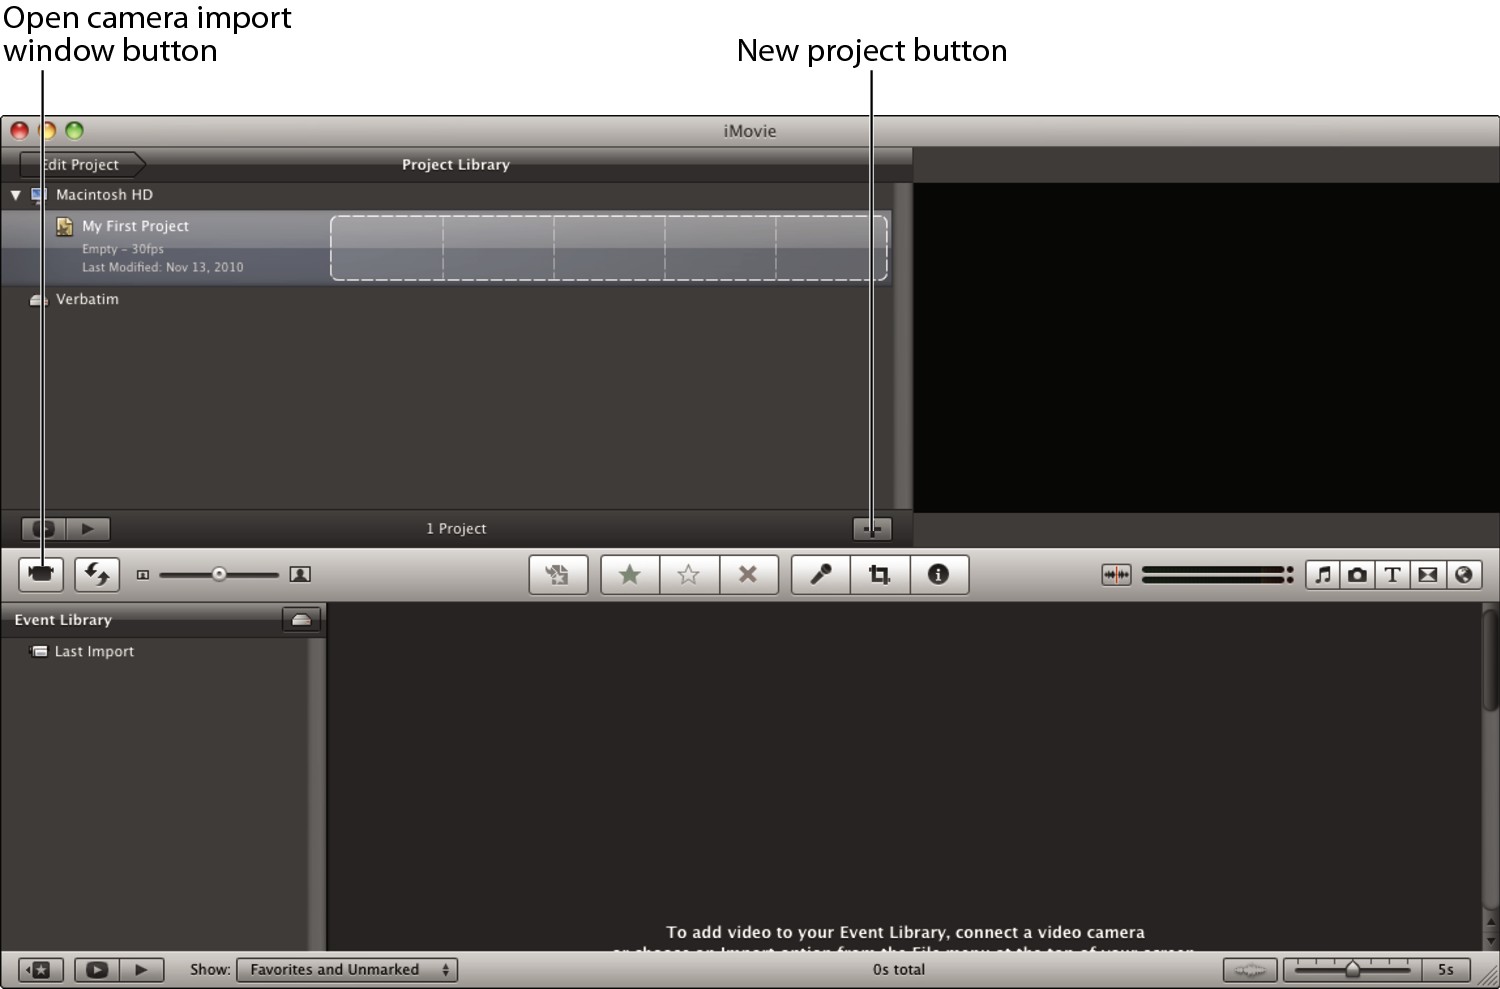
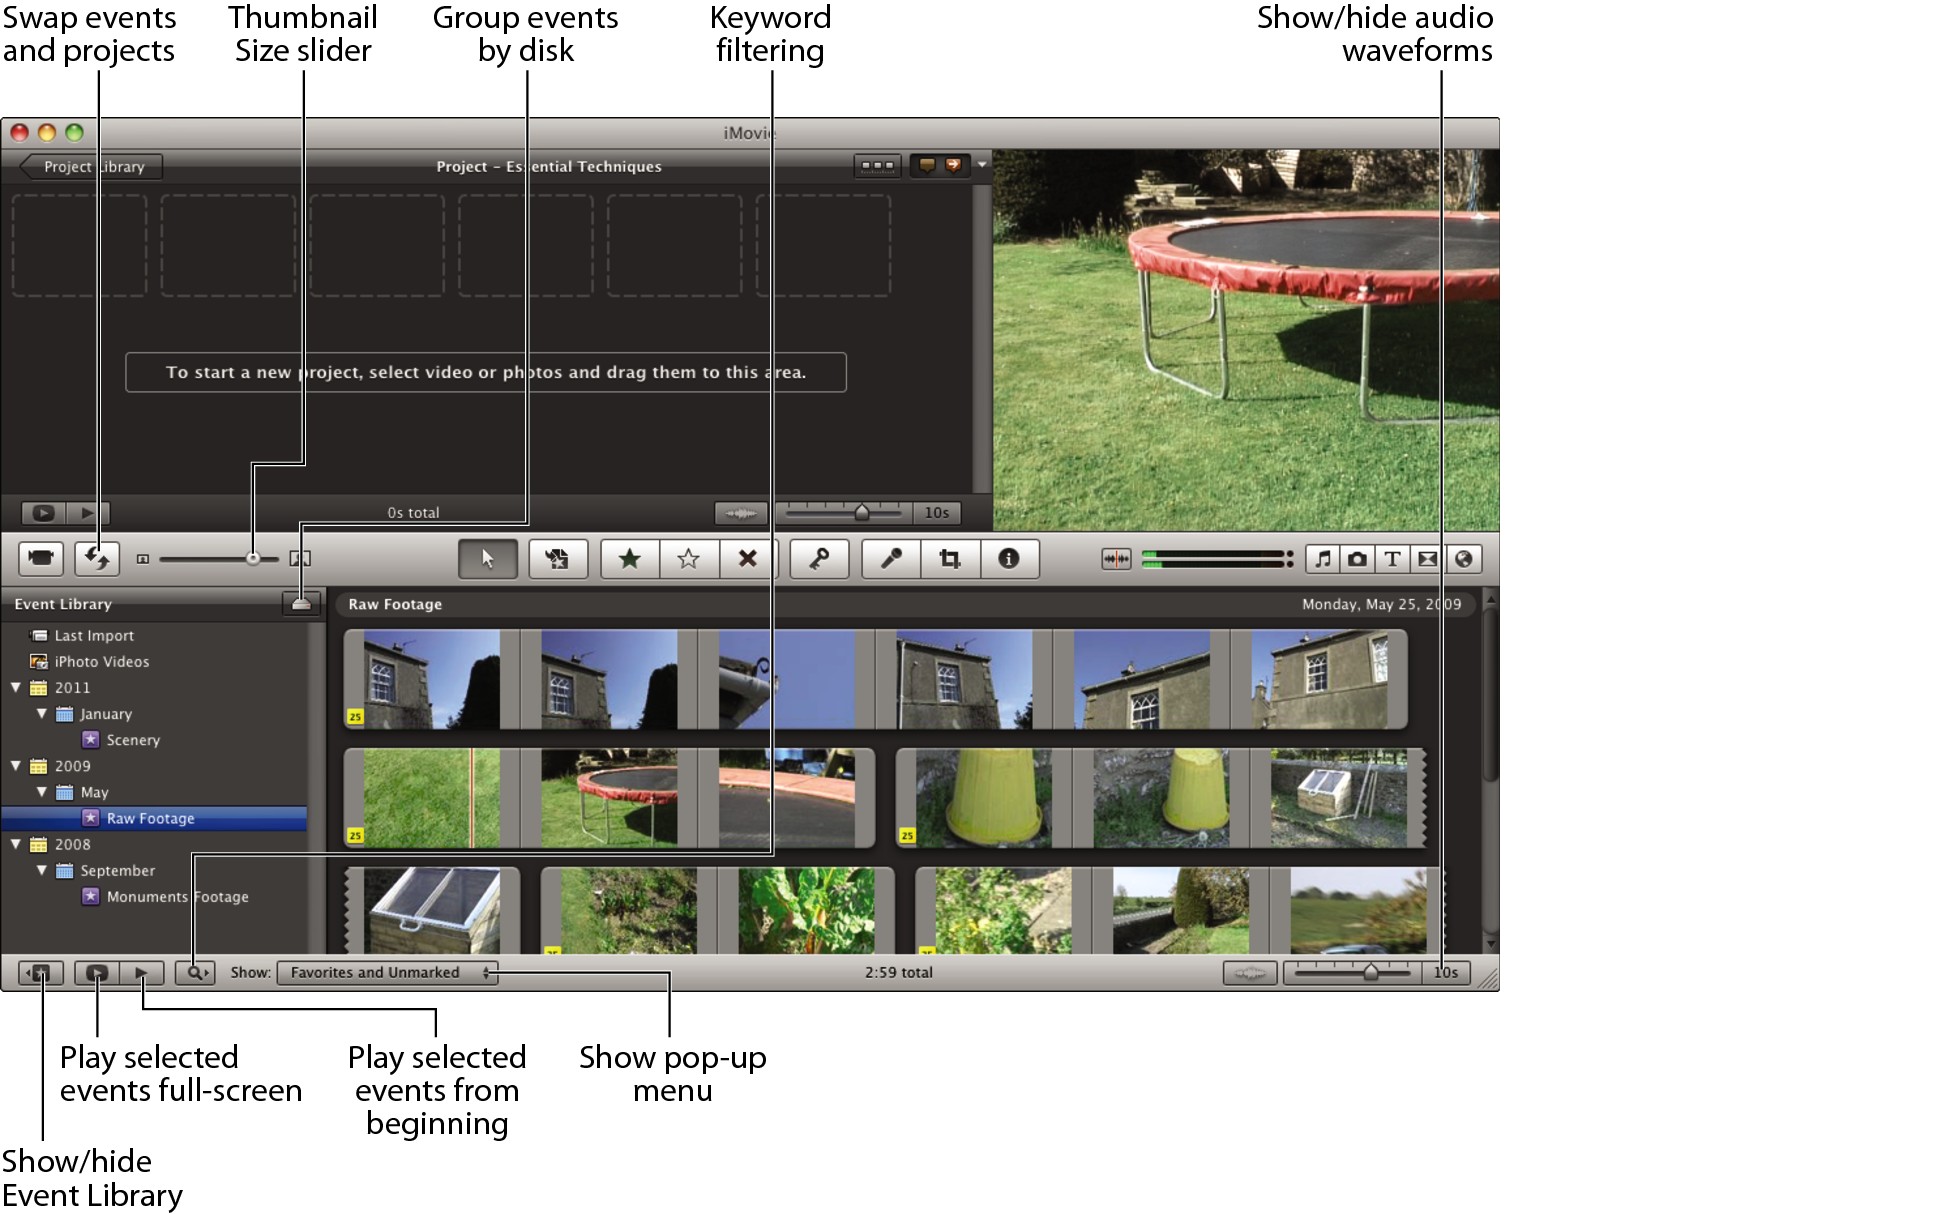
When you open iMovie for the first time, it automatically creates a new movie project called My First Project for you and displays that project. The iMovie window should look like Figure 4.1.

4.1 The main parts of the iMovie window as it appears when you first open the application.
Here are the main parts of the iMovie interface that you see in Figure 4.1, with brief details on what they do:
• Project Storyboard. This area is where you put your movie projects together. iMovie displays the current project on the Project Storyboard as a series of filmstrips, sequences of frames from the clips you’re using. To leave the Project Storyboard and go to the Project Library (which you meet in a moment), click the Project Library button.
• Toolbar. This strip across the middle of the iMovie window contains most of the controls you use for manipulating content and for displaying other parts of the iMovie interface, such as the Music & Sound Effects Browser or the Title Browser.
• Event Library. This pane lets you browse the Events that contain all the movie footage you import into iMovie. If you don’t need to keep the Event Library open, click the Show/Hide Event Library button to hide it and give yourself more space for the Event browser.
 Events in iMovie work in a similar way to Events in iPhoto (see Chapter 1). An Event is a tool for organizing your movie footage into categories that suit you. iMovie creates Events for you automatically when you import video, but you can also rearrange iMovie’s Events and create your own Events as needed.
• Event browser. This pane displays the clips of movie footage contained in the Event you select in the Event Library. You use the Event browser to pick the footage you want to add to the Project Storyboard.
When you restart iMovie, it automatically opens the last movie project you worked with. You can switch quickly to another movie project by clicking it in the Project Library.
The one main component of the iMovie interface that you don’t see when you first launch iMovie is the Project Library, which shares space with the Project Storyboard. From the Project Storyboard, click the Project Library button in the upper-left corner to move back from the project to the Project Library (shown in Figure 4.2 with just the default project created).
The Project Library pane lists all your movie projects, along with a few frames from each project to help you identify them so you can easily move from one project to another. When you’re ready to work on a project, either double-click it or click it and then click Edit Project. iMovie displays the Project Storyboard in place of the Project Library pane.
4.2 The Project Library gives you quick access to all your iMovie projects.
Choosing Preferences to Make iMovie Work Your Way
Before you start importing video and building a movie project, take a couple of minutes to make sure iMovie’s preferences are set to suit you. Choose iMovie→Preferences to open the Preferences window (see Figure 4.3), and then choose settings, as described next. When you finish choosing preferences, click the Close button (the red button) to close the Preferences window.
Choosing general preferences
The General tab of the iMovie Preferences window displays the following assorted preferences:
• Show Advanced Tools. If you select this check box (which is cleared by default), iMovie displays several additional tools. You meet these tools later in this chapter and in Chapters 5 and 6.
• Display time as HH:MM:SS:Frames. Select this check box if you want iMovie to display clip lengths using professional-style timecodes in hours, minutes, seconds, and frames (such as 01:45:22:10 – 1 hour, 45 minutes, 22 seconds, and 10 frames) instead of seconds (such as 22.3 s – 22.3 seconds).

4.3 Use the iMovie Preferences window to set up iMovie to suit your movie-editing style.
• Show “Play” reminder in viewer. Deselect this check box if you want to suppress the Press the space bar or double-click to Play message that appears when you move the mouse pointer over a filmstrip in the viewer window. This check box is available only when the Show Advanced Tools check box is cleared.
• Exit full-screen mode after playback is finished. iMovie comes with this check box selected, so when it finishes playing back a movie in full-screen mode, it displays the iMovie window again. Normally, this behavior is handy, but if you want iMovie to stay in full-screen mode until you switch it back manually, deselect this check box.
• Full-screen playback. In this pop-up menu, choose the size at which you want iMovie to play back movies when you use full-screen view. Normally, iMovie uses the Entire Screen setting, which stretches or squeezes the movie as needed to fill the screen. If you find your Mac struggles to play back video smoothly at full screen, try Entire Screen – Reduced Resolution instead. Otherwise, choose Actual Size if you want to see the movie at its “real” size or Half Size for a smaller view.
• Check for iMovie updates automatically. Select this check box if you want iMovie to automatically check for updates when your Mac is online. Usually, installing the latest updates is a good idea because they may fix bugs in iMovie. If you deselect this check box, Mac OS X checks for iMovie updates when checking for other updates at the interval you’ve set in Software Update preferences.
Choosing browser preferences
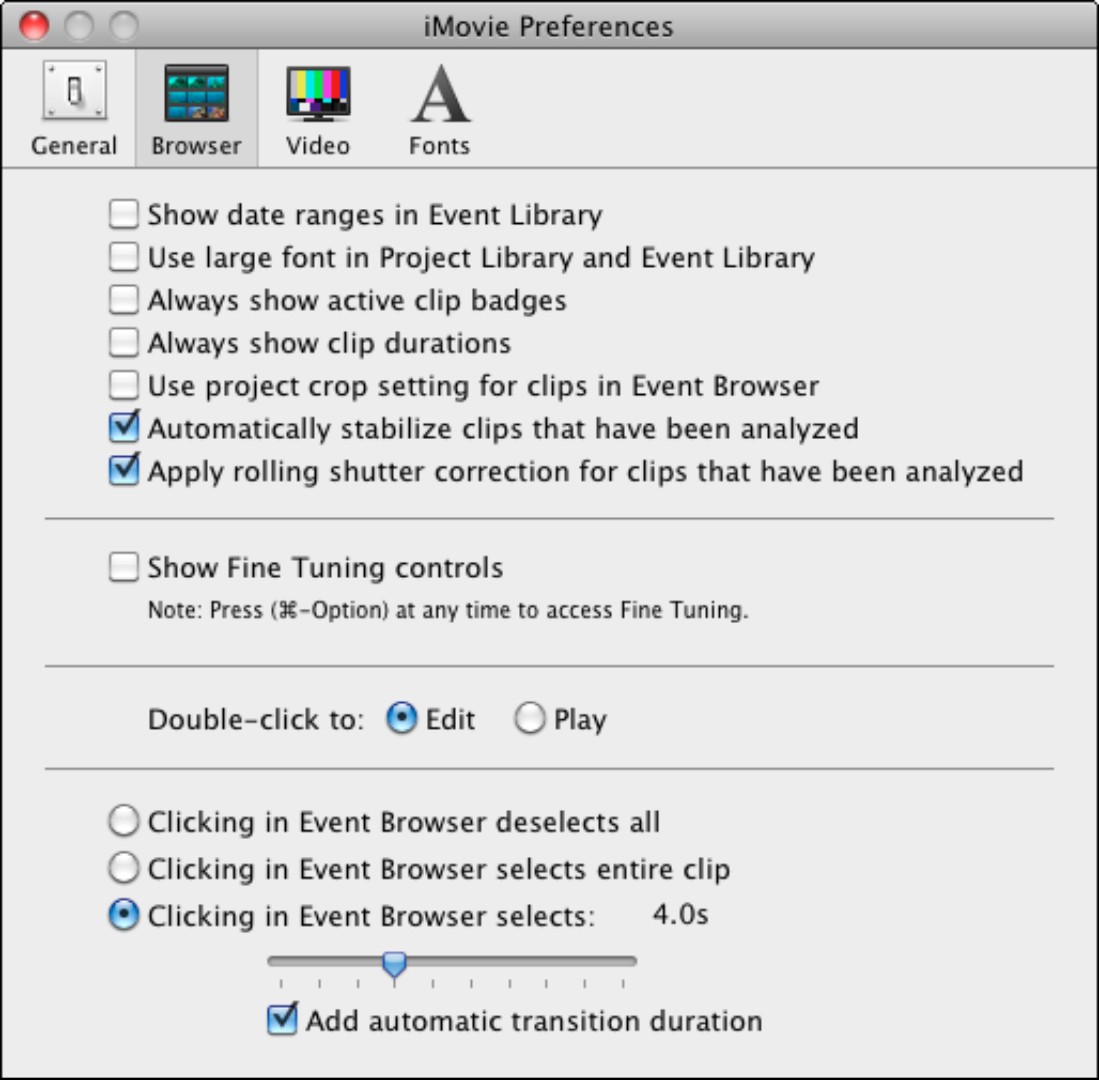
The Browser tab of the iMovie Preferences window (see Figure 4.4) lets you tell iMovie what to do when you click a filmstrip in the Event browser:
• Show date ranges in Event Library. Select this check box if you want iMovie to display the beginning and end date of each Event in the Event Library. Showing the date ranges is helpful when you’re working by date as well as by content, but it can make the Event Library appear cluttered.
4.4 Take a minute to set the Browser preferences because they make a big difference in how you work in the Event browser.
• Use large font in Project Library and Event Library. Select this check box if you want the Project Library and Event Library to use a larger font that’s easier to read.
• Always show active clip badges. Select this check box if you want iMovie to display badges (tiny icons) on the active clip indicating which edits and effects you’ve applied to it. For example, if you’ve cropped a clip, iMovie displays a clip icon in its upper-left corner when the clip is active.
• Always show clip durations. Select this check box if you want iMovie to display the duration of every clip. Showing the durations can be helpful when you select footage and build your projects, but it makes the iMovie interface that much busier.
• Use project crop setting for clips in Event Browser. Select this check box if you want the Event browser to show clips using the cropping that you’ve applied to the project as a whole.
• Automatically stabilize clips that have been analyzed. Select this check box if you want iMovie to automatically apply stabilization to clips you analyze for stabilization. If you need to stabilize many clips, try selecting this check box to see if it saves you time overall. Otherwise, it’s usually best to apply stabilization only to clips you’ve decided to use.
• Apply rolling shutter correction for clips that have been analyzed. Select this check box if you want iMovie to automatically minimize problems with clips shot on a camera that uses a rolling shutter (such as the iPhone or many digital cameras). Because a rolling shutter records each frame in a pass from top to bottom rather than all at once, a moving subject can appear blurred in the frame. This feature tries to correct such blur.
• Show Fine Tuning controls. If you select this check box, when you point to a clip that you’ve already shortened, iMovie displays a button that you can use to change the clip’s length. You’ll learn how to do this in Chapter 5. If you deselect this check box, you can display the Fine Tuning buttons by pressing  +Option while pointing to a clip.
• Double-click to. Choose the action you want to occur when you double-click an event: Edit or Play.
• Clicking in Event Browser deselects all. Select this option button if you find it easier to select by clicking and dragging than by merely clicking.
• Clicking in Event Browser selects entire clip. Select this option button to make a click select an entire clip rather than just the first part of it.
• Clicking in Event Browser selects. Select this option button, and then click and drag the slider to choose how many seconds you want to select at the beginning of a clip you click in the Event browser. The default setting is 4.0 seconds. Select the Add automatic transition duration check box if you want iMovie to include the length of any transitions you’ve decided to apply automatically.
Choosing video settings
The Video tab of the iMovie Preferences window (see Figure 4.5) contains only a single control, the Import HD video as pop-up menu. In this pop-up menu, choose the size at which to import high-definition video:
• Full – Original Size. Select this item to import the high-definition video at its full size. Doing this gives you the highest quality in your projects, but it takes up a lot of hard drive space.
• Large – 960×540. Select this item to import high-definition video at a smaller size. This size takes up around a quarter as much space as full-quality HD video.
Unless you have a professional-quality HD camcorder or you must keep your high-definition video full quality, choosing Large in the Import 1080i video as pop-up menu is usually a good idea. Consumer HD camcorders typically record less data than the 1920×1080 format technically requires, which means the image is not full quality — so if you reduce the image to 960×540, the drop in actual image quality is so small few people notice it.

4.5 On the Video tab of the iMovie Preferences window, choose whether to import high-definition video at full size or at the reduced “Large” size.
Choosing fonts settings
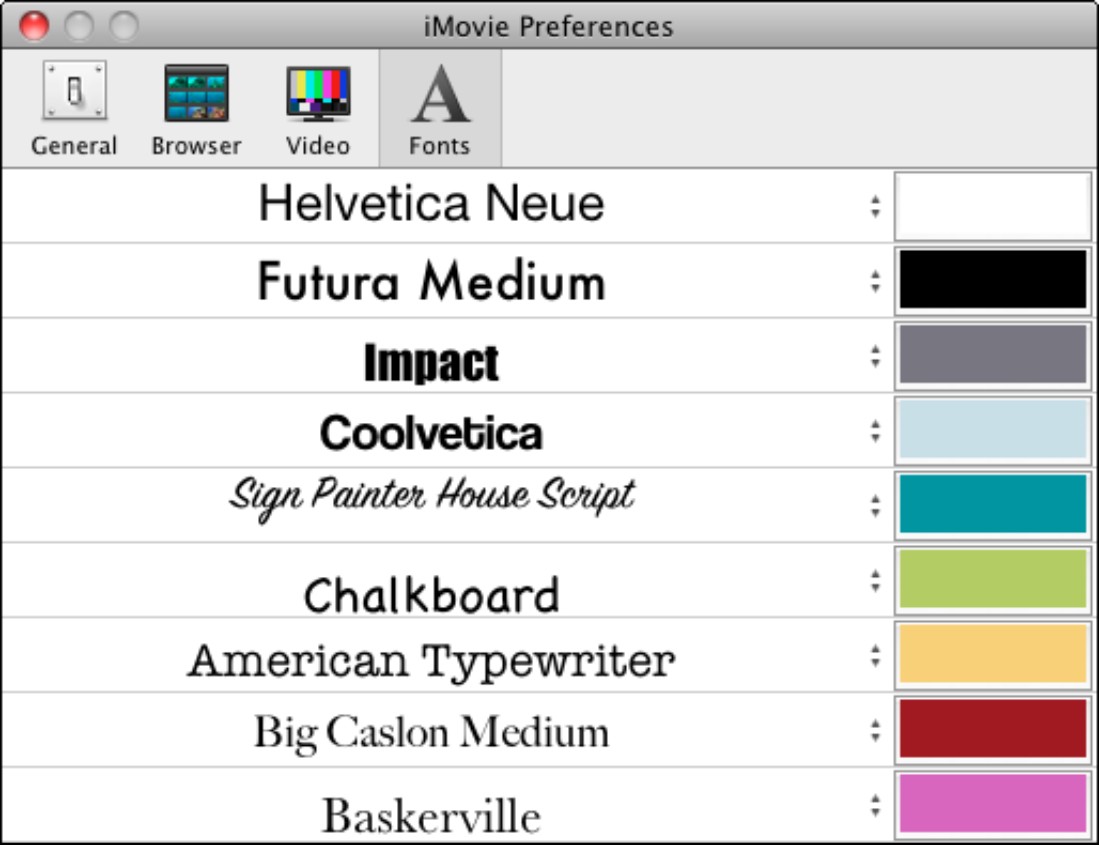
The Fonts tab of the iMovie Preferences window (see Figure 4.6) displays the list of fonts that comprise iMovie’s Choose Font panel, which is a subset of your Mac’s complete list of system fonts. For each of the nine listed fonts, you can choose a typeface and a color.
4.6 On the Fonts tab of the iMovie Preferences window, choose the fonts and colors you want to be able to apply quickly in your projects.
The Choose Font panel is the quick way of applying fonts, so use the Fonts tab of the iMovie Preferences window to line up the fonts and colors you’ll want to use most often. You can apply other fonts as needed using the Font window, but it takes a little longer.
Starting a Movie Project
If you’ve just opened iMovie, and iMovie has created a project called My First Project for you, you’re ready to start. First, though, you may want to rename the movie project and check that its properties are set the way you need them.
If you’ve already added material to My First Project, you may prefer to create a new project. To do so, follow these steps:
1. Click the New Project button in the lower-right corner of the Project Library, or choose File→New Project from the menu bar, or press +N. iMovie displays the dialog shown in Figure 4.7.
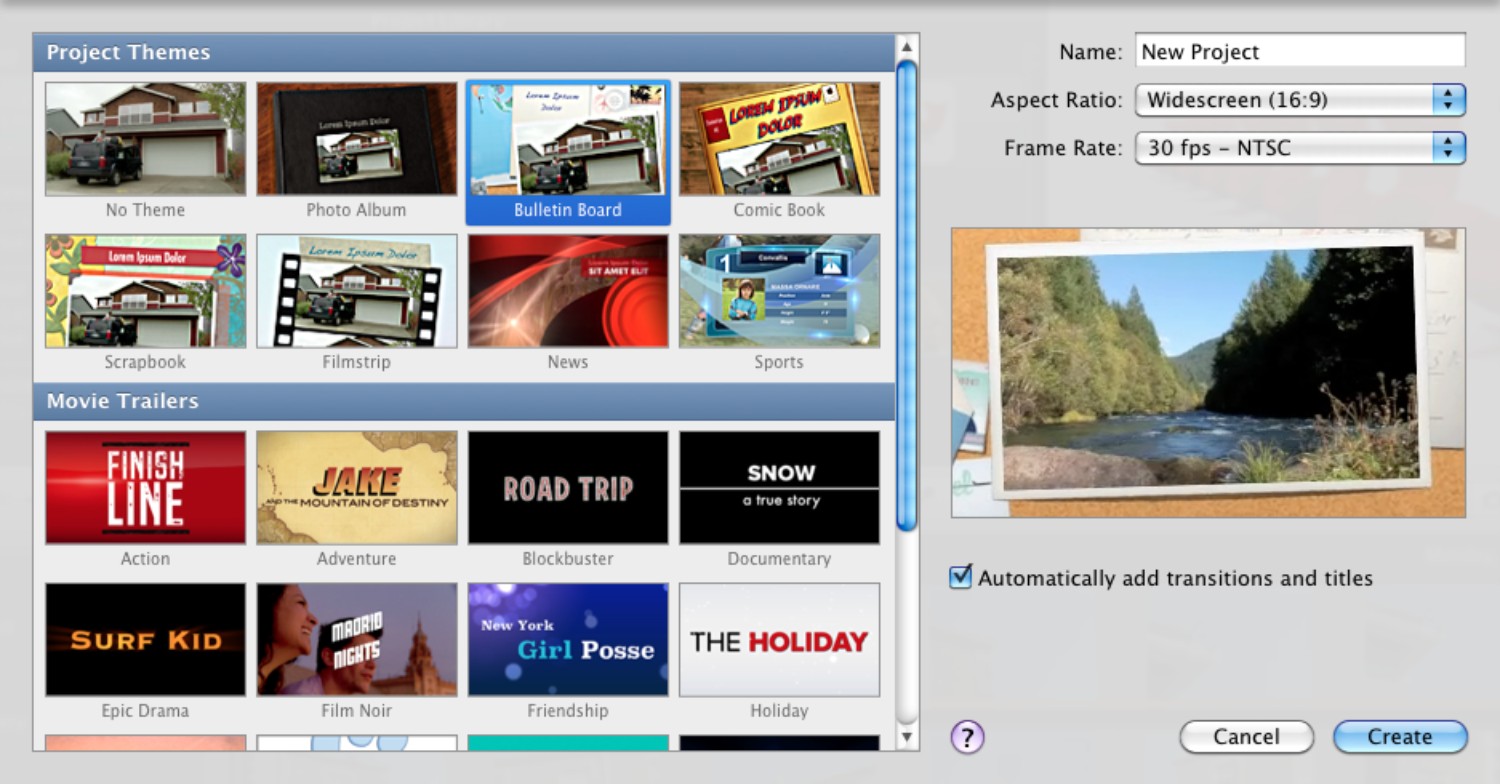
4.7 When you create a new project, you give it a name, choose its aspect ratio and frame rate, and apply a theme if you want to use one.
2. In the Name box, type the name you want to give the project. You can change this at any point, so go ahead and assign a working title if you haven’t chosen a killer name yet.
3. In the Aspect Ratio pop-up menu, choose the aspect ratio you want — the proportion of the frame’s width to its height. These are your choices:
• Widescreen (16:9). Choose this aspect ratio (16 units wide by 9 units high) for playing back on a high-definition TV or a widescreen monitor. If you play the project back on a standard TV or monitor, the video appears letter-boxed, with black bands above and below it.
• Standard (4:3). Choose this aspect ratio (4 units wide by 3 units high) for playing back on a standard-shaped TV or monitor.
You can change a project’s aspect ratio later if necessary by working on its Properties dialog, as described shortly.
4. In the Project Themes box, click the predefined iMovie theme you want to use (or click No Theme if you don’t want to use a theme). Each theme comes with a predefined set of scene transitions, as well as titles and other effects, so you can create a movie simply by snapping your content into place.
5. In the Frame Rate pop-up menu, choose the frame rate and format for the movie. These are your choices:
• 30 fps – NTSC. Choose this item to create a movie using the NTSC (National Television Standards Committee) format. This is the format used in North America, South America, and Japan. It runs at 30 frames per second (fps).
• 25 fps – PAL. Choose this item to create a movie in the PAL (Phase Alternating Line) format. This is the format used in Europe, Australia, China, Africa, and the Middle East. It runs at 25 frames per second.
• 24 fps – Cinema. Choose this item to create a movie using the 24 fps frame rate used in cinemas.
Unless you’ve bought your DV camcorder or TV in another country, or you’re creating a movie for playback in a cinema, you’ll normally want to choose your local standard in the Frame Rate pop-up menu. For example, if you’re in the United States, you’ll probably want to choose the 30 fps – NTSC format.
6. Tell iMovie whether you want it to add scene transitions automatically. How you do this depends on whether you selected a theme in Step 4:
• If you selected No Theme. In this case, select the Automatically add check box and then use the pop-up menu to click the type of transition you want iMovie to apply throughout your project. You learn about the various transitions in Chapter 6, but the best transition for automatic use is Cross Dissolve.
• If you selected a theme. In this case, iMovie selects the Automatically add transitions and titles check box for you. Deselect this check box if you don’t want the automatic transitions and titles. To get the most benefit from using a theme, leave the Automatically add transitions and titles check box selected.
7. Click Create. iMovie creates the movie project for you, adds it to the Project Library, and opens it in the Storyboard so that you can start working on it. If you want to adjust project properties (as discussed in a moment), click the Project Library button to return to the Project Library.
Notice that unlike most applications, iMovie doesn’t let you choose the folder in which to store your project. Instead, iMovie automatically stores the project in the ~/Movies/iMovie Projects folder (where the tilde [~] represents your home folder). iMovie also automatically saves the changes you make to your projects, so you don’t need to save them yourself.
Renaming a movie project
My First Project isn’t the greatest of names, so you may want to change it to something more suitable. To do so, double-click the existing name in the Project Library to display an edit box, type the new name, and then press Return to apply the change.
Setting properties for a movie project
Before you start working on a project, make sure its properties are set the way you need them. Follow these steps:
1. Control+click or right-click the project in the Project Library and choose Project Properties. iMovie displays the Project Properties dialog (see Figure 4.8).
2. In the Aspect Ratio pop-up menu, choose the aspect ratio you want: Standard (4:3) or Widescreen (16:9).
3. In the Frame Rate pop-up menu, choose the frame rate and format to use: 30 fps – NTSC, 25 fps – PAL, or 24 fps – Cinema. Frame rates are covered earlier in this chapter.

4.8 It’s usually a good idea to set properties in the Project Properties dialog before working on a project.
4. Click and drag the Transition Duration slider to set the default length for transitions in this project. You can set from 0.5 seconds up to 4 seconds.
5. Click and drag the Theme Transition Duration slider to set the length of the theme transitions. You can set from 0.5 seconds up to 4 seconds. This slider is disabled if you’ve set the project to use no theme.
6. If you’ve set the project not to apply transitions automatically, select the appropriate option under the Theme Transition Duration slider. If you have set the project to apply transitions automatically, these option buttons are not available.
• Applies to all transitions. Select this option button if you want iMovie to use these settings for all transitions — those you’ve placed so far (if any) and those you add from now on.
• Applies when added to project. Select this option button to apply automatic transitions only to clips you add from now on.
7. Click and drag the Title Fade Duration slider to tell iMovie how long to fade the titles in and out. You can set from 0 seconds to 2 seconds.
8. Choose settings for still photos you add to the project:
• Photo Duration. Click and drag the slider to tell iMovie how long to play a photo for by default (from 1 second to 10 seconds).
• Applies To. Select the Applies to all photos option button if you want to apply this duration to all photos you’ve already placed as well as to any you place from now on. Select the Applies when added to project option button if you want to apply the duration only to photos you place from now on.
• Initial Photo Placement. In this pop-up menu, choose the standard placement for photos: Fit in Frame, Crop, or Ken Burns. You’re just setting your default placement here; you can always change the placement for a photo after you place it.
The Fit in Frame placement makes iMovie add letterboxing to photos and videos that are the wrong aspect ratio for the project. The Crop placement makes iMovie enlarge the photo or video so that it occupies the full aspect ratio, cropping off parts of the dimension that was already fitting. For example, if a photo’s aspect ratio makes it too wide and short for the frame, Crop increases the photo’s height to match the frame, and then crops the extra parts of the width.
9. In the Initial Video Placement pop-up menu, choose the initial video placement: Fit in Frame, or Crop. See the nearby Genius note for an explanation of these options.
10. Click OK to close the Project Properties dialog. iMovie applies your preferences to the project.
If you create stacks of movie projects, the Project Library can get crowded. To ease the congestion, you can use folders within the Project Library to organize your movie projects. To create a folder, Control+click or right-click in the Project Library window, choose New Folder, type the name, and then press Return. You can then drag a movie project to a folder.
Importing Video
You can bring your video content into iMovie in several ways:
• Import video directly from your digital video camera. The process is different for a DV camcorder that uses tape than for one that doesn’t.
• Copy video from your digital video camera, digital camera, or iPhone to your iPhoto Library, and then access the files from iMovie.
• Import existing video files you have on your Mac. You can also import video from iMovie HD projects, an older version of iMovie (this chapter doesn’t cover importing video from iMovie HD).
• Record live video directly into iMovie using an iSight or a DV camcorder.
Importing video from a DV tape camcorder
To import video from a DV camcorder that records onto tape, follow these steps:
1. Connect the DV camcorder to your Mac. Most DV camcorders connect via a FireWire cable, usually with a four-pin (small) plug at the camcorder end and a regular nine-pin FireWire 800 plug at the Mac’s end.
 Connecting a DV camcorder via FireWire can disconnect an external FireWire drive you’re using. This shouldn’t happen — but it does. So before you connect your DV camcorder for the first time, close any files that you’ve opened from any external FireWire drive you’re using just in case the DV camcorder knocks the drive off your Mac’s FireWire chain.
2. Switch the DV camcorder to Play mode or VCR mode. When iMovie recognizes the DV camcorder, it automatically displays the Import From window, as shown in Figure 4.9. If you don’t see the window, click the Open Camera Import Window button (you can also choose File→Import from Camera or press +I).
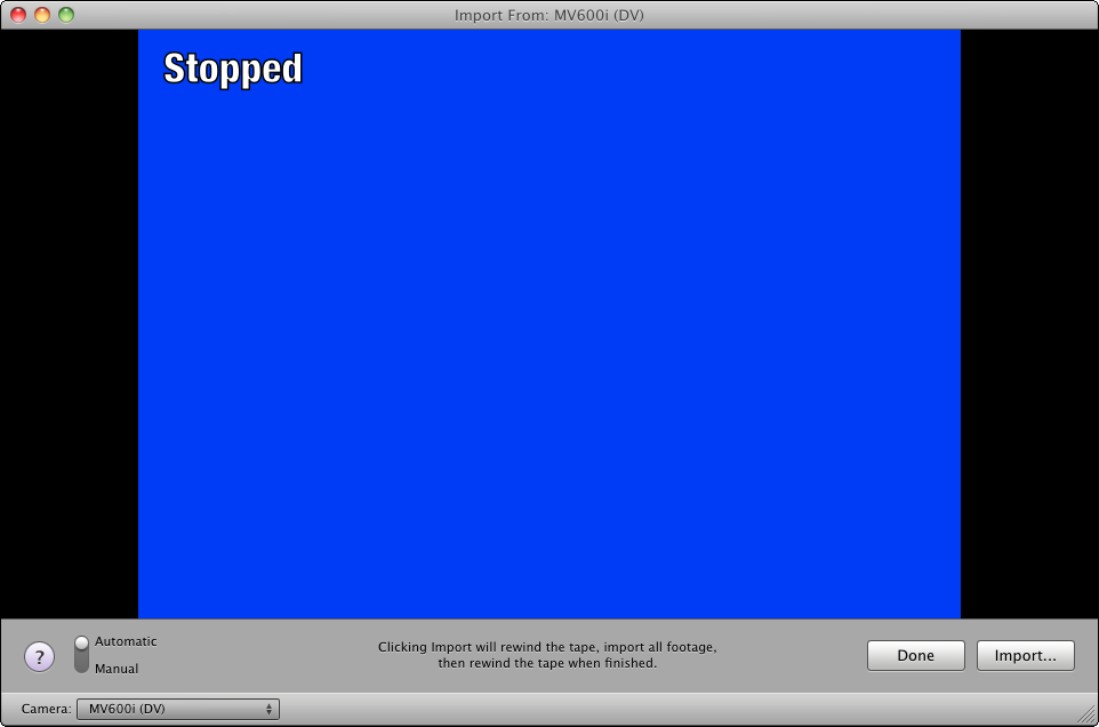
4.9 iMovie displays the Import From window when it recognizes a DV camcorder connected and switched on. This is a tape camcorder.
Once iMovie recognizes the camcorder, you can either import all the video on the tape (as discussed next) or just parts of it (as discussed after that).
Importing all the video on the tape automatically
If you want to import all the video on the tape, follow these steps:
1. Make sure the mode switch in the lower-left corner of the Import From window is set to Automatic.
2. Click Import. iMovie displays the dialog shown in Figure 4.10.
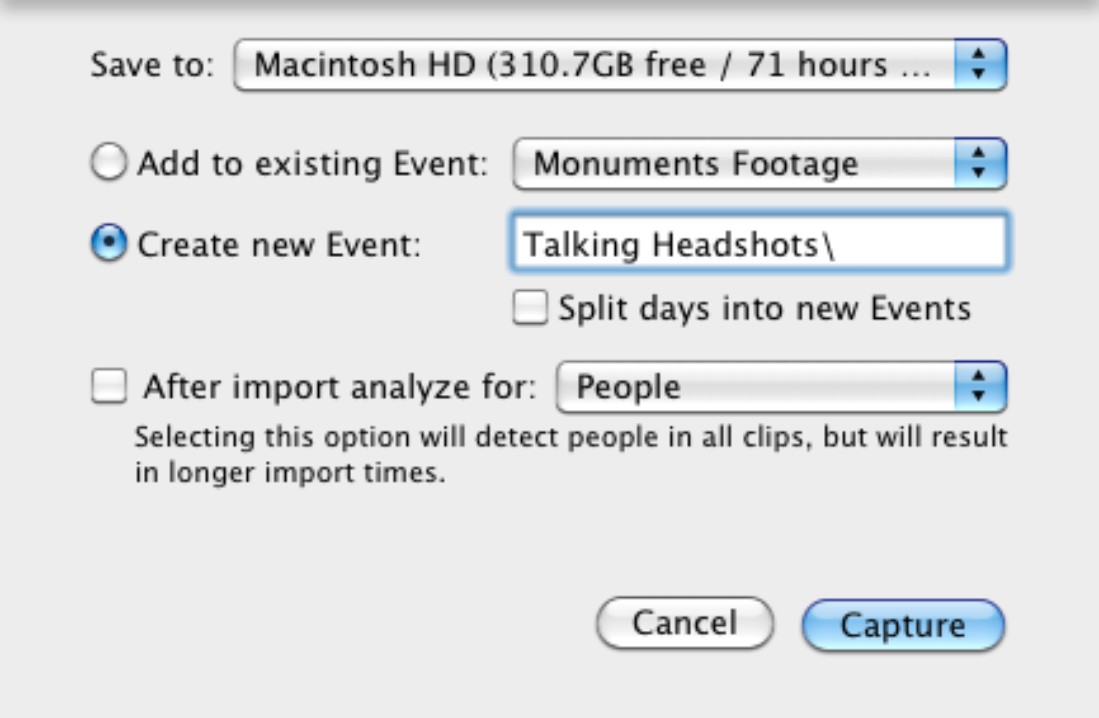
3. In the Save to pop-up menu, choose the hard drive on which you want to save the video. Your Mac’s internal hard drive is usually the best bet unless you’ve attached an external hard drive to give yourself extra space for working with video.
4. Tell iMovie which Event to make the video part of:
• Add to existing Event. Select this option button to add the video to an existing event, and then choose the Event in the pop-up menu.
• Create new Event. Select this option button to create a new Event. Type the name for the new Event in the text box; iMovie suggests New Event and the date, but you’ll find that more descriptive names are more helpful. Select the Split days into new Events check box if you want iMovie to create a separate Event for each day on the imported video.

4.10 Choose which hard drive or storage device to save the video on; whether to create a new Event or add it to an existing Event; and whether to analyze the imported video for stabilization, people, or both.
5. If you want iMovie to apply stabilization to your clips or find people in them after importing the video, select the After import analyze for check box, and then make the appropriate choice in the pop-up menu:
• Stabilization. Analyzing the video for stabilization adjusts your clips to compensate for the telltale signs of shakiness that are the hallmark of handheld video footage.
Analyzing the imported video for stabilization, people, or both can make the import process take much longer than a straightforward import. Unless you’re sure the video is all high quality, you may do better to analyze only selected clips for stabilization or people (or both) after importing the video and grading it for quality.
• People. Select this item to have iMovie try to pick out faces in the clips.
• Stabilization and People. Select this item to have iMovie both analyze the video for stabilization and try to identify faces.
6. Click OK. iMovie rewinds the tape to the beginning, and then imports the video, displaying it in the Import From window as it does so (see Figure 4.11).

4.11 Letting iMovie import all the video from a tape automatically
7. When iMovie displays the Camera Import Complete dialog, as shown in Figure 4.12, click OK. You can now turn off your DV camcorder and start working with the imported video.

4.12 iMovie tells you when it finishes importing the video.
After importing all the video from the tape, iMovie automatically rewinds the tape to the beginning. If you don’t want to tape over your existing footage, you’ll need to wind the tape forward again.
Importing video from your DV camcorder manually
If you want to grab only some of the video from your DV camcorder, follow these steps:
1. Move the mode switch in the lower-left corner of the Import From window to the Manual position. iMovie displays the transport controls for the DV camcorder (shown in Figure 4.13 with an import running).
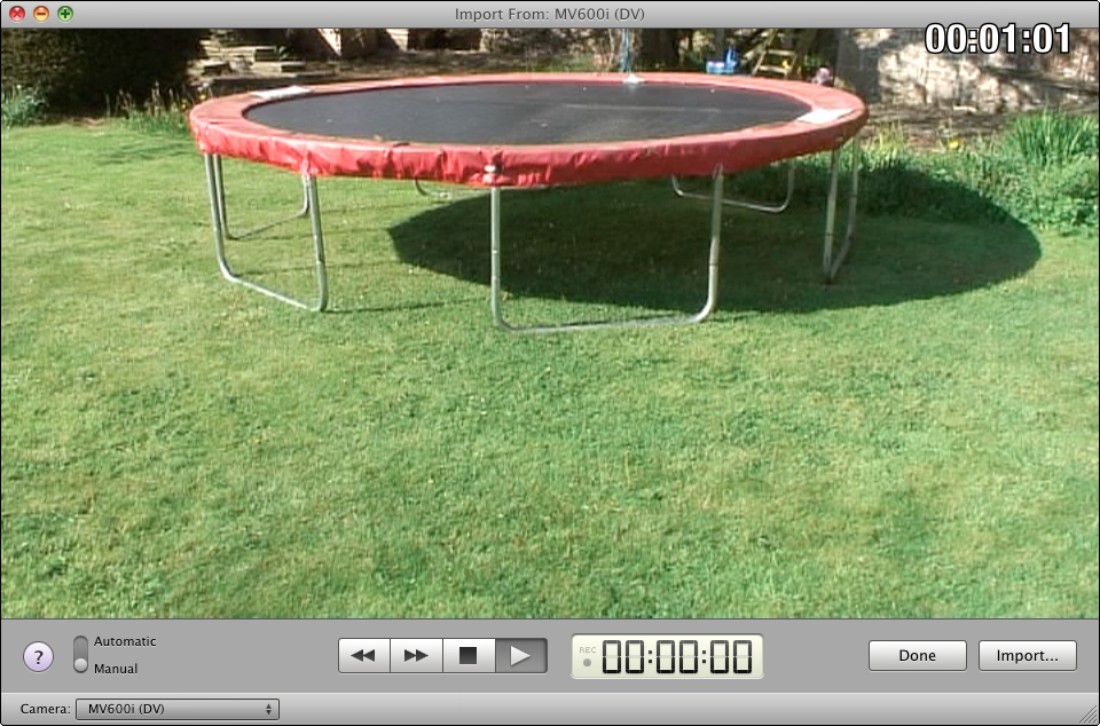
4.13 Move the mode switch to Manual to access iMovie’s transport controls for your DV camcorder.
2. Use the transport controls to reach the part of the tape you want to import. For example, fast-forward to approximately the right part of the tape, play the video until where you want to start importing, and then stop it.
3. Click Import. iMovie displays the dialog for choosing where and how to save the video.
4. In the Save to pop-up menu, choose the hard drive on which you want to save the video.
5. Choose whether to make the video part of an existing Event or to create a new Event for it, as discussed earlier in this chapter.
6. If you want iMovie to analyze your clips for stabilization, people, or both (as described in the previous section), select the After import analyze for check box. In the pop-up menu, choose People, Stabilization, or Stabilization and People, as needed.
7. Click OK. iMovie starts importing the video from the point you chose.
8. Click the Stop button when iMovie reaches the end of the video you want to import. iMovie processes the clip you imported and then displays the blue screen of the Import From window again.
9. If you want to import more video from the DV camcorder, follow Steps 2 through 8 to select and import it. When you finish, click Done to close the Import From window.
Importing video from a DV tapeless camcorder
If your camcorder stores the video on a hard drive, memory card, or DVD, import the video files like this:
1. Connect the camcorder to your Mac. Most tapeless camcorders connect via USB rather than FireWire.
Don’t use the low-power USB port on a desktop Mac’s keyboard — it normally doesn’t work. If possible, connect the tapeless camcorder to a USB jack on your Mac rather than on a USB hub connected to your Mac. Plugging the camcorder in directly helps avoid connection problems and gives you the best transfer speeds.
2. Switch the camcorder on and put it into Playback mode. Some camcorders call this mode PC mode or VCR mode.
3. Your Mac should open or activate iMovie automatically when it notices the camcorder in Playback mode. If not, try quitting iMovie (if it’s running) and then reopening it manually.
4. iMovie automatically transfers or generates thumbnail previews for the clips on the camcorder, and then displays the thumbnails in a panel at the bottom of the Import From window. Figure 4.14 shows an example.
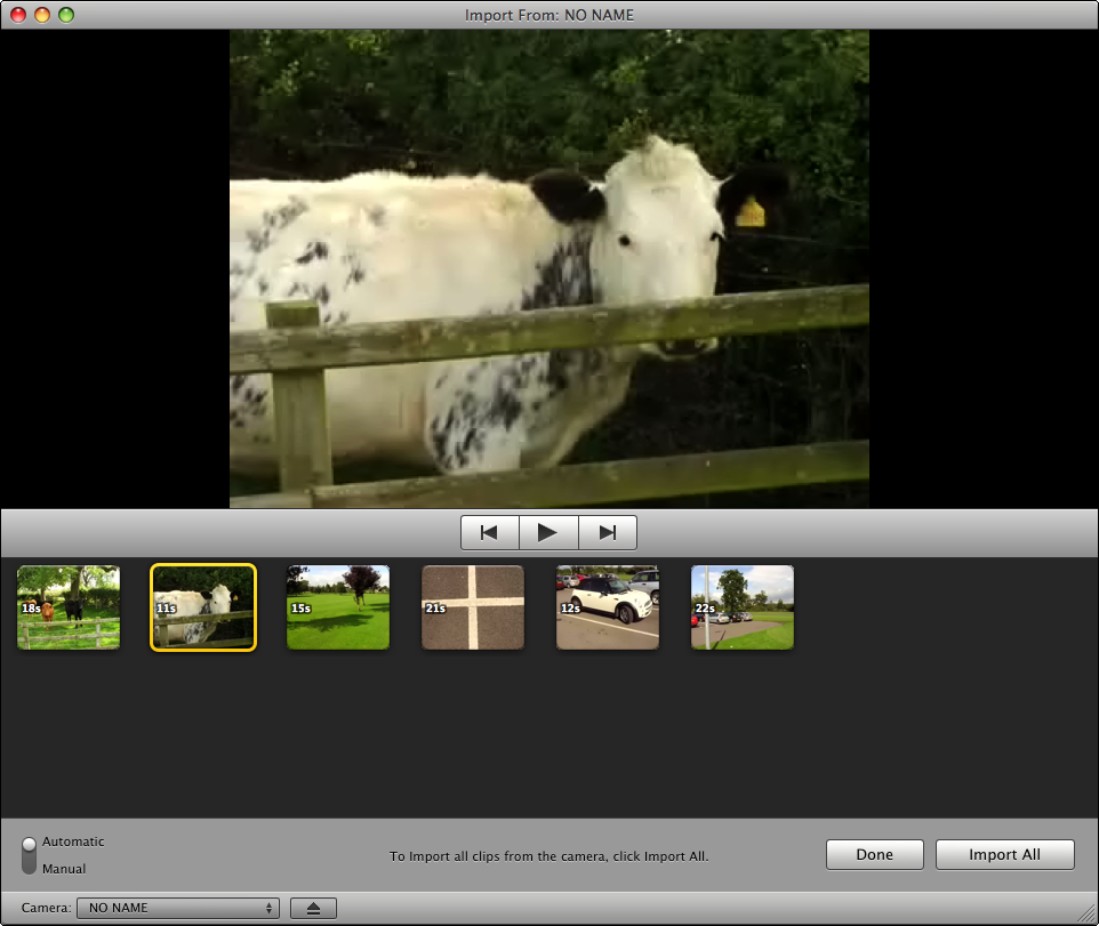
4.14 When you connect a tapeless camcorder, iMovie shows you thumbnails of the clips it contains.
If your Mac doesn’t recognize the camcorder and launch iMovie, you may need to plug the camcorder into a power outlet to persuade the camcorder it has more than enough power to transfer all your video.
5. Choose which clips you want to import:
• If you want to import all the clips, simply click Import All, and go to the next step. Otherwise, click and drag the switch in the lower-left corner of the Import From window from Automatic to Manual. iMovie adds a check box to each clip, as shown in Figure 4.15.

4.15 Move the switch to Manual to reveal check boxes for selecting the clips you want to import.
• To play a clip, click its thumbnail, and then click the Play button. You can then click the Previous button or the Next button to play another clip.
• Select the check box for each clip you want to import. If you want to import most of the clips, click Check All, and then deselect the check boxes for those clips you don’t want.
• Click Import Selected.
6. In the Save to pop-up menu, choose the hard drive on which you want to save the video.
7. Choose whether to make the video part of an existing Event or to create a new Event for it, as discussed earlier in this chapter.
8. If you want iMovie to analyze your clips for stabilization, people, or both (as described in the previous section), select the After import analyze for check box. In the pop-up menu, choose People, Stabilization, or Stabilization and People, as needed.
9. Click OK. iMovie starts importing the video, displaying a progress indicator so you can see how it’s doing. iMovie displays an Import Complete dialog to let you know when it has finished.
10. Click OK to close the Import Complete dialog.
11. Click Done to close the Import From window.
Importing video from a digital camera
If your digital camera takes video clips, you may want to use these in iMovie. Depending on your digital camera, you can import the clips into iMovie in one of these ways:
• Import the clips into iPhoto. If iPhoto recognizes your digital camera, but iMovie does not, import the clips into iPhoto. You can then use the iPhoto Videos Event in iMovie’s Events browser to browse the clips. This is how you import video clips from an iPhone.
• Click and drag the clips from the Finder. Connect your digital camera to your Mac via the camera’s USB cable, and Mac OS X mounts the camera’s storage as a drive in the Finder. Open the drive, locate the video clips you want, and then click and drag them to the Event in which you want to place them in the Event Library.
If Mac OS X doesn’t recognize your digital camera, remove the storage medium from the camera and insert it in a card reader built into or connected to your Mac. For example, remove a CompactFlash card or an SD card from your camera and insert it in a card reader. Once Mac OS X mounts the volume and displays it in the Finder, you can click and drag the video clips from the Finder to an Event in the Event Library in iMovie.
Importing existing video files
If you already have video files on your Mac that iMovie doesn’t know about, you can import them into iMovie by using either the Finder or the Import Movies command.
The simplest way to import existing video files is by clicking and dragging them from the Finder to the Event Library in the iMovie window. Drop the files on the Event to which you want to add them. If the video files are high definition, iMovie imports them at the resolution you set on the Movies tab in iMovie Preferences.
If you want to put the video files you’re importing in a new Event or control the resolution at which iMovie imports high-definition video, use the Import Movies command instead. Follow these steps:
1. In iMovie, choose File→Import→Movies. iMovie displays the dialog shown in Figure 4.16.
2. Navigate to the video files and select them as usual.
3. In the Save to pop-up menu, choose the hard drive on which you want to store the imported video.

4.16 This importing dialog lets you choose whether to create a new Event and whether to copy or move the files you’re importing.
4. Choose whether to add the files to an existing Event or whether to create a new Event. If you create a new Event, type its name in the text box.
5. If you’re importing high-definition video, select the Optimize video check box if you want to optimize the video for the size you choose in the pop-up menu. As when importing from a camera, your choices are Large – 960×540 and Full – Original Size.
6. Select the Copy files option button or the Move files option button. Copying the files lets you change the files in iMovie without worrying about the originals, but it takes twice as much hard drive space. If the files are large, you may want to move them rather than copy them.
7. Click Import. iMovie imports the files and then generates thumbnails for them, keeping you informed of its progress (see Figure 4.17).
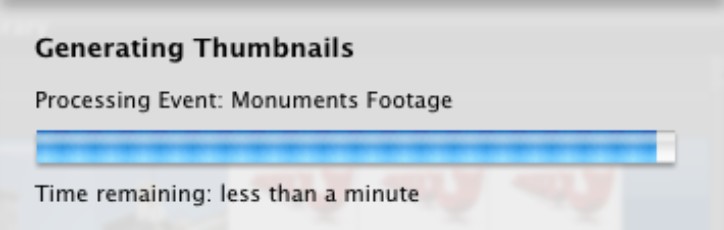
4.17 iMovie generates thumbnails for the video files you import.
Recording live video from an iSight or a camcorder
Another option is to record video directly from an iSight video camera or a DV camcorder connected to your Mac. The iSight can be either built into your Mac or connected via FireWire.
To record live video, follow these steps:
1. If you’re using an external iSight or another external DV camera, connect it to your Mac via FireWire. For a camera other than an iSight, turn its control knob to the Record position or Camera position (depending on the model).
2. Open the Import From window by clicking the Open Camera Import Window button, choosing File→Import from Camera, or pressing +I. If you’re using an external camera other than an iSight, the Import From window may open automatically when you switch the camera to the Record position or Camera position. The illustration on the opening page of the chapter shows iMovie ready to record from an iSight.
3. If you have two or more cameras connected, choose the camera you want from the Camera pop-up menu.
4. If the Video Size pop-up menu appears, choose the resolution you want. Some DV camcorders and iSight cameras can provide different resolutions (for example, 640×480 or 1024×576), while others can manage only a single resolution.
5. Aim the iSight or camera and any external microphone you’re using.
6. Position your subject (for example, yourself) in the frame.
7. Click Capture when you’re ready to start recording. iMovie displays the dialog shown in Figure 4.18.
8. In the Save to pop-up menu, choose the hard drive on which you want to store the imported video. Your Mac’s internal hard drive is usually the best choice.
9. Choose whether to add the files to an existing Event or whether to create a new Event whose name you type in the text box. Select the Split days into new Events check box if you want iMovie to create a new Event for each day you film. Unless the clock is ticking toward midnight or you’re planning a marathon filming session, you don’t normally need to worry about this check box when recording live.
10. If you want iMovie to analyze your clips for stabilization, people, or both (as described in the previous section), select the After import analyze for check box. In the pop-up menu, choose People, Stabilization, or Stabilization and People, as needed.
4.18 Choose where to store the footage, which Event to make it part of, and whether to analyze it for people or stabilization after import.
11. Click Capture. iMovie starts recording through the camera.
12. Click the Stop button when you want to stop capturing video.
13. Click Done when you’re ready to close the Import From window. iMovie adds your new footage to the Event you chose.
Reviewing and Sorting Your Video Clips
After you import your video clips as described earlier in this chapter, review them to see what footage you have and what parts of it you want to keep. iMovie lets you quickly identify known people in your clips, mark clips you want to keep as favorites, and mark clips that don’t make the grade as rejects. To make your clips easy to sort and search, you can add keywords to them, and you can organize them into different Events so that you can easily find the footage you need.
Navigating through your Events
As you’ve seen in this chapter, when you import video clips, iMovie assigns them to Events. To work with Events, you use the Event Library in the lower-left corner of the iMovie window. Figure 4.19 shows the Event Library with various events added.
4.19 The Event Library with various events.
The Event Library organizes your Events like this:
• Last Import. This Event contains the last batch of clips you imported from your video camera. If you’ve just imported some video, this is the place to start.
• iPhoto Videos. This Event contains the videos you’ve imported into iPhoto from your digital camera.
• Year folders (2011, 2010, and so on). Each folder contains the Events for footage shot in that year. For example, if you dredge up a tape from 2008 and import it, iMovie puts it in the 2008 folder rather than the folder for the current year. (iMovie picks up the date from the timecode on the video.)
Depending on the video format your digital camera uses, you may find that iMovie displays the No matching video message when you select the iPhoto Videos Event in the Event Library — even though your iPhoto library contains videos that you can play in QuickTime Player by double-clicking them in iPhoto. If this happens, use QuickTime Player’s Export command to export the videos in another format, such as MP4, which iMovie can play.
Changing the Event Library’s sort order
Normally, the Event Library sorts the Events and folders in reverse date order, so the most recent items appear at the top of the list, where they’re handiest. If you want to switch to conventional date order, choose View→Most Recent Events at Top to remove the check mark by this command.
Viewing Events by month or day
If you want to see the Events listed by month in the Event Library, choose View→Group Events by Month. iMovie adds a separate category for each month that has footage. Choose the same command again if you want to hide the months again.
Viewing Events and folders by drives
If you want to see the Events and folders listed by the drives on which they’re stored (see Figure 4.20), click the Group Events by Disk button in the upper-right corner of the Event Library (this button is labeled in Figure 4.19). Alternatively, choose View→Group Events By Disk to place a check mark by this item.
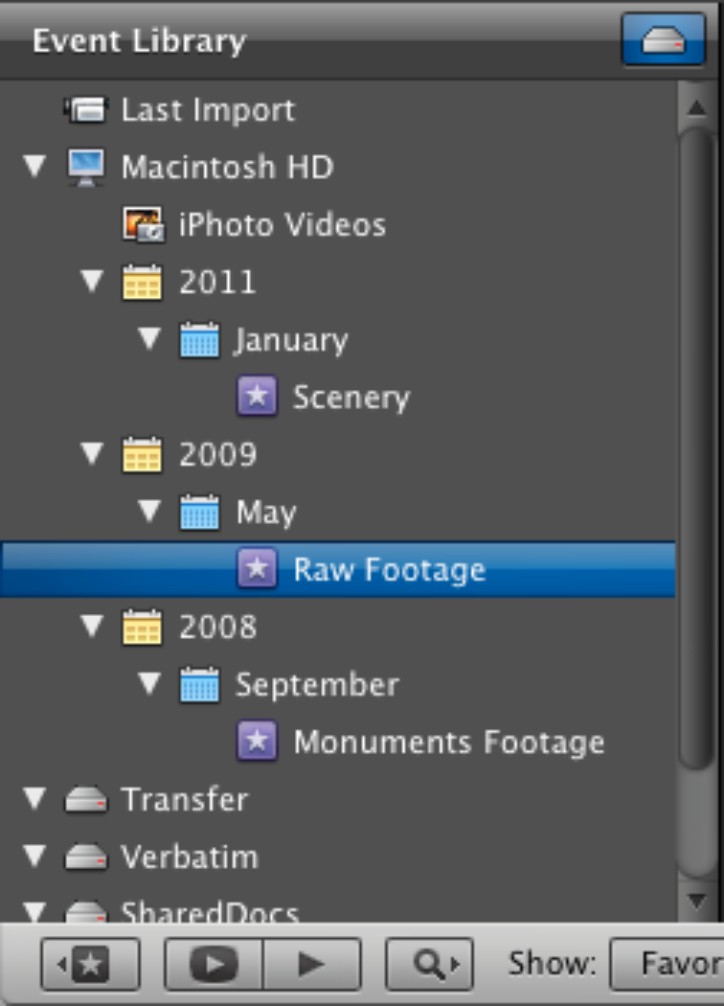
4.20 Viewing Events by disk lets you tell easily which drive an Event’s clips are stored on.
To return to the reverse date order, just click the Group Events by Disk button again. Alternatively, choose View→Group Events by Disk again to remove the check mark.
Viewing the clips in an Event
To view the clips in an Event, click the Event in the Event Library. iMovie displays the clips in the Event browser (see Figure 4.21) as filmstrips, sequences of frames that show you the contents of the clips.
To change the size of the video thumbnails, drag the Thumbnail Size slider to the left or the right. (Figure 4.19 shows where this slider is.)
To change the number of frames iMovie displays for a filmstrip, drag the Filmstrip length slider to the left or right. If you drag the slider all the way to the left, iMovie displays a single frame for each clip.
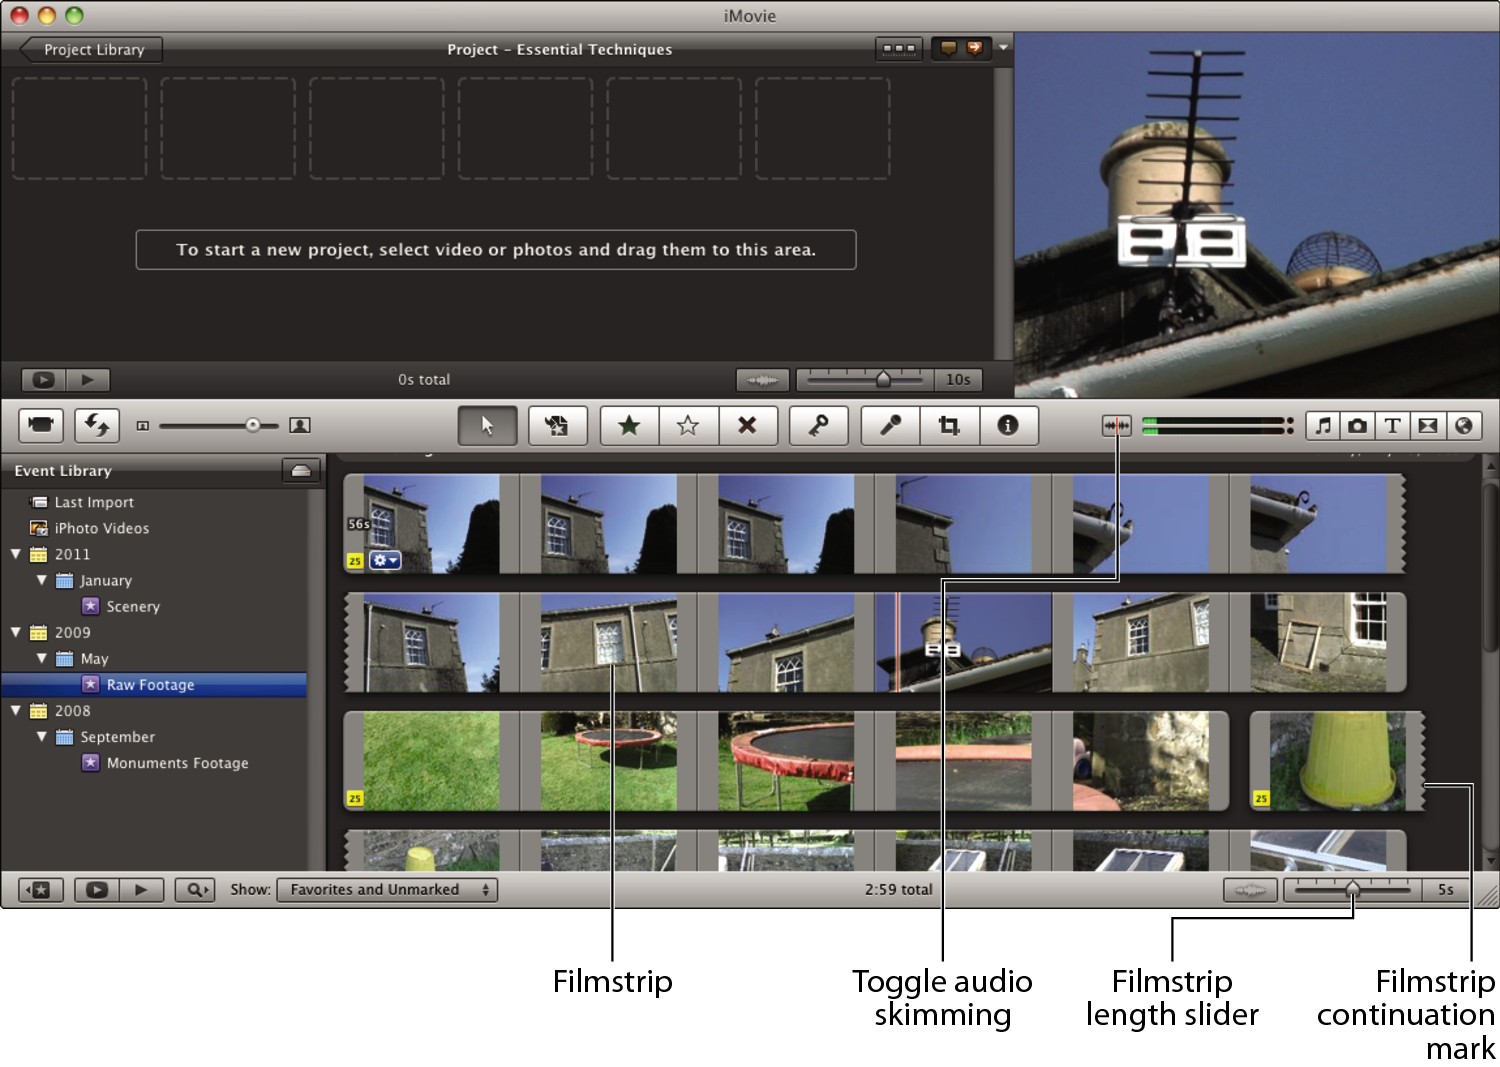
4.21 Viewing an Event’s clips as filmstrips in the Event browser.
You can play clips in any of these ways:
• In the viewer. Control+click or right-click the clip and then click Play Clip on the context menu.
• Full screen. Control+click or right-click it and choose Play Full Screen.
• Play all clips in the selected Event (or Events) in the viewer. Click the Play selected Events from beginning button.
• Play all clips in the selected Event (or Events) full screen. Click the Play selected Events full screen button. This way you can get the full impact of the clips.
Skimming through a clip
To move through a clip at your own pace, position the mouse pointer over the filmstrip in the Event browser so that iMovie displays a red line representing the playhead (see Figure 4.22), and then move the mouse to the left or right to move through the frames. iMovie shows the current frame both in the Event browser and in the viewer so you can get a good view of what’s happening. iMovie calls this technique skimming.

4.22 Drag the Playhead (the red line) to skim through a clip.
When you skim through a clip, iMovie plays the audio. If you don’t want to hear the audio, click the Toggle Audio Skimming button on the toolbar to turn off audio skimming. (Figure 4.21 shows where the Toggle Audio Skimming button is.) Click the button again when you want to turn it on again.
After placing the playhead in a clip, you can press the Left Arrow key or the Right Arrow key to move through the clip one frame at a time.
Switching the Event and Project areas
When you review your clips, you may want to switch the Event area and the Project area around so that the Event Library and Event browser appear at the top of the iMovie window alongside the viewer. Switching the Event area and the Project area is also useful when you work on the Storyboard and you want more space.
To switch the two areas, click the Swap Events and Projects button. iMovie swaps them over with a swirly animation. Figure 4.23 shows iMovie with the Event Library and Event browser at the top of the window. Click the button again when you want to switch the areas back.

4.23 You can swap the Event area and the Project area to make browsing your clips easier or to give yourself a larger Storyboard area to work in.
Selecting the footage to keep
To save space on your Mac’s hard drive, you’ll usually want to trim down your clips by selecting only the footage you want to use. Use these techniques to select the footage:
• To select a standard-length chunk of video, click the clip. iMovie displays a yellow outline around it starting from the point you clicked. By default, iMovie selects 4 seconds.
To change the number of seconds of video that iMovie selects when you click a clip, choose iMovie→Preferences, click the Browser tab, and then click and drag the Clicking in Events Browser selects slider to the number of seconds you want.
• To select as much video as you want, click and drag through a clip. iMovie displays a yellow outline around the part you selected (see Figure 4.24).

4.24 Click and drag to select as much of a clip as you want.
• To change the length of the selection, drag the handle at either side to the left or right. Alternatively, Shift+click another point in the clip to make the nearest handle snap to where you click.
• To move the selection without changing its length, drag its top or bottom border to the left or right.
• To select an entire filmstrip, Option+click it. Alternatively, Control+click or right-click and choose Select Entire Clip.
• To select multiple filmstrips, click the first one, and then +click each of the others. The first click gets you however many seconds iMovie is set to select, but as soon as you +click the second clip, iMovie selects the whole of the first clip as well.
Identifying clips that contain people
When your video clips include shots of people, you can use iMovie’s People Finder feature to locate the clips that contain people — or, strictly speaking, people’s faces.
Unlike iPhoto’s Faces feature, People Finder doesn’t recognize the faces of individuals and allow you to assign names to them. It just finds people in your clips by identifying their faces so that you can easily locate the clips that feature people.
To use People Finder, click the Event you want to analyze, and then choose File→Analyze Video→People. iMovie displays the Detecting People dialog (see Figure 4.25) as it scans the clips for people. This process may take several minutes, depending on how much footage there is and how powerful your Mac is.

4.25 iMovie may take several minutes to detect all the people’s faces in an Event.
You can also have iMovie run People Finder when you import clips, as discussed earlier in this chapter. And if you want to analyze the video for stabilization needs at the same time as searching for people, choose File→Analyze Video→Stabilization and People. As you’d imagine, performing both forms of analysis at the same time takes longer, but it can save you time overall if you need to run both operations.
When iMovie finishes analyzing the clips for people, it displays a purple bar across the clips that contain faces and adds the People button to the bar across the bottom of the window, as shown in Figure 4.26.

4.26 iMovie shows a purple bar across the clips and footage that contain people and displays the People button.
Now you can click the People button to filter down the clips displayed to only those that contain people. This is a great way of finding the footage that contains people quickly without having to skim through many clips.
But it gets better. Click the Show/hide Keyword Filtering pane button to display the Filter by Keyword pane, and you can turn on filters to find exactly what you need. For example, try this:
1. Click the green side of the People button at the top to turn on filtering by people. This may be on already.
2. Click the red side of the One Person button to tell iMovie not to display footage containing one person.
3. Click the green side of the Two People button to tell iMovie to display footage containing two or more people.
4. Click the green side of the Closeup button to tell iMovie to display closeups.
5. Click the green side of the Medium button to include medium-distance shots.
6. Click the red side of the Wide button to strip out wide shots of people.
Figure 4.27 shows the type of result you’ll see: clips that contain two or more people in closeup or medium shots.

4.27 Use the Filter by Keyword pane to make the Event browser display only the footage containing the number of people and types of shot you want.
Marking your video clips as favorites or rejects
After you select the footage you want, you can quickly mark it as a favorite. Similarly, you select footage you don’t want to keep and mark it as a reject:
• Mark as a favorite. Click the Mark Selected Video as Favorite button on the toolbar (see Figure 4.28) or press F. iMovie puts a green bar across the top of the selected part of the clip.
• Mark as rejected. Click the Reject Selected Video button or press R. iMovie puts a red bar across the top of the selected part of the clip.
• Remove the marking. Click the Unmark Selected Video button or press U. iMovie removes the green bar or red bar.

4.28 Use these toolbar buttons to quickly mark favorites and rejects.
After marking favorites and rejects, you can narrow down the clips displayed by opening the Show menu and choosing Favorites Only, Favorites and Unmarked, or Rejected Only, as appropriate. When you want to see all the clips again, open the Show pop-up menu once more and choose All Clips from it.
Adding keywords to video clips
To make your video clips easier to sort and to find, you can add keywords to them. Follow these steps:
1. Choose iMovie→Preferences, click the General tab, select the Show Advanced Tools check box, and then click the Close button (the red button on the title bar) to close the Preferences window. iMovie displays the Advanced tools.
2. Click the View Keywords for Selection button — the button with the key icon — that appears in the middle of the toolbar. iMovie displays the Keywords window with the Inspector tab at the front (see Figure 4.29).
3. Change the list of keywords to suit your needs:
• To change an existing keyword, double-click it on either tab. Type the replacement word, and then press Return.
• To add a keyword, type it in the box in the lower-left corner of the Auto-Apply tab, and then click Add.
• To rearrange the list of keywords, drag them up and down the list. iMovie automatically assigns the numbers 1 to 9 to the first nine keywords so that you can apply them quickly.

4.29 Use the Keywords window to tag clips with keywords that make them easier to identify.
4. To apply keywords to a selected clip, click the Inspector tab, and then select the check box for each keyword you want to apply. You can also press the 1 through 9 keys to apply the keywords currently assigned those numbers.
5. To apply the same keywords quickly to several clips, use Auto Apply like this:
• Click the Auto-Apply tab.
• Select the check box for each keyword you want to apply.
• Drag across each section in the filmstrip that you want to give the keywords. To apply the keywords to a whole filmstrip, Option+click it.
6. When you finish working with keywords, close the Keywords window. Either click the Close button (the X button) in the upper-left corner of the Keywords window, or simply click the Keywords button in the middle of the toolbar.
Filtering your clips by keywords
After you apply keywords to your clips, you can use the keywords to filter the clips so that you see only the clips that have the keywords you choose. Here’s how to do this:
1. Click the Keyword Filtering button to display the Keyword Filter panel (see Figure 4.30). The panel appears between the Event Library (if it’s displayed) and the Event browser.
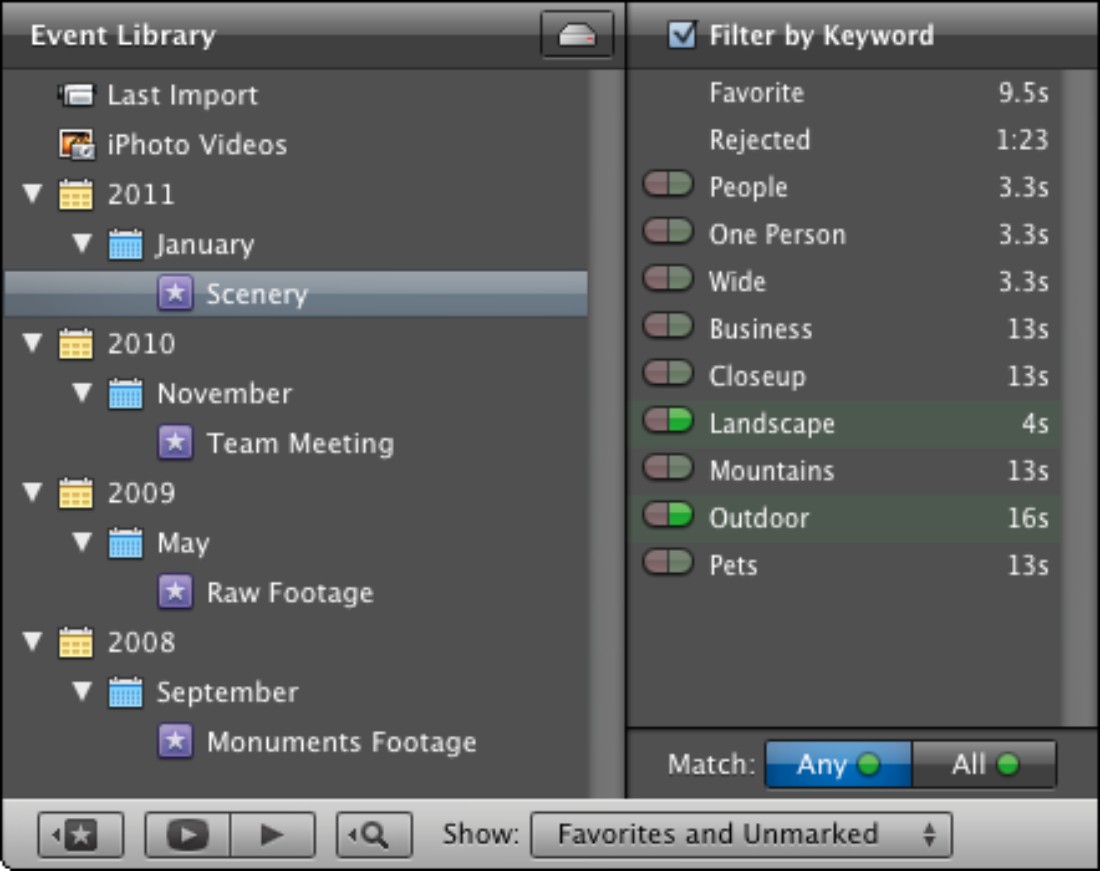
4.30 Use the Keyword Filter panel to display only the clips that match the keywords you select.
2. Click the green part of the button for each keyword by which you want to filter.
3. In the Match line at the bottom of the pane, click the Any button if you want to see clips that have any of the keywords you’ve selected. Click the All button if you want only clips that have all the keywords.
4. When you finish using the Keyword Filter panel, click the Keyword Filtering button to close the panel again.
Organizing clips into Events
To make your clips more manageable, you often need to move a clip from one Event to another. You may also need to split, merge, or rename Events — or even delete Events and their contents.
Moving a clip from one Event to another
To move a clip from one Event to another, follow these steps:
1. Control+click or right-click the clip and choose Select Entire Clip. iMovie puts a yellow hoop around the clip.
2. Click and drag the clip to the Event in which you want to place it. iMovie displays the Move Clip to Event dialog, as shown in Figure 4.31.

4.31 Click OK in the Move Clip to Event dialog box to move a clip to a different Event.
3. Click OK. iMovie moves the clip to the Event you chose.
Splitting an Event into two Events
Here’s how to split an Event into two events:
1. Click the Event in the Event Library to display its clips.
2. Control+click or right-click the clip before which you want to split the Event, and then choose Split Event Before Clip. iMovie creates a new Event containing the clip you clicked and those clips that follow it.
3. Double-click the default name for the new clip, type a new name, and then press Return.
Merging two Events into one
If you find that iMovie has split clips that belong together into separate Events, you can easily merge the Events. Follow these steps:
1. Click the Event whose name you want to lose and drag it on top of the Event whose name you want to keep. iMovie displays the renaming dialog shown in Figure 4.32.

4.32 You can merge two Events into a single Event to pool their clips.
2. If necessary, type a new name for the merged Event. If you simply want to use the name of the second Event you used, you’re all set.
3. Click OK. iMovie merges the Events and puts the merged Event in the appropriate place in the Events list.