Chapter 5: How Do I Turn My Content into a Movie?
As most directors will be quick to tell you, shooting the film is only the first part of the long process of creating a movie. Once you shoot your footage, import it into iMovie, and choose favorite clips as described in Chapter 4, you’re ready to edit your clips and put your movie together on the Storyboard. You can also add still photos to your movies and create a custom Ken Burns Effect to bring them to life. First, though, you need to know how iMovie applies edits to your clips because you can edit clips either in the Event browser or on the Storyboard — and the effects are different.
How Editing Affects Your Clips
Arranging the Clips on the Storyboard
Editing Your Clips
Adding Still Photos to a Movie
How Editing Affects Your Clips
For most editing maneuvers, iMovie gives you the choice of editing a clip either in the Event browser or after you place it on the Storyboard. This may seem puzzling at first, but it makes good sense when you get used to it.
As you saw in Chapter 4, the Event Library is where you store all the footage you may want to use in your projects. All the clips you import from your DV camcorder, digital camera, or other sources go into the Event Library, and you can use the clips for any project. You narrow down the amount of footage available by creating favorites, by rejecting clips and footage you don’t want to keep, and by organizing the clips into Events.
Changes you make to a clip in the Event browser apply to any project in which you use that clip. By contrast, changes you make to a clip after you place it on the Storyboard for a project apply only to that project.
This means you’ll want to make general changes to clips in the Event browser and more specific changes to clips after placing them on the Storyboard. Here’s a quick example using cropping:
• Event browser. If a clip has a cropping problem such as a bystander’s head and shoulders appearing in the corner of the frame at a sporting event, you’ll probably want to crop it in the Event browser. This obstruction will be a problem in any project you add the clip to.
• Storyboard. If you need to create a special effect by emphasizing the subject of the clip, crop the clip after placing it on the Storyboard. This way, you can use the clip as normal in other projects.
Either way, the edits you make to your clips in iMovie are still nondestructive — they don’t actually change the video footage you’ve shot, just the way in which it appears. This means that you can undo any of your edits or redo the edits differently as needed, even when you make changes in the Event browser rather than in the Storyboard.
Arranging the Clips on the Storyboard
After choosing the footage you like, you can start creating your movie by arranging clips on the Storyboard, the area that appears when you hide the Project Library in the iMovie window.
If you’re like me, you’ll find the easiest way to start putting your movie together is by adding clips to the Storyboard in the order in which you want them to appear in the movie. Doing this lets you lay out the story of the movie in a natural and logical way.
Other times, though, you may need to add a clip to a different part of the Storyboard. This takes only a moment longer.
Adding a clip to the end of the Storyboard
iMovie gives you two easy ways to add a selected clip to the end of the Storyboard:
• Keyboard. Press E.
• Mouse. Click the Add selected video to Project button on the toolbar (see Figure 5.1).

5.1 Click the Add selected video to Project button or press E to add the selected clip to the Storyboard.

5.2 The orange bar on a clip in the Event browser indicates you’ve already used this clip in the current project.
When you add a clip to the Storyboard, iMovie places an orange bar across the bottom of the clip in the Event browser (see Figure 5.2) to indicate that you’ve used the clip in the current project. (If you click another project in the Project Library, iMovie changes the bars to show the clips used in that project, so you can always see exactly what you’ve used in your current project.)
Adding a clip elsewhere in the Storyboard
When you need to add a clip to another part of the Storyboard than the end, click the clip and drag it to where you want it.
You can drop the clip either between two clips that are already on the Storyboard or inside a clip. When you drop a clip inside another clip, move the mouse pointer over the destination clip to skim through the footage to the point at which you want the clip you’re dragging to appear (see Figure 5.3), and then drop the clip there.
5.3 You can also click and drag a clip to the point in the Storyboard where you want it to appear.
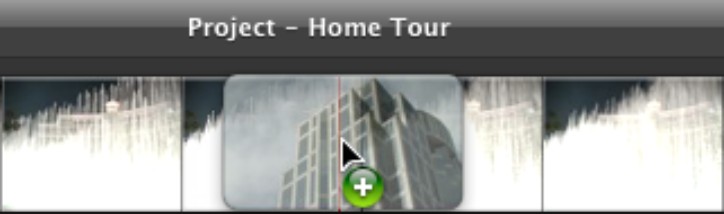
When you drop a clip on another clip, iMovie displays the pop-up menu shown in Figure 5.4. Click Insert to insert the clip at the position of the playhead.
5.4 Click Insert on the pop-up menu to insert the clip where you’ve placed the Playhead.
Adding multiple clips to the Storyboard
If you want, you can add two or more clips to the Storyboard at the same time like this:
1. Select the first clip you want to add, and then Shift-click each of the other clips.
2. Press E or click the Add selected video to Project button on the toolbar. iMovie displays the Editing Tip dialog (see Figure 5.5) suggesting that your movie will be optimal if you use only your best video segments. Little does it know that you’ve selected them already.

5.5 iMovie objects to your adding two or more clips to the Storyboard at once. Click Continue to proceed.
3. Click Continue. iMovie adds the clips to the end of the Storyboard.
Adding clips quickly with the Edit tool
Adding clips to the Storyboard using the techniques discussed so far in this chapter is quick enough for most people. But if you want to be able to add footage even faster, try the Edit tool.
First, you need to display iMovie’s advanced tools because iMovie hides the Edit tool until you do this. Choose iMovie→Preferences, click the General tab, select the Show Advanced Tools check box, and then click the Close button (the red button) at the left end of the window’s title bar.
Now, you can click the Edit Tool button on the toolbar (see Figure 5.6) to turn on quick-add mode.

5.6 Click the Edit Tool button to turn on quick-add mode when you need to build a movie project quickly.
When you turn on quick-add mode, the mouse pointer appears as an arrow with a little sheet bearing a star. With this pointer, skim across a clip to where you want to start selecting, and then click and drag. As you drag, iMovie turns the selected footage light orange (see Figure 5.7). When you release the mouse button, iMovie adds the selected footage to the end of the Storyboard.

5.7 After clicking the Edit Tool button, click and drag across clips in the Event browser to select the footage you want.
Keep selecting footage using this technique. When you finish, click the Edit Tool button again to turn off the Edit Tool and restore normality.
 If you find yourself dragging across the wrong part of a clip when using quick-add mode, press Esc to cancel the selection without adding it to the end of the Storyboard, and then release the mouse button.
Playing back video on the Storyboard
To see how your movie looks with the clips you’ve added so far, you can play back the footage you’ve placed on the Storyboard. Without effects, transitions, titles, and added sound, the movie may seem pretty bald, but you’ll be able to see how it’s developing.
Playing back everything on the Storyboard
To play back in the viewer everything you’ve put on the Storyboard from the beginning, choose View→Play from Beginning or press the \ (backslash) key. Press \ again to stop playback.
To play everything full screen, click the Play Project full screen button. Alternatively, Control+click or right-click in the Storyboard and choose Play Full Screen.
When playing full screen, you can move the mouse to display the navigation bar (see Figure 5.8). Here’s how it works:
• Play/Pause. Click the Play/Pause button at the left end of the navigation bar. You can also press the spacebar.
• Skim through clips. Pause playback and then move the mouse pointer through the clips on the navigation bar.
• Change location. Double-click another clip in the navigation bar to start playback there. Or else click another clip in the navigation bar to move there and pause playback.
• Exit full screen. Click the X button in the bottom-left corner of the navigation bar or press Esc.

5.8 Use the navigation bar to move around a project you’re playing full screen.
Playing back from a particular point
To start playback in the viewer, click at the point at which you want playback to start, and then click the Play button (or choose View→Play). You can also skim through the footage to the point where you want to start, and then press the spacebar to start playback. Click anywhere in the iMovie window or press the spacebar to stop playback.
To start playback full screen, skim to the point at which you want to start, and then press  +G.
+G.
If you find your movie looks weird when playing full screen, it may be because it’s stretched out of its aspect ratio. Choose iMovie→Preferences, click the General tab, and use the Full Screen playback size pop-up menu to choose Actual Size or Half Size instead of Entire Screen. Try playing back again, and full screen playback will have black borders rather than actually filling your screen, but the project will appear at its correct aspect ratio.
Playing back just a short section
If you want to play back just part of what you’ve placed on the Storyboard, click and drag to select it, and then press the / (forward slash) key. Press / again if you want to stop playback before the end of your selection.
To play just a couple of seconds of video, point to the area of interest, and then press the [ key (to play 1 second) or the ] key (to play 3 seconds) around where you point.
Moving a clip to a different point
Here’s how to move a clip to a different point on the Storyboard:
1. Select the clip or the part of it you want to move. You can move either an entire clip or just a selected part of one.
2. Click the clip or selection and drag it to where you want to place it. iMovie displays a vertical green line between the existing clips to indicate where the clip or selection will land.
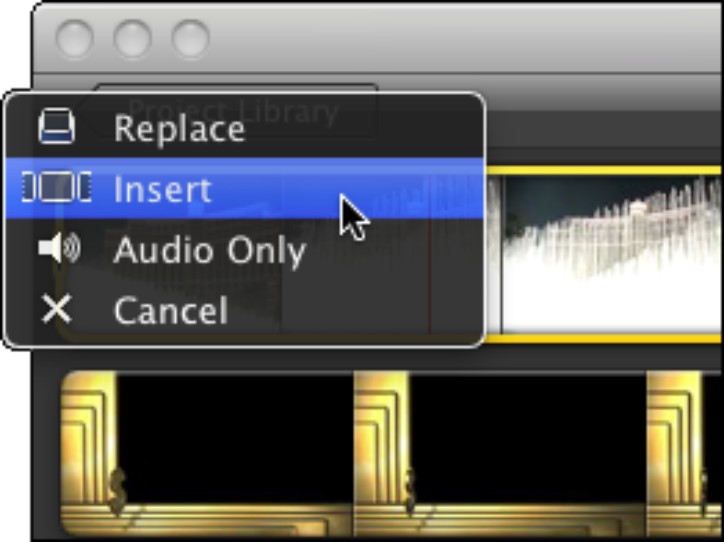
If you want to place the clip you’re moving inside another clip, Option+drag it instead of plain dragging. iMovie displays a playhead on the clip over which you drag the clip you’re moving, so that you can skim through the footage to the right place. Drop the clip at the appropriate place, and then click Insert in the pop-up menu that iMovie displays (see Figure 5.9).

5.9 When you move a clip on the Storyboard to a position inside another clip, click Insert on the pop-up menu that appears.
Editing Your Clips
To get your clips looking just right, you’ll almost certainly need to edit them, if only to trim them to exactly the length you need. iMovie provides easy-to-use editing tools that enable you to make good video look great and even salvage video that has problems with cropping, exposure, or color balance.
First, it’s a good idea to set up iMovie to give you a better view of what you’re doing.
Preparing to edit a clip
Normally, when you edit a clip, you’ll want to see as much of it as possible. Use these five suggestions to improve your view:
• Zoom the iMovie window as large as possible. Unless you need to see other applications at the same time, give all your screen space to iMovie. Click the green Zoom button in the upper-left corner or choose Window→Zoom.
• Increase the size of the viewer by choosing Window→Viewer→Large or pressing +0. Alternatively, you can play your clips full screen.
You can quickly change the size of the viewer window by pressing +8 (Small size), +9 (Medium size), or +0 (Large size) instead of fiddling about by choosing Window→Viewer.
• Show only the clips you’re interested in. When you’re working in the Event Library, select the Event that contains the clips you want to work with. Then open the Show pop-up menu and choose Favorites Only or Favorites and Unmarked to make the Event browser hide clips you’ve rejected.
• Make the thumbnails larger. Click and drag the Thumbnail Size slider to the right to pump up the size of the thumbnails and make their contents easier to see.
• Adjust the number of frames per filmstrip. Either in the Event browser or in the Storyboard, click and drag the Filmstrip Length slider to increase or decrease the number of frames each filmstrip displays.
How many frames you need to have displayed in a filmstrip depends on how long the clip is and how much its contents change. For example, a long clip of a little-changing scene usually needs fewer frames displayed than a shorter take in which the camera pans or the subjects move. You may well need to change this setting as you move from clip to clip.
Adjusting the length of a clip
One of the most important edits you’ll need to make is adjusting the length of a clip. You can do this by trimming off a selected part of the clip or cutting the clip down to only the part you selected, adjusting the clip’s playing length using the Trim Clip pane, or making precise adjustments using the Fine Tuning buttons.
Trimming off the beginning or end of a clip
When you need to trim off the beginning or end of a clip, follow these steps:
1. On the Storyboard, click the clip to display a yellow selection rectangle around it.
2. Click and drag the left selection handle to the point at which you want to start deleting. If you want to start deleting from the beginning of the clip, you don’t need to move the selection handle.
3. Click and drag the right selection handle to the point where you want to stop deleting. If you want to stop deleting at the very end of the clip, you don’t need to move the selection handle. Figure 5.10 shows an example of dragging the right selection handle.

5.10 Click and drag the yellow selection handle to select the part of the clip you want to delete. The white figures show the clip’s length in seconds and tenths of seconds. The cog button is the action button, which you’ll meet shortly.
4. Press Delete, choose Edit→Delete Selection, or Control+click or right-click and click Delete Selection.
If you want to remove the selection and paste it into another part of the movie, Control+click or right-click and choose Cut instead of deleting the selection. Move the mouse pointer to where you want to paste the selection, Control+click or right-click, and then choose Paste.
 You can also cut and paste a selection by using the menu commands (Edit→Cut and Edit→Paste) or the standard keyboard shortcuts (+X for cut and +V for paste).
Trimming a clip to only the part you want
The second way to approach the process of trimming a clip is to select the part you want and then dispose of the rest. Here’s how to do that:
1. On the Storyboard, click the clip to display a yellow selection rectangle around it.
2. Click and drag the left selection handle to the beginning of the part you want to keep.
3. Click and drag the right selection handle to the end of the part you want to keep.
4. Control+click or right-click in the selection and choose Trim to Selection. iMovie gets rid of the parts you didn’t select, leaving those you selected.
You can also trim a clip to the current selection by pressing +B or choosing Clip→Trim to Selection.
Trimming a clip to the playhead’s position
When you need to trim a clip quickly, try using the Trim to Playhead command. This command trims all the frames in the clip that lie to the right of the playhead’s current position.
To use the Trim to Playhead command, skim through the clip on the Storyboard until you reach the last frame you want to keep. Then Control+click or right-click at that point, and click Trim to Playhead on the context menu.
Adjusting a clip with the Clip Trimmer
When you need to dig deeper into a clip than you can on the Storyboard, open the clip in the Clip Trimmer.
Here’s how to use the Clip Trimmer:
1. Open the Clip Trimmer (see Figure 5.11) by moving the mouse pointer over a clip, clicking the Action button that appears (pointed out in Figure 5.10), and then clicking Clip Trimmer. You can also choose Window→Clip Trimmer, or press +R.

5.11 The Clip Trimmer appears in place of the Event browser and gives you a full-length view of the clip you’re editing. The selection rectangle shows the part of the clip you’re using.
2. Change the part of the clip you’re using. For example
• Click and drag one of the selection handles to increase or reduce the amount of footage selected.
• Click and drag the bottom edge or top edge of the selection rectangle to move it along the clip without changing its length.
• Point at the end of the clip you want to move, and then press Option+left arrow or Option+right arrow to move it one frame at a time.
3. When you select the part of the clip you want, click Done to close the Clip Trimmer and return to the Storyboard.
Making a short adjustment with the Fine Tuning buttons
When you need to adjust the length of a clip by less than a second, use the Fine Tuning buttons. The Fine Tuning controls are turned off by default in iMovie, so you must turn them on before you can use them. To do so, choose iMovie→Preferences, click the Browser tab, and then select the Show Fine Tuning controls check box.
To use the Fine Tuning controls, follow these steps:
1. Move the mouse pointer over the clip so that the Fine Tuning control buttons appear on it (see Figure 5.12).

5.12 The Fine Tuning buttons appear when you position the mouse pointer over a clip on the Storyboard.
2. Click the Fine Tune Clip Start button or the Fine Tune Clip End button to display an orange handle for trimming the start or end of the clip.
3. Click and drag the handle to the left or right, as appropriate.
To quickly change the beginning or end of a clip by only a few frames, move the mouse pointer toward the end you want to affect. Press Option+left arrow to move the end to the left or Option+right arrow to move the end to the right.
Figure 5.13 shows an example of trimming the end of a clip. The readout shows the number of frames you moved the clip end and the current length of the clip.

5.13 Click and drag the orange handle to fine-tune the start or end of a clip.
You can also display the orange handle for fine-tuning a clip by holding down +Option while you point to the clip’s start or end. If you deselected the Show Fine Tuning buttons check box in iMovie’s Preferences, you need to use this technique because the Fine Tuning buttons won’t appear when you point to a clip.
Splitting a clip into two or three pieces
Often, you’ll need to split a clip into two so that you can use different parts of it easily in different sections of your movie. Or you may want to insert another clip — for example, a cutaway — between the different parts of the clip to add visual interest.
From the Storyboard, you can split a clip into either two pieces (a beginning piece and an end piece) or three pieces (a beginning piece, a middle piece, and an end piece). Here’s what to do:
1. In the Storyboard, select the part of the clip that you want to split off from the rest. You can split a clip into two parts by selecting either the beginning or the end, or split it into three parts by selecting a section in the middle.
2. Choose Clip→Split Clip or press +Shift+S. iMovie splits the clip into the required number of parts.
Cropping a video
To get the best effect in your video, you may need to crop a clip so that only part of it appears on the screen. Cropping applies to an entire clip rather than just part of it, but you can split off the part you want to crop into a separate clip by using the technique just described.
You can crop a frame down to 50 percent of the original dimensions. As you’d imagine, quality suffers when you crop an image because the remaining data must appear at a larger size to occupy the whole frame. But you can usually get good results if you crop standard-definition video only a modest amount. And if you have high-definition video, you can crop up to that 50 percent limit and still retain good quality.
Here’s how to crop a clip:
1. Click the clip in the Event browser or on the Storyboard. iMovie displays the clip in the viewer.
2. Click the Crop button on the toolbar. iMovie displays the cropping and rotation buttons in the viewer.
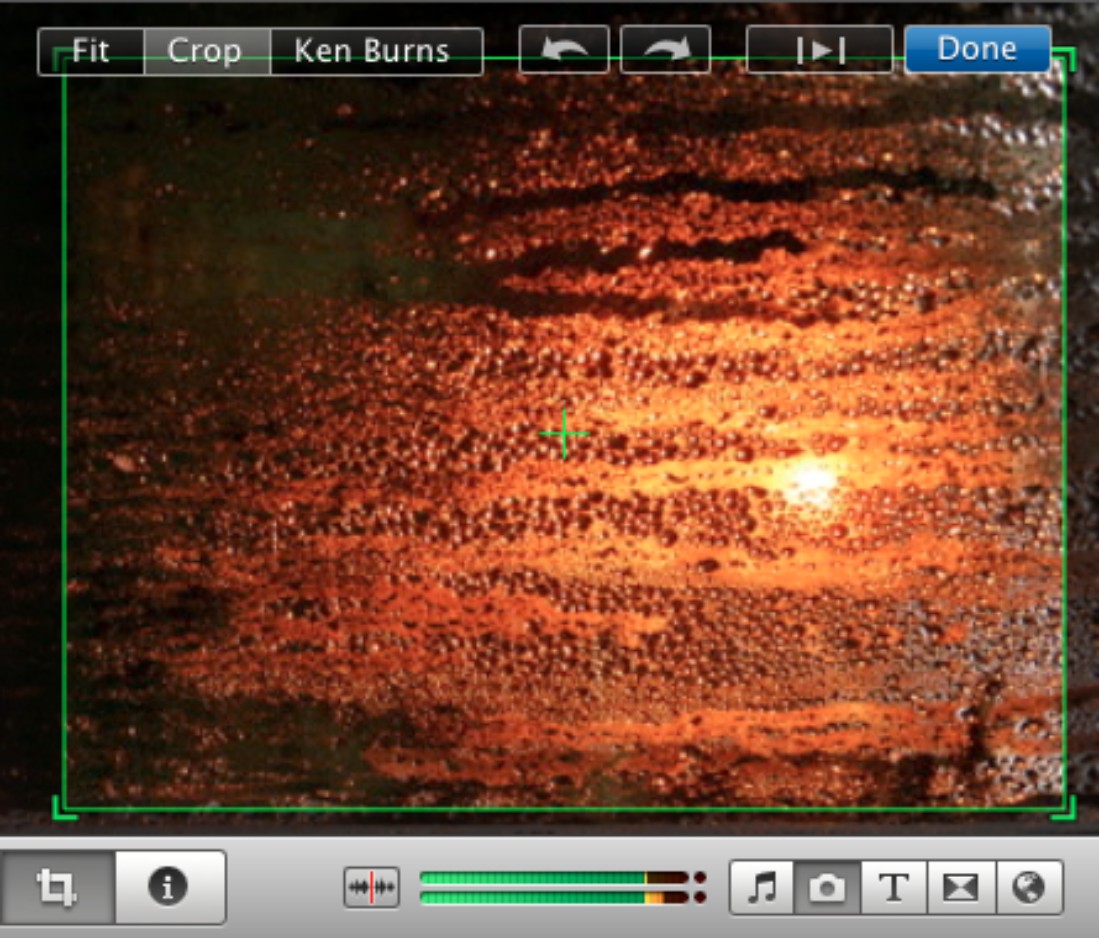
3. Click the Crop button in the upper-left corner of the viewer. iMovie displays green cropping handles and a frame in the viewer (see Figure 5.14) and adds a red dot to the playhead on the clip.

5.14 Click and drag the green cropping handles to select the part of the frame you want to keep. The green cross shows the middle of the cropping area.
4. Click and drag a corner handle to resize the cropping area proportionally. iMovie stops you at the 50 percent limit of size and height if you drag that far.
5. If necessary, reposition the cropping area by clicking and dragging anywhere in the rectangle. The mouse pointer becomes a hand when it’s in the cropping area.
6. Check the effect of the cropping in either of these ways:
• Click and drag the red dot on the Playhead to skim through the crop.
• Click the Play button in the viewer to play the clip.
7. Click Done to apply your cropping.
Cropping is an effect that you apply to the clip rather than a change that you make to it, so you can change the cropping if you need to. Just open the clip for cropping again, and choose the cropping effect you want. If you want to get rid of the cropping, click the Fit button.
Adjusting color
One of the neatest things that iMovie can do is adjust the color of your video clips. So if you find that a precious clip is overexposed or underexposed, or if the color balance makes everyone’s otherwise healthy face look green, iMovie may be able to save the day.
To adjust the color of a clip, follow these steps:
1. In the Event browser or the Storyboard, click the clip whose colors you want to adjust. As usual, if you click the clip in the Event browser, the color adjustments apply to all projects that use the clip. If you click the clip on the Storyboard, the adjustments apply only to the current project.
2. Click the Inspector button on the toolbar and then click the Video tab in the Inspector window (see Figure 5.15). iMovie also adds a playhead with a red dot to the clip.

5.15 The Video tab of the Inspector window lets you correct the exposure, brightness, contrast, saturation, and color balance of your video clips.
3. Click and drag the playhead dot to select a frame that gives you a good view of the colors you want to adjust.
4. If you want to use iMovie’s automatic best guess at the color adjustments needed, click the Auto button. If you don’t like the effects, click the Revert to Original button to restore the previous color balance. If you do like them, either adjust them further as described next, or simply skip the remaining steps in this list.
Like cropping, color adjustments apply to the whole of a clip rather than part of it, so if only a part of a clip needs adjustment, you will need to split it off into a separate clip, as described earlier in this chapter.
5. If necessary, use the histogram at the top of the Video tab to change the overall color balance:
• Click and drag the black slider to the right to add black tones to the clip.
• Click and drag the white slider to the left to add white tones to the clip.
The histogram shows how the colors in the selected video frame are distributed between pure black (at the left end, 0 percent) and pure white (at the right end, 100 percent). The red, green, and blue show the individual red, green, and blue color channels in the image.
6. To adjust the exposure of the clip, click and drag the Exposure slider. The scale goes from 0 percent to 100 percent, but generally you’ll need to make only small changes to improve the clip’s look considerably.
7. To adjust the brightness of the clip, click and drag the Brightness slider.
8. To increase or decrease the contrast, click and drag the Contrast slider.
9. To boost or lower the intensity of the colors, click and drag the Saturation slider.
If you want to adjust the red, green, and blue levels separately, you need to add the Red Gain slider, Green Gain slider, and Blue Gain slider to the Video tab of the Inspector window. To do so, choose iMovie→Preferences, click the General tab in the iMovie Preferences window, select the Show Advanced Tools check box, and then click the Close button (the red button at the left end of the title bar).
10. To correct the clip’s white balance, set the white point by clicking the appropriate color on the color wheel or clicking a white or gray area of the frame in the viewer. You may need to try several colors to find one that gives the look you want.
11. When you’re satisfied with the effect you produced, click Done to close the Inspector window.
Getting color adjustments right can be a ticklish process you don’t want to repeat unnecessarily. When you apply color adjustments to one clip, you can apply the same adjustments to another clip by copying them and pasting them. Control+click or right-click the clip you fixed and choose Copy, and then select the target clip and choose Edit→Paste Adjustments→Video. Repeat this trick for other clips as needed.
Rotating video
Another effect that iMovie lets you apply to a clip is rotation. Again, this applies to the whole clip rather than part of it, so you may need to split a clip into smaller clips to separate the footage you want to rotate.
Rotation is a dramatic effect best used for special occasions, such as when you want to make a clip play upside down for laughs. But rotation can also be useful if you (or your camera operator) has recorded a clip with the camera on its side, something that’s easy to do with a digital camera or iPhone you’re used to turning vertically to take still photos in portrait orientation rather than landscape orientation.
To rotate a clip, follow these steps:
1. Click the clip in the Event browser or on the Storyboard. iMovie displays the clip in the viewer.
2. Click the Crop button on the toolbar (or press C). iMovie displays the cropping and rotation buttons in the viewer.
3. Click the Rotate Counterclockwise button or the Rotate Clockwise button in the viewer. Each click gives you a 90-degree rotation in that direction.
4. If necessary, crop the video to make it the right aspect ratio in its new orientation.
5. Click Done to apply the rotation and any cropping.
Restoring a clip to how it was before
Because iMovie’s editing is nondestructive, you can always restore a clip to the way it was before. To restore a clip, open the tool you used to edit it, and then remove the change you made. For example
• Remove cropping. Click the clip, and then click the Crop button to display the cropping and rotation buttons. Click the Fit button to fit the video back to the frame, and then click Done.
• Remove color adjustments. Click the clip, click the Inspector button, click the Video tab, click the Revert to Original button, and then click Done.
• Remove rotation. Click the clip, click the Crop button to display the cropping and rotation buttons, and then click the rotation button needed to put the clip the right way around again. Change the cropping as well if necessary. Click Done to apply the change.
Deleting your rejected footage
Video tends to hog hard drive space, and even with today’s ever-larger hard drives, creating and editing movies can run you out of space quickly. You can reclaim disk space by deleting your rejected footage, as described here, or use iMovie’s Space Saver feature (described next) to attack the problem even more aggressively.
The reason iMovie doesn’t automatically delete your rejected footage is that you may need it again. For example, you may need to lengthen a clip by using some of the rejected footage, or you may simply have rejected some valuable footage by accident when working quickly.
Here’s how to delete your rejected footage:
1. In the Event Library, click the Event from which you want to remove the footage. You can select several Events if necessary. For example, select a month (or even a year) to work with all the Events it contains.
2. Open the Show pop-up menu and choose Rejected Only to make iMovie display only the rejected clips (see Figure 5.16).

5.16 Review your rejected clips before clicking Move Rejected to Trash.
3. Review the clips to make sure there’s nothing valuable. Depending on how many clips are involved, you may want to play them all or simply glance at the filmstrips and skim any clips you don’t recognize.
4. Click Move Rejected to Trash in the Event browser or choose File→Move Rejected Clips to Trash. iMovie displays the Move Rejected Clips to Trash dialog (see Figure 5.17) to make sure you understand what’s happening.

5.17 Confirm your decision to trash the rejected clips from the Event.
5. Click Move to Trash to move the clips to the Trash. iMovie changes the selection in the Show pop-up menu to Favorites and Unmarked.
6. When you’re ready to empty the Trash, click the Trash icon on the Dock, and then click the Empty Trash button.
Reclaiming hard drive space with Space Saver
If you deleted your rejected footage (as just described) but you need more space, try the Space Saver feature. Space Saver provides a way to grab all the frames that you haven’t used or made into favorites — and then deletes them.
 Don’t run Space Saver casually because it’s important you understand what the command does before you use it to delete footage you’ll later regret losing. Usually, the right time to run Space Saver is when you finish creating a project and need to get rid of all the extra space it consumes on your Mac’s hard drives.
Here’s how to run Space Saver:
1. Select the Event you want to strip of unused video. You can select several Events if you want.
2. Choose File→Space Saver. iMovie displays the Space Saver dialog (see Figure 5.18).

5.18 Use the Space Saver feature to reclaim valuable space on your Mac’s hard drive by disposing of clips you’re not using.
3. In the Reject entire clips if any portion is area, make sure that only the check boxes you need are selected:
• Not added to any project. Select this check box if you want iMovie to get rid of any clips that you haven’t made part of any project.
• Not marked as Favorite. Select this check box if you want iMovie to dispose of any clips you haven’t marked as favorites.
• Not marked with a keyword. Select this check box if you want iMovie to dispose of any clips you haven’t marked with one or more keywords.
4. Click Reject and Review. iMovie closes the dialog and switches the Show pop-up menu to Rejected Only, marking the clips with the red bar across the top that means they’re rejected.
5. Skim or play the clips to make sure there’s nothing you want to keep.
6. Click Move Rejected to Trash at the right end of the Rejected Clips bar. iMovie displays the Move Rejected Clips to Trash dialog (shown earlier) to confirm the decision.
7. Click Move to Trash to move the clips to the Trash. iMovie changes the selection in the Show pop-up menu to Favorites and Unmarked.
8. When you’re ready to empty the Trash, click the Trash icon on the Dock, and then click the Empty Trash button.
If you realize you’ve rejected vital footage, choose Edit→Undo Move Rejected Clips to Trash immediately in iMovie. If it’s too late for that, but you haven’t yet emptied the Trash, quit iMovie, open the Trash folder and go spelunking in the iMovie Temporary Items folders you’ll find in it. You can click and drag the items named clip and the date and time (for example, clip-2011-02-01 19;57;42.mov) to the Event’s folder in the ~/Movies/iMovie Events folder to restore the clips. Click and drag the contents of the iMovie Thumbnails folder in the iMovie Temporary Items folder in the Trash to the iMovie Thumbnails folder inside the Event. Restart iMovie.
Finding out where a clip lives
When you place many clips on the Storyboard, you may need to find out which Event a particular clip belongs to. To do so, Control+click or right-click the clip on the Storyboard and choose Reveal in Event Browser.
iMovie can also show you a clip’s file in the Finder, which is useful when you want to duplicate a clip or share it with someone else. Just Control+click or right-click the clip on the Storyboard or in the Event browser and choose Reveal in Finder. iMovie opens a Finder window showing the folder containing the clip.
Adding Still Photos to a Movie
As its name suggests, iMovie is primarily designed for working with movie footage, but the application also makes it easy to use still photos in your movies. Completely still photos tend to lack visual excitement compared with moving pictures, but iMovie lets you easily apply the Ken Burns Effect to add life and movement to your still photos.
Preparing your photos for use in iMovie
To get your photos ready for use in iMovie, you’ll normally want to import them into iPhoto, as described in Chapter 1. Use iPhoto’s tools for rotating your photos, editing them, cropping them, and adjusting the colors as necessary.
If you need to use a photo differently in iMovie than in iPhoto, duplicate the photo in iPhoto (press +D), and then change the duplicate so that it’s suitable for iMovie.
Importing a photo into iMovie
To import a photo into iMovie from iPhoto, you use the Photos browser pane. Click the Photos browser button (see Figure 5.19) to open the Photos browser pane. You can also choose Window→Photos or press +2.

5.19 Clicking the Photos browser button is the easiest way to open the Photos browser pane for inserting a photo in your movie.
After you open the Photos browser pane (see Figure 5.20), use its controls to navigate to the photo you want.
Alternatively, click in the Search box and type a search term. You can click the pop-up button at the left end of the Search box and choose Keywords from the pop-up menu to restrict the search to items you’ve tagged with a particular keyword in iPhoto. (This is another good reason to tag your photos in iPhoto.) You can also restrict the search by choosing Faces, Places, or Rating from the Search pop-up menu at the bottom of the Photos browser pane.
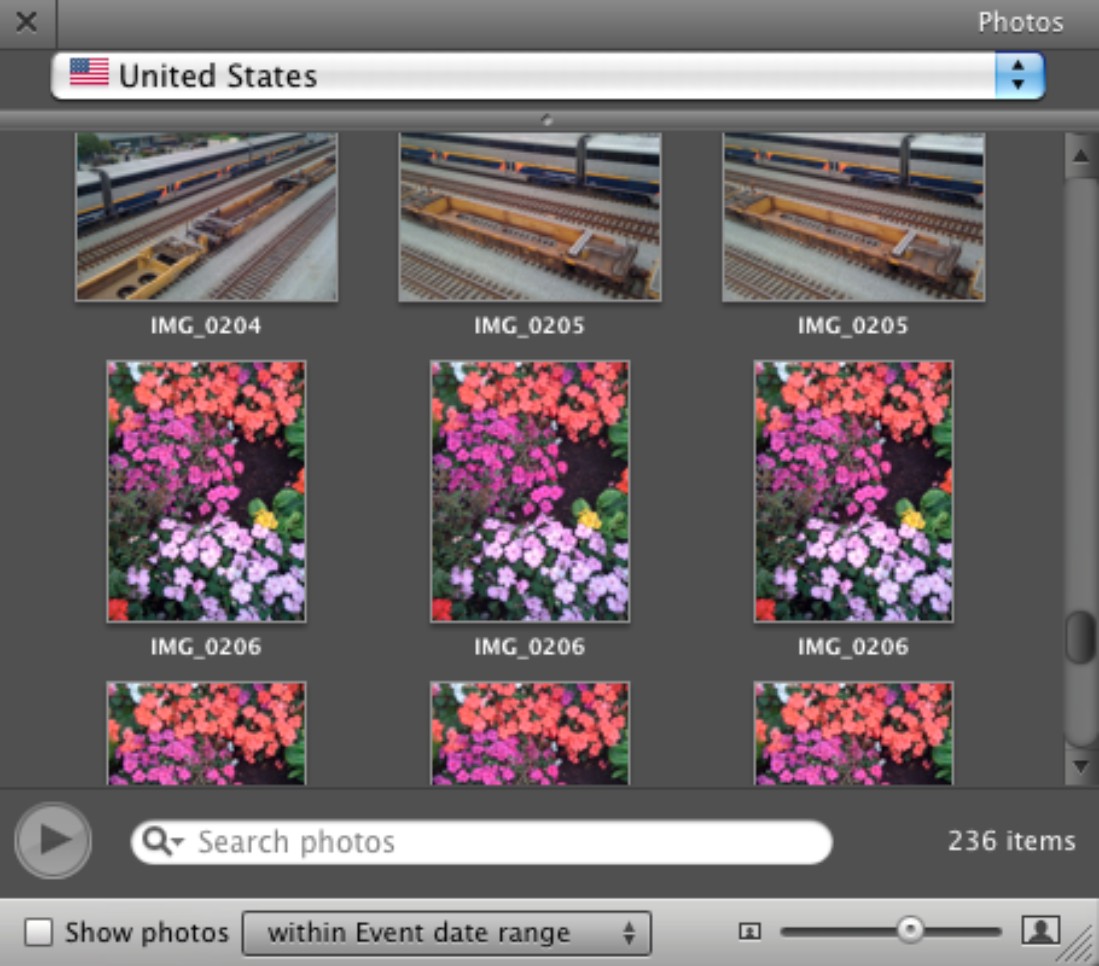
5.20 Use the Photos browser pane to add photos to iMovie from your iPhoto albums.
Here’s how to find the photo you want and insert it in your iMovie project:
1. In the Albums pop-up menu at the top of the Photos browser pane, choose the album that contains the photo you want. For example
• If the photo is in the last set of photos you imported, choose Last Import in the Albums pop-up menu.
• If you want to see the last year’s worth of photos, choose Last 12 Months.
• If you want to see all the photos from a particular location, choose that location in the Places list.
• If you want to find photos of a particular person, click Faces.
2. Select the photo or photos you want. If necessary, click and drag the Thumbnail Size slider in the lower-right corner of the Photos Browser pane to zoom in on the thumbnails (or zoom out so that you can see more at once).
3. Click and drag the photo or photos to the Storyboard. iMovie displays a vertical green line to show where they’ll land.
Instead of using iPhoto to import photos into iMovie, you can click and drag a graphic file directly from a Finder window (or your desktop) to a project to place the graphic on the Storyboard. This technique can be handy sometimes for pictures you don’t want to have in your iPhoto library. But usually you’ll get better footage in iMovie by importing your photos into iPhoto, cropping and adjusting them there, and then using the Photos pane to place them in your iMovie projects.
Setting the duration for a photo
When you place a photo on the Storyboard, iMovie automatically assigns a 4-second duration to it. Try playing back the part of the movie that contains the photo and see if this is suitable. If not, set the duration like this:
1. Click the photo to select it.
2. Click the Inspector button on the toolbar (or press I). The Inspector window appears.
3. Click the Clip tab (see Figure 5.21).
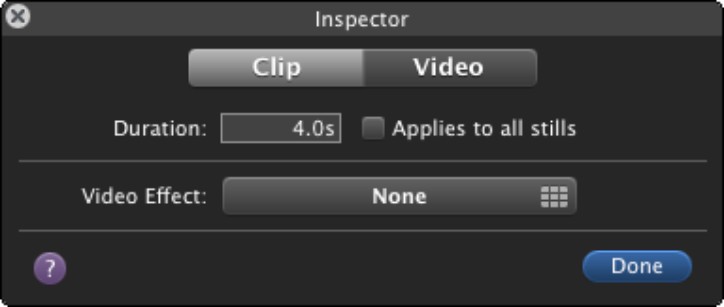
5.21 Set the duration (in seconds and frames) for iMovie to display the photo.
4. Type the duration in the Duration box.
5. If you want to use this duration for all your photos, select the Applies to all stills check box.
6. Click Done to close the Inspector window. Try playing back the movie around the photo, and make sure the setting is suitable.
Setting cropping and Ken Burns Effect
When you place a still photo on the Storyboard, iMovie automatically applies a Ken Burns Effect to it with a modest amount of zoom — just enough to give that elusive soupçon of visual interest. For some photos, you may want to remove the Ken Burns Effect and simply show the full picture (or a cropped version of it) without panning and zooming. More likely, though, you’ll want to set up a custom Ken Burns Effect to highlight the parts of the picture you want your audience to concentrate on.
Here’s how to crop a picture or customize the Ken Burns Effect:
1. Click the photo on the Storyboard to display it in the viewer.
2. Click the Crop button on the toolbar to display the cropping tools for still photos (see Figure 5.22).
3. To crop the photo without adding the Ken Burns Effect, follow these steps:
• Click the Crop tab if it’s not already selected.
• Click and drag one or more corners of the green cropping frame to select the crop size you want.
• If necessary, click and drag the cropping frame so that it contains the part of the photo you want to use.
• Skip to Step 5 in this list.
4. To customize the Ken Burns Effect, follow these steps:
• Click the Ken Burns tab if it’s not already selected.
• Click and drag a corner or side of the green Start rectangle to select the photo size to display at the beginning of the pan and zoom. If necessary, click within the Start rectangle and drag it to select a different area of the picture. The green cross shows you where the middle of the Start rectangle is, and the yellow arrow shows you the direction and extent of the pan you’ll get.
5.22 The cropping tools for still photos.
• Click and drag a corner or side of the red End rectangle to select the photo size to display at the end of the pan and zoom. As with the Start rectangle, click within the End rectangle and drag it to select a different area of the picture. The red cross shows you where the middle of the End rectangle is. Figure 5.23 shows an example.
• Click the Play button to view the effect and judge how well it works.
5. Click Done to apply the cropping or Ken Burns Effect to the photo.
If you need to swap the start position and end position of the Ken Burns Effect, click the Switch Beginning and End button, the little button bearing two curving arrows. And if you need to create a multistage Ken Burns effect, insert two copies of the picture. Set the first pan and zoom on the first copy, and then the second pan and zoom on the second copy. Make sure the start point of the second Ken Burns Effect matches the end point of the first, so there’s a smooth transition.

5.23 You can create a custom Ken Burns Effect by resizing and repositioning the green Start rectangle and the red End rectangle. The yellow arrow shows you the direction and extent of the movement.
Exporting a still picture from a video clip
One trick you’ll probably want to use when working with still pictures is creating a still picture from a video clip. This trick is great when you’ve shot a brief amount of compelling movie footage and you want to make the most of it — for example, by using the Ken Burns Effect to zoom and pan over it.
You can also use your still pictures to create a freeze-frame scene, making the action stop for a moment — or as many moments as you choose — before restarting again. Or you can use a still picture with a Ken Burns Effect, followed by another still picture of the same frame, to create an effect of panning and zooming, then holding on the subject.
Here’s how to export a still picture from a video clip:
1. Either in the Event browser or on the Storyboard, skim through the clip to the frame you want.
2. Control+click or right-click to display the context menu, then click the appropriate command:
• Storyboard. Click Add Freeze Frame. iMovie creates a still picture from the frame and adds it to the Storyboard, splitting the clip with the still picture.
• Event browser. Click Add Still Frame to Project. iMovie creates a still picture from the frame and adds it to the end of the Storyboard.
When you create a still photo from a clip in the Event Library, iMovie automatically applies a small Ken Burns Effect to the still picture, so you’ll probably want to customize the effect, as described in the previous section. When you create a still picture from a clip on the Storyboard, iMovie doesn’t apply a Ken Burns Effect.
3. If you created the still picture in the Event browser, move the still picture to where you want it to appear in the project.
If you want to use the still picture elsewhere in Mac OS X, Control+click or right-click the picture’s clip on the Storyboard and choose Reveal in Finder. iMovie opens a Finder window showing the contents of the Stills folder within the project. You can then copy the picture file to wherever you need it.