Chapter 6: How Do I Finish My Movie and Share It?
With your clips placed in the right order and edited to fit in with each other, your movie is starting to look like a finished product. Now you need to increase its impact by adding titles, transitions, and audio, and polish the movie until you’re satisfied with it. It may then feel like it’s time to rest on your laurels — but what you should do first is create a trailer and share your movie. iMovie makes it easy to share your movie with iTunes on your Mac or with the world by publishing it to YouTube or your MobileMe Gallery. When you need to use your movie elsewhere, you can export it either as an MPEG-4 movie file or a wide variety of other file formats.
Applying a Theme to a Movie
Adding Titles to a Movie
Adding Transitions to a Movie
Adding Audio to a Movie
Creating a Trailer for a Movie
Sharing and Exporting a Movie
Applying a Theme to a Movie
To make editing your videos as effortless as possible, iMovie includes a variety of themes that you can use to give your movie projects a kick-start. Each theme comes with its own set of titles and transitions that are added automatically, saving you lots of work. iMovie has seven themes: Photo Album, Bulletin Board, Comic Book, Scrapbook, Filmstrip, News, and Sports. If any of these themes is suitable for your project, you can cut down on your production time by applying the theme.
As you saw in Chapter 4, you can choose a theme when you first start your project or go without a theme by choosing the No Theme option. You can change the theme at any point like this:
1. Open the project for editing on the Storyboard if it’s not already open.
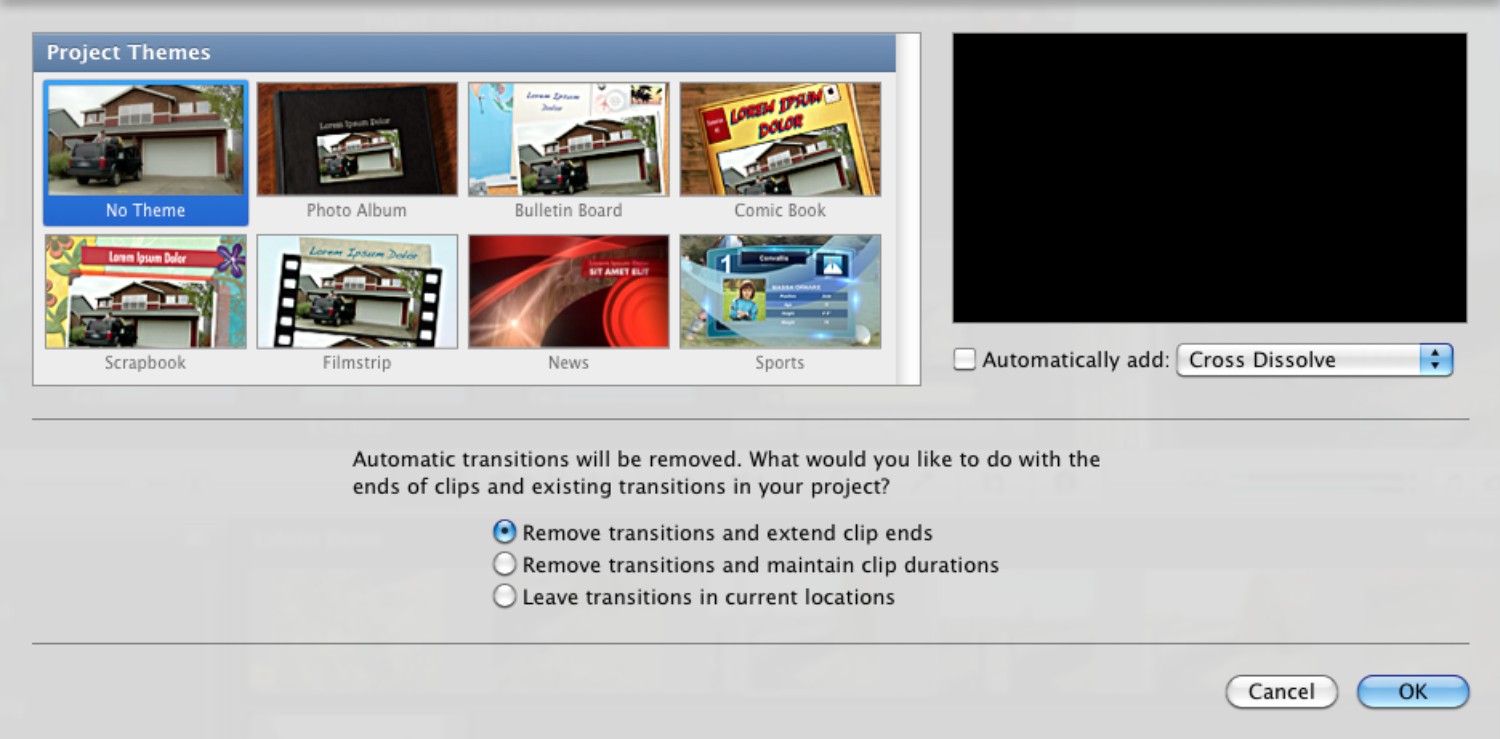
2. Choose File→Project Theme, or press  +Shift+J. iMovie displays the Project Themes dialog (see Figure 6.1).

6.1 Use the Project Themes dialog to switch quickly from one theme to another.
3. Click the theme you want to use.
4. When using a theme, select the Automatically add transitions and titles check box if you want to use the transitions and titles built in to the theme. When using No Theme, you can add default transitions by selecting the Automatically add check box and choosing the transition type in the pop-up menu.
5. When you choose not to use automatic transitions in a project that already contains transitions, iMovie expands the dialog (see Figure 6.2), and you use the following options to decide how to handle the ends of clips and the current transitions:
• Remove transitions and extend clip ends. Select this option button to make iMovie remove the transitions and extend the clip ends to fill the space that the transitions previously occupied. This option keeps your movie the same length, so it’s the best choice if you’ve already created an audio track synchronized with the movie.
• Remove transitions and maintain clip durations. Select this option button if you want to remove the transitions but keep the clips at their current lengths. Choose this option if you don’t want to reveal extra footage at the end of clips that was hidden (or partly hidden) by transitions. This option shortens your movie, so you will usually need to rework the audio track.
• Leave transitions in current locations. Select this option button if you want to keep your existing transitions but not let iMovie add any other transitions automatically. You can then change the existing transitions manually as needed.
6.2 If your theme change involves removing existing transitions, the Project Themes dialog displays an extra section to let you decide how to deal with them.
6. Click OK. iMovie adds the theme’s titles and transitions.
Adding Titles to a Movie
Most movies need one or more title screens at the beginning and credits at the end — and many require other text screens strategically placed within the movie.
If your project uses automatic titles as part of its theme, it may already have the titles you need. If your project doesn’t use automatic titles, or if you want to supplement the existing titles, you can add titles manually.
To start working with titles, open the Titles Browser by clicking the Titles Browser button on the toolbar, choosing Window→Titles, or pressing +3. Figure 6.3 shows the Titles Browser as it appears for a project that uses a theme. The top line of titles comes from the theme (in this case, the News theme).

6.3 The Titles Browser pane gives you instant access to all iMovie’s various titles.
iMovie provides more than 30 styles of titles (plus four extra theme-specific styles if you have a theme applied), so you have plenty of choices. Many of the titles are animated, which can be very effective if used in moderation. (To see a preview of a title’s animation effect, hover the mouse pointer over the title thumbnail in the Titles Browser.) In most cases, you’ll use the animated titles on their own, such as the Scrolling Credits title style shown in Figure 6.4.

6.4 Some title styles, such as Scrolling Credits shown here, are best applied on their own.

6.5 You can superimpose titles on existing video clips. This style, Gradient – Black, gives a discreet effect.
You can use the static title styles on their own or superimpose them over a clip. For example, the Gradient – Black title style is a classy way to identify what’s on-screen (see Figure 6.5) or provide a name for an upcoming video segment.
Applying the title
To apply a title, simply click it in the Titles Browser and drag it to where you want to place it on the Storyboard. You can either place a title on its own or superimpose it on a clip.
Applying a title on its own
To place the title on its own, follow these steps:
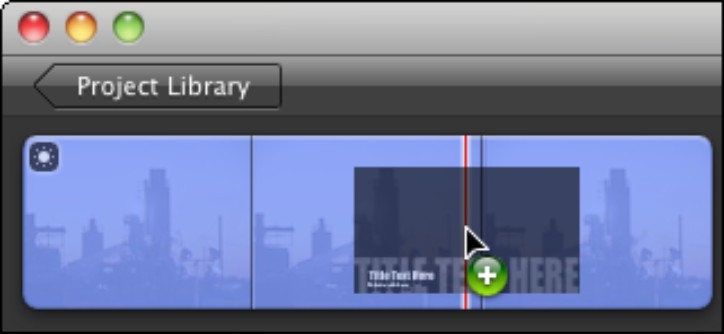
1. Click and drag the title to the Storyboard so that iMovie displays a vertical green bar between clips where you want to place it (see Figure 6.6).
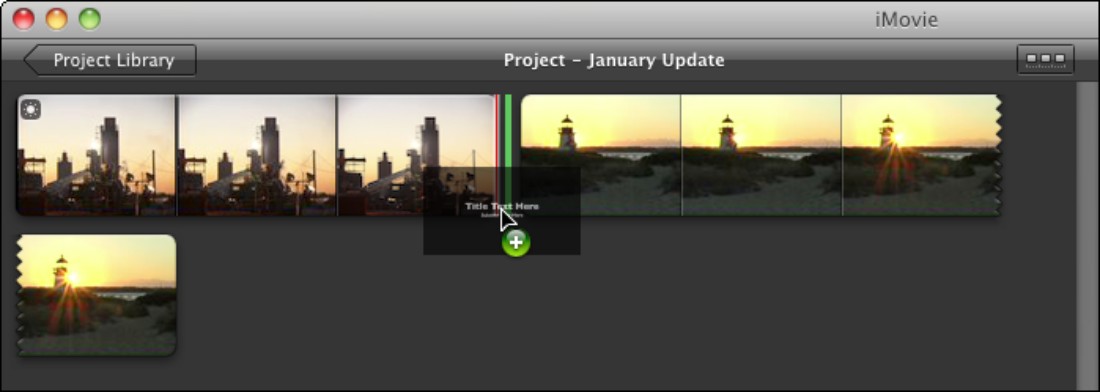
6.6 Placing a title between two clips adds to the movie’s length and file size.
2. Drop the title in the Storyboard. iMovie displays the Choose Background window (see Figure 6.7).
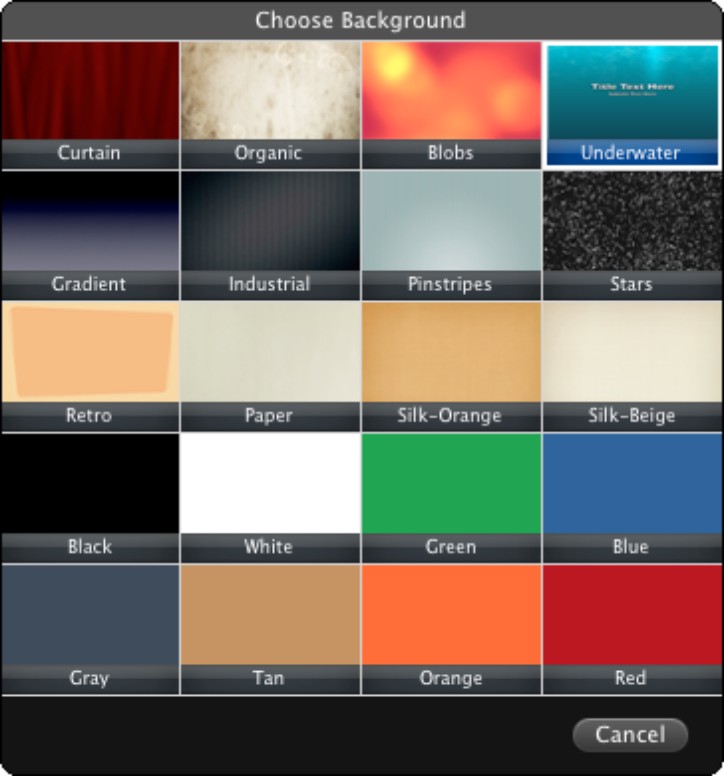
6.7 When you place a title between clips, you get to choose the background color or pattern for the title you’re adding.
3. Click the background color or pattern you want to use for the title. iMovie extends the movie by adding enough frames to cover the duration of the title (4 seconds, by default) and displays a title box over the new frames.
4. Type the title text, as described later in this chapter.
5. Change the duration of the title, as described later in this chapter, to suit your needs.
Superimposing a title on a clip
To superimpose the title on a clip, click and drag it to the clip on which you want to place it. You can drag it to the middle of the clip to use the title for the entire clip, to the beginning to use it for the first part of the clip, or to the end to use it for the last part.
As you drag the title, iMovie displays shading on the clip and a time readout so you can see what’s covered (see Figure 6.8).
6.8 When you drag a title onto a clip, the shaded area and time readout show you where and how long the title will play.
After you drop the title, it appears above the clip in a little balloon (see Figure 6.9), and you can drag the sides of the balloon to extend or shorten the time the title appears. You can fine-tune these settings later as needed. Superimposing a title on a clip works well for most title styles.

6.9 The title appears as a balloon above the clip. You can drag the ends of the balloon to control when the title plays.
Applying theme titles
As you saw earlier, when you apply a theme to your project you can choose to have iMovie add titles and transitions automatically. When you do this, iMovie adds two titles to your project automatically:
• Opening title. This is the name of your project superimposed on the first few seconds of the movie.
• Closing title. This displays “Directed By” followed by your user account name, which is superimposed over the last few seconds of the movie.
 If you put a title in the wrong place, you can remove it by Control+clicking or right-clicking it on the Storyboard and then choosing Delete Selection.
iMovie also adds four theme-related title styles to the top of the Titles Browser (look back to Figure 6.1), so you can also add your own theme titles.
Adding the text to the title
When you put the title on the Storyboard, you can edit its text by clicking the title’s box on the Storyboard and then working in the viewer. Click to select a line of the placeholder text and then type the text you want.
Most of the title styles include a subtitle. Select that line too and type a subtitle if you want one; if not, just press Delete to delete the subtitle.
If you’re using a theme, iMovie hides the Show Fonts button to encourage you to stick with the theme’s fonts. You can change the theme by choosing Text→Show Fonts (or pressing +T) and working in the Fonts window, as described later in this chapter.
To change the font used in a movie to which you haven’t given a theme, select the part of the title you want to affect, and then click Show Fonts to display the Choose Font panel (see Figure 6.10). The main part of the window is divided into three columns: The left column is the font family; the middle column is the font color; and the right column is the font size. Click the item you want in each column to set the basic font. You can fine-tune the font by clicking the Style buttons (from left to right, Bold, Italic, and Shadow) and Alignment buttons (from left to right, Align Left, Center, Justify, and Align Right).

6.10 The iMovie Choose Font panel gives you a quick and easy way to apply font formatting to titles when you’re not using a theme.
When you finish using the Choose Font panel, click Done to close it.
 Remember that you can customize the layout of the Choose Font panel. Choose iMovie→Preferences, click the Fonts tab, and then customize each of the nine font family choices and the nine font color choices.
If you need more font-formatting options, click System Font Panel in the Choose Font panel window to display the Mac OS X Fonts window (see Figure 6.11). You can then work with the full set of font options like this:
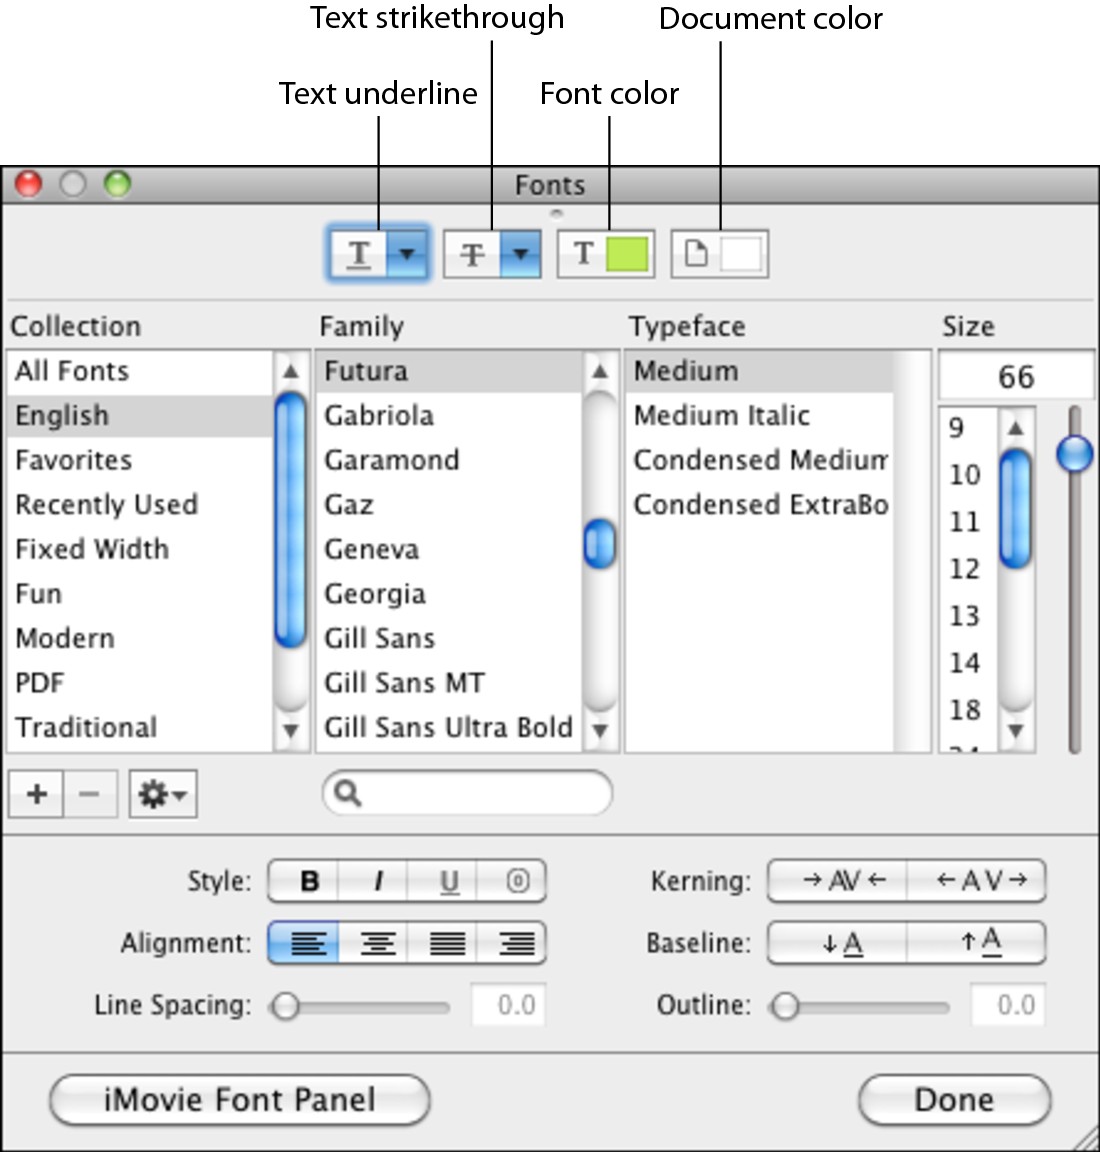
6.11 You can apply a wide range of font formatting to any titles that need it.
• Font. Choose a font collection in the Collections box (or simply choose All Fonts), and then choose the font family in the Family box. In the Typeface box, choose the typeface — for example, Regular, Italic, Bold, or Bold Italic. Then choose the size in the Size list, or drag the Size slider beside the Size list; you can also type the font size you want in the Size box.
• Underline and Strikethrough. Use the Text Underline pop-up menu and the Text Strikethrough menu if you need to apply these effects.
• Text Color. Click the Text Color button to open the Colors window, pick the color, and then click the Close button (the red button) to return to the Fonts window.
• Style. Click the Bold button, Italic button, Underline button, or Outline button, as needed.
• Alignment. Click the Align Left button, Center button, Justify button, or Align Right button to align the title’s paragraph with the margins.
In iMovie the Document Color control in the Fonts window doesn’t change the background color of free-standing titles.
• Line Spacing. Drag the slider to increase the line spacing. This is especially useful for spacing out scrolling credits.
• Kerning. Click the left button to move the selected letters closer together, or click the right button to move them farther apart.
• Baseline. Click the left button to move the baseline of the selected letters down, or click the right button to move the baseline up.
• Outline. Drag the slider to change the strength of the outline.
To see the effect of the titles you create, you have two choices:
• In the Fonts window, click Play in the viewer.
• In the Choose Font panel, place the mouse pointer near the beginning of the font family box you chose, and then move the pointer to the right. As you move the pointer, a playback bar appears inside the box, and the viewer displays the title effect. You can use the same technique in any font family box, any font color box, and any font size box.
When you finish working on the text of the titles, click Done.
Changing the duration and timing of the title
As you saw, when you drop a title on a clip, you can set the title’s approximate duration by dragging it to the middle, beginning, or end of the clip on which you’re placing it. Here’s how you can fine-tune the duration and timing of a title:
1. To change the duration of the title, position the mouse pointer over the beginning or end of the title so that the pointer changes to a two-headed arrow, and then drag to the left or right. As you drag, iMovie displays the new duration on the left side of the title box.
2. To change when the title plays, click the title box on the Storyboard and drag it to where you want it. The playhead on the clip shows where the title will start, and iMovie tells you how far from the beginning of the clip the title will start (see Figure 6.12). Watch the viewer to get a close-up on the frame that the playhead is over.
You can also use the Inspector dialog to change the duration of a title. Click the title box and the click the Inspector button in the toolbar. In the Inspector dialog, use the Duration text box to type the duration. If you want to override the default fade and fade out times, select the Manual option and then drag the slider to set the fade time you want to use. Click Done to put the new settings into effect.
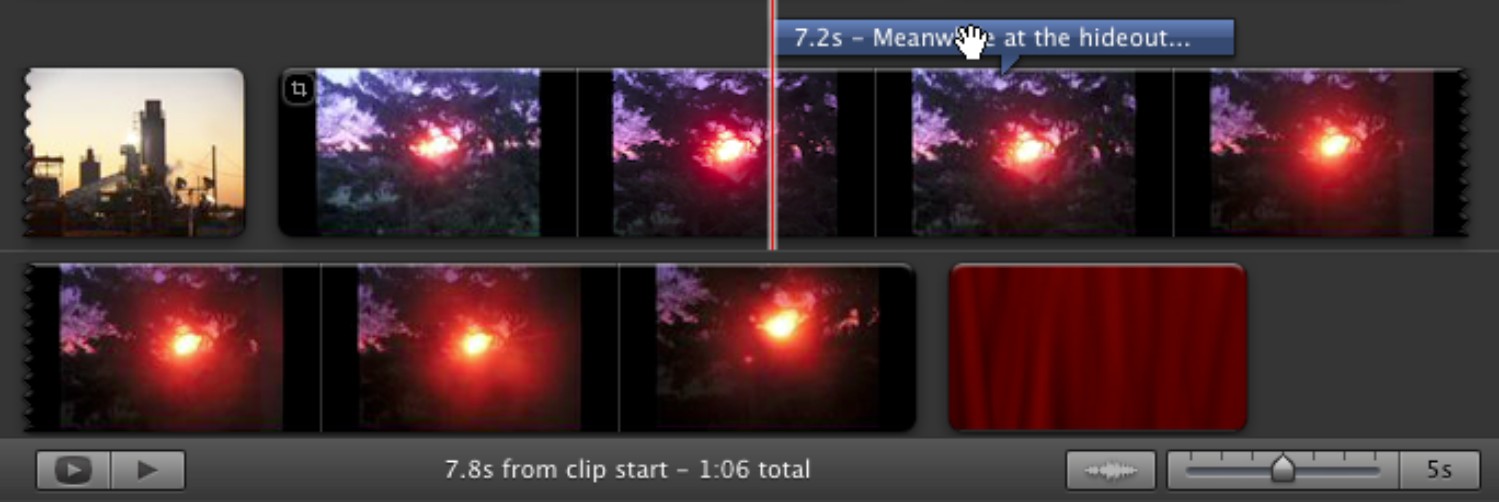
6.12 Click and drag the title to where you want it to start.
Adding Transitions to a Movie
When one clip of your movie ends, the next clip begins. The changeover between the two is called the transition. If you don’t apply one of iMovie’s transition effects (or let iMovie apply a transition automatically), you get what’s called a straight cut — iMovie blips straight from the last frame of the first clip to the first frame of the second clip.
If those last and first frames are similar in contents, a straight cut can work well. If the contents are substantially different, a straight cut can produce a jarring effect. Sometimes, you may want to give the audience that jar, but often, you will want to treat the audience more gently.
To reduce the disjunction of the change between two clips, you can apply one of iMovie’s transition effects to the transition between those clips.
To start working with transitions, open the Transitions browser by clicking the Transitions Browser button on the toolbar, choosing Window→Transitions, or pressing +4. Figure 6.13 shows the Transitions browser.
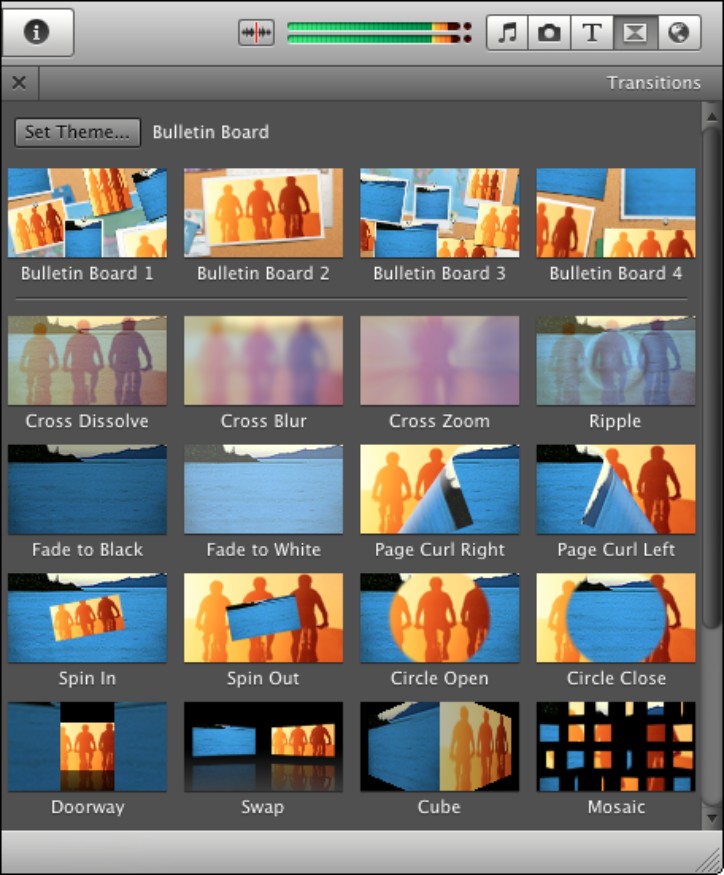
6.13 The Transitions browser lets you apply any of iMovie’s transitions to your clips in moments. Point to a transition to preview its effect.
Choosing a suitable transition to apply to a clip
The key to using transitions successfully in your movies is to use the right transition at the right time. Table 6.1 explains the various types of transitions that iMovie provides.
iMovie provides 24 transitions for use with all projects. If you apply a theme to your project, iMovie adds an extra four transitions to the top of the Transitions browser. You can apply a theme right from the Transitions browser, too: click Set Theme, click the theme you want, and then click OK.
|
Table 6.1 iMovie’s Transitions and When to Use Them |
|
|
Transition Name |
Explanation |
|
Circle Open |
Displays a small circle on the first clip that gradually opens to reveal the contents of the second clip. This is a dramatic effect that suggests the second clip is springing from the first. |
|
Circle Close |
Draws the first clip gradually into a circle that shrinks down, revealing the second clip, and then disappears. This is a dramatic effect that suggests the first clip is vanishing into the distance. |
|
Cross Blur |
Gradually cross fades from the first clip to the second clip, where the second clip starts off blurry and gradually comes into focus. This is useful if you want to obscure the second clip briefly to add tension to the transition. |
|
Cross Dissolve |
Gradually cross fades from the first clip to the second clip. This transition is widely useful, and you can make it almost imperceptible by shortening it to ten frames or so. |
|
Cross Zoom |
Gradually cross fades from the first clip to the second clip, where the second clip zooms in quickly and then zooms back to its normal size. Use this transition to emphasize speed or the rapid passing of time. |
|
Cube |
Uses Apple’s widely used rotating-cube effect to switch from the first clip to another. This transition suggests a complete change of focus to something happening separately in parallel. Use Cube with care because it’s not subtle. |
|
Doorway |
The first clip splits vertically as though opening a double-doorway. The second clip zooms in as though entering the doorway. This is an occasionally useful transition when you need to introduce someone or something. |
|
Fade Through Black |
Fades out the end of the first clip to a black screen and then fades into the second clip. This transition is good for suggesting that whatever was happening in the first clip has ended and that the movie’s subject is changing. |
|
Fade Through White |
Fades out the end of the first clip to a white screen and then fades into the second clip. This transition tends to give a ghostly feeling; use it in moderation if at all. |
|
Mosaic |
Divides the first clip into a series of small squares, each of which turns randomly to reveal parts of the second clip, which is then consolidated into the actual scene. This transition is useful for indicating that the second clip is a different aspect of, or the opposite of, the first clip in some way. |
|
Page Curl Left |
Curls down the upper-right corner of the frame of the first clip and pulls it down and across to the left, revealing the second clip underneath. This is a dramatic transition that can easily bother the audience, but it can be effective at suggesting a major change if you use it in moderation. |
|
Page Curl Right |
This is the same as Page Curl Left, except that it curls down the upper-left corner of the frame of the first clip and pulls it down and across to the right. |
|
Puzzle Left |
Three panels containing the second clip slide across the first clip in sequence, entering from different directions and starting from the right (moving to the left). |
|
Puzzle Right |
Three panels containing the second clip slide across the first clip in sequence, entering from different directions and starting from the left (moving to the right). |
|
Ripple |
Creates a ripple in the middle of the first clip as through you dropped a stone in a still pool. As the ripple spreads outward, it reveals the second clip. Use this transition with care. |
|
Slide Left |
The second clip slides across the first clip from the right, moving to the left. |
|
Slide Right |
The second clip slides across the first clip from the left, moving to the right. |
|
Spin In |
The second clip starts off in a small rectangle set at an angle. The clip gradually grows larger and rotates into place. This is a trick transition that can be effective if you use it in moderation. |
|
Spin Out |
This is the same as Spin In, except the first clip transitions out of the scene by shrinking into a small rectangle set at an angle. |
|
Swap |
This transition reduces the first clip to a thumbnail and displays it beside a thumbnail of the second clip in a distinctly Cover Flow-like arrangement. The second clip then turns and zooms into the scene. Use this transition if you want the audience to briefly compare the two scenes. |
|
Wipe Down |
Gradually wipes down across the first clip from the top, revealing the second clip. |
|
Wipe Left |
Gradually wipes left across the first clip from the right, revealing the second clip. |
|
Wipe Right |
Gradually wipes right across the first clip from the left, revealing the second clip. |
|
Wipe Up |
Gradually wipes up across the first clip from the bottom, revealing the second clip. |
 iMovie makes it easy to use transitions, but don’t use transitions just because they’re there. Before you apply a transition, always ask yourself whether the clips need the transition. If a straight cut works fine, don’t embellish it. When you do apply a transition, check that it works as you intended; if not, replace it with another transition, or simply remove it.
Applying a transition between clips
To apply a transition between clips, click the transition type in the Transitions browser, drag it to the Storyboard, and then drop it between the clips you want to affect. iMovie displays a green bar to show where the transition will land, and then displays an icon representing the transition. Each transition type has a different icon, but some of the icons are hard to decipher at first.
If possible, stick with just one transition type to give your movie a consistent look, or use cross-dissolves and one other type of transition. Using many different types of transitions tends to grate on the audience.
To delete a transition, Control+click or right-click it, and then choose Delete Selection or press Delete. To replace a transition with another transition, click and drag the replacement transition on top of the existing transition, and then click Replace on the pop-up menu that iMovie displays. The replacement transition picks up the duration of the transition it replaces.
If you didn’t apply a theme for your project, but you did select the Add automatically check box for transitions in the Properties dialog for the movie project, iMovie automatically adds transitions of the type you choose. If you want to prevent iMovie from doing this, choose File→Project Properties, deselect the Add automatically check box, and then click OK.
Changing the transition duration
iMovie automatically makes each transition you add to your movie project the length you set in the project’s Properties dialog. You can change the duration of a transition like this:
1. Click the transition on the Storyboard.
2. Click the Inspector button in the toolbar. iMovie displays the Inspector dialog for transitions.
3. In the Duration box, type the length you want to use for the transition.
4. If you want iMovie to use this duration for all your transitions, select the Applies to all transitions check box.
5. Click Done. iMovie applies the change.
iMovie limits any transition to occupying only up to half of a clip (so that you can also put another transition at the other end of the clip). You may find this limiting with short clips because even if you set the exact transition length you want, you won’t get it if the clips aren’t long enough.
Adjusting the transition with the Precision Editor
When you add a transition between two clips, the increased visual appeal is sometimes offset by having a bit of your footage obscured in some way. For example, if you’re using a Fade to Black transition, iMovie increasingly darkens the last few frames of the first clip, and increasingly lightens the first few frames of the second clip. Similarly, if you’re using a Cross Blur transition, iMovie slowly blurs the last few frames of the first clip, and slowly focuses the first few frames of the second clip.
If those darkened or blurred frames contain frames you don’t want the audience to miss, you can use the Precision Editor tool to adjust exactly where the transition occurs. So, for example, if you want fewer frames at the end of the first clip to be darkened or blurred (or whatever) during the transition, you can shift the transition toward the second clip.
Here’s how to adjust a transition with the Precision Editor:
1. Move the mouse pointer over the transition icon. The Action button appears below the transition icon.
2. Click the Action button and then click Precision Editor. iMovie displays the Precision Editor in the bottom half of the window, as shown in Figure 6.14. This window has the following features:
• The top filmstrip shows the frames from the first clip.
• The bottom filmstrip shows the frames from the second clip.
• The bar in the middle represents the transition.
• The brightened frames in both filmstrips represent clip footage that appears in the movie.
• The darkened frames in both filmstrips represent clip footage that doesn’t appear in the movie.
• In both filmstrips, the diagonal separation of bright and dark within the transition zone represent the progress of the transition. In the top filmstrip, for example, the decreasing brightness indicates the increase of the transition effect (such as darkening or blurring).
• You can use the Playhead to play the filmstrips (move the mouse pointer across the filmstrip) or the transition (move the mouse pointer across the transition bar).
3. Use any of the following techniques to adjust the transition:
• To adjust the position of the transition relative to both clips, move the mouse pointer over the transition bar and then click and drag the bar left or right,
• To include a particular frame in the transition, click the frame in its corresponding filmstrip.
• To change just the start point of the transition, click and drag the left edge of the transition bar.
• To change just the endpoint of the transition, click and drag the right edge of the transition bar.
4. Click Done.
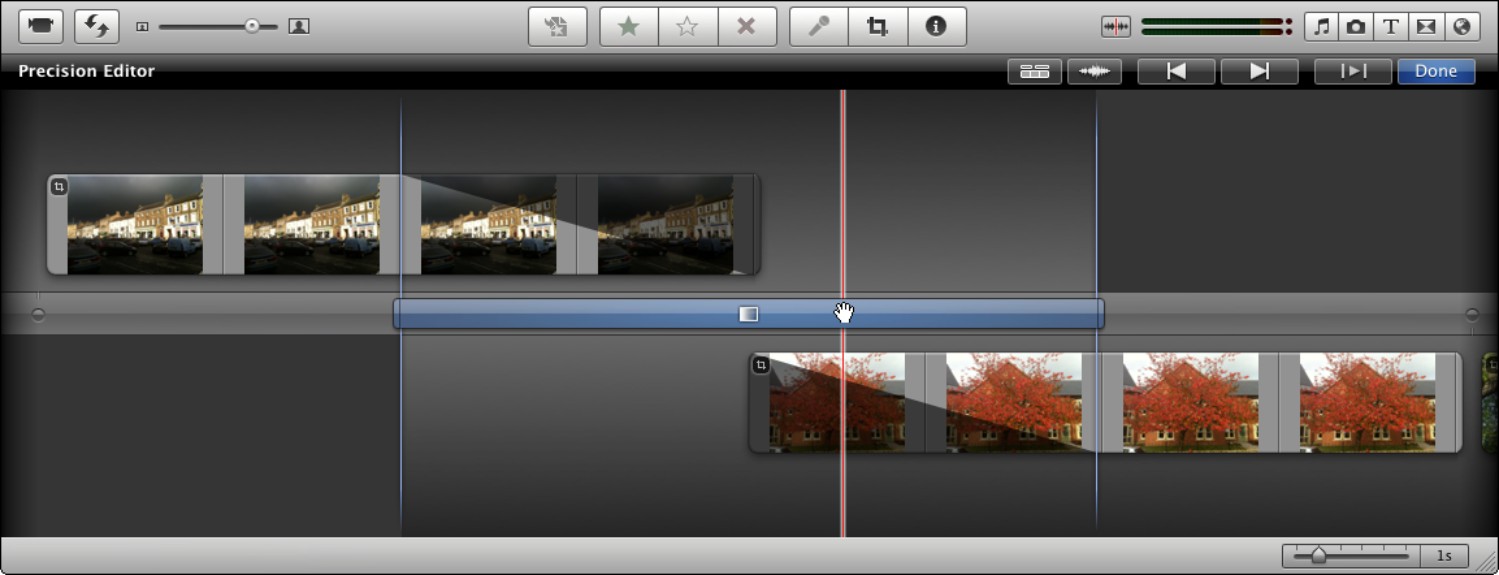
6.14 Use the Precision Editor tool to make frame-by-frame adjustments to transitions.
Adding Audio to a Movie
If you’ve ever seen a silent movie, you know what a huge difference a soundtrack makes. And though most video footage you shoot includes sound, you’ll usually want to work on your movie’s audio to make it sound right and give it the impact you need.
Understanding how iMovie handles audio
As well as helping you make the most of the audio recorded in your clips, iMovie lets you add music and sound effects to your movie:
• A clip’s own audio plays along with the clip. You can change the audio’s volume or timing, or suppress it altogether.
• Music plays from the start of the movie and continues to the end. Music can either be a single song or a playlist of songs that you assemble in iTunes.
• A sound effect or song plays at the point of the clip to which you attach it. If you move the clip, the sound effect goes along.
You can also use a song as a sound effect by attaching it to a clip rather than adding it to the movie as a whole. You can find more about this in the next section.
To add either music or sound effects, open the Music and Sound Effects browser by clicking the Music and Sound Effects browser button on the toolbar, choosing Window→Music and Sound Effects, or pressing +1. Figure 6.15 shows the Music and Sound Effects browser.
Adding music and sound effects to a movie
Here’s how to add music and sound effects to a movie:
1. In the Music and Sound Effects browser, choose the item that contains the music or sound effect you want:
• GarageBand. Choose GarageBand to see the songs you’ve composed in GarageBand.
• iTunes. Choose iTunes to see all the songs in iTunes.
• A playlist or playlist folder. Choose a particular playlist or playlist folder in iTunes to see only the songs in that playlist or the playlists in the folder.
• iMovie Sound Effects. Choose this item to see iMovie’s wide range of sound effects — everything from an alarm and a dog barking to a walrus roar and whale sounds.
• iLife Sound Effects. Choose this item to see the hundreds of sound effects available to the iLife applications. Choose one of the folders — Ambience, Animals, Booms, Foley (extra sound effects usually added after a movie has been shot), Jingles, Machines, People, Sci-Fi, Sports, Stingers, Textures, Transportation, and Work – Home — to see only the effects that folder contains.

6.15 The Music and Sound Effects browser lets you quickly place sound effects from iMovie and iLife and songs from GarageBand and iTunes in your movie.
2. Find the song or sound effect you want. If necessary, click in the Search box and start typing a word to find matching items.
3. To play a song or sound effect, click it, and then click the Play button in the lower-left corner of the Music and Sound Effects browser. Alternatively, double-click the song or sound effect. Click the Play button or press spacebar to stop playback.
4. Click the song or sound effect and drag it to the Storyboard:
• Music. To apply the song or sound effect as background music, drop it in open space on the Storyboard. You can easily see when it’s in the right place, as iMovie displays a green border around the area in the Storyboard that will be affected and applies green shading to everything within the border (see Figure 6.16).

6.16 The green border and shading indicates that iMovie will apply the sound effect or song as music to the whole movie.
• Sound effect. To apply the song or sound effect as a sound effect attached to a clip, drag it over the clip, move the playhead to where you want the sound to start, and then drop the song or sound effect. The sound effect appears as a box under the clip (see Figure 6.17).

6.17 A sound effect you attach to a clip appears as a box under the clip.
If you want to remove music or a sound effect, Control+click or right-click it and choose Delete Selection. You can also click the item and then press Delete.
Changing when the music starts
Once you add music to a project, iMovie keeps it in place even if you edit the movie. This is handy if you’re editing the movie to suit the music, but if you want the music to suit the movie, you may need to change when the music starts. To do so, follow these steps:
1. Make sure the music isn’t selected on the Storyboard. If it is selected, click outside its left or right border to deselect it.
2. Click the name of the music at the top of the Storyboard (scroll up if necessary) and then drag to the right. iMovie changes the green shading to purple and lets you move the beginning of the music (see Figure 6.18).
6.18 Click and drag the name of the music to the right to change the music’s starting point.
3. When the mouse pointer reaches the frame at which you want the music to start, release the mouse button.
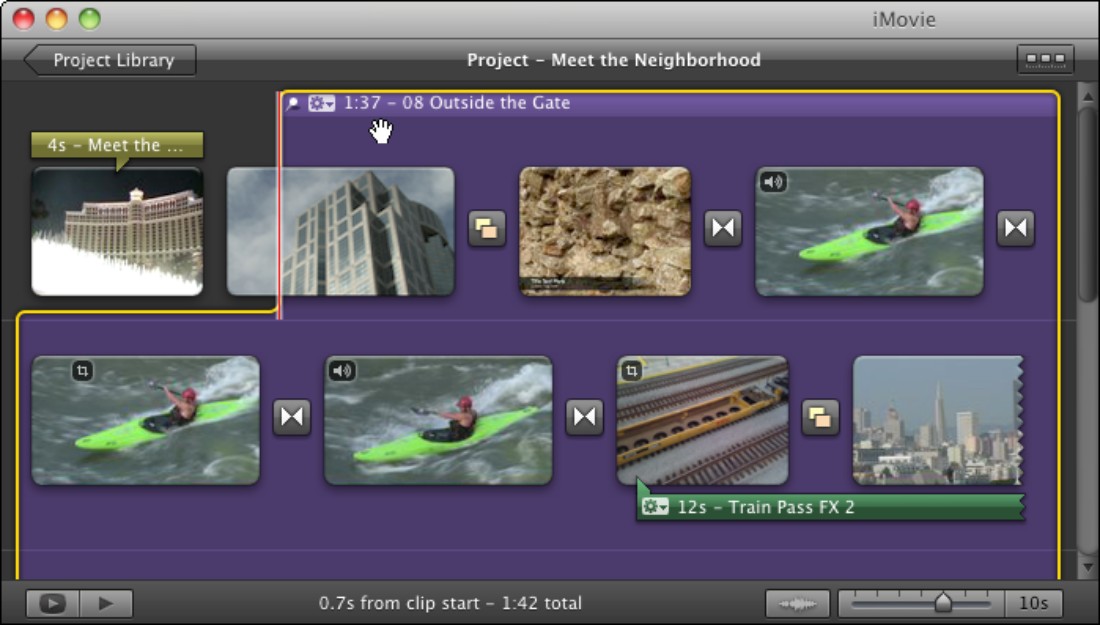
To change when a sound effect plays, click its box on the Storyboard and drag it until its pointer and the playhead reach the frame where you want the effect to start.
Trimming a song or sound effect
When you need to trim a song or sound effect quickly, you can do so like this:
1. Click the sound effect’s box to select it.
2. Move the mouse pointer over the left end or right end of the box so that the mouse pointer turns to a double-headed arrow.
3. Click and drag to shorten the sound effect from the end you drag.
For greater control, or when you need to trim a music track rather than a sound effect, use the Clip Trimmer pane like this:
1. Click the Action button that appears on the left side of the music track or sound effect and then click Clip Trimmer. iMovie displays the Clip Trimmer pane (see Figure 6.19).
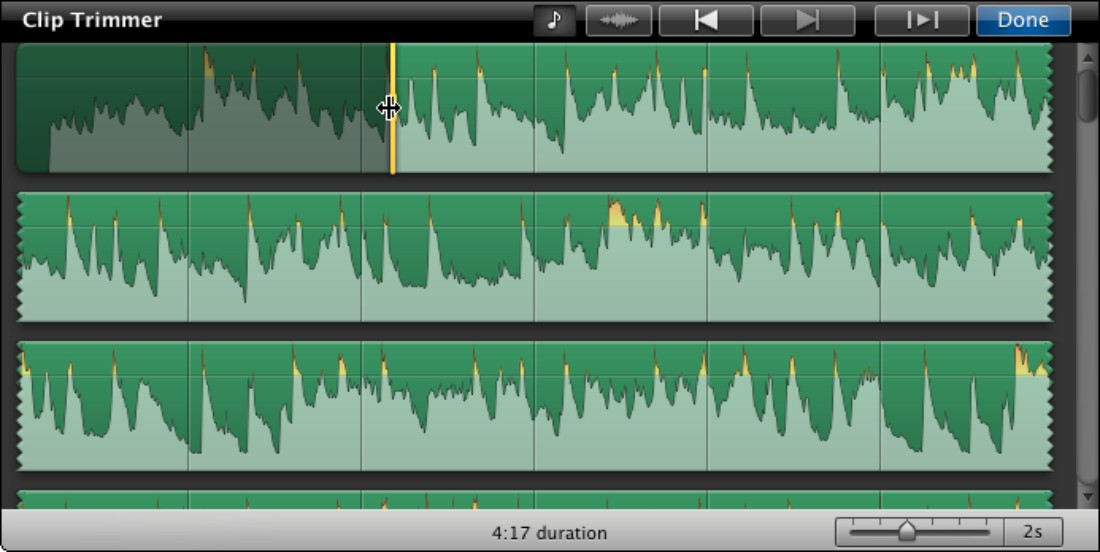
6.19 Use the Clip Trimmer pane to trim a music track down to the right length.
2. Click and drag the left handle or right handle to trim the beginning or end. Click the Play button to check your trimming.
3. Click Done to close the Clip Trimmer pane.
Adding a voiceover
Many movies need a voiceover — spoken words that help set the scene, explain what’s happening, or bridge show-stopping gaps in the plot that you can no longer patch with footage. Here’s how to add a voiceover to your movie:
1. Click the Voiceover button on the toolbar (the microphone button) or press O to open the Voiceover window (see Figure 6.20).

6.20 Choose the recording source and set the input volume in the Voiceover window.
2. In the Record From pop-up menu, choose the microphone or sound source you want to use. For example, choose Built-in Microphone if you’re recording through your Mac’s microphone.
3. Speak into the microphone at the volume you’ll use. Drag the Input Volume slider as needed to put the volume bars about three-quarters of the way across to the right, but not so far that you get the red LEDs at the right end all the time.
4. If you’re recording in a noisy environment, you may need to adjust the Noise Reduction slider to get good results. This slider allows you to tell the microphone to try to filter out background noises so that it picks up your voice clearly.
5. Select the Voice Enhancement check box if you want iMovie to try to improve the sound of your voice. Experiment with this feature and see if you like the effect; if not, turn it off by deselecting the check box.
6. Select the Play project audio while recording check box if you need to hear the project’s audio as you speak your narration. You’ll need to wear headphones to prevent your microphone from picking up the audio and recording it into the voiceover.
7. In the Storyboard, skim to the point at which you want to start recording the voiceover.
8. When you’re ready to begin, click where you want to start. The viewer prompts you to get ready and then counts down from 3 to 1, showing you the 3 seconds of footage before you clicked.
9. Speak the voiceover, and then press spacebar to stop. iMovie displays a purple bar called Voiceover Recording under the clips (see Figure 6.21).

6.21 iMovie displays the voiceover as a purple bar under the clip or clips to which it’s attached.
10. Repeat Steps 7 to 9 if you need to record more voiceovers.
11. When you finish recording, click the Close button (the X button) to close the Voiceover window.
You can make voiceovers overlap if need be. And you can trim a voiceover either by clicking it and dragging one of its end handles or by clicking its action button, clicking Clip Trimmer, and then working in the Clip Trimmer pane.
Viewing the audio waveforms
When you need to work in detail with audio, you may find it helpful to display the audio waveforms along with the clips, sound effects, voiceovers, and other items.
To display the audio waveforms for the items on the Storyboard (see Figure 6.22), click the Show/hide audio waveforms button at the bottom of the Storyboard.

6.22 Click the Show/hide audio waveforms button when you want to display the audio waveforms.
Similarly, to display the waveforms for the clips in the Event Browser, click the Show/hide audio waveforms button at the bottom of the window. Each Show/hide audio waveforms button appears to the left of the corresponding Frames per thumbnail slider (one for the Storyboard, the other for the Event browser).
When you no longer need to see the audio waveforms, click the appropriate Show/hide audio waveforms button again.
Adjusting audio volume and fading
When you add music, sound effects, or a voiceover to your movie, you usually need to adjust one or more of the audio clips to make sure the parts you want to hear are audible. You can also adjust the audio that’s part of the video clip, which is useful when you need to boost it, reduce it, or suppress it altogether.
To adjust an audio clip’s volume, fading, and normalization, follow these steps:
1. Click the audio clip you want to adjust. For example, click a Voiceover Recording clip or the music clip. To work with the audio in the video track, click the video clip.
2. Click the Inspector button on the toolbar or press I to display the Inspector window with the Audio tab displayed (see Figure 6.23).

6.23 Use the Audio tab in the Inspector window to change the volume on an audio clip.
3. Drag the Volume slider to increase or decrease the volume. You can mute the track altogether by dragging the slider all the way to the left.
4. Apply ducking if the track needs it. Ducking means reducing the volume of the other tracks while this track plays, and then restoring their volume. To set ducking, follow these steps:
• Drag the Reduce volume of other tracks to slider to the left or right. iMovie automatically selects the Reduce volume of other tracks to check box for you. (You can select it first manually if you prefer.)
• Listen to the effect to see if your track is audible over its competition. Increase or decrease the ducking as needed.
5. If you want to create a gradual fade-in instead of using iMovie’s automatic rapid fade-in, select the Manual check box in the Fade In area. Drag the slider to the right to set the number of seconds and frames the fade-in occupies. The maximum setting is 5 seconds.
6. If you want to create a gradual fade-out instead of using iMovie’s automatic rapid fade-out, select the Manual check box in the Fade Out area. Drag the slider to the right to set the number of seconds and frames the fade-out occupies. As with the fade-in, the maximum setting is 5 seconds.
7. If the audio suffers from background noise, try selecting the Reduce background noise by check box and experimenting with the slider in different positions. Listen to the result and see if there’s an improvement.
8. If you want to apply equalization to the audio clip, select the Equalizer check box, open the pop-up menu, and choose the equalization to use. For example, choose Voice Enhance equalization if you want to give the movie’s vocals a boost.
If none of the equalizations suits the audio, create a custom equalization by dragging the ten sliders to different positions. The leftmost slider affects the lowest frequencies (bass), and the rightmost slider the highest frequencies (treble). Drag a slider up above the midpoint (the zero mark) to get more of that frequency; drag a slider below the midpoint to get less of that frequency.
9. If your audio was recorded at different volumes, try clicking the Normalize Clip Volume button to even it out. If you don’t like the result, click Remove Normalization.
10. To work with another clip, click it, and then repeat Steps 3 to 9.
11. When you finish working with audio, click Done to close the Inspector window.
If you mess up a clip’s audio by working on the Audio tab of the Inspector window, click Revert to Original to restore the clip to its original state.
Creating a Trailer for a Movie
When you create a movie, you’ll likely want to get as many people as possible to see it. One great way to drum up an audience is to create a powerful and professional-looking trailer for the movie, just like the professional studios do for their movies, and then share the trailer on the Internet.
To create a movie trailer, follow these steps:
1. Choose File→New Project to display the New Project dialog. You can also press +N, or click the New Project button in the Project Library.
2. In the list box on the left, scroll down so that you can see the full list of movie trailers (see Figure 6.24).
3. Click a trailer to display a preview in the box on the right. iMovie displays brief details for the trailer: the number of cast members, the duration, and a synopsis of the approach and what it’s suitable for.
4. After you choose the trailer, set up the other details of the project as usual:
• Type the name in the Name text box.
• Choose the aspect ratio — Widescreen (16:9) or Standard (4:3) — in the Aspect Ratio pop-up menu.
• Choose the frame rate in the Frame Rate pop-up menu. As with movie projects, your choices are 30 fps – NTSC, 25 fps – PAL, or 24 fps – Cinema.
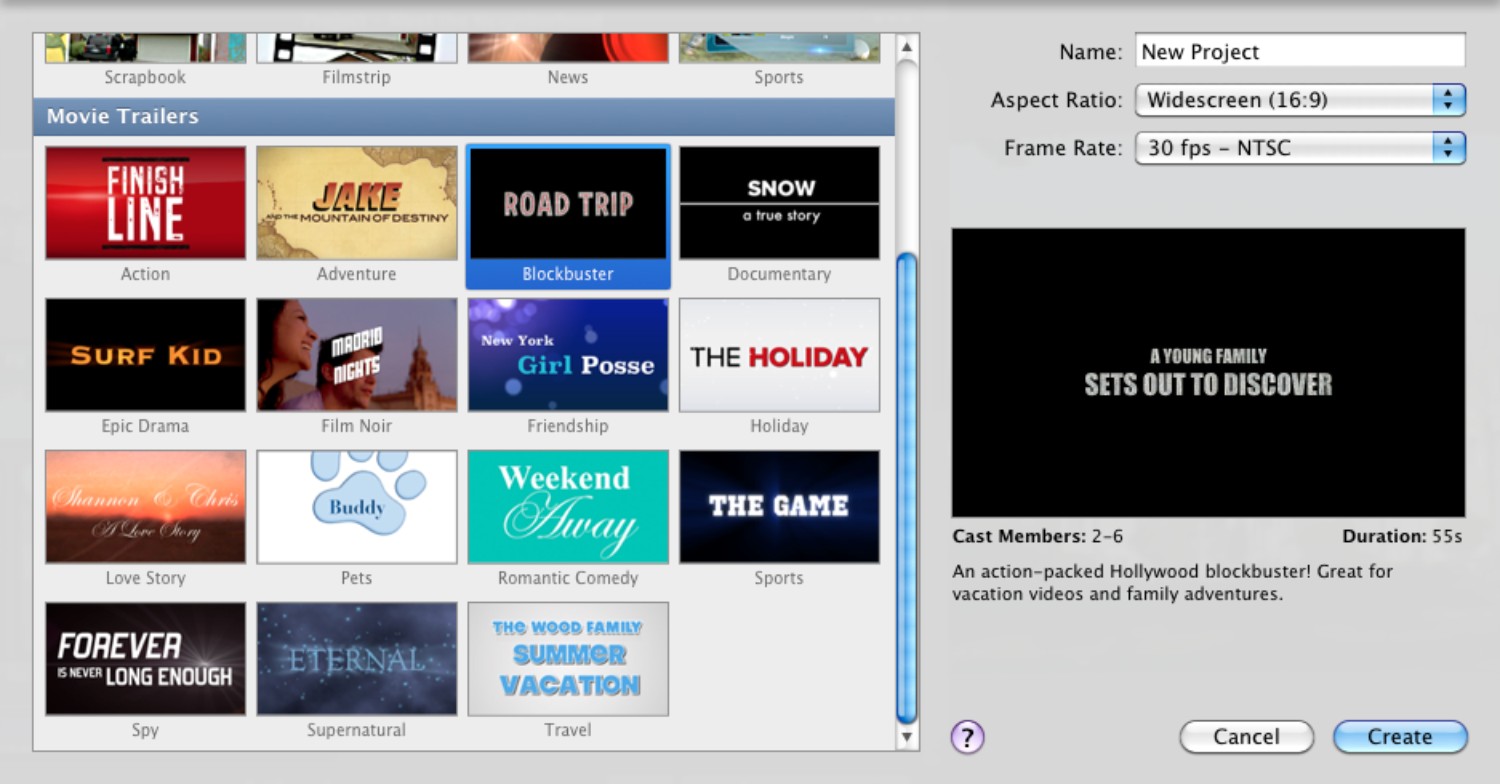
6.24 In the Movie Trailers list in the New Project dialog, click the trailer for which you want to see a preview and details.
5. Click Create to close the New Project dialog and create the movie trailer project. iMovie opens the project for editing, putting the Outline tab at the front of the Storyboard (see Figure 6.25).

6.25 On the Outline tab, fill in the details of the movie, release date, cast, and other information.
6. Fill in the movie’s name and release date, the cast members, the studio, and the credits. Click the Add button (+) to add another cast member, or click the Remove button (–) to remove an existing cast member.
7. Click the Storyboard tab to bring it to the front, and then fill in the text and clips you want (see Figure 6.26):
• Click each text bar in turn, and then type the text you want. Some bars contain a single text item, while others contain two text items, one for each line on the screen.
• After you type the text in a text bar, it displays a curling counterclockwise arrow that you can click to restore the placeholder text.
• Click the first photo placeholder, and then in your Event Library click a frame showing the type of content the placeholder mentions — for example, Landscape for a scenery shot or Group for a group of people. iMovie automatically selects the next placeholder for you so that you can move right along. If you get the wrong item in a placeholder, just click it again, and then click the right frame.

6.26 On the Storyboard tab, type the text to use for the captions, and add a clip to each placeholder.
8. When you finish filling in the text and photo placeholders on the Storyboard, iMovie displays the Trailer Complete dialog, as shown in Figure 6.27). Click Watch Trailer if you want to see how the trailer looks in the viewer. If you want to watch the trailer full screen, click Done, and then click the Play trailer full-screen button in the upper-right corner of the Storyboard area (or press +G).
As your trailer plays, you’ll almost certainly find that some of the clips you chose don’t work in their contexts or that you have other clips that are more suitable or will give greater punch.

6.27 Click Watch Trailer in the Trailer Complete dialog if you want to watch the trailer in the viewer.
You can replace clips or change the text by working on the Storyboard tab. You can also click a clip and use the icons that appear to make adjustments to it — for example, turning on its audio.
To get a breakdown of the shots the trailer uses, click the Shot List tab (see Figure 6.28). On this tab, you can replace a shot by clicking the placeholder and then clicking the replacement clip in the Event Library. And as with the Storyboard, you can click a clip and use the icons that it displays to make adjustments to it.

6.28 Use the Shot List tab to get an overview of the shots in the trailer and to replace any that don’t work.
After adjusting the trailer, play it again — full screen for best effect — and keep working on it until it gives the message and impact you want.
Sharing and Exporting a Movie
Watching your movie (or trailer) on your Mac is great with your family, but you’ll probably want to share it with other people, too.
iMovie lets you share your movies quickly and easily in five ways:
• iTunes. You can add a movie to iTunes so that you can watch it in iTunes;, on an iPad, iPhone, or iPod; or on an Apple TV.
• iDVD. You can burn your movie to a DVD using the iDVD application.
• Media Browser. You can publish a movie to iLife’s Media Browser so that you can use it in iDVD or iWeb.
• YouTube and other major online sites. You can publish a movie straight from iMovie to major video-sharing sites on the Web. YouTube is the biggest site, but you can also post your videos to Facebook, to Vimeo, or to CNN iReport.
• MobileMe Gallery. If you have a MobileMe subscription, you can publish a movie straight from iMovie to your Gallery on MobileMe so that visitors to your MobileMe site can view it.
If you want to turn your movie into a file you can use on other sites, you can export your movie in three ways:
• Export Movie. This command lets you quickly save the movie as an MPEG-4 file using standard settings.
• Export using QuickTime. This command gives you more control over the exported movie. You can choose exactly the settings you need, and you can save it in any of various file formats. For example, you can create a movie file in the AVI format to share with Windows users.
• Export Final Cut XML. This command lets you create a version of the movie that you can bring into Final Cut Express or Final Cut Pro, Apple’s more powerful video-editing applications.
Understanding the essentials of sharing
When you share a movie, you decide which size or sizes to use for it. iMovie offers five sizes; for some types of sharing, you choose a single size, but for others, you can use multiple sizes. Table 6.2 explains the five sizes iMovie offers, their resolutions, and the devices on which they work.

Seeing where you exported a movie
Given these various ways of exporting a movie, it can become difficult to keep track of which copies of the movie you put where. Luckily, iMovie automatically tracks the various copies you export and keeps you up to date with a clear readout at the top of the Storyboard.
Figure 6.29 shows the Storyboard for a video that has been shared to iTunes and published to both MobileMe and YouTube. You can click the pop-up menu to display options for viewing the movie, starting an e-mail giving a friend the URL of a movie, republishing the movie, or removing it from the site.

6.29 The Storyboard shows you where you published a movie and provides a pop-up menu for viewing and sharing it.
iMovie also places icons to the right of the movie project’s name in the Project Library, showing that you’ve shared the movie (the beam icon) and which sizes you created for it (the four rounded rectangles). Figure 6.30 shows an example. A white rectangle indicates a size you’ve created, and a gray rectangle indicates a size you haven’t created yet.
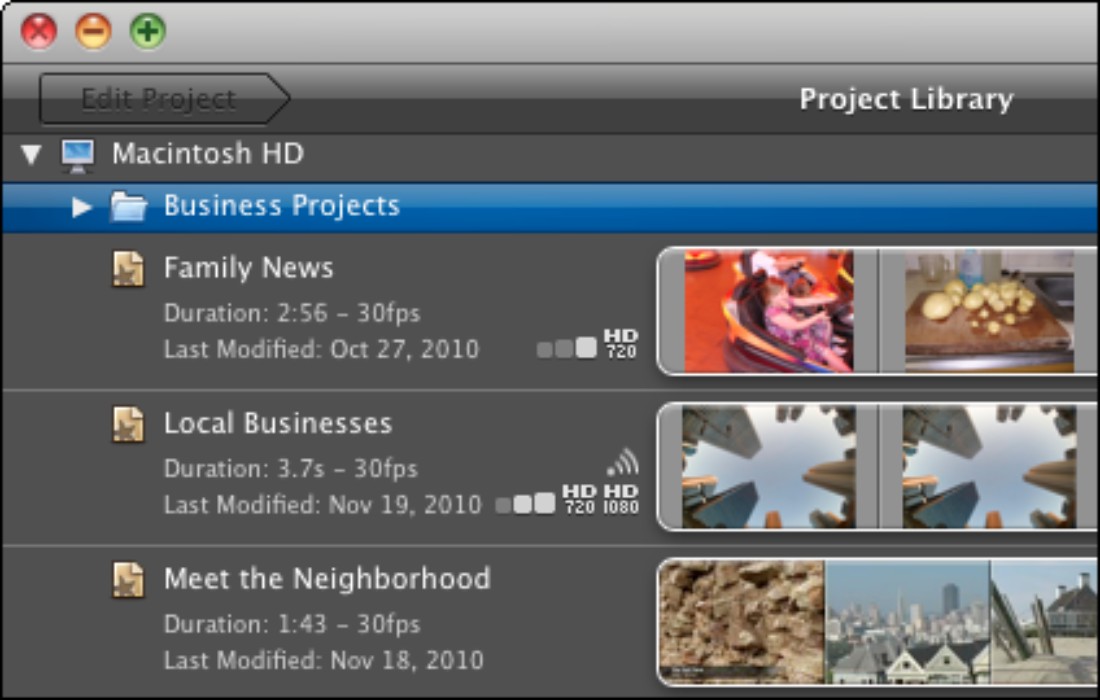
6.30 The Project Library shows you which projects you’ve shared and the sizes you’ve created for them.
Updating a movie you already published
If you change a movie project after publishing it to iTunes, MobileMe, or YouTube, iMovie displays the Shared or Finalized Project dialog, as shown in Figure 6.31, to warn you that the published project is now out of date. Click OK to continue making the edit, or click Undo if the warning has made you change your mind.

6.31 When you change a movie you’ve already shared, iMovie reminds you that you need to share it again.
iMovie then displays a yellow triangle with an exclamation point and an out-of-date notice at the top of the Storyboard (see Figure 6.32). The yellow triangle icon also appears on the project’s sharing icon in the Project Library.

6.32 These yellow exclamation icons remind you that the published version of the movie is out of date.
When you finish updating the movie, republish it to the sites on which you’ve published it. In most cases, the easiest way to do this is to click the site’s button on the Storyboard screen and then click the Republish or the Publish command.
iMovie displays the dialog for publishing the movie (you see these dialogs shortly) but reapplies the settings you chose the first time. Make any changes, and then click the button to publish the movie.
Sharing a Movie to the Media Browser
If you want to use your movie in iWeb or iDVD, share it to the Media Browser like this:
1. Choose Share→Media Browser to display the Publish your project to the Media Browser dialog, as shown in Figure 6.33.

6.33 In the Publish your project to the Media Browser dialog, choose the sizes you want to be able to use in your iWeb and iDVD projects.
2. Select the check box for each size you want to create.
3. Click Publish.
Publishing a movie to iTunes, iPad and iPhone (or iPod), or Apple TV
If you want to be able to watch your movie in iTunes, on your iPad or iPhone (or iPod), or on an Apple TV, export it to iTunes like this:
1. Choose Share→iTunes. iMovie displays the Publish your project to iTunes dialog (see Figure 6.34).

6.34 When you publish a project to iTunes, create multiple sizes to ensure the movie looks good on the different devices you use.
2. Choose the sizes you want to create.
• Usually you’ll want to select the the Medium check box and the Large check box so that you can watch the movie on an iPhone or iPad, an Apple TV, or your Mac.
The iPhone 4 uses 960×640-pixel resolution, and the iPad uses 1024×768 resolution. If you’re using either of these devices, the Large size will look much better than the Medium size or the Mobile size.
• iMovie creates a separate movie file for each, adding the size to the project’s name — for example, Our New Arrival – Mobile and Our New Arrival – Medium — so that you can distinguish the files.
3. Click Publish.
When iMovie finishes creating the files, it automatically launches or activates iTunes so that you can check out the movies. Click Movies in the sidebar to see the list of movies.
Publishing a movie to YouTube, Facebook, Vimeo, or CNN iReport
iMovie makes it easy to publish a movie to four major sites for sharing videos online:
• YouTube (www.youtube.com)
• Facebook (www.facebook.com)
• Vimeo (www.vimeo.com)
• CNN iReport (http://ireport.cnn.com)
Here are the essentials of publishing a movie to these sites:
• Set up an account. If you don’t already have an account with the site, go to its Web site, and then follow the instructions for creating an account.
• Publish a movie to the site. Click the project in the Project Library or open it on the Storyboard, and then choose Share→YouTube, Share→Facebook, Share→Vimeo, or Share→CNN iReport, as appropriate. Choose the account you want to use, and then follow the prompts.
• Remove a movie from the site. Open the project on the Storyboard. Click the site’s button on the Shared to bar at the top, and then click the Remove from command — for example, Remove from YouTube. Follow the prompts to remove the movie.
Publishing a movie to your MobileMe Gallery
If you have a MobileMe subscription, you can easily publish a movie to your MobileMe Gallery.
First, if you’re not currently signed in to your MobileMe account, sign in before publishing your movie. Click System Preferences in the Dock, click MobileMe, click Sign In, and then type your MobileMe credentials.
Now follow these steps in iMovie:
1. Select the movie project in the Project Library or open it on the Storyboard.
2. Choose Share→MobileMe Gallery. iMovie displays the Publish your project to your MobileMe Gallery dialog, as shown in Figure 6.35.
3. Improve the title in the Title box if necessary.
4. Type a description of the movie in the Description box.
5. In the Sizes to publish area, select the check box for each size you want to publish.
6. In the Viewable by pop-up menu, choose who may view the movie:
• Everyone. Anyone on the Web can view the album.
• Only me. You keep the album to yourself — good for personal or work photos.
• Edit Names and Passwords. To add the name of a person or group and assign a password, click this item, and work in the dialog that appears. Click OK when you finish.
7. If you want to hide the movie on your Gallery page, select the Hide movie on my Gallery home page check box.
8. Select the Allow movie to be downloaded check box if you want people to be able to download the movie rather than just watch it online.
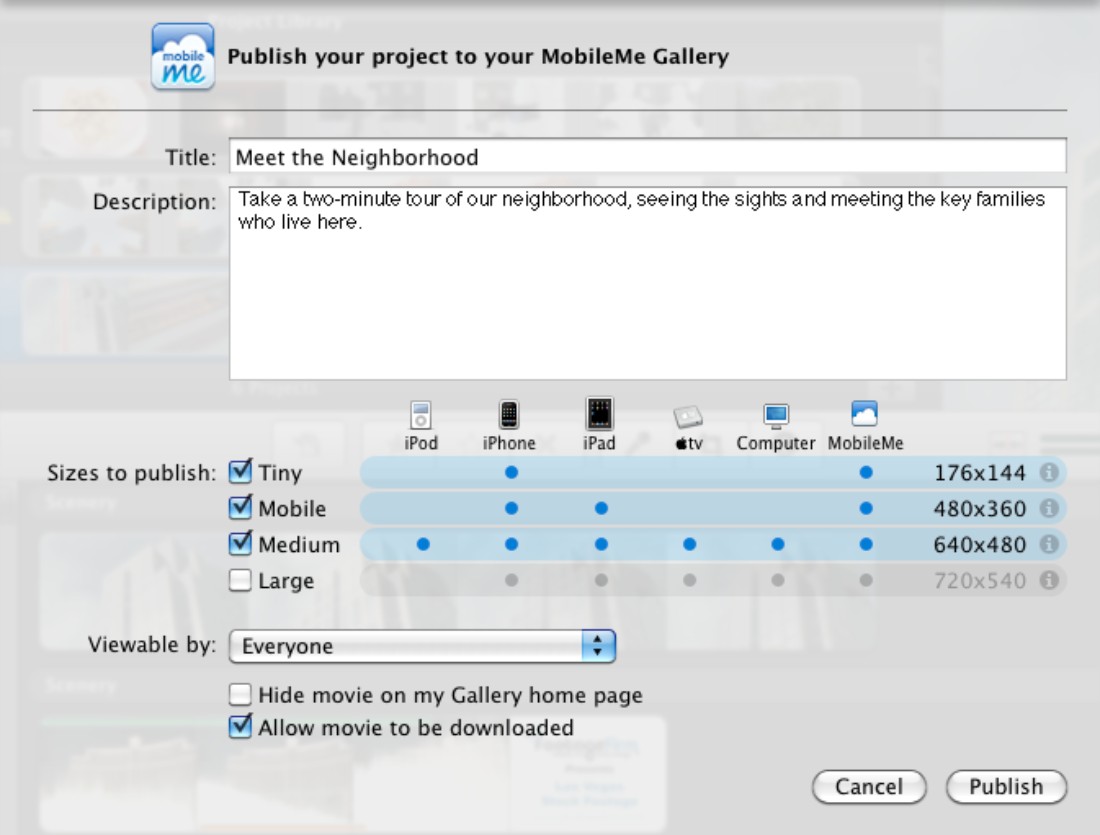
6.35 You can put up to four different sizes of movie on your MobileMe Gallery. This allows visitors to download the size they want.
Hiding a movie so that it doesn’t appear on your MobileMe Gallery page is good for when you need to share different movies with different people. Instead of needing to password-protect a movie to keep out people you don’t want to see it, you can simply prevent the movie from appearing, and give the movie’s URL to the people you want to watch it.
9. Click Publish. iMovie prepares the movie sizes you chose and publishes them to your Gallery, and then displays a dialog telling you it has done so.
10. Click Tell a Friend to start an e-mail message announcing your movie, click View to view your Gallery, or click OK to close the dialog.
Putting a movie on a DVD
iMovie gives you two ways to publish a movie to a DVD:
• Media Browser. Choose Share→Media Browser to publish the movie to iLife’s Media Browser. Then switch to iDVD and pull in the movie from the Media Browser.
• Publish to iDVD. Choose Share→iDVD to publish the movie straight to the iDVD application.
See Chapter 12 for the details on using iDVD to create a DVD.
Exporting a movie quickly to an MPEG-4 file
If you want to export a movie quickly to a Mobile, Medium, or Large size MPEG-4 file using iMovie’s preset settings, creating a file that will play on almost any type of computer, follow these steps:
1. Select the movie project in the Project Library or open it on the Storyboard.
2. Choose Share→Export Movie or press +E. iMovie displays the Export As dialog shown in Figure 6.36.
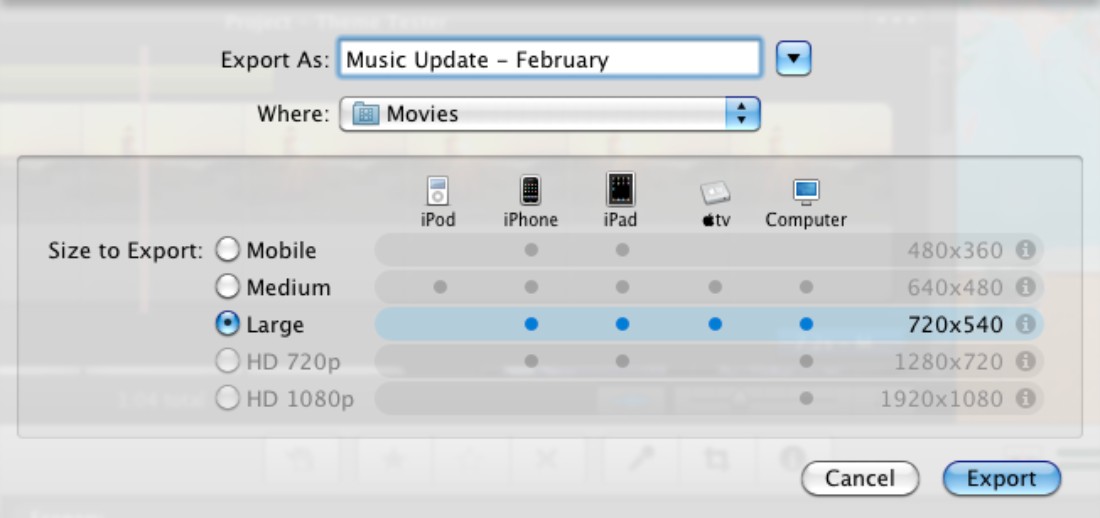
6.36 The quick way to create a file containing a movie is to choose Share→Export.
3. In the Export As box, iMovie enters the project’s name. Edit this name or type a new name as necessary.
4. In the Where pop-up menu, choose the folder in which to store the exported file. If necessary, expand the dialog so that you can see the sidebar.
5. In the Size to Export area, select an option button —Mobile, Medium, or Large — as appropriate. Table 6.2 (earlier in this chapter) explains the sizes.
6. Click Export. iMovie exports the movie to the file and saves it in the folder you chose.
Exporting to another file format
When you need a file format other than MPEG-4, or when you need to control exactly how iMovie exports the file, you can export to a QuickTime file instead. Here’s what to do:
1. Select the movie project in the Project Library or open it on the Storyboard.
2. Choose Share→Export using QuickTime. iMovie displays the Save exported file as dialog shown in Figure 6.37.
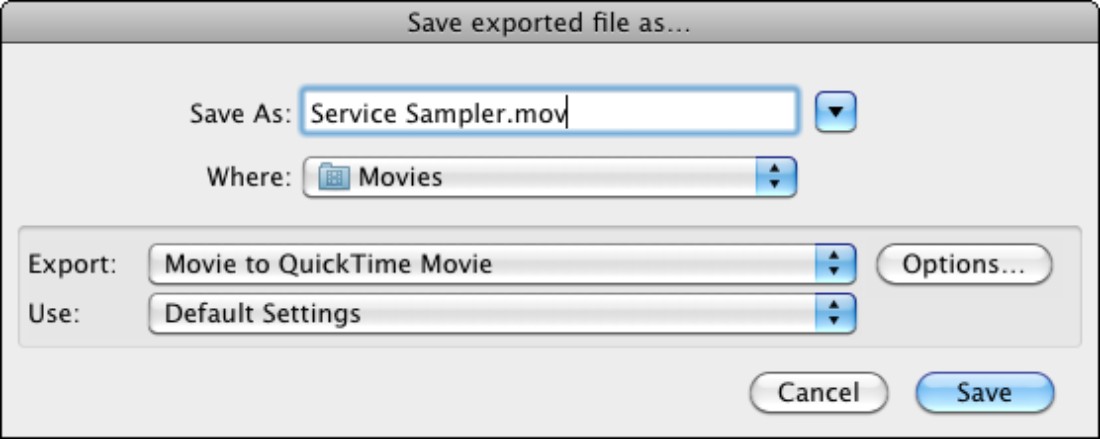
6.37 The Export using QuickTime command lets you choose from a wide variety of export formats.
3. In the Save As box, iMovie enters the project’s name. Edit this name or type a new name as necessary.
4. In the Where pop-up menu, choose the folder in which to store the exported file. If necessary, expand the dialog so that you can see the sidebar and navigate to other folders.
5. In the Export pop-up menu, choose the format you want. Table 6.3 explains your options.
QuickTime’s Sound To export formats are great for grabbing the audio from a movie so that you can use it elsewhere.
6. If the Options button is available instead of being dimmed, you can click it to choose options for the export format. For example, if you choose the Movie to QuickTime Movie export format, you can choose options like this:
• Click Options to display the Movie Settings dialog.
• To change the video settings, click the Settings button in the Video box, and then choose compression, motion, data rate, and encoding settings in the Video Compression Settings dialog.
• To apply a special effect such as Lens Flare, click the Filtering button, and then choose settings in the Filtering dialog.
|
Table 6.3 Export Options Using QuickTime |
|
|
Export Format |
Explanation |
|
Movie to 3G |
Creates a movie in the 3GP format, streaming the movie to 3G mobile phones. |
|
Movie to Apple TV |
Creates a movie in the MPEG-4 format. This gives you the same result as choosing Share→Export Movie and choosing the Medium size (which is easier). The movie’s resolution is 640×480 pixels. |
|
Movie to AVI |
Creates a movie in the AVI format, which is widely used on Windows. You can choose the quality and compression (if any). |
|
Movie to DV Stream |
Creates a movie in a DV format. You can choose whether the movie is formatted for NTSC or for PAL. |
|
Movie to FLC |
Creates a movie in the FLIC animation format. You can choose the frame rate and whether the movie uses Windows Colors or Mac Colors. |
|
Movie to Image Sequence |
Creates an image file for each frame of the movie. You can choose from various image formats (such as JPEG). |
|
Movie to iPhone |
Creates a movie in the MPEG-4 format suitable for viewing on the iPhone or iPod touch. This gives you the same result as choosing Share→Export Movie and choosing the Mobile size. The movie’s resolution is 480×360 pixels. |
|
Movie to iPhone (Cellular) |
Creates a movie in the 3GP format suitable for watching as a stream on the iPhone. The movie’s resolution is 176×132 pixels. |
|
Movie to iPod |
Creates a movie in the MPEG-4 format suitable for viewing on any iPod or on a TV to which it’s connected. The movie’s resolution is 640×480 pixels, the same as the Movie to Apple TV export format, but it uses a lower bit rate and so has a smaller file size. |
|
Movie to MPEG-4 |
Creates a movie in the MPEG-4 format. This is the same as choosing Share→Export Movie, except you can click the Options buttons to set a wide variety of movie options, including the image size, frame rate, and audio format. |
|
Movie to QuickTime Movie |
Creates a movie in the QuickTime format. You can choose from a wide variety of settings to get the resolution and quality you need. |
|
Sound to AIFF |
Exports the soundtrack from the movie to a file in the AIFF format, an uncompressed, full-quality format used widely on the Mac. |
|
Sound to AU |
Exports the soundtrack from the movie to a file in the AU format. This file format is less widely used than AIFF or WAV. |
|
Sound to Wave |
Exports the soundtrack from the movie to a file in the WAV format, an uncompressed, full-quality format used widely on Windows. |
• To change the resolution of the video, click the Size button, and then choose settings in the Export Size Settings dialog.
• To use a different sound format or quality, click the Settings button in the Sound box, and then choose settings in the Sound Settings dialog.
• If you want to be able to stream the movie across the Internet, select the Prepare for Internet Streaming check box, and then choose Fast Start, Fast Start – Compressed Header, or Hinted Streaming. Fast Start is usually the best choice for general use. Hinted Streaming is for use with QuickTime Streaming Server.
• Click OK to close the Movie Settings dialog and return to the Save exported file as dialog.
7. Click Save. iMovie exports the file in the format you chose.
Exporting to a Final Cut XML file
If you have Final Cut Express or Final Cut Pro, Apple’s more powerful video-editing applications, you may want to bring into it movies that you’ve created in iMovie so that you can develop them further.
To do this, you can use the Export Final Cut XML command. But before you do, it’s vital that you’re clear on what you get and what you don’t get:
• Video. You get the video footage, but iMovie removes any color adjustments you made.
• Audio. You get the audio tracks, but iMovie removes any voiceovers, sound effects, and music tracks.
• Transitions. iMovie replaces all your custom transitions with Cross Dissolves.
• Titles. You lose all the titles.
• Cropping and Ken Burns Effects. iMovie removes these as well.
That may sound as though there’s not much left. But if what you’re looking to do is get your edited video into one of the Final Cut applications so that you can reedit it there, you get just about enough.
Here’s how to export your movie project to a Final Cut XML file:
1. Click the movie project in the Project Library or open it on the Storyboard.
2. Choose Share→Export Final Cut XML. iMovie displays the Export FCP XML dialog, as shown in Figure 6.38.
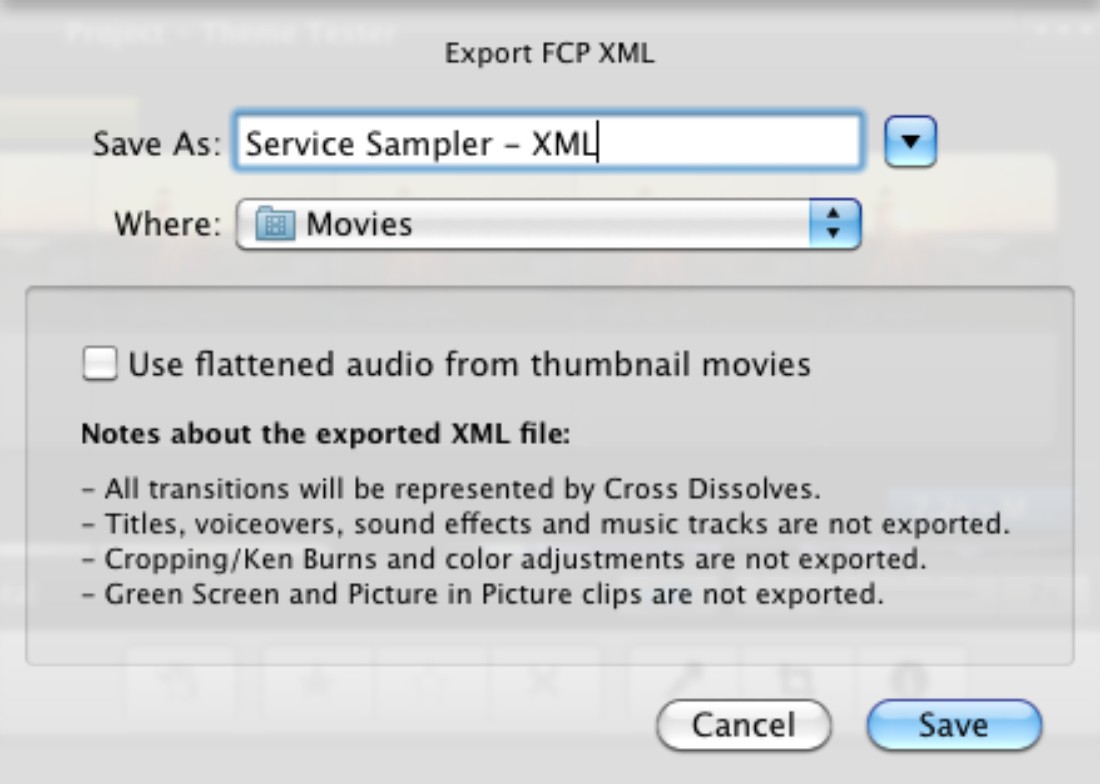
6.38 When you export a movie to Final Cut XML, you lose transitions, voiceovers, cropping, and more — but you do transfer the footage.
3. In the Save As box, type the name you want to give the file. iMovie suggests the name XML File, so you’ll normally want to change it.
4. In the Where pop-up menu, choose the folder in which to store the exported file. If necessary, expand the dialog so that you can see the sidebar.
5. Select the Use flattened audio from thumbnail movies check box if you want to include the rendered audio. Deselect this check box if you plan to render the audio in Final Cut (which gives you more control over how it sounds).
6. Click Save. iMovie exports the file. You can then import it into Final Cut.