Chapter 7: How Do I Set Up a Virtual Studio in GarageBand?
GarageBand gives you all the tools you need to create professional-quality music on your Mac. But because of its power and complexity, GarageBand has a steep learning curve and takes some getting used to. This chapter shows you how to come to grips with GarageBand, assemble and configure your computerized music studio, use the Magic GarageBand feature to quickly create a customized backing track containing exactly the type of music you want to play along to, and even have GarageBand teach you how to play songs.
Understanding What You Can Do with GarageBand
Creating and Saving a Song Project
Getting Up to Speed with the GarageBand Interface
Connecting Your Audio Instruments
Setting Preferences to Suit the Way You Work
Kick-Starting a Song with Magic GarageBand
Improving Your Instrument Playing with GarageBand
Understanding What You Can Do with GarageBand
GarageBand lets you create original music quickly and easily by using your Mac on its own or with musical instruments.
GarageBand comes with a library of prerecorded audio loops for many different instruments, from rock music standards such as drums, bass, and guitars (lead and rhythm) to instruments such as woodwind, brass, and organs. You can arrange these loops to play back in the order you want, repeat them as needed, and even change their tempo and pitch. You can use the Magic GarageBand feature to quickly whip together a backing track from loops that work with each other.
You can connect a MIDI keyboard to your Mac and use its keys to play either keyboard-based Software Instruments (such as pianos or synthesizers) or instruments such as guitars or drum kits. You can play along to tracks you build out of prerecorded loops, record your performances, and choose the best of them.
You can connect a physical musical instrument such as a guitar or bass to your Mac (usually through an external audio interface) and play along with a backing track. You can record what you play and manipulate it to make it sound better.
You can connect one or more microphones to your Mac (again, usually through an external audio interface) so that you can add vocals or other instruments you cannot connect directly to your Mac. For example, you can record an acoustic guitar, a flute, or a drum kit through one or more microphones. You can record these tracks, too, and improve them in GarageBand.
You can mix your loop-based tracks and your recorded tracks, adding effects as needed to give you a professional-quality result. You can then export the resulting song to iTunes or to a CD.
If you want to improve your playing, you can use the Learn to Play feature to take lessons in instruments such as piano and guitar and the How Did I Play? feature to track your progress as you play live with GarageBand. You can download guitar lessons, piano lessons, and lessons from individual artists who teach you how to play particular songs of theirs. Last but not least, you can unleash the full power of GarageBand on the tiny task of creating a ringtone for the iPhone.
 GarageBand also lets you create podcasts and add chapter markers to movies for DVDs. Chapter 11 shows you how to create podcasts. Chapter 12 explains how to add chapter markers to movies.
Creating and Saving a Song Project
The first time you launch GarageBand by clicking the GarageBand icon on the Dock or (if the icon doesn’t appear there) double-clicking the icon in the Applications folder, GarageBand displays the opening screen shown in Figure 7.1.
The next time you open GarageBand, it automatically loads the project you were working on the last time you quit the application. If you closed the project before quitting GarageBand, the application displays the opening screen so that you can decide between opening an existing project and starting a new project.

7.1 When you open GarageBand, the application displays this screen to let you choose which feature to use.
Create and save your song project like this:
1. If the New Project button in the left panel isn’t selected, click it so that you see the available instruments (such as Piano, Electric Guitar, and Voice) and features (such as Songwriting and Podcast).
2. Click the instrument you want to use — for example, Keyboard Collection — and then click Choose. GarageBand displays the New Project from Template dialog (see Figure 7.2).
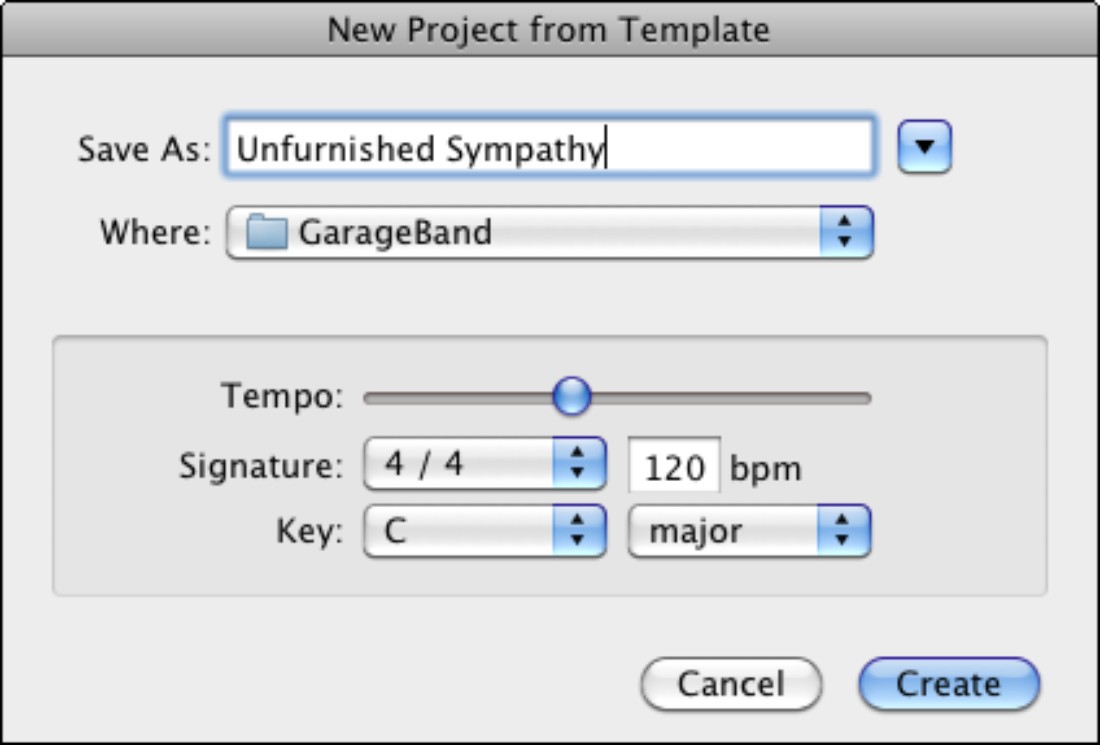
7.2 In the New Project from Template dialog, name your song; choose where to save it; and set the tempo, signature, and key.
Chapter 11 discusses how to use GarageBand to create podcast episodes and distribute them via iWeb.
3. In the upper part of the dialog, name your song, and choose where to save it. As usual, you can click the arrow button to the right of the Save As box to reveal the dialog’s navigation area.
4. Set the tempo for the song by dragging the Tempo slider to adjust the number in the bpm box. See the nearby sidebar for advice on choosing the tempo, signature, and key. You can also type the number directly in the bpm box if you find that easier than dragging the Tempo slider.
5. Choose the time signature for the song in the Signature pop-up menu.
 GarageBand wraps each song into a package file that contains all the track information and any audio files that you record into the song. The result is that GarageBand song files that include recorded audio can be large, so don’t try to save them on any storage device that’s short of space.
6. Choose the key in the Key pop-up menu, and then choose major or minor in the pop-up menu to the right of it.
7. Click Create. GarageBand closes the New Project from Template dialog and displays your project.
Getting Up To Speed with the GarageBand Interface
After you create your first project, the GarageBand window should look something like Figure 7.3, which uses the Keyboard Collection instruments. GarageBand starts the project with a track for the instrument you chose, or a track for each instrument in the collection, but you can delete any track — or change it to another instrument — as needed.
These are the main elements of the GarageBand window:
The Loop Browser, Track Info pane, and Media Browser share the same area on the right side of the screen, so you can display only one of these items at once. To give yourself more space for the Timeline, you can also hide whichever of these three is currently displayed. To hide the current pane, click its button.
• Tracks column. You place a track in this column for each Software Instrument or Real Instrument you want to play or record. The track header shows the instrument type and contains controls for recording the track, listening to it, changing its volume, and panning it. The track header for the instrument you’ve currently selected appears in green so you can easily pick it out.
• Playhead. The triangle in the Timeline and the red line down across the tracks indicate the current play position. The playhead moves as you play back the tracks. You can also move it by dragging or by using the Transport controls.
• Timeline. This is the area where you arrange loops, tracks, and sounds so that they start when you want them to and play for the required length.
• Zoom slider. Drag this slider to zoom in on the Timeline so you can see it in more detail, or to zoom out to see more of your project at once.
• New Track button. Click this track to open the dialog box for adding a new Software Instrument track or Real Instrument track.
• Loop Browser. In this pane, you pick prerecorded audio loops to place in the song.
• Loop Browser button. Click this button to display or hide the Loop Browser.

7.3 When you create a song project, GarageBand looks something like this. The track or tracks depend on the instrument or feature you chose in the New Project from Template dialog.
• Track Info button. Click this button to display or hide the Track Info pane, which you use for working with Software Instruments and Real Instruments.
• Media Browser button. Click this button to display or hide the Media Browser, which you use to select audio clips, photos, and movies, just like in most of the other iLife applications. You use the Media Browser when creating podcasts rather than when creating songs; see Chapter 11 for details.
• Track Editor button. Click this button to display the Track Editor, which you use to edit the audio in a track.
• Record button. Click this button to start or stop recording.
• Transport controls. Use these buttons to move the playhead to where you want it.
• Time display. This readout displays details of the time, measures, chord, or project. To switch among the four available sets of information, either click the up and down arrows at the left end, or click the icon on the left and choose from the pop-up menu.
• Master Volume slider. Drag this slider to control the master volume of the song. You use the controls in the Mixer column to set the volume level for an individual track.
• Volume meters. These meters display the output level for the song as a whole. Each track has its own volume meters that show only that track’s output level.
• Playhead Lock button. Click this button to lock or unlock the playhead in the Timeline from the playhead in the Track Editor. By unlocking the two playheads, you can work with a different part of the song in the Timeline than in the Track Editor, which can be handy.
• Choose Timeline Grid Value button. Click this button to change the note value shown in the Timeline grid. For many projects, it’s best to use the default setting, Automatic, which lets GarageBand change the note value automatically as you zoom in and out.
• Cycle Region. Click this button to turn on the cycle region, which you use to make a part of the song play in a loop so that you can work with it while ignoring the rest of the song.
• Metronome. Click this button to turn on the metronome, which plays a click track to help you keep time.
Using the on-screen keyboard and Musical Typing
To play Software Instruments on your Mac, you’ll most likely want to connect an external musical keyboard, as discussed later in this chapter. This gives you the greatest flexibility and lets you play almost as if you were using a full-size instrument.
If you don’t have a musical keyboard, or for times when you can’t take a musical keyboard with you (for example, when you travel), GarageBand provides an on-screen keyboard that you can play either with the mouse or by pressing the keys on your Mac’s keyboard.
Using the on-screen keyboard
To display or hide the on-screen keyboard, choose Window→Keyboard or press  +K. Figure 7.4 shows the on-screen keyboard.
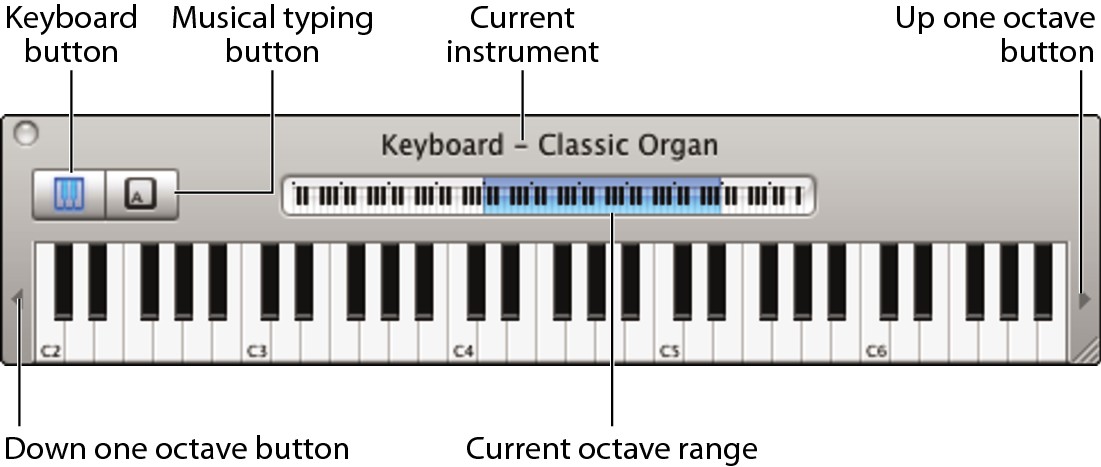
7.4 The on-screen keyboard lets you play any Software Instrument using your mouse.
The on-screen keyboard is easy to use, but it has a couple of hidden features:
• Choose the instrument. Click the Software Instrument track you want to play. The Keyboard window’s title bar shows the instrument.
• Play a note. As you’d guess, you click the key. But the farther down the key you click, the harder you strike it. So if you want to play a note gently, click near the top of the key.
• Change the octave range. Click the gray button at the left end to move down an octave, or click the gray button at the right end to move up an octave. Or simply drag the blue-shaded area on the miniature keyboard at the top.
• Resize the keyboard. Drag the sizing handle in the lower-right corner of the Keyboard window to stretch out the keyboard or to shrink it back down. Drag the handle all the way to the right to display the entire keyboard so that you don’t need to use the octave arrows.
Using Musical Typing
If you’re handy with the mouse, you can play the on-screen keyboard pretty well in a pinch — one note at a time. But what you may find easier is to play using your Mac’s keyboard. GarageBand calls this feature Musical Typing.
To use Musical Typing, click the Software Instrument track you want to play with the keyboard, and then choose Window→Musical Typing or press +Shift+K. GarageBand displays the Musical Typing window (see Figure 7.5).

7.5 The Musical Typing keyboard lets you play piano — or any other Software Instrument — using your Mac’s keyboard instead of an external keyboard.
If you already have the Keyboard window open, you can switch to Musical Typing by clicking the Musical Typing button, the right-hand button of the two on the upper-left side of the toolbar. Click the Keyboard button (the left button) when you want to switch back to the keyboard.
The title bar shows the instrument you’re currently playing. You can switch the keyboard to play another Software Instrument by clicking that instrument’s track header in the main GarageBand window.
The Musical Typing keyboard is easy to use:
• Play a note. Press the note shown on the key.
• Change octave. Click the piano keyboard at the top of the window to pick an octave, or drag the blue shaded area to the left or right. You can also press Z to move down an octave or X to move up an octave.
• Sustain a note. Hold down Tab to sustain the note you’re playing.
• Change velocity. Press C to reduce the velocity or V to increase it.
• Add pitch bend. Press 1 to lower the pitch or 2 to raise it. Keep holding down the key for as long as you want to bend the pitch.
• Add modulation. Press the number keys 4 through 8 to add modulation (the higher the number, the more modulation). To turn modulation off, press 3.
If you prefer, you can click the buttons on the Musical Typing keyboard instead of (or as well as) pressing the keys.
Using the Loop Browser
To make the best use of the space available in the window, GarageBand makes the Loop Browser, the Track Info pane, and the Media Browser share the same area. That means you can display only one of them at a time.
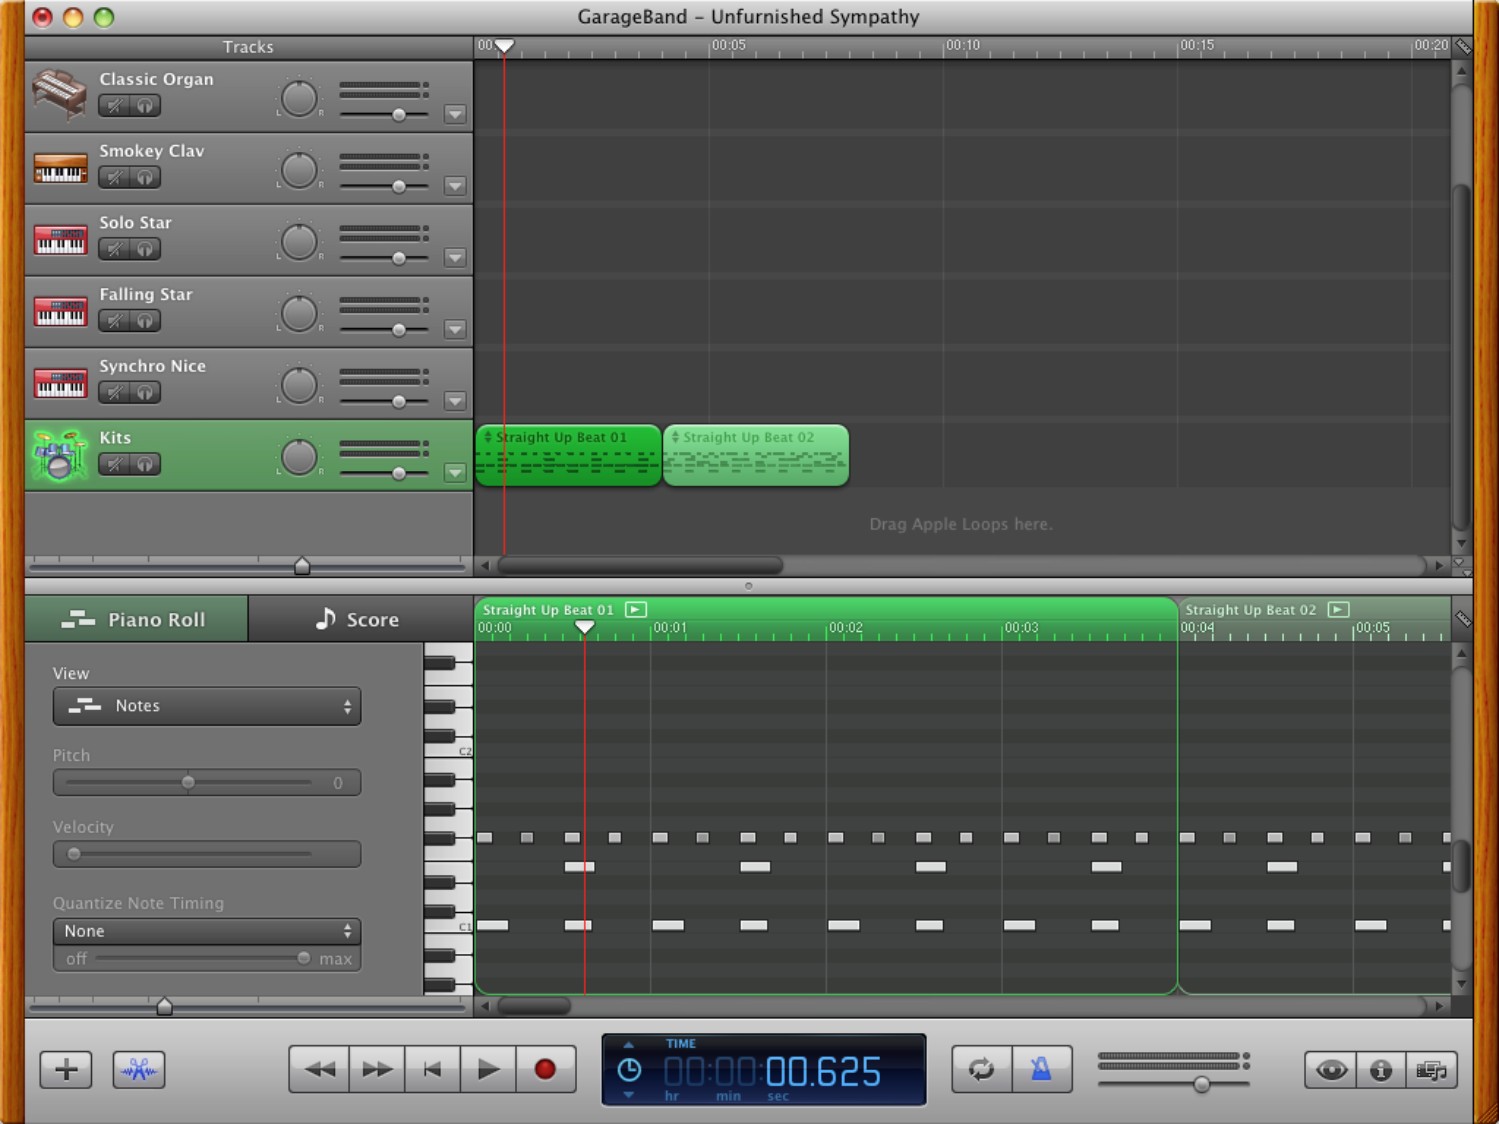
To add audio loops to your projects, you use the Loop Browser. Click the Loop Browser button to display the Loop Browser on the right side of the window. You can then click one of the category buttons in the top part of the Loop Browser to display the matching loops in the list at the bottom. For example, Figure 7.6 shows the Loop Browser open with the Guitars button clicked, so the list at the bottom displays all the guitar loops.

7.6 Open the Loop Browser and then click a category button to see a list of matching loops. Click a loop to listen to it; click again to stop, or click another loop to start it.
Click the loop you want to hear, or drag it to the Track list to create a new track that uses that loop. GarageBand adds the loop to the track as a region, a section of the track.
 You can increase the depth of the Loop Browser so that it shows more category buttons by clicking the two-bar handle below the category buttons and dragging downward.
Meeting the Track Editor
To display the Track Editor across the bottom of the GarageBand window, click the Track Editor button. You can then click a region to open it for editing in the Track Editor (see Figure 7.7) or double-click a region to bring it to the leftmost position in the Track Editor.
7.7 Opening a region for editing in the Track Editor. Hide the Loop Browser, Track Info pane, or Media Browser to give the Track Editor more space.
Meeting the Track Info pane
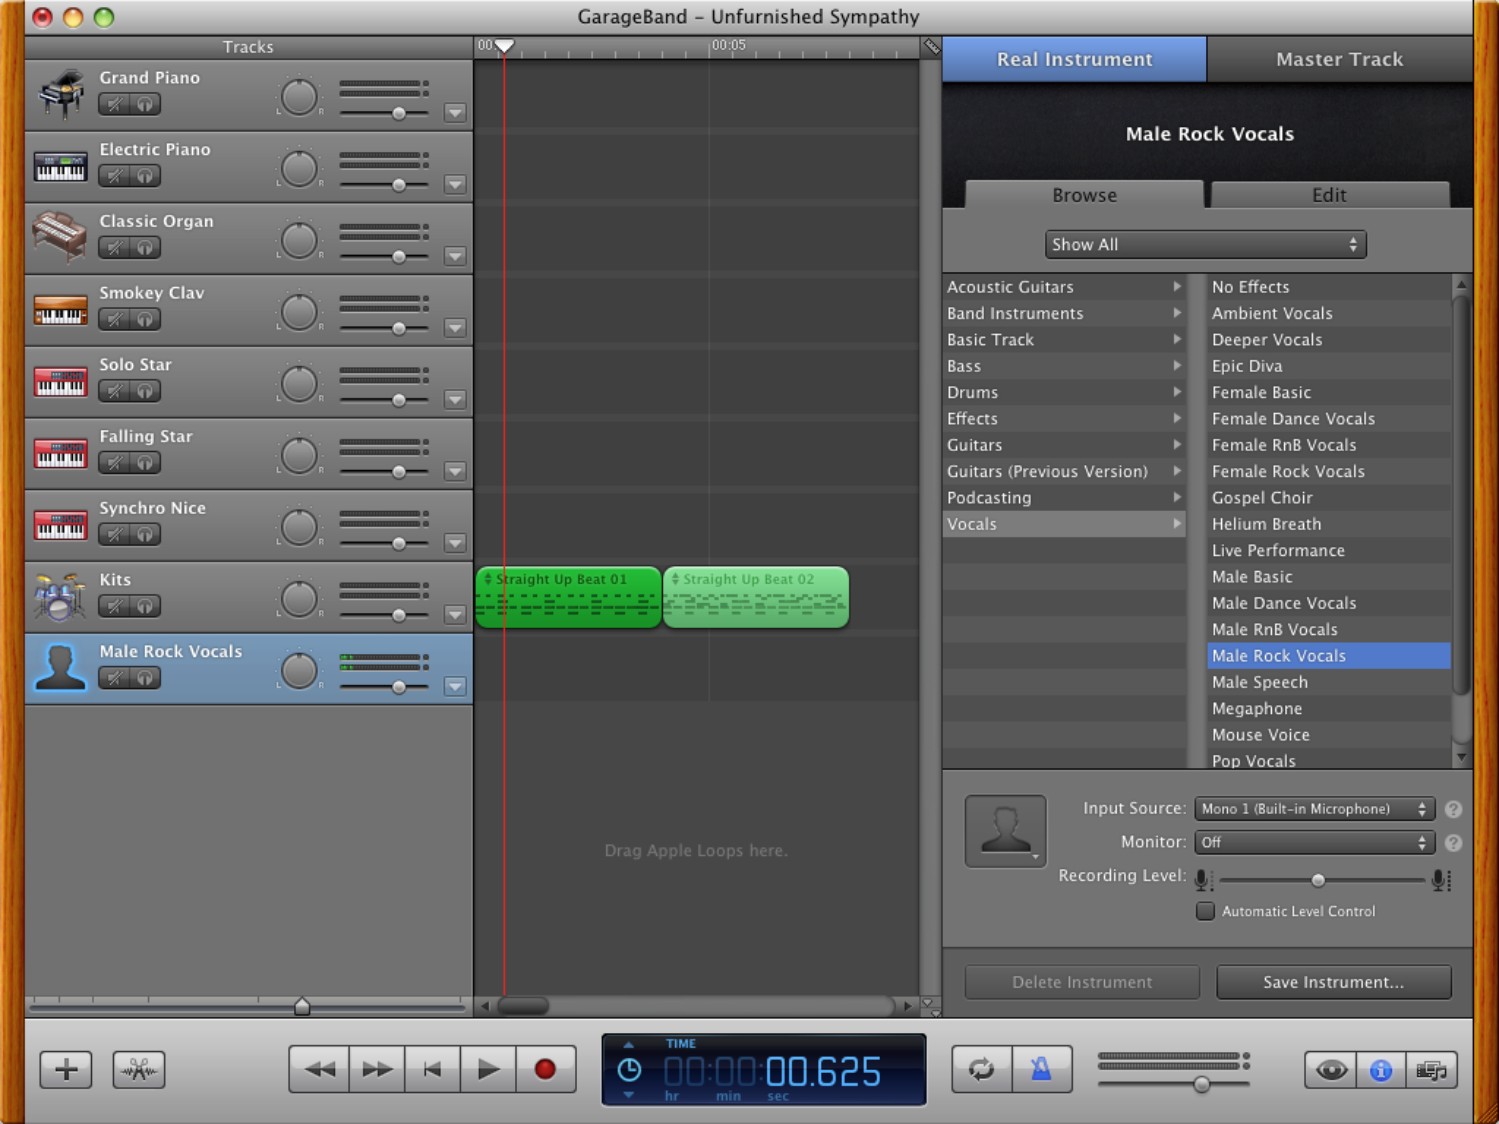
You use the Track Info pane to check and change the settings for a selected instrument track or for the master track (which controls the song as a whole). To display or hide the Track Info pane, click the Track Info button or press +I. Figure 7.8 shows the Track Info pane as it initially appears for a Real Instrument track, Male Rock Vocals. Click the Browse tab to choose among the different instruments that GarageBand provides, and select the input source and recording level for Real Instrument tracks.
You can increase the depth of the Track Editor so that it shows a wider range of notes by dragging upward the bar that divides it from the upper part of the window. The bar has a circular handle in the middle, but you can drag any part of the bar.
7.8 The Track Info pane appears on the right side of the GarageBand window.
You can click the Edit tab at the top of the Track Info pane to display the Edit tab (see Figure 7.9), which you use to set effects for the track.
The other GarageBand component that occupies the same part of the GarageBand window as the Loop Browser and the Track Info pane is the Media Browser. You use the Media Browser to add photos, audio clips, and movies to podcasts, so I leave this component until Chapter 11 (which covers creating podcasts).

7.9 Click the Edit tab of the Track Info pane when you need to set effects manually.
Connecting Your Audio Instruments
You can make great music in GarageBand by using its audio loops, but to get the most out of GarageBand you need to connect your own instruments.
Connecting a MIDI keyboard
The first essential is a MIDI keyboard. If you buy a MIDI keyboard that connects via USB (such as the M-Audio KeyStation models that the Apple Store sells), you connect the keyboard via a single USB cable and don’t even need to use a power supply because the keyboard gets power from the USB cable. Other MIDI keyboards connect to a MIDI controller, which you then connect to your Mac via USB.
When you connect a keyboard or other MIDI instrument, GarageBand lets you know instantly by displaying a dialog telling you that the number of MIDI inputs has changed and how many there now are. Figure 7.10 shows an example of this dialog.
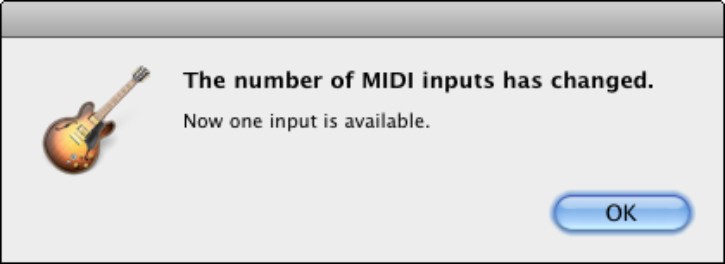
7.10 GarageBand tells you when the number of MIDI inputs changes — for example, when you connect a MIDI keyboard to your Mac.
If possible, connect your MIDI keyboard directly to a USB port on your Mac rather than to a USB hub connected to your Mac.
Connecting a microphone
To record live instruments such as drums, acoustic guitar, or vocals, you need to use one or more microphones. If your Mac has a built-in microphone, you can use that in a severe pinch, but for high-quality results you should use an external microphone that you can position exactly where you need it. Choose a microphone designed for recording music rather than a general-purpose microphone.
If you’re using a single microphone, you can connect it directly to your Mac’s audio input socket. To use two or more microphones, you need to use an audio interface, which is discussed next.
Connecting an audio interface
When you need to connect other instruments or audio equipment to your Mac so that you can direct their output into GarageBand as input, you need to use an audio interface — an electronic box that accepts the input from the instrument or audio kit, processes it as needed, and then passes it along to your Mac. You can get Mac-compatible audio interfaces that connect via either USB or FireWire; USB interfaces are usually easier.
When choosing an audio interface, figure out how many audio inputs you need, including high-impedance (for instruments) and lower-impedance (for lower-powered devices) inputs. Decide whether you need audio outputs (for example, for playback through an amplifier) as well as the USB output, and whether you need “phantom” power that will allow you to use a dynamic microphone.
For most audio interfaces, you need to install a driver to enable Mac OS X to recognize the interface. After you install the driver, you typically manage the audio interface either through a custom panel in System Preferences or via a custom application provided by the interface’s manufacturer. Figure 7.11 shows an example of a control panel in System Preferences.

7.11 Managing a USB audio interface via a custom control panel in System Preferences
Setting Preferences to Suitthe Way You Work
To enable yourself to work as fast and smoothly as possible in GarageBand, it’s a good idea to spend a few minutes setting the application’s preferences to suit the way you work. Even if you choose not to change the default settings at first, knowing which preferences you can change will be helpful when you find you do need to alter GarageBand’s behavior.
Start by pressing +, ( and the comma key) or choosing GarageBand→Preferences to open the Preferences window.
Setting General preferences
If GarageBand doesn’t display the General preferences (see Figure 7.12) at first, click the General button to display them.
• Cycle Recording. Select the Automatically merge Software Instrument recordings when using the cycle region check box when you want to loop through a section of a Software Instrument track and add what you play to what’s already there. This technique is useful for creating complex parts. For example, when recording a drum beat, you can play the bass drum on the first pass, add the snare drum on the second pass, add the hi-hat and cymbals on the third pass, and have all of them merged into a single track. The alternative is to have GarageBand record each pass through the region as a separate take; you can then select the take you want to keep.

7.12 GarageBand’s General preferences let you choose whether to use cycle recording and whether to create an audio preview of your projects.
• Audio Preview. Select the Render an audio preview when saving check box if you want GarageBand to create a preview that you can listen to from the other iLife applications or from the Finder. Creating this preview is usually a good idea, but it means that each time you close a project in GarageBand, saving the file takes a little longer because of creating the preview. Saving an audio preview increases the project’s file size as well, but the difference is negligible given how useful the preview is.
• Reset Warnings. Click this button to reset GarageBand’s warning messages to their default settings. Normally, you won’t want to do this because it causes all the warning dialogs you’ve suppressed to start springing out of the woodwork again.
If you don’t select the Render an audio preview when saving check box in General preferences, GarageBand prompts you to decide whether to create a preview until you tell it to stop prompting you. So normally it’s best to select the check box.
Setting Audio/MIDI preferences
Next, click the Audio/MIDI tab to display the Audio/MIDI preferences (see Figure 7.13), and then choose settings:
• Audio Output. In this pop-up menu, choose where you want to direct GarageBand’s output. Select System Setting to use the output selected on the Output tab in Mac OS X’s Sound preferences in System Preferences. Select Built-in Audio or Built-in Output (depending on your Mac) to use your Mac’s speakers or output jack. If you have connected an audio interface, you can select it from this pop-up menu to send the audio to the interface (and then to whichever amplifier or speakers you’ve connected to it).
• Audio Input. In this pop-up menu, choose which audio input GarageBand should use. Select System Setting to use the input selected on the Input tab in Mac OS X’s Sound preferences in System Preferences. Select Built-in Microphone to use your Mac’s built-in microphone, or Built-in Audio to use the input jack. If you have connected an audio interface, select it from this pop-up menu.

7.13 In Audio/MIDI preferences, choose your Mac’s inputs and outputs, decide how to optimize GarageBand’s playback, and set the keyboard sensitivity.
• MIDI Status. This readout shows how many MIDI devices GarageBand has detected. You can’t change it directly, only by plugging in or unplugging MIDI devices. Use this readout to make sure GarageBand is aware of all the MIDI devices you’re using.
• Keyboard Sensitivity. Drag the slider to choose how sensitive GarageBand should treat your keyboard as being. Finding the best setting for yourself depends on the keyboard and your playing style, so you’ll probably need to experiment with this setting. Start with the slider at the Neutral position (in the middle), and then drag toward the Less end or the More end as needed.
Setting Loops preferences
Now click the Loops tab to display the Loops preferences (see Figure 7.14), and then choose settings for working with loops:
• Keyword Browsing. Select the Filter for more relevant results check box if you want to return only search results that are within two semitones of the song key you’re using. This setting is useful when you’ve installed many loops and need to narrow your search results.

7.14 In Loops preferences, choose how to browse loops, whether to convert Software Instruments to Real Instruments when you add them to the Timeline, and whether to share your loops.
• Keyword Layout. Click Reset to reset the keyword layout to its default after you customize it.
• Adding Loops to Timeline. Select the Convert to Real Instrument check box if you want GarageBand to automatically convert Software Instrument loops to Real Instrument loops when you add them to the Timeline. Real Instrument loops take less processor power to play than Software Instrument loops, so converting Software Instrument loops to Real Instrument loops can be a good move if your Mac is struggling to play a song. You can override this setting by Option+dragging a loop to the Timeline.
• My Apple Loops. Select the Available to Your Username Only option button if you want to keep your selection of Apple loops to yourself. Select the Share with all users on this Mac option button if you want to share the loops with others. Two things to note here: First, this setting applies only to extra loops you add, not to GarageBand’s main set of loops (which are available to all users of your Mac). Second, only administrator users can make this choice; standard users can’t.
• Loop Browser. Select the Display original tempo and key check box if you want the Loop Browser to display the Tempo column and the Key column, showing these two pieces of information about each loop. Give this option a try to see if you find it useful; many people do, but others prefer to keep the Loop Browser stripped down to the essentials.
Setting Advanced preferences
Click the Advanced tab to display the Advanced preferences (see Figure 7.15), and then choose settings that suit you:
• Auto Normalize. Select the Export projects at full loudness check box if you want GarageBand to automatically adjust the volume on projects you export. Unlike the normalization in iTunes that tends to wreck the dynamic range of songs, GarageBand’s normalization is usually a good idea because it enables you to export songs at around a standard volume even if you’ve mixed them at a lower volume.
• Audio Resolution. In this pop-up menu, select Good, Better, or Best, as appropriate. Good resolution records and exports at standard CD audio quality (16-bit), which is enough for any projects you plan to put on CD. Better resolution records at 24-bit quality and exports at 16-bit, allowing you to keep higher-quality versions in GarageBand than you’re outputting. Best resolution both records and exports at 24-bit quality; use this for songs you’ll distribute at higher quality than CDs.
The disadvantage to using Better or Best audio resolution is that your GarageBand files take up one-and-a-half times as much space because the quality is higher.
• Movie Thumbnail Resolution. For your movie and podcast projects, select the Low option button or the High option button to control the resolution of the movie thumbnail image that GarageBand creates. High-resolution thumbnails make your files larger.
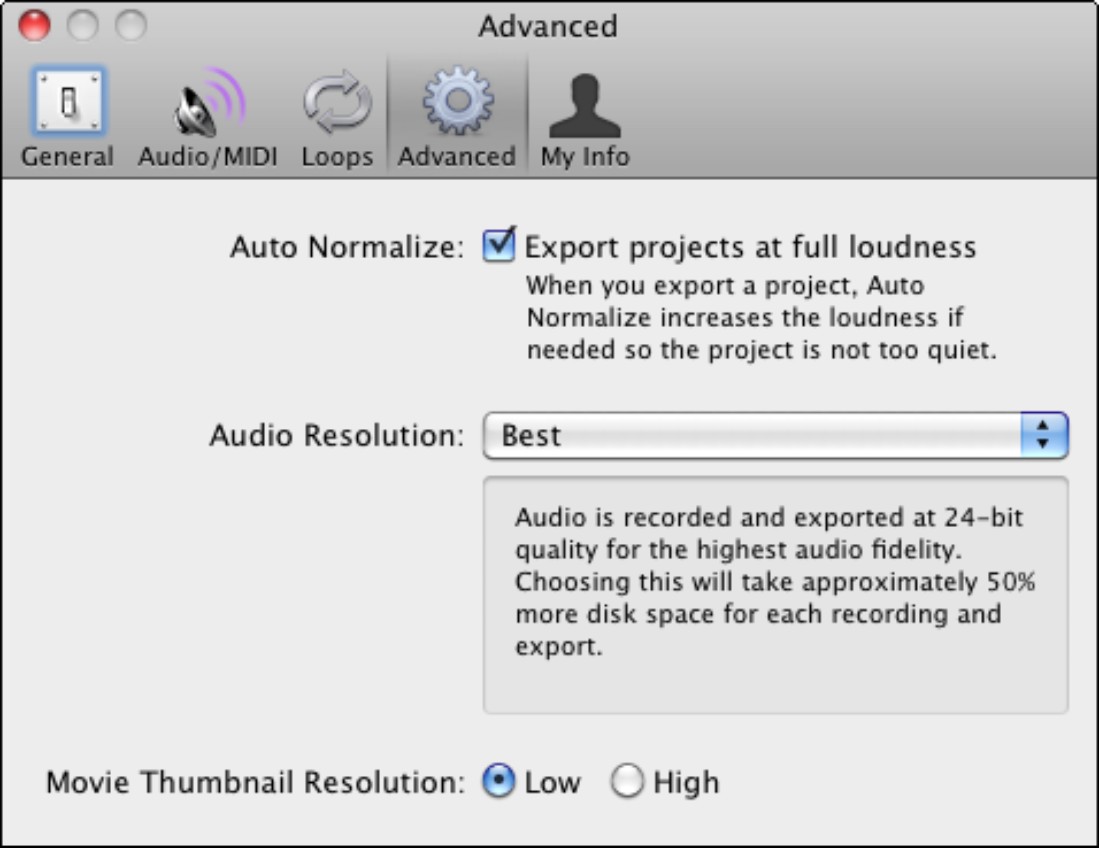
7.15 Advanced preferences let you normalize projects automatically and choose resolution for audio and for movie thumbnails.
Setting My Info preferences
Finally for the preferences, click the My Info tab (see Figure 7.16) and set the information you want to use to tag your songs and podcasts in iTunes:
• iTunes Playlist. This setting tells iTunes which playlist to place your songs in. If the playlist doesn’t exist yet, iTunes creates it when you export the first song from GarageBand.
• Artist Name. This setting tells iTunes which artist name to assign to the song.

7.16 In the My Info preferences, provide the information for tagging your songs and podcasts in iTunes.
• Composer Name. This setting tells iTunes what to write in the Composer tag.
• Album Name. This setting controls the album name that iTunes applies.
Kick-Starting a Song with Magic GarageBand
Have you ever needed to put together a backing track in a minute so that you can play along and develop an idea you’ve had on the guitar or piano?
If so, you can use Magic GarageBand to quickly create a custom backing track from generic ingredients. The “magic” part is that GarageBand automatically picks sequences of instrumental loops that work together, quickly creating a viable custom backing track for the combination of instruments and musical genres you choose.
Here’s how to get started with Magic GarageBand:
1. Press +N or choose File →New to display the GarageBand opening screen. If you have a project open that contains unsaved changes, GarageBand prompts you to save them.
2. Click the Magic GarageBand button in the left panel to display the Magic GarageBand music choices.
3. Click the icon for the music genre you want to create: Blues, Rock, Jazz, Country, Reggae, Funk, Latin, Roots Rock, or Slow Blues. To preview the type of music, move the mouse pointer over an icon and click the Play icon on the Preview button that appears; click the Stop icon (which replaces the Play icon) to stop the preview.
4. Click the Create button. GarageBand displays the Magic GarageBand screen and loads a standard set of instruments for the musical genre you chose. Figure 7.17 shows the selection you get for Rock.
5. Choose your instrument from the My Instrument pop-up menu on the left. You can choose Keyboard, Line In, or a microphone. From the same menu, you can turn the monitor on (so that you hear the instrument through GarageBand) or off (so that you hear the instrument only through your other audio equipment).
In the lower part of the My Instrument pop-up menu, the Monitor On item automatically applies feedback protection to the monitoring to help you avoid creating a feedback loop to rival The Who in their prime. The Monitor On (no feedback protection) item removes the feedback protection; use this setting with care.

7.17 Magic GarageBand loads a standard set of instruments for music of the genre you choose.
6. Tune your instrument (or your voice). Click the tuning-fork icon to the right of the My Instrument pop-up menu, and then use the controls that appear to make sure GarageBand agrees the note you’re playing or singing is what you intend. Click the icon again when you finish tuning.
7. Click the icon for the subtype of instrument you’re using. For example, for Keyboard, choose Grand Piano, Electric Piano, or Arena Run. You can also click the Customize button to display a window containing a wider selection of choices (see Figure 7.18); click the instrument you want, and then click Done.
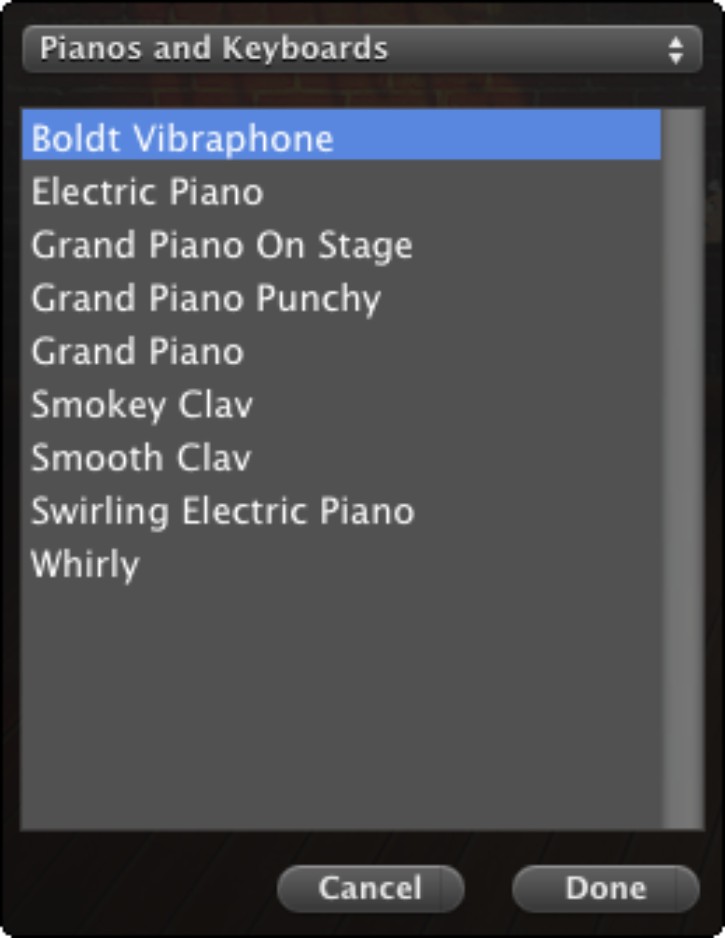
7.18 Use this dialog to select from a wider range of instruments than appear in the main Magic GarageBand window.
8. Decide whether to create a snippet or an entire song by moving the switch on the bottom of the window frame to Snippet or Entire Song. Entire Song usually gives better results because you can hear more of the music. If you choose Snippet, click the section of the song in the gray bar: Intro, Verse 1, Chorus, Verse 2, or Ending.
From here, you pick a sound for each instrument you want to include, and knock out any instruments you don’t need. Exactly how you proceed depends on the genre of music you’re creating, your musical skills, and what kind of music you like. But here’s an example of setting up a rock backing track to which you will add a lead guitar line.
You can simply start the music playing by clicking the Play button and working from there, but many people find it easier to start with a single instrument as described in this example.
1. Silence all the instruments except the one you want to start with. Click each instrument to display its name, click the disclosure triangle to the left of the name to display a set of controls, and then click the Mute button on the left (see Figure 7.19).

7.19 It’s usually easiest to start by silencing most of the instruments so that you can gradually build up the sound you want. You can play along on your instrument to help choose the right backing tracks.
Instead of silencing an instrument, you can get rid of it. Click the instrument, and then click the No Instrument button on the toolbar. The instrument disappears, leaving an empty spotlight on the boards as its placeholder.
2. When you’ve silenced all the instruments except the one you want to start with, click the Play button, and then click the toolbar button for the style you want. Drag the instrument’s volume control if you need to increase or decrease the volume.
3. Click the instrument you want to add next, turn off its muting, and then click the toolbar button for the style.
4. Repeat Step 3 as needed to add each other instrument you want to the song and choose the style you want it to play. To focus on one instrument, you can click its Solo button (the button that shows a pair of headphones).
5. When you’re satisfied with your choices, click Open in GarageBand to create the project. Magic GarageBand pulls together the files, and then displays the song in the GarageBand window. Figure 7.20 shows an example.

7.20 When your song appears in the main GarageBand window, you can customize it manually to get exactly the structure and sound you’re looking for.
You can change an instrument’s style at any point by clicking the instrument, and then clicking the style you want.
To switch to another genre, you can click Change Genre at any time.
From here, you can adjust the song as needed. For example
• Rename it. Magic GarageBand gives the song a generic name based on the genre. To rename it, choose File→Save As.
• Customize your instrument. Double-click the track header for your instrument to open the Track Info pane, click the Edit tab, and then pick your preferred settings.
• Change some of the loops. If you find that a particular section doesn’t fit the song you’re trying to create, you can change it or simply delete it. See Chapter 8 for details.
• Add other tracks as needed. See Chapter 8 for details.
Improving Your Instrument Playing with GarageBand
One of GarageBand’s most exciting features is Learn to Play, which gives you lessons in instruments such as piano and guitar right through GarageBand. GarageBand includes the first couple of basic lessons, and you can download further basic lessons for free from the Lesson Store. The Lesson Store also sells artist lessons, in which artists give you a walkthrough of how to play a particular song.
Getting started with Learn to Play
To get started with Learn to Play, simply choose File→New (or press +N), and then click the Learn to Play button on the left of the opening GarageBand screen. Click the lesson you want, and then click Choose. GarageBand opens the lesson full screen (see Figure 7.21) and starts teaching you.
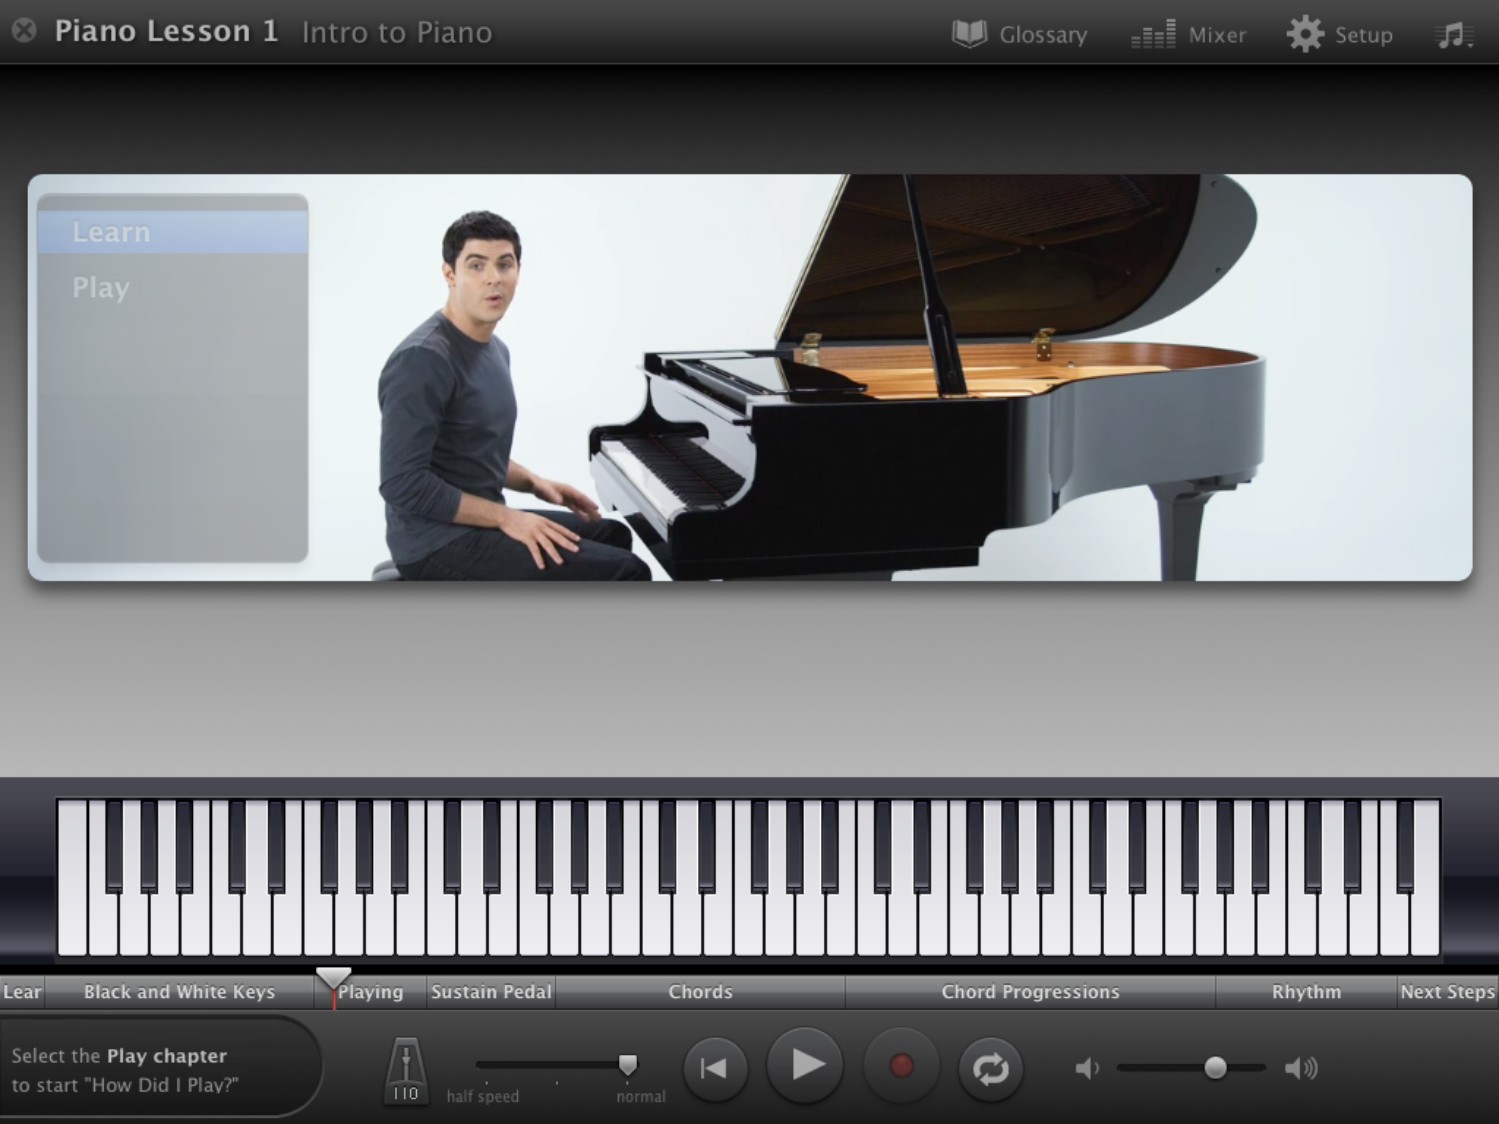
7.21 GarageBand’s Learn to Play feature helps you get up to speed on piano or guitar — and even teaches you how to play popular songs.
Practicing with the How Did I Play? feature
To play along and have GarageBand track your progress with its How Did I Play? feature, move the mouse pointer over the left end of the instruction area, and then click Play on the pop-up panel that appears. GarageBand switches to Play mode. Click the Record button to start recording your playback. GarageBand automatically tracks your results, showing the notes you hit correctly in green and the notes you get wrong in red (see Figure 7.22).
Click the History button to display a screen showing a history of your progress. Click the Done button when you’re ready to resume practice.
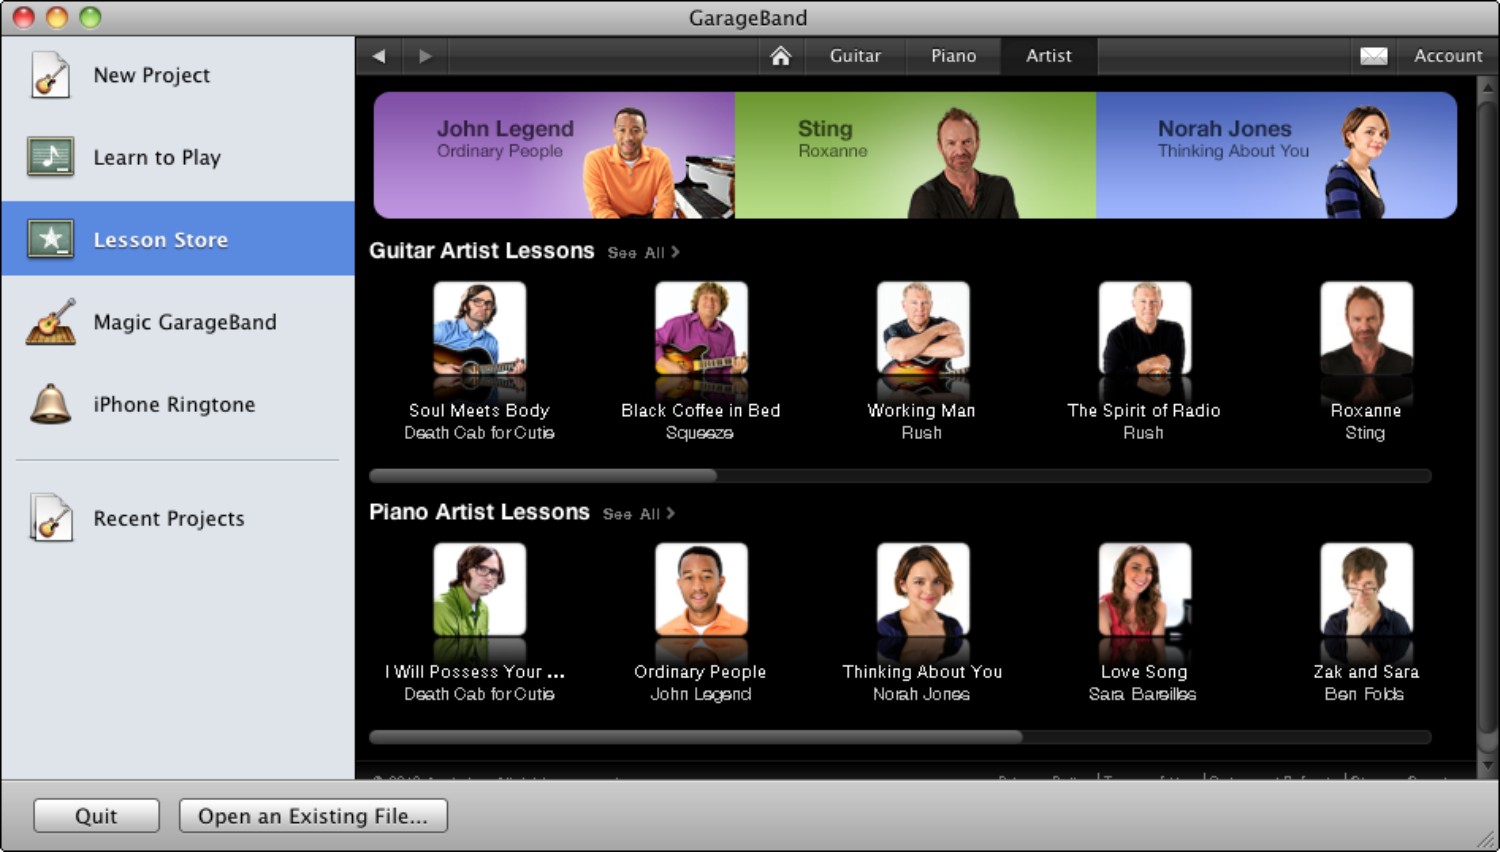
Getting more lessons for Learn to Play
To get more lessons for Learn to Play, choose File→New (or press +N), and then click the Lesson Store button on the left of the opening GarageBand screen. Click the Guitar tab to find guitar lessons, the Piano tab to find piano lessons, or the Artist tab to find lessons by particular artists (see Figure 7.23).

7.22 The How Did I Play? feature scores the notes you play against those you should be playing, enabling you to keep track of your progress.
7.23 The Lesson Store provides guitar lessons and piano lessons by popular artists.