Chapter 8: How Do I Record a Song in GarageBand?
With your music studio set up on your Mac as described in Chapter 7, you’re ready to record an original song. If you want to begin by assembling tracks from loops, start at the beginning; if you want to start using the Arrangement Track to structure your song, or if you’re ready to record either Software Instrument or Real Instrument tracks, jump straight into the middle of the chapter. And if you’ve wondered how to create your own custom Software Instruments or jot down the lyrics in a song project, go to the end of the chapter to find out.
Creating a New Track
Browsing and Auditioning Loops
Working with the Arrangement Track
Changing the Song’s Tempo, Signature, and Key
Recording Software Instruments and Real Instruments
Creating Custom Software Instruments
Keeping Notes with GarageBand’s Notepad
Creating a New Track
If you’ve come straight from Chapter 7 and already have GarageBand running with a music project open — either a new project from exploring GarageBand or a project you’ve kick-started using Magic GarageBand — you’re ready to start. Otherwise, start a new project like this:
1. Launch GarageBand from the Dock or from the Applications folder.
2. If GarageBand opens the previous project you were working on, choose File→New to close it and display the GarageBand opening screen.
3. In the left column, click the New Project button.
4. Click the instrument or instrument collection you want to use. For example, click Piano.
5. Click Choose. GarageBand displays the New Project from Template dialog.
6. Type the song name; choose the tempo, signature, and key; click Create.
This chapter starts off with a new project that uses the default settings from the New Project from Template dialog: 4 / 4 time signature at 120 beats per minute and the C major key.
When you start most new projects, GarageBand gives you a single track for the instrument you chose. For example, if you choose Piano in the New Project from Template dialog, GarageBand gives you a Grand Piano track to start off with. For other projects, such as Keyboard Collection, GarageBand starts you off with multiple tracks.
To pick a different type of instrument, double-click the track header to open the Track Info pane with the Browse tab selected. You can then change the instrument to another Software Instrument, as described later in this chapter.
 To get rid of a track, click its header and press
  +Delete or choose Track→Delete Track.
Beginning to add a track
Here’s how to add a new track to your music project and choose the instrument for it:
1. Click the New Track button in the lower-left corner of the GarageBand window, or choose Track→New Track, or simply press +Option+N. GarageBand displays the dialog shown in Figure 8.1, prompting you to choose between a Software Instrument track, a Real Instrument track, or an Electric Guitar track.
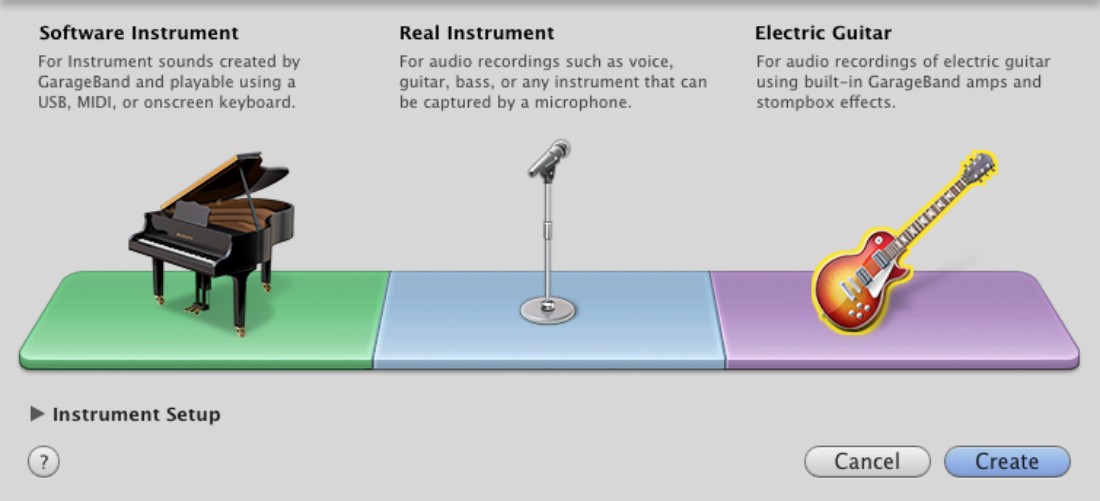
8.1 The first step in adding a new track is to choose a Software Instrument track, a Real Instrument track, or an Electric Guitar track.
2. Click the track type you want to add:
• Software Instrument. Click this button if you want to add a track consisting either of Software Instrument loops or of a Software Instrument that you play using either one of GarageBand’s on-screen keyboards (see Chapter 7 for details) or an external musical keyboard you connect via USB.
• Real Instrument. Click this button to add a track that you use either to play Real Instrument loops or to record a real instrument such as an electric guitar or bass, a vocal track, or any other track that uses an external microphone (for example, a piano, an acoustic guitar, or a woodwind instrument).
• Electric Guitar. Click this button to add a track specifically for electric guitar. This option enables you to use GarageBand’s built-in amplifiers and stompbox effects.
 GarageBand can’t actually tell which instrument you’ve plugged in, so you can put other instruments through an Electric Guitar track if you want to use its effects on them.
3. If you want to change the instrument’s setup, click the Instrument Setup disclosure triangle to reveal the hidden part of the dialog (see Figure 8.2), and then choose settings:
• My instrument is connected with. In the upper pop-up menu, select the means of connection — System Setting (using the setting in System Preferences’s Sounds pane), Built-in Input, Built-in Microphone, or an external audio interface you’ve connected. In the lower pop-up menu, select Mono 1 for a mono input on channel 1, Mono 2 for a mono input on channel 2, or Stereo 1/2 for a stereo input using both channels.
For a Software Instrument track, only the I hear sound from pop-up menu is available in the extra section of the dialog for adding a track.

8.2 Open the lower part of the dialog if you need to specify the way the instrument is connected
• I hear sound from. In this pop-up menu, choose the audio output you’re using — System Setting (using the setting in System Preferences’s Sounds pane), Built-in Output, or an external audio interface you’ve connected.
• I want to hear my Instrument as I play and record. Select this check box if you want GarageBand to play the instrument’s sound back through whichever output you’ve chosen in the I hear sound from pop-up menu. Usually, you’ll want to select this check box unless you’re listening to the instrument using a means that bypasses GarageBand — for example, headphones plugged into an external audio interface.
4. Click Create. GarageBand adds the track and displays the Track Info pane. You can now choose settings for the Software Instrument track (as discussed in the next section), the Real Instrument track, or the Guitar Track.
Setting up a Software Instrument track
Use the Track Info pane (see Figure 8.3) to set up a Software Instrument track like this:
1. In the left column, click the instrument category you want — for example, Drum Kits. The list of available instruments (or kits, for drums) appears in the right column.

8.3 Choose the instrument category and the specific instrument for a Software Instrument track on the Browse tab of the Track Info pane.
2. In the right column, click the instrument you want — for example, Rock Kit. GarageBand applies the instrument. If an instrument is grayed out, you may need to install extra GarageBand files from your iLife install DVD or from Software Update.
3. Test the instrument’s sound by playing your keyboard. Use either the Onscreen Keyboard, the Musical Typing keyboard, or your external musical keyboard. If you don’t like the sounds, you can either choose another instrument by repeating Steps 2 and 3, or change its sound as described later in this chapter.
4. If you want to change the icon for the instrument, click the instrument icon near the bottom of the Track Info pane, and then choose an icon on the pop-up panel.
5. Click the Track Info button if you’re ready to hide the Track Info pane again. (If you have enough screen space, you can leave the Track Info pane open if you prefer.)
>You can change an instrument’s icon just to get an icon you like, but changing the icon is more useful when you use multiple tracks of the same type and need to distinguish them easily. You can also change a track’s name by clicking the name in the track header, typing a new name, and then pressing Return.
Setting up a Real Instrument track
Here’s how to set up a Real Instrument track in the Track Info pane (shown in Figure 8.4):
1. If you will play an instrument through this track instead of playing loops, connect the instrument, as described in Chapter 7. If the instrument is already connected, you’re set.

8.4 On the Browse tab of the Track Info pane for a Real Instrument, choose the instrument type, the effect you want, and the input source and recording level if you’re using an instrument rather than loops.
2. In the left column, click the category of loop or instrument you will play through this track — for example, Bass. The list of available effects appears in the right column.
3. In the right column, click the effect you want to apply to the instrument — for example, Edgy Rock Bass for a bass.
4. For a musical instrument or microphone, make sure the Input Source pop-up menu shows the source you want. This is the setting you chose when adding the track; you can change it here if necessary (for example, if you plug your guitar into a different input).
5. For a musical instrument or microphone, you can use the Monitor pop-up menu to change the monitoring of the input. Select Off, On, or On (no feedback protection), as needed; the On setting has feedback protection. If you’re planning to use this Real Instrument track only for GarageBand’s Real Instrument loops, make sure the Monitor pop-up menu is set to Off.
Turn GarageBand’s monitor off if you put the musical instrument through an audio interface that lets you monitor it outside the Mac. For example, if your audio interface can drive an amplifier, you can monitor the instrument through the amplifier rather than through GarageBand.
6. For a musical instrument or microphone, drag the Recording Level slider to set the recording level. Select the Automatic Level Control check box if you want GarageBand to set the level for you. If these settings aren’t available, you’ll need to control the input volume manually on your audio interface.
7. Click the Track Info button if you’re ready to hide the Track Info pane again.
 Avoid using GarageBand’s Automatic Level Control if possible. GarageBand doesn’t know how loud you’re going to play, so it will need to adjust the level as the input volume changes. You’ll get much better results by setting the Recording Level control manually to a level that allows your loudest playing without distortion but that doesn’t adjust automatically for quieter passages.
Setting up an Electric Guitar track
Here’s how to set up an Electric Guitar track in the Guitar Track pane:
1. If you haven’t already connected the guitar, connect it as described in Chapter 7.
2. In the pop-up menu at the top of the pane, choose the sound on which you want to base this guitar track. For example, choose Classic Crunch, Seventies Metal, or Woodstock Fuzz. GarageBand displays an amplifier with the effects pedals used for the sound. Figure 8.5 shows an example.
3. To switch to a different amplifier, move the mouse pointer over the amplifier, and then click either the Previous button or the Next button that GarageBand displays. GarageBand changes the amplifier. Test the setting, and decide whether to change it again.
4. To change one of the existing settings, click the effects pedal you want to change, and then use your mouse to change the knobs, switches, and other controls.
5. To change the pedals used for the sound, click the Edit button to the right of the pop-up menu that shows the sound’s name. The Guitar Track pane shows the selection of available pedals (see Figure 8.6). Drag a pedal up to a space on the stage to add it, or drag a pedal down off the stage to remove it. Click Done when you finish.

8.5 In the Guitar Track pane, choose the basic sound, and then customize it as needed while you play.

8.6 You can add or remove effects pedals to produce exactly the sound you want.
To swap the positions of two of the pedals you’re using, drag one from its current position to the other pedal’s position. GarageBand swaps the pedals for you.
6. If you’ve customized the sound, save the changes. Click Save Setting, type a name for the new sound in the Save Instrument dialog, and then click Save. You can then reapply your sound quickly by choosing it from the My Settings section at the bottom of the pop-up menu.
7. Click the Track Info button if you’re ready to hide the Track Info pane again.
Browsing and Auditioning Loops
The quick way to build a track is by using GarageBand’s prerecorded loops of music. These loops, which are called Apple Loops, contain chunks of music that you can assemble into the order you want to create a track. GarageBand lets you change the tempo and pitch of loops, so you can make them sound substantially different to suit the needs of a song.
To work with loops, you use the loop browser, which lets you audition loops, add them to your song, and view their original tempo, key, and duration.
Start by opening the loop browser in one of these ways:
• Click the loop browser button.
• Press +L.
• Choose Control→Show loop browser.
Figure 8.7 shows the loop browser in its normal view with the Guitars button clicked. The icons that appear in green indicate Software Instrument loops and work only in Software Instrument tracks. The icons that appear in blue indicate Real Instrument loops and work only in Real Instrument tracks.
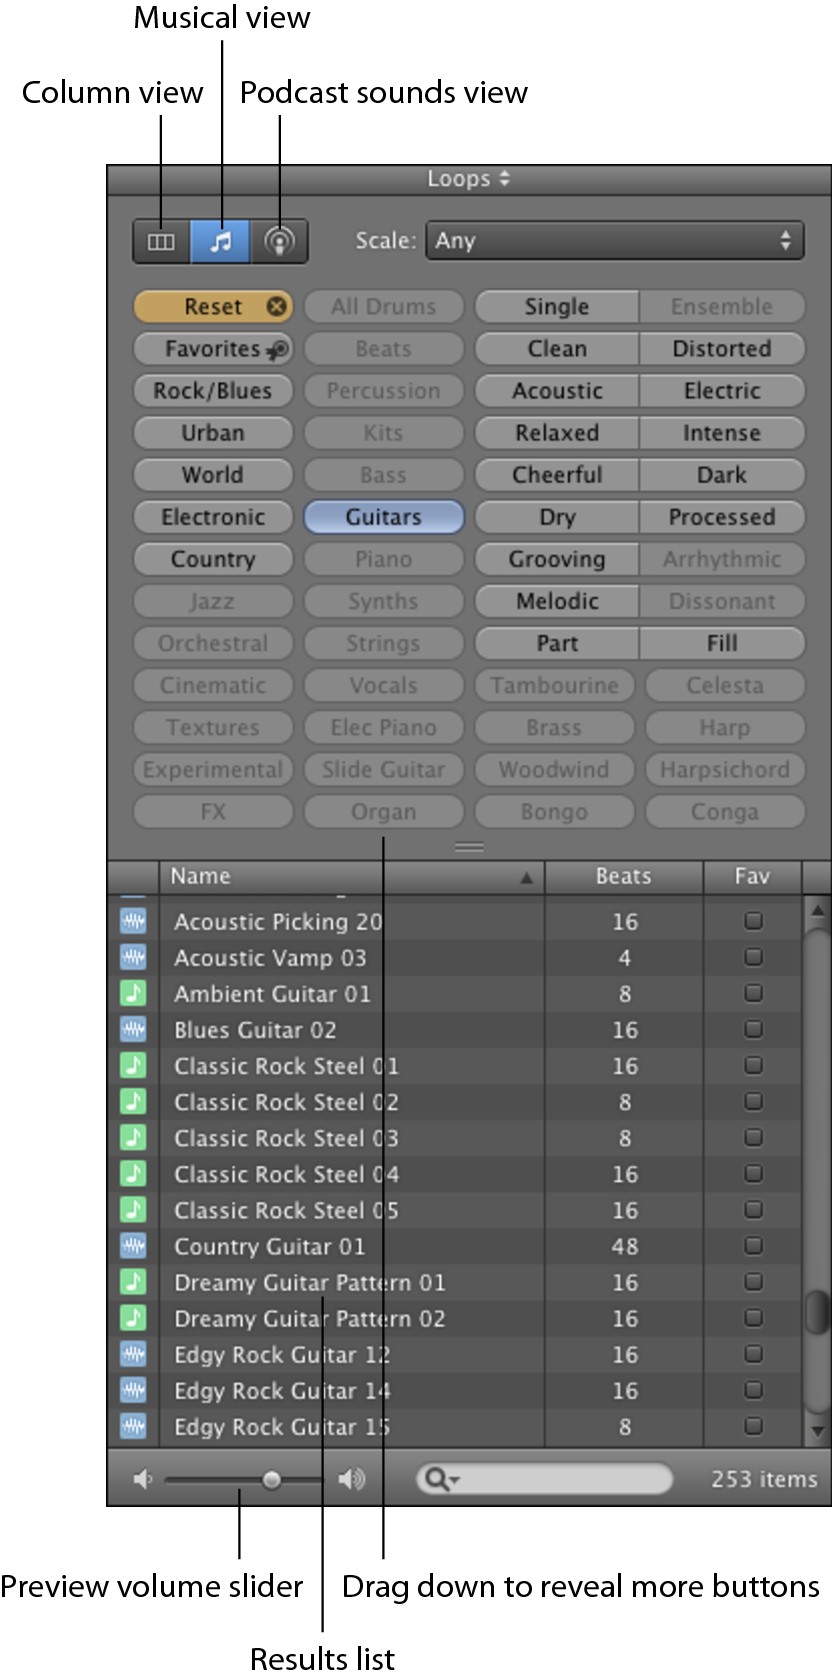
8.7 The loop browser open in Musical Button view.
Choosing a view and finding loops
You can find loops in three easy ways in the loop browser:
• Musical Button view. Click a button to display the list of loops tagged with that keyword — for example, Guitars. Click another button to narrow the selection further.
• Column view. Click the keyword type in the first column, click the category in the second column, and then click the keyword in the third column (see Figure 8.8). The results then appear in the results list.
• Searching and sorting. To search, click in the Search box, type one or more keywords, and then press Return. To sort the loops you find, click a column heading.
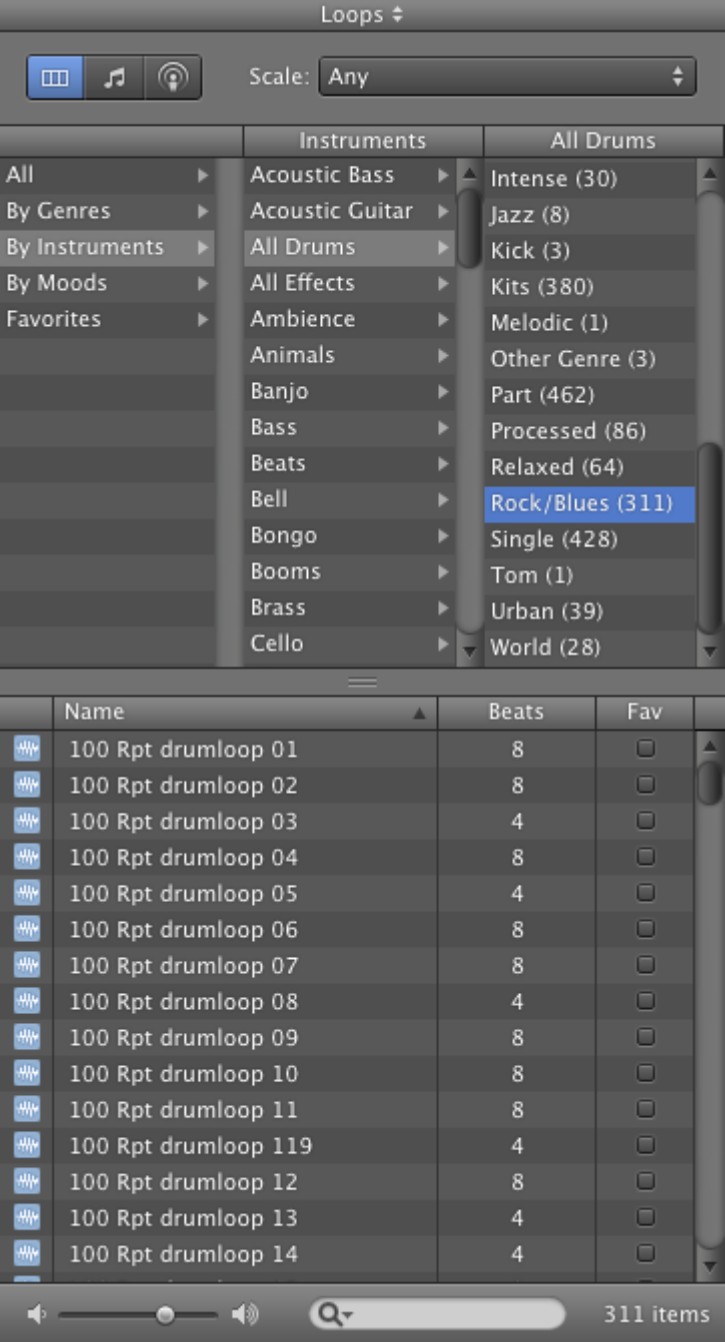
8.8 Column view enables you to browse the loops by genres, instruments, moods, or favorites.
You can swap the positions of any two buttons in Musical Button view by clicking a button, dragging it onto another button, and dropping it there. You can also change a button by Control+clicking or right-clicking it and choosing the item you want it to bear.
The loop browser also has Podcast Sounds view, which shows only jingles, stingers, sound effects, and favorites. See Chapter 11 for coverage of Podcast Sounds view.
Auditioning a loop by itself
To audition a loop by itself, click it in the list in the loop browser. GarageBand starts playing the loop repeatedly until you stop it by clicking again, by clicking another loop to start that loop playing, or by dropping the loop on a track in the song (as discussed next).
When you audition a loop and find you like it, select its check box in the Fav (Favorites) column. You can then find it quickly by clicking the instrument type (for example, Bass) and then clicking the Fav column heading to bring your favorites to the top. In Column view, you can click Favorites in the first column to browse by favorites.
Adding a loop to your song
When you find a loop you want to use in your song, drag the loop from the Results List to the Track List:
• To use an existing track, drop the loop on that track. GarageBand displays a black vertical bar that shows the bar at which you place the loop’s start (see Figure 8.9). If you need to change the settings for the track, double-click its header and work in the Track Info pane, as described earlier in this chapter.

8.9 When you add a loop to an existing track, the black vertical bar shows where the loop’s region will begin.
• To create a new track, drop the loop below the last track you used in the Track List. GarageBand automatically creates a new track of the right type (Software Instrument or Real Instrument) for the loop you dropped.
When you add a loop like this, GarageBand creates a region containing the loop. The region is a copy of the loop that you can adjust without changing the original version of the loop.
If the region ends up in the wrong track bar, click it and drag it to where you want it.
Playing back the song
When you place one or more loops in your song, listen to it so that you can judge how the loops work together.
1. Move the playhead to where you want to start playback. For example, click the Go to Beginning button in the transport controls (see Figure 8.10) to move the playhead to the beginning of the song.
2. Click the Play button to start playback.
3. Click the Play button again when you want to stop playback.

8.10 Use the transport controls to play back the song.
Repeating, shortening, and extending regions
Next, adjust the duration of the region as needed for your song:
• Repeat the region. To make the region play back more than once, position the mouse pointer over the upper part of the region’s right border so that the pointer changes to a curling arrow. Drag the border to the right as far as you want the region to repeat. GarageBand shows a notch at the end of each full repetition (see Figure 8.11), so you can easily end the region right at the end of a repetition if you need to.

8.11 Drag the upper part of a region’s right border to the right to repeat the region. The notches at the top and bottom indicate complete repetitions of the loop.
• Shorten a region. To play only part of the region, position the mouse pointer over the lower part of the region’s right border so that the pointer changes to a bracket with two arrows. Drag to the left to shorten the region (see Figure 8.12).

8.12 Drag the lower part of a region’s right border to the left to shorten the region.
You can’t shorten a region that you’ve repeated. Instead, reduce the length of the last repetition by dragging to the left with the curling arrow.
You can also extend a Software Instrument region by dragging the lower part of its right border to the right. Extending the region is different from looping it because you add empty air to the end of the region. This sounds pointless, but it lets you join two regions together, as described next. You can’t extend a Real Instrument region.
Joining two or more regions into a single region
After you adjust two or more regions so that they play just right in sequence, you can join them together so that you can repeat the sequence more easily in another part of the song.
Here’s how to join adjacent regions:
1. Select the regions you want to join. Click the first region, and then Shift+click each other region in turn.
2. Choose Edit→Join or press +J. GarageBand joins the regions together and gives the joined region the name that the first region had.
Splitting a region in two
Other times, you may need to split a region into two parts. Splitting is especially useful with regions you record and then find you want to use in separate parts, but you can also split GarageBand’s prerecorded regions if you want. Follow these steps:
1. Position the playhead where you want to split the region.
2. Click the region you want to split.
3. Choose Edit→Split or press +T. GarageBand splits the region and gives each new region the same name.
4. Rename the regions to indicate the change. This step is optional, but if you don’t rename the regions, it’s easy to get confused by their having the same name but different contents.
Auditioning a loop with your song
Auditioning a loop by itself lets you focus on how it sounds, but often you’ll be able to judge its suitability better by listening to how it sounds with the rest of your song so far. You can do this easily:
1. Move the playhead to just before the part of the song where you want to try out the loop.
2. Click the Play button to start playback.
3. When playback reaches the bar before where you want to hear the loop, click the loop in the results list. GarageBand starts playing the loop when the new bar begins.
4. Drag the Preview Volume slider as needed to change the loop’s volume. For example, you may need to increase its volume so that you can hear it more clearly over the other tracks.
Auditioning multiple loops with the cycle region
If you need to audition several loops, turn on the cycle region so that GarageBand repeatedly plays back the part of the song you want to hear. Follow these steps:
1. Click the Cycle Region button (the button with two gray arrows to the right of the time display) to turn on the cycle region. GarageBand changes the arrows to blue and displays a golden bar below the Timeline indicating the extent of the cycle region.
2. To change the region, position the mouse pointer over the start or finish, and then drag the region to where you want it (see Figure 8.13).

8.13 Drag either end of the yellow cycle region to tell GarageBand which part of the song to repeat.
3. Move the playhead to where you want to start play, and then click the Play button. GarageBand starts playing the cycle region and loops back to the start when it reaches the end.
When you turn on the cycle region, clicking the Go to Beginning button in the transport controls moves the playhead to the beginning of the cycle region rather than the beginning of the song.
4. Click the first loop you want to play. When you’re ready to start the next loop, click it. Click the Play button when you want to stop playback.
Switching to another loop in the same family
Two arrows that appear in the upper-left corner of the loop’s region means the loop is part of a family of loops, a group of loops that are related to each other.
You can switch quickly to another loop in the same family by clicking the arrows and then choosing the loop from the pop-up menu (see Figure 8.14).
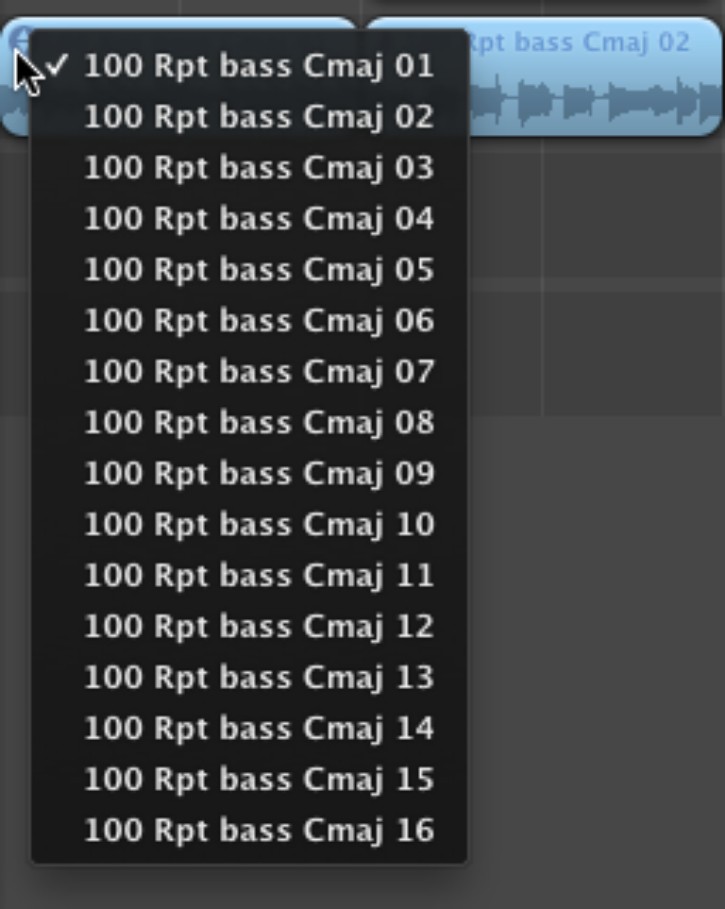
8.14 Click the pair of arrows in the upper-left corner of a loop to switch quickly to a related loop.
Switching loops like this can give strange effects, but it’s well worth a try, especially because you can switch back to the previous loop in moments.
Filtering loops
To cut down on the number of results in the results list, you can filter the results by scale type. To do so, open the Scale pop-up menu at the top of the loop browser and choose Major, Minor, Neither, or Good For Both. Filtering by scale is helpful with harmonic loops such as bass lines or melodies; don’t use it for rhythmic loops such as drums, where it won’t help.
To turn off filtering by scale type, choose Any in the Scale pop-up menu.
You can filter loops further by selecting the Filter for more relevant results check box in Loops preferences (choose GarageBand→Preferences, and then click Loops). This setting restricts the display to loops within two semitones of the song key and is useful when you have many loops in your GarageBand library.
Adding loops to your collection
GarageBand comes with plenty of loops to get you started, but if you get heavily into GarageBand, you’ll want to add further loops. You can add other people’s prerecorded loops as described here, or you can create your own custom loops, as described next.
You can add loops to GarageBand in three ways:
• Run an installation routine. If you buy one of the GarageBand Jam Packs from the Apple Store (http://store.apple.com), run the installation routine to install the loops.
• Add individual loops or folders of loops to the loop browser. Open a Finder window to the folder that contains the individual loops or the folders of loops. Select the loops or the folders you want to add, drag them to the loop browser, and drop them there. GarageBand displays the Importing Loops dialog while it imports the loops and categorizes them.
• Add a loop to a song. Instead of adding one or more loops to the loop browser, you can insert a single loop directly in a song. When you do this, the loop doesn’t appear in the loop browser, so you can use it only in the song to which you added it. Chances are you won’t want to do this often, but when you do, open a Finder window to the folder that contains the loop, drag the loop to the existing track in which you want to use it in the GarageBand window, and then drop it. To create a new track using the loop, drop the loop below the last track in the track list.
Creating your own loops
One of the best things about GarageBand is that you can create your own loops from either Real Instrument or Software Instrument recordings you make. You’re getting a bit ahead of yourself here because you probably haven’t made any recordings yet, but when you have, come back to this section and try making a loop.
Follow these steps to create a loop:
1. Record the loop and edit it as necessary to make a region the right length for the loop. Use the editing techniques described in this chapter and in Chapter 9.
2. Click the region in the Timeline to select it.
3. Choose Edit→Add To Loop Library to display the dialog shown in Figure 8.15.

8.15 You can quickly create a loop from a Software Instrument region or a Real Instrument region.
4. Type the name you want to give the loop in the Name box. GarageBand suggests the instrument’s name, but giving it a more descriptive name is better. Name your loops consistently (for example, Storming Electric Lead 1, Storming Electric Lead 2) to make them appear next to each other in the results list.
5. In the Type area, choose whether to create a loop or a one-shot sound:
• Loop. This is what you’ll normally create — a region that GarageBand automatically manipulates to make it match the song’s tempo.
• One-shot. This is a sound file that you want to always play back at the tempo at which you recorded it — for example, a cymbal smash, a guitar riff that you want to use only at a specific tempo, or a sound effect that always needs to play at the same speed.
6. Open the Scale pop-up menu and choose with which scales you want to use the loop or sound: Any, Minor, Major, Neither, or Good For Both. This setting controls when the loop appears when you filter the loops by the Scale pop-up menu in the loop browser.
7. Open the Genre pop-up menu and choose the genre: None, Rock/Blues, Electronic, Jazz, Urban, World, Cinematic, Orchestral, Country/Folk, Experimental, or Other Genre. Specifying the genre lets you browse the loops by genre, which can save time.
8. In the Instrument Descriptors box, click the instrument type on the left, and then click the specific instrument on the right. For example, choose All Drums on the left and Kick on the right.
9. In the Mood Descriptors area, click the button for each descriptor you want to apply to the loop. When you click a button, it turns blue; click it again if you want to turn it off. The buttons are arranged in opposing pairs by row, so clicking one button in a pair turns off the other button if it’s on. For example, Single and Ensemble are opposites, so you can select only one of them at once.
10. Click Create to close the dialog and add the loop to GarageBand’s library.
Working with the Arrangement Track
If your song follows a normal pattern, it will have several components that repeat one or more times, either identically or with variations. GarageBand lets you break up your song into different sections that you can copy and repeat as needed. For example, you can divide your song into an intro section, a verse section that repeats, a chorus section that repeats, a bridge between some of the repetitions, and an ending.
To define and manipulate the different sections of the song, you create what GarageBand calls arrangement regions in the Arrangement Track. An arrangement region acts as a vertical section of the Timeline — you choose how many beats or bars it lasts — and gives you a way of grabbing all the loops you’ve positioned in that part of the Timeline. You can then move or copy all the contents of the arrangement region at once.
Setting up arrangement regions
First, set up arrangement regions within the Arrangement Track like this:
1. Display the Arrangement Track at the top of the Timeline by choosing Track→Show Arrangement Track or pressing +Shift+A. The Arrangement Track appears as a gray bar below the beat ruler with a single button — the Create a new Arrangement region button — on it (see Figure 8.16).

8.16 The Arrangement Track appears below the beat ruler.
2. Click the Create a new Arrangement region button to create a new arrangement region. GarageBand adds an eight-bar region and names it “untitled.”
3. If you need to change the start position of the arrangement region, drag the bar so that its beginning is in the appropriate place.
If you move the first arrangement region from the beginning of the song, GarageBand automatically creates a new arrangement region at the beginning of the song to occupy whatever space is available.
4. To change the duration of the arrangement region, drag its right border to where you want the region to end.
5. Rename the arrangement region by double-clicking the “untitled” name, typing the new name, and then pressing Return. Make sure the arrangement region is selected before you double-click; if it’s not, the double-click won’t register correctly.
6. To create a new arrangement region, click the Create a new Arrangement region button. GarageBand adds the new arrangement region after the one you just renamed. Adjust the new arrangement region and rename it as before.
Moving and copying arrangement regions
After you create arrangement regions, you can quickly rearrange your song by dragging them in these ways:
• Copy an arrangement region. Option+drag the arrangement region to where you want the copy. GarageBand creates a copy and adds “copy” to the original name. Rename the copy with a more descriptive name.
• Move an arrangement region. Drag the arrangement region to where you want it. GarageBand moves the other arrangement regions out of the way as you drag (see Figure 8.17).

8.17 Drag an arrangement region to move its section of your song to another position.
• Swap the positions of two arrangement regions. Drag one of the arrangement regions and drop it on the other arrangement region. GarageBand swaps the two arrangement regions over.
• Overwrite an arrangement region with another arrangement region. +drag the arrangement region and drop it on the arrangement region you want to overwrite.
Joining and splitting arrangement regions
You can join two or more arrangement regions like this:
1. If the arrangement regions aren’t adjacent, drag one or more of them so that they are.
2. Click the first arrangement region, and then Shift+click each other arrangement region to select all the ones you want to join.
3. Choose Edit→Join or press +J to join the regions. GarageBand gives the joined arrangement region the name of the first arrangement region. Rename it if necessary.
Similarly, you can split an arrangement region into two arrangement regions:
1. Position the playhead where you want to split the arrangement region.
2. Choose Edit→Split or press +T. GarageBand splits the arrangement region and gives each new arrangement region the same name.
3. Rename one or both of the arrangement regions as needed. Leaving both with the same name is a recipe for confusion.
Changing the Song’s Tempo, Signature, and Key
When you first create the song project, you choose the tempo, the time signature, and the key for it. But often, as you assemble the song, you realize that you need to change one or more of these elements.
GarageBand makes it easy to change the tempo, the time signature, and the key. However, it’s important that if you do need to make one of these changes, you do so before you record any Real Instrument tracks into your song. This is because GarageBand can’t change the tempo, time signature, and key of audio you record in Real Instrument tracks.
To change the tempo, time signature, or key, choose Project in the LCD Mode pop-up menu at the left side of the display. You can then use the Key pop-up menu, the Tempo pop-up menu, or the Signature pop-up menu (see Figure 8.18) to make the change.

8.18 You can quickly change the key, tempo, or time signature using the Project LCD.
Recording Software Instruments and Real Instruments
GarageBand’s wide selection of Software Instruments lets you play everything from grand piano to bass and drums using your musical keyboard, the Onscreen Keyboard, or the Musical Typing keyboard. This is great for composing music, but what’s even better is adding a real musical instrument or a vocal part to your GarageBand song. This section shows you how to do both.
You can record either Software Instruments or Real Instruments in a single take or in multiple takes. With Software Instruments, you can also combine multiple passes through a cycle region into a single recording.
Preparing to record a Software Instrument
Start by getting your keyboard and the Software Instrument track ready like this:
1. Get your keyboard ready. Connect your musical keyboard via USB if it’s not already connected. Or, if you’re using the Onscreen Keyboard or the Musical Typing keyboard, display that keyboard.
2. Add a Software Instrument track for the instrument you want to play, as described earlier in this chapter. If your song already contains a Software Instrument track for the instrument, click that track’s header to activate it.
3. Position the playhead where you want to start playing. For example, click the Go to Beginning button to move the playhead to the beginning of the song.
Preparing to record a Real Instrument or Electric Guitar
Follow these steps to get a musical instrument ready for recording:
1. Connect your instrument to your Mac, as discussed in Chapter 7. For example, plug your electric guitar into an audio interface connected via USB to your Mac, and check that the Audio Input pop-up menu in GarageBand’s Audio/MIDI preferences is set to use that audio interface.
2. Add a Real Instrument track of the appropriate type to the song, as discussed earlier in this chapter. Choose the right input source in the Input Source pop-up menu in the Track Info pane, and choose whether to turn the monitor off, on, or on without feedback protection. For an electric guitar, add an Electric Guitar track.
3. Play your instrument, and set the recording level. Look at the level meter in the Mixer column for the track you’re recording. You need to have the green LEDs and some of the orange LEDs lighting up while the input plays, but not have all the red on constantly or you’ll get distortion. To adjust the recording level, drag the Recording Level Slider in the Track Info pane for the track or change the volume on the instrument or the audio interface.
4. If you want to change the track’s name, double-click the default name in the track header, type the new name, and then press Return.
To give yourself a heads-up of when to start playing, turn on the count-in feature by choosing Control→Count In or pressing +Shift+U. GarageBand then gives you a one-bar count-in when you click the Record button. The count-in works only when the metronome is turned on (choose Control→Metronome or press +U).
Recording in a single take
The straightforward way of recording a track is by using a single take, either for part of the song or (if you prefer) for the whole song. Follow these steps:
1. Click the Record button to start recording. Alternatively, press R.
2. Play your part on the keyboard (for a Software Instrument) or on the musical instrument (for a Real Instrument).
3. Click the Record button to stop recording, or click the Play button to stop both recording and playback.
Before recording multiple takes with Software Instruments, make sure that you deselect the Automatically merge Software Instrument recordings when using the cycle region check box in the General preferences. If this check box is selected, you will create a single layered part instead (as discussed next). This setting doesn’t apply to Real Instruments.
Recording multiple takes with cycle recording
If you prefer, you can record multiple takes for the same part of the song by turning on the cycle region. This works for both Software Instrument tracks and Real Instrument tracks.
Here’s how to record multiple takes:
1. Click the cycle region button to turn on the cycle region. Drag the ends of the cycle region so that it will repeat the part of the song you want to record.
2. Click the Record button to start recording.
3. Play your part on the keyboard or musical instrument. When the Playhead reaches the end of the cycle region, it loops back to the start of the region. GarageBand starts recording a new take, so you can just keep playing.
4. Click the Record button to stop recording, or click the Play button to stop both recording and playback. The yellow icon in the upper-left corner of the recorded region shows how many takes you’ve recorded (see Figure 8.19).

8.19 The yellow icon shows how many takes you’ve recorded for the region.
Now play back the song and decide which take you want to keep. You can switch from take to take by clicking the icon and choosing the take from the pop-up menu (see Figure 8.20).

8.20 Use the pop-up menu to switch from one take to another and to delete the takes you don’t want to keep.
Creating a layered part with cycle recording
With Software Instruments, the alternative to recording multiple takes with cycle recording is to use multiple passes through the same region to build a layered part. Each time GarageBand loops through the cycle region, it merges the new notes you play with those you recorded on previous passes.
This technique is especially useful for creating drum parts because it lets you record using several passes rather than a single pass. For example, you can record hi-hat and bass drum on the first pass, snare drum and ride cymbal on the second pass, tom-toms on the third pass, and extra cymbals and percussion on subsequent passes. You end up with a single region that contains all the drums instead of having a separate region for each pass.
Here’s how to create a layered part:
1. Choose GarageBand→Preferences. Select the Automatically merge Software Instrument recordings when using the cycle region check box in the General preferences, and then close the Preferences window.
2. Click the Cycle Region to turn on the cycle region. Drag the ends of the cycle region so that it repeats the part of the song you want to record.
3. Click the Record button to start recording.
4. Play your first pass on the keyboard. When the playhead reaches the end of the cycle region, it loops back to the start of the region. Start your second pass, and repeat with as many passes as you need. As you play, GarageBand merges all the notes into the same region. Figure 8.21 shows this process on the Rock Kit track.

8.21 Creating a layered part by playing multiple passes through the same cycle region
5. Click the Record button to stop recording, or click the Play button to stop both recording and playback.
After you finish recording, listen to the track. If you need to add further to it, you can do so by simply starting recording again and playing the additions.
Recording multiple tracks at once
At first, GarageBand is set to record a single track at once. When you’re working on your own, this is usually the best way to proceed unless you’re a live-action, one-man band.
When you need to record two or more tracks at once, choose Track→Enable Multitrack Recording or press +Option+R to turn on multitrack recording. When you do this, GarageBand displays a Record button at the left end of the buttons on each track’s track header (see Figure 8.22). Click the Record button for each track you want to record so that the Record button shows a red dot.
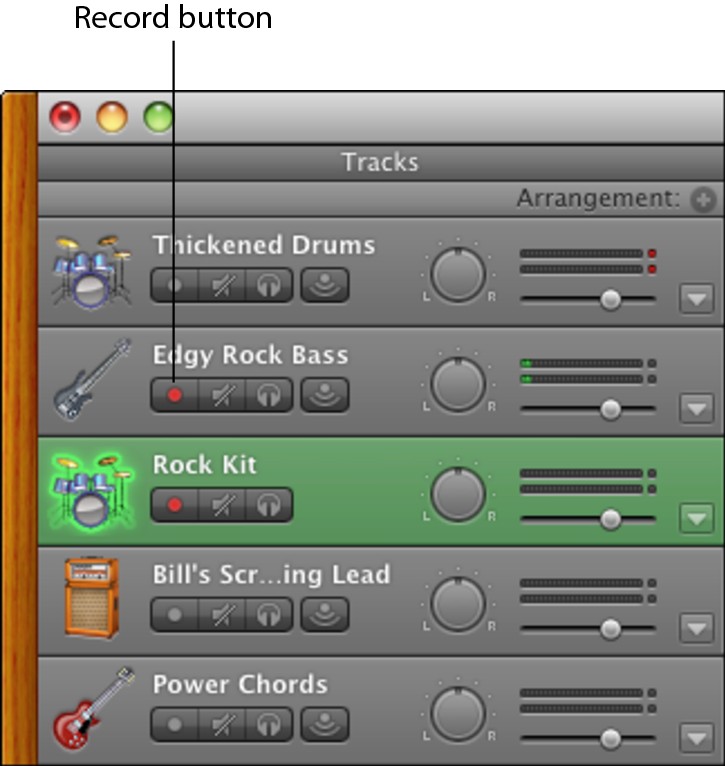
8.22 Click to place a red dot on the Record button for each track you want to record with multitrack recording.
Each track you record must have its own input channel — otherwise GarageBand doesn’t know which track receives the input. And if you have connected only a single MIDI keyboard to your Mac, you can record only a single Software Instrument track at once.
When you want to turn off multitrack recording, choose Track→Disable Multitrack Recording or press +Option+R again.
Creating Custom Software Instruments
GarageBand comes with a great set of Software Instruments that you can use straight out of the box, but if you want to make your music sound special, you can build your own Software Instruments. The process is quick and easy, especially if you start from an existing Software Instrument, as this section shows you how to do.
Follow these steps to create a custom Soft-ware Instrument from an existing Software Instrument:
1. Click the New button, or press +Option+N, to display the dialog for creating a new track.
2. Select the Software Instrument option button, and then click Create. GarageBand creates a new Grand Piano track and displays the Track Info pane showing its settings.
3. Switch to the instrument on which you want to base your new instrument. In the left list box, select the category of instrument — for example, Guitars. In the right list box, select the instrument itself — for example, Big Electric Lead.
4. Click the Edit tab to display the settings for the instrument you chose. Figure 8.23 shows an example.

8.23 Use the controls on the Edit tab of the Track Info pane to create a new custom Software Instrument that sounds just the way you want it to.
5. Play the instrument using your musical keyboard (or one of GarageBand’s keyboards) and see how it sounds. Continue to play as you make changes so that you can judge their effects.
6. If you want to make sweeping changes, change the sound generator used to create the sound. In the Sound Generator area, choose the generator from the upper pop-up menu and the sound from the lower pop-up menu. You can also click the picture under the Sound Generator text and use the dialog that appears to customize the sound of the instrument. The dialog contains different controls depending on the instrument; Figure 8.24 shows an example of the Guitar dialog. Click the Close button (the red button) to close the dialog when you finish.
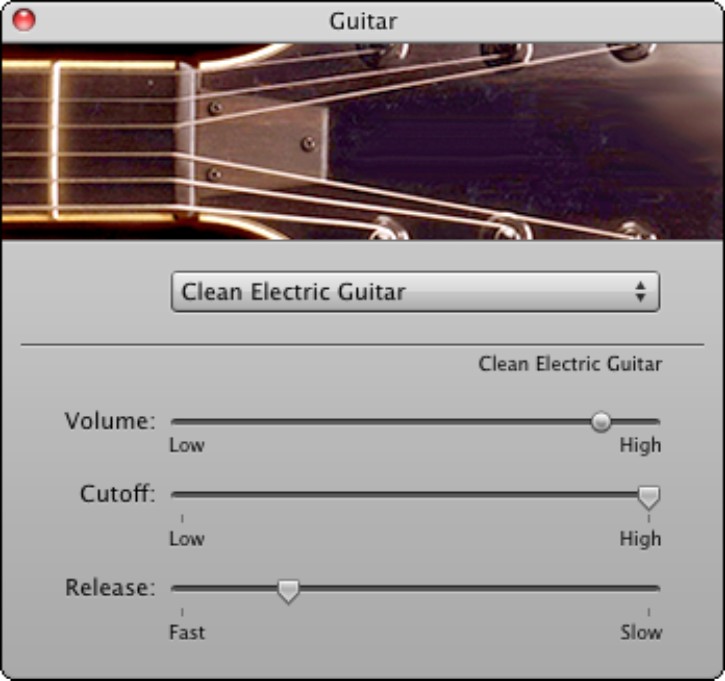
8.24 To change the overall sound of an instrument, open its dialog and adjust the controls.
7. Adjust or remove the effects already applied to the instrument:
• To adjust an effect, choose a different sound in the pop-up menu below its name.
• To edit the sound in the pop-up menu, click the picture button to its left, and then work in the dialog that appears. Figure 8.25 shows the Amp Simulation dialog for adjusting guitar sounds. Click the Close button (the red button) to close the dialog when you finish.
• To turn an effect off, click the green light on the left side of the picture button so that the light goes off.
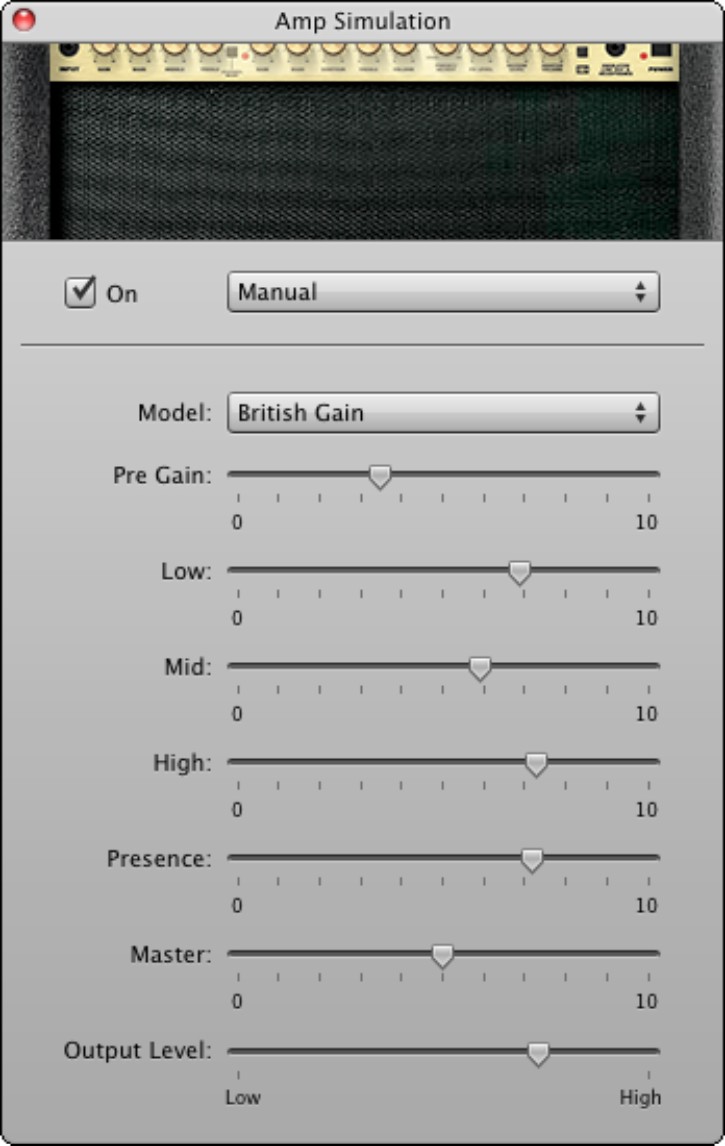
8.25 Configuring the amplifier simulation effect for a guitar.
8. Add other effects as needed:
• Click one of the unused buttons in the Effects area, and choose the effect from the pop-up menu that appears.
• Choose a sound or setting in the pop-up menu below the name of the effect you added.
• If necessary, edit the sound or setting by clicking the picture button and working in the resulting dialog.
9. To make your custom instrument easy to recognize in the track list, click the Browse tab, click the icon button at the bottom, and choose a distinctive icon from the panel.
10. Click Save Instrument at the bottom of the Details pane, type a descriptive name in the Save Instrument dialog, and then click Save.
Normally, you’ll want to keep the Software Instruments you create, but if you decide you no longer need one, you can delete it by clicking it in the Track Info window and then clicking Delete Instrument. GarageBand confirms the deletion (see Figure 8.26); click Remove to get rid of the instrument.

8.26 GarageBand confirms that you want to delete a custom Software Instrument from your Mac.
Keeping Notes with GarageBand’s Notepad
When you write a song, you often need to jot down ideas, lyrics, or notes about the instruments and settings you use. GarageBand provides a handy Notepad for taking notes within a project.
To open the Notepad, choose Window→Notepad or press +Option+P. With the Notepad window open (see Figure 8.27) you can write down whatever you need.
You don’t need to save the contents of the Notepad separately because GarageBand automatically saves the notes in the project file.
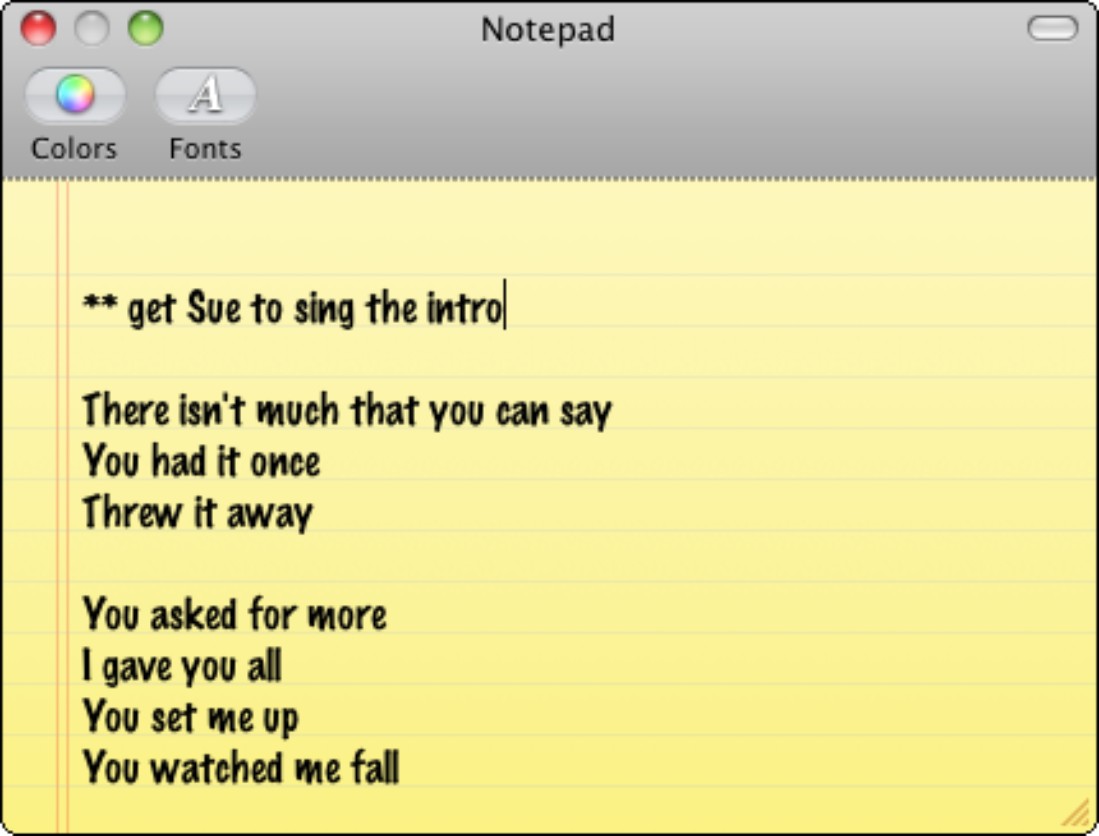
8.27 Use the Notepad window to jot down lyrics, notes, and ideas for the project.