Chapter 9: How Can I Make My Song Sound Great and Then Share It?
Recording a song is half the battle won, but if you want to grab your listeners by the ears and not let them go, you need to edit and mix the song as well. GarageBand provides powerful tools for editing both Software Instrument tracks and Real Instrument tracks to remove unwanted parts and change the pitch. You can then mix the song by changing the volume, panning, and effects of both individual tracks and the master track that controls the song’s overall sound. When the song is finished, you can use it in the other iLife applications directly from GarageBand; but what you’ll probably want to do is export the song to iTunes, give it a full set of tags, add lyrics and artwork, and then share the song with friends or the world via the Internet. You may also want to create a ring tone from the song for your iPhone.
Editing a Song
Mixing a Song
Sharing a Song
Editing a Song
To edit a song, you need to pick out the tracks you want to work on, either individually or together. You can then open a track in the Track Editor and edit it. You can change Software Instrument tracks extensively, even changing the pitch and velocity of individual notes; for Real Instrument tracks, including Electric Guitar tracks, your options are more limited, but you can move sections of audio, delete them, and change the track’s tuning or timing.
Muting and soloing tracks
When you edit a song, you often need to focus on a single track or just a handful of tracks. You can do this by using GarageBand’s Mute and Solo controls, which appear in the track header (see Figure 9.1).

9.1 Use the buttons in the track header to mute and solo tracks so that you can hear exactly what you need to.
To mute a track so that you hear the other tracks without it, click the track’s Mute button once to turn on muting. Click a second time to turn off muting again.
To solo a track so that you hear that track without the others, click the Solo button. Click the Solo button a second time to turn off soloing.
 If you need to listen to several tracks but not all of them, you can either solo each of those tracks or mute all the other tracks. Either approach works, so take your pick.
Editing Software Instrument tracks
Recording Software Instrument instruments is pretty wonderful because you can either record multiple takes (and choose the best) or record a single take using multiple passes. But what’s even better is that you can edit a region you’ve recorded, adjust the notes it contains, and even change their length and velocity.
Opening a region for editing in the Track Editor
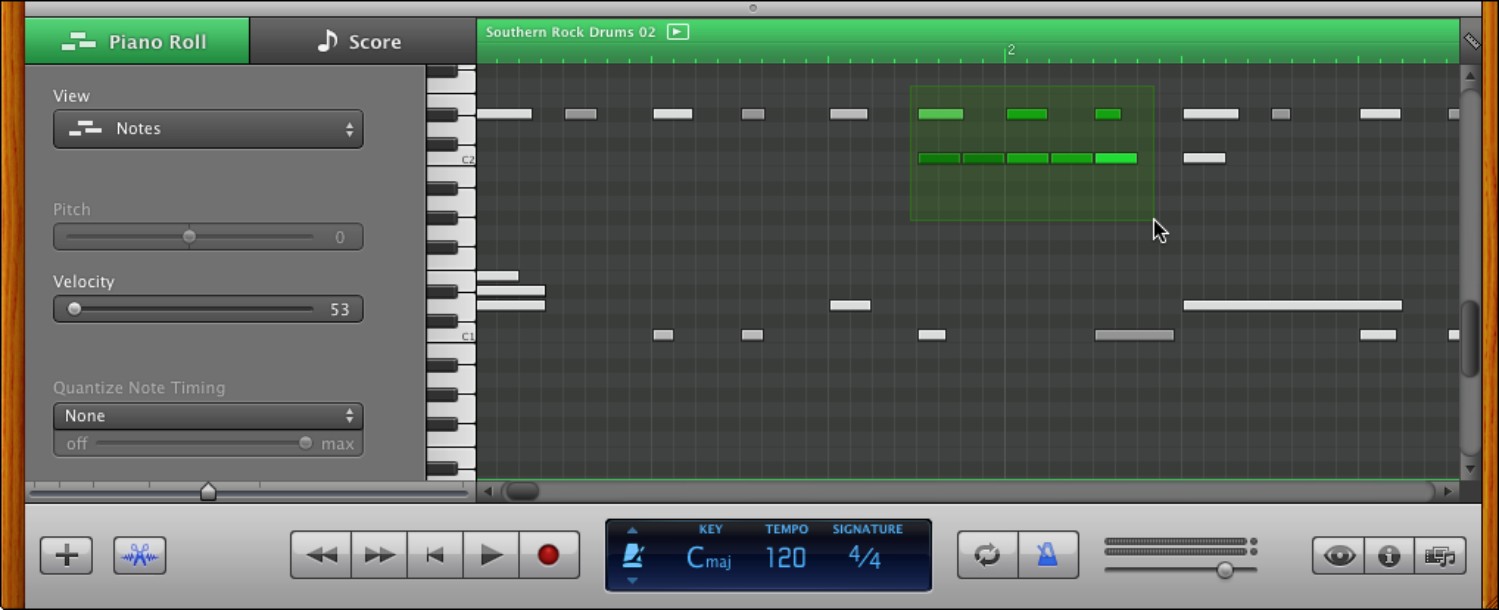
To open a region for editing, double-click the region in the Timeline. Figure 9.2 shows a Software Instrument region open for editing in Piano Roll view, the view in which GarageBand first opens the region. The other view is Score view, and you meet it shortly.

9.2 A Software Instrument region open for editing in the Track Editor in Piano Roll view.
Editing individual notes in Piano Roll view
Here’s how to edit individual notes in Piano Roll view:
• Select multiple notes. Either drag a selection box around the notes (see Figure 9.3), or click the first note, and then Shift+click each of the other notes.
• Copy a note. Option+click the note and drag it to where you want the copy.
• Change the pitch. Select the note, and then drag it up or down. As you drag, GarageBand plays the note you’ve reached.
• Change the velocity. Select the note, and then either drag the Velocity slider or type a new value in the Velocity box.
9.3 Selecting multiple notes in Piano Roll view in the Track Editor.
• Change the length. Select the note, and then drag the right end of its length bar to the right or to the left.
• Add a note.  +click where you want to place the note. Drag the right edge of the note to change the length as needed, and change the velocity by dragging the Velocity slider or typing in the Velocity box.
Editing individual notes in Score view
Score view shows notes as they appear on sheet music, with musical note symbols placed on staves to indicate their timing and pitch. Here’s how to edit individual notes in Score view:
• Select multiple notes. Either drag a selection box around the notes (see Figure 9.4), or click the first note and then Shift+click each of the other notes.
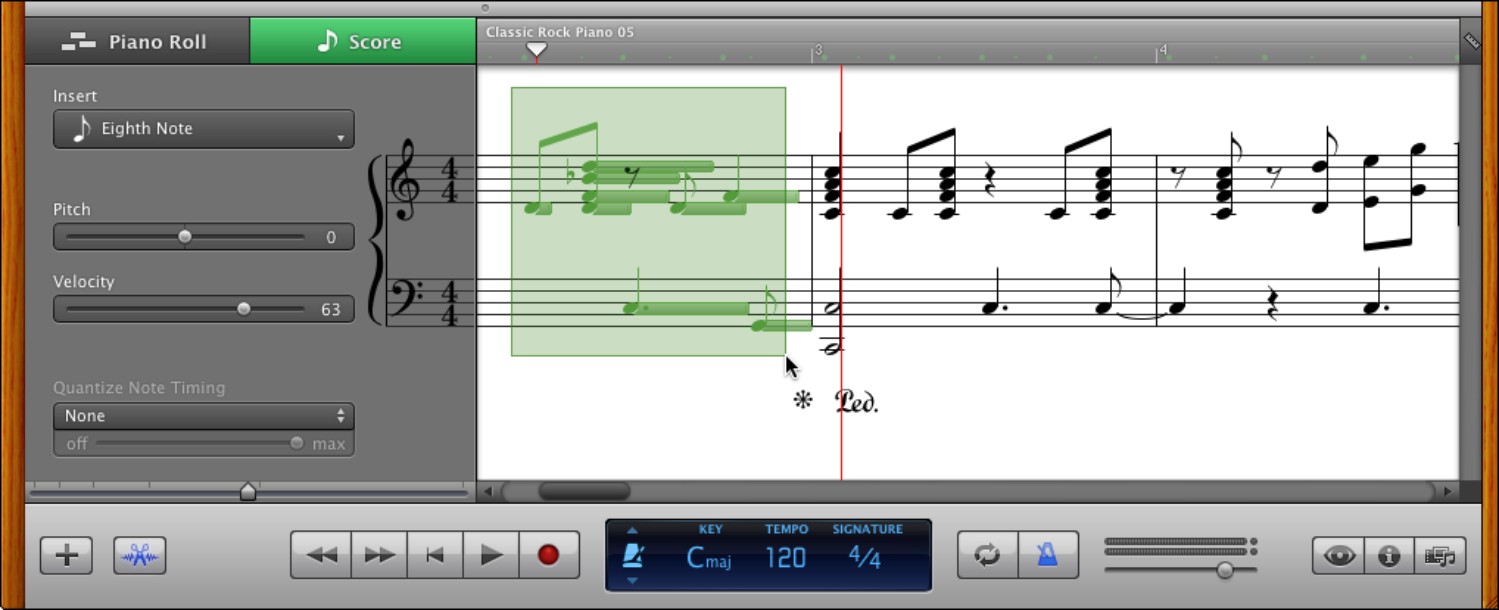
9.4 When you select multiple notes in Score view, GarageBand displays the length of each note as a box attached to its note character.
• Copy a note. Option+click the note head and drag it to where you want the copy.
• Change the pitch. Select the note, and then press Up Arrow or Down Arrow. Alternatively, drag the note head up or down. As you move the note, GarageBand plays the note you’ve reached.
• Change the velocity. Select the note, and then either drag the Velocity slider or type a new value in the Velocity box.
• Change the length. Select the note, and then drag the right end of its length bar to the right or to the left.
• Add a note. Open the Insert pop-up menu and choose the note length you want (for example, Eighth Note), and then +click where you want to place the note.
• Change the note value. Control+click or right-click the existing note you want to change, and then choose the note value from the menu that appears (see Figure 9.5).

9.5 Changing the length of an existing note in the region.
Changing the timing for a track
If you’ve recorded a Software Instrument track that’s not perfectly in time, you may be able to fix it by using the Quantize Note Timing feature. Follow these steps:
1. Set the song playing so that you can judge the effect the timing change produces.
 Changing the tuning can save a track, but you need to understand the limitations. First, tuning works accurately only on regions that contain single notes rather than chords. Second, changing the tuning affects all the regions in the track, not just a single region.
2. Open the track in the Track Editor by double-clicking one of the track’s regions in the Timeline.
3. Open the Quantize Note Timing pop-up menu at the bottom of the pane and choose the note value you want to use. For Software Instrument tracks, this menu offers a wide range of choices, from 1/1 Note through 1/64 Note, from 1/4 Triplet through 1/32 Triplet, and from 1/8 Swing Light through 1/16 Swing Heavy.
4. Drag the Quantize Note Timing slider to adjust the timing. Listen to the effect the change produces, and adjust it if necessary.
Changing the modulation, pitchbend, sustain, expression, or foot control
To make your tracks sound more lively, you can change the modulation, pitchbend, sustain, expression, or foot control for a region. If you recorded this controller information by using the controls on your keyboard, you can edit the existing movements of the controls. If not (for example, because your keyboard doesn’t have a foot control), you can add controller information manually using your mouse.
To change the controller information, follow these steps:
1. Set the song playing so that you can judge the effect of the changes you make.
2. Open the track in the Track Editor by double-clicking one of the track’s regions in the Timeline.
3. In the View pop-up menu, choose the controller you want to work with. The controller information appears in the Track Editor. Figure 9.6 shows an example of changing the pitchbend on a track.

9.6 You can change the pitchbend of a track by choosing Pitchbend in the View pop-up menu and moving the control points.
4. Adjust the curve as needed:
• Remove unneeded control points, the points at which the curve changes. Click a control point and press Delete to delete it.
• Change the value of a control point. Drag the control point up or down.
• Alter when a change occurs. Drag a control point to the left or right.
• Draw a new line. +click an empty area in the control track. You can then drag the control points for the line.
Editing Real Instrument tracks
What’s even neater than editing the notes in a Software Instrument track is being able to edit the regions in a Real Instrument track — either a region you create from a loop or one you record using a musical instrument. You can edit out mistakes (or mis-takes) and sew together your best performances to produce a seamless track.
Selecting the audio you want to edit
Here’s how to select the audio you want to edit in a Real Instrument track:
1. Double-click the region you want to edit to open it for editing in the Track Editor. Figure 9.7 shows the Track Editor with a Real Instrument region ready for editing.

9.7 The Track Editor with a Real Instrument region ready for editing.
2. Drag the Zoom slider in the Track Editor to zoom in or out so that you can see as much of the region as you need to.
3. Move the mouse pointer into the region in the Track Editor below the zero (0) line so that it appears as a cross. Anywhere below the zero line is fine; anywhere above the zero line means you’re using the Flex Time feature, which you learn about later in this chapter.
4. Drag left or right to select the section you want. Figure 9.8 shows an example.
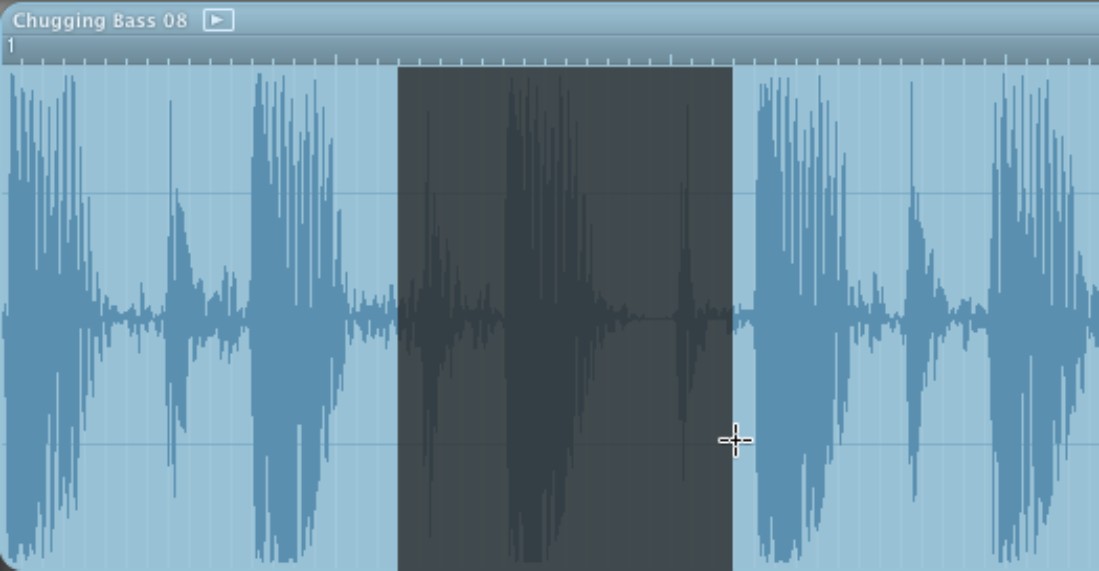
9.8 Drag with the cross-hair pointer below the zero line to select a section of a Real Instrument region in the Track Editor.
Changing the tuning for a track
If you record a Real Instrument track that’s in time but not fully in tune, try using the Automatic Tuning feature to fix the tuning like this:
1. Set the song playing so that you can judge the effect that the tuning change produces.
2. Open the track in the Track Editor by double-clicking one of the track’s regions in the Timeline.
3. Drag the Automatic Tuning slider to the right from the leftmost position (in which it is off). Listen to the effect the change produces, and adjust it if necessary.
4. If you want to restrict the tuning to the project’s key instead of using the 12-note chromatic scale, select the Limit to Key check box. Again, listen to the effect of the change and decide whether you want to keep it.
Changing the timing for a track
If you record a Real Instrument track that’s not perfectly in time, you may be able to fix it by using the Auto Quantize feature. Follow these steps:
1. Set the song playing so that you can judge the effect that the timing change produces.
2. Open the track in the Track Editor by double-clicking one of the track’s regions in the Timeline.
3. Open the Auto Quantize pop-up menu at the bottom of the pane and click the note value you want. For example, choose 1/8 Triplet or 1/8 Note rather than 1/16 Note.
Changing the timing for part of a track
If you recorded a Real Instrument track that has parts in time and parts out of time, you can use the Flex Time feature to fix the timing problems. Flex Time lets you move notes in Real Instrument regions so that they play when you need them to. You can also use Flex Time to extend a note or shorten a note.
To use Flex Time, follow these steps:
1. Set GarageBand to cycle through the part of the song you want to adjust:
• Turn on the cycle region by clicking the Cycle Region button on the toolbar so that it displays two blue arrows.
• Move the cycle region to the part of the song you want to work on. Drag the cycle region to the right place, and then drag the ends of the cycle region if you need to lengthen or shorten the cycle region.
2. Click the Real Instrument region you want to change, and then click the Track Editor button on the toolbar to display the Track Editor (assuming the Track Editor isn’t already open).
3. In the upper part of the Track Editor (above the zero line), click the note you want to change, and then drag to the left or right as needed. Figure 9.9 shows an example of using Flex Time to change a Real Instrument region. GarageBand displays a different-colored outline around the area that it is changing.
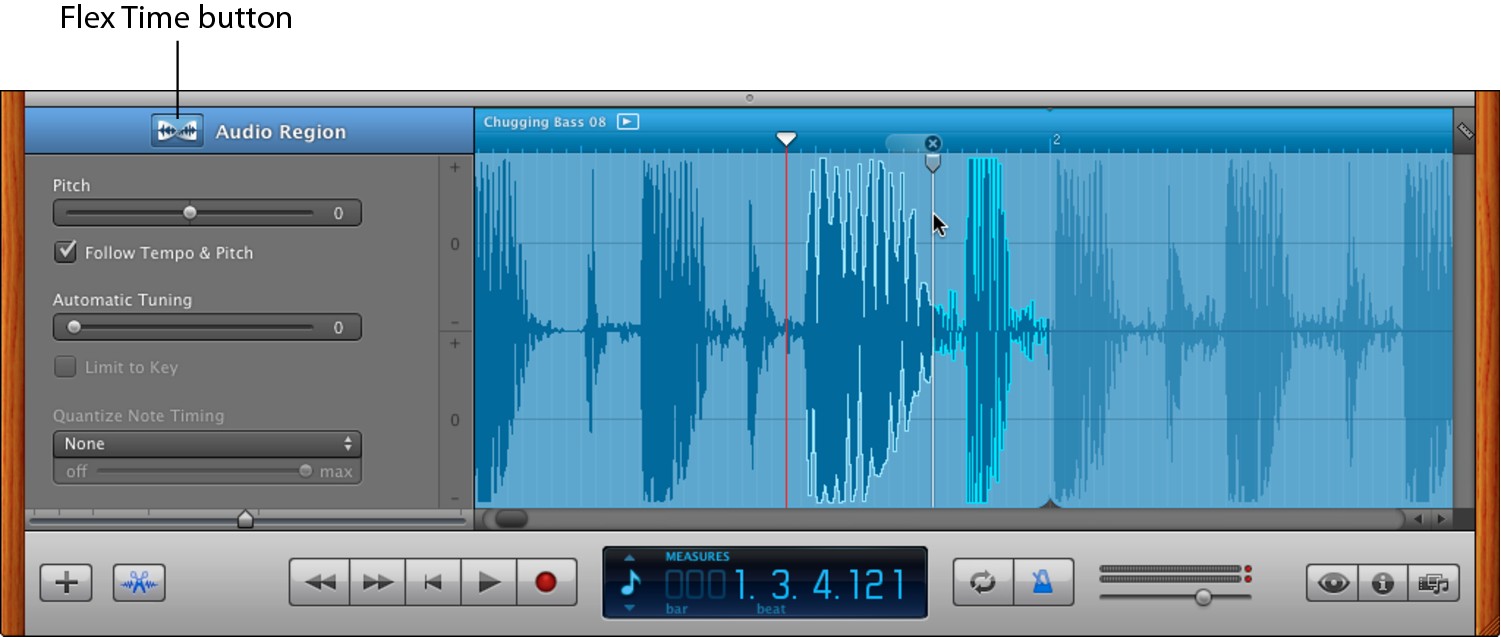
9.9 Click and drag in the upper part of the Track Editor to change a note’s timing using the Flex Time feature.
4. Listen to the effect of the adjustment, and change it again on the next iteration through the cycle region if needed. Keep making the changes until the region sounds the way you want it to sound.
You can turn off Flex Time by clicking the Flex Time button at the top of the Audio Region pane. When Flex Time is off, this button shows a waveform on a rectangular white background. When Flex Time is on, this button shows the waveform on a bow-tie-shaped white background.
Editing an audio file outside GarageBand
When GarageBand’s editing capabilities aren’t enough to fix a problem with a Real Instrument region you’ve recorded, you can use an external audio editor to fix the problem instead.
GarageBand saves your recorded Real Instrument regions within a package file, so you need to use the Finder to open the package and locate the region file like this:
1. Close the project file in GarageBand.
2. Open a Finder window to the folder that contains the song. For example, open a window to the ~/Music/GarageBand folder.
3. Control+click or right-click the song and choose Show Package Contents. Mac OS X opens a new Finder window showing the files contained in the song’s package.
4. Open the Media folder to locate the audio file containing the region.
5. Control+click or right-click the audio file, highlight Open With, and then choose the audio editor.
6. When you finish editing the audio, save the file:
• If you save the file under the same name, GarageBand simply loads the new version of the file when you open the project.
• If you save the file under a different name, you must replace the version that’s in the Timeline with the new version. This extra step is often a good idea in case editing the file doesn’t produce exactly the result you want; if this happens, you can return to the original file (or try editing it again).
Making other tracks match a timing track
When you record, you often get some tracks out of time with others — especially if you have several people playing together (or otherwise) with more enthusiasm than skill. When this happens, you can use GarageBand’s Groove Track feature to fix the timing problems. You designate the track with the correct timing as the groove track, and GarageBand automatically adjusts the timing of the other tracks to match the timing of the groove track.
If your song includes a rhythm track you’ve created using loops, consider using that track as the groove track.
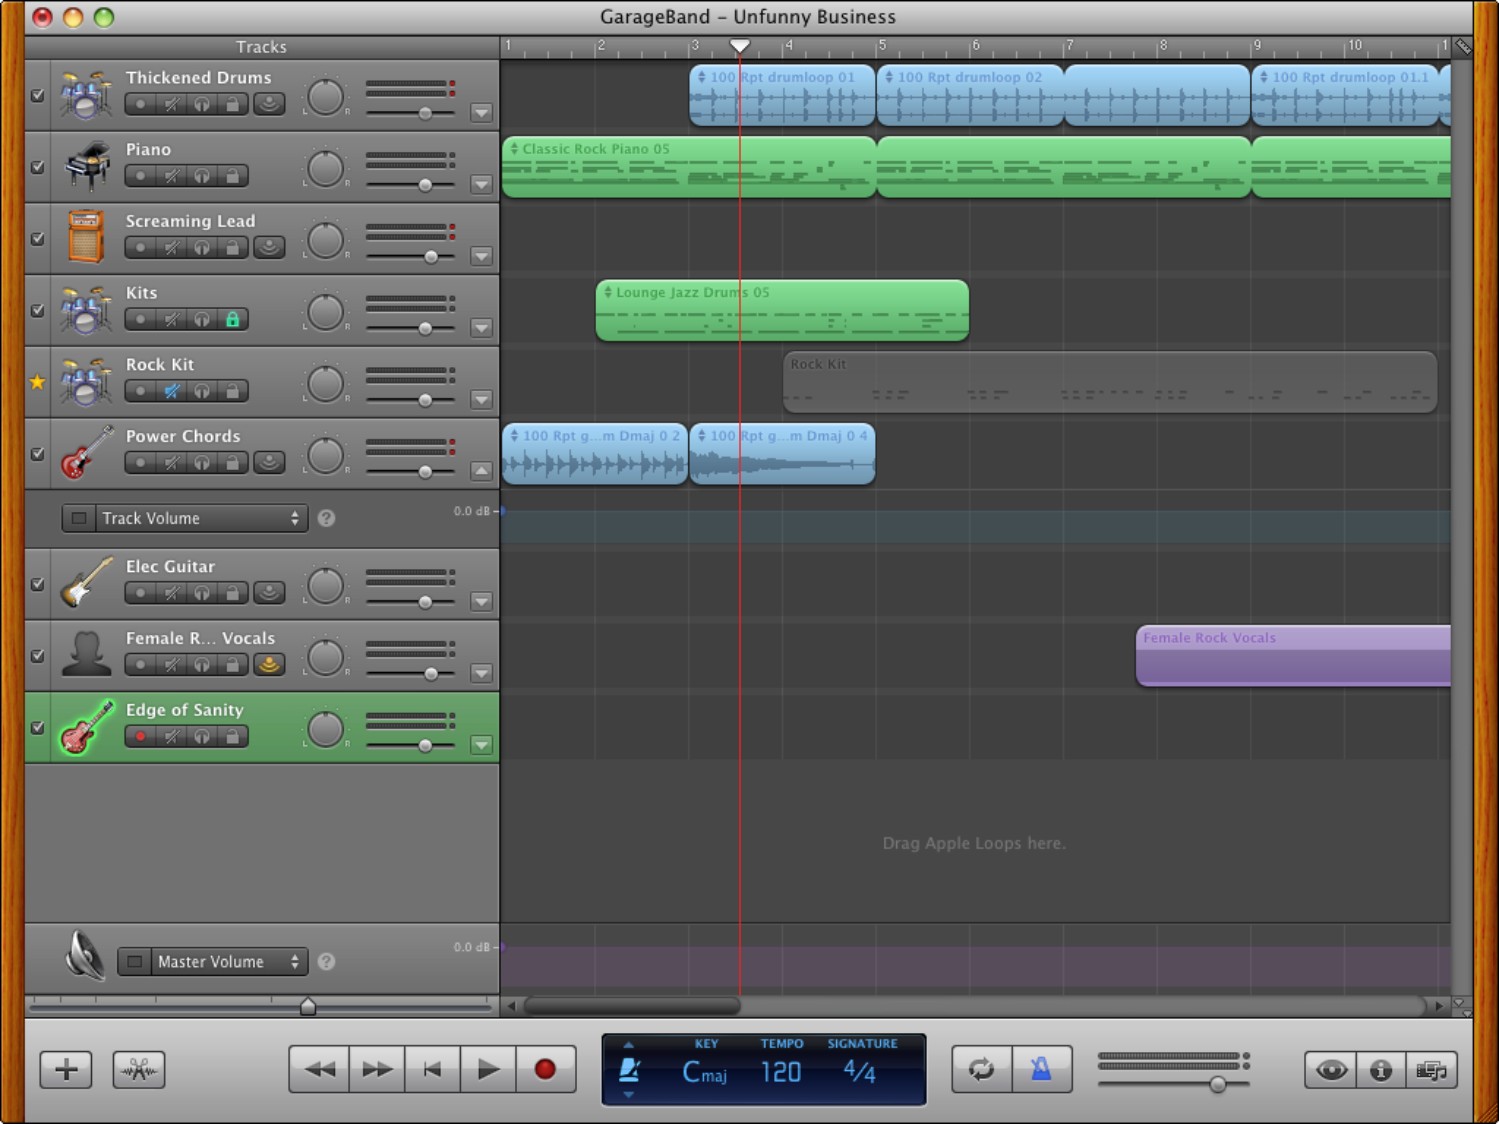
To use the Groove Track feature, move the mouse pointer to the left side of the track header for the track you want to use as the groove track, and then click the star button that appears (see Figure 9.10).

9.10 To set the song’s groove track, click the star to the left of the icon in the track’s header.
GarageBand displays the Analyzing audio for Groove Tracks dialog (see Figure 9.11). Select the Don’t show again check box if you don’t need to see this dialog again, and then click Continue.
After GarageBand analyzes the audio (which can take a few minutes), GarageBand displays a check box next to each of the other tracks (see Figure 9.12). Leave a track’s check box selected to have GarageBand adjust the track’s timing using the groove track. Deselect the check box to make the track play with its original timing.

9.11 Click Continue in the Analyzing audio for Groove Tracks dialog to go ahead with creating the groove track.

9.12 Deselect the check box for any track that doesn’t need adjusting to the groove track’s timing.
Locking a track
When you finish setting up a track, you can lock it to prevent yourself from changing it inadvertently. Locking is often helpful, but GarageBand doesn’t display the lock buttons at first, so you need to choose Track→Show Track Lock to display them (see Figure 9.13).
To lock the track, click the Lock button in the track header so that the button glows green. Click the Lock button again to remove the locking.

9.13 Choose Track→Show Track Lock to display the lock buttons so that you can lock one or more tracks against accidental editing.
Locking a track has a second advantage as well as preventing editing: It tells GarageBand that you’re not planning to work with the track for the time being, so GarageBand renders the track to the hard drive. This gives GarageBand more processing power to devote to playing the other tracks.
Mixing a Song
To mix the tracks of your song into the arrangement you want, you use GarageBand’s mixer controls (see Figure 9.14). These allow you to adjust the volume and control the left-right panning of each track automatically as the track plays. You can also add other automation curves to a track to control other effects, such as echo, reverberation, or the intensity and speed of a tremolo effect.

9.14 The mixer’s deceptively simple controls can make all the difference to the sound of a track.
Adjusting the volume of individual tracks
GarageBand lets you adjust the volume either for the whole of a track or for parts of it. By using both techniques, you can set the track’s volume exactly the way you need it.
Start by using the Track Volume slider to set the relative volume of the track. When you add the track, GarageBand sets the slider to 0 decibels (dB), which means the track’s loudness is not increasing or decreasing.
To reduce the track’s volume, drag the slider to the left; to increase the volume, drag it to the right. GarageBand displays a tooltip showing the decibel measurement you’re setting (as shown in Figure 9.15), but normally you’ll do better to rely on your ears to judge whether the track is as loud as you want it.
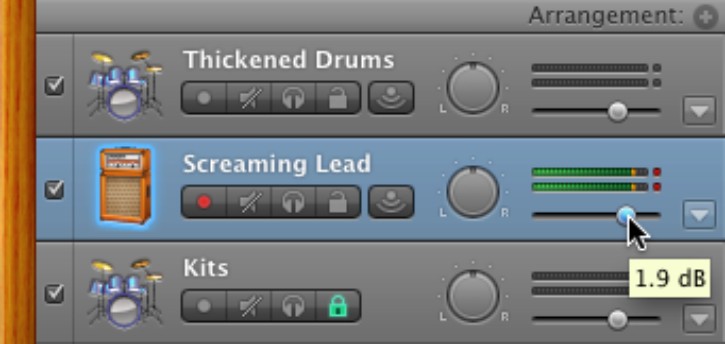
9.15 Changing a track’s volume using the Track Volume slider.
That sets the track to play at the same level. Often, you’ll want finer control than this. For example, you may want to fade into the song rather than start with a bang, fade out to a whimper, or play parts of the track at a lower volume so that other tracks can come to the fore.
To make different parts of a track play at different volumes, use the track’s volume curve like this:
1. If the Automation track isn’t displayed, click the View/Hide Track Automation button on the track header to display it. Figure 9.16 shows the Automation track with the Track Volume automation curve displayed and turned on.
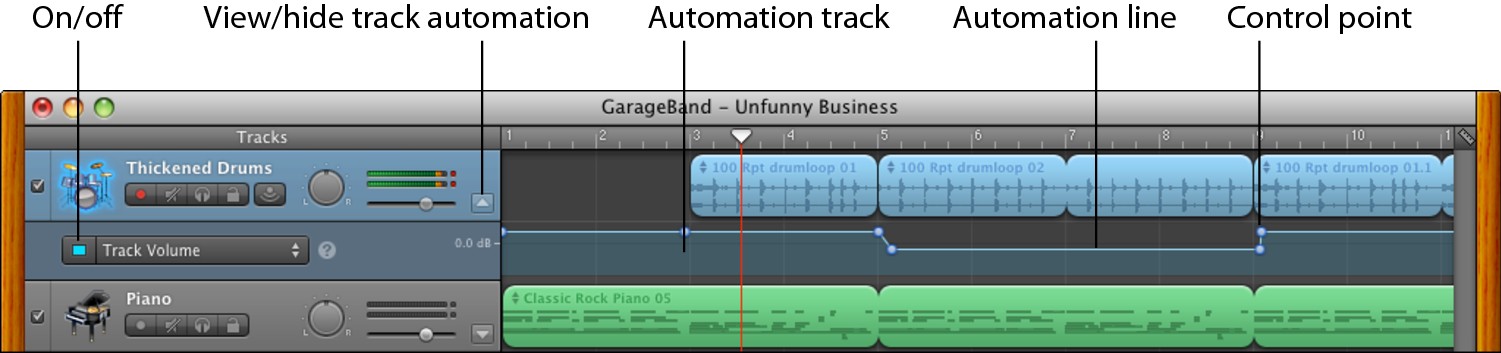
9.16 The Automation track displays a single automation effect at a time — Track Volume, Track Pan, or another automation effect you add.
2. In the Automation Parameters pop-up menu, choose Track Volume if it’s not already selected. The line along the Automation track shows the volume level. Unless you’ve set a volume curve already, this line will be horizontal, maintaining a steady volume. You can increase the volume by dragging the first control point up or decrease it by dragging down. This first control point controls the overall volume of the track until you create a volume curve, so dragging it has the same effect as moving the Track Volume slider for the track: The line remains straight, and moves up or down as you drag.
3. To create a volume curve, place control points on the volume line like this:
• Set the song to cycle through the section you’re working with so that you can hear the effects of the changes you make. Start playback.
• Click where you want to place a control point. Each control point appears as a blue dot for a Real Instrument track or a green dot for a Software Instrument track (see Figure 9.17).
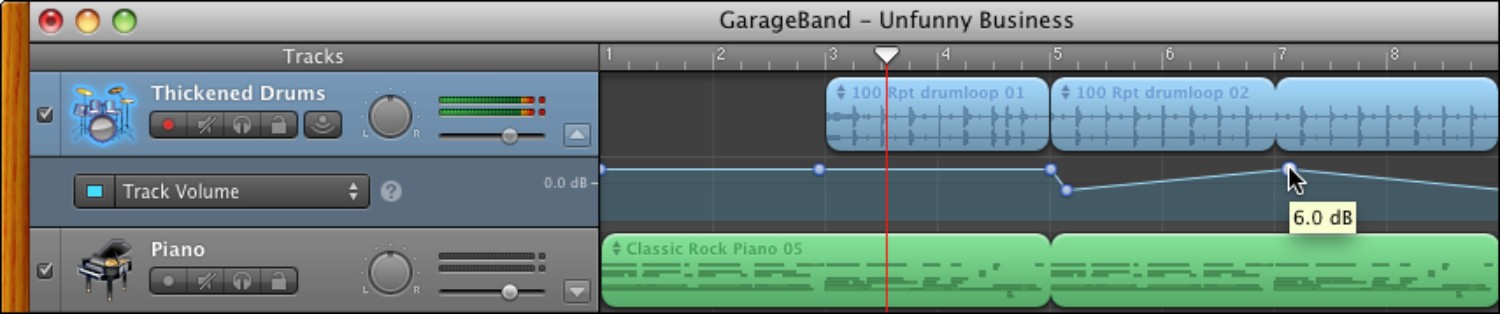
9.17 Dragging a control point to create a volume curve on an Automation track.
• Drag a control point up to increase the volume at that point, or drag it down to decrease the volume.
• To change when a control point alters the volume, drag the control point to the left or right along the volume curve.
• To delete a control point, drag it along to the next control point, which swallows it without comment.
4. When you finish setting the volume curve, click the View/Hide Track Automation button to hide the Automation track again. If you’re going to change panning (discussed next) or automation (discussed later in this chapter), you may want to leave the Automation track displayed.
Controlling panning
To control the left-right placement of the sound on tracks, use the panning controls. These let you position different tracks where you want them around the panorama of the song, so that the tracks sound as though they’re coming from different directions. For example, you may choose to place your drum track, lead instrument, and vocals centrally and pan the backing tracks to the left and right.
You can set a track panning position for the track as a whole, or you can create a custom panning curve that moves the track to different pan positions at different points in the Timeline as needed. For example, you can make your edgy guitar line move from one side of the mix to the other — and then back again.
Go easy on the panning — you seldom need to pan a track all the way to the left or the right. Doing so can make the song sound stretched and odd. Many tracks need only a single panning position rather than weaving left and right through the mix like the highway patrol in pursuit on the interstate.
To set a track panning position for the track as a whole, click the Track Pan knob and drag downward to pan to the left or upward to pan to the right.
To create a custom panning curve for the track, follow these steps:
1. If the Automation track isn’t displayed, click the View/Hide Track Automation button on the track header to display it.
2. In the Automation Parameters pop-up menu, choose Track Pan.
• The line along the Automation track shows the panning for the track, with panning to the left appearing above the 0 mark (with positive values) and panning to the right appearing below the 0 mark (with negative values).
• Until you set a custom pan curve for the track, the panning line is horizontal, maintaining a steady position that you set by dragging the Track Pan knob.
• You can adjust the panning for the whole track by dragging the first control point up (to pan to the left) or down (to pan to the right). This first control point controls the overall panning of the track until you create a custom panning curve, so dragging the control point has the same effect as dragging the Track Pan knob: The line remains straight, and you pan the whole track.
3. To create a panning curve, place control points on the track like this:
• Set the song to cycle through the section you’re working with so that you can hear the effects of the changes you make. Start playback.
• Click where you want to place a control point. Each control point appears as a blue dot for a Real Instrument track or a green dot for a Software Instrument track.
• Drag a control point up to pan to the left at that point, or drag it down to pan to the right.
• To change when a control point alters the panning, drag the control point to the left or right along the panning curve.
• To delete a control point, drag it along to the next control point.
 When you create an automation curve for a track, GarageBand automatically turns on that automation parameter and displays the green On light (for a Software Instrument track) or blue On light (for a Real Instrument track) when that parameter is selected in the Automation Parameters pop-up menu. You can turn the automation parameter off by clicking the On light so that it goes off.
4. When you finish setting the panning curve, click the View/Hide Track Automation button to hide the Automation track again. If you’re going to change automation (discussed next), you may want to leave the Automation track displayed.
Adding automation parameters to a track
A volume curve and custom panning curve can make a big difference to a track’s sound, especially when you set them for most or all of the tracks in the song. But GarageBand also lets you add other automation curves to each track as needed. You can add an automation curve for visual equalization (to control, say, bass frequency or treble gain), echo, reverberation, or any of the other effects you apply to the track.
Adding an automation parameter
Here’s how to add an automation parameter to a track:
1. If the Automation track isn’t displayed, click the View/Hide Track Automation button on the track header to display it.
2. In the Automation Parameters pop-up menu, choose Add Automation to open the Add Automation dialog. Figure 9.18 shows the Add Automation dialog for a guitar track with several effects.
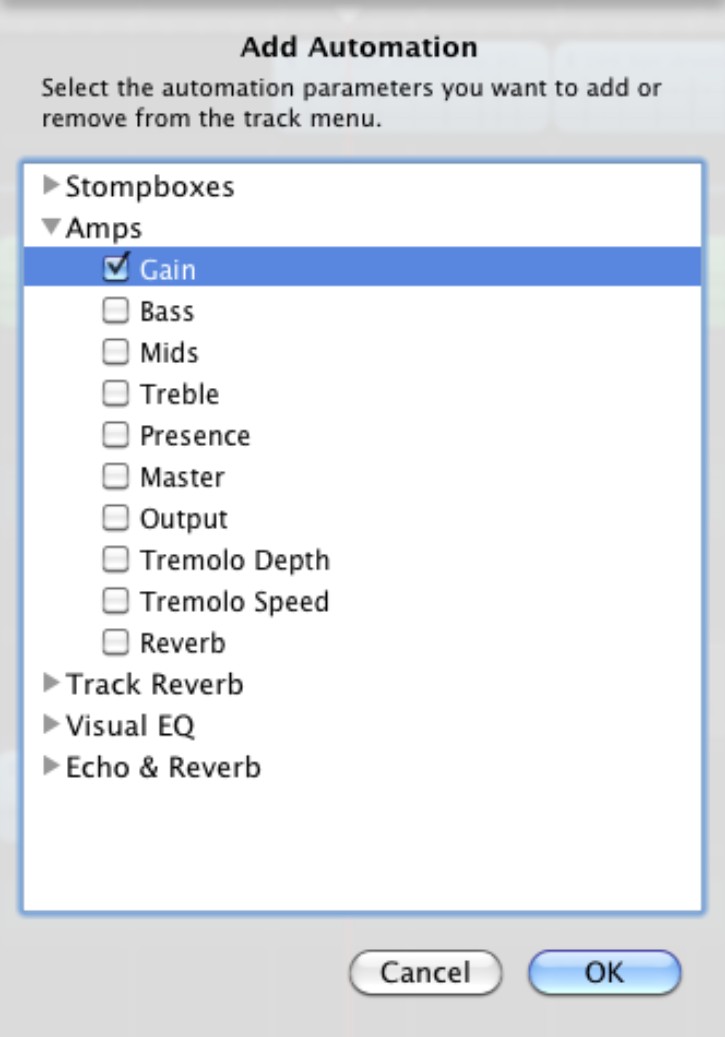
9.18 Choose the automation parameter in the Add Automation dialog.
3. If the category for the automation parameter is collapsed, click the disclosure triangle to expand it. For example, click the sideways triangle next to Echo & Reverb to display the Echo and Reverb automation controls.
4. Select the check box for each automation parameter you want to give a custom curve.
5. Click OK to close the Add Automation dialog. If you selected a single automation parameter, GarageBand displays the Automation track for it. If you selected more than one, Garage Band displays the Automation track for the first parameter. To choose a different parameter, open the Automation Parameters pop-up menu and choose the automation parameter you want to change first (see Figure 9.19).

9.19 Choose the automation parameter for which you want to create an automation curve.
6. Add control points and position them as described earlier in this chapter.
7. Work with other automation parameters as needed, or click the View/Hide Track Automation button on the track header to hide the Automation track again.
Removing an automation parameter
If you need to remove an automation parameter from a track, open the Add Automation dialog, expand the category if necessary, and deselect the check box for the automation parameter. GarageBand prompts you to confirm the decision. Click Continue in the You are about to remove automation dialog, and then click OK to close the Add Automation dialog.
Setting up the master track
After you arrange the volume and panning for the individual tracks within the song and apply such effects as are needed, you’re ready to do the same for the master track. This is the track that controls the volume, panning, automation, and effects for the song as a whole.
Deciding how to arrange the master track
Given that the master track controls the overall sound of the song, you normally need to treat it differently than the individual tracks. Here are two things you normally need to do to the master track:
1. Choose track info settings for the master track. GarageBand comes with a stack of preset settings for different types of track, and you can customize them as needed.
2. Set a volume curve for the master track to control the overall volume of the song and to implement any fade in, fade out, or volume changes that apply throughout the song.
Here are two things you may need to do to the master track:
1. Create a master pitch curve for the song (varying the pitch as the song plays) or a master tempo curve (so that some parts of the song play faster than others).
2. Apply automation parameters to control the effects used for the track. For example, you may need to change the amount or color (feeling) of echo in different parts of the track.
You may want to apply effects to the master track when creating different mixes of a song. Usually, you do this after you create the song’s normal mix.
By contrast, you seldom need to set a panning curve for the master track. If you already panned the individual instruments to where they belong in the mix, you won’t need to pan the whole track unless you’re trying to disorient the listener.
Similarly, you will normally do best to go easy on the effects you apply to the master track, because these effects build on the effects you already applied to the individual tracks.
Displaying the master track
The master track is normally hidden until you display it by choosing Track→Show Master Track or pressing +B. The master track appears at the bottom of the Track List, separated from the other tracks by an open space (see Figure 9.20).
9.20 The master track appears at the bottom of the track list and has no Mixer controls.
Setting track info for the master track
What you normally need to do first is set track info for the master track. The track info lets you quickly switch the overall feel of your song, so it’s great for creating different edits of the song.
To set the track info for the master track, follow these steps:
1. Double-click the track header for the master track to display the Track Info pane with the Master Track button selected (see Figure 9.21).

9.21 The master track lets you quickly change the overall feel of the song.
2. In the left list box, click the sound category you want — for example, Pop or Stadium Rock. The list of available sounds appears in the right box.
3. In the right list box, click the sound you want. For example, if you choose Stadium Rock, you have choices such as Stadium Rock Basic, Large Arena, and Stadium Empty.
4. Play the song and make sure the effect is what you want. If not, choose another sound and test it.
5. If you want to fine-tune the sound, click the Edit tab to display the effects used (see Figure 9.22).
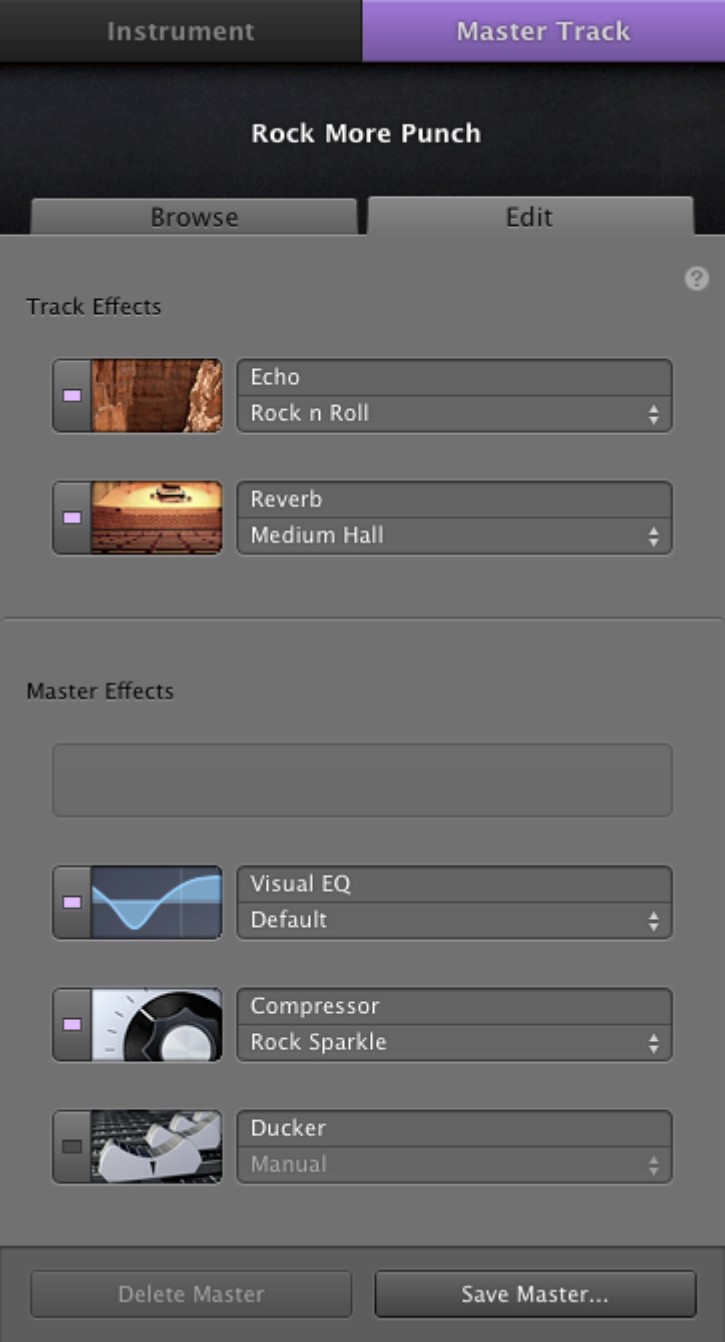
9.22 Use the Edit tab in the Master Track info pane to fine-tune the effects for your song.
From the Master Track info pane, you can also adjust the song’s tempo, time signature, or key. Usually, you’ll want to fix these elements earlier in the process of creating your song because changing them now can wreck the whole song. But sometimes you need to tweak a setting to make the song sound the way you want it to.
6. Change or remove any of the effects applied to the master track using the techniques explained earlier in this chapter. For example, choose a different preset for the Echo effect, or click the picture to the left of the Reverb effect and use the resulting Reverb window to set the reverb time, color, and volume you want.
7. If necessary, add another effect in an empty row in the Master Effects list. For example, you may want to apply the AUMultibandCompressor effect. This offers preset compressions such as Fast and Smooth, Sub Control, and Gentle, or you can click the Edit button and use the AUMultibandCompressor dialog (shown on the opening page of this chapter) to create custom multiband compression.
8. If you customized the sound in a way you want to be able to use again for other songs, save the master track settings as a preset. Click Save Master, type a descriptive name in the Save Master dialog, and then click Save.
Creating a volume curve for the master track
After choosing the effects for your master track, create a volume curve for it like this:
1. On the master track’s track header, open the Automation Parameters pop-up menu and choose Master Volume to display the volume curve (unless it’s displayed already).
2. Set control points as described earlier in this chapter to create the volume curve you want. For example, create a swift fade in at the beginning of the track and a gradual fade out at the end.
GarageBand can create a fade out for you automatically. Just click the track and then choose Track→Fade Out. But because GarageBand doesn’t know your music, you should always listen to the effect and customize it as necessary.
Changing the tempo during the song
Many songs work well at a standard tempo, but for others, you can add variation and aural excitement by changing the tempo during the song. For example, you may want to speed up the tempo during the climax of a song or wind it down toward the end.
If you’ve locked any of the tracks in the song, you must unlock them before you can make changes to the master pitch or tempo. (Changes to the master volume are okay because they affect only the volume of the song as a whole, rather than changing individual tracks.) If one or more tracks is locked when you try to change the master pitch or tempo, GarageBand prompts you to unlock them; click the Unlock All button to do so.
To change the tempo during the song, create a custom Master Tempo curve like this:
1. On the master track’s track header, open the Automation Parameters pop-up menu and choose Master Tempo from it. GarageBand displays the Master Tempo track.
2. Set control points as usual to create the tempo curve you need. Drag a control point upward to increase the tempo or downward to decrease it; GarageBand displays the bpm value as you drag. Figure 9.23 shows an example of a tempo curve that makes a section of a song faster before gradually returning to the previous tempo. The change appears minor in the Timeline, but the listener hears a dramatic difference.

9.23 Creating a custom Master Tempo curve to add variation to a song.
Changing the master pitch of the song
Besides letting you change the pitch of a region or track, GarageBand also lets you change the master pitch of the song. This basically means grabbing all the regions that it makes sense to shift and moving them up or down the musical scale. GarageBand doesn’t change drum tracks or Real Instrument regions you’ve recorded.
As with the other Automation tracks, you can either change the pitch for the whole song or create an automation curve that changes the pitch for only the parts of the song that you specify. Here’s what to do:
1. Open the Automation Parameters pop-up menu and choose Master Pitch from it. GarageBand displays the Master Pitch track.
2. If you want to change the pitch of the entire song, drag the first control point (which GarageBand creates automatically) up or down. When you drag the first control point, the automation curve remains straight, so the pitch changes evenly throughout the whole song.
3. If you want to change the pitch of parts of the song, set control points as for any other automation curve. Drag a control point upward to increase the pitch or downward to decrease it. GarageBand displays a tooltip showing the number of musical half-steps by which you’re moving the control point (for example, +1 or -2).
Adding automation to the master track
You can add automation to the master track by using the same techniques as for the other tracks:
1. Open the Automation Parameters pop-up menu and choose Add Automation to display the Add Automation dialog.
2. Select the check box for each automation parameter you want to add, and then click OK.
3. Open the Automation Parameters pop-up menu and choose the parameter you want to work with.
4. Add control points and create an automation curve for the parameter.
For the master track, GarageBand offers four echo automation parameters rather than the one echo automation parameter that’s available for other tracks:
• Echo Time. This parameter controls how long each echo lasts (whether it is faster or slower than the previous echo).
• Echo Repeat. This parameter controls how many times the echoes repeat.
• Repeat Color. This parameter controls whether the echoes are dark, with each repetition sounding duller than the previous one, or bright, with each repetition sounding thinner than the previous one.
• Echo Volume. This parameter controls how loud the echoes are.
By working with the different echo parameters, you can produce a wide variation of echo effects that enhance the song.
Sharing a Song
When you finish a song, you’ll probably want the world to know about it. GarageBand makes it easy to export a song to iTunes, share it with other people on the Internet, or put it to use in a slide show, a movie, or a DVD. You can also create a ring tone to use on your iPhone.
Exporting a song to iTunes
If you want to listen to your song using iTunes, put it on your iPad or iPhone, or burn it to CD, export the song to iTunes like this:
1. Choose Share→Send Song to iTunes to open the Send your song to your iTunes library dialog (see Figure 9.24).
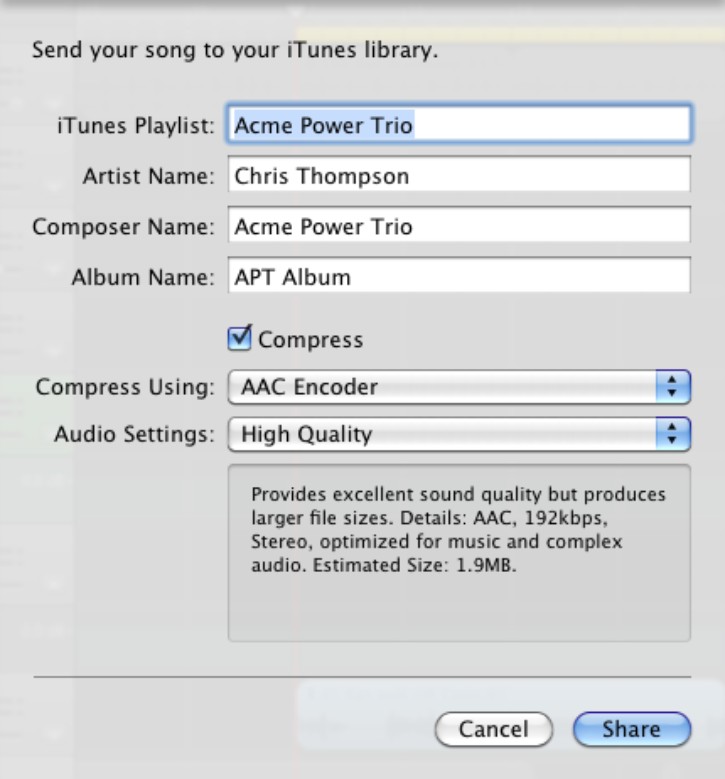
9.24 Exporting a song to iTunes. The Compress Using pop-up menu and Audio Settings pop-up menu appear only when you select the Compress check box.
2. Change the text in the iTunes Playlist, Artist Name, Composer Name, and Album Name boxes as needed. Garage Band imports what you’ve set in its My Info preferences, but you’ll often want to give songs different artist and composer credits or put them in different albums.
3. If you want to compress the song to reduce the file size, select the Compress Using check box and choose the compression method:
• Select AAC Encoder or MP3 Encoder in the Compress Using pop-up menu. AAC gives marginally higher quality than MP3 and is great for iPods, iPhones and iPads, and iTunes, but MP3 files are playable in more hardware and software players than AAC files, so it’s a trade-off.
If you deselect the Compress check box in the Send your song to your iTunes library sheet, GarageBand exports the song as an AIFF file.
• Choose the quality from the Audio Settings pop-up menu. Usually, it’s best to choose Higher Quality to make your song sound good, but you can also experiment with the High Quality setting if you need to save some space. The AAC encoder also offers a Medium Quality setting (which is okay for music) and a Low Quality setting (which you should use for spoken audio only). The MP3 encoder also offers a Good Quality setting; this too is suitable only for spoken audio such as podcasts, not for any music you care about.
4. Click Share. GarageBand mixes down the song and adds it to your iTunes library. iTunes starts playing the new song automatically, even if you were listening to something else at the time.
If you want to compress your song at the highest-possible quality, export it from GarageBand without compression, and then compress it using Apple Lossless Encoding in iTunes. In GarageBand, deselect the Compress check box on the Send your song to your iTunes library dialog and click Share. In iTunes, open the General preferences and click Import Settings. Choose Apple Lossless Encoder in the Import Using pop-up menu, and then click OK to close each dialog. Control+click or right-click the file you imported and choose Create Apple Lossless Encoding Version.
Tagging a song
When you send a song to your iTunes library, GarageBand fills in the Name, Artist, Composer, Album, BPM, and Year tags.
This is a good start, but it’s only a start. Before distributing a song, Control+click or right-click it in iTunes, choose Get Info, and then use the tabs of the Item Info dialog (see Figure 9.25) to edit these tags (if needed) and to add further tags and information to the song. Consider adding the following:
• Genre. It’s vital to set the genre so that people find the song when they browse by genre.
• Track Number. Fill this in so that the listener can sort your songs in the order you intended.
• Artwork. Drag one or more pictures to the box on the Artwork tab of the Item Info dialog, or click the Add button and use the Open dialog to pick the pictures. If you add multiple pictures, drag them into the order in which you want the audience to see them.
• Album Artist. Set this tag if the album artist is different from the artist.
• Sorting tags. If you want your song to be sorted by a different name, artist name, album artist, album, or composer, type the appropriate tags on the Sorting tab.
• Lyrics. If your song has words, add them on the Lyrics tab. Not only do most people like to know a song’s lyrics, but you avoid the heartache of seeing your lyrics mangled by well-intentioned listeners on the Web’s lyrics sites.

9.25 After exporting a song to iTunes, fill in as many tags as possible in the song’s Info dialog. Most of the essential tags are on the Info tab, but adding lyrics and artwork is a great help.
Using a song in other iLife applications
Even without exporting a song from GarageBand, you can use it in your projects in the other iLife applications as long as you save an iLife preview of the song (as GarageBand prompts you to do when you close a project).
To use the song, simply open the Media Browser in the application and select the song in the GarageBand category.
If you haven’t saved an iLife preview for the song, you won’t be able to preview it in the Media Browser. Instead, when you select the song in the Media Browser, the application you use prompts you to open the song in GarageBand so that you can create a preview (see Figure 9.26). Click Yes if you want to use the song.

9.26 The iLife application (here, iMovie) prompts you to open GarageBand and save an iLife preview for a song project that lacks one.
Creating an iPhone ring tone from a song
If you have an iPhone, you can quickly create a custom ring tone from a GarageBand project. You can use either the whole of a short GarageBand project (for example, one that you create specifically as a ringtone) or just part of a longer project. Either way, the maximum length for the ringtone is 40 seconds.
To create a ringtone, all you need do is select the part of the project and then choose Share→Send Ringtone to iTunes.
Provided that your selection is short enough to create a ringtone, GarageBand mixes down the audio and adds it to iTunes, placing it in the Ringtones category in the iTunes library. iTunes starts playing the ringtone (even if you were enjoying some other music at the time), so you can tell immediately if it has turned out the way you wanted.
If your selection is too long, GarageBand displays the Your iPhone ringtone length needs to be adjusted dialog (see Figure 9.27). Click Adjust to return to your song project, select a shorter section, and then choose Share→Send Ringtone to iTunes again.

9.27 GarageBand warns you if your selection is too long to create a ringtone.