Chapter 11: How Do I Publish Blogs and Podcasts with iWeb?
Do you have information to share with people frequently? If so, you can go beyond the limits of standard Web pages by publishing your own blog or podcasts on your Web site. A blog is a great way of distributing text-based information quickly, but you can also include photos, audio, or movies as needed. A podcast lets you quickly distribute either audio-based content or video-based content to listeners or viewers worldwide. Visitors can either browse or subscribe to your blog entries and podcasts on your Web site so that they automatically receive news of new entries and podcasts.
Publishing a Blog
Creating Podcasts
Publishing a Blog
A blog (short for Web log) is a journal that you keep on a Web site. A blog is a great way to communicate with your family and friends — or in a business setting with your colleagues and customers.
iWeb makes it easy to set up a blog, make it look good, and keep it updated with attractive content. When you add a new entry to a blog, it automatically appears at the top of the blog so that visitors see it first. Below it appear other recent entries, and older blog posts appear on archive pages.
Adding a blog to your iWeb site
Here’s how to add a blog to your iWeb site:
1. Click the Add Page button in the iWeb toolbar (or choose File→New Page) to open the Template Chooser.
2. In the list box on the left, choose the theme you’re using for your Web site.
3. In the larger box, click the Blog item, and then click Choose. iWeb closes the Template Chooser, adds a Blog item (containing an Entries item and an Archive item) to your Web site in the sidebar, and starts creating your first entry (see the chapter-opening illustration).
4. Double-click the title placeholder to select it, and then type the name you want to give your blog.
Understanding the Blog, Entries, and Archive items
When you start creating a blog, iWeb adds three items to the sidebar:
• Blog. This is a collapsible item that contains the Entries item and Archive item (discussed next). Click Entries to view the main page that visitors will see when they access your blog. This page contains the latest entries you’ve created.
• Entries. This is the page you use in iWeb to create new blog entries and manage older ones. This page appears only in iWeb, not on your Web site.
• Archive. This page contains all the entries in your blog — both those on your Blog page and older entries that don’t appear there.
iWeb automatically creates a canned entry in the blog for you so that you can see how the blog works. This entry’s title and content vary depending on the blog’s template — for example, the “Day of longboarding” entry you see in the chapter-opening illustration. The easiest way to start is by customizing this entry.
Creating a blog entry
You can now create a blog entry as follows:
1. Click Entries in the sidebar. If you’re working with the initial entry created by iWeb, skip Step 2.
2. Click Add Entry. iWeb creates a new blog entry and adds some default content.
3. Double-click the default title in the entry to display an edit box. (If the title’s already selected and displaying an edit box, you’re all set.) Type the title you want, and then press Return to apply it. iWeb automatically applies the change to the entry’s title in the Title box at the top of the window.
4. If you want to change the date from today’s date, double-click the date to display a date picker (see Figure 11.1). Choose the date you want the blog entry to show.
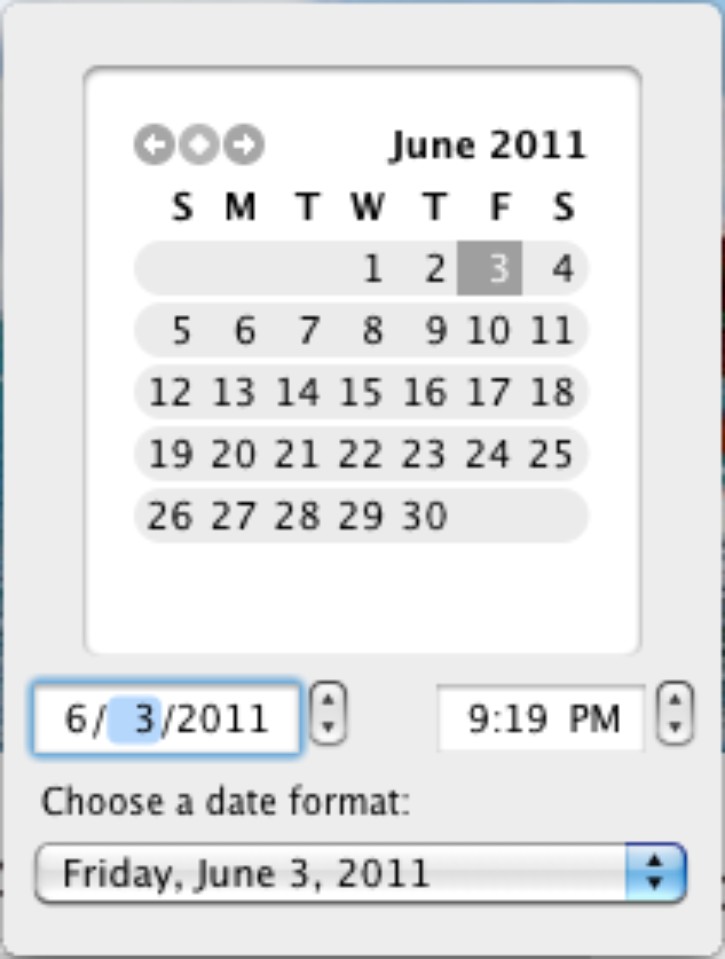
11.1 Use the date picker to change the blog entry’s date if necessary or to choose a different date format.
 In the date picker, you can also change the date format the blog uses if you want to.
5. Double-click the placeholder text for the entry, and then type your entry.
6. Replace the placeholder image with a photo of your own. Click the Media button to open the Media Browser, display the Photos tab, and then drag the photo across. If necessary, zoom, recenter, or otherwise adjust the image, as you learned in Chapter 10.
If you need to delete a blog entry, click it in the list of blog entries, and then click the Delete Entry button. iWeb doesn’t confirm the deletion, but if you delete the wrong entry, you can undo the deletion by immediately choosing Edit→Undo Delete Blog Entry.
Setting up the main page for the blog
Next, set up the main page of the blog — the page that visitors see when they first go to your blog. Follow these steps:
1. Click the Blog item in the sidebar to display the main page. Figure 11.2 shows an example using the White theme. Some of the blog themes are much busier and have many more elements that you can customize.
 Beware choosing a busy theme for your blog. While being able to add more photos and other elements is fun, they may distract readers from the text.
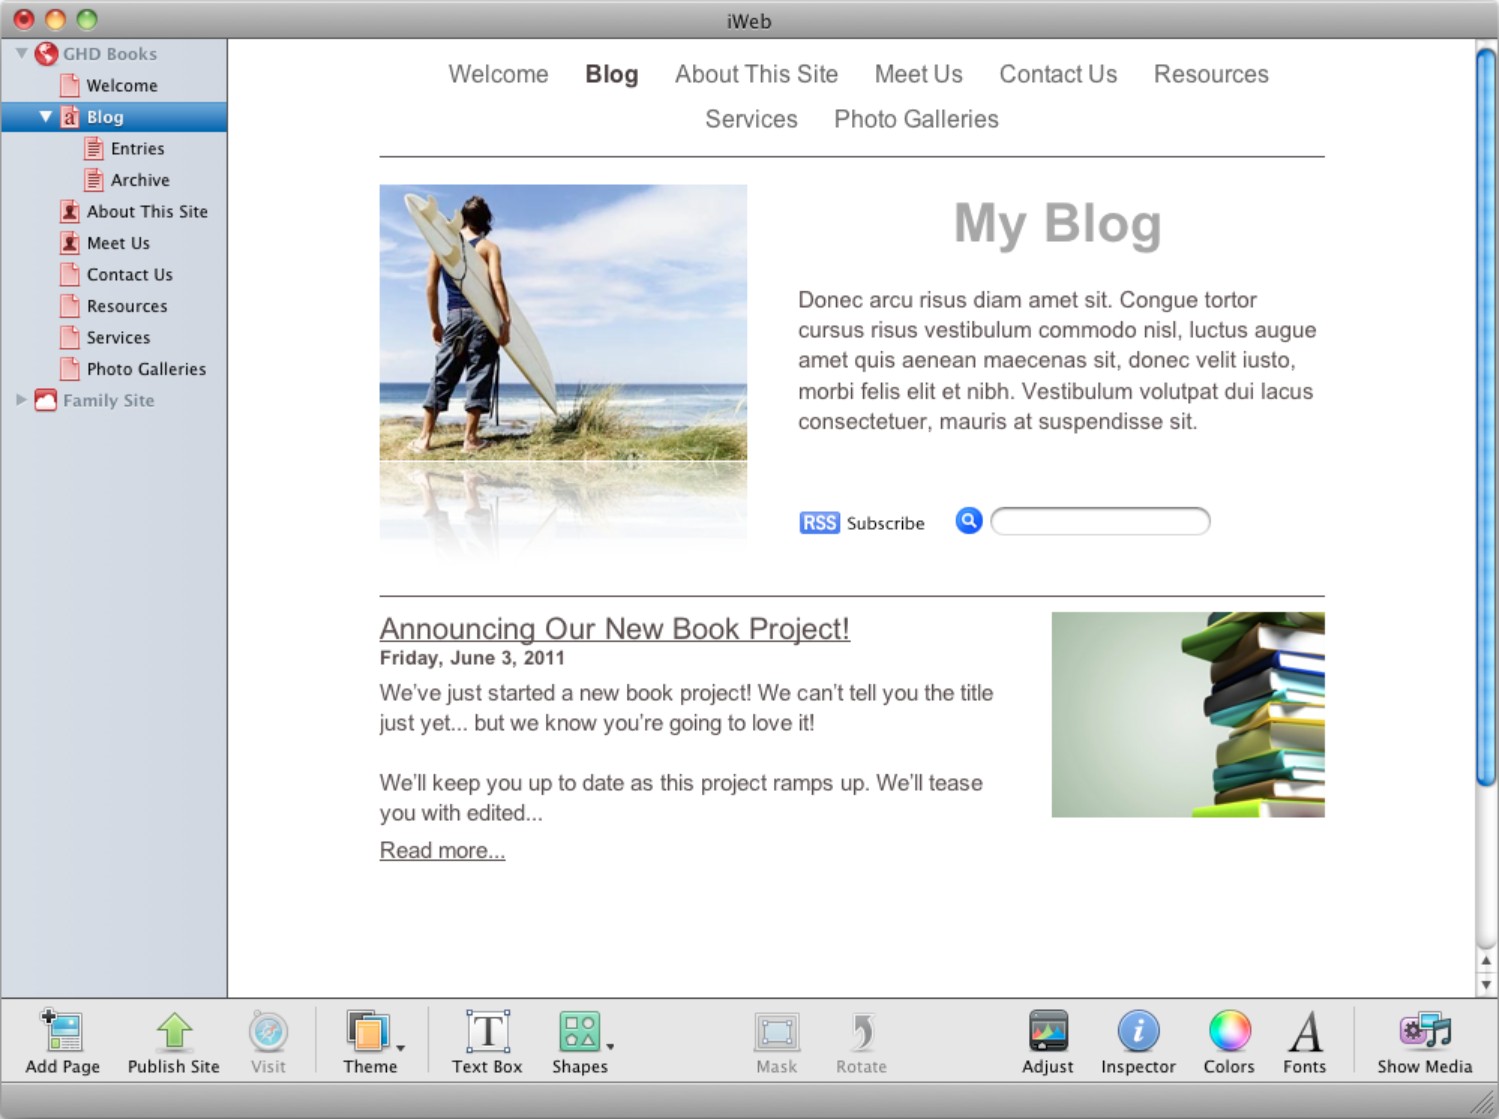
11.2 The entry or entries you just created appear on your blog’s main page, but you need to customize all the other elements.
2. Change the title, main picture, description, and other elements on the main page. As usual, double-click a text placeholder to select its contents, and then type the text you want. Replace the placeholder images by dragging photos from the Photos tab of the Media Browser.
3. Click the Inspector button on the main iWeb toolbar to open the Inspector window. Click the Blog & Podcast Inspector button on the toolbar across the top of the Inspector window, and then click the Blog tab to display its contents (see Figure 11.3).
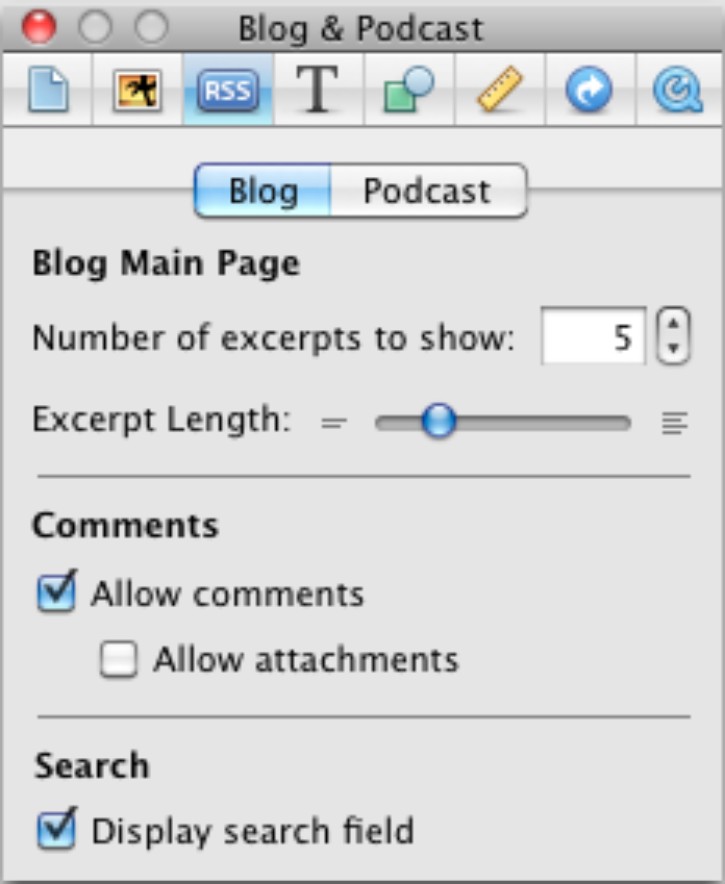
11.3 Use the Blog tab of the Blog & Podcast Inspector to choose whether to allow comments and attachments on your blog.
4. In the Blog Main Page area, set the Number of excerpts to show value and drag the Excerpt Length slider to choose how much of each entry to show. You’ll see the changes in the entry or entries you’ve created so far.
5. In the Comments area, choose whether to allow comments and attachments:
• Select the Allow comments check box if you want to allow visitors to leave comments. iWeb displays the Allow Comments dialog to make sure you know how to manage comments. Click OK.
• If you selected the Allow comments check box, you can select the Allow attachments check box if you want visitors to be able to leave attachments as well. iWeb displays the Allow Attachments dialog warning that you may get objectionable attachments or ones for which you don’t have distribution rights. Click OK.
6. Select the Display search field check box if you want to allow visitors to search through your blog. Usually, searching is helpful.
Each attachment can be up to 5MB in size. That’s enough for a high-resolution photo or a four-minute song at reasonable quality (for example, 128 Kbps in AAC or MP3 format), but if your site gets a lot of 5MB attachments, it can chew through your MobileMe storage allowance and transfer allowance quickly.
Changing the layout of your blog template
From the main page of your blog, you can also change the layout of the entry pages. Here’s how to do this:
1. Click anywhere in the blog entries area on the main page to open the Blog Summary window (see Figure 11.4).

11.4 Use the Blog Summary window to rearrange the photos in your blog.
2. Deselect the Show photos check box if you want to hide the photo from the blog entry. You can then skip the rest of this list because clearing this check box disables the other controls.
3. To change the placement of a photo, open the Placement pop-up menu and click the placement you want to apply.
4. To make the photo bigger or smaller, drag the Photo size slider.
5. To increase or decrease the amount of space around a photo, adjust the number in the Extra space box. This measurement is in pixels.
6. To change the shape of the photo box, open the Photo proportion pop-up menu and choose Original, Square, Landscape, or Portrait.
7. Click the X button in the upper-left corner to close the Blog Summary window.
Adding multimedia to a blog entry
Blog entries are often text-only or text and pictures, but iWeb lets you easily add audio or video to your blog entries if you want.
To add an audio file, follow these steps:
1. Click Entries and then click the blog entry to which you want to add the audio file. If you want to create a new entry, click the Add Entry button, and then type the title and any text as usual.
2. Click the Show Media button to open the Media Browser, and then click the Audio tab.
3. Drag the audio file to the blog entry and drop it there. iWeb displays a Drag image here placeholder.
4. If you want to add a photo to provide visual interest while the audio plays, click the Photos tab in the Media Browser, and then drag a photo to the placeholder. Resize the photo as needed. Figure 11.5 shows an example of a blog entry containing a photo with the audio controls under it.

11.5 When you include an audio file in a blog entry, you can add a picture to give visitors something to look at.
To add a video file from your Mac to a blog entry, follow these steps:
1. Open the blog entry to which you want to add the audio file.
2. Click the Show Media button to open the Media Browser, and then click the Movies tab.
3. Drag the movie file to the blog entry and drop it there. Resize the movie as needed.
Avoid adding large video files to your blog because they will not only take a long time for visitors to download but they will take up your bandwidth allowance quickly. When you add a very large file, iWeb displays a warning dialog to make sure you’re aware of the file’s size. When this happens, click OK, but then delete the video from the blog page. Then either choose a different file or use iMovie to create a shorter edit of the video.
Publishing your blog
When you’ve created your blog entries, click the Publish Site button to publish your blog together with all the other changes you’ve made to your Web site. When iWeb tells you it has finished publishing the Web site, click the Announce button and send an e-mail to encourage friends and family to read your blog. If your blog is gripping, your visitors will subscribe for updates, so you may not need to send announcements via e-mail after your first few entries.
Managing visitor comments
One of the most compelling features of blogs is that visitors can contribute to them by adding comments. If you want, you can also let visitors attach files to their comments so that other people can download the files.
Visitor comments can greatly add to the appeal of your blog. But if you allow comments, you will need to review them frequently and delete any unsuitable comments.
Similarly, if you allow attachments, you must check the files frequently to make sure that none contains offensive material or copyrighted material that is being distributed without adequate permission. You will also need to make sure that attachments don’t take your MobileMe account over its monthly storage limit or data-transfer limit.
 iWeb helps to protect you against “comment spam” by making anyone who tries to submit a comment type a displayed sequence of characters first. This “captcha,” or Completely Automated Public Turing Test to Tell Computers and Humans Apart, aims to prevent automated programs from posting spam comments to your site. Some programs have been written that break captchas by deciphering and typing the word automatically, but at this writing these programs mostly target large sites such as Gmail and Hotmail.
Reviewing and removing comments and attachments
If you do permit comments (and maybe attachments) on your blog, you should review them regularly to make sure there’s nothing you need to remove.
When visitors add comments to your blog, the iWeb icon on the Dock displays a telltale red icon showing the number of comments, just like Mail does for unread e-mail messages. You can force iWeb to check for comments by choosing File→Check for New Comments.
Figure 11.6 shows an example of comments in iWeb. One comment includes an attachment; the other does not.
To delete a comment, click the Delete button (the round button with an X on it). As long as your Mac is connected to the Internet, iWeb deletes the comment from the published version of your blog immediately as well as from the iWeb version. You don’t need to publish your blog again to get rid of the comment from the published version.

11.6 Viewing the comments and attachments that visitors have left.
Deleting comments from your blog using a browser
Because the live version of your blog (on the Web) isn’t kept strictly in sync with the version in iWeb, you can get into the situation where your blog has comments but you can’t read them in iWeb because you’ve deleted the entries.
When this happens, you can use Safari or another Web browser to read the comments — and to delete them if necessary. Follow these steps:
1. In iWeb, click the Visit button or choose File→Visit Published Site to open your blog in your default Web browser.
2. Click the Blog link, and then go to the blog entry that contains the comments.
3. Click the lock icon next to the number of comments. The browser displays the Site Owner Login screen.
4. Type your MobileMe ID and password, and then click the Login button. The browser displays the Manage Comments page (see Figure 11.7).
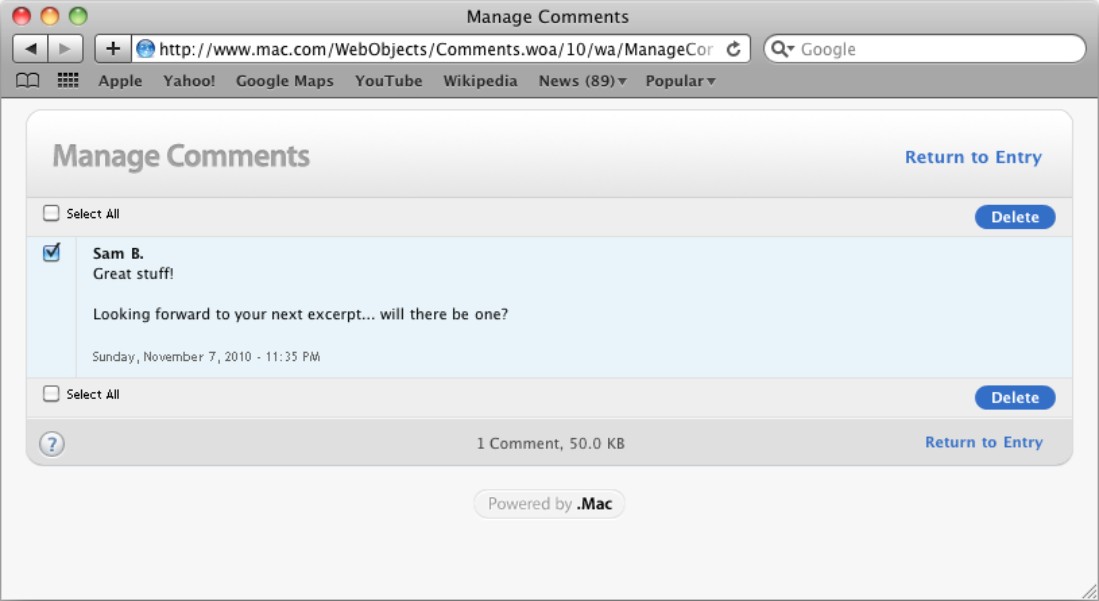
11.7 You can also manage comments and attachments from Safari or another Web browser.
5. Select the check box for the comment (or comment and attachment) you want to delete, or select the Select All check box, and then click Delete. Click OK in the confirmation dialog that the browser displays.
6. Click the Return to Entry link if you want to return to the blog entry.
Creating Podcasts
Podcasts give you a way of broadcasting your own audio or video content easily on the Internet. You create a podcast episode and post it to your Web site, where anyone worldwide can download it. And if that person enjoys the podcast, he or she can subscribe and receive automatic notification of future episodes when you post them.
Putting a podcast up on the Web is a four-stage process:
1. Add a podcast to iWeb. Start by creating your Podcast item in iWeb. This Podcast item is the overall container for the podcast, in the same way as your Blog item is the container for your blog posts.
2. Create the podcast episode. To create a podcast, you use an audio or video application such as GarageBand.
3. Create a Web page for the podcast. In iWeb, you create a Web page using one of the Podcast templates. You then place the podcast episode on the page, together with any explanatory text it needs.
4. Publish the podcast to the Web. You publish the podcast from iWeb in exactly the same way as you publish other Web pages.
If you want, you can also submit your podcasts to the iTunes Store. This can be a great way of putting your material in front of a larger audience than you can reach via your own Web site.
Add a podcast to iWeb
To add a podcast to your Web site in iWeb, follow these steps:
1. Click the Add Page button in the iWeb toolbar (or choose File→New Page) to open the Template Chooser.
2. In the list box on the left, choose the theme you’re using for your Web site.
3. Click the Podcast item, and then click Choose. iWeb adds three items to the sidebar:
• Podcast. This is a collapsible item that contains the Entries item and Archive item (discussed next). Click this item to view the main page that visitors see when they access your podcasts. This page contains an overview of your last few podcasts.
• Entries. This is the page you use in iWeb to create new podcasts and manage older ones (for example, deleting them). This page appears only in iWeb, not on your Web site. iWeb creates a new entry for you by default.
• Archive. This page contains all your podcasts — both those on your Podcast page and older podcasts that no longer appear on that page.
4. Click the Podcast page in the sidebar, and then customize the text and image placeholders using the techniques you learned in this chapter and in Chapter 10. This is the first page that visitors see when they click the Podcast link in your Web site.
5. To change the layout of the podcast entry pages, click one of the entries, and then use the Blog Summary dialog as discussed earlier in this chapter.
6. When you finish customizing the Podcast page, click Entries in the sidebar to display the Entries page, and then delete the entry that iWeb created for you. Click the entry in the list box at the top, and then click the Delete Entry button. You create a real podcast entry from GarageBand next.
Creating a podcast from GarageBand
GarageBand lets you create both audio podcasts and video podcasts. You can create a simple podcast that contains only audio or only video and audio, but GarageBand makes it easy to create enhanced podcasts that include artwork (in audio podcasts), navigation markers, and URLs the viewer can visit. This section shows you how to create enhanced podcasts.
Start creating a podcast
Here’s how to start creating a podcast:
1. Launch GarageBand from the Dock icon or the Applications folder. If GarageBand is already open, choose File→Close to close the open project.
2. On the GarageBand opening screen, click New Project in the left pane, click Podcast in the main pane, and then click Choose. GarageBand displays the New Project from Template dialog (see Figure 11.8).
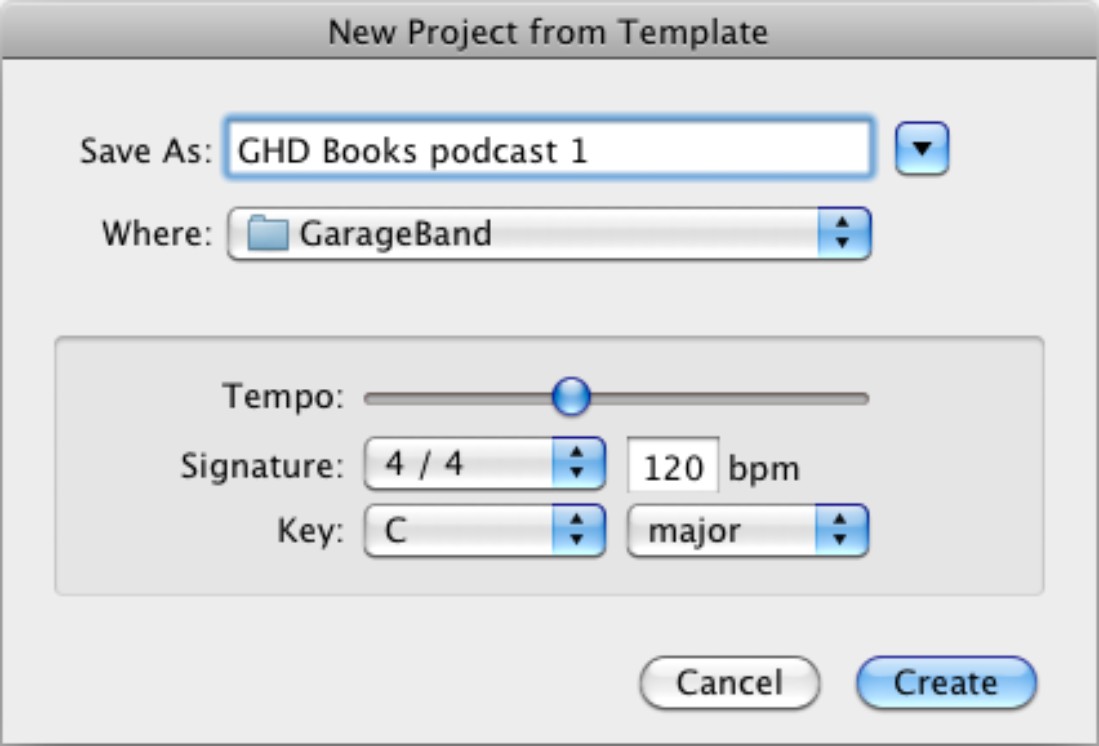
11.8 In the New Project from Template dialog, name your podcast episode and pick the folder in which to store it.
3. Type the name for the podcast episode in the Save As box, and pick the folder in the Where pop-up menu.
4. Click Create. GarageBand creates the blank podcast project and displays it. Click the Podcast Track in the upper-left corner of the window to display the Podcast Markers pane, as shown in Figure 11.9.

11.9 A blank podcast project includes a Podcast Track, a Male Voice track, a Female Voice track, and a Jingles track.
Here are the details of what you see in the figure:
• Podcast Track. This is the track that contains the audio for the podcast. If you want to create a video podcast instead, you replace the Podcast Track with a Movie Track. A podcast can have only one of these at a time.
• Male Voice track. This is a Real Instrument track with settings optimized for making a male voice clearly audible in the podcast.
• Female Voice track. This is a Real Instrument track with settings optimized for making a female voice clearly audible in the podcast.
• Jingles. This track is for adding jingles, sound effects, and other short audio items to the podcast.
• Podcast pane. This pane contains the opening artwork for the podcast episode.
• Markers pane. This pane lets you create and work with markers in the podcast.
• Media Browser. As normal in the iLife applications, this browser lets you add audio, photos, and movies to your podcast.
• Mixer. As usual in GarageBand, the mixer controls let you adjust the volume, balance, and panning of different tracks in your podcast.
Adding audio to the podcast
You can add audio to the podcast either by recording narration or by adding musical tracks or loops.
Here’s how to record narration:
1. Double-click the Male Voice track header or the Female Voice track header (depending on the voice that will narrate) to display the Track Info pane (see Figure 11.10).
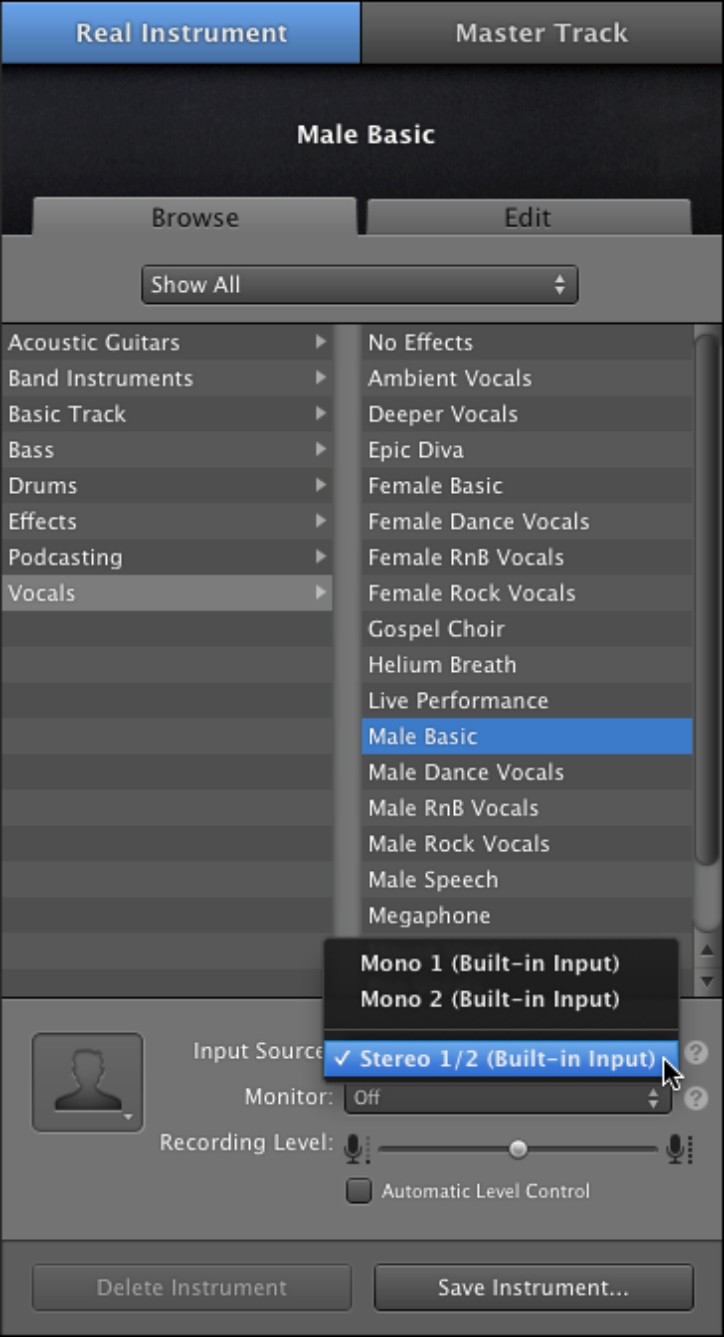
11.10 To record narration, choose the input source in the Track Info pane.
2. In the Input source pop-up menu, choose the microphone you will use — for example, your Mac’s built-in microphone, recording in stereo.
3. If you want to hear what you’re recording, choose On in the Monitor pop-up menu. GarageBand automatically protects the input from feedback. You can also choose the On (no feedback protection) setting, but you may get feedback.
4. Drag the Playhead to the time at which you want to start the recording. If you add introductory music or jingles, leave enough space at the start. Otherwise, you can begin the recording right from the start.
5. Click the Record button to start recording, and then start your narration. Click the Stop button when you finish recording.
To add an audio file to the podcast, display the Media Browser, click the Audio tab, and then drag the file across to the podcast. GarageBand creates a new track for it, which you can adjust, as discussed in Chapter 8.
Similarly, you can add Software Instrument or Real Instrument tracks to the podcast. Just click the Loop Browser button to display the Loop Browser, select the loop, and drag it to the podcast.
Replacing the Podcast Track with a Movie Track
If you want to create a video podcast, you replace the Podcast Track with a Movie Track. To do so, choose Track→Show Movie Track, and then click Replace in the dialog (see Figure 11.11) that GarageBand displays.

11.11 To create a video podcast, you replace the Podcast Track with the Movie Track.
GarageBand displays the Movie Track at the top of the track list. You can then drag a movie from the Movies tab in the Media Browser and drop it on the Movie Track. GarageBand adds the movie to the Movie Track and adds a Real Instrument track named Movie Sound containing the audio from the movie. You can edit this track just like any Real Instrument track — you can even mute it if you want to suppress it altogether and accompany the movie with narration or other audio content instead.
Adding episode artwork
Each podcast can have one piece of episode artwork — the image that represents the episode and that appears on the podcast’s Web page in iWeb and your Web site.
To add the episode artwork, follow these steps:
1. If the Track Editor isn’t already displayed, click the Track Editor button to display it. If you don’t see the Podcast Markers pane, click the Podcast Track.
2. If the Media Browser isn’t already displayed, click the Media Browser button to display it. Click the Photos tab to display its contents.
3. Find the photo you want, and then drag it to the Episode Artwork pane in the lower-left corner of the GarageBand window.
4. If you need to edit the photo, double-click it in the Episode Artwork area to open the Artwork Editor window (see Figure 11.12). Drag the slider to resize the photo, and then drag the photo so that the border frames the part you want to display. Click Set when you finish.

11.12 Use the Artwork Editor window to resize a photo and to select the part you want to display.
Adding markers to a podcast episode
If you’re creating an enhanced podcast episode, you can add markers to it. The markers break up the podcast track into marker regions that show you how long each section lasts. You can move marker regions or resize them using the same techniques you use for audio clips.
Here’s the easiest way to add a marker:
1. Position the Playhead where you want the marker region to start. Either drag the Playhead or play through the podcast to reach the right point, and then stop playback.
2. Click the Add Marker button or choose Edit →Add Marker (or simply press P). GarageBand adds a marker to the Track Editor (see Figure 11.13).
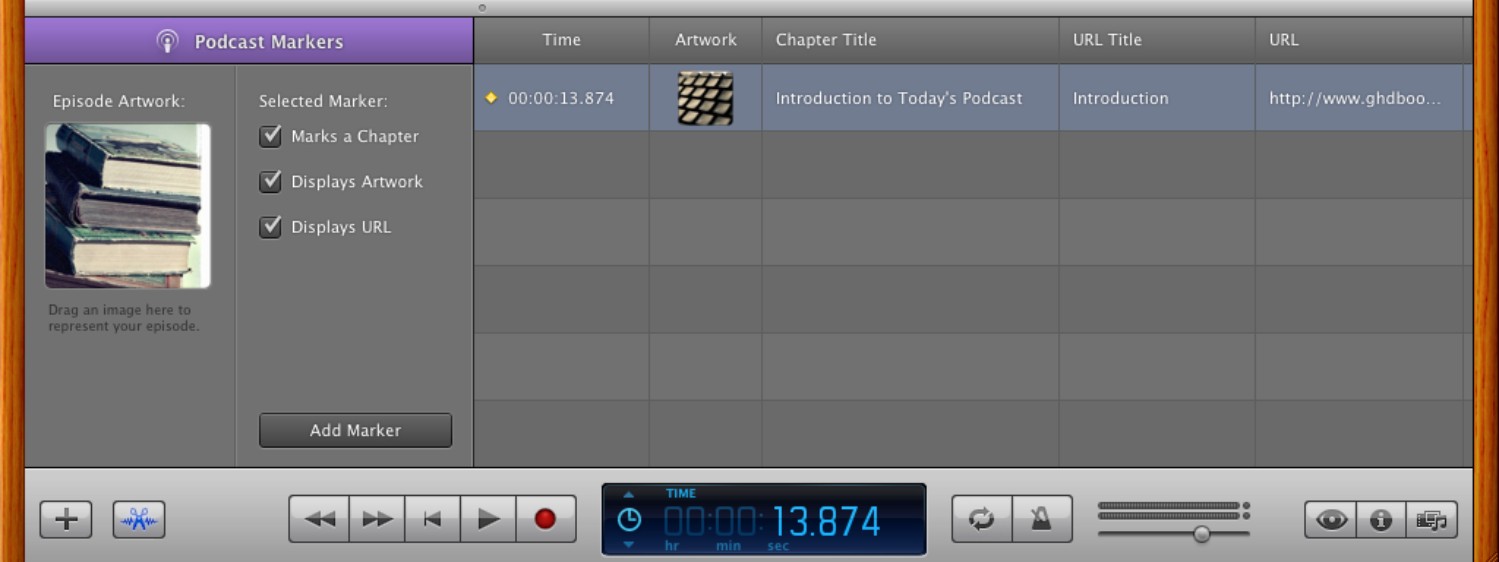
11.13 Markers make your podcast episode easier to navigate and let you add URLs the viewer can reach.
3. Add artwork for the marker by dragging it from the Photos tab of the Media Browser to the marker’s placeholder in the Artwork column in the editing area. If you need to edit the photo, double-click it in the Artwork column to open it in the Artwork Editor, and then resize it and select the part you want, as described earlier in this chapter.
You can also create a new marker and add artwork to it by dragging a photo from the Photos tab of the Media Browser to the appropriate point on the Podcast Track.
4. Click in the marker’s row in the Chapter Title column in the editing area, type the title, and then press Return to apply it.
5. If you want to add a URL to the marker, click in the URL Title column in the marker’s row, and then type the text you want to display for the URL. Then click in the URL column and type or paste the URL itself. The URL title can be the same as the URL itself if you want, but often it’s helpful to display a URL title that’s shorter than the URL, more descriptive, or both.
Adding a chapter title to a marker is optional, but it enables someone playing back the podcast in iTunes, iDVD, or QuickTime to move quickly from one marker to another.
Adding sounds or jingles
To help you jazz up your podcasts, GarageBand also provides jingles, sound effects, and stingers (attention-grabbing sounds). Here’s how to add these sounds to a podcast episode:
1. If the loop browser isn’t open, click the Loop Browser button.
2. Click the Podcast Sounds View button. GarageBand displays the sounds in Podcast Sounds View (see Figure 11.14).

11.14 The loop browser’s Podcast Sounds View lets you quickly browse through the jingles, stingers, and sound effects.
3. Navigate to the sound you want. For example, click Sound Effects in the Loops column, click the category in the second column, and then click the sound. Or type a search term in the Search box and press Return to find sounds that match that term.
4. Drag the sound to the Jingles track, and position its beginning at the time you want it to start.
Ducking backing tracks to keep narration audible
If your podcast episode includes audio tracks as well as one or more narration tracks, you can duck the audio tracks to make sure that the narration is always audible. To do this, you tell GarageBand which tracks are lead tracks and which tracks are backing tracks. When playing or mixing your podcast episode, GarageBand ducks (lowers) the backing tracks when any of the lead tracks have a sound. You can adjust the amount of ducking to get the effect you need.
Here’s how to duck the backing tracks:
1. If GarageBand isn’t displaying the ducking controls (see Figure 11.15), choose Control→ Ducking or press  +Shift+R to display them.

11.15 In the ducking controls, the yellow arrow pointing up indicates a lead track, and the blue arrow pointing down indicates a backing track.
2. To make a track a lead track, click the upper arrow button so that it turns yellow. If the button is already yellow, the track is already a lead track.
3. To make a track a backing track, click the lower arrow button so that it turns blue. If the button is already blue, the track is already a backing track.
Play back the episode to see whether the ducking is how you want it to be. If not, adjust the ducking like this:
1. Click the Track Info button to open the Track Info pane.
2. Click the Master Track tab.
3. Click the Edit tab.
4. In the Ducker pop-up menu, choose the preset you want — for example, Fast - Maximum Music Reduction:
• Speed. There are three speeds: Fast, Slow, and Slowest. These control how fast the ducking happens.
• Degree of reduction. There are three degrees of reduction: Maximum Music Reduction, Moderate Music Reduction, and Slight Music Reduction.
5. If none of the Ducker presets suits you, create your own setting like this:
• Choose Manual in the Ducker pop-up menu.
• Click the picture button to the left of the Ducker pop-up menu to display the Ducker window, as shown in Figure 11.16.
• Drag the sliders to set the amount of ducking you need, and then click the Close button (the red button in the upper-left corner of the Ducker window).
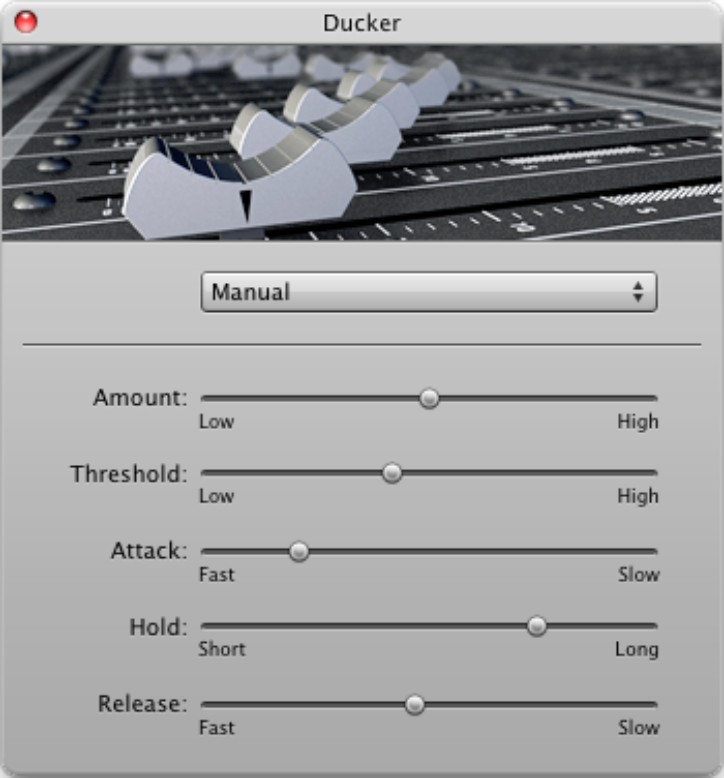
11.16 You can use the Ducker window to create custom ducking for your podcast episode.
Adding episode information to the podcast episode
After creating the content for your podcast episode, add the episode information like this:
1. Double-click the Podcast Track to open the Track Info pane.
2. Click the Podcast Track tab to display the Episode Info pane, as shown in Figure 11.17.
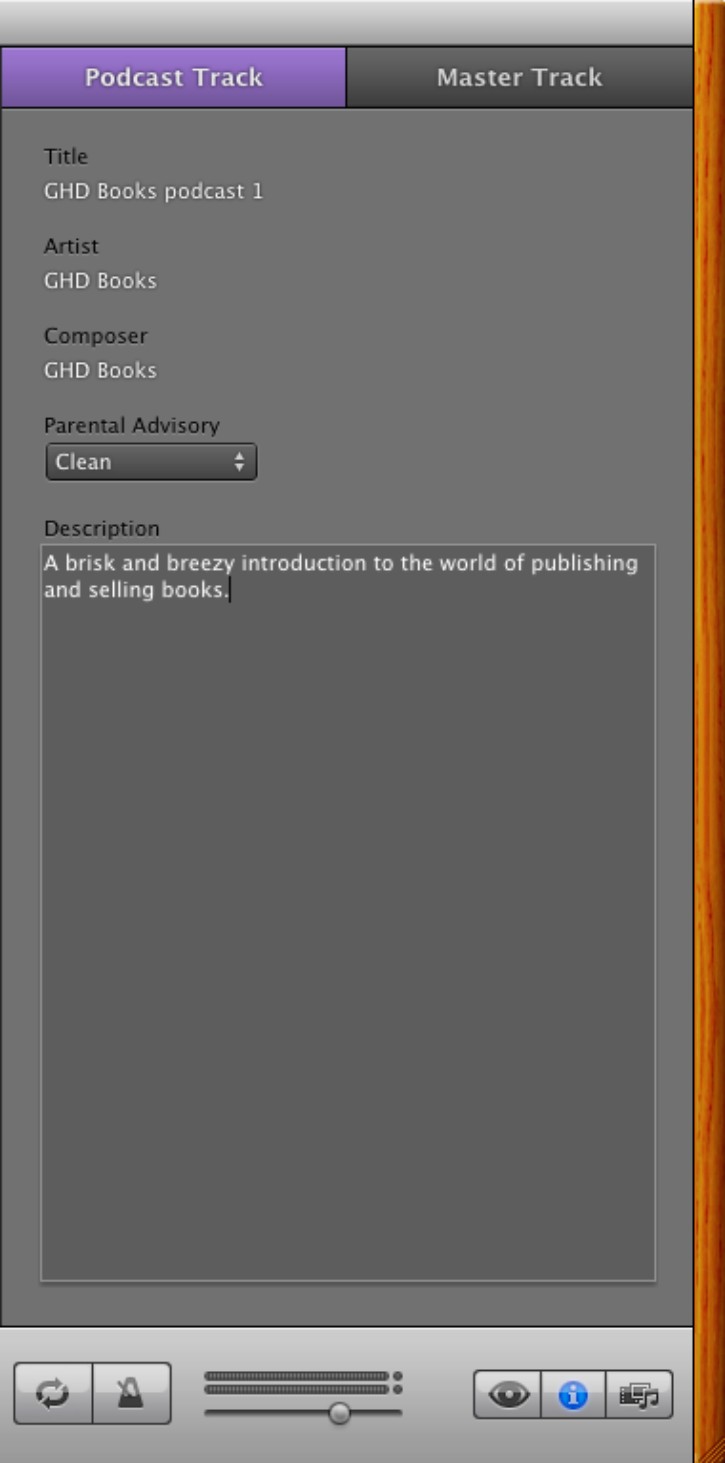
11.17 Use the Episode Info pane to set the title, artist, and composer information, apply a parental advisory if needed, and add a description.
In the Ducker window, the Threshold slider controls the threshold level at which GarageBand starts to apply the ducking. The Attack slider controls the speed at which the ducking takes effect, and the Release slider the speed at which the ducking ceases. The Hold slider controls how long the ducking remains on.
3. Type the title and adjust the artist and composer information as needed.
4. If you want to apply a parental advisory to the episode, open the Parental Advisory pop-up menu and choose Clean or Explicit, as appropriate. If you don’t want to apply a parental advisory, choose None.
5. Click in the Description box and type a description of the episode’s contents.
When you finish creating your podcast episode, save it by pressing +S.
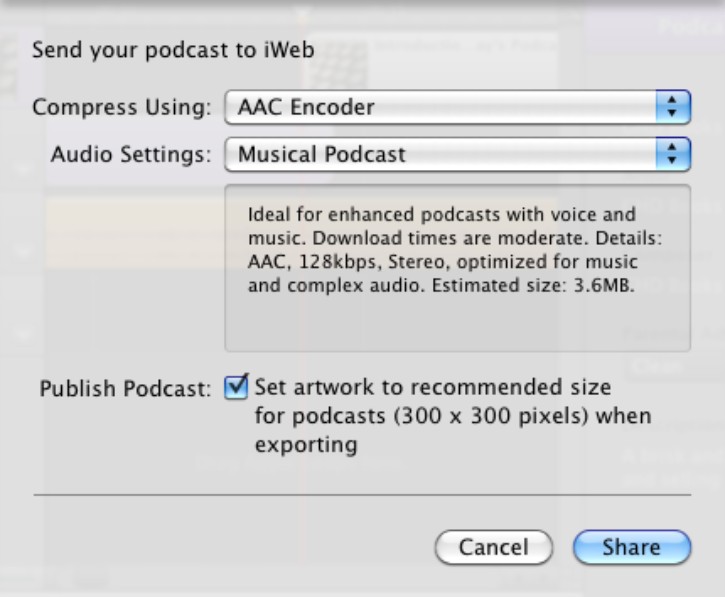
Sending the podcast to iWeb
When you complete the podcast, send it to iWeb like this:
1. Choose Share→ Send Podcast to iWeb. GarageBand displays the Send your podcast to iWeb dialog (see Figure 11.18).
11.18 Before you can add your podcast to your Web site, you need to export it using this dialog.
2. In the Compress Using pop-up menu, choose AAC Encoder if you want to use AAC format, or MP3 Encoder if you want to use MP3 format. AAC gives marginally better quality, but MP3 is usually a better choice because many more players can play MP3 than AAC. MP3 is also a better choice for playing from within a Web page.
3. In the Audio Settings pop-up menu, choose the quality:
• Mono Podcast. Uses the 32 Kbps bit rate and mono (one channel) rather than stereo. The files download quickly and help conserve Internet bandwidth, but the audio results are disappointing — as if you were podcasting on AM radio.
• Spoken Podcast. Uses the 64 Kbps bit rate and stereo. This sounds fine for voice, but music and other complex audio suffers.
• Musical Podcast. Uses the 128 Kbps bit rate and stereo. Music sounds fine to anyone except audiophiles.
• Higher Quality. Uses the 192 Kbps bit rate and stereo. Music sounds great to most people, but the file sizes are that much larger.
• iTunes Plus. (AAC Encoder only.) Uses the 256 Kbps bit rate and stereo. This produces high-quality sound at the expense of larger file sizes.
• Custom. Opens the AAC Encoder dialog or MP3 Encoder dialog (depending on the encoder you chose in the Compress Using pop-up menu) so that you can choose exactly the settings you want. Figure 11.19 shows the MP3 Encoder dialog. Click OK when you make your choices.

11.19 Use the MP3 Encoder dialog or the AAC Encoder dialog when you need to create super-high-quality podcasts.
4. If you’re using the AAC Encoder, select the Set artwork to recommended size for podcasts when exporting check box if you want GarageBand to resize the art automatically. This is usually a good idea. This setting doesn’t apply to MP3 podcasts.
5. Click Share. GarageBand exports the podcast and passes it to iWeb, which prompts you to decide which blog you want to send it to.
6. Choose the blog or podcast, and then click OK. iWeb adds the podcast to the Entries list for the blog or podcast.
Use custom audio settings when you need to crank the quality as high as possible. In the AAC Encoder dialog or MP3 Encoder dialog, choose a high bit rate — up to 320 Kbps if you can afford large file sizes. Turn on Variable Bit Rate Encoding to squeeze the highest quality into your files. Select the Stereo option button unless you need mono. For MP3, turn off joint stereo for bit rates more than 160 Kbps — joint stereo is a space-saving measure that reduces audio quality, so you shouldn’t use it at higher bit rates.
Publishing the podcast from iWeb
After you add the podcast episode to iWeb from GarageBand, you need to finalize its Web page, set series, and episode information, and then publish it to your Web site.
Finalizing the podcast’s Web page
When GarageBand creates an entry in iWeb’s Podcast category for the podcast episode, it copies across the title and artist information you supplied. Often, you need to edit this information to make the entry’s Web page look compelling. For example, you may want to improve the description, give the podcast a snappier title, or change the date.
Setting series and episode information
Next, set the series and episode information for the podcast like this:
1. Click the Inspector button on the toolbar to display the Inspector window.
2. Click the Blog & Podcast Inspector button to display the Blog & Podcast Inspector. Click the Podcast tab to display it, as shown in Figure 11.20.
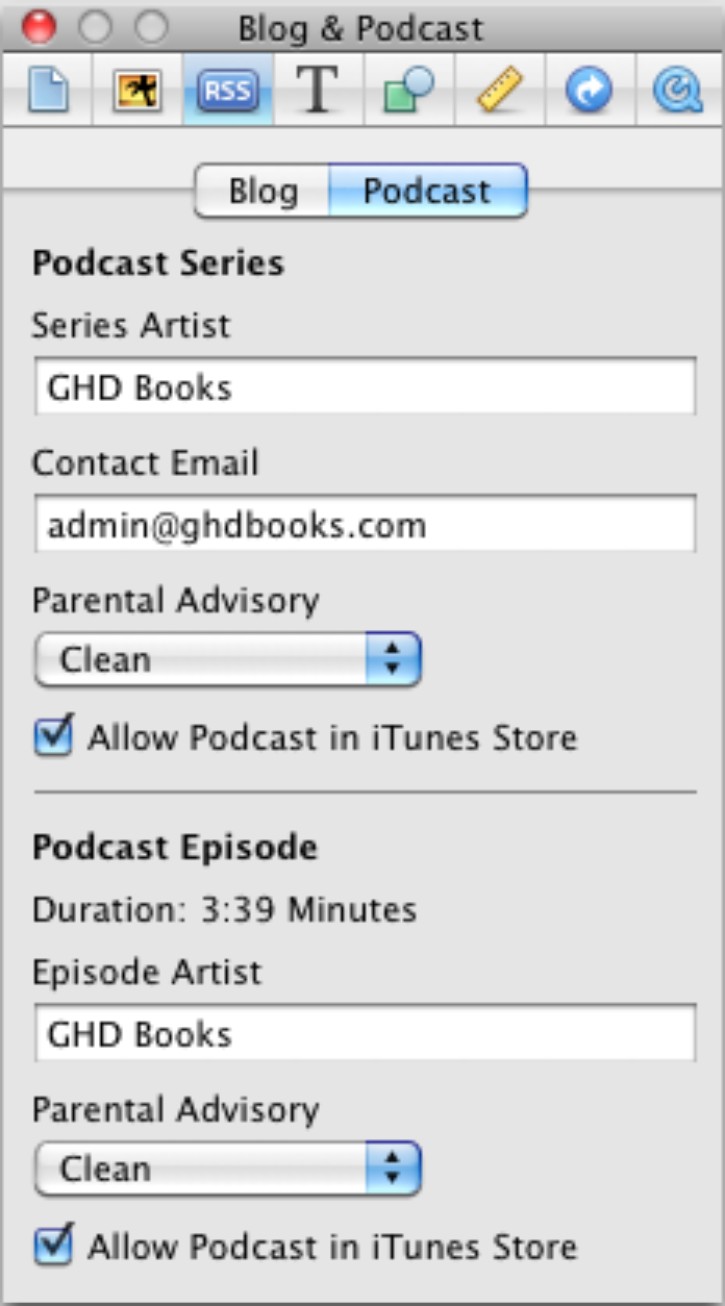
11.20 Enter the series and episode information for your podcast on the Podcast tab in the Blog & Podcast Inspector.
3. Choose serieswide options in the Podcast Series area:
• Series Artist. Type the name you want to use for the artist for the podcast series. (This may be different from the artist for individual episodes.)
• Contact Email. Type the address you want to use for the podcast series.
• Parental Advisory. Choose Clean or Explicit if you want to apply a parental advisory to the series. Choose None if you don’t.
• Allow Podcast in iTunes Store. Select this check box if you want the podcast series to appear in the iTunes Store for free download. This is a great way of getting distribution for your podcast.
4. Choose options for this episode only in the Podcast Episode area:
• Episode Artist. Type a different artist’s name here if necessary.
• Parental Advisory. Choose Clean or Explicit if you want to apply a parental advisory to this podcast episode. (This rating can be different from that which you applied to the podcast series.) Choose None if you don’t.
• Allow Podcast in iTunes Store. Select this check box if you want the podcast episode to appear in the iTunes Store for free download.
5. Click the Close button (the red button in the upper-left corner) to close the Inspector.
Publishing the podcast
Your podcast is now ready for publishing. To publish it, click the Publish Site button in the lower-left corner of the iWeb window.