Chapter 12: How Do I Design, Build, and Burn DVDs in iDVD?
iDVD lets you create professional-looking DVDs from your movies, photos, and compositions, complete with customized menu screens including pictures, video, and audio. You can either take full control of the process of creating the DVD, or use the Magic iDVD feature to jump-start the process for you and then finish it yourself. You can even use the OneStep DVD feature to burn a DVD directly from your DV camcorder without your intervention. The first essential is to understand the process of creating a DVD in iDVD. Let’s look at that quickly, and then get to work.
Understanding the Process of Creating a DVD
Starting a DVD Project
Adding Content to the DVD Project
Customizing the Menu Screen for the DVD
Checking Your Project’s Status and DVD Space
Using Map View to Inspect Your DVD
Burning the DVD
Creating a OneStep DVD
Jump-Starting a DVD with Magic iDVD
Understanding the Process of Creating a DVD
Before getting into creating a DVD, let’s go quickly through the steps you need to take. The process is straightforward once you know what you’re doing.
1. Get your content ready in the other iLife applications:
• Movies. Create movies in iMovie and export them directly to iDVD or to the Media Browser. If you have movies already prepared in other folders, you can use them directly from there.
• Photos. If you want to create slide shows in iDVD, prepare the photos in iPhoto. For example, put your edited photos in a photo album so that you can grab them all at once.
• Music. Compose songs in GarageBand and save previews of them in the Media Browser so that iDVD can access them. You can also export the finished songs to iTunes and use them from there. And you can use any song or playlist from your iTunes library — so you may want to assemble a suitable playlist for a DVD.
2. Start creating a DVD project in iDVD. You can create either a regular DVD project, which gives you total control right from the start, or use the Magic iDVD feature to jump-start creating the DVD. If you use Magic iDVD, you avoid Step 3 altogether, and Magic iDVD takes care of Step 4 for you.
 The majority of this chapter shows you how to create a DVD manually. If you want to use the Magic iDVD feature to start your DVD project quickly, see the end of the chapter.
3. Add content to the DVD. At this point, you add your movies, photos, and music to the DVD. You may need to add chapter markers to a movie or create a scene selection menu for a movie; the latter involves a bit of work outside iDVD but is well worth the effort.
4. Customize the menu screen for the DVD. The menu screen is the background on which the various buttons for controlling the DVD appear. You can add movies and slide shows to the menu screen to give it more impact.
5. Check the DVD’s status and inspect the items it contains.
6. When the DVD project is ready, burn it to DVD.
After skimming over the previous six steps, you may have already taken care of Step 1, preparing the contents. (If not, go and do so.) The following sections take you through the remaining five steps in turn.
Starting a DVD Project
Now that you understand the process of creating a DVD, it’s time to launch iDVD and start a project.
Launch iDVD by either of these ways:
• Click the iDVD icon in the Dock.
• Click the desktop, choose Go→Applications, and then double-click the iDVD icon in the Finder window.
The first time you launch it, iDVD displays the iDVD opening screen shown in Figure 12.1.

12.1 On the iDVD opening screen, choose the type of DVD project you want to create.
Once you create a DVD project (or several), each time you launch iDVD, it opens the last project you were working with. If you close that project (by choosing File→Close Window), iDVD displays the iDVD opening screen again.
Choosing which kind of DVD to create
Before you can get started with iDVD, you need to pick a task from the iDVD opening screen. This screen lets you create three kinds of DVD projects or open an existing project:
• Create a New Project. Click this button to start a new DVD that you create manually, as described in the bulk of this chapter. This is what you’ll probably want to do most of the time.
• Open an Existing Project. Once you start a DVD project or two, you can click this button to open one of them to work on it further. Choose the DVD project in the Open dialog, and then click the Open button to open it.
• Magic iDVD. Click this button to create a DVD the quick-and-easy way. Like the Magic GarageBand feature in GarageBand for starting custom songs in a snap, Magic iDVD lets you create a customized DVD with minimal effort while providing you with control over the DVD’s contents, menus, and appearance.
• OneStep DVD. Click this button to grab movie content from the tape on your DV camcorder and drop it directly onto a DVD. When you do, you don’t get to use iMovie to edit the movie content and pretty it up, so OneStep DVD is best for content that’s either final (for example, a movie project someone has exported to the DV camcorder) or that you’re simply not planning to edit. You find details of OneStep DVD later in this chapter.
Creating a new project
Here’s how to create a new project:
1. Click the Create a New Project button from the iDVD opening screen. iMovie displays the Create Project dialog (see Figure 12.2).
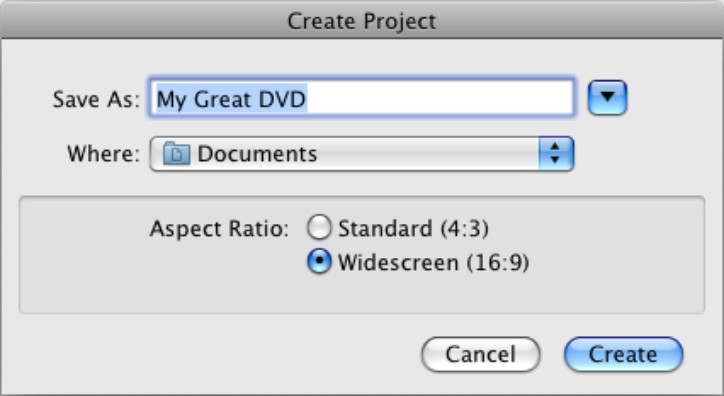
12.2 Start by naming your DVD project, choosing its aspect ratio, and deciding where to save it.
2. Type the name for the project in the Save As box in place of iDVD’s suggestion (My Great DVD).
3. In the Where pop-up menu, choose the folder in which to save the DVD project. iDVD suggests the Documents folder, but it’s better to use a different folder so that your Documents folder doesn’t get cluttered. If necessary, expand the Create Project dialog so that you can see the sidebar and create a new folder.
 If you already have a DVD project open in iDVD, you can display the iDVD opening screen by closing the open project. Alternatively, choose File→New to display the Create Project dialog.
 Make sure the hard drive has plenty of free space for creating the DVD. You need 8 to 10GB for burning a full single-layer disc and 15 to 20GB for burning a full double-layer disc.
4. In the Aspect Ratio area, select the Standard (4:3) option button if you’re creating a DVD for standard-format screens. Select the Widescreen (16:9) option button if your audience will use wide screens; anyone viewing a widescreen DVD on a standard-format screen will see it letterboxed with black bands above and below.
5. Click Create. iDVD creates the project and displays it in the main iDVD window.
Setting preferences to meet your needs
Now that you have iDVD open, you can set preferences to tell iDVD how you want it to work and how to encode your video. Choose iDVD→Preferences to open the iDVD preferences window, and then click the General button on the toolbar if it’s not already selected.
Setting General preferences
The General preferences (see Figure 12.3) contain the following settings:
• Show drop zone labels. Select this check box to have iDVD label the areas on the menu screens where you can drop background music, photos, or movies. These labels are usually helpful.
• Show Apple logo watermark. Select this check box if you want to make an Apple logo appear as a watermark on the menu backgrounds of your DVD.
• Fade volume out at end of menu loop. Select this check box if you want iDVD to gradually fade out the volume at the end of each loop.
• When changing themes. Tell iDVD what to do about changes you’ve made to a theme when you switch a DVD project from one theme to another. Select the Use theme default values option button if you want to use the values in the new theme. Select the Retain changes to theme defaults option button if you want to keep your changes. Select the Always ask option button if you want iDVD to prompt you to decide at the time.
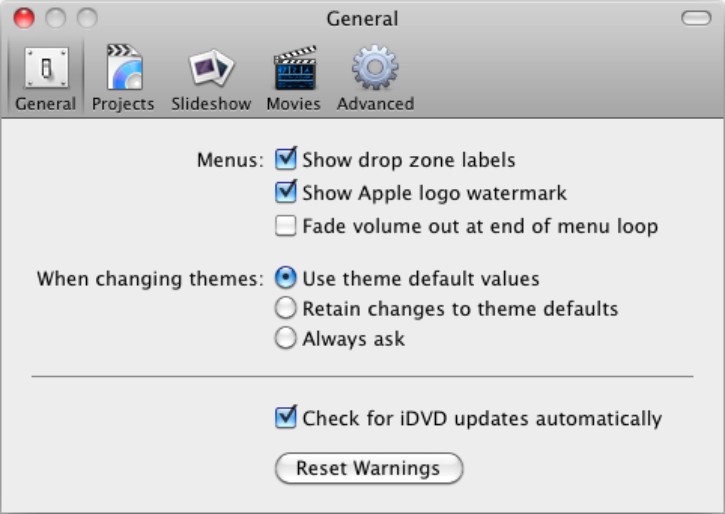
12.3 The General preferences include settings for fading out audio on menu loops and choosing how to handle theme changes.
• Check for iDVD updates automatically. Select this check box if you want iDVD to automatically look for its own updates. Deselect the check box if you prefer to check manually by choosing iDVD→Check for Updates or by using Software Update.
• Reset Warnings. You can turn off many of iDVD’s warnings by selecting a Don’t ask me again check box in them. Click this button if you need to reset all iDVD’s warnings.
Setting Projects preferences
The Projects preferences (see Figure 12.4) let you choose the following settings:
• Video Mode. NTSC is the format generally used in North America, whereas Europe is PAL territory. The two formats use different numbers of frames per second of video and different numbers of horizontal lines, so a DVD in one format won’t play properly on a TV that uses the other format.
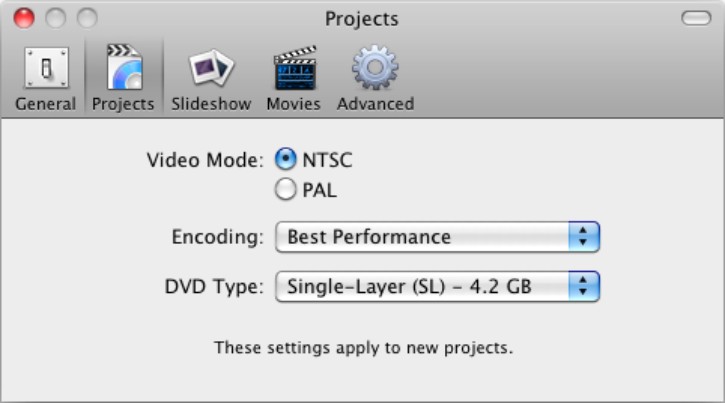
12.4 Choose the video mode and encoding type in the Projects preferences.
• Encoding. This is a vital setting. Choose Best Performance if you want iDVD to encode movies for DVD as you work so that they’re ready to burn when you finish the project. Choose High Quality to encode at higher quality when you start to burn your project. Choose Professional Quality to encode at the highest quality available, again when you start to burn your project.
• DVD Type. Choose whether to create Single-Layer or Dual-Layer discs. If your Mac’s SuperDrive can burn only Single-Layer discs, this pop-up menu is unavailable.
The High Quality and Professional Quality settings in the Encoding pop-up menu in the Projects preferences give visibly better results than the Best Performance setting. The disadvantage is that, because neither of them starts encoding until you start burning the DVD project, the burning process takes that much longer. Professional Quality takes about twice as long as High Quality to encode the video, so plan ahead if you intend to use it.
Setting Slideshow preferences
The Slideshow preferences (see Figure 12.5) let you choose the following settings:
• Always add original photos to DVD-ROM contents. Select this check box if you want to include original, full-size photos on the DVD as well as the smaller versions used for the slide shows. This setting is helpful if you distribute the photos.
• Always scale slides to TV Safe Area. The TV Safe Area is that part of a widescreen project that will appear on a standard-format TV screen (whose aspect ratio is 4:3 rather than 16:9). Select this check box if you want to make sure the full photo always appears on the TV screen. This is a good idea unless you’re certain the DVD will be viewed only on widescreen monitors.

12.5 The Slideshow preferences let you add original photos to the DVD, stay in the TV Safe Area, fade the volume out, and include titles and comments.
• Fade volume out at end of slideshow. Select this check box if you want iDVD to fade the volume out at the end of a slide show. This effect can be useful with music, but you won’t usually want to use it with voiceovers.
• Show titles and comments. Select this check box if you want to include the titles and comments with the photos. Having the titles and comments can be useful when you make DVDs for yourself, but you’ll probably want to omit them when you make DVDs for other people.
Setting Movies preferences
The Movies preferences (see Figure 12.6) let you choose the following settings:
• When importing movies. Select the Create chapter submenus option button if you want iDVD to automatically create a submenu screen to let the viewer access the chapters (the scenes) in the movie.
• Look for my movies in these folders. If you want iDVD to look for movies in other folders than your ~/Movies folder, your iTunes Movies, and the Media Browser, add the folders to this list.

12.6 In the Movies preferences, choose whether to create chapter submenus. You can also add folders iDVD should scan automatically for movies.
Setting Advanced preferences
The Advanced preferences (see Figure 12.7) let you choose the following settings:
• Look for my themes in these folders. iDVD automatically searches your Mac’s /Library/Application Support/iDVD/Themes folder for themes. If you have themes in another folder, add that folder by clicking Add.
• OneStep DVD capture folder. The readout shows the folder iDVD is using to store the data it captures from your camcorder for creating OneStep DVDs. If you’re running out of space on your Mac’s hard drive, you may need to switch to a folder on an external drive. Click Change, select the folder in the Open dialog, and then click the Open button.
• Preferred DVD Burning Speed. In this pop-up menu, choose the DVD burning speed you want to use. Usually, it’s best to choose Maximum Possible and let iDVD handle the speed. But if you find that full-speed burning produces DVDs containing errors, choose a lower speed here.

12.7 The Advanced preferences let you add themes, change your OneStep DVD capture folder, and set your preferred DVD burning speed.
Closing the Preferences window automatically saves your new preferences settings.
If you changed any of the Projects preferences, you have a chicken-and-egg situation here: The new settings you chose apply only to new projects you create from now on, not to the new project you just created in order to be able to set the preferences. To implement the changes, close your project (choose File→Close Window) and create a new one.
Navigating the iDVD interface
Now that you’ve got a project open in iDVD, it’s time to come to grips with the application’s interface. Figure 12.8 shows the main iDVD window.
If you find you’ve chosen Standard format for your DVD project instead of Widescreen, or vice versa, you can change by choosing Project→Switch to Widescreen or Project→Switch to Standard. You can also flip between the formats by pressing  +Option+A.
Applying a theme
A theme is a complete set of formatting for the DVD, including the layouts, background, fonts, and background music.
Here’s how to apply a theme:
1. In the Themes pop-up menu at the top of the Themes pane, choose the category of themes you want to see:
• All. All the themes you’ve installed
• 7.0 Themes. Themes from iDVD ’08, ’09, and ’11
• 6.0 Themes. Themes from iDVD ’06
• Old Themes. Themes from earlier versions of iDVD
• Favorites. Themes you’ve marked as your favorites
2. To see the other screens a theme includes, click the disclosure triangle next to it.

12.8 The main iDVD window.
3. Click the theme you want. iDVD applies the theme to the project. If the theme doesn’t appear in the main iDVD window, try running Software Update from the Apple menu.
If you find iDVD’s themes don’t meet your needs, you can buy other themes online. (To find sites that sell themes, put the search term “iDVD themes” into your favorite search engine.) Usually, the easiest place to install themes is in your Mac’s /Library/Application Support/iDVD/Themes/ folder because iDVD then automatically adds them to the Themes pop-up menu.
If you’re creating a standard-format project and choose a widescreen-format theme, iDVD displays the Change Project Aspect Ratio dialog, as shown in Figure 12.9, asking if you want to change aspect ratio and giving you three choices:
• Keep. Click this button to maintain the aspect ratio. This is usually the best choice because changing the aspect ratio gives the DVD the wrong aspect ratio for your movie.
• Change. Click this button to change the project to the theme’s aspect ratio.
• Cancel. Click this button to cancel applying the theme. You can then pick another theme that uses the right aspect ratio.
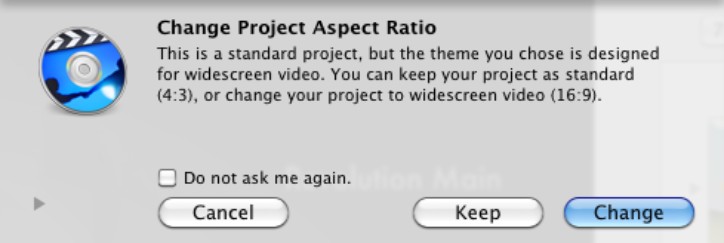
12.9 You may need to decide whether to change the project’s aspect ratio to match the ratio of the theme you applied.
As with most applications, you should save the changes you made to a DVD project when you’re satisfied with them. Press +S or choose File→Save to save the changes.
Adding Content to the DVD Project
Next, add content to your DVD project. You’ll probably want to add one or more movies to the DVD project, but you can also create a powerful DVD by using slide shows either with movies or instead of them.
Adding a movie
To add a movie to your DVD, follow these steps:
1. Click the Media button in the lower-right corner of the iDVD window to display the Media pane.
2. Click the Movies button at the top of the Media pane to display the Movies tab.
3. In the box at the top of the Movies tab, choose the source of the movies:
• iMovie. These are the movies you’ve added to the Media Browser from iMovie.
• Movies. These are the movies stored in your Movies folder.
• iPhoto. These are movies you’ve imported to iPhoto from your digital camera.
• iTunes. These are movies you’ve exported to iTunes from iMovie or otherwise added to iTunes. Click the disclosure triangle to display the Movies category within iTunes.
• Folders. These are movies in the folders you’ve told iDVD to search for movies. You can add other folders as described in the nearby sidebar.
The box at the top of the Movies tab in the Media pane shows only the movie sources that contain movies.
4. Click the thumbnail for the movie you want to add, and then drag it to the menu in the main part of the iDVD window. You can drop it anywhere that the mouse pointer includes a green circle containing a + sign, as shown in Figure 12.10. iDVD adds a menu button with the movie’s name on it.

12.10 Drag a movie thumbnail from the Movies tab of the Media pane to the main part of the iDVD window.
Make sure you don’t drop the movie in one of the drop zones — if you do, iDVD makes it part of the menu screen rather than a separate movie.
5. If you want to change the button’s text, click the button once, and then click it again to display the text-editing controls (see Figure 12.11). Edit the text as needed; choose the font, style, and size; and then click elsewhere to apply the changes.

12.11 You can easily change the text or formatting of a menu button.
Adding chapter markers to a movie
To break a movie up into scenes among which the viewer can easily navigate on a DVD you add chapter markers to the movie. Unfortunately, iDVD’s feature for adding chapter markers is severely limited: It lets you place chapter markers only at regular intervals — for example, every three minutes. This is better than nothing, but unless you’ve shot and edited your movie with unnatural precision, the chapter markers won’t coincide with the beginning of scenes.
If you find working on the main DVD screen confusing, try using the DVD map instead, as discussed later in this chapter. This shows you a layout of the DVD’s contents that is much less graphical and (for many people) much easier to interpret.
Here’s how to add chapter markers in iDVD:
1. Choose Advanced→Create Chapter Markers for Movie. iDVD displays the dialog shown in Figure 12.12.

12.12 iDVD lets you add chapter markers to a movie, but they can only be at regular intervals.
2. Set the number of minutes in the Create marker every box.
3. Click OK. iDVD adds the markers to the movie.
These chapter markers give viewers a rudimentary way of navigating quickly through the movie on your DVD. But if you want to create a proper scene-selection menu tied to chapter markers that appear where you want them to, you need to do a bit more work, as described next.
Creating a scene selection menu
Here’s the workaround for creating a scene selection menu tied to chapter markers that you position yourself instead of having iDVD position automatically. It takes more effort, but the results make it worthwhile.
Before you start this procedure, open iDVD preferences (choose iDVD→Preferences), click the Movies button, and make sure you’ve selected the Create chapter submenus option button in the When importing movies area of Movies preferences. This setting causes iDVD to create the scene selection menu when you import a movie that contains chapter markers.
Follow these steps:
1. In iMovie, export the movie to the Media Browser. You may have done this already.
2. Launch GarageBand. If GarageBand opens your last project, choose File→Close to close it so that the GarageBand opening screen appears.
3. Click New Project, click Movie, and then click Choose. GarageBand displays the New Project from Template dialog.
4. Type the name for the project and choose the folder in which to save it. The best place to save the project is in your ~/Movies folder because then iDVD shows this folder’s movies automatically in the Movies pane.
5. Click the Create button. GarageBand creates the project.
6. If the Media Browser isn’t already displayed, click the Media Browser button (the button at the right end of the toolbar) to open it.
7. Click the Movies button at the top of the Media Browser.
8. Click the movie and drag it to the Movie track at the top of the project. GarageBand adds the movie to the project and creates thumbnails to represent it.
9. Choose Edit→Add Marker (or press P) to display the chapter-editing pane (see Figure 12.13). GarageBand automatically adds a marker for the beginning of the movie. If you want to keep it, click in the Chapter Title box and type the name to give it. If you don’t want the marker, click it, and then press Delete.
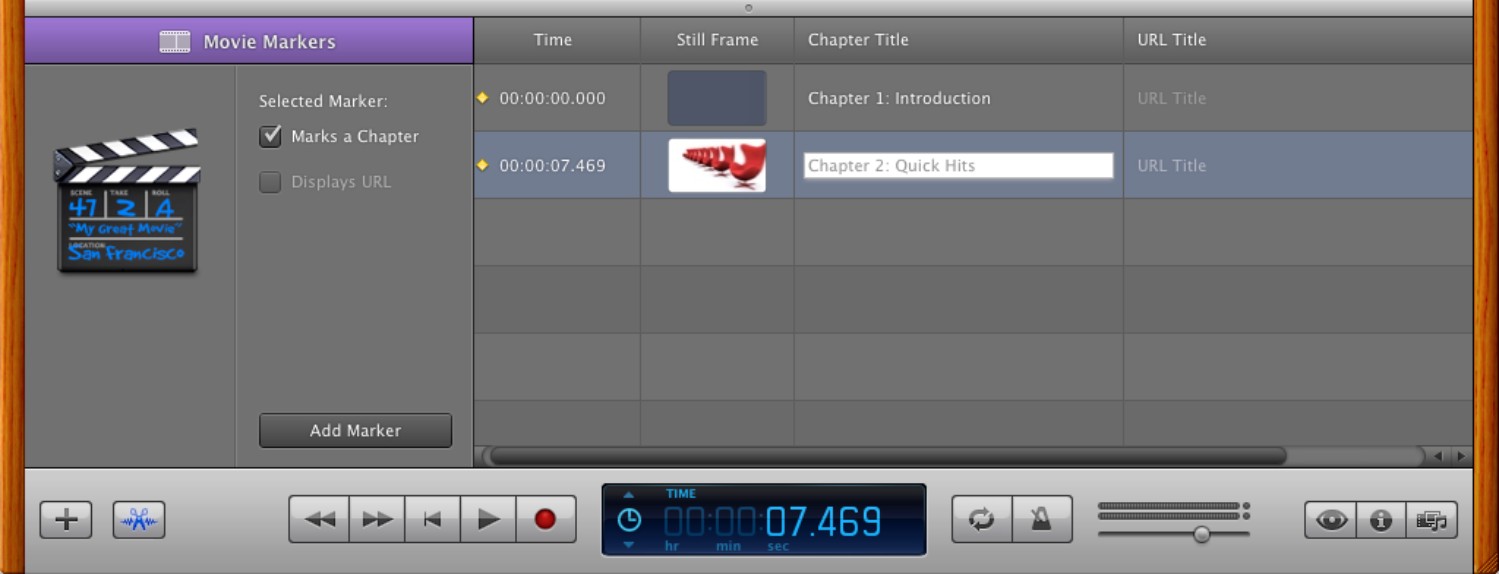
12.13 Creating chapter markers for a movie in GarageBand.
10. Play the movie (click the Play button or press the spacebar) or drag the playhead to where you want to create the next marker. Drag the Zoom slider to zoom in on the thumbnails if you need to get a better view.
11. Click Add Marker in the Markers pane to add a marker. Click in the Chapter Title box and type the name for the marker.
12. Continue until you’ve added all the markers you want.
13. Choose File→Save to save the project.
14. Choose Share→Export Movie to Disk to display the Export your movie to disk dialog.
15. In the Video Settings pop-up menu, choose Full Quality.
16. Click Export. GarageBand displays the Export to Disk dialog.
17. Choose the folder in which to save the new movie. For example, use your Movies folder.
18. Click Save. GarageBand exports the movie file.
Now go back to iDVD and add the movie to your project either by using the Media Browser (if you saved the movie in a folder that iDVD is monitoring) or by dragging it from a Finder window. iDVD automatically creates a scene selection menu, which you can customize as needed.
Adding a slide show
Here’s how to add a slide show to your DVD project:
1. Make sure you’re on the main menu for your DVD project.
2. In the lower-left corner of the iDVD window, click the Add button, and then choose Add Slideshow. iDVD adds a button named My Slideshow to the menu.
3. With the My Slideshow button still selected, click the button to select the text, and then type the name you want to give the slide show. You can also change the font, style, and size if you want. Click outside the button when you finish.
4. Double-click the slide show button. iDVD opens the slide show editor and selects the Photos tab in the Media pane.
5. In the Photos pane, select the category or album that contains the photos you want. For example, select the Flagged category if you want to use photos you flagged.
6. Click and drag one or more photos — or an album — to the slide show editor to add them to the slide show (see Figure 12.14). To select multiple photos at once, click the first, and then +click each of the others.
• If you add a photo you don’t want, click it and press Delete to delete it.
• To view more photos at once, click the Grid View button in the upper-right corner of the slide show editor.
7. When you’ve added all the photos you want, click and drag them into the order you want. You can play back your slide show at any point by clicking the Play button. Click the Stop button to exit the preview window and return to the slide show editor.
8. If you want to add a song as the soundtrack for the slide show, click the Audio tab at the top of the Media pane. Locate the song in either GarageBand or your iTunes library, click it, and then drag it to the slide show. Drop it anywhere, and iDVD applies it to the whole slide show.
9. Set the duration for each slide in the Slide Duration pop-up menu. iDVD applies this duration to each slide; you can’t set different numbers of seconds for different slides.
10. In the Transition pop-up menu, choose the transition to use for the slides, or choose None if you want no transition effect. If the direction button to the right of the Transition pop-up menu is available, select the direction in which you want the transition to move — for example, a Push transition from the top or bottom.

12.14 Adding a photo to a slide show in the slide show editor in iDVD.
If you added a song in Step 8, iDVD automatically sets the Slide Duration pop-up menu to Fit to Audio. This setting automatically divides the length of the song equally among the slides. You can choose another setting if you want to end the slide show earlier or make it carry on for longer.
11. Set the volume for the slide show by dragging the Slideshow volume slider.
12. To choose other settings for the slide show, click the Settings button, select the appropriate check boxes in the settings dialog (see Figure 12.15), and then click OK:
• Loop slideshow. Select this check box to make the slide show repeat itself until the viewer stops it.
• Display navigation arrows. Select this check box to display forward and back arrow buttons on the slides.
• Add image files to DVD-ROM. Select this check box if you want to include original, full-size photos on the DVD as well as the smaller versions used for the slide shows.
• Show titles and comments. Select this check box if you want to include the titles and comments with the photos. This can be useful for your personal DVDs — for example, if you’re reviewing the photos to pick the best.
• Duck audio while playing movies. Select this check box if you want iDVD to lower (duck) the volume on the slide show when the viewer is playing a movie. This is almost always a good idea.

12.15 Slide show options include looping the slide show, displaying navigation arrows, and including titles and comments.
13. When you finish setting up your slide show, click the Return button to go back to the main menu screen.
Customizing the Menu Screen for the DVD
Your next move is to customize the menu screen for the DVD by adding photos, slide shows, or movies to it. To add these items, you use the drop zones, the marked areas on the menu screen.
Finding out how many drop zones a menu screen has
iDVD’s various themes have different numbers of drop zones in their menu screens, but all menu screens have at least one drop zone, and many have several. What’s tricky is that in some menu screens, drop zones appear all at the same time, but in other screens, they play in sequence, so you see only one at a time.
To find out how many drop zones are in the menu screen you’re using, click the Drop Zone button on the toolbar at the bottom of the iDVD window. iDVD displays the drop zone editor (see Figure 12.16).
Adding a movie to a drop zone
A great way to add life to a menu screen is to place a movie in one of the drop zones. The movie then plays when the viewer opens the menu screen.
Normally, it’s best to use short movies for your drop zones because most viewers won’t want to linger on the menu screens. You can also make iDVD play only part of the movie in the drop zone, as you see in a moment.

12.16 Use the drop zone editor to check how many drop zones a menu screen contains.
Here’s how to add a movie to a drop zone and choose which part to play:
1. If the drop zone editor isn’t open, open it as explained in the previous section.
2. Click the Media button to display the Media pane, and then click the Movies tab.
3. Click the movie you want to add, and then drag it to the drop zone in which you want to place it. iDVD displays a thumbnail of the movie in the drop zone.
4. Add movies to any other drop zones in which you want to use movies rather than photos.
5. Click the Drop Zone button to return to the main menu, which now shows the movies you added in the drop zones. Figure 12.17 shows an example in which only the first movie appears.
6. Set the start point and endpoint of each movie you added:
• If your menu screen plays movies in a single drop zone, drag the Motion playhead along the playback bar across the bottom of the menu screen to make the drop zone display the right movie.

12.17 The movies you added appear in the drop zones. This menu screen has only one drop zone (on the left), in which the movies play in succession.
• Click the drop zone. iDVD displays a yellow-and-black border around it and opens the Movie Start/End panel, as shown in Figure 12.18.
• Drag the start marker to select the starting frame. The movie scrubs through the frames as you drag.
• Drag the end marker to select the ending frame.
• Click elsewhere to close the Movie Start/End panel and apply your changes.
• Repeat the procedure for each of the other movies.
7. If you want to turn off the movie intro, deselect the Show/Hide intro movie check box. Likewise, if you want to turn off the outro, clear the Show/Hide outro movie check box.
8. Click the Motion button to loop through the movies in your drop zones and see how they look. Click this button again to stop the playback.

12.18 Use the Movie Start/End panel to choose the frames at which to start and end the movie in the drop zone.
Adding photos to a drop zone
Instead of a movie, you can add a still photo or a photo slide show to a drop zone. Follow these steps:
1. If the drop zone editor isn’t open, click the Drop Zone button to open it.
2. Click the Media button to display the Media pane, and then click the Photos tab.
3. Click the photo you want to add, and then drag it to the drop zone in which you want to place it. iDVD displays a thumbnail of the first photo in the drop zone.
4. Click the Drop Zone button to return to the main menu, which now shows the drop zone to which you added the photos.
5. Set up the slide show to meet your needs:
• Click the drop zone once. iDVD displays a yellow-and-black border around it and opens the Photos panel.
• Click and drag the slider in the Photos panel to view the photos.
• If you need to rearrange the photos, click the Edit Order button in the Photos panel to open the photos in the slide show editor. This is the same slide show editor discussed earlier, but when you create a slide show for a drop zone, you can’t add music or transitions or set slide durations.
• Rearrange the photos as needed by clicking and dragging them. You can also drag in other photos from the Photos pane if you want.
• Click the Return button. iDVD displays the drop zone editor.
• Click the Drop Zone button to return to the menu screen.
6. Click the Motion button to loop through the movies and slide shows in your drop zones and see how they look. Click this button again to stop the playback.
Change a menu’s background and audio
To change the background and audio of a menu screen, follow these steps:
1. Click the Inspector Window button on the toolbar or choose View→Show Inspector to open the Menu Info window (see Figure 12.19).

12.19 Use the Menu Info window to change the background of a menu and add audio.
2. To change the background image for the menu screen, click a photo in the Photos pane and drag it into the center well in the Background area.
3. To change the duration of the loop, drag the Loop Duration slider.
4. To add audio to the menu, click a song in the Music pane and drag it into the Audio well. Drag the Menu Volume slider to set the volume.
5. If necessary, change the menu’s button settings:
• If you want to reposition the menu’s buttons freely, select the Free positioning option button instead of the Snap to grid option button. You can then drag the menu buttons to where you want them.
• To change the highlight color, click the Highlight button, and use the Colors window to pick the color you want. For example, choose a color that works better with the new menu background you’ve applied.
6. Deselect the Show drop zones and related graphics check box if you want to hide these items.
7. When you finish making changes, click the Inspector Window button on the toolbar again to close the Menu Info window.
Checking Your Project’s Status and DVD Space
To see how much of your DVD project iDVD has encoded, or to see how much space you have left on the DVD, choose Project→Project Info (or press Shift++I). iDVD displays the Project info window (see Figure 12.20).
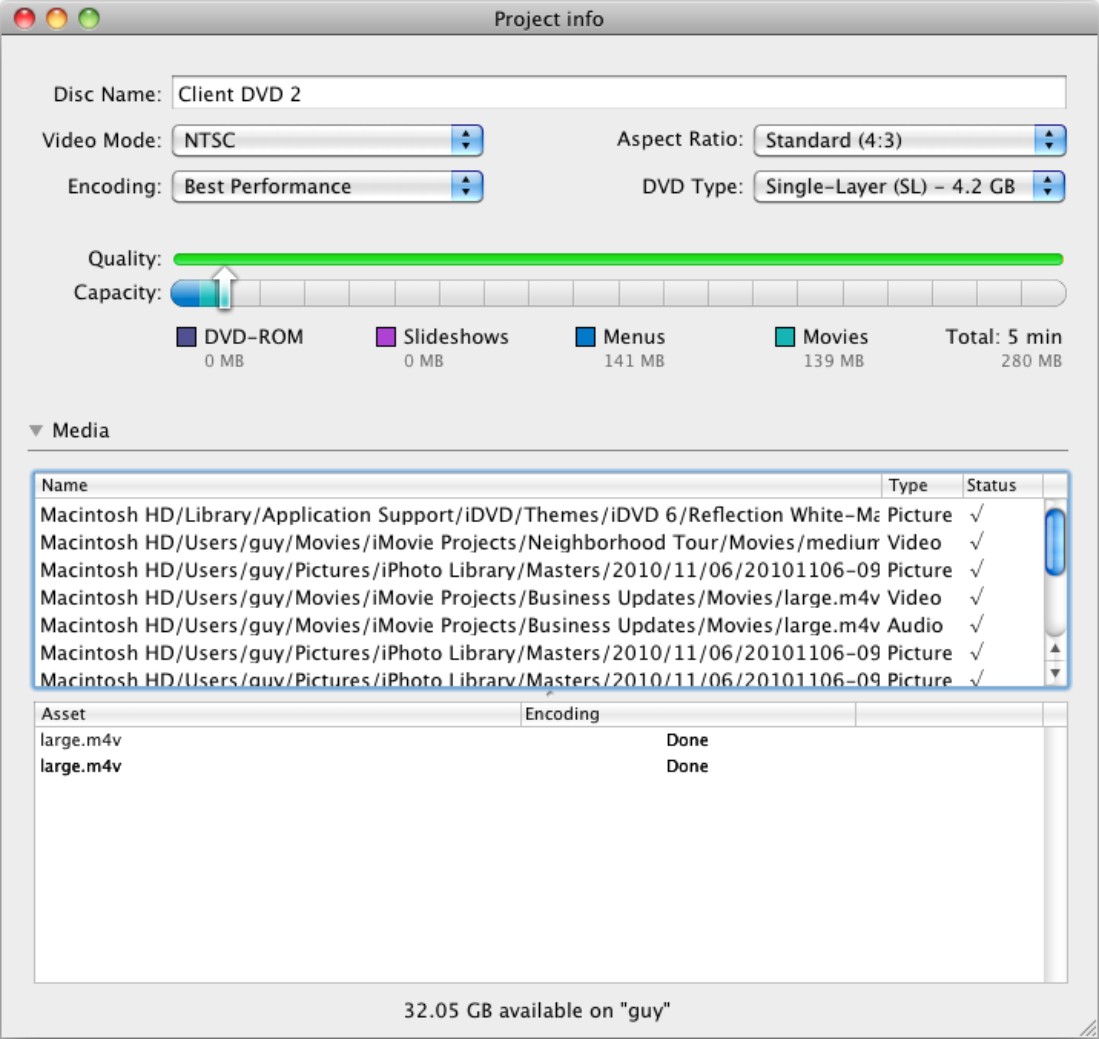
12.20 The Project info window shows you how much space your material will occupy on the DVD and whether the components have been encoded.
If necessary, you can also change the following settings:
• Disc Name. Just type the new name.
• Video Mode. Choose NTSC or PAL.
• Aspect Ratio. Choose Standard or Widescreen.
• Encoding. Choose Best Performance, High Quality, or Professional Quality, as needed.
• DVD Type. Choose Single-Layer or Dual-Layer.
If you change the setting in the Encoding pop-up menu from Best Performance to High Quality or Professional Quality, iDVD displays the Changing Encoding Mode dialog, as shown in Figure 12.21, to make sure you understand that iDVD must reencode all the material it has already encoded. Click Yes if you’re okay with this change; otherwise, click Cancel to restore the project’s previous encoding.
When you finish using the Project Info window, close it by clicking the Close button on its title bar or choosing File→Close Window.

12.21 If you change the encoding mode, iDVD warns you that it must reencode all the material it has already encoded. This can take several hours.
Using Map View to Inspect Your DVD
iDVD’s menu screens are neat, but they can make it hard to see exactly what your DVD contains and where all the content is. When you need to get a clear picture of what’s on the DVD, click the Map button to display the DVD map, as shown in Figure 12.22.
If you can’t see enough of your project, you can change the view in these ways:
• Drag the Zoom slider to zoom out (revealing more of your project) or zoom in.
• Click an upward or left disclosure triangle to collapse the content underneath it. Click a downward or right disclosure triangle to expand its contents.
• Click the Vertical View button to switch the map to vertical view, or click the Horizontal View button to switch to horizontal view.
These are the main actions you can take in the DVD map:
• Delete an item. Click the item and drag it outside the iDVD window, where it vanishes in a puff of smoke. Alternatively, click the item and then press Delete.
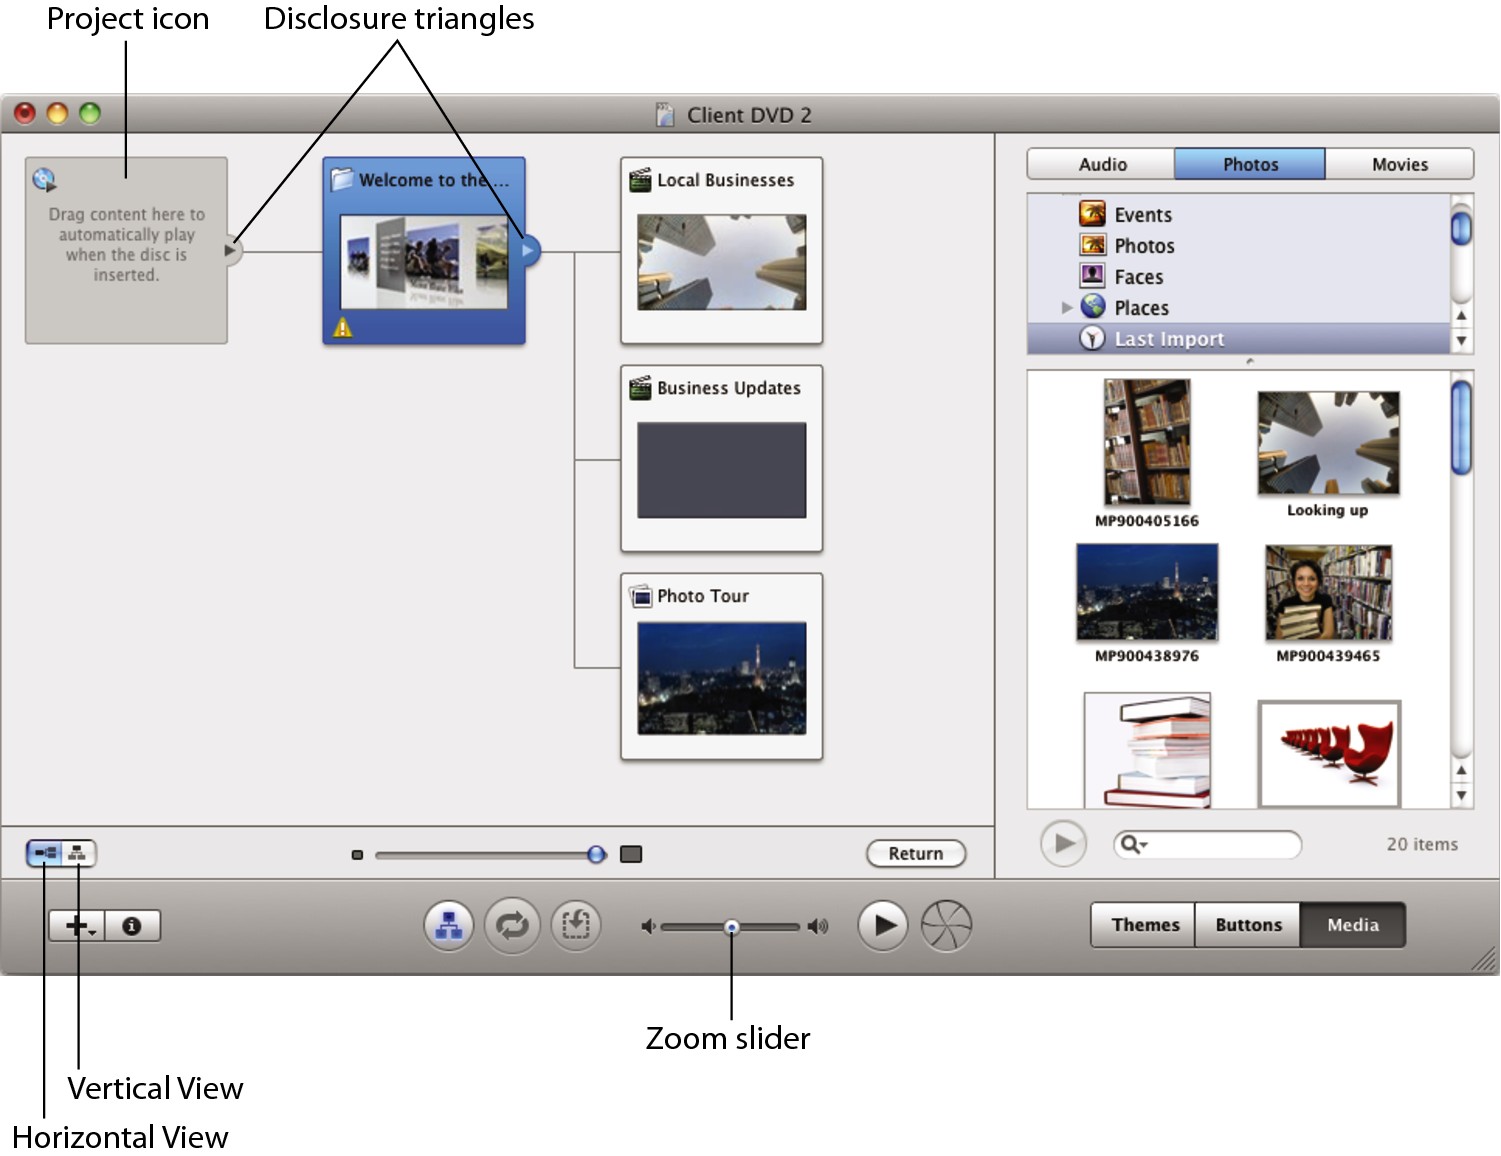
12.22 Use the DVD map to get a clear view of where all the files are in your DVD project and to add an autoplay movie.
• Add an item. Click and drag a movie, photo, or album to a menu button. iDVD adds a new item to the menu.
• Change a movie or slide show. Click and drag another movie, photo, or album to the button to replace its contents.
• Add an autoplay movie or slide show. Click and drag a movie or album to the project icon. If you drag an album, double-click the project icon button to open the Autoplay Slideshow editor and arrange the photos into your preferred order.
When you finish working in the DVD map, click the Map button to return to the menu screen.
You can double-click a slide show button in the DVD map to display the photos in the slide show editor so that you can rearrange the photos, delete some, or add others.
If the DVD map shows a yellow triangle on an item, it means there’s an error such as an empty drop zone. Position the mouse pointer over the yellow triangle to see the details of the error, and then visit the affected screen so that you can fix it.
Burning the DVD
When you finish adding content and have previewed the DVD project, you can burn it to disc. Follow these steps:
1. If your DVD project contains unsaved changes, press +S or choose File→Save to save them.
2. Click the Burn button on the toolbar. iDVD prompts you to insert a recordable DVD.
3. Insert a disc in your Mac’s DVD drive. If it’s a drawer-style drive, close the drawer.
4. Wait while iDVD burns the disc. When it has finished, test the disc, remove it, and label it.
To create a disc image, choose File→Save As Disc Image. In the Save Disc Image As dialog (see Figure 12.23), type the filename, choose the folder in which to save it, and then click Save.
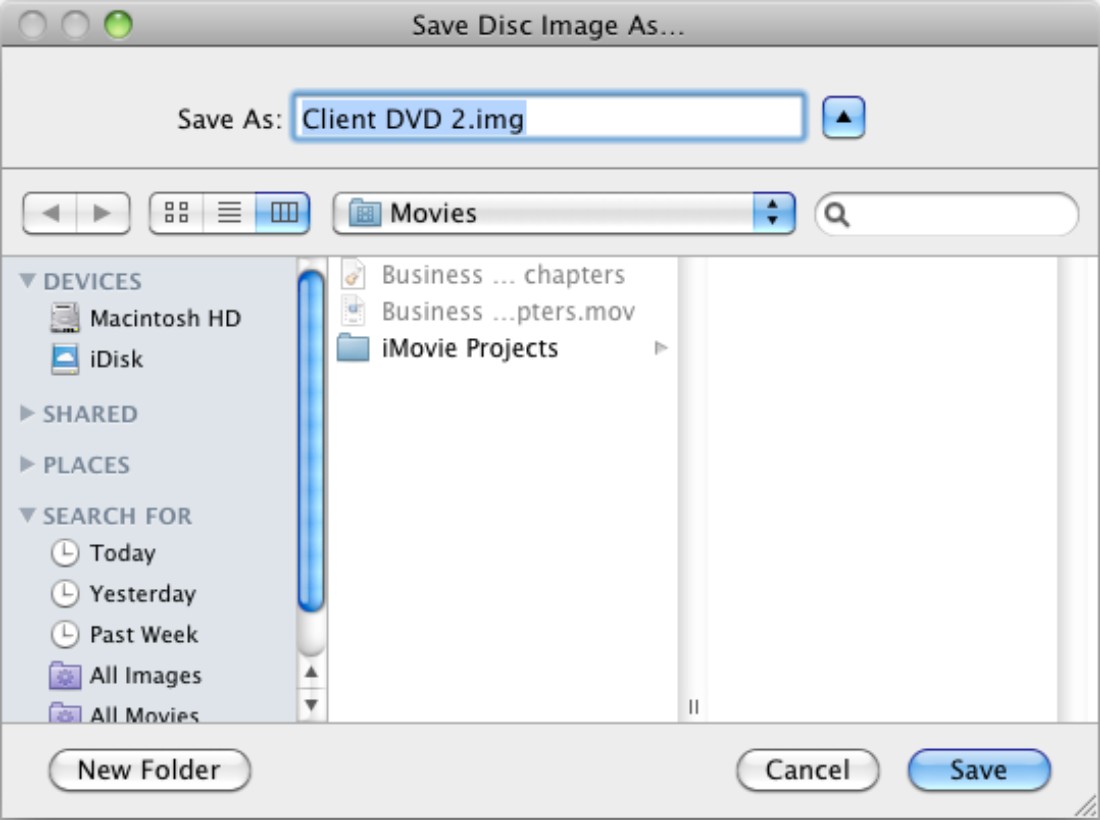
12.23 Save a DVD project to a disc image so that you can burn it to DVD multiple times using Disc Utility.
To create a VIDEO_TS folder, follow these steps:
1. Choose File→Save as VIDEO_TS Folder.
2. In the Save VIDEO_TS folder As dialog, type the filename.
3. Select the folder in which to save the folder.
4. Click Save.
Creating a OneStep DVD
Do you ever find you have finished content on your DV camcorder that you need to burn to DVD? If so, you can use iDVD’s OneStep DVD feature to quickly import the footage and burn it directly to DVD without putting it into iMovie first.
Here’s how to use OneStep DVD:
1. Open iDVD if it’s not already running. Leave it at the iDVD opening screen for the time being.
2. Load the tape containing the movie footage.
3. Choose the starting point if necessary:
• If you want to capture only part of the footage on the tape, wind or play the tape until that point is ready to play.
• If you want to capture all the footage on the tape, either rewind the tape or just let iDVD rewind it for you.
4. Connect the DV camcorder to your Mac via a FireWire cable, just as you would for importing into iMovie. Usually, you’ll need a four-pin (small) plug at the camcorder end and a regular six-pin plug (for FireWire 400) or a regular nine-pin plug (for FireWire 800) at the Mac’s end.
5. Move the camcorder’s switch to VCR mode or Playback mode (whichever the camera calls it).
6. In iDVD, click the OneStep DVD button on the opening screen. iDVD notices the camcorder and prompts you to insert a recordable DVD.
7. Insert a disc in your Mac’s DVD drive.
8. iDVD displays the Creating your OneStep DVD screen.
9. iDVD winds the camcorder’s tape back to the beginning. If you want to start playback from the point you chose, press the Play button on the camcorder immediately to prevent iDVD from winding the tape back.
You can also stop iDVD’s capture at any point by clicking Stop in the Creating your OneStep DVD dialog. If you let the capture run, it continues until it finds a ten-second blank section of tape or until the end of the tape.
10. Wait while iDVD captures the video from the camcorder’s tape, prepares the DVD, processes the movie, and then burns the DVD. iDVD shows you its progress (see Figure 12.24).

12.24 OneStep DVD automatically captures the footage from your DV camcorder and burns it to DVD.
11. When iDVD finishes the burn, it ejects the DVD and displays the Disc Insertion dialog, prompting you to insert another DVD if you want to burn another copy.
12. Insert a blank DVD and repeat the recording process, or click Done to close the OneStep DVD window.
If you like burning DVDs this easily, try choosing File→OneStep DVD from Movie to burn a DVD directly from a movie.
Jump-Starting a DVD with Magic iDVD
If you’ve played with the Magic GarageBand feature in GarageBand for creating custom songs in a snap, you’ll grasp Magic iDVD at once: It gives you a way of creating a customized DVD with as little effort as possible, while providing you with control over the DVD’s contents, menus, and appearance.
Here’s how to create a DVD using Magic iDVD:
1. Open iDVD if it’s not already running.
2. Open the Magic iDVD window (see Figure 12.25):
• If you’re looking at the iDVD opening screen, click the Magic DVD button.
• If you have a project open in iDVD, choose File→Magic iDVD.
3. Select the default title (My Great DVD) in the DVD Title box and type the title you want.
4. In the Choose a Theme box, click the theme for the overall look of the DVD. To see a different selection of themes, open the pop-up menu above the right end of the Choose a Theme box and choose the theme category you want. See the discussion earlier in this chapter for an explanation of the various categories of themes.
5. Click and drag one or more movies from the Movies pane on the right to the wells in the Drop Movies Here box.
• You can click and drag movies from either of the Movies folders shown in the Movies pane.
• You can also click and drag movies from the Movies folder in iTunes.
• If your movies are in another folder, open a Finder window to that folder, and then click the movie and drag it to the well in iMovie.
If you need to delete a movie or slide show from a well, simply click the well and then press Delete. You can also drag an item out of a well and drop it outside the iDVD window, where it vanishes in a puff of smoke.
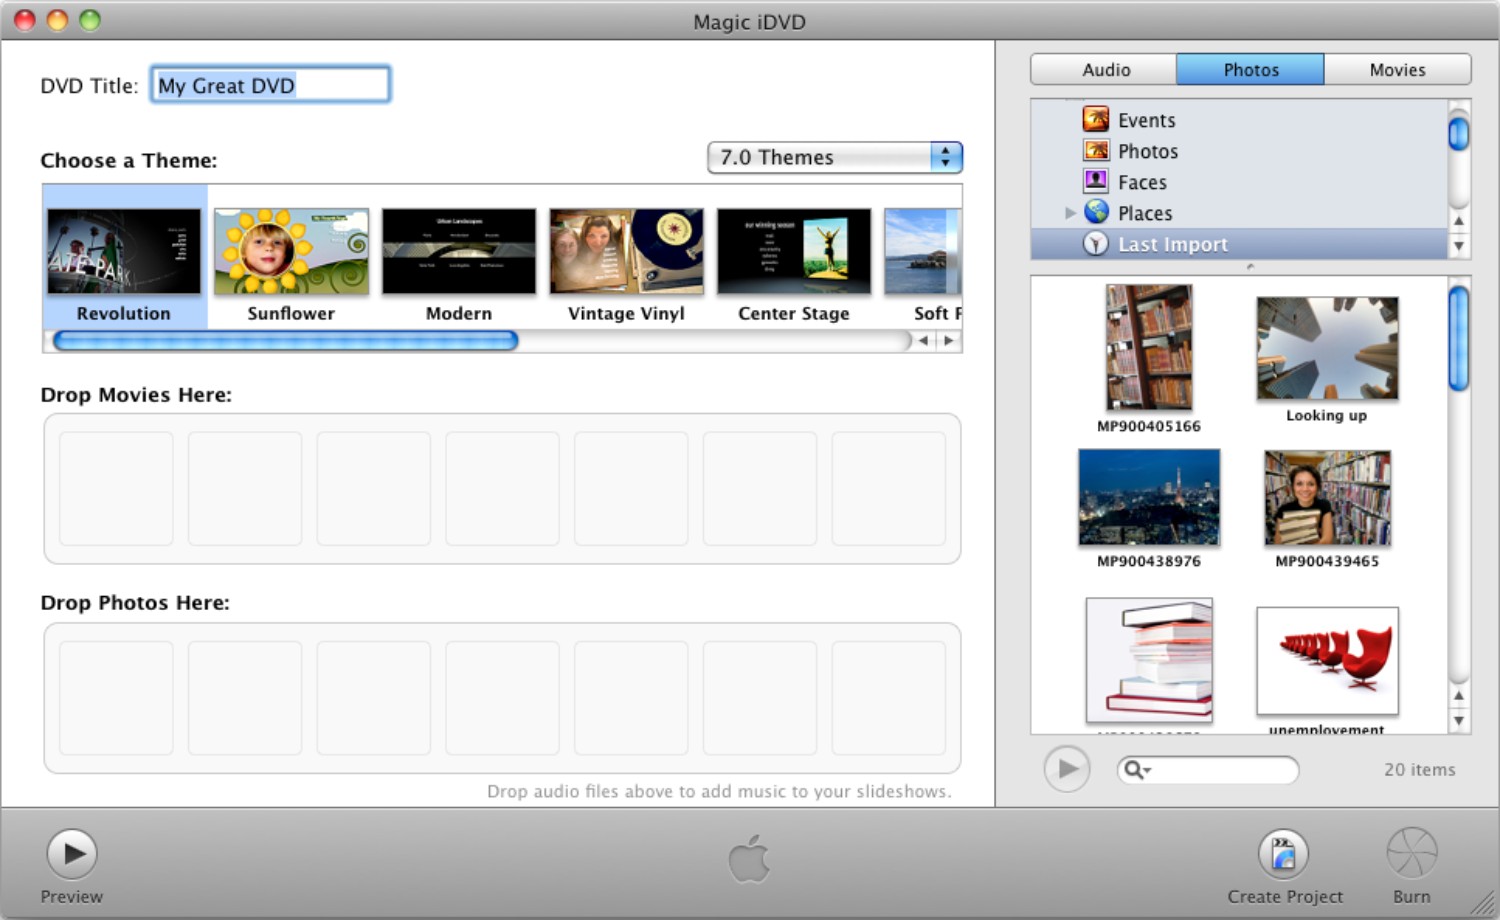
12.25 The Magic iDVD window looks like this when you open it.
6. If you want to add one or more slide shows to the DVD, follow these steps:
• Click the Photos button in the upper-right corner of the Magic iDVD window to display the Photos pane.
Adding a slide show to a DVD with Magic iDVD is a bit weird because what you may want to do is add the slide shows you created in iPhoto. Frustratingly, you can’t actually do this. What you do instead is create a new slide show in iDVD by adding the photos and then (if you want) selecting music for them.
• Select the photos you want. You can select an album, a group of photos you’ve selected, or a single photo.
• Drag your selection to a photo well in the Drop Photos Here box. If you drag a single photo, you’ll probably want to add others to its photo well; otherwise, it won’t make much of a slide show.
• To add audio, click the Audio tab in the upper-right corner of the Magic iDVD window to display the Audio pane. Click the song or playlist you want, and then drag it to the photo well for the slide show.
7. Click the Preview button. iDVD assembles a preview of the project and displays it in the iDVD preview window, together with an on-screen remote control. Use the controls on the remote to navigate the DVD. Click the Exit button to return to the Magic iDVD window, where you can add or delete content as needed.
8. When your project has the contents you want, click Create Project. Magic iDVD creates the project and then displays it in a window. You can now tweak the project as discussed earlier in this chapter, burn it to DVD, or simply leave it until later.
If you’re satisfied with the project when you preview it, you can burn it directly from Magic iDVD. Simply click the Burn button, insert a blank DVD, and wait for the burn to take place.