Appendix: How Do I Upgrade to iLife ’11 and Keep It Updated?
If you buy a new Mac with iLife ’11 installed, you’re all set to get started with iPhoto, iMovie, GarageBand, iWeb, and iDVD. But if you buy a copy of iLife ’11 to install on a Mac that already has an earlier version of iLife, you need to upgrade to iLife ’11; before you do, you should back up your iPhoto library. And whether you upgrade or not, it’s a good idea to keep the iLife applications updated with the latest fixes and improvements Apple releases.
Buying iLife ’11
Backing Up Your iPhoto Library
Upgrading to iLife ’11
Updating iPhoto
Keeping the iLife Applications Updated
Buying iLife ’11
You can buy iLife ’11 from the online Apple Store (http://store.apple.com) or various other online retailers (such as Amazon.com) or from a physical Apple Store or another bricks-and-mortar retailer.
If you have more than one Mac to use iLife on, you can save money by buying the iLife Family Pack instead of two or more single iLife boxes. You’re allowed to install the Family Pack on up to five Macs, which is plenty for most households (and many small businesses).
Backing Up Your iPhoto Library
The iLife ’11 upgrade routine is straightforward, as you see in a moment, but upgrading to the initial release of iLife ’11 caused problems with some existing photo libraries in iPhoto. These problems occurred on only some Macs — but those who suffered the problems had to recover their photo libraries from backups.
So before you upgrade to iLife ’11, make sure that you have a current backup of your photo library. For example
• Run Time Machine. If you use Mac OS X’s Time Machine feature to back up your Mac, run Time Machine to create an extra backup or make sure that your previous backup ran properly. From iPhoto, you can choose File→Browse Backups to browse your Time Machine backups of your photo library and make sure the most recent backup is present and correct.
• Copy the folder that contains your photo library. If you don’t use Time Machine or another automated backup system, open a Finder window to the folder that contains your Photo Library. Copy the folder and paste it to a safe location, such as an external hard drive or an SD card.
Upgrading to iLife ’11
After you back up your photo library, you’re ready to upgrade to iLife ’11. Insert the iLife DVD in your Mac’s optical drive, and then click the Install iLife icon in the Finder window that Mac OS X displays.
The iLife installation is straightforward, and you can simply accept all the default settings if you want to install all the applications in their default location, which is to the Applications folder on your Mac’s main hard drive.
If your Mac has multiple hard drives or hard drive volumes, you can choose on which of them to install iLife by clicking the appropriate icon on the Select a Destination screen.
If you don’t want to install all the applications, click Customize on the Installation Type screen (see Figure A.1).

A.1 If you want to choose which applications to install, click Customize on the Installation Type screen.
The Installer then displays the Custom Install screen (see Figure A.2). Deselect the check box for each item you don’t want to install, and then click Install to proceed with the installation.

A.2 On the Custom Install screen, deselect the check box for any application or item you don’t want to install.
Updating iPhoto
Before you run iPhoto ’11 for the first time, use Software Update to download the latest updates for iPhoto. These updates include a fix for the problem that corrupted some photo libraries created with earlier versions of iPhoto.
 Just to be clear — this problem applies only if you’re upgrading to iPhoto ’11 from an earlier version, not if you’re going straight to iPhoto ’11
To run Software Update, choose Apple→Software Update, and then wait while Software Update checks for updates. (Software Update checks for updates to Mac OS X and all your Apple software, so it may take a while.)
When Software Update returns the results, click Show Details to show the details of the updates you’re getting (see Figure A.3).
Make sure the updates include the iPhoto Update, and deselect the check boxes for any updates you don’t want to install at this point. Then click Install to download the updates and install them. If Mac OS X prompts you to restart your Mac to allow some updates to take place, save your documents, close your applications, and then click Restart.
After installing the updates, launch iPhoto by clicking its icon on the Dock or double-click its icon in the Applications folder. When iPhoto displays the dialog shown in Figure A.4 telling you that it must upgrade your photo library, click Upgrade.
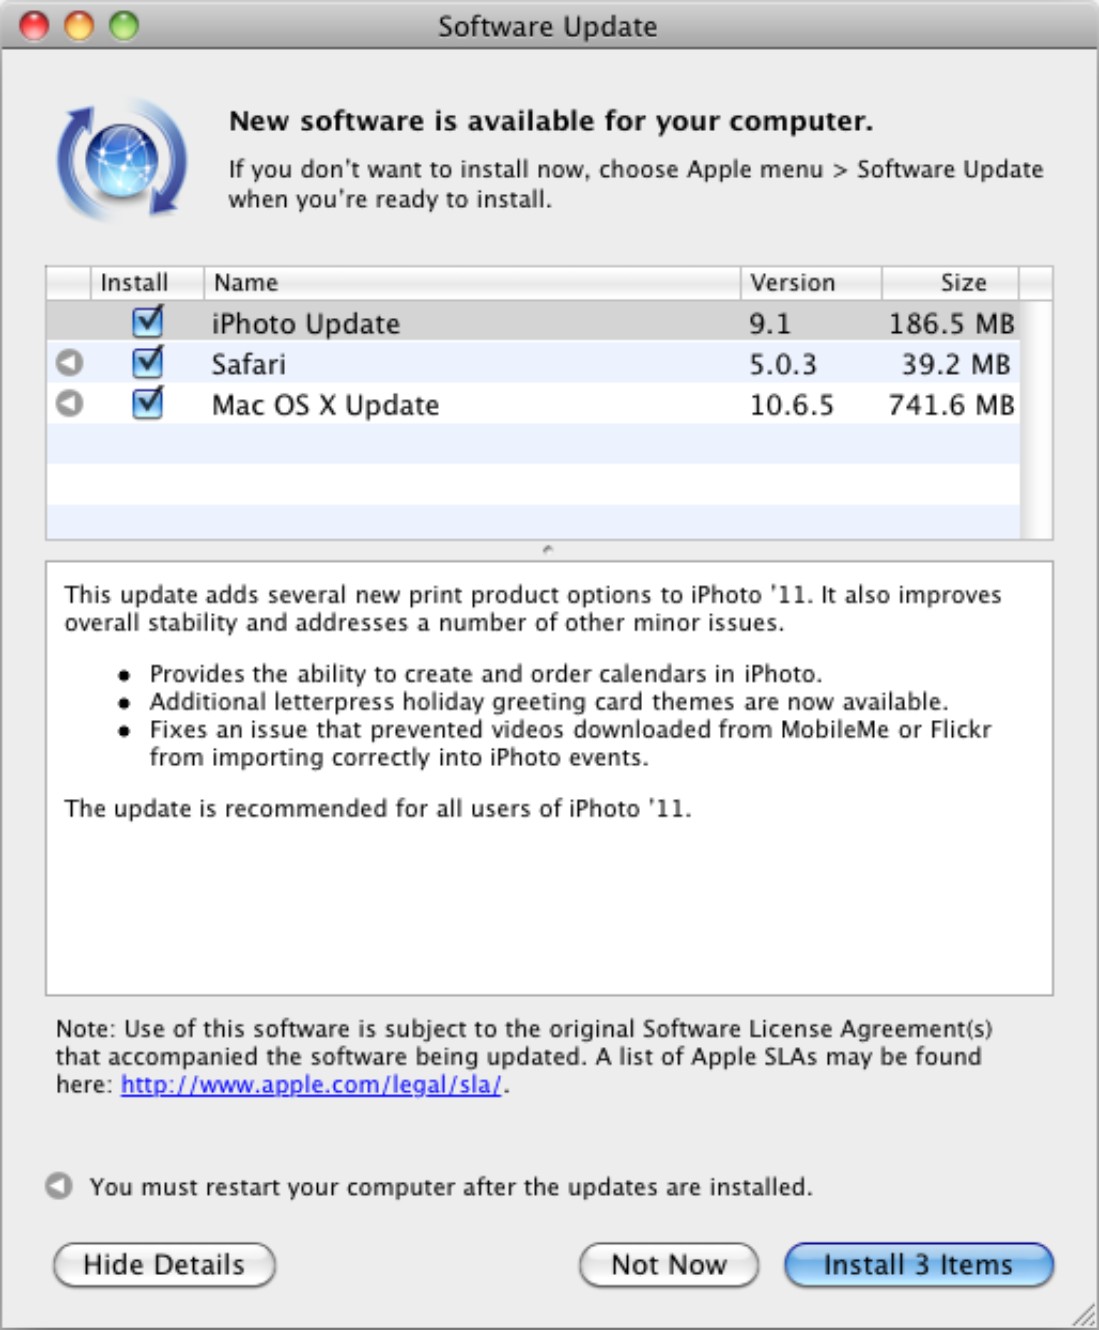
A.3 Verify that the software updates include the iPhoto Update.

A.4 Click Upgrade to upgrade your existing photo library to work with iPhoto ’11.
Keeping the iLife Applications Updated
To get the best performance out of the iLife applications, it’s a good idea to install the latest updates that Apple releases.
You can check for updates from within any of the iLife applications by opening the application’s menu and choosing the Check for Updates command (for example, choose iMovie→Check for Updates from within iMovie). But because using the command this way causes the Software Update utility to run, it’s usually easier to run the utility directly or have it run automatically.
To run Software Update directly, choose Apple→Software Update.
To make sure that Software Update runs automatically, and to control how frequently it runs, follow these steps:
1. Choose Apple→System Preferences to open the System Preferences window.
2. Click the Software Update icon in the System category to display the Software Update pane.
3. On the Scheduled Check tab, select the Check for updates check box and then choose the frequency in the pop-up menu. Daily is the best choice, but you may prefer to check Weekly. Don’t use Monthly — it’s not frequent enough to keep your system protected against bugs and Internet attacks.