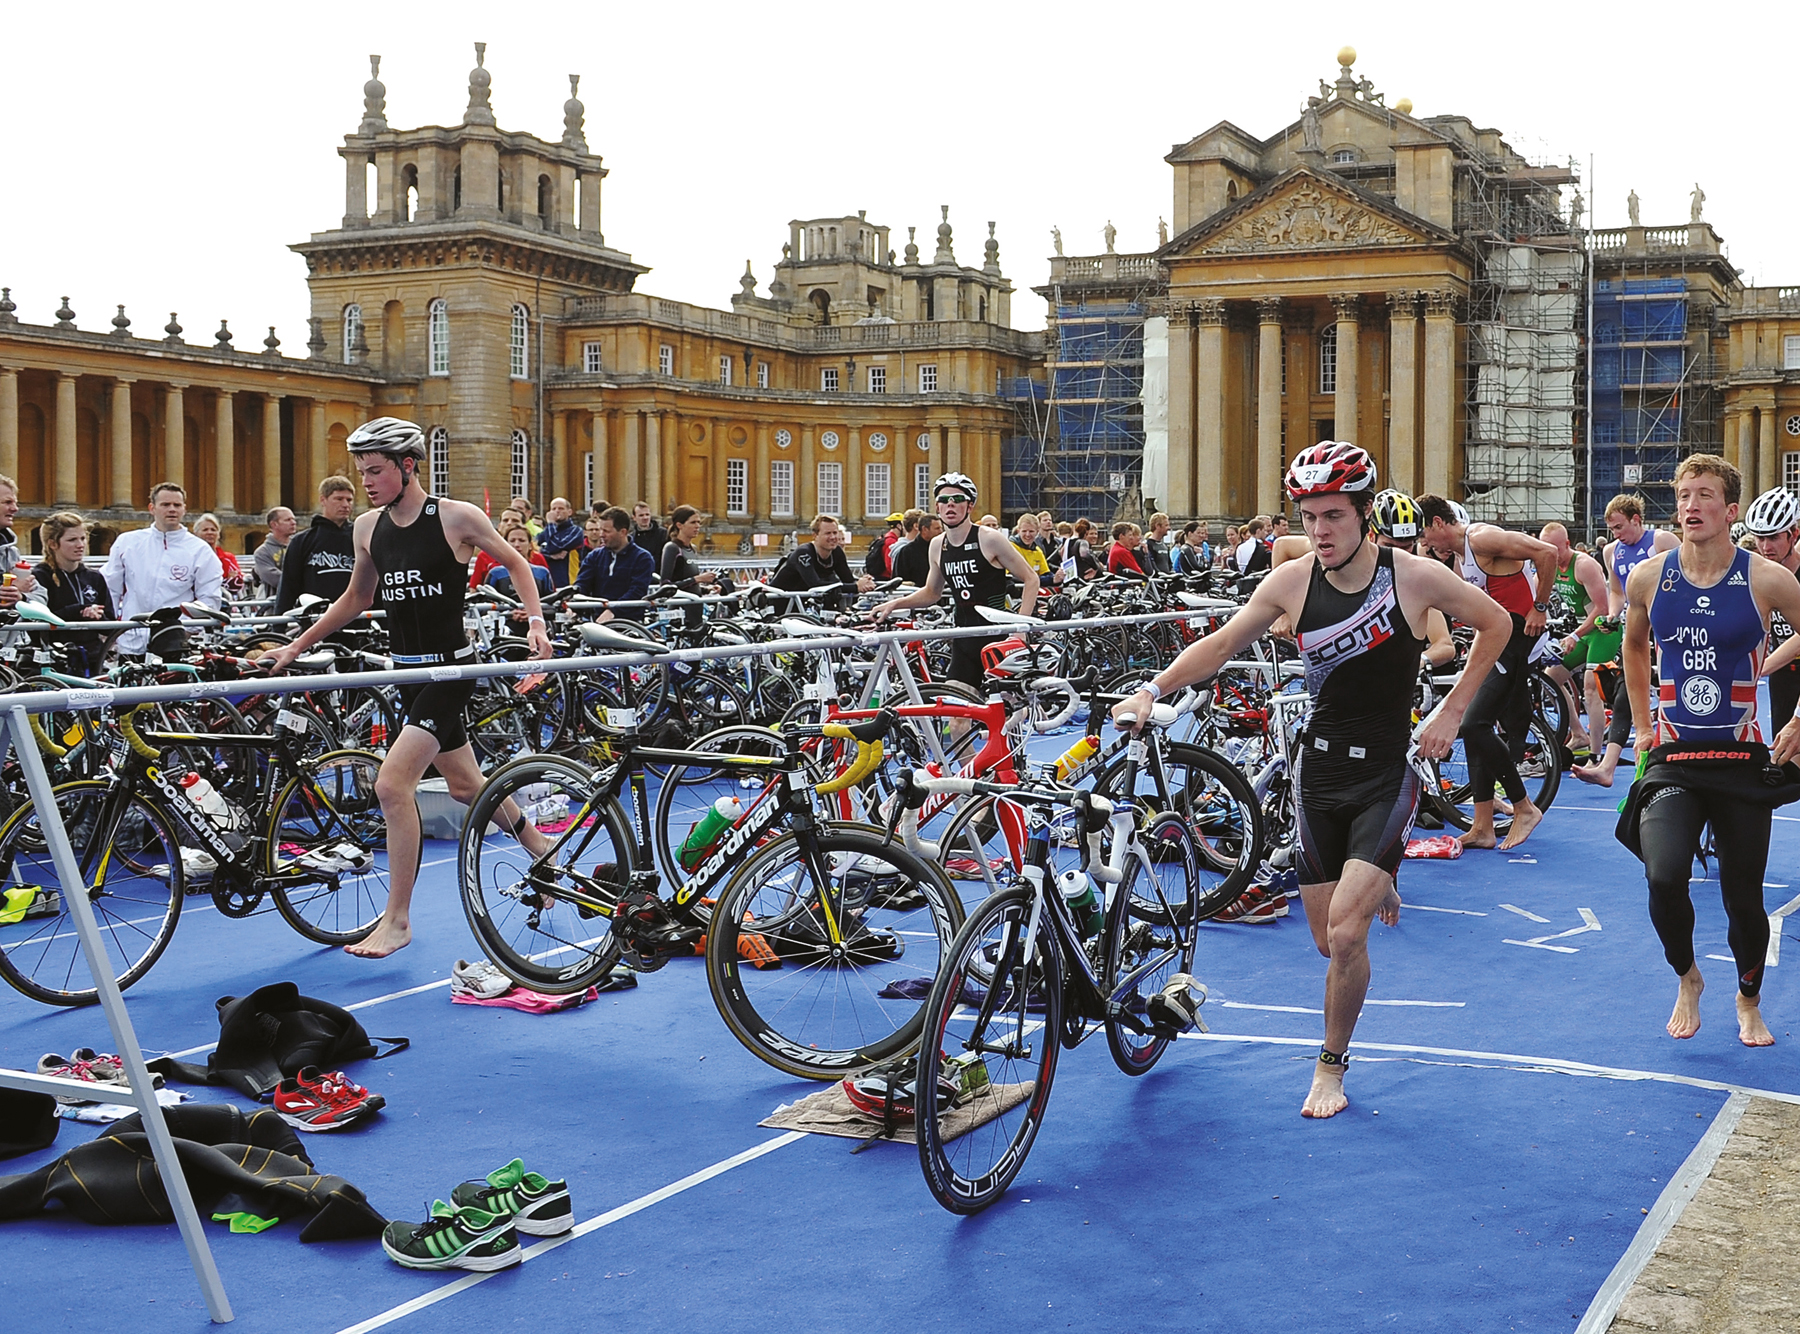
The transition at Blenheim Triathlon, UK.
TRANSITIONING TO TRI: PERFECTING TRANSITIONS
Three sports become one through the oft-feared, seemingly frantic and sometimes confusing fourth discipline: “transition.” In a tri context, it is both a verb and a noun. Transition from swim to bike and then bike to run is what you do, but it’s also the place in which you do the said manoeuvre.
Transition is sometimes identified by the array of flailing body parts, funky-chicken dances, airborne clothing and a feeding frenzy akin to the most disorganised of zoos. If you’ve never been to a triathlon, imagine an H &M changing room during the Boxing Day sales. Yet, fear not, for what appears to be bedlam can be made simple, methodical and orderly with a few words of wisdom and some practice. So, let’s strip bare (although not literally as birthday suit antics are likely to result in a penalty rather than rounds of applause) and get back to basics.
First, a definition. Transition is where you demonstrate the art of moving as swiftly as possible from:
a) swim to bike, otherwise known as Transition 1—or T1;
b) bike to run, otherwise known as Transition 2—or T2.
Transition is also the place where you will get ready before the start. It tends to resemble a bike-storage facility, a changing room and a canteen, and so understanding the art of transitioning is something in which every athlete should invest time.
What are the key things that every transitioning triathlete needs to know?
It’s part of the race
The clock does not stop in transition; therefore, any time spent in transition is taken into account in your final time. The faster you are in T1 and T2, the faster your race. Some people like to be relatively pedestrian, taking a while to lube up, change their wardrobe and leisurely consume fuel—however, if you’re focused on speed, then it pays to try to get through swim/bike and bike/run as quickly and safely as possible.
Practise practise practise
Transitioning from swim to bike and bike to run is a skill. Train to hone the necessary transitioning skills so you can undertake the process as smoothly and rapidly as possible. For example, practise removing your wetsuit without tears (either of the crying or the ripping-of-neoprene variety) or mounting your bike without looking like a drunkard.
Transition can be “split”
That is, when T1 and T2 are in different locations. This means you change into your bike kit in TI and your run kit in T2. Race organisers often transport your running stuff so that it is ready for you in T2 when you arrive, but check the race website or speak to the organiser for more details.
“Transition is identified by the array of flailing body parts, funky-chicken dances, airborne clothing and a feeding frenzy akin to the most disorganised of zoos.”
Different areas of transition
There will be a clearly marked swim exit, a bike exit and a bike “in” and run exit. There will also be a mount line you must cross before you can jump on your bike, and a bike dismount line for the return trip. Mount too early or alight too late and you risk a penalty. There is no need to cut it too fine as you won’t save time, and giving yourself a few metres’ grace can mean more space for a flawless manoeuvre. Spend time before the race familiarising yourself with the entries, exits and lines, and going through each stage in your mind so you can picture exactly where you need to go and when.
Nudity is not allowed
If in doubt, err on the side of caution and avoid showing a butt cheek or nipple. This means thinking about what clothes you want to swim, bike and run in and, if you don’t want to wear the same outfit for the whole race, how you are going to change attire. In Ironman events, there are usually separate male and female changing tents, and so you can strip off more clothing than you can in a shorter distance race where any wardrobe change has to be done al fresco.
Clean and tidy
Each athlete gets about a metre of space in which to rack their bike, store their clothes and kit, and get changed. Keep this area clean and tidy otherwise you may incur a penalty.
Transition bags
Some long-course races provide transition bags (at registration) for you to put your kit in. The race website will let you know if this is the case.
The above provides some basic info but what, I hear you cry, do I actually have to do in this zoo-like zone called transition?
BEFORE THE RACE
Visual map
![]() Check out the race-course map beforehand to see where transition is located.
Check out the race-course map beforehand to see where transition is located.
![]() Once at the event, if possible, recce transition to locate the entrances, exits and mount/dismount lines.
Once at the event, if possible, recce transition to locate the entrances, exits and mount/dismount lines.
Know and remember your spot
![]() You may have an allocated space on a bike rack, corresponding to your athlete race number. Some races aren’t as organised and prefer the free-for-all approach.
You may have an allocated space on a bike rack, corresponding to your athlete race number. Some races aren’t as organised and prefer the free-for-all approach.
![]() Transition can become an unsolvable maze in the heat of the action. You’re not allowed to put any markers down to help you, so make a mental note of your spot by memorising the row/letter number and using fixed landmarks. Having a dayglo bike or vibrant running shoes can help in identifying where your possessions are.
Transition can become an unsolvable maze in the heat of the action. You’re not allowed to put any markers down to help you, so make a mental note of your spot by memorising the row/letter number and using fixed landmarks. Having a dayglo bike or vibrant running shoes can help in identifying where your possessions are.
Go through the safety check
![]() There’s often a safety check on your bike and helmet as you enter transition, either the day before or the morning of the race. This is to make sure the bike is roadworthy and your helmet has passed the necessary safety standard, as indicated by the sticker inside.
There’s often a safety check on your bike and helmet as you enter transition, either the day before or the morning of the race. This is to make sure the bike is roadworthy and your helmet has passed the necessary safety standard, as indicated by the sticker inside.
Body marking
![]() It’s usually mandatory to have your race number inked on your body, commonly on the upper arm and the back of the thigh. You may either be given a temporary tattoo to put on beforehand or there are designated “Body Markers”; volunteers who do it for you.
It’s usually mandatory to have your race number inked on your body, commonly on the upper arm and the back of the thigh. You may either be given a temporary tattoo to put on beforehand or there are designated “Body Markers”; volunteers who do it for you.
Rack your bike
![]() Place your bike on the designated area of the bike rack by the handlebars or the saddle. Some race organisers will stipulate which of the two options they prefer; others leave it to you to decide. I tended to hook mine by the saddle as it was easier for me to remove the bike quickly. I faced the handlebars in the direction of the bike exit so I could steer straight out of transition.
Place your bike on the designated area of the bike rack by the handlebars or the saddle. Some race organisers will stipulate which of the two options they prefer; others leave it to you to decide. I tended to hook mine by the saddle as it was easier for me to remove the bike quickly. I faced the handlebars in the direction of the bike exit so I could steer straight out of transition.
Get your bike and bike gear ready
![]() Pump the tyres up first so that you have more time to sort out any unforeseen problems (having your own track/foot pump is a good idea). Note that if you rack the bike the day before, and it’s hot weather, take a bit of air out of the tyres to reduce the risk of an unfortunate blowout due to internal pressure changes.
Pump the tyres up first so that you have more time to sort out any unforeseen problems (having your own track/foot pump is a good idea). Note that if you rack the bike the day before, and it’s hot weather, take a bit of air out of the tyres to reduce the risk of an unfortunate blowout due to internal pressure changes.
![]() Put the bike in an easy-ish gear.
Put the bike in an easy-ish gear.
![]() Secure your spares to the bike.
Secure your spares to the bike.
![]() Reset your bike computer if you are using one.
Reset your bike computer if you are using one.
![]() Put your (unbuckled) helmet upside down on your handlebars or aerobars.
Put your (unbuckled) helmet upside down on your handlebars or aerobars.
![]() Make sure the lenses of your sunglasses are clean and then put them in the helmet with the arms open; place your number belt (if you are wearing one) upside down on top with the clasp open. If it’s windy, you may wish to place them on the floor to reduce the risk of them going airborne.
Make sure the lenses of your sunglasses are clean and then put them in the helmet with the arms open; place your number belt (if you are wearing one) upside down on top with the clasp open. If it’s windy, you may wish to place them on the floor to reduce the risk of them going airborne.
![]() If you wear bike shoes, sprinkle talc inside and loosen the straps; then either a) clip them into your pedals (some athletes attach their shoes to the bike with elastic bands to keep them upright when running to the mount line), or b) place them next to your bike. If you are doing an Ironman you may have put your shoes in your bike-transition bag.
If you wear bike shoes, sprinkle talc inside and loosen the straps; then either a) clip them into your pedals (some athletes attach their shoes to the bike with elastic bands to keep them upright when running to the mount line), or b) place them next to your bike. If you are doing an Ironman you may have put your shoes in your bike-transition bag.
Get your running kit ready
![]() Place a small towel next to your bike and your running shoes on top (if you are doing an Ironman your shoes will be in your run-transition bag).
Place a small towel next to your bike and your running shoes on top (if you are doing an Ironman your shoes will be in your run-transition bag).
![]() Make sure that the tongue and laces are open and put one sock in each shoe (if you plan to wear socks).
Make sure that the tongue and laces are open and put one sock in each shoe (if you plan to wear socks).
![]() I also sprinkle talc inside my running shoes (and socks) to help soak up excess water and prevent blisters. This can be done the day before.
I also sprinkle talc inside my running shoes (and socks) to help soak up excess water and prevent blisters. This can be done the day before.
Get your nutrition ready
![]() Secure your bottles/gels/bars, etc, to the bike and place any run nutrition next to your running shoes.
Secure your bottles/gels/bars, etc, to the bike and place any run nutrition next to your running shoes.
![]() Focus on yourself and don’t watch what others are doing. Yes, the bike next to you might be slightly more bling than your antique penny farthing, but it’s the engine that counts. Now is not the time for tri perving. Save it for after the race. Close your eyes, relax, breathe and accept that a few nerves are normal!
Focus on yourself and don’t watch what others are doing. Yes, the bike next to you might be slightly more bling than your antique penny farthing, but it’s the engine that counts. Now is not the time for tri perving. Save it for after the race. Close your eyes, relax, breathe and accept that a few nerves are normal!
![]() Leave time to get into your wetsuit (if you are wearing one). Top tips for successfully donning the neoprene can be found on here and here.
Leave time to get into your wetsuit (if you are wearing one). Top tips for successfully donning the neoprene can be found on here and here.
![]() Don’t forget to put your timing chip strap under or below the leg of your wetsuit.
Don’t forget to put your timing chip strap under or below the leg of your wetsuit.
![]() Swing your arms slowly (forward and back) to loosen them before entering the water.
Swing your arms slowly (forward and back) to loosen them before entering the water.
![]() I always did a 10-minute swim warm-up (with some 10–15-second, higher intensity efforts). Some athletes also like to do a short run beforehand.
I always did a 10-minute swim warm-up (with some 10–15-second, higher intensity efforts). Some athletes also like to do a short run beforehand.
TRANSITION 1 (SWIM TO BIKE)
![]() Swim toward the finish, making sure you sight correctly, using obvious landmarks. Kick a little harder at the end to fire your leg muscles, but remain calm and prepare yourself mentally for the next stage.
Swim toward the finish, making sure you sight correctly, using obvious landmarks. Kick a little harder at the end to fire your leg muscles, but remain calm and prepare yourself mentally for the next stage.
![]() If in the ocean, use the waves to propel you forward, body surfing as you near the beach. You may need to increase your stroke rate and kick faster to catch the wave.
If in the ocean, use the waves to propel you forward, body surfing as you near the beach. You may need to increase your stroke rate and kick faster to catch the wave.
![]() Don’t stop or stand up until your fingers scrape the bottom/you reach the exit steps/ramp, then take a deep breath and pull yourself up slowly. There are sometimes volunteers to hoist you up but don’t rely on this.
Don’t stop or stand up until your fingers scrape the bottom/you reach the exit steps/ramp, then take a deep breath and pull yourself up slowly. There are sometimes volunteers to hoist you up but don’t rely on this.
![]() Start to walk (more experienced athletes jog or run) and lift your goggles on to your head. I removed my hat and goggles at this stage.
Start to walk (more experienced athletes jog or run) and lift your goggles on to your head. I removed my hat and goggles at this stage.
![]() Unzip your wetsuit with one hand, remove your arms one at a time and pull the suit down to your waist. You can strip down in the change tent or by your bike.
Unzip your wetsuit with one hand, remove your arms one at a time and pull the suit down to your waist. You can strip down in the change tent or by your bike.

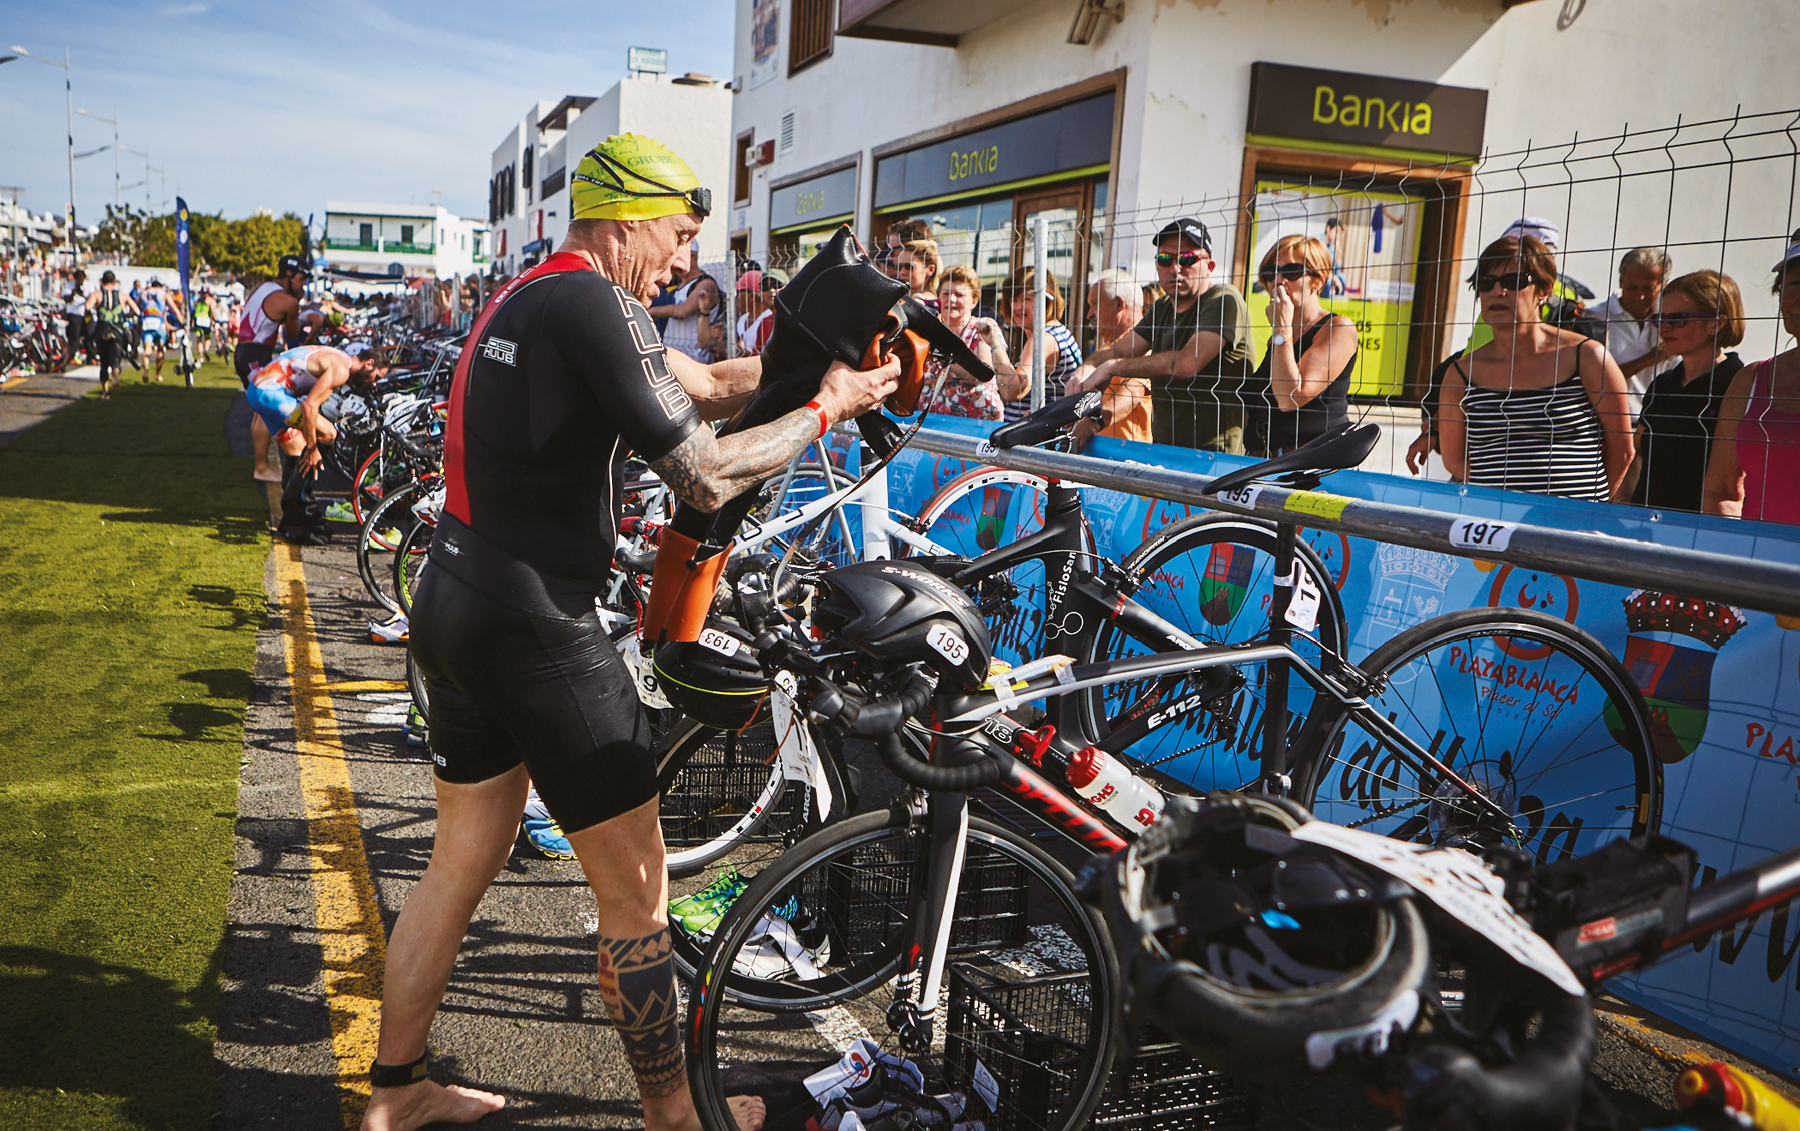
![]() Run or walk to where your bike is racked. If doing an Ironman, you will go through the change tent before getting to your bike and it’s in this tent that you will remove your wetsuit and change into any cycle clothes.
Run or walk to where your bike is racked. If doing an Ironman, you will go through the change tent before getting to your bike and it’s in this tent that you will remove your wetsuit and change into any cycle clothes.
![]() Pull your wetsuit down in one smooth motion so that it is below the knees. Step out of one leg, and tread on the wetsuit to help pull the other leg out. Don’t panic if you can’t get your wettie off immediately; relax, breathe and try again—sit down if necessary.
Pull your wetsuit down in one smooth motion so that it is below the knees. Step out of one leg, and tread on the wetsuit to help pull the other leg out. Don’t panic if you can’t get your wettie off immediately; relax, breathe and try again—sit down if necessary.
![]() Remove hat and goggles if you haven’t already done so.
Remove hat and goggles if you haven’t already done so.
![]() Put your sunglasses on first, then the helmet. This way they will be under the helmet straps and won’t get knocked off when you take your helmet off in T2.
Put your sunglasses on first, then the helmet. This way they will be under the helmet straps and won’t get knocked off when you take your helmet off in T2.
![]() Put your race belt on, with the number on your back (if you haven’t attached your number on to the back of your outfit using safety pins).
Put your race belt on, with the number on your back (if you haven’t attached your number on to the back of your outfit using safety pins).
![]() Apply sunscreen, if required.
Apply sunscreen, if required.
![]() Quick-dry your feet if you want to, and put on your shoes (unless they are attached to the pedals).
Quick-dry your feet if you want to, and put on your shoes (unless they are attached to the pedals).
![]() Unrack your bike and—if you can—wheel your bike by the saddle not the handlebars, to help prevent the pedals bashing your legs en route to the mount line.
Unrack your bike and—if you can—wheel your bike by the saddle not the handlebars, to help prevent the pedals bashing your legs en route to the mount line.
![]() Don’t jump on your steed until you cross the mount line.
Don’t jump on your steed until you cross the mount line.