Before we get our hands dirty with actual coding, let’s try to understand the application process flow first so that you can have a better picture about the whole flow of the application from the user’s perspective.
Application Flow
Mobile application
Web API Server
Web application
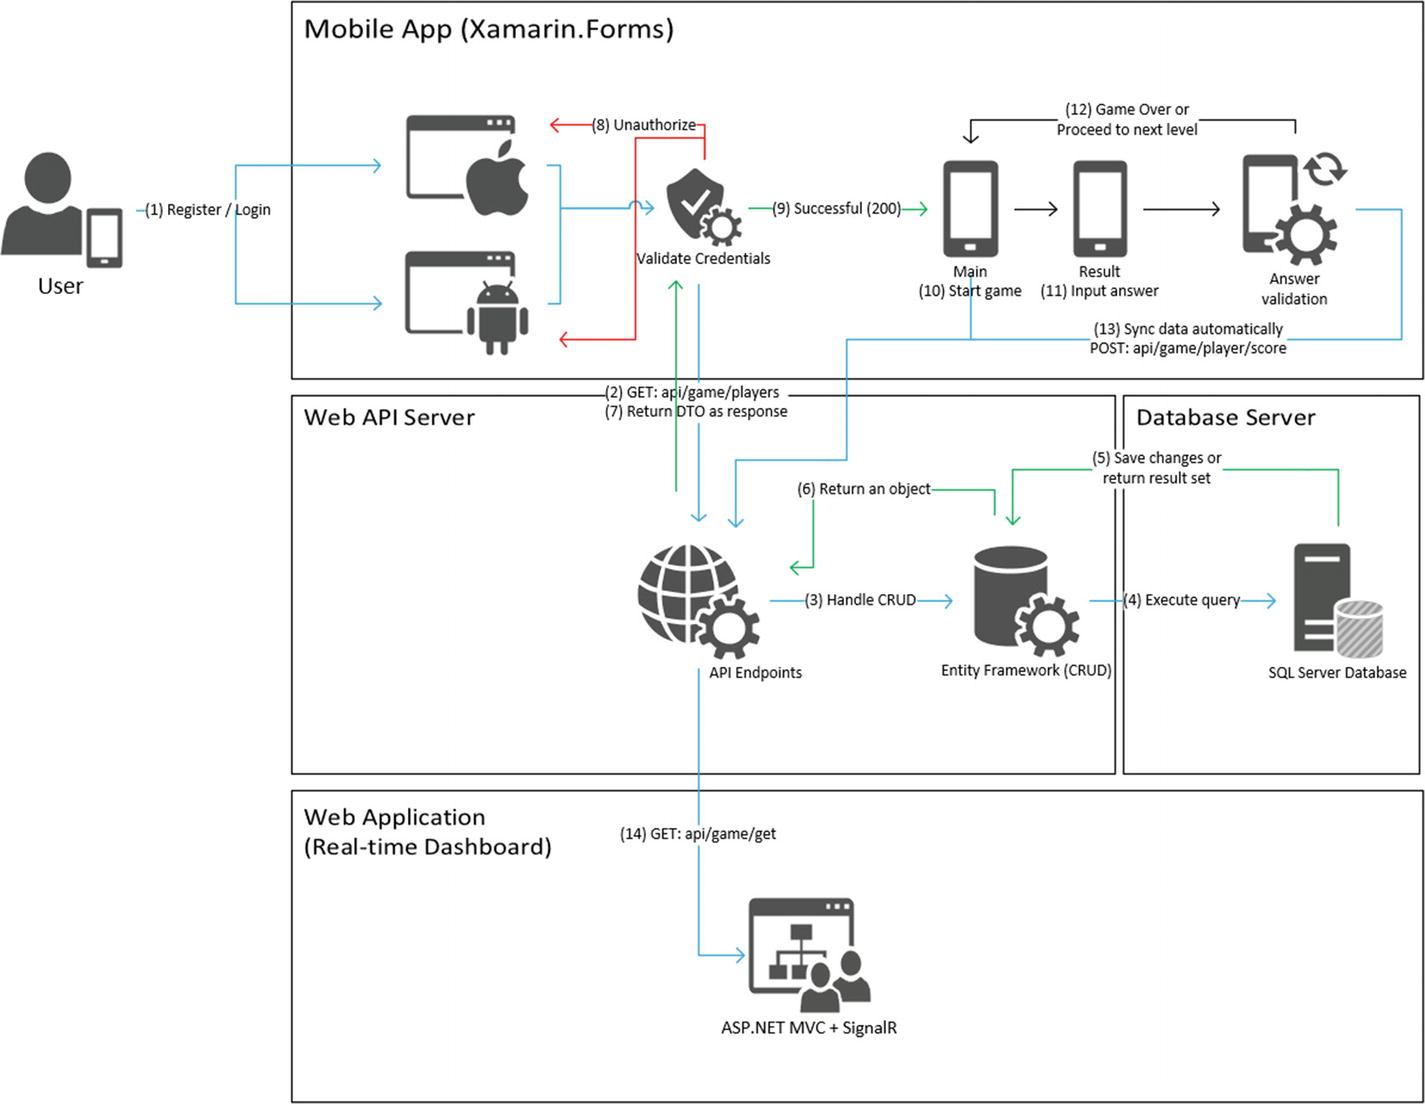
Application process flow
Mobile Application Process Flow
Let’s start with the first layer, the mobile app. In order for a user to start playing the game, they need to register an account first. During registration, a user will simply need to provide their e-mail address, first name, last name, and that’s it. I’ve chosen not to include a password upon registration for the sake of simplicity and to remove the complexity of managing user accounts. With that being said, the mobile application will simply ask for the user’s e-mail address to log in to the system. If you look at the preceding diagram, the mobile application talks to the Web API server to get the user information by issuing an HTTP Get request before validating the credentials. The Web API Server handles the request from the mobile app and returns a JSON response back to the mobile app. Keep in mind that the mobile application also stores the user information locally. This is to ensure that the system has a local copy of data when a user plays the game offline.
Now when a user’s credentials are successfully validated, the user will be navigated to the main screen of the application, wherein they can start playing the game. Otherwise, a validation error that the credentials are invalid or do not exist is prompted.
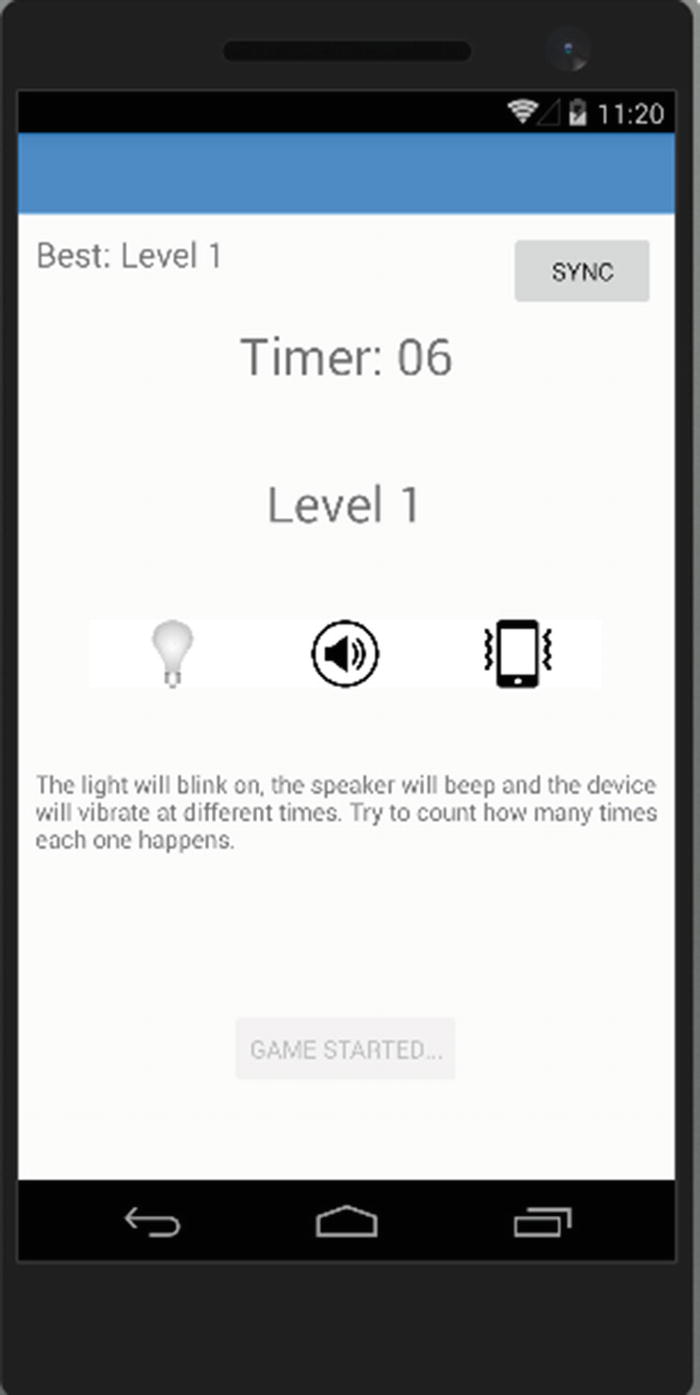
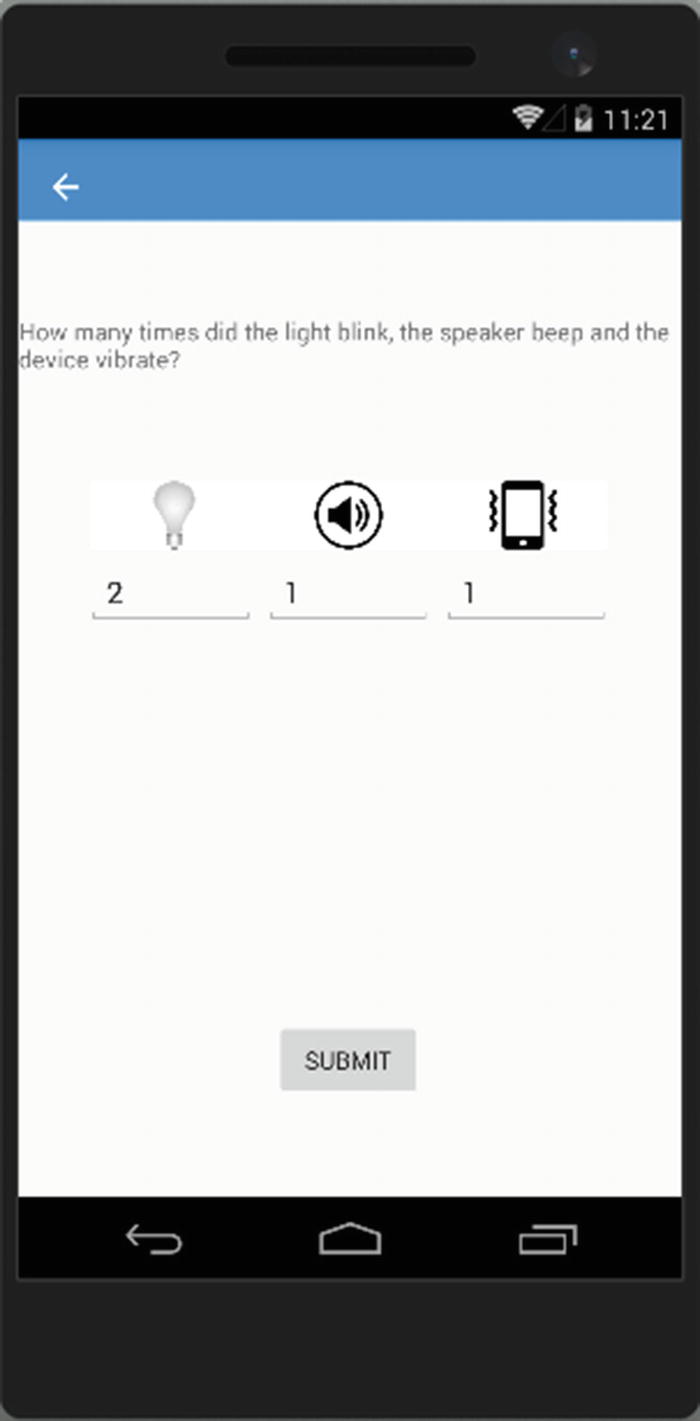
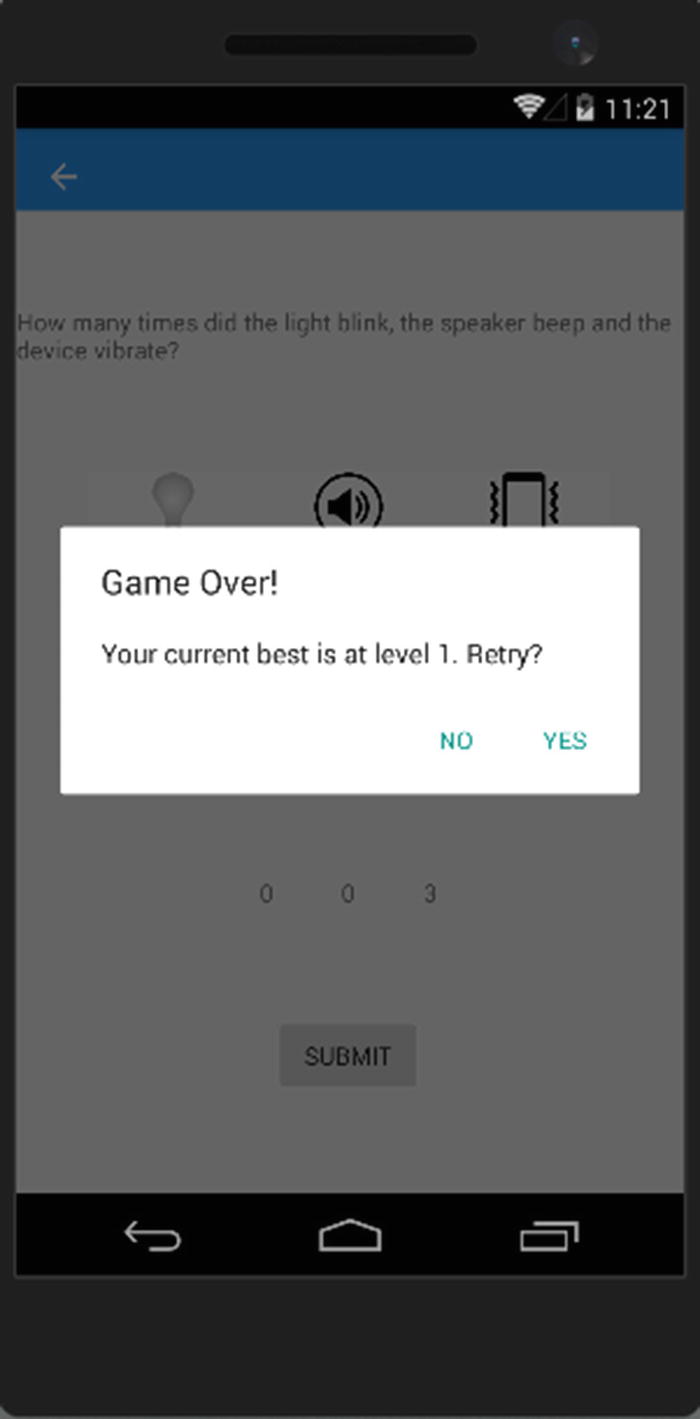
During the game, the application will randomly beep a sound, blink an image, or vibrate the device within a given amount of time in seconds. When the time has elapsed, the application will automatically take the user to the next screen, where they can input their answers. After they submit the answers, the system will validate this input and either display a “congratulations” message and allow them to proceed to the next level or display a “game over” message if their answers are incorrect. The system will also automatically sync the user’s highest score and level after the system has validated the answers.
What’s exciting about this game is that the more you move to a next level, the faster it triggers the different event types until you can’t remember which type of event occurs.
Web API Server Process Flow
As a recap, the API server acts as a central gateway for handling HTTP requests from a client application. In this particular setup, the API server handles both mobile and web app requests and then delegates the request into the data access sublayer using EF to process the data. An HTTP request can be a form of Insert, Update, Read, or Delete. The EF manipulates the data through a strongly typed .NET object and then translates that into a SQL query command and executes it to reflect and persist the changes in the data to the SQL Server database.
Web Application Process Flow
The web app is nothing but a page that displays the user ranking dashboard (a.k.a. leaderboard). This page is an ASP.NET MVC application that asynchronously listens to a data change by subscribing to a Web API endpoint and then displays the changes in real time using ASP.NET SignalR. Real-time changes occur when a manual sync or automatic sync is triggered from the mobile app .
Game Overview
This section discusses the game mechanics and objective.
Mechanics
During the game and as soon as you hit the Start button, the application will randomly play different event types within a given time interval expressed in milliseconds. The trigger cycle has a time interval also expressed in milliseconds. For example, within 10 seconds, the app randomly plays different event types such as blinking an image, playing a sound, or activating vibration on the device in a 2-second cycle. At the succeeding levels, the 2-second cycle interval will decrease, which causes the events to trigger much faster than at the previous level.
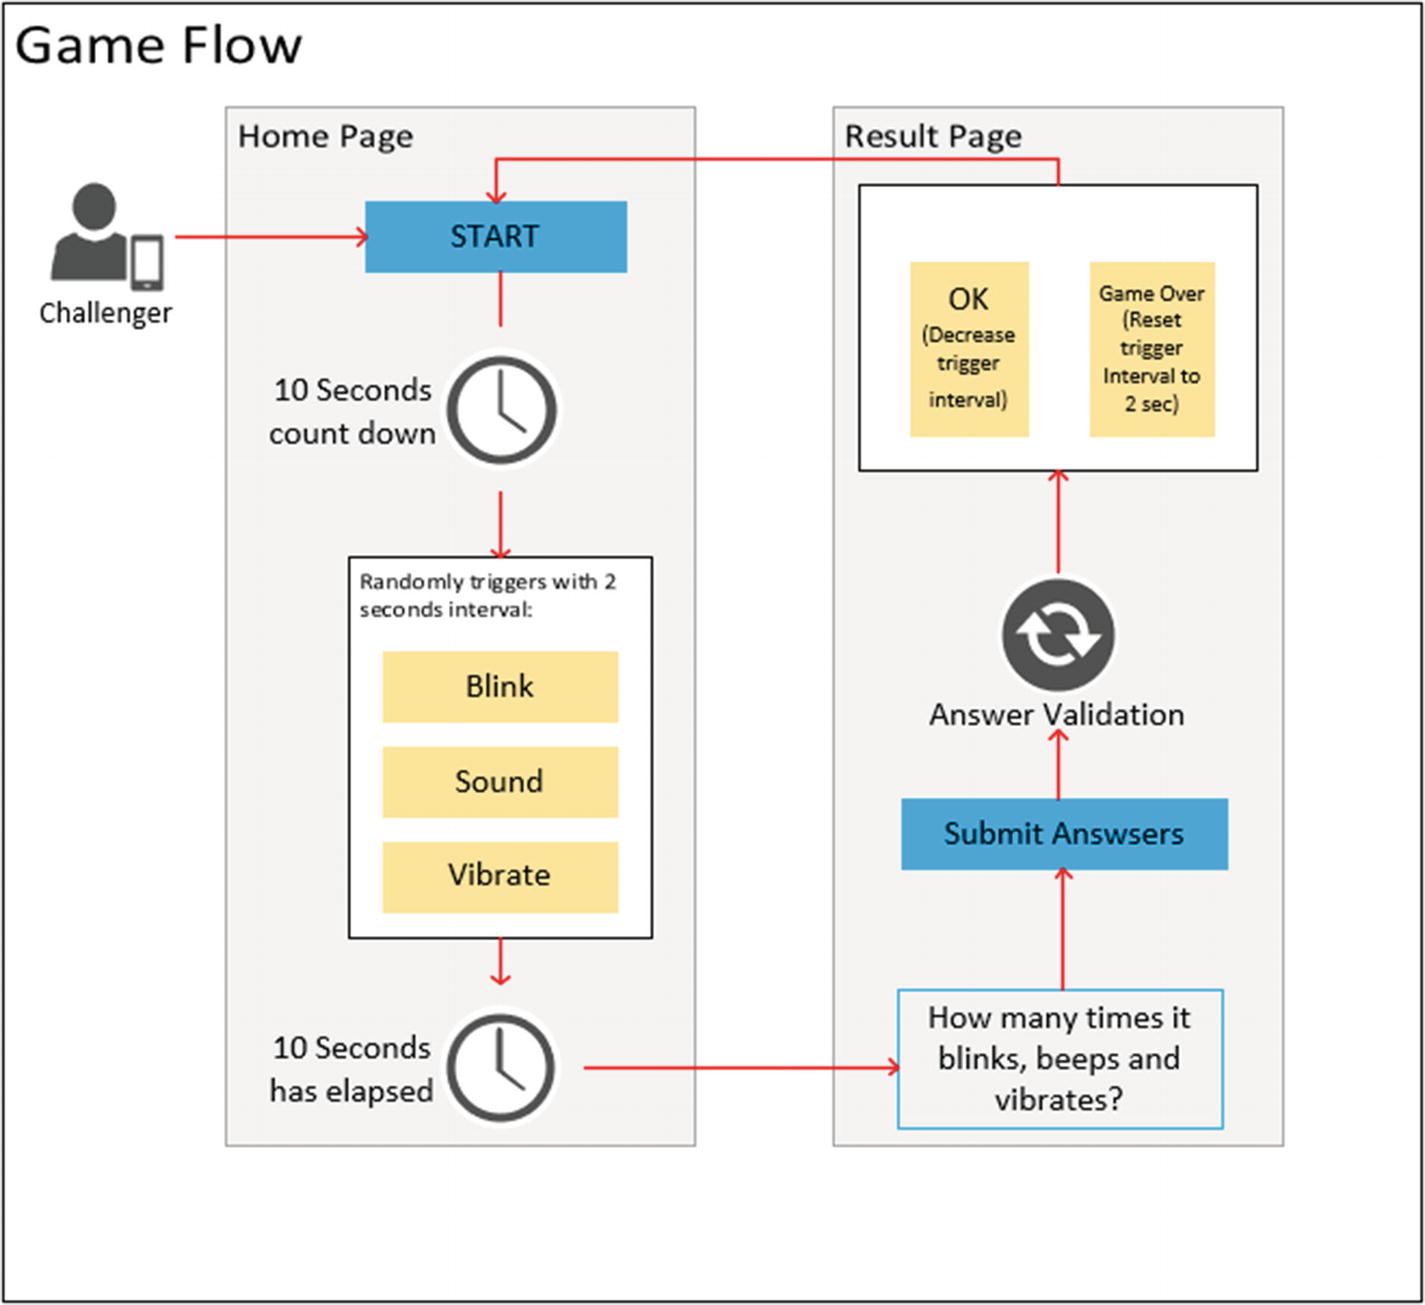
Game flow
Objective
The objective of this game is very simple; you just need to count and memorize how many times the light blinks on, the speaker beeps, and the device vibrates within a span of time. The higher your level is, the faster it blinks, beeps, and vibrates. This will test how great your memory is.
Mobile Application Views
This section will give you some visual references about the outputs of the applications that we are going to build.
Welcome Screen
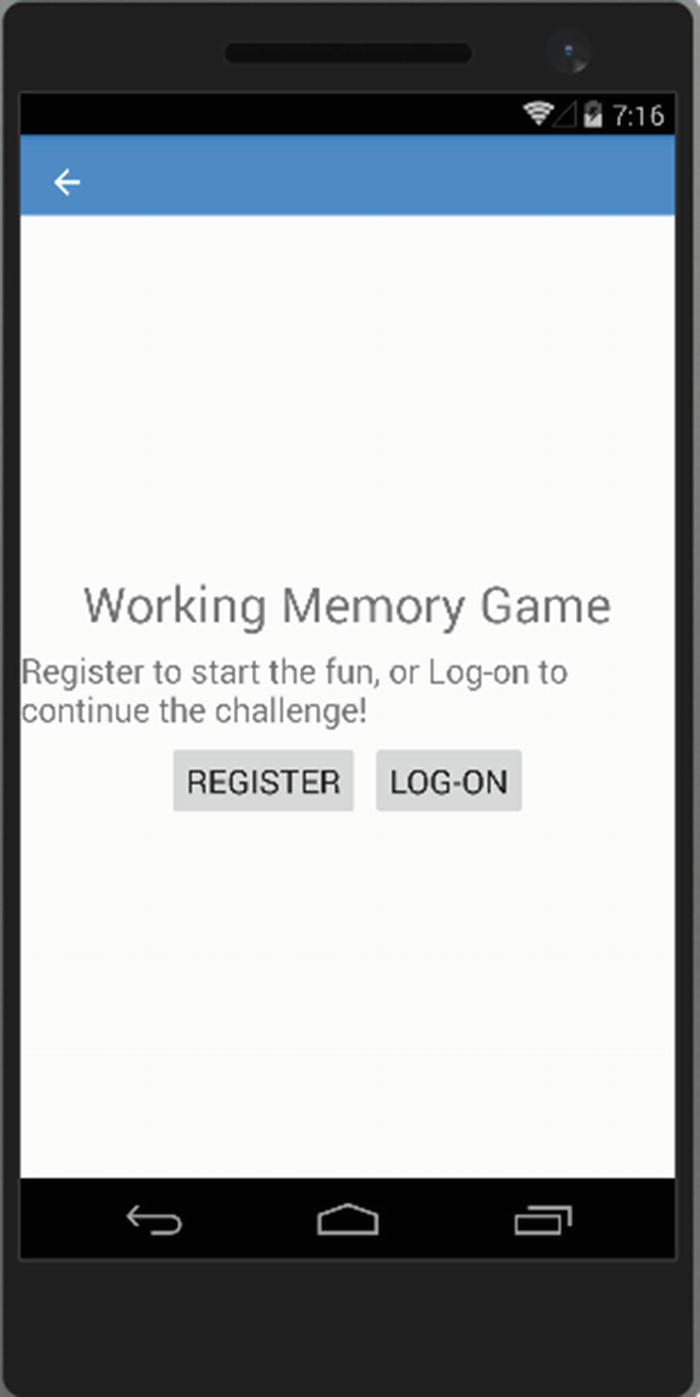
Mobile app welcome view
Registration Screen
Clicking the REGISTER button will display the registration screen, which allows users to register using first name, last name, and e-mail. The LOG-ON button will display the login screen, which allows a returning user to enter their registered e-mail.
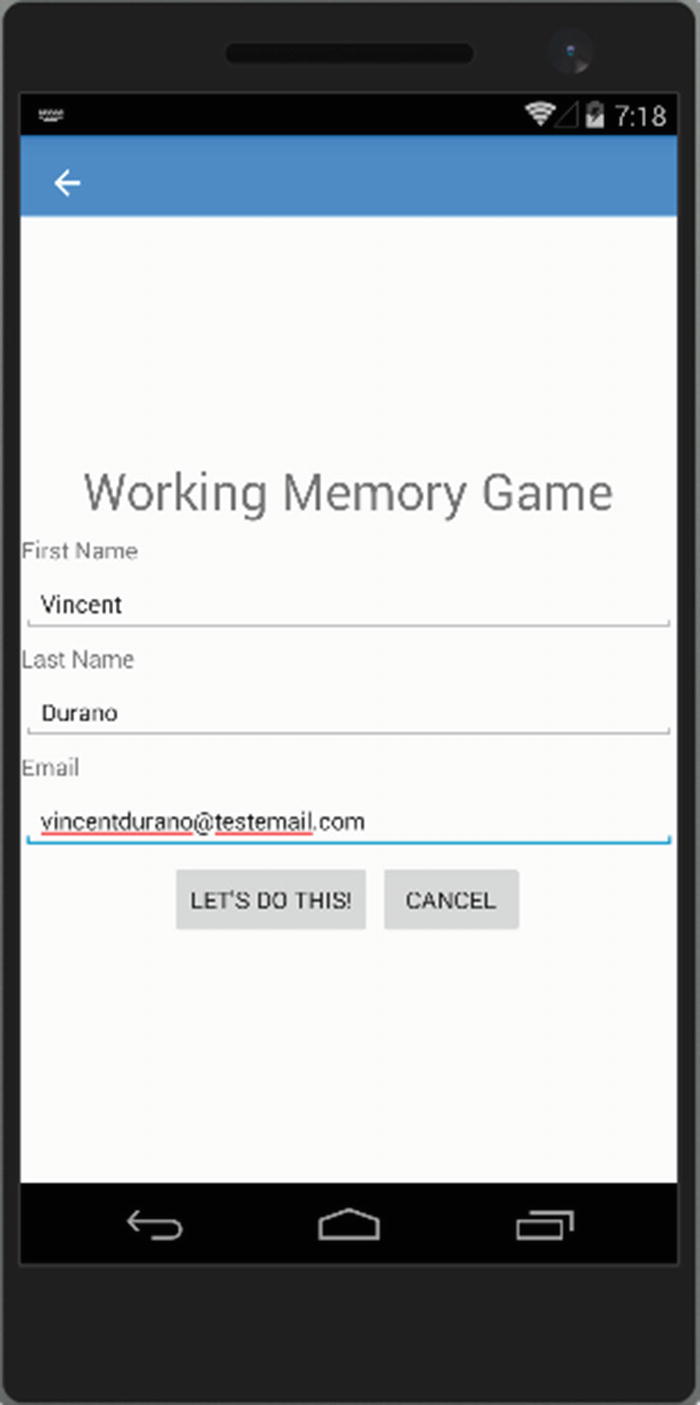
Mobile app register view
Main Screen
Mobile app home view
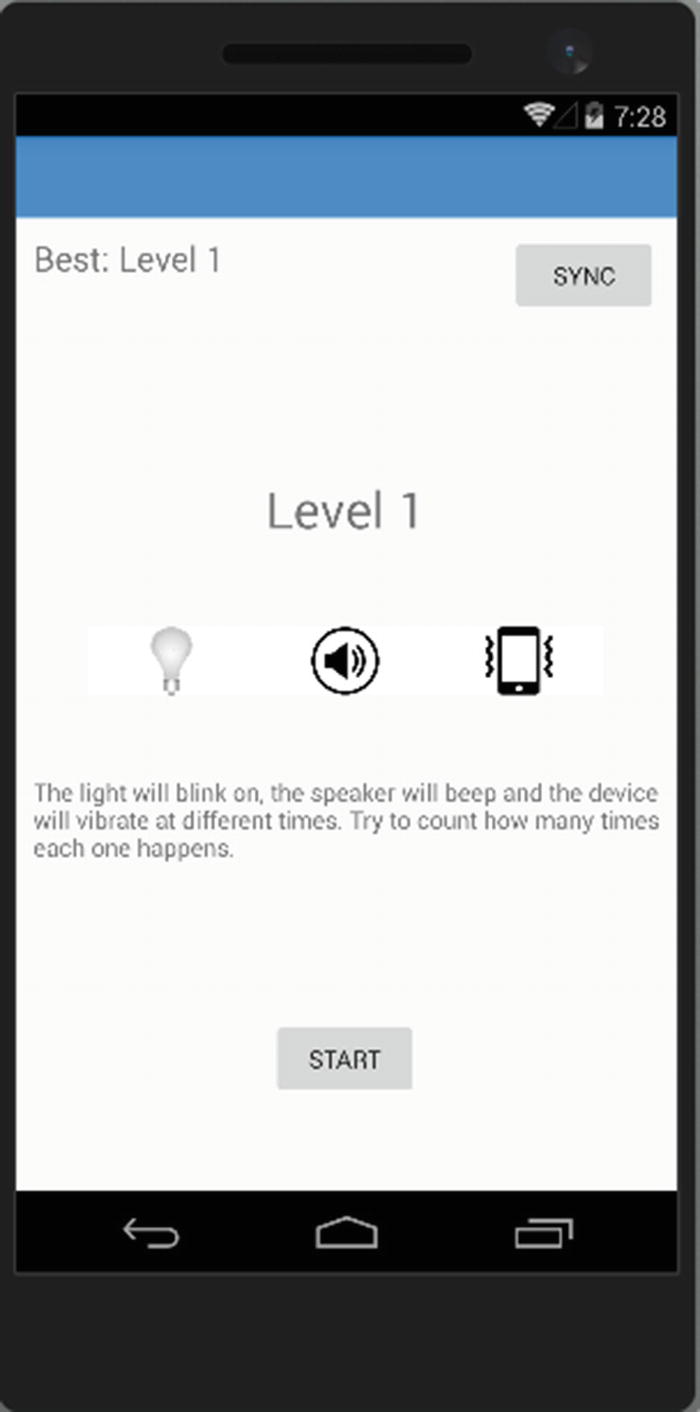
The main screen displays the current and best level scores and as well as a SYNC button to allow users to manually sync their scores in the database. It also displays three main images: a bulb, a speaker, and a device that indicates a vibration.
Mobile app game view
Result Screen
Mobile app answer view
Clicking the SUBMIT button will trigger the system to validate the answers and determines whether the user gave them correctly and thus may proceed to the next level or whether the game should be restarted at the current level. Note that the score will be automatically synced to the database once the user surpasses their current best score.
Mobile app results view: Game Over!
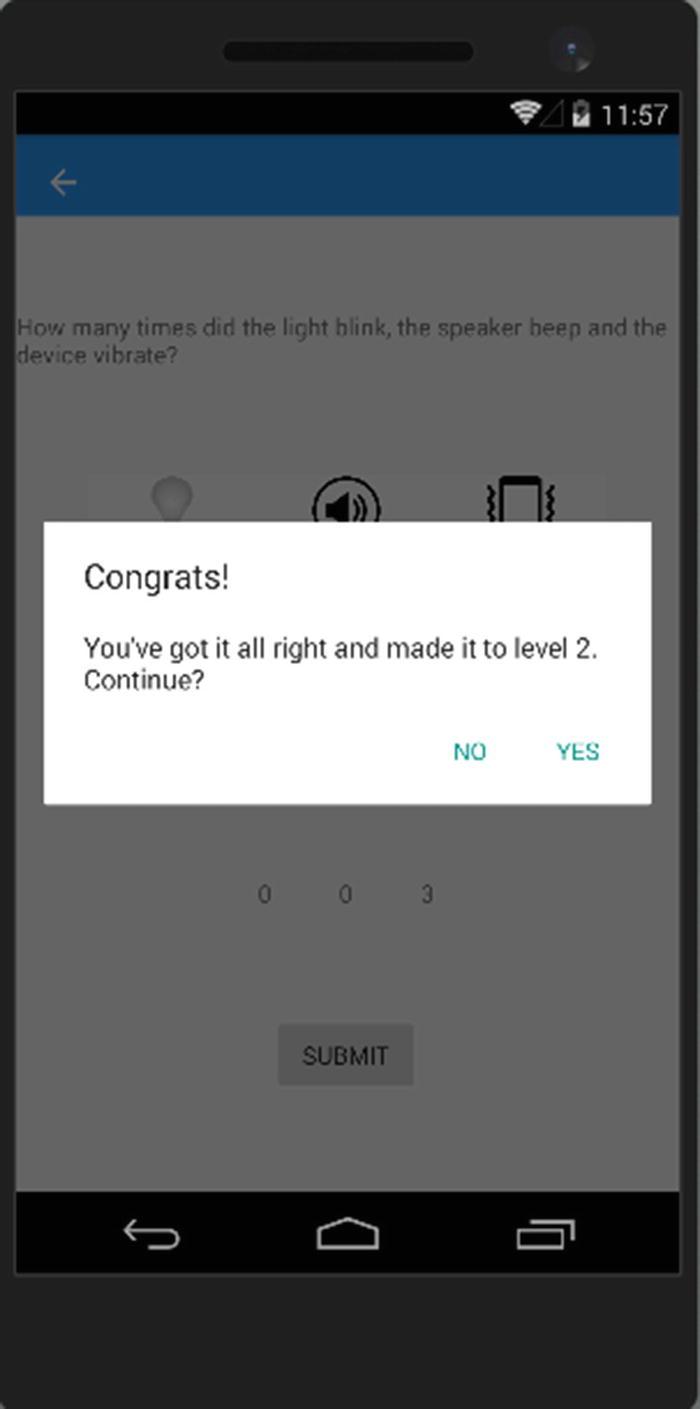
Mobile app results view: Congrats!
Web Application View
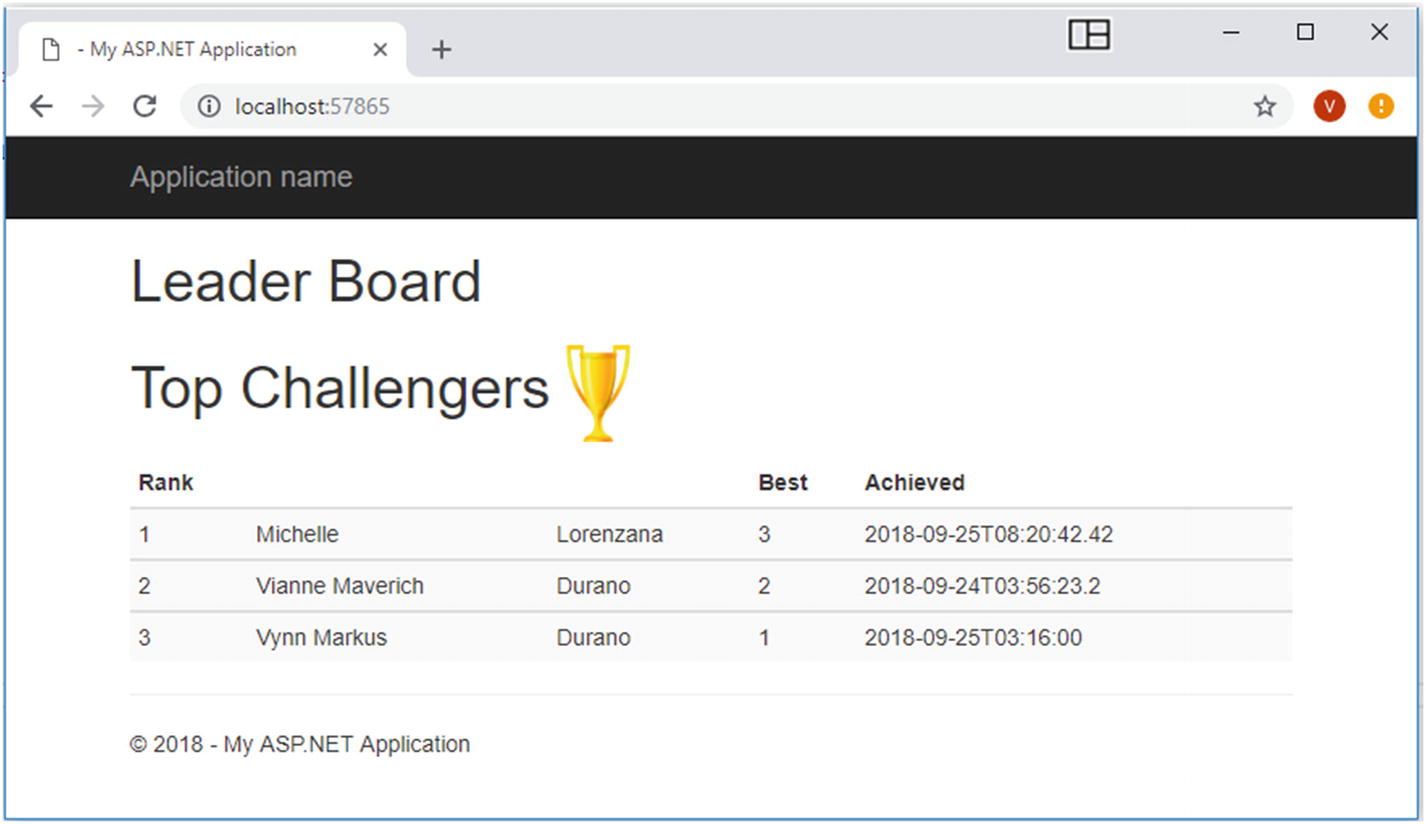
Web app real-time ranking view
That’s it. Now that you have some visual reference for what the app will look like, it’s time for us to build the applications and get our hands dirty with real code examples.
Creating the Core Projects for Mobile App
I’ll try to keep this demo as simple as possible, so beginners can easily follow. By “simple,” I mean that I will limit the discussion of theories and concepts, but instead jump directly into the mud and let us get our hands dirty with code examples.
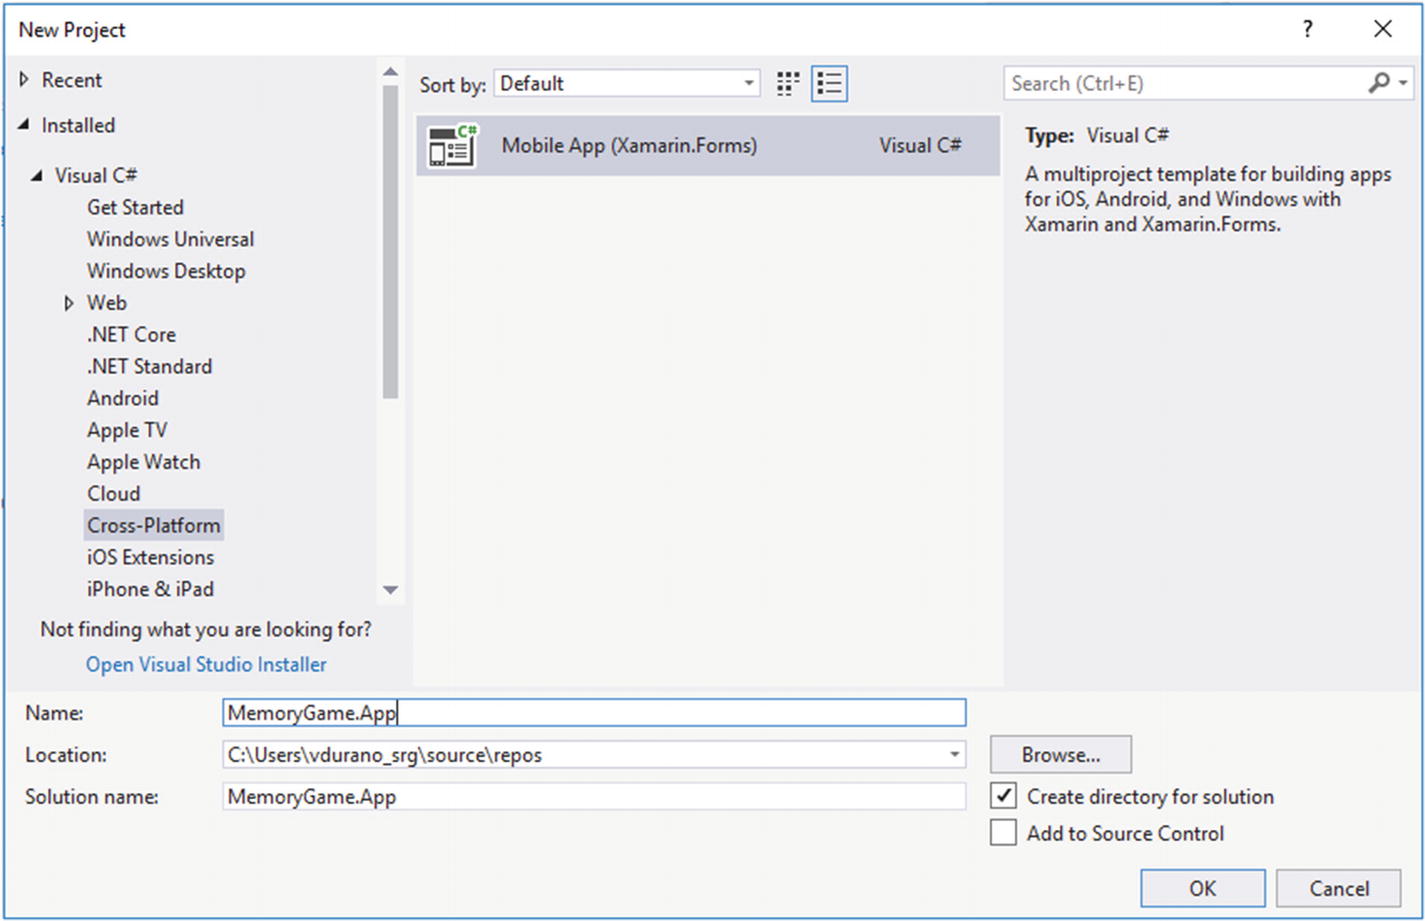
Create new Xamarin.Forms project
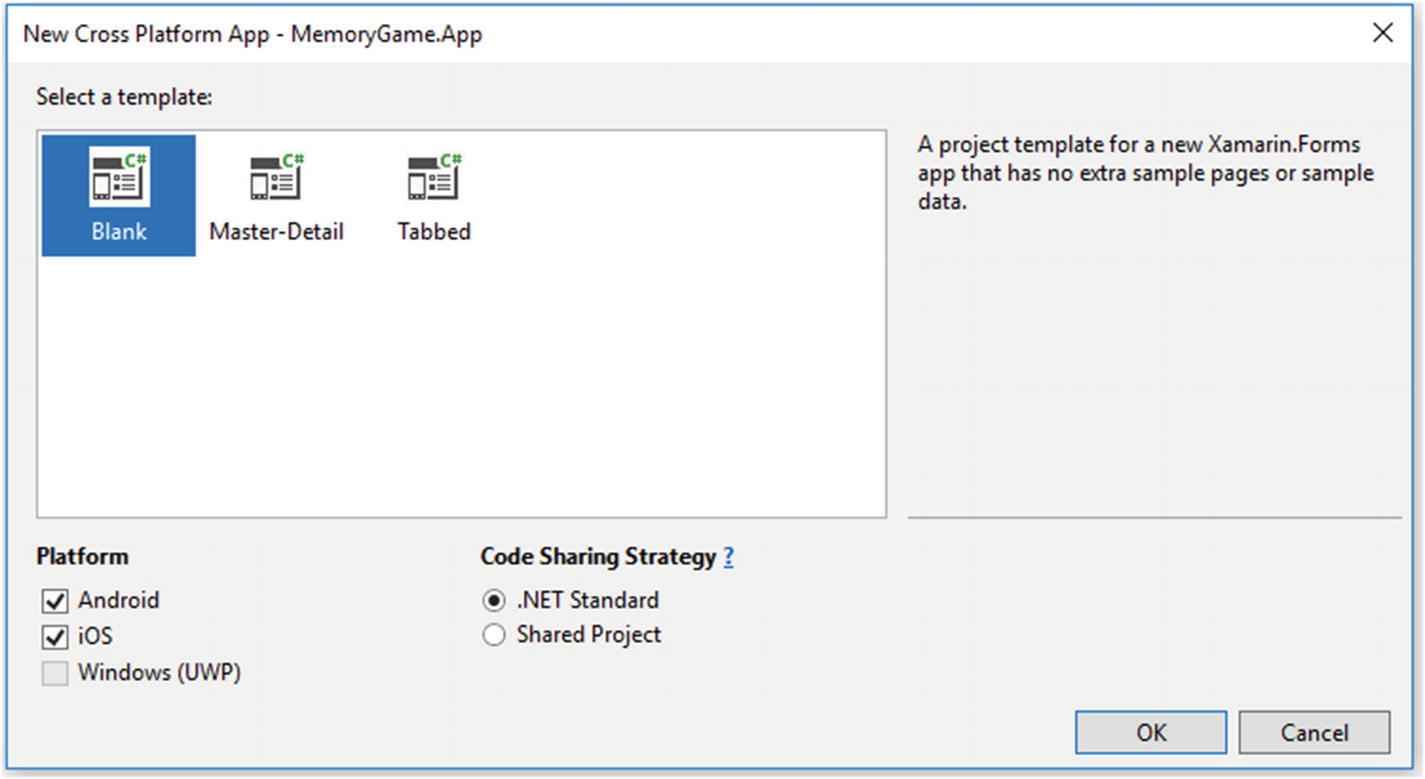
Blank template
Select the Blank template, and under Platform, tick the Android and iOS options. Select .NET Standard as Code Sharing Strategy, and then click OK to let Visual Studio generate the necessary files for you.
It may take a moment to generate the files and dependencies depending on your machine and Internet speed.
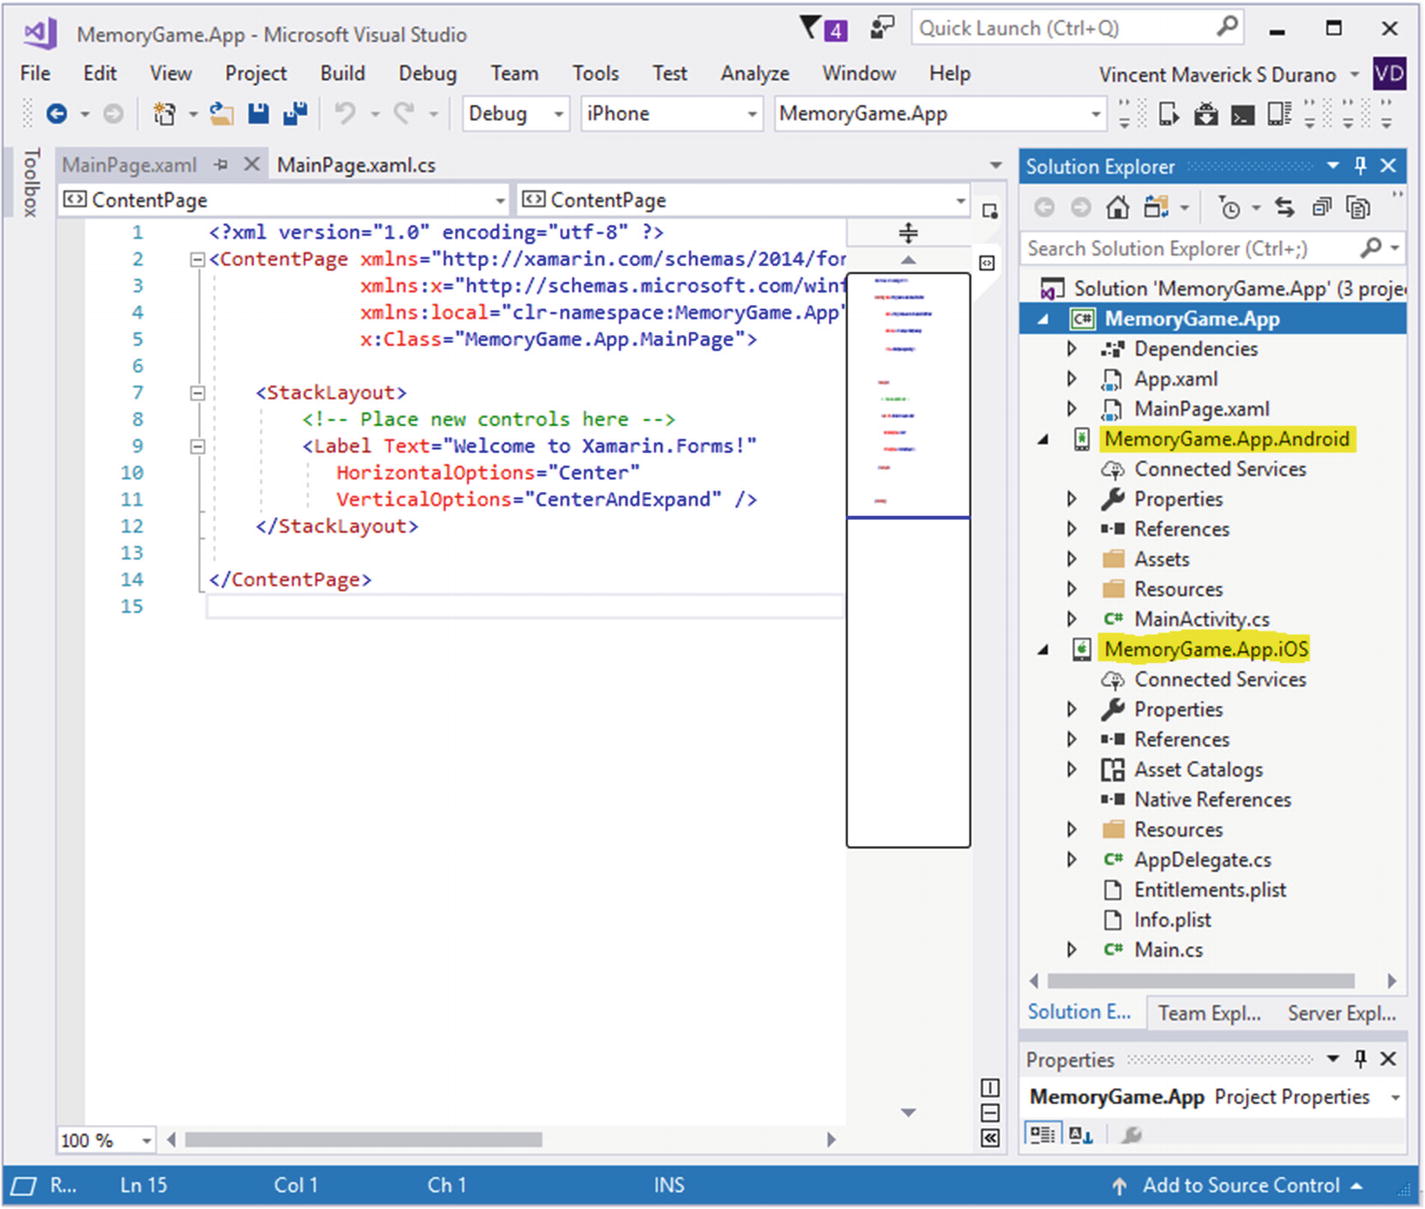
Default generated files
MemoryGame.App
MemoryGame.App.Android
MemoryGame.App.iOS
Note
That the solution only contains the .Android and .iOS projects. We omitted the .UWP project, and so we will be focusing on Android and iOS apps instead.
Overview and Anatomy
Let’s take a quick overview of each project generated.
MemoryGame.App
In 2011, Microsoft released a new type of class libraries called Portable Class Libraries (PCLs). A PCL is a project type that creates a binary file compatible with multiple frameworks. The previous version of Xamarin.Forms uses PCL to enable you to choose a combination of platforms that you want your code to run on. PCLs enable centralized code sharing, which allows developers to write and test code in a single project that can be consumed by other libraries or applications.
However, the available APIs are reduced each time a new target framework is selected. For example, if a class is available in .NET Framework 4.5.1 but not in Windows Universal 10.0, it won’t be available in the PCL targeting both these frameworks. The combinations of the target frameworks are called profiles.
While PCLs were a breakthrough at the time of their creation, it was sometimes difficult to find information on which APIs were available and where to find them. In time, it became clear to the .NET team that a simpler approach was needed, and that’s where .NET Standard fits.
The MemoryGame.App is a .NET Standard Library project. The prerelease version of the Xamarin.Forms 2.3.5 added compatibility with .NET Standard.
.NET Standard is a formal specification of .NET APIs that is intended to be available on all .NET runtimes (such as .NET Framework, Mono, and .NET Core). In real terms, you can think of this as a simplified yet expanded PCL. Any code added to a .NET Standard library can be used on any runtime that supports the .NET Standard platform. In addition, we get expanded access to APIs within the .NET base class libraries, and this supports more platforms. For more information, see https://blogs.msdn.microsoft.com/dotnet/2016/09/26/introducing-net-standard/ .
Folder/File | Purpose |
|---|---|
Dependencies | Contains both NuGet and SDK dependencies for the project. |
App.xaml | Responsible for instantiating the first page that will be displayed by the application on each platform. |
MainPage.xaml | Initializes the main page components. |
MemoryGame.App.Android
Folder/File | Purpose |
|---|---|
Connected Services | Allows service providers to create Visual Studio extensions that can be added to a project without leaving the IDE. It also allows you to connect your ASP.NET core application or mobile services to Azure storage services. Connected Services takes care of all the references and connection code, and modifies your configuration files accordingly. |
Properties | Contains the AndroidManifest.xml file, which describes all the requirements for our Xamarin.Android application, including name, version number, and permissions. It also contains the AssemblyInfo.cs file, in which you can define assembly details such as title, description, copyright info, version, and more. |
References | Contains the assemblies required to build and run the application. |
Assets | Contains the files the application needs to run, including fonts, local data files, and text files. |
Resources | Contains application resources such as strings, images, and layouts. You can access these resources in code through the generated resource class. |
MainActivity.cs | A C# class that contains code for initializing and loading the application. |
MemoryGame.App.iOS
Folder/File | Purpose |
|---|---|
Asset Catalogs | Just like the Assets folder in the .Android project, this contains the files the application needs to run, including fonts, local data files, and text files. |
Native References | This is where you add assemblies specific to the iOS platform. |
Resources | Contains application resources such as strings, images, and layouts. You can access these resources in code through the generated resource class. |
AppDelegate.cs | This class is responsible for launching the UI of the application, as well as listening (and optionally responding) to application events from iOS. |
Entitlements.plist | Used to specify entitlements and to sign the application bundle. In essence, Entitlements are special app capabilities and security permissions granted to applications that are correctly configured to use them. |
Info.plist | Contains metadata to the system. This file typically contains the keys and their corresponding values for the application’s configuration bundle. |
Main.cs | The main entry point of the application. |
Architecture Fundamentals
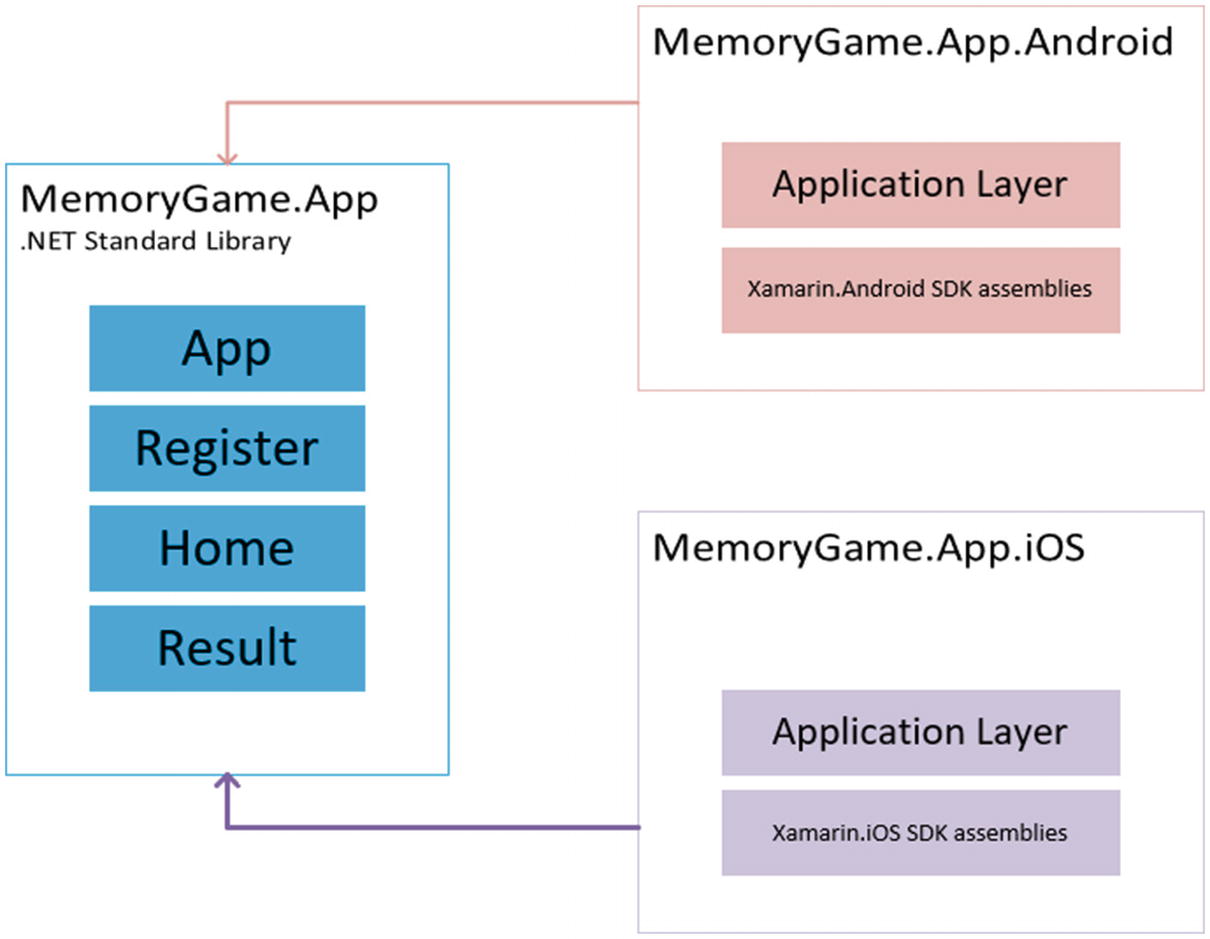
Xamarin.Forms architecture fundamentals
First Run
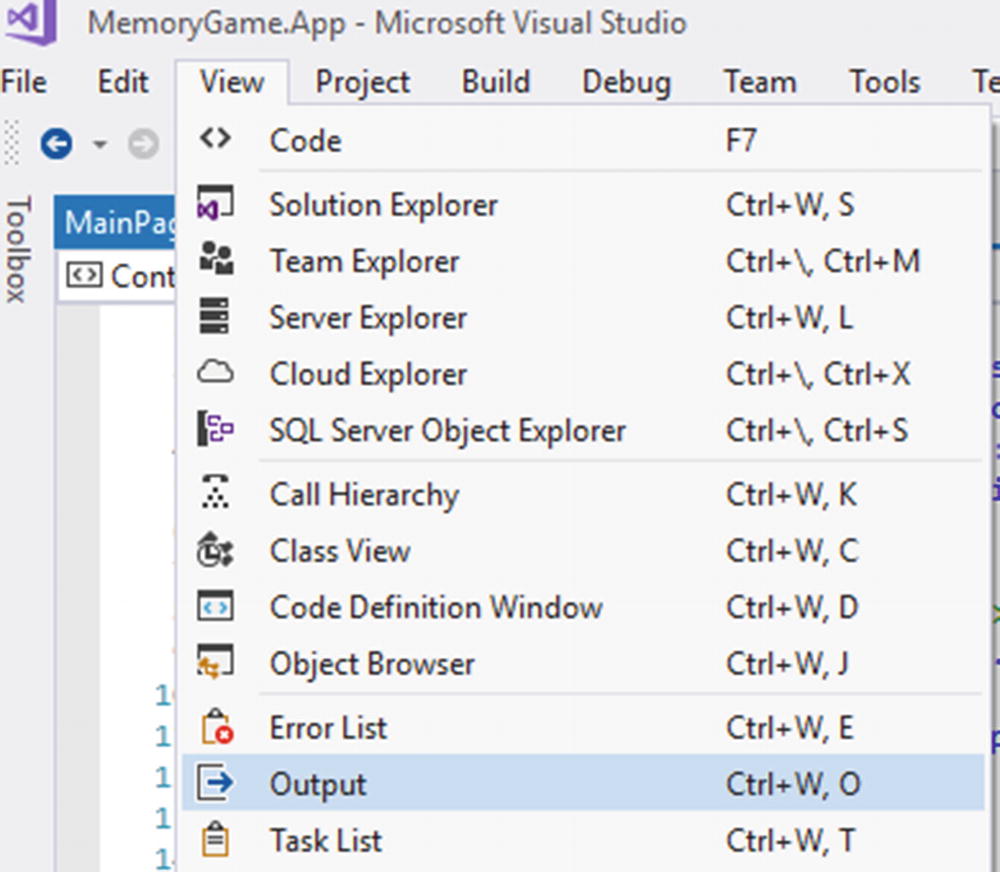
Enabling Output window
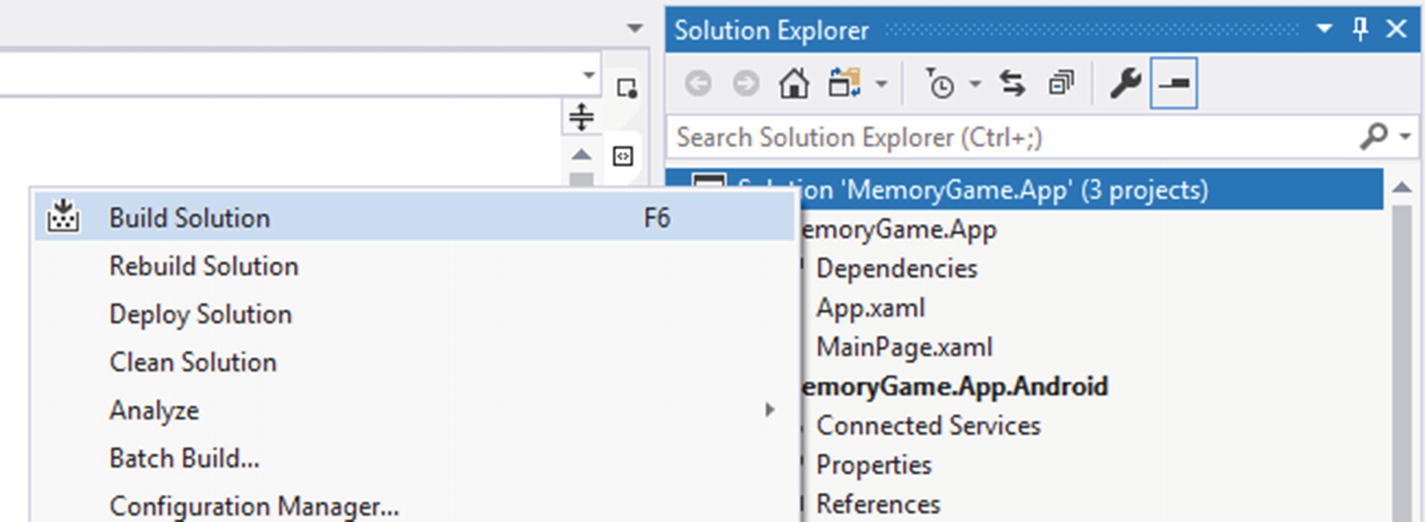
Building the project’s solution
Or, you could simply hit the F6 key.
The Output window should show the build results. If everything goes well and builds successfully, then we can start running the apps. The good thing is that the Visual Studio Emulator for Android is included when you install Visual Studio 2017 to develop Xamarin apps. This means that you can test and run the application right away without needing to download and install the Android emulator separately.
Windows 8.1 and Windows 10: https://visualstudio.microsoft.com/vs/msft-android-emulator/
Windows 7: You can use Android SDK/Google or use a third-party emulator such as GenyMotion/Xamarin Android Player.
For this demo, I will just use the default emulator in Visual Studio 2017.
Xamarin.Android
Let’s try to run the Xamarin.Android project first. To do that, we need to set the Xamarin.Android project as the startup project by right-clicking the MemoryGame.App.Android and then select Set as StartUp Project.

Running the Xamarin.Android project for the first time
Note
If you are prompted with a performance warning that says the emulator will run unaccelerated, just click the “Start Anyway” button to launch the emulator.
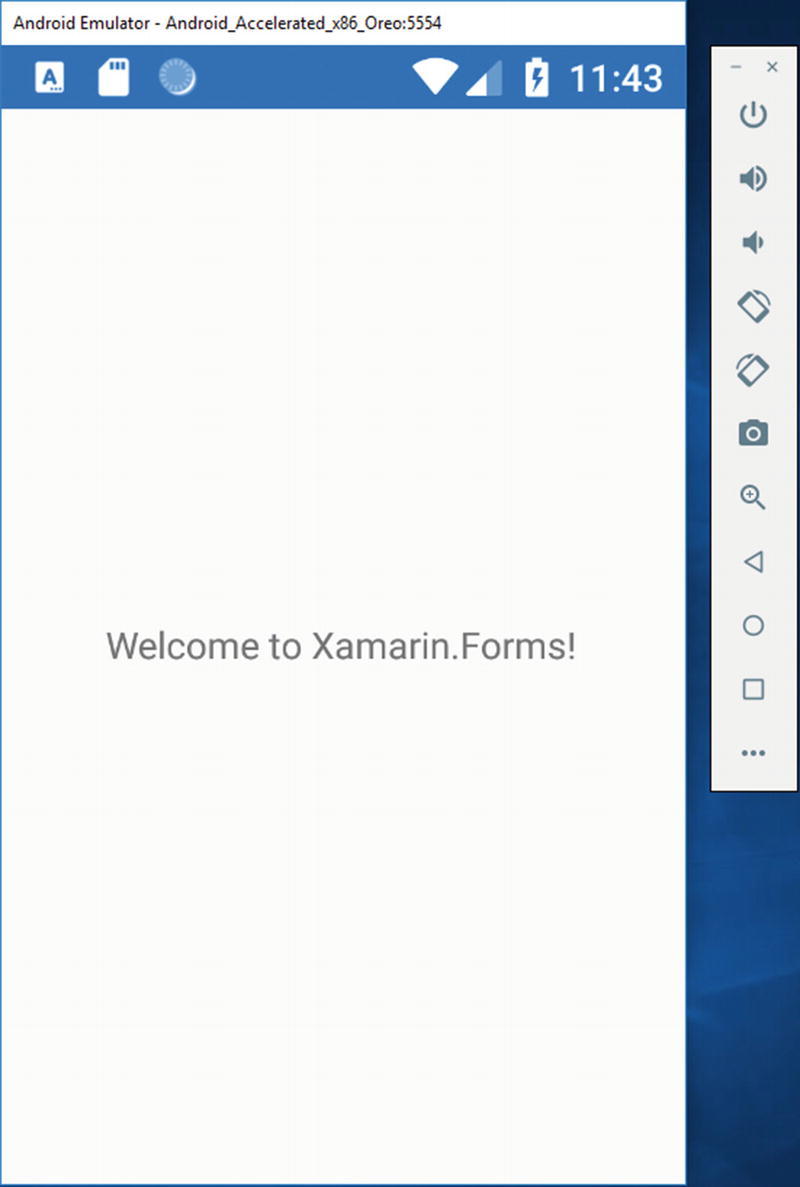
Android emulator output
The emulator may be left running: it is not necessary to shut it down and wait for it to restart each time the app is launched. The first time a Xamarin.Android app is run in the emulator, the Xamarin.Android shared runtime for the targeted API level is installed, followed by the application. The runtime installation may take a few moments, so please be patient. Installation of the runtime takes place only when the first Xamarin.Android app is deployed to the emulator; subsequent deployments are faster because only the app is copied to the emulator.
At this point, you may close the Android emulator, because we need to test out the MemoryGame.App.iOS project.
Xamarin.iOS
To run the Xamarin.iOS project, you need to have a Mac machine to simulate the application. You will first need to pair your Mac so that the MemoryGame.App.iOS project can connect to it.
Building native iOS applications requires access to Apple’s build tools, which only run on a Mac. Because of this, Visual Studio 2017 must connect to a network-accessible Mac to build Xamarin.iOS applications. For more information on pairing your Mac, see the following:
https://docs.microsoft.com/en-us/xamarin/ios/get-started/installation/windows/connecting-to-mac/
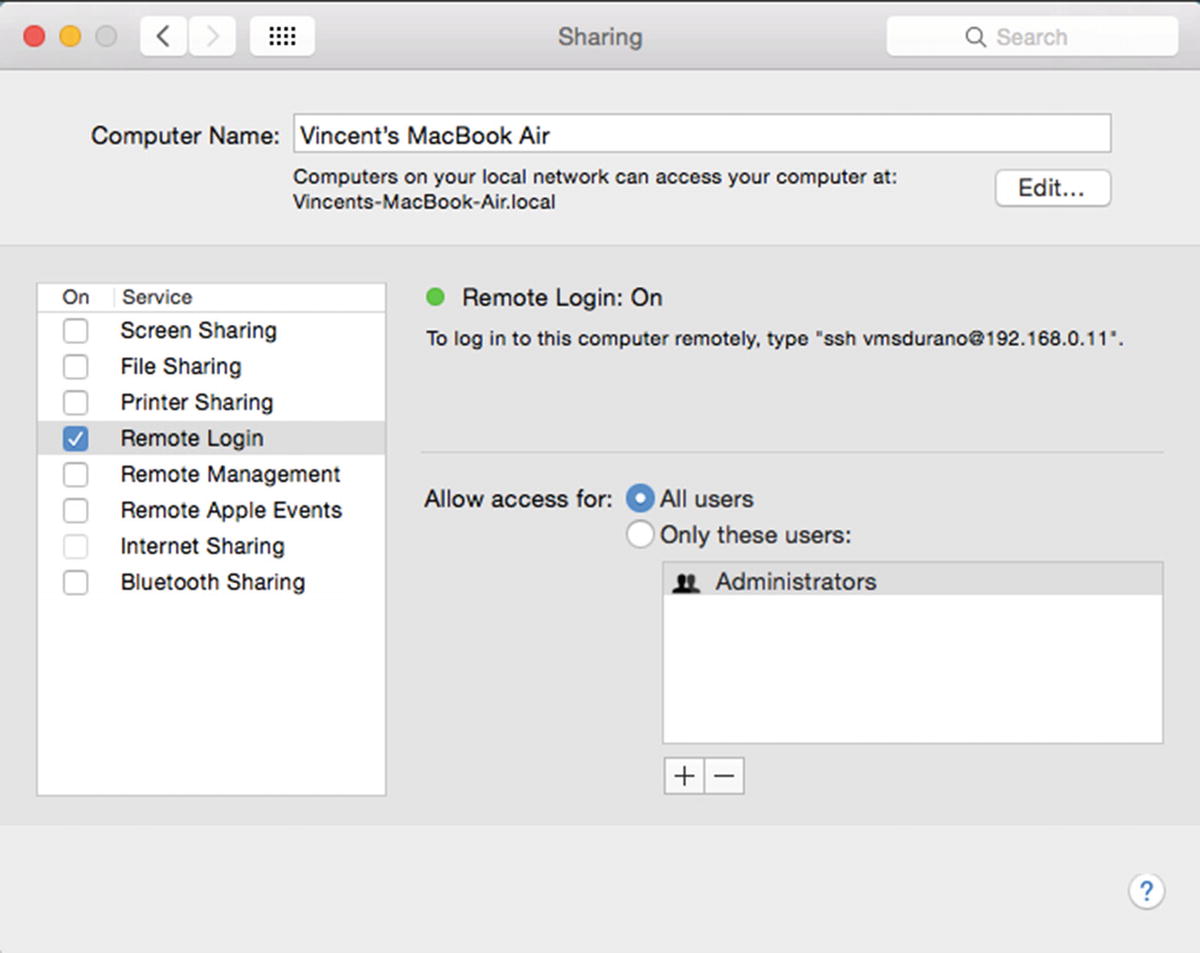
Enabling remote login on Mac
Xcode is required in order to build and run iOS apps, so ensure that you installed that correctly and it’s functional.
Now go ahead and switch to Visual Studio and set the MemoryGame.App.iOS project as a startup project.

Running the Xamarin.iOS project for the first time
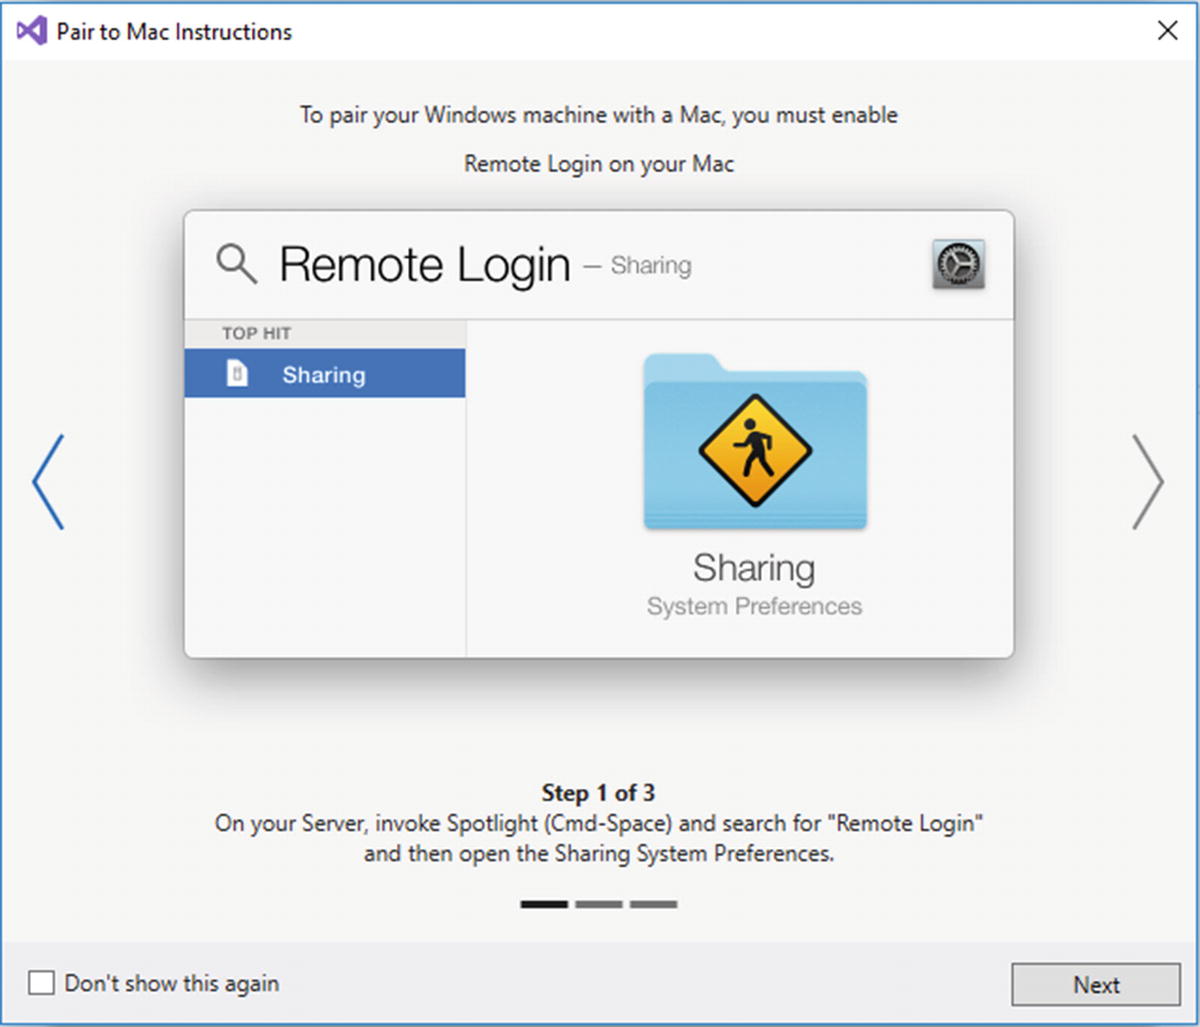
Pair to Mac instructions
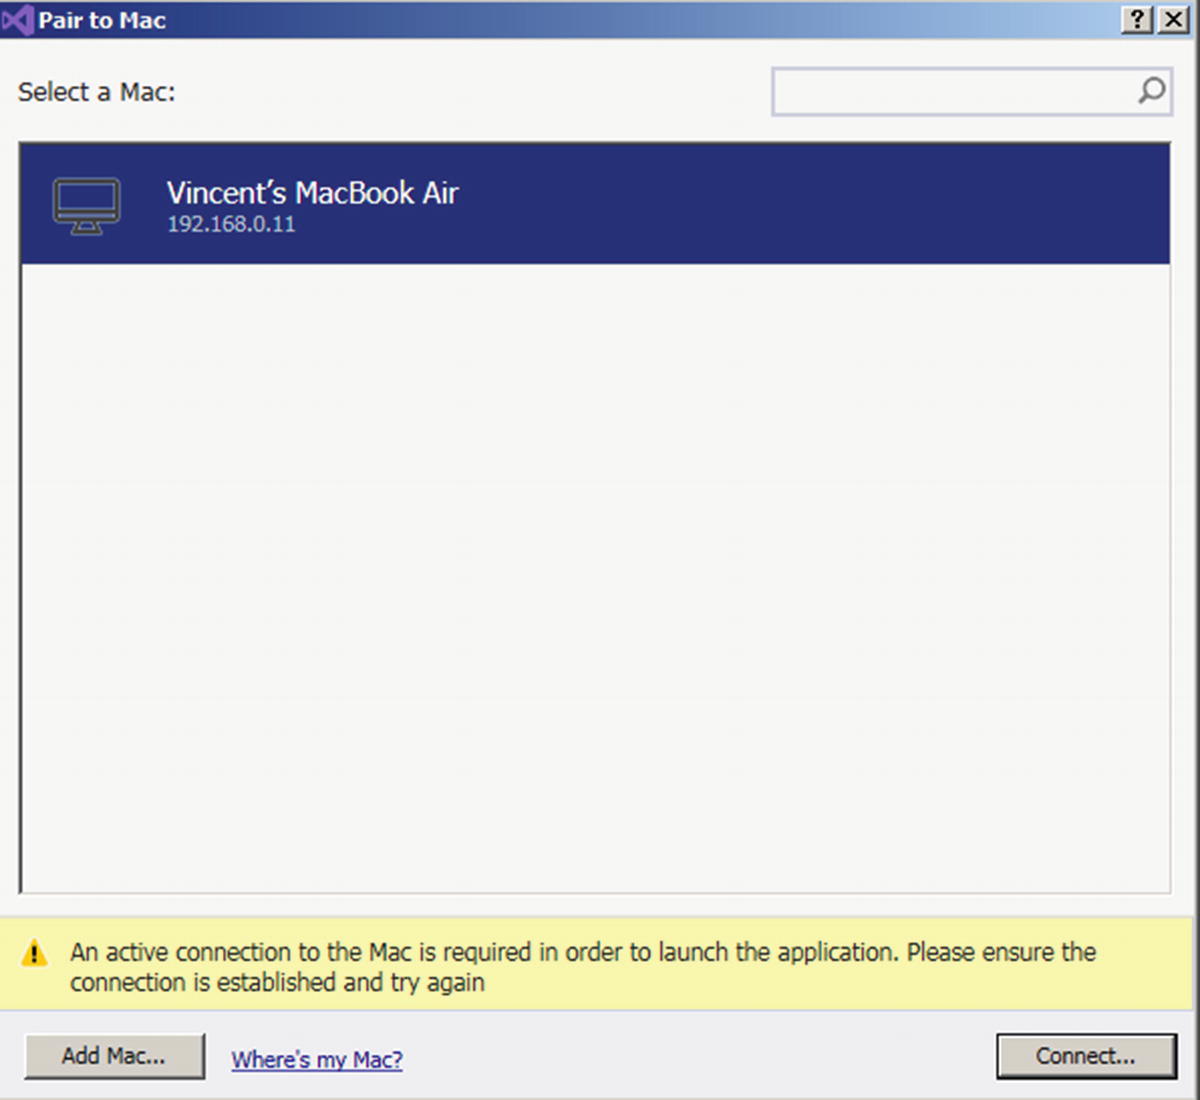
Select a Mac to pair
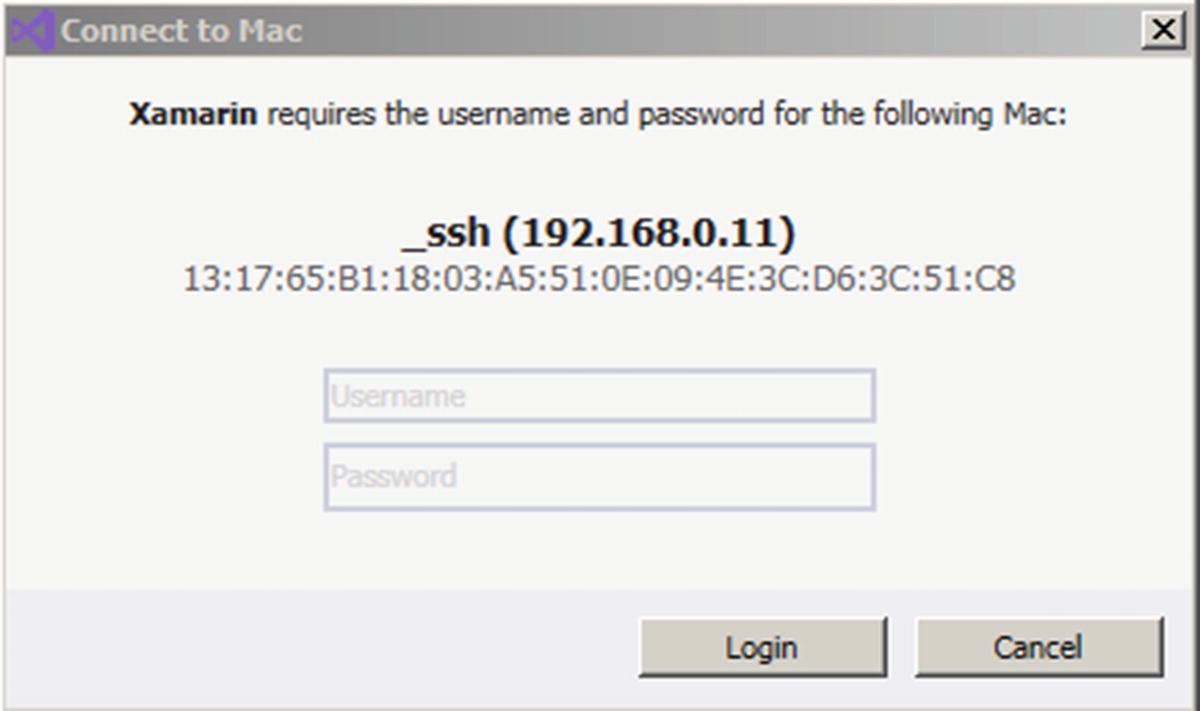
Connect to Mac
Enter your username and password and click Login.

Missing Mono installation warning

Missing Xamarin.iOS installation warning
If for some reason the Mono installation fails, then try installing it manually on your Mac machine. You can download the Mono installer here: www.mono-project.com/docs/getting-started/install/mac/
To ensure that you have everything you need to run Xamarin.iOS on Mac, I would recommend that you install Visual Studio for Mac. You can download the installer here: https://docs.microsoft.com/en-us/visualstudio/mac/installation
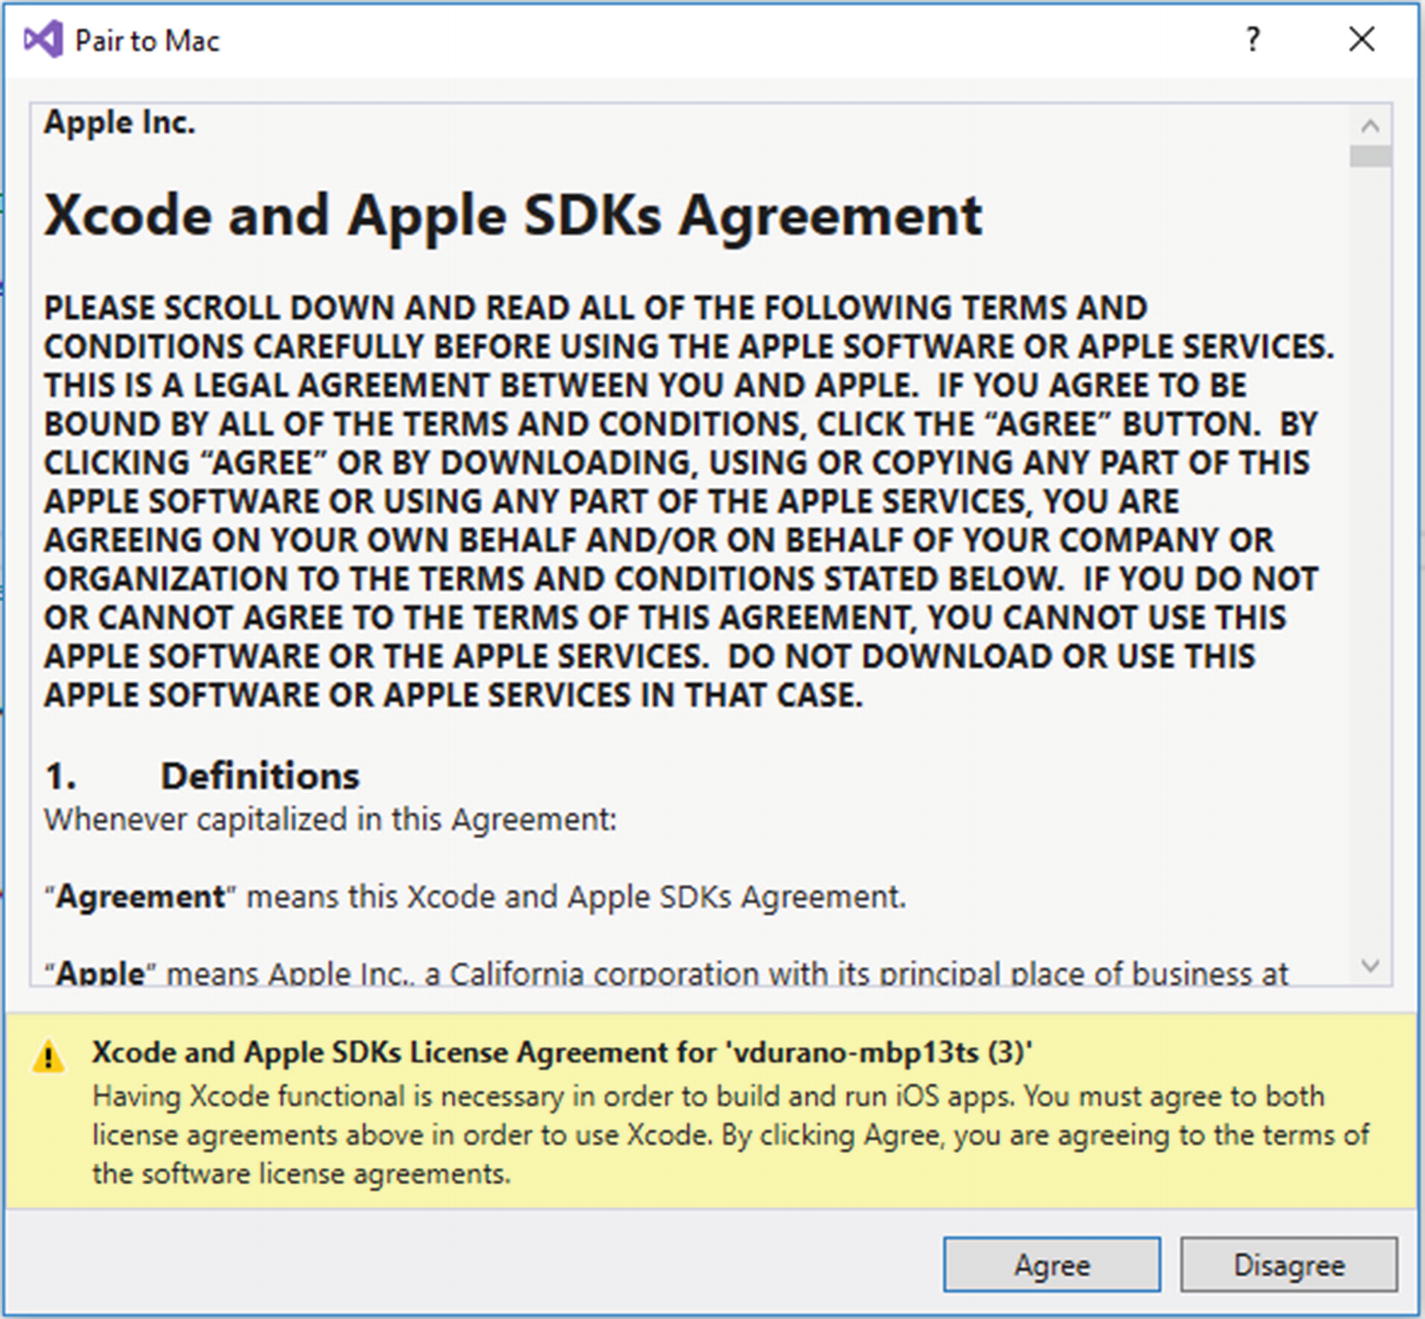
Xcode and Apple SDKs agreement
Click Agree.
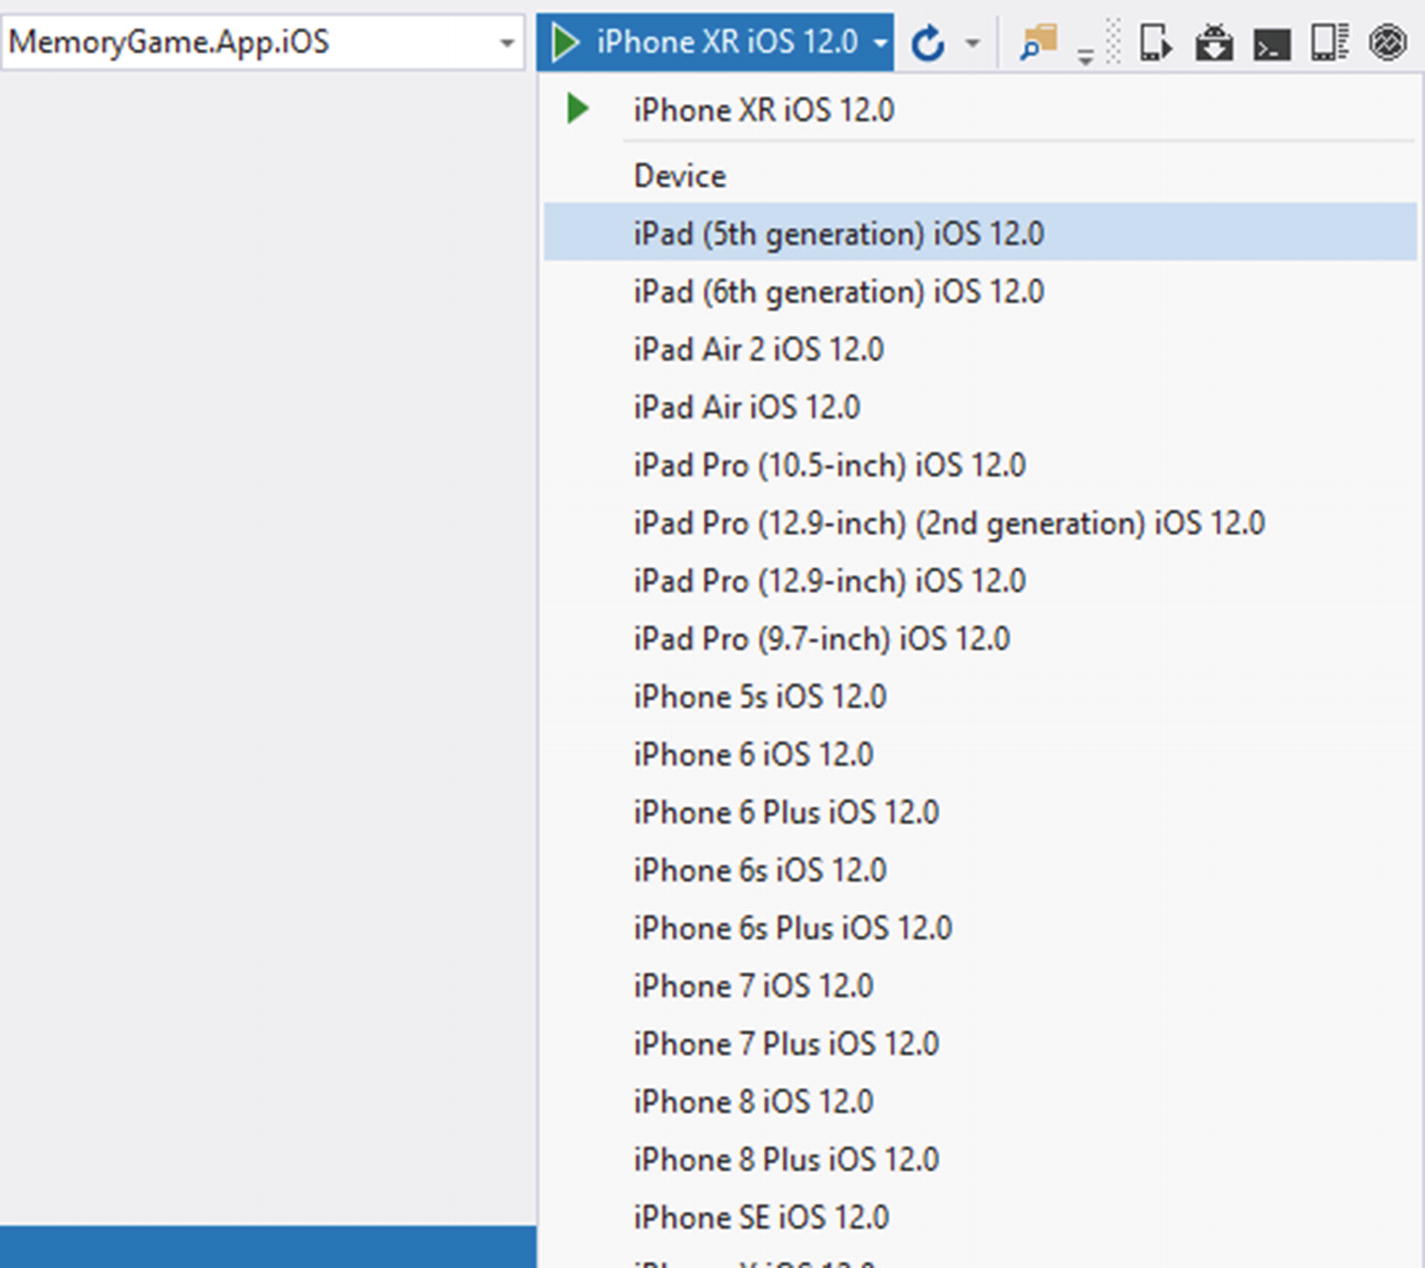
Selecting an iOS device emulator
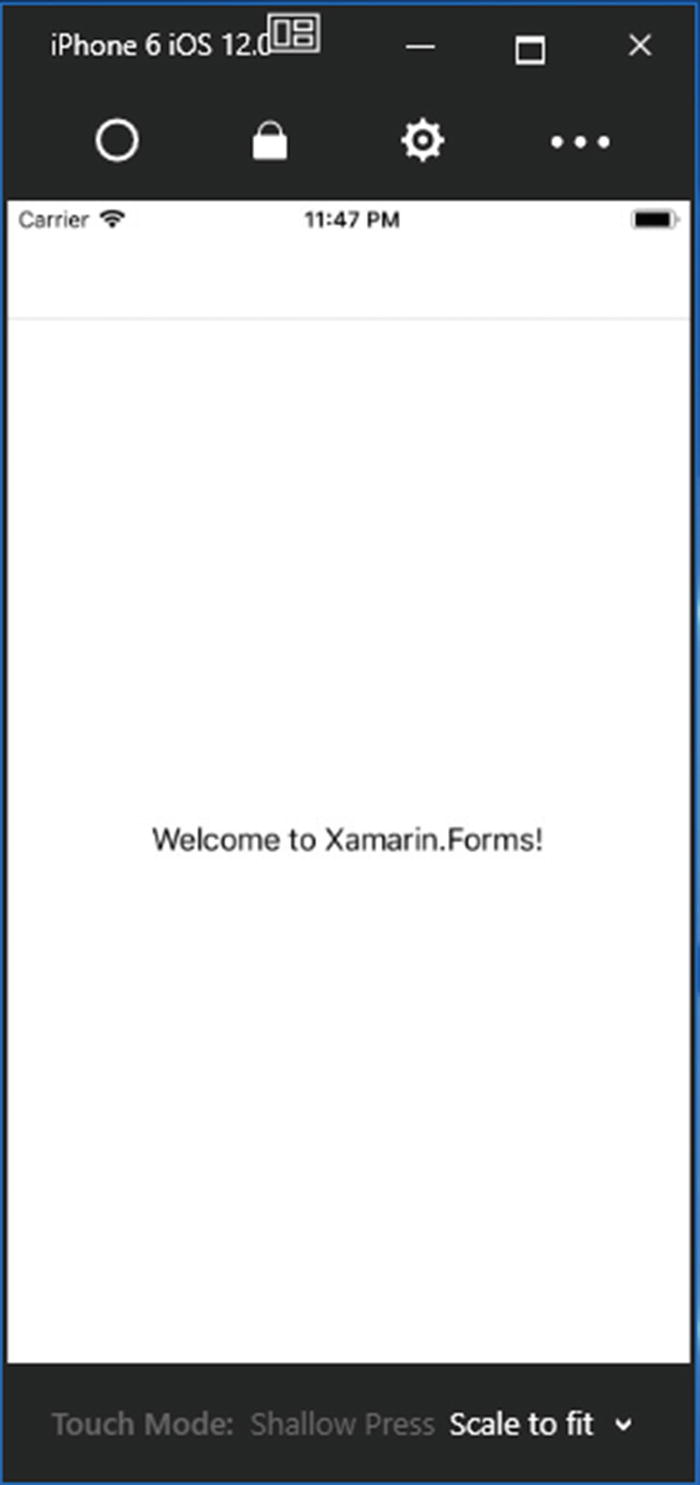
iOS emulator output
For more information about pairing your PC to Mac, see the following: https://docs.microsoft.com/en-us/xamarin/ios/get-started/installation/windows/connecting-to-mac/
The Required NuGet Packages
Xam.Plugins.Settings 3.1.1
Xam.Plugin.Connectivity 3.2.0
Newtonsoft.Json 11.0.2
Note
The specific versions indicated in the preceding. Those are the latest stable versions released as of this time of writing, and we are going to use them in this demo. Future releases of each packages might contain some new changes and might work differently.
We’ll be using the Xam.Plugins.Settings to provide us consistent cross-platform settings/preferences across all projects (portable library, .NET Standard, Android, and iOS projects). The Xam.Plugin.Connectivity will be used to get network connectivity information such as network type, speeds, and connection availability. The Newtonsoft.Json will be used in our code to serialize and deserialize a JSON object from an API request. We’ll see how each of these references is used in action later.
There are two ways to add packages in Visual Studio; you could either use the Package Manager Console, or proceed via NuGet Package Manager (NPM). In this demo, we are going to use NPM so you can have a visual reference.
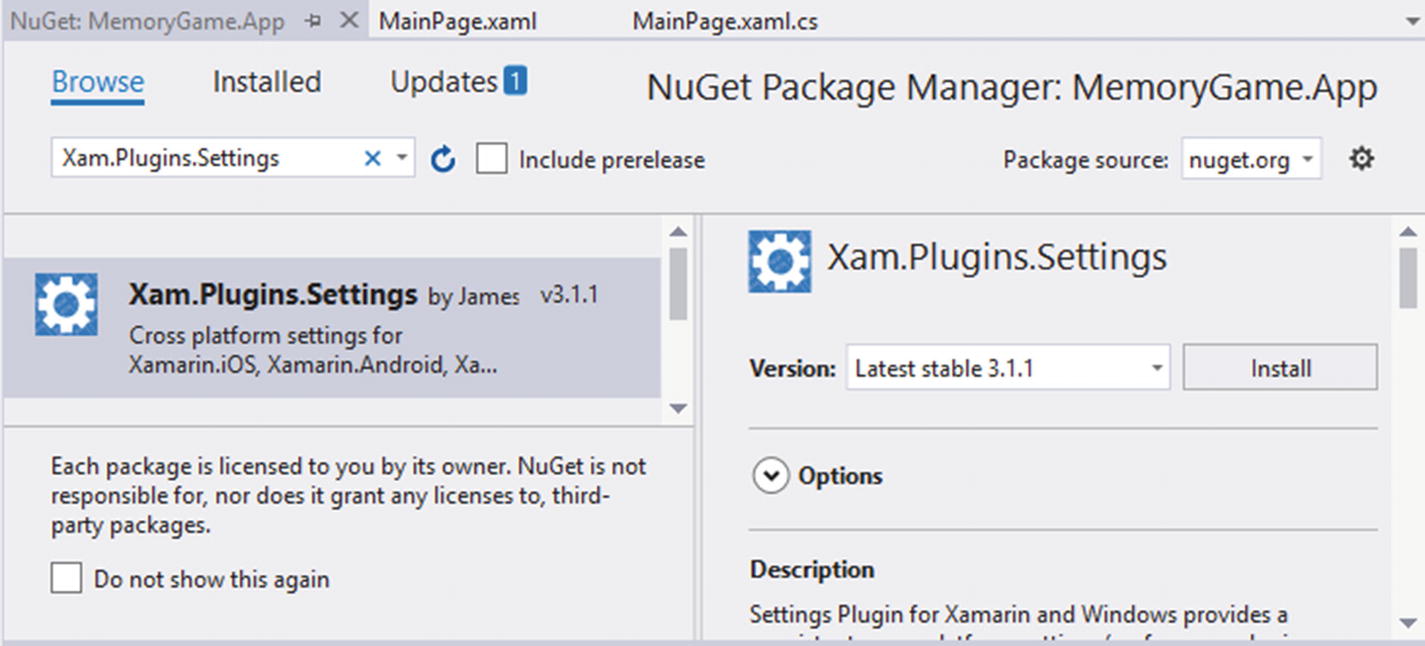
Installing NuGet packages
When the install is successful, a reame.txt file for using the Xam.Plugins.Settings should automatically display. Next, install the “ Xam.Plugin.Connectivity ” and “ Newtonsoft.Json ” NuGet packages.
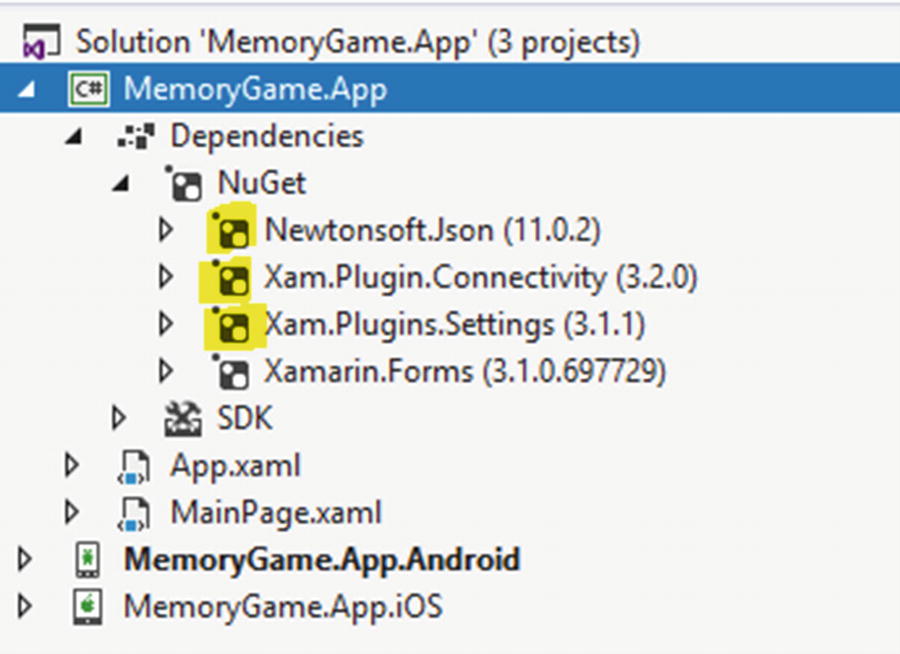
The installed NuGet packages
At this point, we should be confident that we have everything we need to build and run the applications. Now it’s time to get our hands dirty with coding.
You may also want to look at Xamarin.Essentials, as it provides you with cross-platform APIs for your mobile applications. See the documentation here: https://docs.microsoft.com/en-us/xamarin/essentials/