Installing Linux
In This Chapter

- Downloading the Linux variant Raspbian
- Saving Raspbian on your SD card
- Customizing Raspbian
- Getting more software
You have many options for operating systems with your Raspberry Pi, but Raspbian, a variant of Linux, is the most widely supported and optimized operating system available. It gives you a lot of compatible software, and installation is easy.
Raspbian also is going to be the most familiar operating system to you if you’re a Windows or Mac user. Although it does do some things differently, the overall interface is easy to understand. For the most part, you can do almost everything you need to do with just a mouse, but I’ll show you some command line tricks as well.
The installation process is the same for every operating system that works on the Raspberry Pi, so once you get Raspbian installed and running, you’ll know how to install any others you might want to try.
In this chapter, you learn how to download Raspbian, install it on your SD card, get Raspbian configured correctly, and launch your Raspberry Pi for the first time. This is a little complicated at first, but follow along and you’ll be fine. And once you get the hang of it, you’ll be loading up new operating systems all the time.
Raspbian is a free operating system that’s constantly being updated with new features. You can always find the newest version on the Raspberry Pi site. Here’s how:
- Point your computer’s web browser to raspberrypi.org/downloads.
- Click the Download ZIP button in the Raspbian section. It’s a big file, so it might take a little while to download.
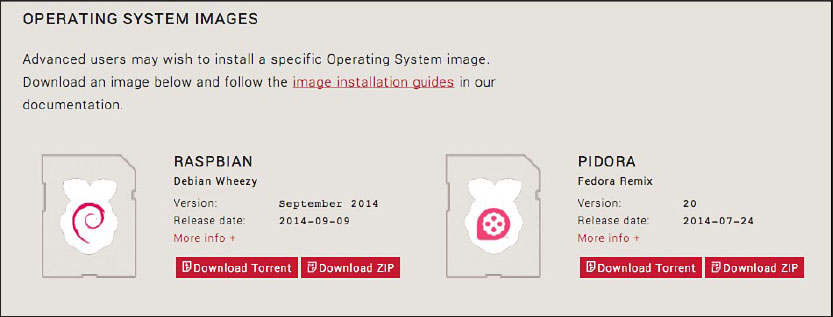
- When it’s finished downloading, double-click the .zip file to unzip it. This creates a new folder that includes an image (IMG) file of the Raspbian operating system. That’s what you’ll install on your SD card.

SOFTWARE SOLUTION
If you’re not sure which operating system you want to use, you can download the most popular options all at once with NOOBS (new out of the box software). NOOBS lets you install different operating systems using your SD card and the Raspberry Pi itself. Download NOOBS at raspberrypi.org/downloads.
Installing Raspbian on Your SD Card
Your SD card is going to become your Raspberry Pi’s main hard drive. You’ll install Raspbian onto the SD card using your personal computer. The process is a little different, depending on whether you’re on a Windows or Mac machine.
Getting Raspbian installed on your Windows PC takes one piece of external software (Win32 Disk Imager, which enables you to write an image to your SD card), so you’ll need an internet connection to download it. Be sure your SD card is installed in your SD card reader and it’s hooked up to your computer.
Here’s what to do:
- Download Win32 Disk Imager from sourceforge.net/projects/win32diskimager.
- Double-click the downloaded file to unzip it. This creates a new folder.
- Inside that folder is an application called Win32DiskImager.exe; double-click it to open it. If you’re on Windows 7 or 8, right-click and choose Run as Administrator.
- Win32 Disk Imager should automatically choose your SD card, but if it doesn’t, click on the drop-down menu and choose your SD card from the list. Be sure to choose your SD card and not your hard drive.
- Click the folder icon, and select the Raspbian IMG file you downloaded in the earlier “Downloading Raspbian” section.
- Click the Write button, and wait for Win32 Disk Imager to run. When it’s complete, you can eject your SD card.
Now your SD card has Raspbian installed on it. It’s time to get started playing with your Raspberry Pi.
Mac:
You’ll need one extra piece of software (RPi-sd card builder) to get Raspbian onto your SD card using your Mac. The process only takes a few minutes—be sure your SD card is connected to your Mac:
- Download RPi-sd card builder from alltheware.wordpress.com/2012/12/11/easiest-way-sd-card-setup.
- Double-click the downloaded file to unzip it, and double-click the RPi-sd card reader application inside that folder.
- You’ll be asked for your Raspbian image. Select the IMG file you downloaded in the earlier “Downloading Raspbian” section.
- You’ll be asked to verify your SD card. Be sure it’s the correct drive, and click OK.
- Enter your computer’s password, and click OK.
- You’ll get a prompt saying your SD card was ejected. Do not remove the SD card, but check that it’s no longer visible on your desktop. If the SD card isn’t visible, select Continue.
- Sit back and relax while RPi-sd card builder does its job. When it’s finished, it’ll display a note saying it’s complete.
That’s it. Now you can boot up and start configuring your Raspberry Pi.
Booting Up
Now you have your Raspberry Pi’s operating system ready to go. Plug the SD card that contains Raspbian into your Raspberry Pi. If you haven’t already, plug in your keyboard and mouse, and connect your Raspberry Pi to your display. Finally, connect your Raspberry Pi to your power adapter. Your Raspberry Pi will now boot up on its own.
If everything goes properly, you’re greeted with the Raspberry Pi boot screen. After a few seconds, you’re shown the Raspberry Pi configuration screen.
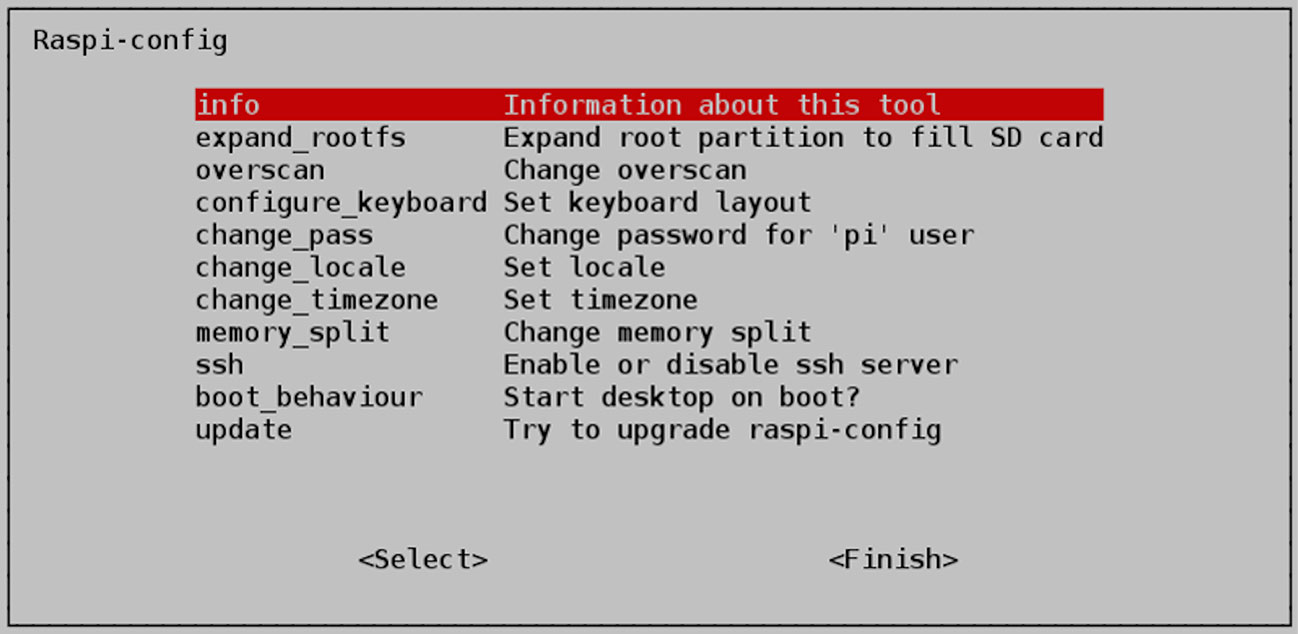
When you start your Raspberry Pi, you should see this configuration screen.
Now you need to set up some specifics with the Raspberry Pi.
The first screen you’ll see on your Raspberry Pi is the Raspi-config menu. This is where you’ll set up some of the basics of your Pi. You can navigate the menu with your keyboard; hit Enter to select a highlighted item.
Configuring Raspbian for Full Storage
When you create your SD card image, the image takes up space on the entire card. This means you can’t install new software because the SD thinks it’s full. You can expand the SD card so you get more space. Select the expand_rootfs option, and let the software do its thing.
Configuring Raspbian for Full-Screen
Depending on the type of display you’re using, you might need to change the overscan option. Older TVs used overscan to properly display an image full-screen, but most new models don’t need it.
If you’re using a monitor or HD TV, you can most likely turn off overscan so the operating system takes up the full screen. If this is the case, select the overscan option, and disable it.
Establishing Keyboard Layout
The Raspberry Pi is originally from the United Kingdom, so the initial keyboard configuration is based on the UK layout. If you’re not in the UK, select the configure_keyboard option, and pick your region.
Changing Your Password
By default, the Raspberry Pi’s password for the main user (“pi”), is “raspberry.” This isn’t very secure, so now is a good time to change your password.
Select the change_pass option, and type in a password of your choice.
Setting Your Time Zone
So your clock is correct, let’s set your time zone. Select the change_timezone option, and pick your local time zone.
Configuring Raspbian for Boot-to-Desktop
If you want your Raspberry Pi to boot straight into Raspbian (instead of the command prompt), select the boot_behaviour option. This way, when you turn on your Pi, it’ll load Raspbian automatically.
When you’re done with these settings, select <Finish>, and your Raspberry Pi will reboot.
Logging In for the First Time
Now to boot into the Raspbian operating system. If you selected the boot-to-desktop option, Raspbian will automatically load when you turn on your Raspberry Pi.
Depending on the settings you chose in the preceding section, you might need to type in your username and password to log in. If you didn’t set one, the default username is pi and the password is raspberry.
Accessing the Raspi-Config Tool
If you want to change any of the settings you adjusted in the preceding section, you can do so at any time. From the command prompt, type in raspi-config to load the configuration menu.
You can get to the command prompt from Raspbian by selecting the Logout option from the bottom-left corner menu in Raspbian or by opening LXTerminal in Raspbian. I cover what all this means more in the next chapter, but it’s worth mentioning briefly here.
Launching Raspbian Manually
If you didn’t set your Pi to boot to desktop, you’ll get a command prompt when you turn on your Raspberry Pi. Type startx to boot into the desktop environment.
Getting Acquainted with Raspbian
Raspbian is the main operating system for your Raspberry Pi, so spend a little time familiarizing yourself with how it works. The graphical front end is going to be similar to Windows or OS X, but how you actually use it differs in a few subtle ways.
Similar to Windows or OS X, Raspbian comes with all kinds of preinstalled applications and utilities to get you started. You also can download third-party applications, mess around with system settings, and more.

Raspbian shares many visual similarities with Windows.

PI POINTER
Raspbian isn’t all that different from Windows. You can find a folder with all your applications in the bottom-left corner, all your applications are divided into different categories so they’re easy to find, and applications that are running show up in the bottom menu so you can quickly access them. Installing new applications is a very different process from something like Windows, but otherwise, you should have no problem getting used to Raspbian.
Learning the Raspbian Interface
If you’ve never used Linux before, Raspbian might be a bit confusing at first. However, if you can navigate Windows, Raspbian won’t be completely foreign-looking from the start. Let’s go through a few of the basics so you can start using it:
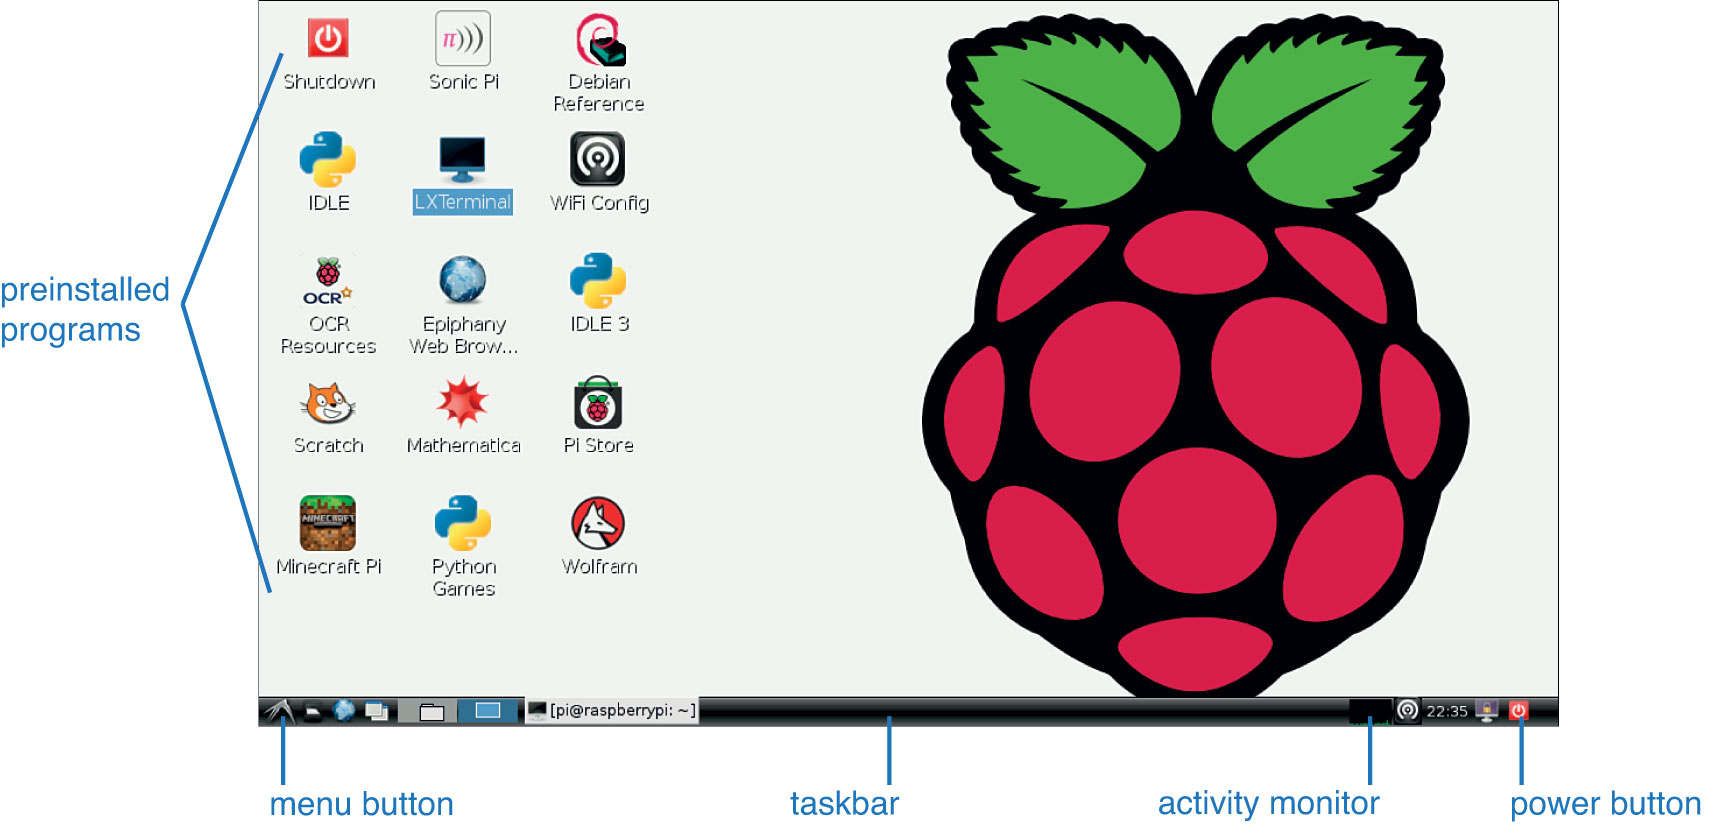
Raspbian is pretty user friendly.
The menu button in the bottom left-corner works just like the Start menu in Windows. Click it, and you’re shown a list of applications.
The desktop works the same as Windows as well. Depending on which version of Raspbian you have installed, different applications will already be on your desktop. Just double-click an icon to launch the preinstalled program.
In the bottom-right corner of the screen, you’ll see an activity monitor that displays how much CPU Raspbian is currently using as well as a power button. The activity monitor shows how many resources you’re currently using. When you’re running a lot of software it’ll show green spikes. Click the power button when you want to shut down or reboot.
When you open an app, you’ll see a shortcut to it appears in the taskbar at the bottom of the screen. You can reopen apps from here, minimize them, or maximize them.
You’ll also find a file manager option in your programs. This works just like Explorer on Windows. You can browse files on your Raspberry Pi and open them with a double-click of the mouse.
Otherwise, Raspbian tends to work the same way as the personal computers you’re probably already used to. It has its quirks, but don’t be afraid to poke around a little bit to get to know it when you first launch it.
Raspbian comes packed with a lot of different applications you need to get started right away. Much like Windows, you can pull up your installed applications by clicking on the menu button in the bottom-right corner of the screen and selecting what you want.
We’re not going to go through every single program installed on Raspbian here, but the following are the most notable applications you’ll find yourself using:

Depending on your version of Raspbian and from where you downloaded it, you have a suite of programs already installed.
Scratch: Scratch is a coding program that teaches children how to program. It’s simple to use and utilizes a lot of images and diagrams instead of complex coding to teach the basics of computer science.
Epiphany Web Browser: This is your web browser. Like Chrome, Safari, or Firefox, you simply type in the URL of the website you want to visit, and off you go. It’s not as powerful as any of those browsers though, so you might notice that it’s a bit slow and struggles to load complicated pages.
LeafPad: This is your notepad. It works just like you’d expect.
Mathematica: Mathematica is a program that teaches computer science and mathematics in relation to computers. It’s built by the technical search engine Wolfram|Alpha.
The list of installed applications varies depending on which version of Raspbian you have installed and from where you download it. The Raspberry Pi Foundation loads up their image with a lot of programming utilities, while other distributions might have a different suite of software. The preceding applications are usually included in builds of Raspbian from the foundation, but that might change over time.
There’s more than just applications to play around with. Raspbian is also packed with just about every utility you’ll need to use your Raspberry Pi. These include tools to access the terminal from inside Raspbian, configure a Wi-Fi USB adapter, and more.
Here’s a taste of what you’ll actually use:
WiFi Config: This is the setup utility for your wireless internet. (I go more in depth into how to set this up in Chapter 11.)
LXTerminal: This is the terminal program that gives you access to the Linux Shell and allows you to access your command line at any time. (I talk all about the command line in the next chapter.)

PI POINTER
Linux Shell is a program that takes commands from your keyboard and gives them to the operating system to perform. Basically, it gives you access to the command line, where you can type in commands instead of clicking around the graphical user interface.
File Manager: Like Explorer on Windows or Finder in OS X, you’ll use File Manager to search for files, browser folders, and move things around.
Xarchiver: This is your archive program. It can zip and unzip files you download from the internet. Generally speaking, you’ll only need this if you download a program as a zipped file.
IDLE: IDLE is a Python shell. Like LXTerminal, it allows you to type commands directly into the Raspberry Pi using Python. We won’t be covering Python much in this book, but it’s a good advanced project to pursue if you’re interested in programming.
Unlike Windows, these utilities aren’t included in every Linux-based operating system, so it’s nice to have them with Raspbian so you don’t have to go search for simple things like a file manager program.
Getting and Installing New Applications
Although it comes with a lot, Raspbian doesn’t come with absolutely everything you could possibly need. Chances are that at some point, you’ll want or need to track down some more software so you can use Raspbian exactly how you want.
Because Raspbian is built on Linux, you actually have two different ways to do this: through the Pi Store or manually through the command line.

PI POINTER
The Pi Store launched in 2012 with just 23 titles. Now, it includes more than 100 games, tools, and other applications made by Raspberry Pi users just like you.
Linux doesn’t install programs the same way as Windows or OS X. You can’t simply download a file anywhere online and install it. With the exception of the Pi Store, you’ll need to do a little bit of command line work.
Shopping the Pi Store
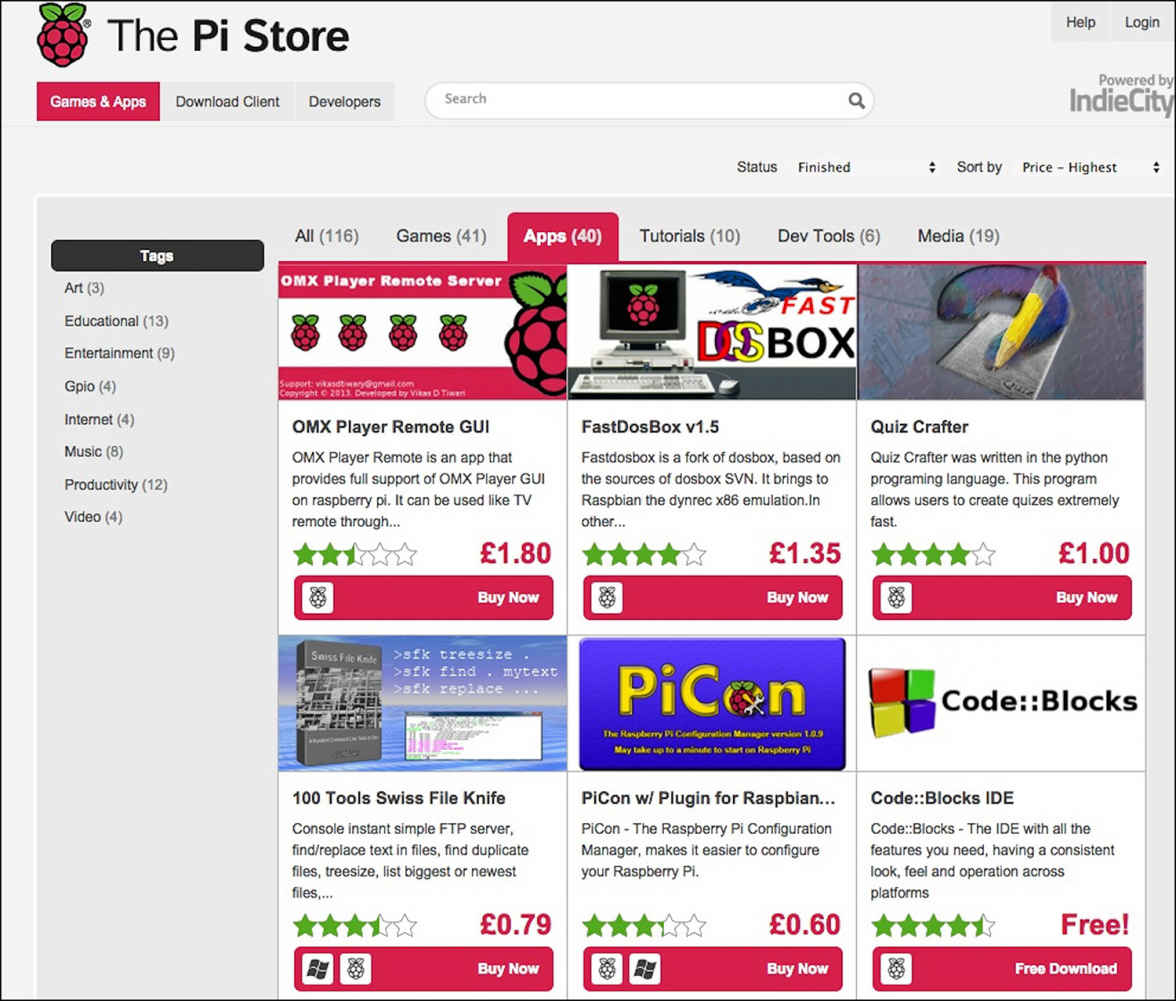
The Pi Store is the easiest place to find and install software for your Raspberry Pi. You can find the Pi Store on Raspbian’s desktop; just double-click the Pi Store icon to launch it. Much like the app store on your smartphone, it’s a quick, one-stop shop where you can find all the software you need.
The store is divided into sections for Games, Apps (applications), Tutorials, Dev (developer) Tools, and Media.
Games and Apps are both pretty self-explanatory.
Tutorials include video guides, downloadable programming lessons, and PDF guides for different projects.
Dev tools are typically for advanced users who aren’t satisfied with the development tools included in Raspbian. These are usually alternative programs to access the terminal or other coding programs.
Media is where you’ll find all types of video guides and digital magazines filled with more information about Raspbian. If you’re still yearning for more after you finish this book, the Media tab in the Pi Store is a great place to find more project ideas.
You can find all sorts of software for your Raspberry Pi at the Pi Store.
Finding Applications Manually
Most applications are installed manually in Linux. This means you pull up the terminal, type in a command, and the program you want is downloaded and installed from an online repository.
You can download software using the command line a number of ways, and if you’re browsing on a website, you’ll usually find specific instructions for how to download software directly from the developer. If you just want to download a program directly, it’s pretty easy.
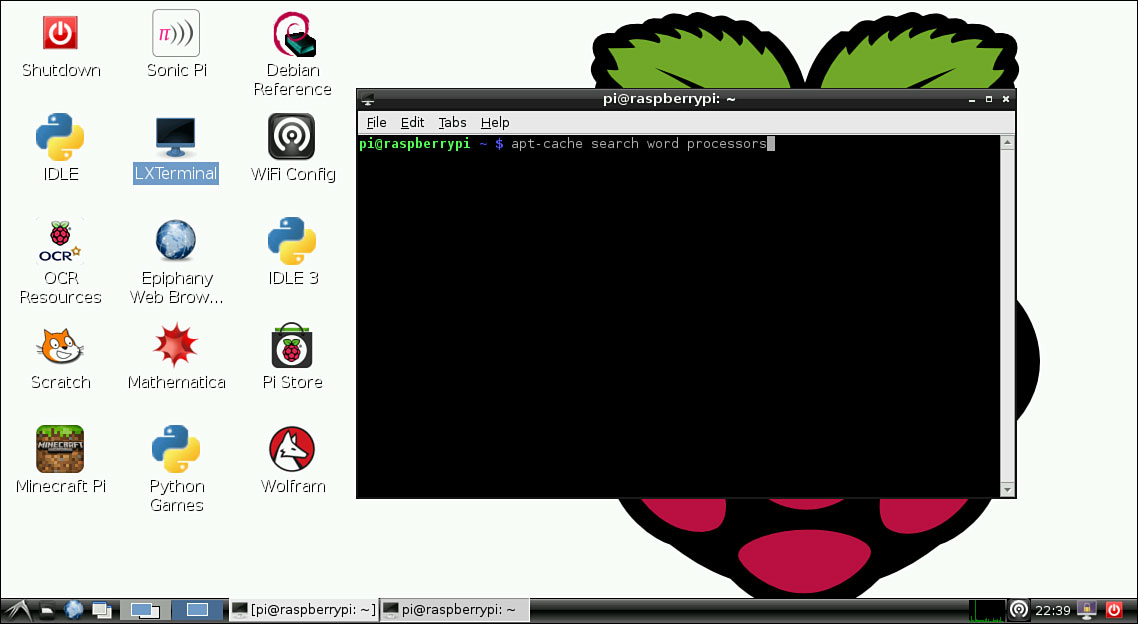
You can find and install more applications for your Raspberry Pi through the command line.
You can do this from LXTerminal in Raspbian or from the command line when you exit out of Raspbian. Here’s how to search for and download a program:

PI POINTER
You’ll need internet access to do this, so be sure you’re connected to your router or modem through your Ethernet cable.
- At the command line, type in
apt-cache searchalong with the type of program you’re looking for. For example, if you’re looking for games, type inapt-cache search games. If it’s word processors you’re after, type inapt-cache search word processors. You’ll get a list of all the programs that match that genre. - Navigate the list with the arrow keys on your keyboard until you find something you want to download. Make a note of the first word on the list—this is the name of the program.
- To download and install the program, type in
sudo apt-get installand the program name. For example, if you want to download the office suite LibreOffice, type insudo apt-get install libreoffice.
Your Raspberry Pi will download all the files it needs to run the program you want to download.
In the next chapter, we’re going to explore the command line more in-depth and learn what each command means.
- You’ll need a computer with an SD card reader and the internet to download and install Raspbian.
- Once you get Raspbian onto your SD card, you can set up some basic settings in the Raspi-config menu.
- Raspbian includes a handful of preinstalled applications to get you started with programming, browsing the web, and more.
- Downloading and installing programs on Raspbian works a little differently from Windows or OS X. You’ll need to type in commands into the command line to download most software.
