Folk Bed
The basic design for most beds stems from the simple bedstock, known in the 18th century as the stump bedstead, with the legs of its wooden framework extended at one end and filled in with a plain headboard. The supporting wooden laths, which replaced a webbed base, gave way to the use of spring metal and, by the middle of the 19th century, the iron and brass bedstead had become fashionable. However, country makers continued to make wooden bedsteads, and today they remain as popular as ever. This solid, substantial bed, with head- and footboards, has a distinctly folk art feel to it. The two heart-shaped cutouts are a typical motif of the Tirol region in the Swiss Alps.

ABILITY LEVEL
Experienced
SIZE
80 x 56 x 44 in. (2032 x 1422 x 1118 mm)
MATERIALS
Pine
CUTTING LIST
2 corner posts
44 x 3 x 3 in. (1118 x 76 x 76 mm)
2 corner posts
34 x 3 x 3 in. (864 x 76 x 76 mm)
1 headboard
53 x 32 x .75 in. (1346 x 813 x 19 mm)
1 footboard
53 x 22 x .75 in. (1346 x 559 x 19 mm)
2 side rails
77 x 6 x 1.5 in. (1955 x 152 x 38 mm)
2 slat rails
75 x 2 x 1 in. (1905 x 51 x 25 mm)
12 slats
52 x 3 x 1 in. (1320 x 76 x 25 mm)
4 wooden balls
3 in. (76 mm) dia
4 bolts
6 in. (152 mm)
These dimensions are designed for a 75 x 54 in. (1905 x 1372 mm) mattress. However, it is best to measure the mattress to be used before starting this project and adjust dimensions as necessary.
See template pattern in the Templates chapter for heart motif.
Note: After cleaning off all surface marks, you can apply a clear polish, stain, or paint (see Finishing chapter for different finishes).


1: Begin by making up the head- and footboards by edge-joining narrower pieces of wood (see Tools & Techniques chapter for advice). Individual pieces should be as wide as possible so that there are not too many joints.
2: When gluing is complete and the work has dried, clean up the boards and check that they are flat. Cut them to the exact length and check that the ends are square.
3: Using the grid above, mark out and cut the curved top edges of each board.
4: Mark out and cut the heart motifs. Use the template pattern in the Templates chapter. Round over all cut edges.
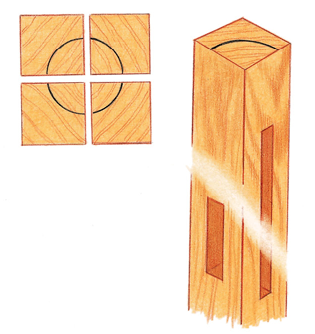
5: Cut the corner posts to length and plane or sand the surfaces smooth. The ball finials are optional and may be fitted later. Make pencil marks on one end of the posts, as shown below, to avoid confusion later when marking out for jointing.
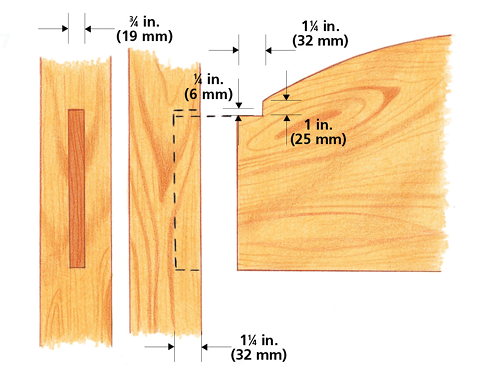
6: Head- and footboards are housed, at their full thickness, in mortises cut into the corner posts. Take measurements from the boards you have; they may differ from those given. Make the mortises a little undersized and trim the ends of the boards to a tight fit.
7: Each end board is notched at the top to fit the mortise and should be cut slightly short (see diagram). This is an allowance for any movement that may take place in the boards.
8: Test-fit the end boards individually, without using glue, in their respective slots. Adjust if necessary by trimming the ends of the boards until the joints are tight and enter to their full depth. Disassemble and put the boards aside until later.
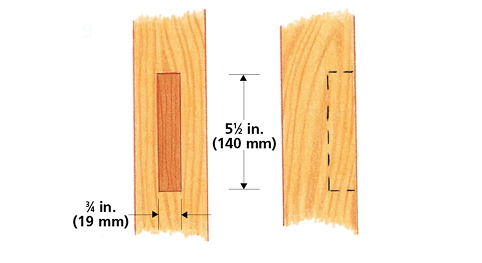
9: Mark out the correct adjacent face of each corner post for the mortises to accommodate the side rails. The pencil marks made on the end of the posts will help here. Cut these mortises (see Tools & Techniques chapter for advice).
10: Cut the side rails to length and make sure that the ends are square. Plane or sand the rails smooth.
11: Mark out and cut the tenons on each end of the side rails (see Tools & Techniques chapter for advice).
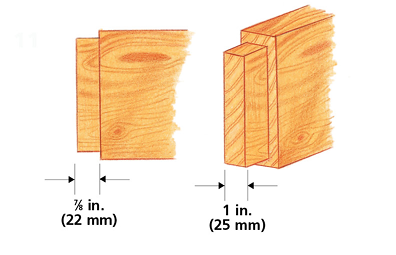
12: Test-fit the side rail tenons and the corner post mortises, without using glue. Adjust as necessary for a good fit.
13: The head- and footboards are permanently glued into their corner post joints. The side rail tenons are not glued but held in their corner post mortises by bed bolts, as shown, to allow easy assembly and disassembly. Bolts can be bought or made using threaded studding.
14: The diagrams show how to fit the bed bolts, but measurements may need to be altered to suit the bolts actually used. The nut recess is bored on the inside of the side rail. Place the post on its side on a bench, with the rail tenon in place in its mortise, and bore the through hole carefully with a carpenter’s twist bit.
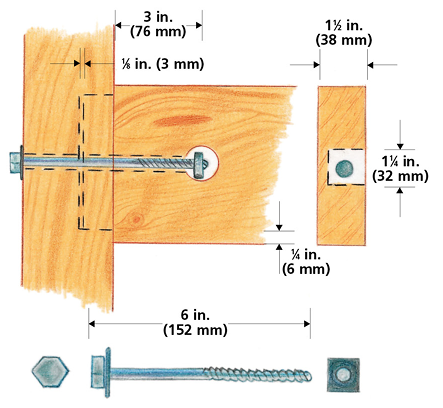
15: Try each joint by fitting the bolt and nut and tightening until the shoulders of the rail tenon come up tight against the corner post. Make identification marks on the rails and posts to aid reassembly. Disassemble.
16: If you are going to fit ball finials, find the center of the corner posts and bore a hole to house the fixing dowel. Glue in place. Chamfer the long edges of each corner post and, if finials are not fitted, round over the top edges.
17: Now join the end boards to their respective corner posts. Place glue in the slot mortises, fit the end boards correctly, and pull them in tight with clamps. Clean off any surplus glue. Leave to dry.
18: The matterss rests on slats, which are supported on rails glued and screwed to the inside of the side rails. Fix these rails so that the slats will be flush with, or slightly below, the top edge of the side rails.

19: Now assemble the bed frame. Make sure that the side rails fit correctly and that the bed bolts tighten fully. Cut the slats to fit across the bed frame. Space them out evenly. Slats may be loosely strung together, nailed or stapled, to two lengths of woven tape. Screw the top and bottom slats down and the assembly will stay in place.