Tools & Techniques
It is not easy to say what a basic set of tools is for a modern woodworker—much depends on what you are making, personal preferences, and what is affordable. But whatever you decide, always buy the best quality you can afford and then take good care of the tools that you have. Working with poorly made or misused tools is a handicap that nobody needs.
The following list includes those tools required for the projects, and it concentrates mainly on hand tools, together with a few of the most helpful and time-saving power tools.
Basic hand tools
Tape measure
Rule
Marking knife
Marking gauge
Mortise gauge
Carpenter’s or combination square
Sliding T-bevel
HB pencils
Compasses or dividers
Crosscut saw
Tenon saw
Coping saw and blades
Jack plane
Smoothing plane
Block plane
Cabinet scraper
Spokeshave
Drawknife
Wood chisels
Carving gouges
Mallet
Cross pein hammer
Nail punch
Pincers
Screwdrivers
Wheelbrace or drill
Twist drills
Forstner bits
Bradawl
Rasp or file, half round
Abrasive paper
Clamps
Sharpening stones
Optional power tools
Electric drill
Orbital sander
Power router
Jigsaw or band saw
Most of the projects featured in this book require only the simplest of woodworking tools, so there is no need to have or buy an expensive or complicated kit. However, some basic knowledge of how to use these tools is assumed.
If you are a beginner, start with the projects that have been designed for the “novice” level and, by working through these, hopefully you will soon pick up the expertise required to undertake the more complicated “intermediate” and “experienced” projects that appear later in the book.
All of the projects have been designed to be completed using hand tools only. However, although immensely satisfying, working entirely with hand tools (as opposed to power tools) can be both tiring and time-consuming, and it often requires a high degree of skill. So, if you have power tools available—and you know how to use them safely and competently—there is no reason why you should not press them into servise. In my own work, I often use a combination of methods: power tools for the initial, often repetitive, work such as sawing to size and planing to thickness; a combination of power and hand tools for shaping and jointing; and hand tools for finishing and detailing.
The original country woodworker would have had few tools at his disposal, and these would have most probably been general-purpose implements, rather than specialty ones, used for all manner of jobs around the cottage or farm. An axe and an adze would have been used for chopping and riving, for example; a saw and a few chisels for cutting; a drawknife, spokeshave, rasp, and files for shaping; a plane for smoothing; a brace and bit for drilling holes; a hammer and nails for fastening; and a knife for cutting and trimming.
Construction methods, too, would have been all-purpose and relatively simple, using whatever timber was available and most suitable for the job at hand. The fundamental techniques of woodworking—shaping and jointing—have been known for thousands of years, and working methods evolved from applications such as house and barn construction, fence building, wheelwrighting, and so on. The joints used were basic to all forms of woodworking: the mortise and tenon of the shipwright and barn framer is larger and perhaps cruder than that of the furniture maker, but it is the same joint; the foot-long trenels (tree nails) of the trestle builder are no different in principle to the smaller pegs used to secure the joints of a country-made chair.
The techniques employed in the projects section of this book would have been used as a matteer of course by the early country woodworker, and while the methods of certain types of construction may not have been part of the daily routine, he would certainly have been familiar with them. However, the exact way and sequence in which the steps are carried out would no doubt have varied according to an individual woodworker’s knowledge and level of skill. In the projects described, all of the methods given follow traditional principles that are accepted and in use today, but they are open to individual interpretation.
Drawings and Patterns
Before undertaking any project in wood, it is helpful to have a drawing or plan showing the general shape and main dimensions of the piece, together, preferably, with more detailed drawings of specific parts. There are two main ways in which drawings such as these may be presented.
The first is known as an orthographic presentation, which normally shows three views—front and end views, plus a top, or plan, view. (1)
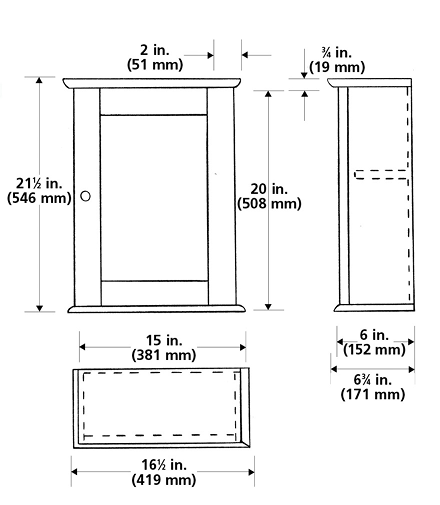
1
The second form of presentation is a perspective drawing, which may also be in the form of an “exploded” view. (2)
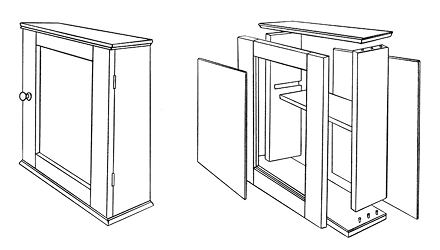
2
Sometimes it is helpful to show detailed parts of a project, such as curves, as a pattern or template. Where these cannot be shown full size, they are drawn on a scale grid. Each small square of the grid represents .5 in. (12 mm), 1 in. (25 mm), or 2 in. (51 mm), as indicated, and from this you can lay out a full-sized pattern using grid squares of the correct size.(3)
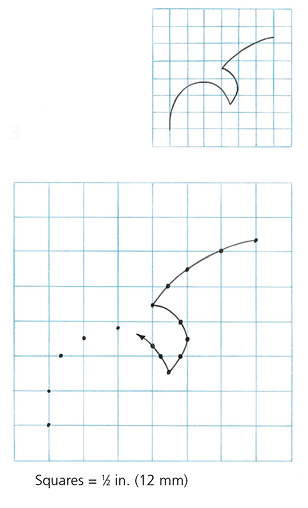
3
Workbench and Vise
On the practical side, a space in which to work and a sturdy table or bench are your first requirements. This bench or table should also have some reliable method of holding wood securely while you are working on it. This usually means fitting a vise of some type, but you can also use other devices, such as bench stops or dogs and G clamps of various sizes (see Tools & Techniques chapter).
A cast-iron carpenter’s vise with wooden jaw facings is ideal. However, if you have an engineer’s vise, you will need to cover its iron jaws to prevent them biting into and damaging the wood. For light work, you can temporarily clamp a vise to the edge of your bench.
A useful device is a bench-hook, which you can easily make yourself (4). It can be gripped in a vise or held against the edge of your bench to provide a useful holding stop for work being chiseled/sawed. It also helps prevent damage to the bench top during these operations.
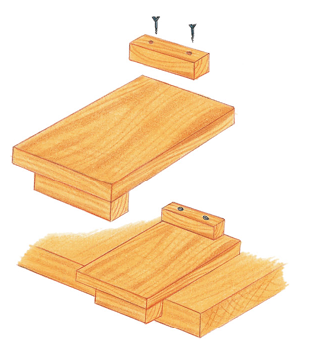
4
Measuring and Marking Out
Before you start making up any piece, you need to check that the wood is the right size and that it is straight and square and square, not warped. If you buy wood “ready planed” or “prepared” it should be fine to work with, but its machine-planed surface will require hand planing or sanding. Identify the best wide surface and an edge, plane them square if necessary, and then mark them with face-side and face-edge marks—see top of diagram 5 for the conventional method. From then on, all marking out and gauging should be done on, or from, these surfaces.
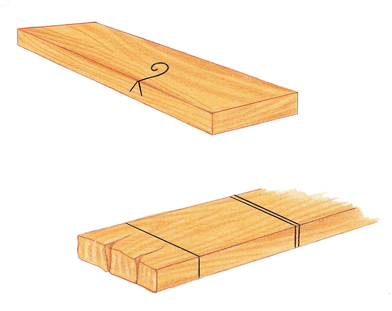
5
When you need to cut a board to length, make certain to check that the starting end is sound (not damaged or split) as well as square. If necessary, mark off a “waste” piece from the suspect end (single line in diagram 5), measuring the length of the board from that mark. For a small board you can use a ruler, but a retractable steel tape is quicker when measuring a long board.
When drawing the line to indicate the length of board you want, mark it accurately and squarely by using a try square or an all-metal combination square. For precise work, make an allowance for the width of the saw cut, or kerf (double lines in diagram 5). Always saw on the waste side of the line, and if you want to cut several pieces from the same board, allow a generous .125 in. (3 mm) waste strip for the kerf between each piece.
A well-sharpened HB-grade pencil is suitable for most of the marking out you will encounter. But for really accurate results, the point of a sharp knife has many advantages, especially when marking wood across the grain. The knife point severs the surface fibers of the wood and leaves a clean edge after cutting. A traditional carpenter’s marking knife has a thick, beveled skew blade for this purpose—usually ground for right-hand users only. A small, lock-blade pocket knife is also recommended.
To mark lines parallel to an edge, you should be using a marking gauge, which is mainly used to gauge wood to both width and thickness prior to hand planing. Adjust it to give the mark you need by setting the required distance between the movable head and the pointed spur. To mark a line, press the head firmly against the edge of the work and push or pull the gauge away from you. Use a light stroke to reduce the danger of the point digging in and following the grain. (6)
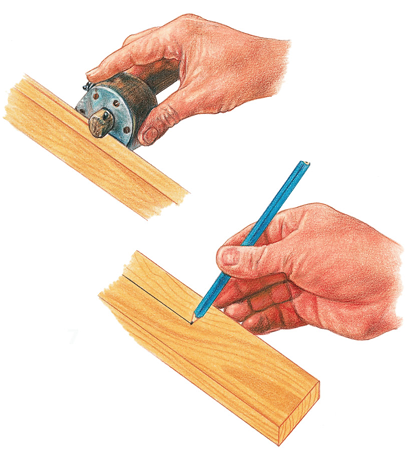
6 & 7
For less precise work, hold a pencil and your fingers as shown—this “trick of the trade” is known as finger gauging. (7)
There are two other types of gauge you should be familiar with: the cutting gauge and the mortise gauge. The cutting gauge has a small blade instead of the marking gauge’s spur, and it is most effective when marking across the grain. The mortise gauge, as its name suggests, is mainly used for marking out mortise and tenon joints. It has two pointed spurs, and the inner one is adjustable so that you can mark out parallel lines of different distances from each other.
Compasses and dividers are most often used to mark circles or arcs, and you can use dividers to transfer measurements and to “step off” equal divisions along a line.
Saws and Sawing
There are several different types of hand saw, some designed for general use and others for more specialized applications. The shape and size of the saw blade, and the number and configuration of its teeth, are what distinguish one type from another.
Rip saws, for example, are large, have between 4 and 6 teeth every 1 in. (25 mm), and are used for cutting (ripping) with the grain. The shorter crosscut saw has between 7 and 12 teeth every 1 in. (25 mm). Both types are used mainly in the initial preparation of timber and for cutting boards to size. (8)
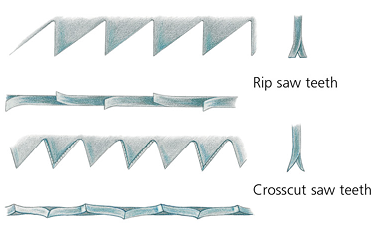
8
The tenon saw is the best-known example of what are called back saws. These saws have thin blades stiffened and weighted by a folded metal strip, usually brass, along their back edges, and they are used for accurate bench work and for cutting joints. Back saws are available in different sizes and can have from 12 to more than 20 teeth every 1 in. (25 mm). The smallest type of back saw with the greatest number of teeth and finest cut is generally known as a dovetail saw. Saws for cutting curved shapes use a narrow, flexible blade that easily breaks. In some saws, this problem is overcome by holding the blade under tension in a frame. The earliest type, known as a bow saw, has a blade held in a wooden frame tensioned by means of a twisted cord. More modern designs rely on a spring-steel frame and one of these, the coping saw, uses disposable blades that fit into pins tensioned by twisting the handle of the saw. You can fit the blade so that it cuts either on the pull stroke or on the push stroke. To make an internal cut through a piece of wood, first drill a small hole through the work, pass the blade through, and then fit it into the saw frame. The coping saw is used to remove waste wood from a dovetail joint (see Tools & Techniques chapter).
If you always make sure your saw is sharp, then sawing by hand should not be too difficult. Never force the saw into the wood. This is hard work, and it tends to cause the blade to twist and jam in the kerf. For trouble-free sawing, support or hold your work securely; work with firm, even, fluid strokes; and use the whole length of the blade to cut with. Begin carefully—with a tenon saw, pull back on the first strokes to establish a start—and work to the waste side of the line.
All of these sawing operations can be carried out with power tools, either portable or fixed. You can use a circular saw for straight cuts, while for straight and curved cuts, you have a choice of the versatile jigsaw, a saber saw, a machine fret saw, or a band saw.
Planes and Planing
The type of plane generally known as a bench plane is used to reduce the thickness or width of a piece of wood to the size required and to straighten or smooth a surface. Other types of specialist plane are used for grooving, molding, and shaping; some of these may be multipurpose planes.
There are various types and sizes of bench plane, but they are all constructed in much the same way. Early planes had wooden bodies, or stocks, fitted with a blade, or cutting iron, held in place with a wooden wedge. The all-metal plane appeared in the middle of the 19th century and, due to the fact that it could be more easily and precisely adjusted, it became the preferred tool—although wooden planes are still in use today.
The metal jack plane is a “jack-of-all-trades.” Its main use is to bring timber down to size, but, if it is fitted with a suitably ground and sharpened blade (see Tools & Techniques chapter), you can also use it for general straightening and smoothing. The length of a jack plane varies between 14 and 18 in. (355 and 457 mm), making it particularly useful for planing long edges for jointing purposes. The metal smoothing plane (9) is made in the same way as the jack plane, but it is shorter in length—8 to 10 in. (203 to 254 mm). It, too, can be used as a general-purpose plane, but it is intended mainly for finishing a surface after a jack plane or a machine plane has been used. Light planing with a sharp and fine-set smoothing plane can produce an excellent surface finish.
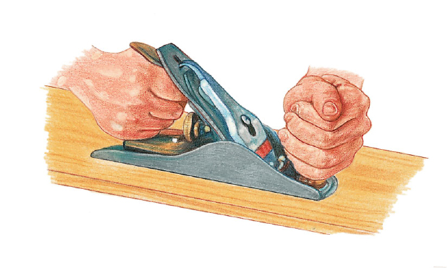
9
When planing a piece of work, make sure that the wood is securely and safely held in place. When edge planing, grip the work in a bench vise; for surface planing, either clamp the wood to the bench top or hold it between pairs of bench dogs. In order to achieve a smooth finish, you have to plane with the grain of the wood, not against it. On the end grain, plane halfway from each side to avoid splitting out the far edge. The lower cutting angle of the smaller block plane is best for end grain work. As a general rule, when any plane is not in use, place it on its side on the bench in order to prevent damage to the blade.
For a particularly fine finish, especially on hardwoods, a cabinet scraper is the ideal tool. This device consists simply of a thin piece of good-quality steel, the edge of which is specially shaped and sharpened to remove a delicate shaving of wood—like a butterfly’s wing—when held and flexed between the fingers and thumbs of both hands and pushed forward over the wood at a suitable angle.
Although not really a plane, a spokeshave cuts in a similar way. Older, wooden-stocked versions have forged, tanged blades, which may be more difficult to adjust than a modern spokeshave but produce an excellent finish. Modern, metal spokeshaves are available in either flat or half-round versions. Used with a pushing action, a spokeshave makes chamfers and smooths narrow curved edges (10). A drawknife, which is used mainly for roughing-out work and for rounding and shaping, is drawn toward you with a firm pulling action. Drawknives are best suited to working on green (unseasoned) wood.

10
The specialty planes used for such tasks as grooving have become more or less obsolete due to the portable electric router, which does the same work with greater speed. However, many of these hand planes are still available and can be used.
Electric planers can be either portable or fixed. Hand-held electrical planers are not reco mmended, and fixed machines can be expensive. Whenever possible, it is best to buy wood that is “ready planed” or “prepared” to size. If wood is machine planed it will need to be finished off with a hand plane, or sanded, in order to remove the rippled surface left by the rotary cutting action produced by all power planers.
Chisels and Gouges
Chisels for woodworking are of several different types and come in many different sizes, depending on the work they are to perform; firmer, bevel-edged, paring, and mortise are just some of the names given to them. “Chisels” with a curved cutting edge should more correctly be called “gouges.” In addition, there are chisels and gouges made specifically for lathe work and for wood carving. Chisels are categorized by size—for example, the width of the cutting edge—and gouges by size and “sweep”—the degree of curvature of the cutting edge.
For general woodworking, the bevel-edge chisel has some clear advantages over the others because its shape makes it particularly suitable for reaching into tight corners, cleaning out joints, and so on. You can, if necessary, strike the top of its handle lightly with a wooden mallet to get extra force behind its cutting action. Keep your chisels sharp at all times because it is easier to have an accident when forcing a blunt chisel to cut than when guiding a sharp chisel into the wood. And never hold your piece of work with one hand while using a chisel with the other; secure the wood in place and keep both hands behind the chisel’s cutting edge. Make your first cuts across the grain of the wood to sever the fibers and try to cut with the grain at all other times. (11)
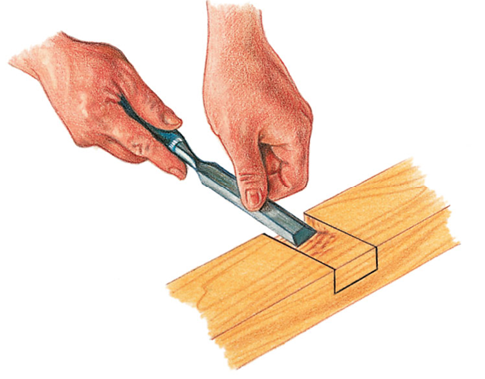
11
Shaping and Smoothing
Although a cutting tool produces a better surface finish and is satisfying to use, there are times when you need to use other implements for shaping and smoothing. Rasps and files are abrading tools made from hardened steel. Rasps have coarse, triangular-shaped teeth and, because they remove wood quite quickly, they are used for rough shaping. Files, which come in a variety of “cuts” from coarse to fine, are used more for smoothing. All can be readily bought in flat and half-round shapes— some files in round (or “rat’s tail”) section. (12)
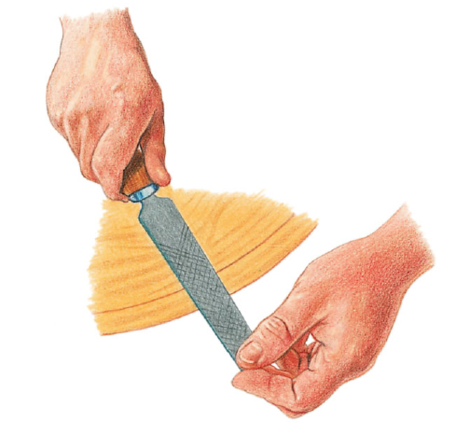
12
Modern abrading tools usually have tungsten-carbide grit welded to both rigid and flexible substrates, while another design incorporates a disposable blade of thin, hardened steel perforated with many sharp-edged holes. These holes form multiple cutting edges, but they leave a rough surface that requires smoothing.
For many shaping operations you can use electric belt, disc, and drum sanders, while orbital sanders are often recommended for surface finishing. These devices can save you a lot of time, especially in production work, but they do not always leave a satisfactory finish. They also produce a lot of fine dust. Either the tool should have its own dust bag or you will need to wear a dust-protection mask or respirator.
Drills and Drilling
Traditionally, wood-boring bits or auger bits fixed into a brace of wood and metal were used for drilling holes in wood. These were replaced by all-metal braces using interchangeable bits, or drills, together with another form of hand drill known as the wheelbrace. Metal braces, some with a ratchet action, and wheelbraces are still in use today, but the portable electric hand drill is the most popular and commonly used device when drilling holes in wood. You can buy a vertical stand to convert an ordinary electric hand drill into a simple but effective bench drill, while the multispeed drilling machine, available in both bench and floor-standing models, is more suited to heavy and repetitive types of work.
Whatever type of drill you decide to use, there is a wide range of drill bits from which to choose. For general drilling, up to about .5 in. (12 mm) diameter, ordinary twist bits, or engineer’s drills, are suitable (13A). An improvement on this design is the modified twist bit known as the dowel bit, or brad point bit (13B). For more accurate drilling and for large-diameter holes, the saw-tooth Forstner bit is recommended (13C), but this type of drill bit requires a power drill. If you are using a brace, the old type of center bits (13D) and auger bits (13E) are probably best. For countersinking after drilling, use a rose-head countersink (13F).
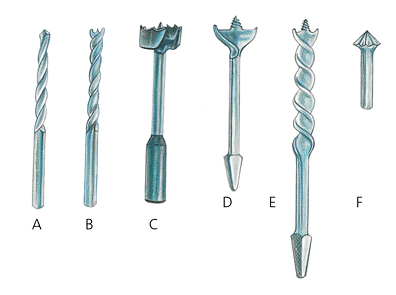
13
Hammers, Screwdrivers, and Related Tools
For the projects described in this book, a medium-weight cross pein hammer is most generally suitable. Hold small nails and panel pins between your fingers and start off using the tapered pein before switching to the face of the hammer to drive them home. A pair of pincers is useful for removing nails that bend or break. A wooden mallet is used mainly when you are working with a chisel or gouge, but you may also find it useful at the assembly stage of some jobs. Choose a medium-sized mallet with a head made from seasoned beech.
Screwdrivers are available in a wide range of sizes and types, with handles in different shapes and made from a variety of materials. What matteers most is the size and shape of the end, or tip, in relation to the size and type of screw you are using. The oldest, and perhaps the most common, type of screwdriver is the flat blade, made to fit the traditional slotted screw heads; more modern types include various patterns of Phillips-head screws and screwdrivers. A flat blade should fit snugly into the screw slot. Make sure that it is neither too large nor too small or you may damage the screw.
For starting screws, and sometimes nails, in softwood you may find a bradawl useful. A bradawl makes a guide hole and reduces the danger of the wood splitting. Start a screwdriver-tipped bradawl across the grain of the wood. When nailing or screwing into hardwood, and sometimes into softwood, it is best to drill clearance and pilot holes (see Tools & Techniques chapter). You can use a pin punch or nail set to sink nail heads below the surface of your work.
Clamps
You will find that clamps are useful items for holding work securely in place temporarily or for applying pressure to pieces of wood while glue dries and bonds them together.
The most common kind of clamp is the G clamp (14), and there are several types and sizes from which to choose. The size is usually quoted as the maximum distance between the jaws of the clamp, and this may range from 2 in. (51 mm) to 12 in. (305 mm). For holding larger or wider pieces of work, usually during the assembly stages, you should use sash or bar clamps. These consist of a steel bar drilled through at intervals to hold a pin that retains a sliding jaw or shoe. At the opposite end there is an adjustable jaw that takes up the final pressure. Always use clamps with protective blocks of wood to prevent the surface of your work from becoming damaged. There are numerous modern variations of these standard types of clamps, some better than others.
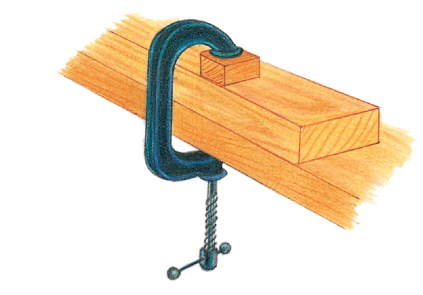
14
Abrasives and Adhesives
The words “sandpaper” and “sanding” are still frequently used as general terms for abrasive sheet materials and their use. However, sand is no longer to be found on abrasive sheets. Instead, materials such as powdered glass, crushed garnet, aluminum oxide, or silica carbide are used. These are deposited as grits on to various backings—cloth or paper—and in different densities and grit sizes. Sheets are normally classified by the type and grade of abrasive and by a number system related to grit size—the higher the number, the finer the abrasive. For hand sanding, many people prefer the pink-colored garnet paper in grades 100, 150, and 220. Always sand with, not across, the grain of the wood, and wrap the paper around a sanding block to help keep the surface of the wood flat. Even if you use a power sander, you will still probably have to finish off by hand sanding.
The term “gluing-up” may in fact mean using any one of numerous adhesives that are now available. Traditionally, animal glue was used—it was all there was—and it had to be melted and applied hot. Today, there are upward of a dozen different types of adhesive, some intended for specialty applications. Those types based on PVA (polyvinyl acetate) are good, general-purpose glues, available for both indoor and outdoor use. Where a high level of water resistance is required, be sure to use a synthetic resin adhesive.
Sharpening Tools
Sharp tools are a prerequisite for producing good-quality work—a dull cutting edge makes work difficult and is potentially dangerous. More cut hands result from pushing too hard with a blunt chisel than from working with one with a well-sharpened blade.
Sharpening includes both grinding and honing. Grinding is carried out on a revolving grindstone, which usually leaves a coarse finish unsuitable as a cutting edge. After grinding, tools then have to be honed, or whetted, usually on a sharpening stone—either an oilstone or a waterstone—to produce a sharp cutting edge. In normal use, tools can be honed several times before regrinding becomes necessary. Many grindstones are electrically driven and most have narrow abrasive wheels revolving at about 3,000 rpm (revolutions per minute) and are used dry. The danger here is that the steel being sharpened may overheat and become soft as a result. The only way to avoid this is to dip the metal constantly in water to cool it. Machines with wider wheels revolving at only about 150–200 rpm are more suitable.
Sharpening stones, usually oilstones, come in three grades—coarse, medium, and fine—with the medium and fine grades being the most generally useful. Both natural and artificial stones are available. You should protect all types of oilstone in a wooden box when they are not in use, and make sure that the surface is always lubricated with thin oil. The oil reduces the friction and floats off the fine metal residue produced by the sharpening process, which would otherwise clog the pores of the stone, causing the surface to glaze and become ineffective. Some stones use water as a lubricant. These stones are rather soft and easily damaged, but they do produce a fine edge. For really good results, the surface of your sharpening stone must be perfectly flat, so remember always to use the full width of the stone when sharpening tools.
Sharpening stones
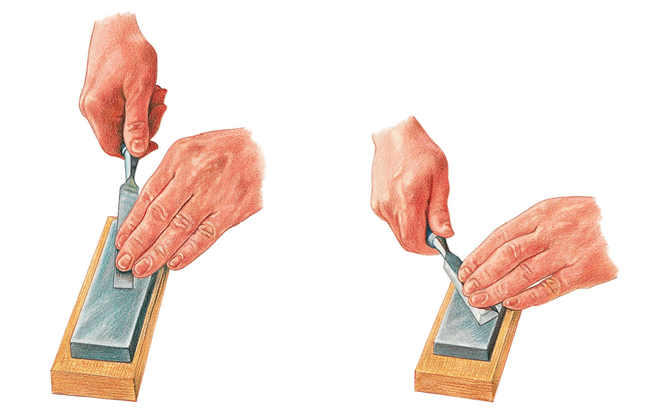
When you buy new edge-cutting tools, such as planes and chisels, the blades supplied are ground but not honed. In order to hone a blade at the correct angle, hold it in both hands and place the ground bevel (which is about 25˚) flat on the surface of the stone. Raise your hands slightly to give an angle of about 30˚. Using moderate pressure, rub the blade back and forth along the full length of the stone’s surface. This produces a fine burr, or wire edge, on the back of the blade (you can easily feel it with your thumb). Turn the blade over and, keeping it absolutely flat on the stone, rub the burr away to produce a sharp cutting edge. Check your results by holding the blade, edge up, to the light. Any bluntness will reflect light and show as a white line. For a superior cutting edge, strop the blade on a piece of leather dressed with oil and a mild abrasive.
One of the problems many beginners experience when honing is rocking the tool or blade. This rounds the bevel over and stops it from cutting properly. Maintaining the blade at the correct angle to the stone throughout the process can also cause problems. Gripping the blade firmly and keeping your wrists stiff help combat the first problem, while a useful aid for both is the honing guide. This device runs on rollers and holds the blade firmly at precisely the correct honing angle to the stone while you push it back and forth.
Working Methods
Joining Wood
There are numerous ways of joining pieces of wood together. Some involve metal fastenings, such as nails or screws, or use wooden dowels, while some rely entirely on the adhesion of glued surfaces or a combination of these methods. In others, the wooden components themselves are shaped into interlocking joints, such as mortise and tenons, dovetails, and so on, which form, when glued, permanent constructions.
These jointing techniques have evolved slowly over centuries and few of them can be improved on. However, in recent times, the increased use of man-made composite materials—plywood, chipboard, and MDF (medium-density fiberboard), for example—and the requirements of ease and speed of manufacture and assembly have resulted in the introduction of other methods of fastening and joining, such as the so-called knock-down fittings and other instant-jointing systems. However, in this book, the emphasis is on the use of solid, seasoned wood and the traditional methods of jointing, and only those techniques required to make the projects will be included.
Using Nails
Nails are available in a wide range of types and sizes. The selection illustrated here includes those required in the projects. Nails are made of a variety of materials, including steel, galvanized steel, brass, copper, and aluminium, and are known generally as wire nails or common nails, round and oval, and panel pins. Steel nails are suitable for most jobs; oval types reduce the risk of the wood splitting, and you can punch them below the surface for a neat finish. For light work, and in some furniture making, panel pins are more suitable, and these too can be punched below the surface of your work to make a hidden fixing.
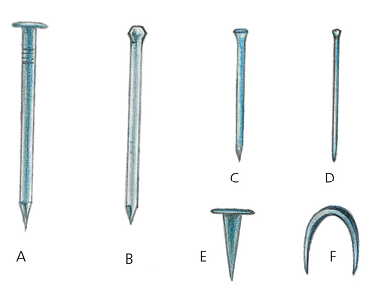
15 (A) Round wire nail, (B) oval nail, (C) finish nail, (D) panel pin, (E) tack or stud, (F) staple.
Always use a nail or pin of suitable length. Long pins tend to bend easily, so support them between your forefinger and thumb and take care when knocking them in. Short pins may be difficult to hold, so try pushing them through a piece of stiff card held between your finger and thumb.
Pins used in conjunction with glue can make quite a strong joint. Strength is improved, especially on wide boards, if “dovetail nailing” is used. To make any nailed assembly easier, tap the nail or pin almost through the top piece first, apply the glue, and then position the pieces of wood together and knock the nail or pin all the way in. When working with hardwoods, which tend to split easily, it is best to predrill holes slightly smaller than the nails or pins to be used. For a neat finish, punch the nails or pins below the surface of the wood, using a small nail punch or nail set and hammer. The punch should have a concave tip to prevent it from slipping off the pin or nail head. Fill the holes left on the surface with a woodfiller or with a mixture of glue and sawdust.
Using Screws
Screws are used for joining pieces of wood together and for fitting hardware such as hinges, handles, and so on.
16
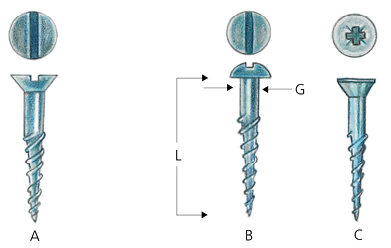
They are classified by length (16L); the thickness of the shank, or gauge (16G); and type of head. They are made in steel or brass and there are also several steel-coated varieties, such as chromium and zinc. The size is specified by length and the gauge by a number—the larger the number, the thicker the screw. Head types are basically either countersunk or flat head (16A), designed to go flush with or below the surface of the wood; or round head (16B), designed to sit on the surface. Screws may have the traditional straight slot for use with a conventional screwdriver or be cross headed (16C) for use with an appropriate cross-head screwdriver.
For most work in the projects section, countersunk, slotted steel screws are used. However, with oak you must always use brass screws to prevent the tannin in the wood from corroding the screws.
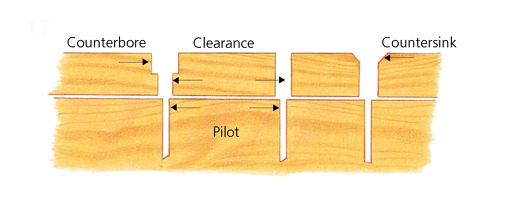
Drilled holes are necessary when joining wood with screws and when fitting hardware. With hardwoods, drill a clearance hole—one fractionally larger than the screw diameter—through the top piece, and a pilot hole—one smaller than the diameter of the screw threads—to the full length of the screw. In softwoods, the top clearance hole should be drilled, but you can use a bradawl for making the pilot hole. Use a countersink to recess the surface or counterbore the top and fill the surface with a wooden plug if you intend to conceal the head completely. Make sure you use the correct size of screwdriver for the size of screw, and press down firmly on the screw head as you turn it to prevent damage to the slot. Soft steel screws are easily damaged. (17)
17
Using Adhesive
Using an appropriate adhesive is often the most satisfactory way to join wood to wood, especially when it is used with one of the interlocking types of joint or when reinforced by nails or screws. For the glue to have maximum strength, you must first clean the parts that are to come into contact to remove any dust or loose wood that could create gaps—don’t use glue as a space filler if you want a good joint. Then you must keep the pieces in tight contact until the glue is properly dry (see the manufacturer’s recommendations), usually by clamping them together.
Plan the gluing-up stage of your work carefully. Have a clear, dust-free area in which to work. First, test-fit the pieces together (without using glue) to make sure that everything fits properly and is square. Have your glue and a damp cloth on hand; clamps should be ready and set to the right size, with protective blocks available if needed. Use enough glue to prevent a dry joint but not so much that you create a messy clean-up job afterwards. Wipe away any surplus glue with a damp cloth. Bear in mind that glue marks can mar the appearance of some surface finishes.
Making Joints
Edge Jointing
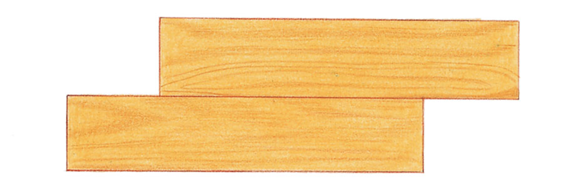
When a wide piece of wood is called for, it may be necessary to join two narrower pieces together, edge to edge. The simplest and most satisfactory method is to use the plain rubbed joint. For this to work, you need to make sure that the mating edges are true and square along their entire length. You can avoid making the common error of planing more off the ends by planing the middle fractionally hollow. Planing the two edges at the same time helps accuracy. To test your results, hold the edges together and up to the light to identify any gaps.
When you are satisfied, apply glue to one of the adjoining edges, press the edges together, and rub them backward and forward a few times. This removes any air from the joint and rubs the glue into the fibers, which gives the joint its name. (18)
18
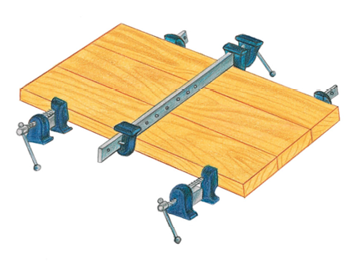
To hold the edges in tight contact, you will need a minimum of three sash or bar clamps, placed as shown. Tighten the middle one first. Check your work for flatness, clean off any surplus glue, and leave it to dry overnight. Plane or, preferably, scrape the joint area clean if necessary afterwards. (19)
19
The plain rubbed joint is fine for most work, but for larger surfaces, such as tabletops, you can use a similar joint strengthened with dowels or by a loose tongue. To make a wider board, purchased tongue-and-groove boards can be glued together. (20)
20
Grooves and Rebates
Although not strictly joints by themselves, grooves and rebates form parts of joints. A groove is a narrow channel cut usually along the length of a component, and a rebate is a recess along an edge, either with or across the grain. Both may be used to hold panels in place. Special-purpose all-metal planes are available for making grooves and rebates. A rebate plane will only cut a rebate, while a plough plane will tackle rebates and grooves. There are various multiplanes that will also do both, and other work besides. When using these planes, make short cuts beginning at the far end of the work and finish off with light continuous cuts.
The portable electric router, fitted with interchangeable cutters, has now taken over the work once performed by these different hand tools. When it is used with a suitable guide fence or with a manufactured or custom-built routing table, the portable router is safe, accurate, and quick.
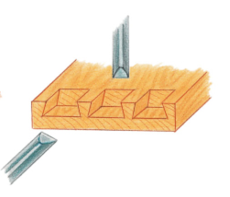
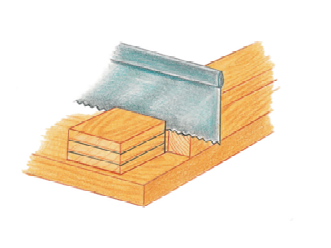
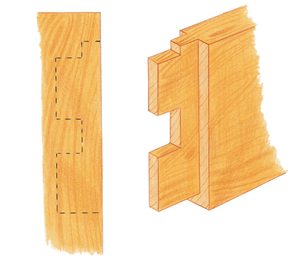
Housing Joint
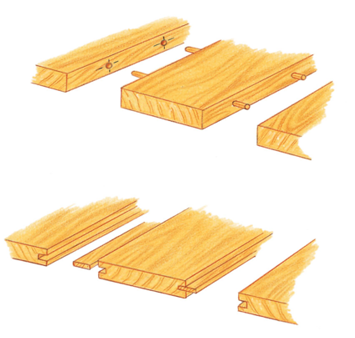
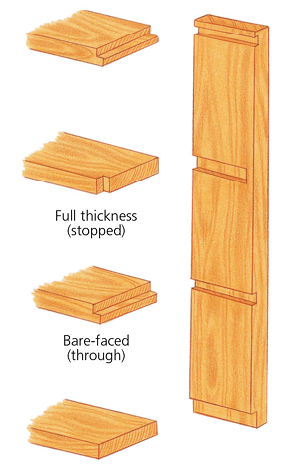
This type of joint comprises a narrow trench or wide groove cut across the grain of a piece of wood into which the end of another piece, such as a shelf, is fitted. Housings may be full thickness (of the shelf) or bare-faced, meaning that the shelf thickness is reduced to fit a narrower housing, and they can be either made through or stopped, as shown (21). You can cut the joint entirely by hand, with a little help from a drilling machine if you like, or you can use an electric router.
21
Begin by measuring the thickness of the shelf (or the bare-faced tongue made on the end of the shelf) and set out the position of the shelves on the supporting side pieces. Make the width of the housing joints fractionally less than the thickness of the shelves to ensure a tight fit. After checking, mark the cutting lines across the grain with a sharp marking knife. Gauge the depth of the joint—which is usually one third of the thickness of the side piece—from the inside face. Securely clamp the work to the bench. Using a sharp .75 in. (19 mm) chisel, cut into the knifed lines on the waste side to form a guide groove for the saw. Saw down to the depth of the housing joint and then chisel out the waste wood, working in toward the center from both ends where possible. You can use a drill to remove the bulk of the waste wood. Smooth the bottom of the joint and try the shelf for a fit. If necessary, plane a shaving off the underside of the shelf until you get a tight fit. (22)
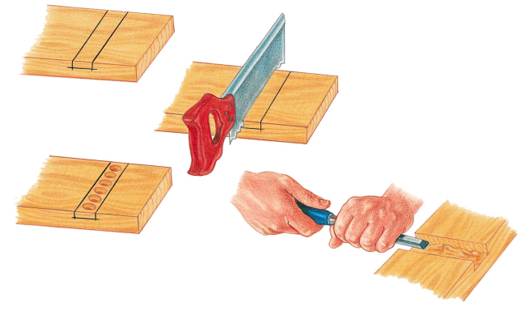
22
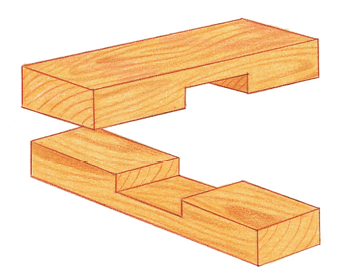
Where one piece of wood meets another at a corner, as, for example, in a box-like construction, you can use similar housing joints. If the housing is full thickness, it becomes, in effect, a cross-grain rebate, and you should secure it with glue and nails. However, a bare-faced housing is preferable in most circumstances and, if well made, this joint is strong enough using glue alone.
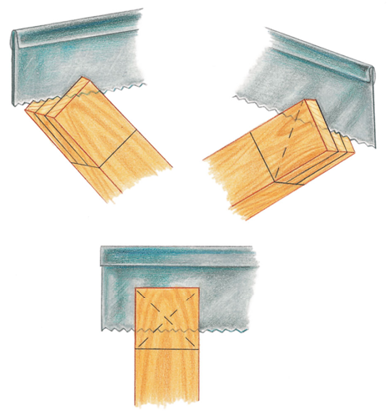
Dovetail Joints
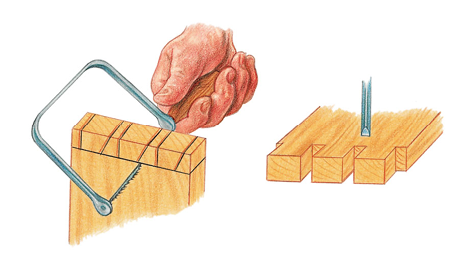
You can obtain a much stronger corner joint using a dovetail joint, which is also particularly good for drawers. The strength of this joint lies in the increased gluing area and the interlocking shapes.
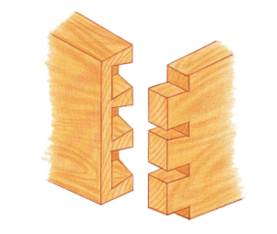
There are several types of dovetail, the simplest being the through dovetail (23). In this, the end-grain portions of the joint, the tails and pins (the pieces in between the tail sockets), are visible on both sides. In the lapped dovetail, often used on drawer fronts, the end grain is concealed on one face.
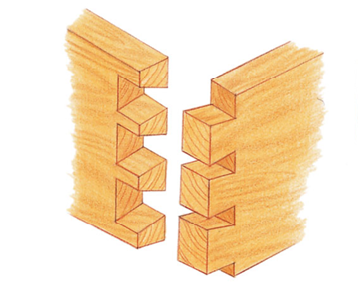
23
In drawer construction, always cut the tails on the side pieces. Cut the materials to the required length and square across the end. Number, or otherwise identify, the matching ends. For through dovetails, where the front and sides are the same thickness of wood, mark out and cut the components as follows:
A: Set a marking (or cutting) gauge to the thickness of the wood and mark the ends of each piece all around—this is the depth line of the joint. Mark out the tails first, using either a T-bevel or a dovetail template. The tails should be evenly spaced and the marked positions squared across the end.
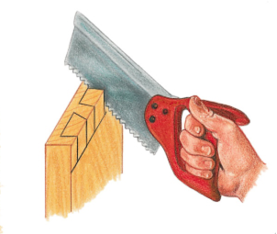
B: With the wood held upright in a vise, carefully saw on the waste side, using a dovetail or some other back saw, down to the depth line as shown above.
C: Remove the bulk of the waste wood using a coping saw and then finish removing the waste from both sides with a sharp bevel-edge chisel.
D: Mark out the sockets using the mating tails as a template. Hold the component to be marked upright in a vise and support the tail piece on it as shown.Align the tails carefully and mark clearly with a knife and square lines down to the depth line.
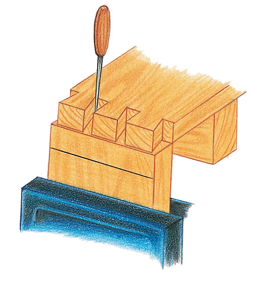
E: Cut away the waste wood as before, remembering to cut on the waste side of the marked lines, and clean out the joint with a sharp chisel. Test-fit the joint and adjust as necessary with a chisel.
For lapped dovetails, the front piece is usually thicker than the sides – this extra thickness forms the lap that conceals the tails (24). Prepare your materials as described for through dovetails and, after deciding on the length of the tails (which are often equal to the thickness of the sides for convenience), set a marking gauge and mark the ends of the side pieces all around. Mark the front piece along the end and on the inside surfaces. Cut the tails and mark out the sockets as described for the through dovetail.
24
A: With the front piece held upright in a vise, carefully saw at an angle down to the gauged lines on the inside surface and lap. Remember to cut on the waste side of the lines.
B: With the piece secured flat on the bench, chisel out the waste wood, beginning with vertical cuts (across the grain) and horizontal cuts. Use a sharp bevel-edge chisel and get right into the corners of the sockets. Test-fit the joint and adjust as necessary.
You can cut dovetails by machine, and these are usually recognizable by the even size and spacing of the pins and tails. However, modern jigs allow you to use a router to cut dovetails that are indistinguishable from hand-cut joints.
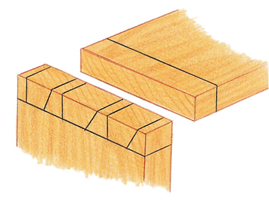
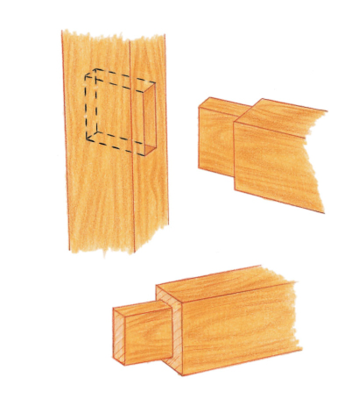
Cross-halving, or Cross-lapped, Joint
Where two pieces of wood (usually of the same thickness) are to cross each other at right angles, and you want the surfaces to remain flush, you will have to use a cross-halving, or cross-lapped, joint. (25)
25
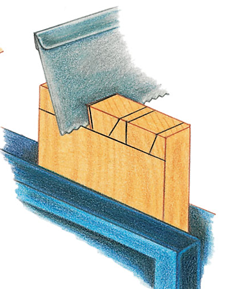
Plane the materials to size and square and mark the position of the joint full width and square across each piece using a sharp knife. Also mark the lines squared down the sides in pencil. Set a marking gauge to half the thickness of the wood and mark in the depth of the joint equally on both pieces. Chisel a sloping groove into the knifed lines (on the waste side) to make a guide for the saw, and then saw vertically down to the gauged line indicating the depth of the joint. Chisel out the waste wood, working from both sides in so that it is smooth and flat. (26)
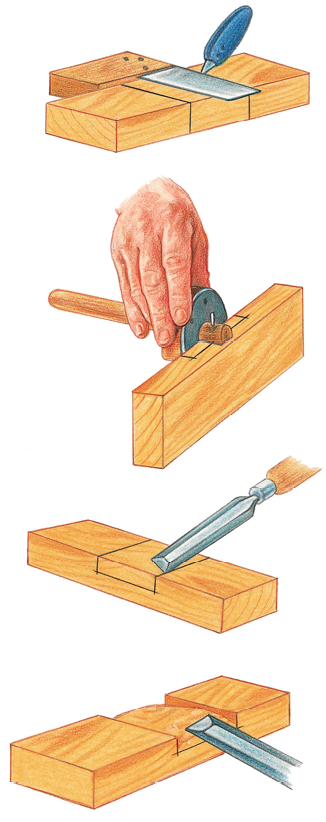
26
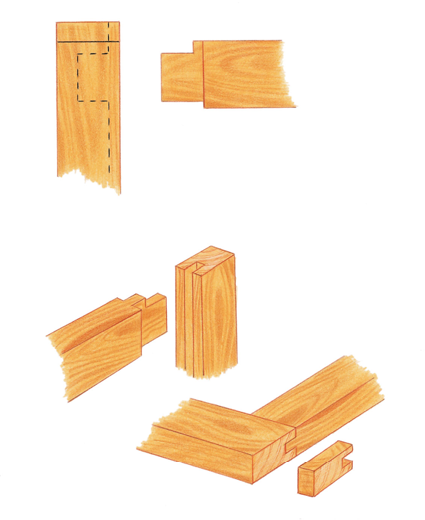
Mortise and Tenon Joints
The strongest as well as the most commonly used type of framing joint is the mortise and tenon. Although there are many variations of this joint, only three are considered here: the stub, or blind, mortise and tenon; the haunched mortise and tenon; and the more specialized double mortise and tenon. The main parts of each of these joints are the mortise, which is a recess or slot cut into (usually) the upright member or stile, and the tenon, which is a reduced projection on the end of the mating piece (generally called the rail), made to fit tightly into the mortise.
Plane the materials true and square, making sure that they are square across the ends. Where mortises come close to the end, it is usual practice to leave some extra length to the stiles initially to prevent the wood splitting. These projections are sawed off later.
A: Cut the rails, remembering to allow for the length of both tenons. Mark the required length and square around with a sharp knife. This is the shoulder line of the tenon.
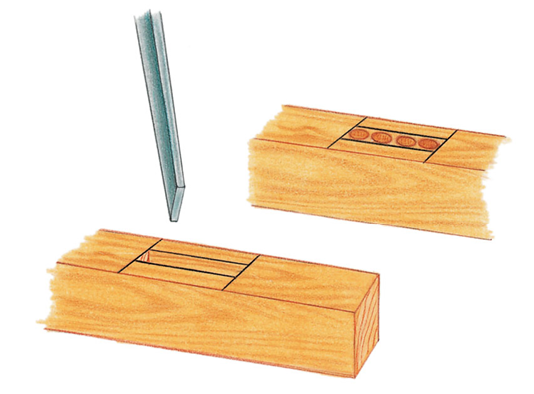
B: Mark out the positions of the mortises. The width required is the width of the tenons. Set the spurs of a mortise gauge to a chisel-width equal or close to one third of the thickness of the rail. Use the gauge at this setting to mark the thickness of tenon all around and also to complete the marking of the mortise.

C: Cut the mortises first. If you are doing this by hand, it helps to drill vertically down between the marked lines with a smaller-sized drill to remove the bulk of the waste wood and then use a chisel to clean and square the joint. Make mortises .125 in. (3 mm) deeper than the length of the tenon.
D: Now cut the tenons. With the rail held in a vise, saw down both cheeks to the shoulder line, cutting on the waste side of the marked lines, with a tenon saw in three stages, as shown. Then, with the rail held to the bench, chisel a sloping groove into the knifed shoulder line, on the waste side, to make a guide for the saw.
E: Saw vertically down to the previously made saw cut to remove the cheek waste. Finally, mark the reduction in tenon width and saw off the waste.
F: Trim the tenon to a good fit in the mortise. Aim to keep everything square so that the joints don’t cause the frame to twist.
The haunched mortise and tenon is ideal when making a frame that is grooved to accept a panel, as in a door. The haunch can help to strengthen the joint, but here it also fits and fills the exposed end of the groove in the stile. Where possible, make the groove the same size as the mortise and cut out the mortise as previously described, after first cutting the groove. (see Tools & Techniques chapter.)
Mark out the tenon and saw down the cheeks, but mark off and retain the haunch portion when sawing off the remaining waste. Trim to fit. (27)
27
Double tenons are used when joining wide rails to stiles where the long mortise required for a single, wide tenon would weaken the stile, or where a wide tenon might become loose through shrinkage. It is, for example, the correct joint to use when jointing large paneled doors and deep apron table frames. Mark out the joint as shown above. Cut the mortise, including the recess for the tenon haunch and central tongue, first. Then mark out and cut the double tenon, haunch, and tongue. Trim to fit. (28)
28
There are machines for cutting mortises, as well as attachments that you can fit to a bench drill to do the same. Tenoning machines are used in commercial manufacturing, but on a smaller scale, by using suitable jigs, you can cut tenons on a circular saw or band saw or with a router.
Round tenons into drilled sockets This is the traditional joint often used in stool- and chair-making to join legs to seats or cross rails to uprights. Sockets can be either bored “through” or “blind;” through joints are often wedged (29). Some woodworkers advocate tapered sockets, but straight, parallel-sided sockets give a more secure joint. First, bore out the required size of socket using a drill bit—the saw-toothed Forstner bit is most suitable—and then make the round tenon by whittling with a knife or rounding with cutting or abrasive tools. A general rule of thumb is that the socket depth should not be less than the socket diameter.
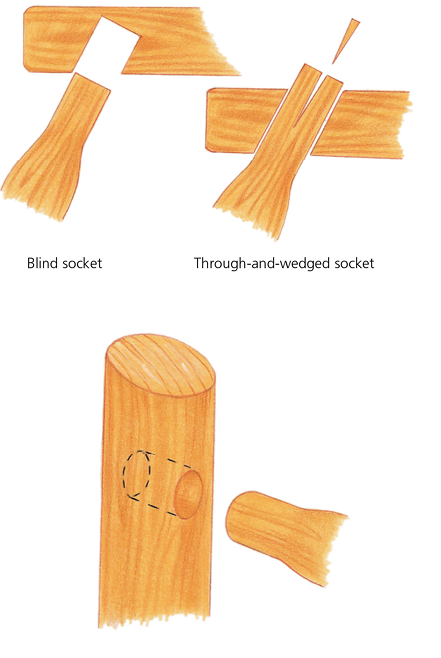
29
Draw Boring (Pegging Joints)
An old method of tightening up and securing mortise and tenon joints is to insert a wooden pin or peg through the joint. This is known as draw boring, and it is often incorrectly copied in some modern reproduction furniture by boring through the assembled joint and simply fitting a dowel.
The correct way of making this joint is as follows. After you have cut the joint, but with the tenon withdrawn, bore a suitable hole through the side of the mortise. Then replace the tenon to its full depth and insert the drill again to just mark the surface of the tenon inside the mortise. Withdraw the tenon, re-mark it about .0625 in. (1.5 mm) nearer to the shoulder and drill through at this point. The slight offset you have created will draw the joint up really tight when you drive the pin in. The pin should be straight grained and its head should be slightly larger than the hole and tapered to a point to ease starting. Cut the pin off flush on completion. (30)
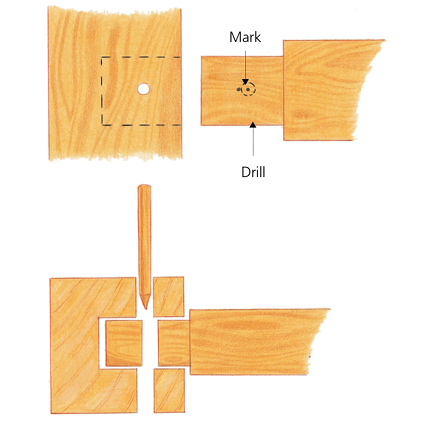
30