WHAT’S IN THIS CHAPTER?
WROX.COM CODE DOWNLOADS FOR THIS CHAPTER
Please note that all the code examples in this chapter are available as a part of this chapter’s code download on the book’s website at www.wrox.com on the Download Code tab.
Accessing data is one of the main things almost every application must do. Nearly all applications deal with data in some manner, whether that data comes from memory (in-memory data), databases, XML files, text files, or something else. Many developers find it very difficult to move from the strongly typed object-oriented world of C# or Visual Basic to the data tier where objects are second-class citizens. Before the Entity Framework, the transition from writing code using strongly typed objects to the more loosely typed collections of data returned from a data store was difficult, and often error-prone. Data access can complicate your application development for a number of reasons, not the least of which is the fact that code written to interact with a database and code written to handle application logic are very different from both a design and an implementation perspective.
Microsoft continuously attempts to simplify tasks that are common and laborious for programmers. This is typically done by abstracting the difficulties of these tasks through a combination of new interfaces and IDE assistance. With the latest release of the Entity Framework, you will find that navigating the world between the database and your application is easier than ever. In fact, by using Entity Framework Code First (discussed in this chapter), you now have more options for crossing the chasm between your code and the data in the database.
One of the benefits of working with any one of the available .NET programming languages is that the objects in your code are strongly typed. As a programmer, you can navigate very easily through namespaces, work with a debugger in the Visual Studio IDE, and more. However, when it comes to accessing data, things are dramatically different. You end up in a world that is not strongly typed, where debugging is painful or even non-existent, and you spend most of the time sending strings to the database as queries. As a developer, you must be aware of the underlying data and how it is structured. You must also understand how all the data points relate to one another.
The Entity Framework is a set of ADO.NET technologies that eliminates many of the difficulties mentioned above. Using the Entity Framework (along with LINQ), you now have a lightweight façade that provides a strongly typed interface to the underlying data stores that you are working with. Using these technologies, you can stay within the coding environment you are used to, and you have the ability to access the underlying data as objects that work with the IDE, IntelliSense, and even debugging. You no longer have to worry about the issues developers faced in the past with loosely typed lists of data. Entity Framework allows you to work with data using the same strongly typed objects that you are already comfortable with.
Not only do you have the capability to access and work with data using a more familiar paradigm, but you can do this with data from multiple data stores. The ADO.NET Data Provider model provides a common managed interface in the .NET Framework for connecting to and interacting with a data store. Entity Framework builds on top of the ADO.NET Data Provider model to allow for the use of Entity Framework with any data source for which a supported provider is available. The .NET Framework includes ADO.NET providers for direct access to Microsoft SQL Server and for indirect access to other databases with ODBC and OLE DB drivers. But third-party providers are available to provide direct access to other popular data stores as well, such as Oracle, MySQL, DB2, and many others.
This chapter provides an overview of the latest version of the Entity Framework and how you can use this framework within your ASP.NET applications. The latest version of the Entity Framework is now available as the EntityFramework NuGet package. The NuGet Package Manager is already installed in Visual Studio 2012.
As discussed earlier, building applications that communicate with databases should be an easier task than it is. The difficulty is that objects in code and objects in the database are inherently different beasts. Communicating objects from the database tier to other tiers of your application stack is the primary reason for the added complexity.
The Entity Framework provides the capability to map your application objects to your relational database schemas. For example, when you have an Orders table that is full of references to Customer objects and StoreItem objects, and you are working with a relational database schema, these entities are created using JOIN statements between various tables. However, if you are working with this construction from your C# or VB code, then you are creating an Order object that includes a property reference to a Customer object and a StoreItem object. Mapping these disparate representations together has usually been the job of developers.
In the past, an effort was made to address this issue of mapping with the introduction of the DataSet object. This object was an in-memory table representation that included with it multiple tables, with the table joins and constraints in place. However, with the pure object-oriented code that people really wanted to develop, the DataSet approach was often not recommended.
When you represent your data within the database, you are representing it as a logical model through the database’s relational schema. However, coding your application is accomplished using a conceptual model. Having both logical and conceptual layers forced the creation of a mapping layer. The mapping layer allows you to transfer objects from the .NET classes that you are working with in your code to the relational database schemas that you are working with within the database, as represented in Figure 11-1.
This mapping layer is sometimes thought of as a data access layer. Microsoft has provided a number of data access technologies over the past few years, and many third-party companies have formed around the concept of making this mapping as simple as possible. Some of the third parties even came on board to provide mapping or data access transformation to specialized databases.
Microsoft has moved forward to make the mapping of objects from the application code to the database schemas as simple as possible. The Entity Framework is in place so that you can write less code to get your applications out the door.
Note that you are going to need both the objects in your application code and the entities that you build within the relational schema of the database for some time to come.
So in the end, the Entity Framework consists of the following:
Developers like options. You have three options for working with data in the Entity Framework:
When you already have a database, you can use the Entity Framework to generate a data model for you. Database First and Model First development workflows utilize the rich designer and tooling support available in Visual Studio 2012. Using Database First, you build your model layer on a design surface from an existing database. Using Model First, you define your model layer using the designer and then use that to generate your database schema. The database schema is then used to create a new database. The designer does this by generating data definition language (DDL) statements to create the database.
The other workflow option was originally introduced in Entity Framework 4. It is called Code First development. Code First development is a more code-centric approach in which you don’t use a designer. In Code First development, you define your model using “plain old classes.” Database creation and persistence is enabled through the use of a convention over configuration approach, so no explicit configuration is necessary.
The Entity Data Model (EDM) is an abstract conceptual model of data as you want to represent it in your code. It is usually construed as .NET classes that you can manipulate as you would any other object within your code. This first conceptual layer is created using the Conceptual Schema Definition Language (CSDL), which is an XML definition of your objects.
The logical layer is defined using the Store Schema Definition Language (SSDL). The logical layer details the relational schema that you are storing within your database. This includes a definition of the tables, their relations, and their constraints.
The last piece of the Entity Data Model is the mapping layer. This layer maps the CSDL and the SSDL instances using the Mapping Specification Language (MSL).
It is possible for the combination of these three layers to work together for a few reasons. One is that there is a common type system within the Entity Data Model that all three layers can share. This system enables you to specify types that the code of your application will understand and then these same types will be understood by the database that you are working with. The EDM also provides the ability to work with the concept of inheritance as well as complex objects and to make the appropriate mappings between the layers.
The three layers — the conceptual model, the logical model, and the mapping between them — are stored in XML in an .edmx file What’s nice about Visual Studio 2012 is that you have a graphical designer to create these layers and the corresponding .edmx file on your behalf and under your direction. The graphical designer is then used to display and edit the .edmx file graphically so you don’t have to edit the XML directly.
When using Code First development, you directly define your conceptual model by writing C# or VB classes. You can then use this model to generate a database schema.
For an example of working with the Entity Framework, the first task is to work through all the steps that are required to read some data from a database and present it in your ASP.NET application using a designer workflow.
For this example, you must have Visual Studio 2010 or Visual Studio 2012. From this IDE, create a new empty ASP.NET web application called AspnetEntityFx, a standard ASP.NET application.
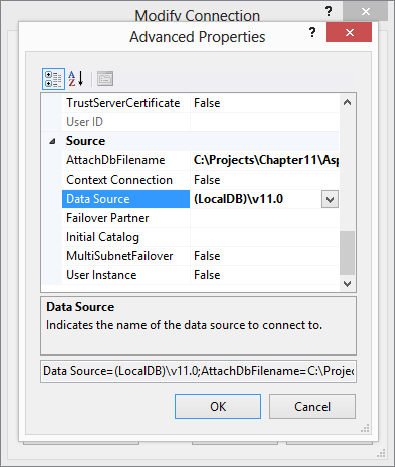
After you have added the database file to your project, you will need to upgrade the database to a SQL Express LocalDB database. Open the Server Explorer by selecting the View from the Visual Studio menu, then selecting Server Explorer. Expand the Data Connections to see the database file you just added. Right-click on the AdventureWorks2012_Data.mdf data connection and select Modify Connection. Click the Advanced button to display the Advanced Properties dialog box. Verify that the Data Source property is set to (LocalDB)\v11.0 and the User Instance property is set to False. Figure 11-2 shows the Advanced Properties dialog box with the correct settings for Data Source and User Instance.
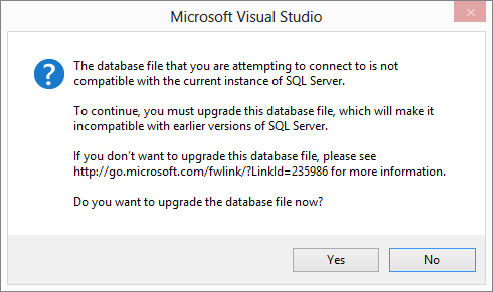
Click OK to dismiss the Advanced Properties dialog box and OK to dismiss the Modify Connection dialog box. You will be presented with a message indicating that the database you are connecting to is not compatible with the current instance of SQL Server. Figure 11-3 shows this window. Click Yes to upgrade the database.
Once you have upgraded the database, you are ready to create your Entity Data Model. Right-click on your project within the Solution Explorer from Visual Studio and select Add ⇒ New Item. The Add New Item dialog box appears. From this dialog box, select the Data option for the language you are working with (found in the left pane of the dialog box). The available items you can add from the Data option include an ADO.NET Entity Data Model item, as shown in Figure 11-4.
For this example, name your Entity Data Model EmployeeDM.edmx (refer to Figure 11-4).
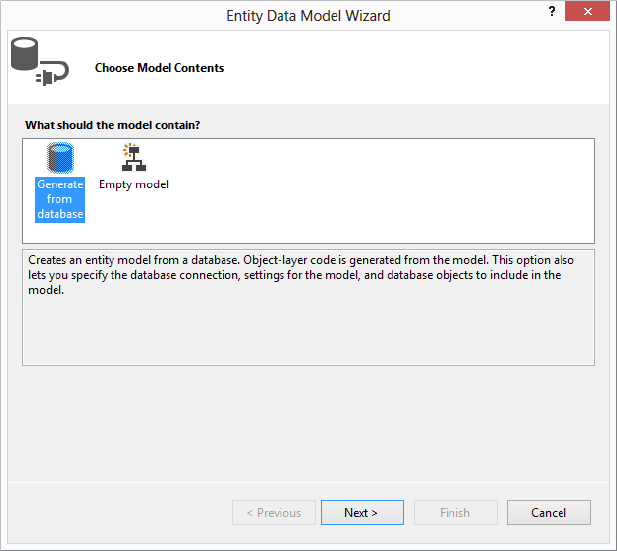
Adding this file when clicking the Add button does not actually insert a file right away, but instead starts a wizard. You can create an Entity Data Model in two ways. The first option is to create an Entity Data Model based on a preexisting database. The second option is to create the Entity Data Model from a blank slate. The .NET Framework 4.5 really makes the second option something you can work with easily. When you choose this second option, you can create your Entity Data Model and then use a wizard to create the database representation of that model.
The first screen in the wizard presents these options, as Figure 11-5 illustrates.
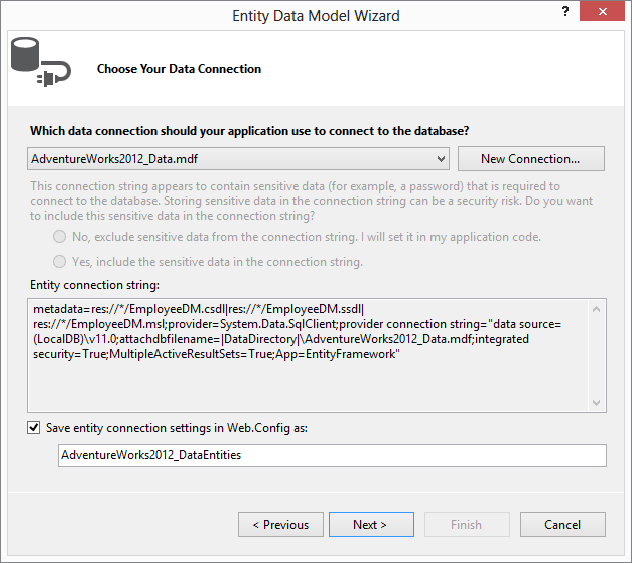
For this example, select the Generate from Database option. After you click Next in the wizard, the next step is to establish an entity connection string to the database, as shown in Figure 11-6.
This wizard enables you to select the database that you want to work with from the first drop-down. The AdventureWorks2012_Data.mdf file appears as an option in this drop-down if you have added it to the project as previously instructed.
When selecting this database option in the drop-down, you will be presented with the entity connection string. It is much like a normal connection string:
metadata=res://*/EmployeeDM.csdl|res://*/EmployeeDM.ssdl|res://*/EmployeeDM.msl;
provider=System.Data.SqlClient;
provider connection string="Data Source=(LocalDB)\v11.0;
attachdbfilename=|DataDirectory|\AdventureWorks2012_Data.mdf;
integrated security=True; MultipleActiveResultSets=True; App=EntityFramework "
Notice that in addition to the normal connection string information that you might have, such as properties for the provider and the provider connection string, you also have the entity definition for what to use for the logical model and the conceptual model, as well as the mapping. The EmployeeDM.csdl file is for the conceptual model, EmployeeDM.ssdl is for the logical model, and EmployeeDM.msl is for the mapping required.
The final option in this dialog box is like most providers’ configurations that you have worked with in the past with ASP.NET; it allows you to save the connection string in the web.config file of your project.
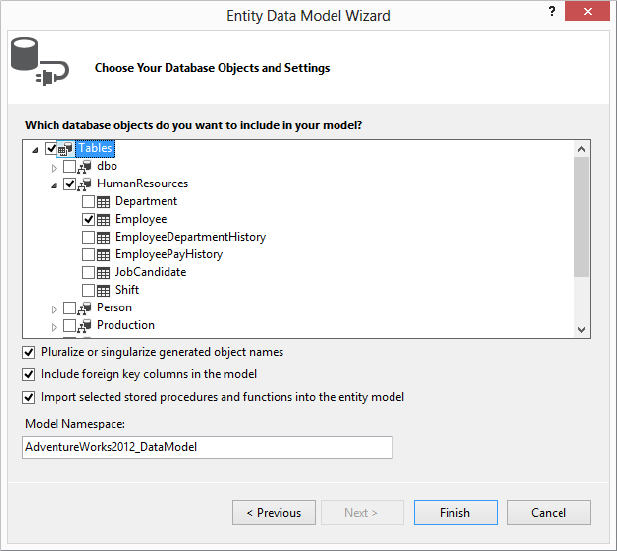
When you are done with this page of the wizard, click Next to choose the tables, views, and stored procedures that you are going to require for your Entity Data Model.
For this example, expand the Tables option in the tree view and select the Employee (Human Resources) table by selecting the check box next to the option (see Figure 11-7).
Notice that this part of the wizard enables you to define the namespace that you would use in accessing it from code. This example uses the default option of AdventureWorks2012_DataModel. This step is the last part of the wizard. Click the Finish button and a designer surface for your Entity Data Model then appears. After the designer surface opens, you may get a security warning asking whether you want to run a text template. The designer uses T4 templates to automatically generate a DbContext file and files for each of the entities you selected to be generated from the database. Check the option to not show the message again and click OK.
The designer built into Visual Studio for working with the Entity Framework is powerful because it allows you to visually configure your conceptual layer and control how it maps to the logical layer.
If you worked through the wizard as defined earlier, then you will have a single Employee object represented on the design surface, as demonstrated in Figure 11-8.
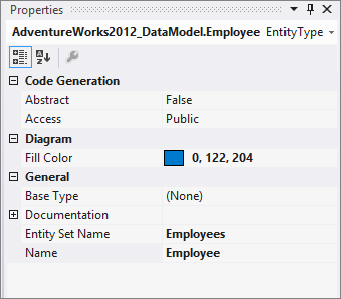
When you highlight the Employee object in the designer, some basic properties will appear in the Properties pane within Visual Studio, as illustrated in Figure 11-9.
Here you can change the access modifier of the object and provide some basic documentation for the object. Visual Studio also provides you with some views to work with the Entity Framework. After you have created your .edmx file, a view is opened on your behalf — the Model Browser.
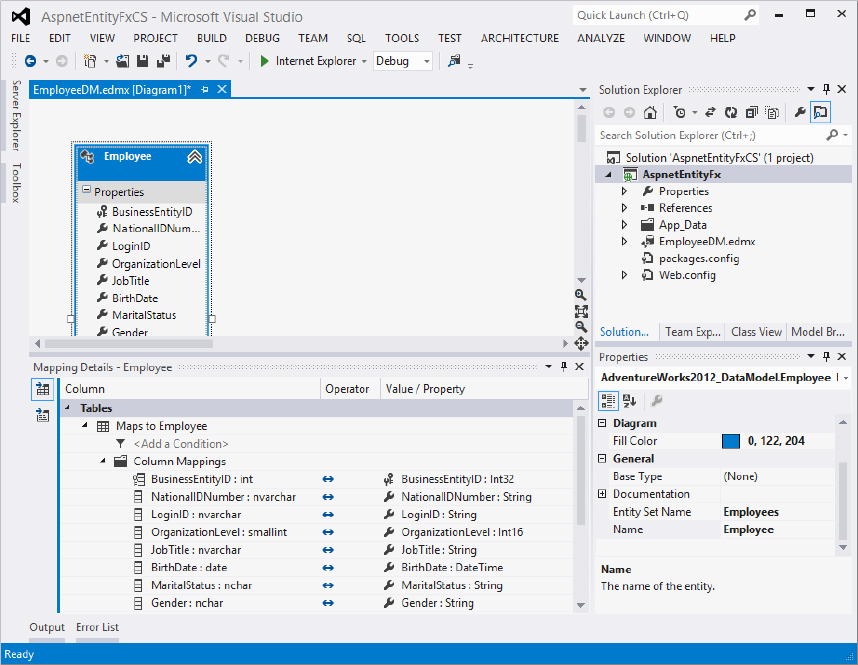
Another important view is the Entity Data Model Mapping Details window. You can get to this view in a couple of ways. You can select View ⇒ Other Windows ⇒ Entity Data Model Mapping Details from the Visual Studio menu, or you can right-click on the Employee object in the designer and select Table Mapping from the provided menu. Figure 11-10 presents both the Entity Data Model Browser and the Entity Data Model Mapping Details windows.
Now that this simple object is in place and your .edmx file is ready to go, the next step is to build a small ASP.NET Web Form that will use this construct.
Now that you have your Entity Data Model in place, this section shows you how to build a simple Web Form that uses this model. The first step is to add a new Web Form to your project called BasicGrid.aspx. Add a GridView control on the page. In the end, the code of your ASP.NET Web Form will look like the code presented in Listing 11-1 (BasicGrid.aspx in the code download for this chapter).
LISTING 11-1: A basic ASP.NET Web Form that uses your EDM
<%@ Page Language="C#" AutoEventWireup="true"
    CodeBehind="BasicGrid.aspx.cs" Inherits="AspnetEntityFx.BasicGrid" %>

<!DOCTYPE html>

<html xmlns="http://www.w3.org/1999/xhtml" >
<head runat="server">
    <title>My EDM</title>
</head>
<body>
    <form id="form1" runat="server">
    <div>
        <asp:GridView ID="GridView1" runat="server">
        </asp:GridView>
    </div>
    </form>
</body>
</html>
This is the C# version of the Web Form. Notice that only a GridView control is on the page. You will use this control to populate the results that come out of the Entity Data Model that you created.
To use the Entity Data Model, Listing 11-2 (BasicGrid.aspx.vb and BasicGrid.aspx.cs in the code download for this chapter) shows you the code-behind page of the ASP.NET Web Form that is presented in Listing 11-1.
LISTING 11-2: The code-behind page for the ASP.NET Web Form
VB
Partial Public Class BasicGrid
    Inherits System.Web.UI.Page
    Protected Sub Page_Load(ByVal sender As Object,
      ByVal e As System.EventArgs) Handles Me.Load

        Dim adventureWorks2012_DataEntities As New
           AdventureWorks2012_DataEntities()

        Dim query =
         From emp In adventureWorks2012_DataEntities.Employees
         Select emp

        GridView1.DataSource = query.ToList()
        GridView1.DataBind()
    End Sub

End Class
C#
using System;
using System.Linq;
namespace AspnetEntityFx
{
public partial class BasicGrid : System.Web.UI.Page
{
protected void Page_Load(object sender, EventArgs e)
{
AdventureWorks2012_DataEntities adventureWorks2012_DataEntities =
new AdventureWorks2012_DataEntities();
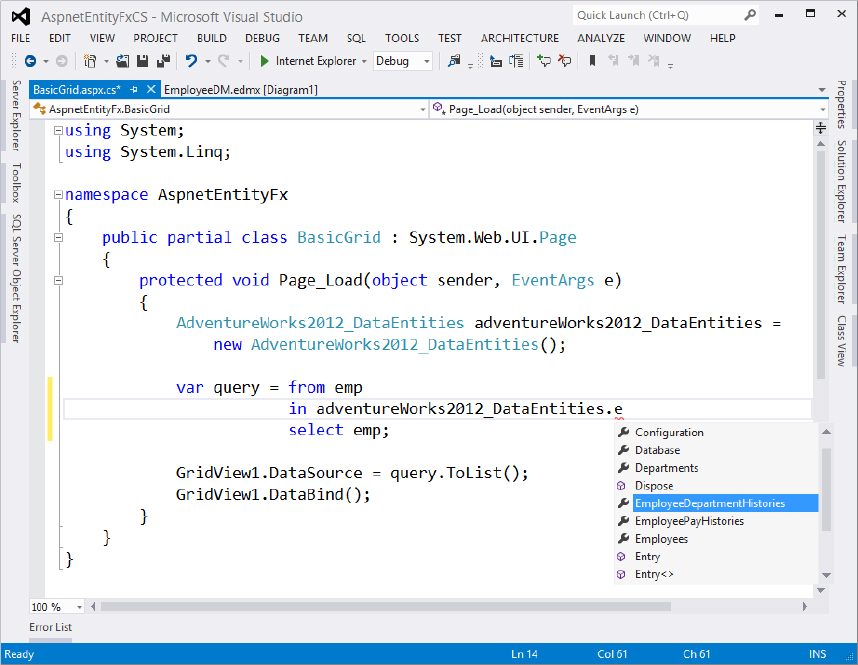
var query = from emp in
adventureWorks2012_DataEntities.Employees
select emp;
GridView1.DataSource = query.ToList();
GridView1.DataBind();
}
}
}As you can see, there isn’t much code to this page. Running the Web Form produces the results shown in Figure 11-11.
To work with your new Entity Data Model, an instance of the model is created:
Dim adventureWorks2012_DataEntities As New AdventureWorks2012_DataEntities()This instance manages your connection to the database and takes care of feeding in the queries that you might perform over the datastore. The next line is a LINQ statement:
Dim query = _
   From emp In adventureWorks2012_DataEntities.Employees _
   Select emp
Here you are using an implicitly typed variable, query. The value assigned to the query object is the value of the Employees property, which is of type IQueryable<Employee>. This LINQ query simply pulls the entire contents from the Employee table and places the result in the query object for use within your code.
After the LINQ operation is complete, a list created from the query object is assigned and bound as a source to the GridView1 control.
GridView1.DataSource = query.ToList()
GridView1.DataBind()
This simple example was of a one-to-one mapping. The next example looks at how to work with a many-to-many relationship.
The previous example was a good showing of a one-to-one mapping — an Employee object that mapped to the Employee table. In this section you take look at one-to-one and one-to-many relationships and many-to-one and many-to-many relationships.
A one-to-one relationship is a construct in which one table maps to one type within your Entity Data Model. This is also called a Table per Type model (TPT).
To show this relationship in better detail, you will work with the Employee table from the previous example.
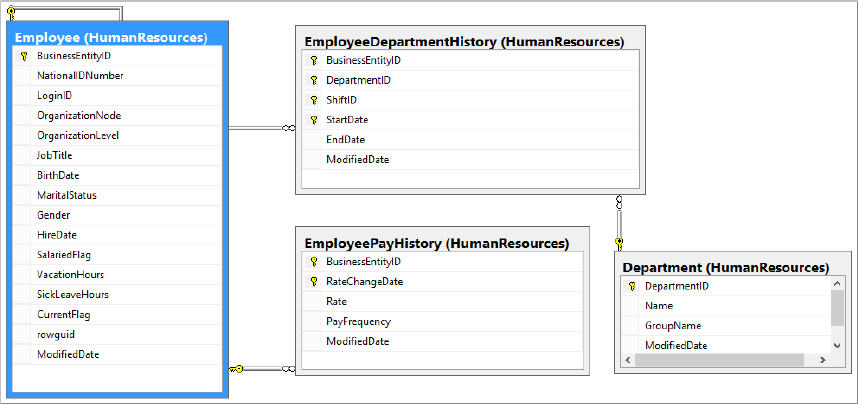
If you look through the details of the AdventureWorld2012_Data.mdf database file, you will see that there are a lot of different tables. In terms of the Employee section of the database that this example uses, you can find the database relationships illustrated in Figure 11-12.
As you can see, in addition to the Employee table that you worked with earlier, you will find other tables such as the EmployeeDepartmentHistory, Department, and EmployeePayHistory tables with a specific mapping.
You can see from the figure that many of these tables are related through the BusinessEntityID foreign key.
In contrast to this mapping, you can pull up the EmployeeDM.edmx file that you created earlier in this chapter. From the design surface of this file, right-click and select Update Model from Database from the provided menu.
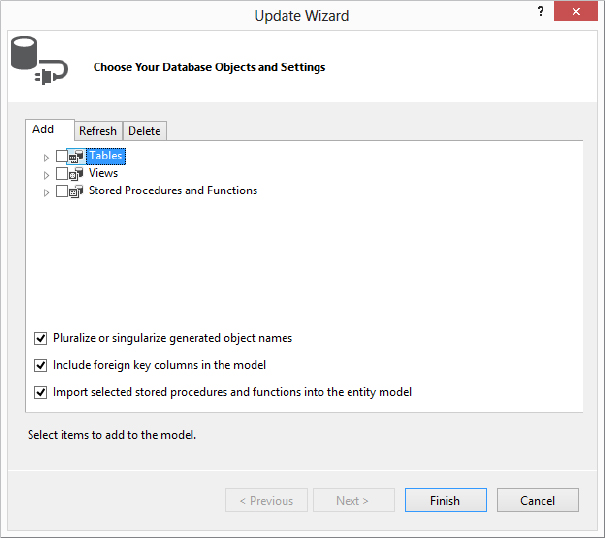
An Update Wizard appears, as shown in Figure 11-13.
Expand the Tables node and add references to the missing tables — EmployeeDepartmentHistory, Department, and EmployeePayHistory by selecting the check boxes next to each of them. From this figure, you can see that a one-to-many relationship exists with the other types of employee data.
With this construction in place, you will also find through IntelliSense that now one type (or object) maps to each of the specified tables, as illustrated in Figure 11-14.
With these tables in place, you can work with all the objects as demonstrated here. For this example, create a simple ASP.NET Web Form that includes only a single BulletedList control. Then from the code-behind of the Web Form, use the code from Listing 11-3 (OneToMany.aspx.vb and OneToMany.aspx.cs in the code download for this chapter).
LISTING 11-3: Working with one-to-many mappings
VB
Protected Sub Page_Load(ByVal sender As Object, ByVal e As EventArgs)

   Dim adventureWorks2012_DataEntities As
      New AdventureWorks2012_DataEntities()

   For Each employee In adventureWorks2012_DataEntities.Employees
      Dim li As New ListItem()
      li.Text = employee.BusinessEntityID & " "

      For Each pay In employee.EmployeePayHistories
         li.Text &= "Pay Rate: " & pay.Rate & " "
      Next pay

      BulletedList1.Items.Add(li)
   Next employee
End Sub
C#
using System;
using System.Web.UI.WebControls;
namespace AspnetEntityFx
{
public partial class _Default : System.Web.UI.Page
{
protected void Page_Load(object sender, EventArgs e)
{
AdventureWorks2012_DataEntities adventureWorks2012_DataEntities =
new AdventureWorks2012_DataEntities();
foreach (var employee in
adventureWorks2012_DataEntities.Employees)
{
ListItem li = new ListItem();
li.Text = employee.BusinessEntityID + " ";
foreach (var pay in employee.EmployeePayHistories)
{
li.Text += "Pay Rate: " + pay.Rate + " ";
}
BulletedList1.Items.Add(li);
}
}
}
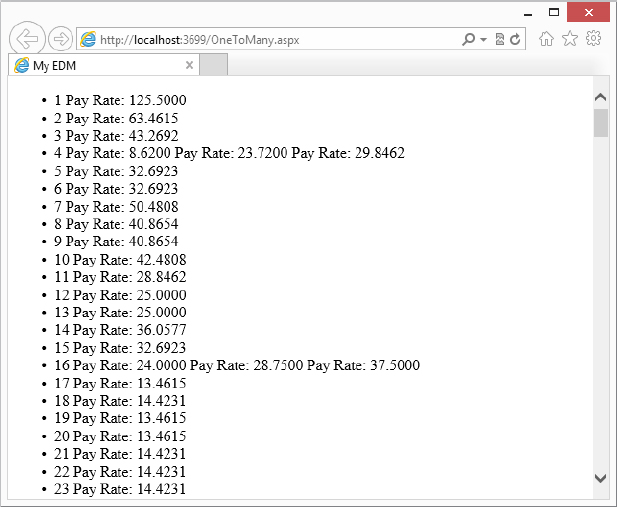
}At first, the Employees objects are accessed and none of the other objects are actually loaded. The first time the EmployeePayHistory object is accessed, it will be automatically loaded if it has not already been. You no longer have to explicitly load related objects as you did in previous versions of the framework.
If you run this bit of code, you get the results shown in Figure 11-15.
In addition to the one-to-one and the one-to-many relationships, the Entity Framework supports many-to-one and many-to-many relationships. In these relationships, the Entity Framework will perform the appropriate table joins for you when you query the database.
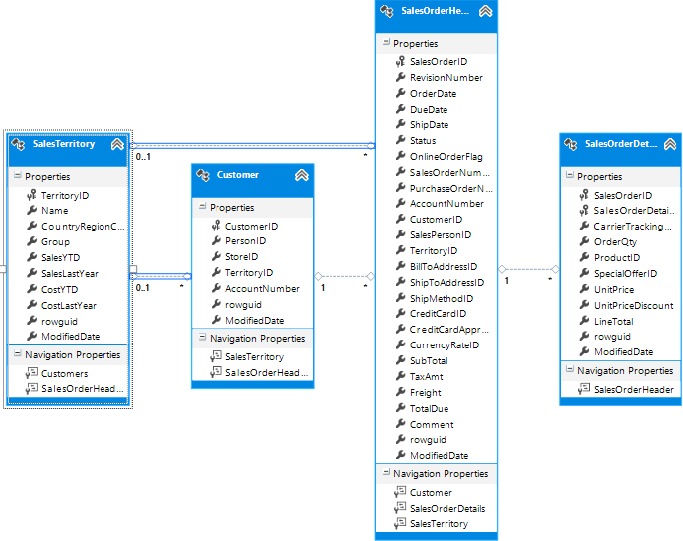
Create a new Entity Data Model (Sales.edmx file) that includes the Customer, SalesTerritory, SalesOrderHeader, and the SalesOrderDetail tables.
You end up with a model that looks like Figure 11-16.
You can see the relationships by looking at the line that connects the visual objects on the designer. An asterisk on one end of the line indicates many. The number 1 appearing on the other side of the connection, as the line that is between the SalesOrderHeader and the Customer objects, indicates a many-to-one relationship. You can also view details about the relationship in the Properties window of Visual Studio upon highlighting the relationship line itself in the designer, as presented through the two End property values in the view.
Now look at a page that will perform some joins on your behalf across the tables. This operation is illustrated in Listing 11-4 (ManyToMany.aspx.vb and ManyToMany.aspx.cs in the code download for this chapter). For this example, just keep the simple Web Form that contains only a GridView control and use the code-behind that is presented here.
LISTING 11-4: Having the Entity Framework perform joins between tables
VB
   Partial Public Class ManyToMany
      Inherits System.Web.UI.Page

    Protected Sub Page_Load(ByVal sender As Object,
       ByVal e As EventArgs)

          Dim adventureWorks2012_DataEntities As
             New AdventureWorks2012_DataEntities1()

          Dim query = _
             From o In adventureWorks2012_DataEntities.SalesOrderHeaders
             Where o.SalesOrderDetails.Any(Function(Quantity)
                Quantity.OrderQty > 5)
             Select New With {Key o.PurchaseOrderNumber,
                      Key o.Customer.CustomerID,
                      Key o.SalesPersonID}

          GridView1.DataSource = query.ToList()
          GridView1.DataBind()

       End Sub
   End Class
C#
using System;
using System.Linq;
namespace AspnetEntityFx
{
public partial class _Default : System.Web.UI.Page
{
protected void Page_Load(object sender, EventArgs e)
{
AdventureWorks2012_DataEntities1 adventureWorks2012_DataEntities =
new AdventureWorks2012_DataEntities1();
var query = from o in
adventureWorks2012_DataEntities.SalesOrderHeaders
where o.SalesOrderDetails.Any(Quantity =>
Quantity.OrderQty > 5)
select new {o.PurchaseOrderNumber,
o.Customer.CustomerID, o.SalesPersonID};
GridView1.DataSource = query.ToList();
GridView1.DataBind();
}
}
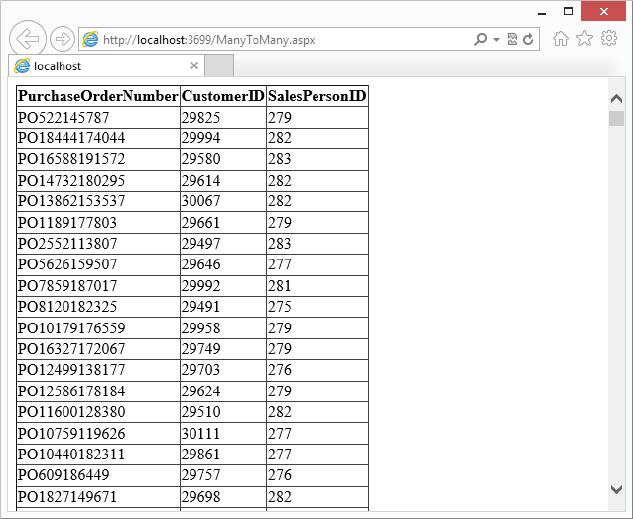
}This query pulls content and works from three different tables, and the Entity Framework does all the work of making the appropriate joins for you against the tables.
In this case, you are working with all the items in the SalesOrderHeader table where the quantity of the order is more than five. From the items selected, the fields are pulled for the dynamic object from across a couple of tables. Finally, the result is again bound to a GridView control. Figure 11-17 presents the final result.
You can perform inheritance when constructing your Entity Data Model just as easily as you can when dealing with your objects within the CLR.
Inheritance gives you the capability to work with and look for specialized objects that you determine. For an example of this feature, in this section you modify the Vendor object so that you can build a query that will look for inactive vendors by object reference rather than through value interpretation.
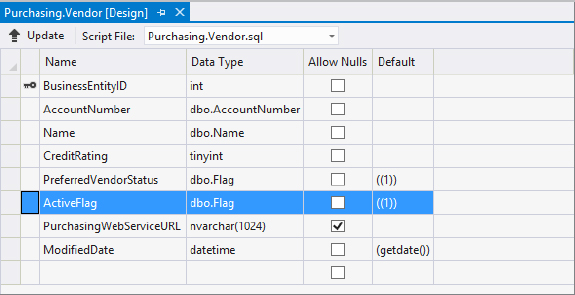
Create a new Entity Data Model (Vendor.edmx file) that contains only the Vendor table (Purchasing section). When you open the table definition of the Vendor table within Visual Studio, you will see something like Figure 11-18.
As you can see from this figure, the ActiveFlag property is of type bit, which means it is either a zero or a one representing a False or True, respectively. For this example, you will build a specialized type that is a reference to an inactive vendor so that you can differentiate between active and inactive.
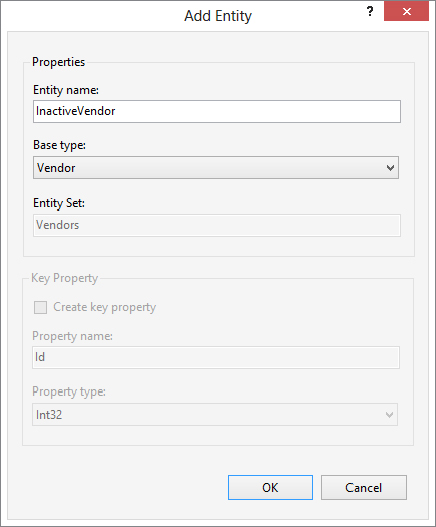
When your Vendor table is in place, right-click on the designer surface and choose Add ⇒ Entity from the provided menu. The Add Entity window then appears.
From this window, provide an entity name of InactiveVendor and have it inherit from a base type of Vendor. In the end, your Add Entity dialog box should appear as shown in Figure 11-19.
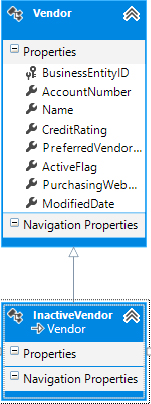
This step will add a visual representation to the mapping, as illustrated in Figure 11-20.
The next step is to further tie the two objects together and to provide some logic to their relationship. To accomplish this task you first delete the ActiveFlag scalar property from the Vendor entity object, because you will not need it in the example.
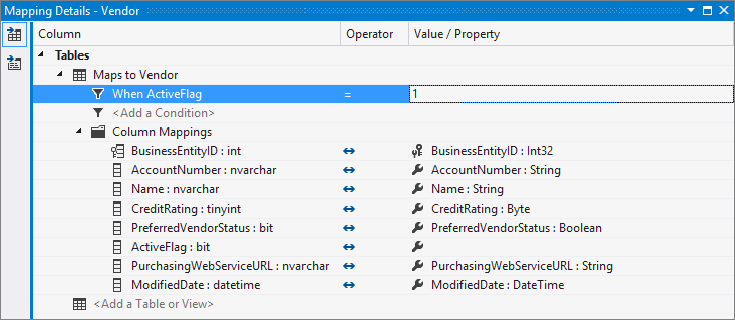
You then highlight the Vendor object within the designer and view the details of the mapping of this object within the Mapping Details view within Visual Studio. From this view, add a condition of ActiveFlag being equal to 1, as demonstrated in Figure 11-21.
This setting really means that if the ActiveFlag has a value of 1, then the object will be of type Vendor. Now you set up the InactiveVendor object. Looking at this object within the Mapping Detail view, you first must add the Vendor table in the Mapping Details view. From there, create a condition where the ActiveFlag is equal to the value 0, as illustrated in Figure 11-22.
Now with these conditions all in place, you are really saying that if the ActiveFlag value has a value of 1, then it is of type Vendor in your Entity Data Model. However, if the ActiveFlag has a value of 0, then the object type is of InactiveVendor. You can work with this in your code, as illustrated in Listing 11-5 (Inheritance.aspx.vb and Inheritance.aspx.cs in the code download for this chapter).
LISTING 11-5: Using inheritance with your Entity Data Model
VB
    Partial Public Class Inheritance
        Inherits System.Web.UI.Page

        Protected Sub Page_Load(ByVal sender As Object,
          ByVal e As EventArgs)

            Dim adventureWorks2012_DataEntities As New
               AdventureWorks2012_DataEntities2()

            Dim query =
                From v In adventureWorks2012_DataEntities.Vendors
                    .OfType(Of InactiveVendor)()
                Select v

            GridView1.DataSource = query.ToList()
            GridView1.DataBind()
        End Sub

    End Class
C#
using System;
using System.Linq;

namespace AspnetEntityFx
{
    public partial class Inheritance : System.Web.UI.Page
    {
        protected void Page_Load(object sender, EventArgs e)
        {
            AdventureWorks2012_DataEntities3 adventureWorks2012_DataEntities =
                new AdventureWorks2012_DataEntities3();

            var query = from v in adventureWorks2012_DataEntities.Vendors
                            .OfType<InactiveVendor>()
                        select v;
            GridView1.DataSource = query.ToList();
            GridView1.DataBind();
        }
    }
}
You can now use the OfType extension method to look for objects of type InactiveVendor.
The EntityDataSource control makes working with your Entity Data Model from your ASP.NET applications easy. The control will handle the LINQ work necessary to bind to any of your controls.
For an example of using the EntityDataSource control, you will go back to the Sales.edmx file and work with the Customer object within that model.
First, you need to create an ASP.NET Web Form to work with this model. To do so, create the Web Form in your ASP.NET web application project and use the code presented in Listing 11-6 (EntityDataSource.aspx in the code download for the chapter).
LISTING 11-6: Using the EntityDataSource server control
<%@ Page Language="C#" AutoEventWireup="true"
    CodeBehind="EntityDataSource.aspx.cs" Inherits="AspnetEntityFx. EntityDataSource" %>

<!DOCTYPE html>

<html xmlns="http://www.w3.org/1999/xhtml" >
<head runat="server">
    <title> </title>
</head>
<body>
    <form id="form1" runat="server">
    <asp:GridView ID="GridView1" runat="server">
    </asp:GridView>
    <br />
    <asp:EntityDataSource ID="EntityDataSource1" runat="server">
    </asp:EntityDataSource>
    </form>
</body>
</html>
With this page in place you can configure the EntityDataSource control on the page to work with the Entity Data Model that you created. Then you can bind the GridView control to this data source control.
Now you configure the data source control on your page so that it will work from your Entity Data Model that you created earlier. To do this, you can either code the EntityDataSource control directly in the code of your ASP.NET Web Form or work through the data source configuration wizard. For this example, you will work through the wizard.
Highlight the data source control in your page, and you will find the Configure Data Source link from the available options. Click the link. The first screen (see Figure 11-23) appears, asking you to configure the ObjectContext.
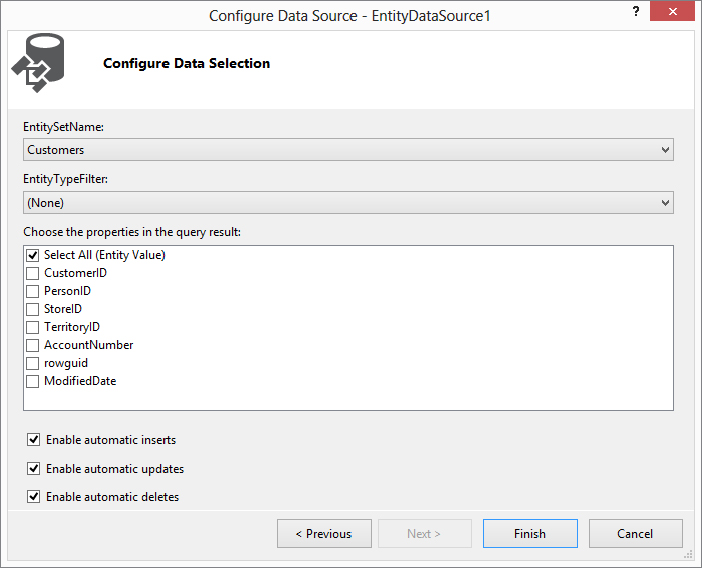
For this example, you work with the AdventureWorks2012_DataEntities1 object that you created earlier. Click the Next button to configure your data selection process. In this case, as presented in Figure 11-24, you can select the Customers table.
Notice that you can also very easily enable the insert, update, and delete functions by just selecting the appropriate check boxes in the wizard. Enabling these functions allows the EntityDataSource control to perform the appropriate LINQ operations over your Entity Data Model on your behalf.
After you have accomplished this and clicked Finish, the code shown in Listing 11-7 (EntityDataSource.aspx in the code download for the chapter) appears (as a C# page). Note that you should also tie the GridView1 control to the EntityDataSource1 control by assigning the DataSourceID property to this control. It might also be beneficial to set the AllowPaging property of the GridView1 control to True.
LISTING 11-7: Pulling the Customer table using the EntityDataSource control
<%@ Page Language="C#" AutoEventWireup="true"
CodeBehind="EntityDataSource.aspx.cs" Inherits="AspnetEntityFx. EntityDataSource" %>
<!DOCTYPE html>
<html xmlns="http://www.w3.org/1999/xhtml" >
<head runat="server">
<title> </title>
</head>
<body>
<form id="form1" runat="server">
<asp:GridView ID="GridView1" runat="server" AllowPaging="True"
DataSourceID="EntityDataSource1">
</asp:GridView>
<asp:EntityDataSource ID="EntityDataSource1" runat="server"
ConnectionString="name=AdventureWorks2012_DataEntities1NorthwindEntities"
DefaultContainerName="AdventureWorks2012_DataEntities1NorthwindEntities"
EnableDelete="True" EnableFlattening="False"
EnableInsert="True"
EnableUpdate="True" EntitySetName="Customers">
</asp:EntityDataSource>
</form>
</body>
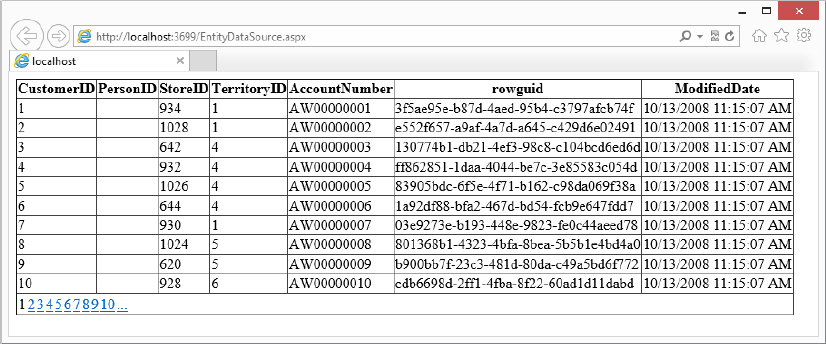
</html>Running this Web Form produces the results shown in Figure 11-25 for viewing the items from your Entity Data Model.
Code First was introduced in version 4.1 of the Entity Framework. The Code First workflow is a code-centric approach to working with your data and models. It provides an alternative to the Database First and Model First development workflows using the designer interface. Code First uses a convention-over-configuration approach, allowing you to focus on defining your models using C# or VB classes. These classes can then be mapped to an existing database or be used to generate a schema that can be used to generate a new database. If any additional configuration is needed, such as more advanced mapping, you can use data annotations or a fluent API to provide the additional details.
Code First Migrations were introduced in version 4.3.1 of the Entity Framework. Until Migrations were introduced, making changes to your Code First model meant dropping and re-creating your database. This might be acceptable during development of your application. But once you release your application into production, dropping and re-creating it every time there was a change in the model was just not acceptable. Much like Code First allows you to represent your model in code, Code First Migrations allow you to express a database schema migration in code. Each time a change is made to your model that you wish to publish to your database, you create a migration. Each migration is a class representing the changes made to the model since the last migration. As a result, you are able to maintain a history of database changes directly in your project.
Add a new Web Form to your project called CodeFirst.aspx. Add a GridView control on the page. Your ASP.NET page will now look like the code (shown for C#) in Listing 11-8 (CodeFirst.aspx in the code download for this chapter).
LISTING 11-8: The basic page that will use your Code First model
<%@ Page Language="C#" AutoEventWireup="true" CodeBehind="CodeFirst.aspx.cs"
Inherits="AspnetEntityFX.CodeFirst" %>

<!DOCTYPE html>

<html xmlns="http://www.w3.org/1999/xhtml">
<head runat="server">
    <title>Code First Model</title>
</head>
<body>
    <form id="form1" runat="server">
    <div>
        <asp:GridView ID="GridView1" runat="server"></asp:GridView>
    </div>
    </form>
</body>
</html>
In the ASP.NET code-behind page you are going to:
Listing 11-9 (CodeFirst.aspx.vb and CodeFirst.aspx.cs in the code download for this chapter) shows the code-behind page after adding the model classes, the context, and the code that uses them.
LISTING 11-9: Code-behind page for the CodeFirst ASP.NET page
VB
Imports System.Data.Entity

Public Class CodeFirst
    Inherits System.Web.UI.Page

    Protected Sub Page_Load(ByVal sender As Object, ByVal e As System.EventArgs)
        Handles Me.Load
        Using context As New TeamContextVB()
            Dim team As New Team() With {.TeamName = "Team 1"}
            context.Teams.Add(team)
            team = New Team() With {.TeamName = "Team 2"}
            context.Teams.Add(team)
            team = New Team() With {.TeamName = "Team 3"}
            context.Teams.Add(team)
            context.SaveChanges()

            Dim query = From t In context.Teams Select t

            GridView1.DataSource = query.ToList()
            GridView1.DataBind()
        End Using
    End Sub

End Class

Public Class Team
    Public Property TeamId() As Integer
    Public Property TeamName() As String
End Class

Public Class Player
    Public Property PlayerId() As Integer
    Public Property FirstName() As String
    Public Property LastName() As String
End Class

Public Class TeamContextVB
    Inherits DbContext

    Public Property Teams() As DbSet(Of Team)
    Public Property Players() As DbSet(Of Player)
End Class
C#
using System;
using System.Collections.Generic;
using System.Data.Entity;
using System.Linq;
namespace AspnetEntityFX
{
public partial class CodeFirst : System.Web.UI.Page
{
protected void Page_Load(object sender, EventArgs e)
{
using (var context = new TeamContext())
{
var team = new Team { TeamName = "Team 1" };
context.Teams.Add(team);
team = new Team { TeamName = "Team 2" };
context.Teams.Add(team);
team = new Team { TeamName = "Team 3" };
context.Teams.Add(team);
context.SaveChanges();
var query = from t in context.Teams
select t;
GridView1.DataSource = query.ToList();
GridView1.DataBind();
}
}
}
public class Team
{
public int TeamId { get; set; }
public string TeamName { get; set; }
}
public class Player
{
public int PlayerId { get; set; }
public string FirstName { get; set; }
public string LastName { get; set; }
}
public class TeamContext : DbContext
{
public DbSet<Team> Teams { get; set; }
public DbSet<Player> Players { get; set; }
}
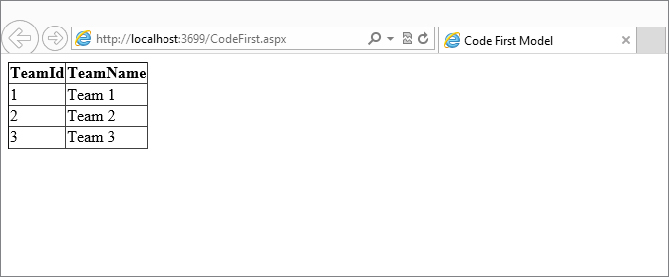
}That is all the code that is necessary to have Entity Framework create a database based on your model. Notice that you don’t have to create a connection to a database or even reference a connection string. That is due to the convention-over-configuration approach of Code First. Executing the page produces the results shown in Figure 11-26.
In order to tell Entity Framework to map your model classes to the database, you create a DbSet<EntityType> for each model class.
public DbSet<Team> Teams { get; set; };
public DbSet<Player> Players { get; set; };
In order to use your new model, you will add some data to the database that will be created for you. You simply need to create a new instance of your class, add it to the Teams DbSet, and tell the database context to persist the changes to the database.
var team = new Team { TeamName = "Test 3" };
context.Teams.Add(team);
context.SaveChanges();
Now you can query the data using the database context just as you did with the Entity Data Model you created using the Database First designer workflow.
var query = from t in context.Teams select tOnce you have the IQueryable returned from the LINQ query, you bind the data to the GridView control.
GridView1.DataSource = query.ToList();
GridView1.DataBind();In the previous example, a database was created for you by DbContext based on a default convention. The database is created the first time you do anything that causes a connection to the database to be established.
Determining where the database was created depends on what version or versions of SQL Express are installed on your machine. If you have a local SQL Express instance running on your machine, Code First installs your database there. By default, SQL Express was installed with Visual Studio 2010. By default, Visual Studio 2012 installs a new version of SQL Express, called SQL Express LocalDB. If Code First cannot find an instance of SQL Express, the database will be installed using LocalDB.
Regardless of the database used, the database is named using the fully qualified name of the derived context. In this example, the database name is AspnetEntityFX.TeamContext.
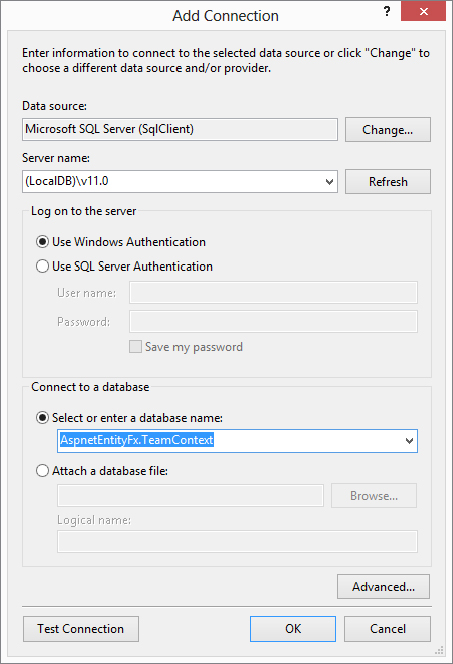
You can view the database that was created using the Server Explorer in Visual Studio. Add a new data connection. For the server name, specify either (LocalDB)\v11.0 if your database was created using LocalDB or .\SQLExpress if your database was created using SQL Express. Specify the database name as the fully qualified name of the derived context. Figure 11-27 shows the completed Add Connection information.
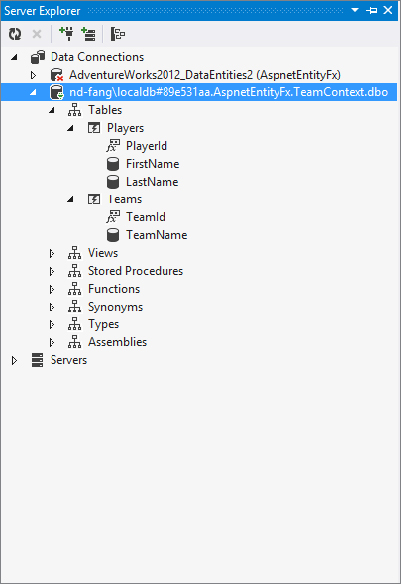
After adding the data connection to the database, expand the database tables to view the schema that was created by Code First. Figure 11-28 shows the database schema created for you by Code First.
The DbContext determined what classes needed to be included in the model based on the DbSet properties you defined. Code First then used a set of default conventions to determine table names, column names, primary keys, data types, and other parts of the database schema. Note that these default conventions can be modified using configuration entries.
Just as you did using the designer, relationships can be created between entities in a Code First model. To demonstrate this, you’ll create a one-to-many relationship between the Team and the Player entities.
The Entity Framework uses navigation properties to represent a relationship between two entity types. Navigation properties can manage relationships in both directions. If the relationship is one-to-one, a property is created referencing the related type. If the relationship is one-to-many or many-to-one, the property is a collection of the type involved in the relationship. Properties can also be used to represent foreign keys on a dependent object using the default Code First conventions. Listing 11-10 (CodeFirst.aspx.vb and CodeFirst.aspx.cs in the code download for the chapter) shows the modified code file after making changes to the classes to create a relationship between the Team and Player classes.
LISTING 11-10: Code showing a one-to-many Code First relationship
VB
Imports System.Data.Entity

Public Class CodeFirst
    Inherits System.Web.UI.Page

    Protected Sub Page_Load(ByVal sender As Object, ByVal e As System.EventArgs)
       Handles Me.Load
        Using context As New TeamContextVB()
            Dim team As New Team() With {.TeamName = "Team 1"}
            context.Teams.Add(team)
            team = New Team() With {.TeamName = "Team 2"}
            context.Teams.Add(team)
            team = New Team() With {.TeamName = "Team 3"}
            context.Teams.Add(team)
            context.SaveChanges()

            Dim query = From t In context.Teams Select t

            GridView1.DataSource = query.ToList()
            GridView1.DataBind()
        End Using
    End Sub

End Class

Public Class Team
    Public Sub New()
        Me.Players = New List(Of Player)()
    End Sub
    Public Property TeamId() As Integer
    Public Property TeamName() As String

    Public Overridable Property Players() As ICollection(Of Player)
End Class

Public Class Player
    Public Property PlayerId() As Integer
    Public Property FirstName() As String
    Public Property LastName() As String

    Public Property TeamId() As Integer
    Public Overridable Property Team() As Team
End Class

Public Class TeamContextVB
    Inherits DbContext

    Public Property Teams() As DbSet(Of Team)
    Public Property Players() As DbSet(Of Player)
End Class
C#
using System;
using System.Collections.Generic;
using System.Data.Entity;
using System.Linq;

namespace AspnetEntityFX
{
    public partial class CodeFirst : System.Web.UI.Page
    {
        protected void Page_Load(object sender, EventArgs e)
        {
            using (var context = new TeamContext())
            {
                var team = new Team { TeamName = "Team 1" };
                context.Teams.Add(team);
                team = new Team { TeamName = "Team 2" };
                context.Teams.Add(team);
                team = new Team { TeamName = "Team 3" };
                context.Teams.Add(team);
                context.SaveChanges();

                var query = from t in context.Teams
                            select t;

                GridView1.DataSource = query.ToList();
                GridView1.DataBind();
            }

        }
    }

    public class Team
    {
        public int TeamId { get; set; }
        public string TeamName { get; set; }

        public virtual List<Player> Players { get; set; }
    }

    public class Player
    {
        public int PlayerId { get; set; }
        public string FirstName { get; set; }
        public string LastName { get; set; }

        public int TeamId { get; set; }
        public virtual Team Team { get; set; }
    }

    public class TeamContext : DbContext
    {
        public DbSet<Team> Teams { get; set; }
        public DbSet<Player> Players { get; set; }
    }
}
A relationship was created from a Team to a collection of related Player entities.
public virtual List<Player> Players { get; set; }Note that when you query the database for a particular Team, you may not need the collection of Player objects to be populated. By making the Players property virtual, you are instructing the DbContext to lazy load the Players collection. Lazy loading means that the collection will automatically be populated from the database when you try to access it.
A relationship was also created from a player back to a team. A navigation property was added to form the relationship to the Team object. It is also a virtual property in order to use lazy loading. Another property was added to instruct Code First to create a foreign key to the Team database table when the database schema is generated.
public int TeamId { get; set; }
public virtual Team Team { get; set; }
If you try to execute the new code now, you will get an exception because the database schema no longer matches the model. Before the new code can be executed, the database must be updated. The next section demonstrates how to use Code First Migrations to update the database schema with the changes you have made to the model.
Code First Migrations were introduced in Entity Framework 4.3.1. Prior to that, modifying your Code First model meant the database would be dropped and re-created. Obviously that is not a good option for an application in production. Migrations are the answer to pushing model changes to your database. Like Code First models, migrations are also built using code. However, you can use a few Package Manager Console commands to build the migrations for you.
The first step to using Code First Migrations is to enable it.
After the command completes, a new Migrations folder is added to your project and two new files have been placed in the folder.
Now you need to create a new migration that includes the changes you made to the model in the previous section. In order to add a new migration, you will run the add migration command passing in a name for the migration. In the Package Manager Console, run the command Add-Migration TeamPlayerRelationship.
When the command runs, it creates a new migration file in the Migrations folder. Listing 11-11 (X_TeamPlayerRelationship.cs and X_TeamPlayerRelationship.vb [where X is the timestamp]) shows the contents of the new migration file.
LISTING 11-11: The contents of the new migration file
VB
Imports System
Imports System.Data.Entity.Migrations

Namespace Migrations
    Public Partial Class TeamPlayerRelationship
        Inherits DbMigration

        Public Overrides Sub Up()
            AddColumn("dbo.Players", "TeamId", Function(c) c.Int(nullable :=
                False))
            AddForeignKey("dbo.Players", "TeamId", "dbo.Teams", "TeamId",
                cascadeDelete := True)
            CreateIndex("dbo.Players", "TeamId")
        End Sub

        Public Overrides Sub Down()
            DropIndex("dbo.Players", New String() { "TeamId" })
            DropForeignKey("dbo.Players", "TeamId", "dbo.Teams")
            DropColumn("dbo.Players", "TeamId")
        End Sub
    End Class
End Namespace
C#
namespace AspnetEntityFX.Migrations
{
    using System;
    using System.Data.Entity.Migrations;

    public partial class TeamPlayerRelationship : DbMigration
    {
        public override void Up()
        {
            AddColumn("dbo.Players", "TeamId", c => c.Int(nullable: false));
            AddForeignKey("dbo.Players", "TeamId", "dbo.Teams", "TeamId",
                cascadeDelete: true);
            CreateIndex("dbo.Players", "TeamId");
        }

        public override void Down()
        {
            DropIndex("dbo.Players", new[] { "TeamId" });
            DropForeignKey("dbo.Players", "TeamId", "dbo.Teams");
            DropColumn("dbo.Players", "TeamId");
        }
    }
}
The add migration command only creates a migration file containing the updates to the database schema. It does not apply those updates automatically. In order to execute the schema changes against the database, you need to run the update database command. Run the Update-Database command in the Package Manager Console. After the command completes, you can view the changes to the database in the Server Explorer. Figure 11-29 shows the database schema after the migration has been executed.
You can then continue the process of making updates to the model, creating a new migration, and updating the database.
This chapter reviewed some of the core principles of the Entity Framework. You as the developer can choose how to work with EF. The EF designer allows you to work with a more graphical interface. You can choose to build your model and generate your database or generate your model from an existing database. Enhanced features have been added and continue to be added to make working with data easier. Features like Code First and Migrations give you options when working with your data to use a code-based workflow in addition to the designer-based workflow.
ASP.NET also includes a control that works with the Entity Framework: the EntityDataSource control.
The Entity Framework provides the ability to work with a multitude of different data sources. It also allows you to explicitly build a mapping layer between your object-oriented business logic layer and the schema-driven database layer or to use a convention-over-configuration approach to mapping your classes to the database layer.