WHAT’S IN THIS CHAPTER?
WROX.COM CODE DOWNLOADS FOR THIS CHAPTER
Please note that all the code examples in this chapter are available as a part of this chapter’s code download on the book’s website at www.wrox.com on the Download Code tab.
The ASP.NET provider model is an important framework to understand as you build your applications. ASP.NET is a way to build applications for the Internet. That means an application’s display code travels over HTTP, which is a stateless protocol. ASP.NET works with a disconnected architecture. The simple nature of this model means that requests come in and then responses are sent back. On top of that, ASP.NET does not differentiate one request from another. The server containing an ASP.NET application is simply reacting to any request thrown at it.
This means that a developer building a web application has to put some thought into how users can remain in context between their requests to the server as they work through the application. Keeping a user in context means recording state (the state of the user) to some type of data store. You can do this in multiple ways, and no one way is the perfect way. Rather, you must choose one of the available methods.
State can be stored via multiple methods, some of which include:
You use all these methods on the server, but you can also employ your own custom methods — such as simply storing state in a database using your own custom schema. Writing state back to the clients, either directly on their computers or by placing state in the HTML output in the response, is also possible. Some of these methods include:
Whether it is one of the built-in providers that comes with ASP.NET or a custom one you’ve put together yourself, you will find that using a provider is a nice model for managing your state. The next section takes a look at what a provider is and how you can use it.
These previous state mechanisms work rather well, but most of them are rudimentary and have short life spans. ASP.NET 4.5 includes a handful of systems (such as a membership and role management system) that handle state for users between multiple requests/response transactions. In fact, these systems require state management capabilities that go well beyond the limited timeframes that are possible in the previously mentioned state management methods. Therefore, many of these systems must record state in more advanced modes — something that is easy to do in ASP.NET. Recording state to data stores in more advanced modes is accomplished through the use of providers.
By default, sessions in ASP.NET are stored InProc, meaning in the same process where ASP.NET is running. In ASP.NET, you can simply change the provider used for the Session object; this will, in turn, change where the session is stored. The available providers for storing session information include:
Besides InProc, you can use StateServer, which enables you to store sessions in a process that is entirely separate from the one in which ASP.NET runs. This protects your sessions if the ASP.NET process shuts down. You can also store your sessions to disk (in a database, for example) using the SQLServer option. This method enables you to store your sessions directly in Microsoft’s SQL Server. How do you go about changing the provider that is used for sessions? You can do this in a couple of ways.
One option to change the provider used for sessions is through the Internet Information Services (IIS) Manager, as shown in Figure 14-1.
The other option is to go directly to a system-wide configuration file (such as the machine.config file) or to an application configuration file (such as the web.config). In the file, change the name of the session state provider that is to be used within the <sessionState> section of the configuration document.
In later versions of ASP.NET, you have been able to take this provider model one step further than you ever could before. You will discover this next.
As ASP.NET developed, users wanted to be able to store sessions by means other than the three methods — InProc, StateServer, and SQLServer. For example, one user request was for a provider that could store sessions in an Oracle database. If the team added a provider for Oracle, they would soon get requests to add even more providers for other databases and data storage methods. For this reason, instead of building providers for each and every possible scenario, the developers designed a provider model that enabled them to add any providers they wanted. Thus, the new provider model found in ASP.NET was born.
Today, ASP.NET 4.5 includes a lot of systems that require state storage of some kind. Also, instead of recording state in a fragile mode (the way sessions are stored by default), many of these systems require that their state be stored in more concrete data stores, such as databases or XML files. This also allows a longer-lived state for the users visiting an application — something else that is required by these systems.
The systems based on the provider model found in ASP.NET 4.5 that require advanced state management include the following:
The membership system is a means to allow ASP.NET to work from a user store of some kind to create, delete, or edit application users. Because it is rather apparent that developers want to work with an unlimited amount of different data stores for their user store, they need a means to change the underlying user store for their ASP.NET applications easily. The provider model found in ASP.NET 4.5 is the answer.
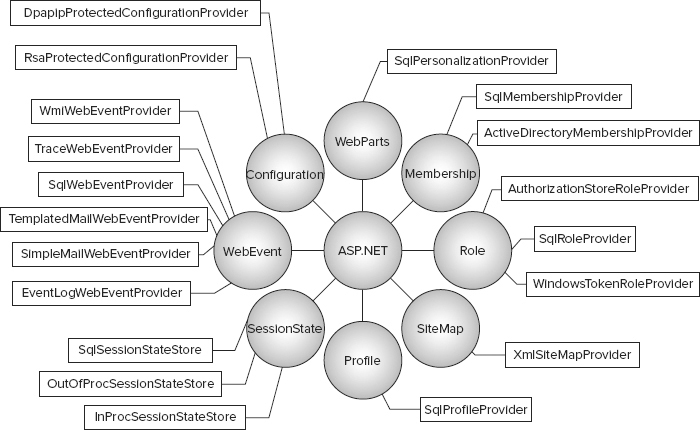
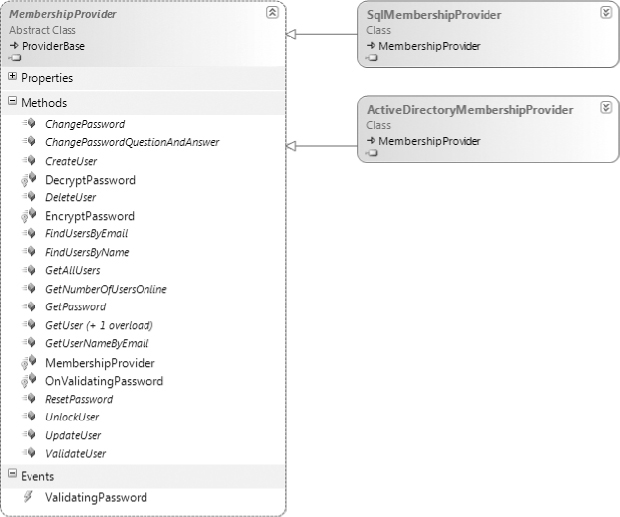
Out of the box, ASP.NET 4.5 provides a couple of membership providers that enable you to store user information. The included providers are the SQL Server and the Active Directory membership providers (found at System.Web.Security.SqlMembershipProvider and System.Web.Security.ActiveDirectoryMembershipProvider, respectively). In fact, for each of the systems (as well as for some of the ASP.NET 1.x systems), a series of providers is available to alter the way the state of that system is recorded. Figure 14-2 illustrates these providers.
As you can see from the diagram, ASP.NET provides a large number of providers out of the box. Some systems have only a single provider (such as the profile system that includes only a provider to connect to SQL Server), whereas other systems include multiple providers (such as the WebEvents provider that includes six separate providers). Next, this chapter reviews how to set up SQL Server to work with a number of the providers presented in this chapter. You can use SQL Server 2005, 2008, or 2012 for the backend data store for many of the providers presented (although not all of them). After this explanation, you review each of the available providers built into ASP.NET 4.5.
Quite a number of providers work with SQL Server. For example, the membership, role management, personalization, and other systems work with SQL Server right out of the box. However, all these systems work with LocalDB by default instead of with one of the full-blown versions of SQL Server such as SQL Server 2005, SQL Server 2008, or SQL Server 2012.
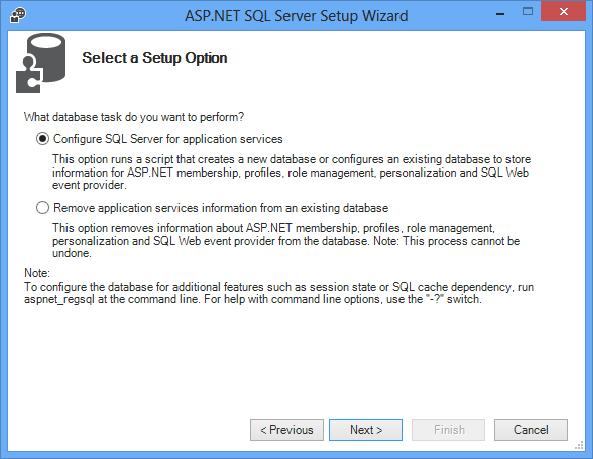
To work with any of these databases, you must set up the database using the aspnet_regsql.exe tool. Working with aspnet_regsql.exe creates the necessary tables, roles, stored procedures, and other items needed by the providers. To get at this tool, open up the Visual Studio 2012 Command Prompt by selecting Start ⇒ All Programs ⇒ Microsoft Visual Studio 2012 ⇒ Visual Studio Tools ⇒ Visual Studio 2012 Command Prompt. This gives you access to the ASP.NET SQL Server Setup Wizard. The ASP.NET SQL Server Setup Wizard is an easy-to-use tool that facilitates setup of the SQL Server to work with many of the systems that are built into ASP.NET 4.5, such as the membership, role management, and personalization systems. The Setup Wizard provides two ways for you to set up the database: using a command-line tool or using a GUI tool. First, look at the command-line version of the tool.
The command-line version of the Setup Wizard gives the developer optimal control over how the database is created. Working from the command line to use this tool is not difficult, so don’t be intimidated by it.
You can get at the actual tool, aspnet_regsql.exe, from the Visual Studio Command Prompt if you have Visual Studio 2012. At the command prompt, type aspnet_regsql.exe –? to get a list of all the command-line options at your disposal for working this tool.
Table 14-1 describes some of the available options for setting up your SQL Server instance to work with the personalization framework.
| COMMAND OPTION | DESCRIPTION |
| -? | Displays a list of available option commands. |
| -W | Uses the Wizard mode. This uses the default installation if no other parameters are used. |
| -S <server> | Specifies the SQL Server instance to work with. |
| -U <login> | Specifies the username to log in to SQL Server. If you use this, you also use the -P command. |
| -P <password> | Specifies the password to use for logging in to SQL Server. If you use this, you also use the -U command. |
| -E | Provides instructions to use the current Windows credentials for authentication. |
| -C | Specifies the connection string for connecting to SQL Server. If you use this, you can avoid using the -U and -P commands because they are specified in the connection string itself. |
| -A all | Adds support for all the available SQL Server operations provided by ASP.NET including membership, role management, profiles, site counters, and page/control personalization. |
| -A p | Adds support for working with profiles. |
| -R all | Removes support for all the available SQL Server operations that have been previously installed. These include membership, role management, profiles, site counters, and page/control personalization. |
| -R p | Removes support for the profile capability from SQL Server. |
| -d <database> | Specifies the database name to use with the application services. If you don’t specify a name of a database, aspnetdb is used. |
| -sqlexportonly <filename> | Instead of modifying an instance of a SQL Server database, use this command in conjunction with the other commands to generate a SQL script that adds or removes the features specified. This command creates the scripts in a file that has the name specified in the command. |
To modify SQL Server to work with the personalization provider using this command-line tool, you enter a command such as the following:
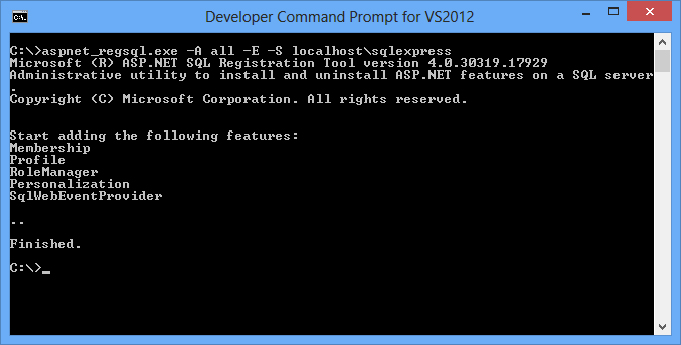
aspnet_regsql.exe -A all -EAfter you enter the preceding command, the command-line tool creates the features required by all the available ASP.NET 4.5 systems. The results are shown in the tool itself, as you see in Figure 14-3.
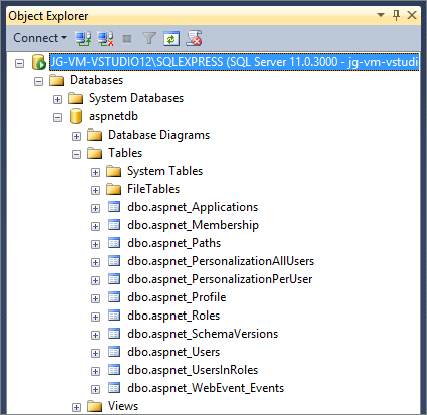
When this action is completed, you can see that a new database, aspnetdb, has been created in the Microsoft SQL Server Management Studio, which is part of Microsoft SQL Server 2012 (the database used for this example). You now have the appropriate tables for working with all the ASP.NET systems that are able to work with SQL Server (see Figure 14-4).
One advantage of using the command-line tool rather than the GUI-based version of the ASP.NET SQL Server Setup Wizard is that you can install in the database just the features that you are interested in working with instead of installing everything (as the GUI-based version does). For example, if you are going to have only the membership system interact with SQL Server 2012 — not any of the other systems (such as role management and personalization) — you can configure the setup so that only the tables, roles, stored procedures, and other items required by the membership system are established in the database. To set up the database for the membership system only, you use the following command on the command line:
aspnet_regsql.exe -A m -EInstead of working with the tool through the command line, you can also work with a GUI version of the same wizard. To get at the GUI version, type the following at the Visual Studio command prompt:
aspnet_regsql.exeAt this point, the ASP.NET SQL Server Setup Wizard welcome screen appears, as shown in Figure 14-5.
Clicking Next gives you a new screen that offers two options: one to install management features into SQL Server and the other to remove them (see Figure 14-6).
From here, choose the Configure SQL Server for application services option and click the Next button. The third screen (see Figure 14-7) asks for the login credentials to SQL Server and the name of the database to perform the operations. The Database option is <default> — meaning that the wizard creates a database called aspnetdb. If you want to choose a different folder, such as the application’s database, choose the appropriate option.
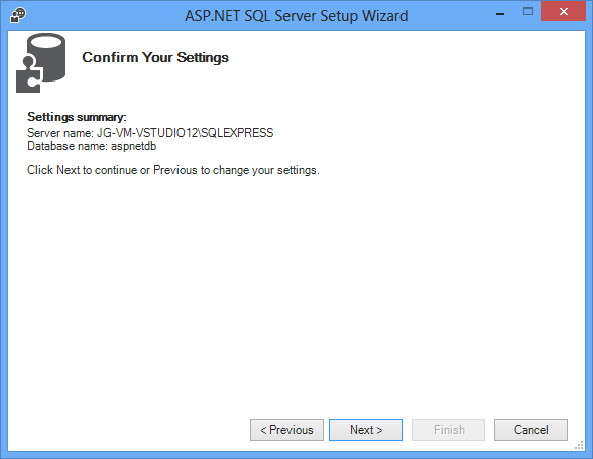
After you have made your server and database selections, click Next. The screen shown in Figure 14-8 asks you to confirm your settings. If everything looks correct, click Next; otherwise, click Previous and correct your settings.
When this is complete, a screen appears, notifying you that everything was set up correctly.
After you set up the full-blown Microsoft SQL Server to work with the various systems provided by ASP.NET, you create a connection string to the database in your machine.config or web.config file, as shown in Listing 14-1.
LISTING 14-1: Changing the connection string to work with SQL Server 2012
<configuration>
    <connectionStrings>
        <add name="LocalSqlServer"
          connectionString="Data Source=127.0.0.1;Integrated Security=SSPI" />
    </connectionStrings>
</configuration>
You may want to change the values provided if you are working with a remote instance of SQL Server rather than an instance that resides on the same server as the application. Changing this value in the machine.config file changes how each and every ASP.NET application uses this provider. Applying this setting in the web.config file causes only the local application to work with this instance.
After the connection string is set up, look further in the <providers> section of the section you are going to work with. For example, if you are using the membership provider, you want to work with the <membership> element in the configuration file. The settings to change the SQL Server are shown in Listing 14-2.
LISTING 14-2: Altering the SQL Server used via configuration
<?xml version="1.0"?>
<configuration>
    <connectionStrings>
        <add name="LocalSqlServer"
          connectionString=
          "Data Source=127.0.0.1;Integrated Security=SSPI;Initial Catalog=aspnetdb;" />
    </connectionStrings>

    <system.web>
        <compilation debug="false" targetFramework="4.5" />
        <httpRuntime targetFramework="4.5" />
        <membership defaultProvider="AspNetSqlMembershipProvider">
            <providers>
                <add name="AspNetSqlMembershipProvider"
                    type="System.Web.Security.SqlMembershipProvider,
                       System.Web, Version=4.0.0.0, Culture=neutral,
                       PublicKeyToken=b03f5f7f11d50a3a"
                    connectionStringName="LocalSqlServer"
                    enablePasswordRetrieval="false"
                    enablePasswordReset="true"
                    requiresQuestionAndAnswer="true"
                    applicationName="/"
                    requiresUniqueEmail="false"
                    passwordFormat="Hashed"
                    maxInvalidPasswordAttempts="5"
                    minRequiredPasswordLength="7"
                    minRequiredNonalphanumericCharacters="1"
                    passwordAttemptWindow="10"
                    passwordStrengthRegularExpression="" />
            </providers>
        </membership>
    </system.web>
</configuration>
With these changes in place, the SQL Server 2012 instance is now one of the providers available for use with your applications. The name of this provider instance is AspNetSqlMembershipProvider. You can see that this instance also uses the connection string of LocalSqlServer, which was defined in Listing 14-1.
Pay attention to some important attribute declarations from Listing 14-2. The first is that the provider used by the membership system is defined via the defaultProvider attribute found in the main <membership> node. Using this attribute, you can specify whether the provider is one of the built-in providers or whether it is a custom provider that you have built yourself or received from a third party. With the code from Listing 14-2 in place, the membership provider now works with Microsoft SQL Server 2012 (as shown in this example) instead of the Microsoft SQL Server Express Edition files.
The next section reviews the providers that are built into ASP.NET 4.5, starting with the membership system providers.
The membership system enables you to easily manage users in your ASP.NET applications. As with most of the systems provided in ASP.NET, it features a series of server controls that interact with a defined provider to either retrieve or record information to and from the data store defined by the provider. Because a provider exists between the server controls and the data stores where the data is retrieved and recorded, having the controls work from an entirely different backend is fairly trivial. You just change the underlying provider of the overall system (in this case, the membership system) by making a simple configuration change in the ASP.NET application. It really makes no difference to the server controls.
As previously stated, ASP.NET 4.5 provides two membership providers out of the box:
Both of these membership provider classes inherit from the MembershipProvider base class, as illustrated in Figure 14-9.
Next, you review each of these providers.
The default provider is the SqlMembershipProvider instance. You find this default declaration for every ASP.NET application that resides on the application server in the machine.config file. You find this file in C:\Windows\Microsoft.NET\Framework\v4.0.30319\Config. Listing 14-3 shows the definition of this provider, which is located in the machine.config file.
LISTING 14-3: A SqlMembershipProvider instance declaration
<configuration>
    <system.web>
        <membership defaultProvider="AspNetSqlMembershipProvider">
            <providers>
                <add name="AspNetSqlMembershipProvider"
                    type="System.Web.Security.SqlMembershipProvider,
                       System.Web, Version=4.0.0.0, Culture=neutral,
                       PublicKeyToken=b03f5f7f11d50a3a"
                    connectionStringName="LocalSqlServer"
                    enablePasswordRetrieval="false"
                    enablePasswordReset="true"
                    requiresQuestionAndAnswer="true"
                    applicationName="/"
                    requiresUniqueEmail="false"
                    passwordFormat="Hashed"
                    maxInvalidPasswordAttempts="5"
                    minRequiredPasswordLength="7"
                    minRequiredNonalphanumericCharacters="1"
                    passwordAttemptWindow="10"
                    passwordStrengthRegularExpression="" />
            </providers>
        </membership>
    </system.web>
</configuration>
From this listing, you can see that a single instance of the SqlMembershipProvider object is defined in the machine.config file. This single instance is named AspNetSqlMembershipProvider. This is also where you find the default behavior settings for your membership system. By default, this provider is also configured to work with a SQL Server Express instance rather than a full-blown version of SQL Server such as SQL Server 2005, 2008, or 2012. You can see this by looking at the defined connectionStringName property in the provider declaration from Listing 14-3. In this case, it is set to LocalSqlServer. LocalSqlServer is also defined in the machine.config file, as shown in Listing 14-4.
LISTING 14-4: The LocalSqlServer defined instance
<configuration>
    <connectionStrings>
        <clear />
        <add name="LocalSqlServer"
            connectionString=" data source=.\SQLEXPRESS;Integrated
            Security=SSPI;AttachDBFilename=|DataDirectory|aspnetdb.mdf;
            User Instance=true"
            providerName="System.Data.SqlClient" />
    </connectionStrings>
</configuration>
You can see that this connection string information is set for a local SQL Server Express Edition file (an .mdf file). Of course, you are not required to work with only these file types for the SqlMembershipProvider capabilities. Instead, you can also set it up to work with either Microsoft’s SQL Server 2005, 2008, or 2012 (as was previously shown).
It is also possible for the membership system provided from ASP.NET 4.5 to connect this system to a Microsoft Active Directory instance or even Active Directory Application Mode (ADAM), which is a standalone directory product. Because the default membership provider is defined in the machine.config files at the SqlMembershipProvider, you must override these settings in your application’s web.config file.
Before creating a defined instance of the ActiveDirectoryMembershipProvider in your web.config file, you must define the connection string to the Active Directory store, as shown in Listing 14-5.
LISTING 14-5: Defining the connection string to the Active Directory store
<configuration>
    <connectionStrings>
        <add name="ADConnectionString"
          connectionString=
          "LDAP://domain.myAdServer.com/CN=Users,DC=domain,DC=testing,DC=com" />
    </connectionStrings>
</configuration>
With the connection in place, you can create an instance of the ActiveDirectoryMembershipProvider in your web.config file that associates itself to this connection string, as illustrated in Listing 14-6.
LISTING 14-6: Defining the ActiveDirectoryMembershipProvider instance
<configuration>
    <connectionStrings>
        <add name="ADConnectionString"
           connectionString=
           "LDAP://domain.myAdServer.com/CN=Users,DC=domain,DC=testing,DC=com" />
    </connectionStrings>
    <system.web>
        <membership
            defaultProvider="AspNetActiveDirectoryMembershipProvider">
            <providers>
                <add name="AspNetActiveDirectoryMembershipProvider"
                    type="System.Web.Security.ActiveDirectoryMembershipProvider,
                    System.Web, Version=1.0.3600, Culture=neutral,
                    PublicKeyToken=b03f5f7f11d50a3a"
                    connectionStringName="ADConnectionString"
                    connectionUsername="UserWithAppropriateRights"
                    connectionPassword="PasswordForUser"
                    connectionProtection="Secure"
                    enablePasswordReset="true"
                    enableSearchMethods="true"
                    requiresQuestionAndAnswer="true"
                    applicationName="/"
                    description="Default AD connection"
                    requiresUniqueEmail="false"
                    clientSearchTimeout="30"
                    serverSearchTimeout="30"
                    attributeMapPasswordQuestion="department"
                    attributeMapPasswordAnswer="division"
                    attributeMapFailedPasswordAnswerCount="singleIntAttribute"
                    attributeMapFailedPasswordAnswerTime="singleLargeIntAttribute"
                    attributeMapFailedPasswordAnswerLockoutTime="singleLargeIntAttribute"
                    attributeMapEmail = "mail"
                    attributeMapUsername = "userPrincipalName"
                    maxInvalidPasswordAttempts = "5"
                    passwordAttemptWindow = "10"
                    passwordAnswerAttemptLockoutDuration = "30"
                    minRequiredPasswordLength="7"
                    minRequiredNonalphanumericCharacters="1"
                    passwordStrengthRegularExpression=
                      "(?=.{6,})(?=(.*\d){1,})(?=(.*\W){1,})" />
            </providers>
        </membership>
    </system.web>
</configuration>
Although not all these attributes are required, this list provides you with the available attributes of the ActiveDirectoryMembershipProvider. In fact, you can easily declare the instance in its simplest form, as shown here:
<membership
    defaultProvider="AspNetActiveDirectoryMembershipProvider">
    <providers>
        <add name="AspNetActiveDirectoryMembershipProvider"
            type="System.Web.Security.ActiveDirectoryMembershipProvider,
            System.Web, Version=1.0.3600, Culture=neutral,
            PublicKeyToken=b03f5f7f11d50a3a"
            connectionStringName="ADConnectionString" />
    </providers>
</membership>
Again, with either the SqlMembershipProvider or the ActiveDirectoryMembershipProvider in place, the membership system server controls (such as the Login server control) as well as the membership API, once configured, will record and retrieve their information via the provider you have established. That is the power of the provider model that the ASP.NET team has established. You continue to see this power as you learn about the rest of the providers detailed in this chapter.
After a user is logged in to the system (possibly using the ASP.NET membership system), the ASP.NET role management system enables you to work with the role of that user to authorize him for a particular access to the overall application. The role management system in ASP.NET 4.5, as with the other systems, has a set of providers to store and retrieve role information in an easy manner. This, of course, doesn’t mean that you are bound to one of the three available providers in the role management system. Instead, you can extend one of the established providers or even create your own custom provider.
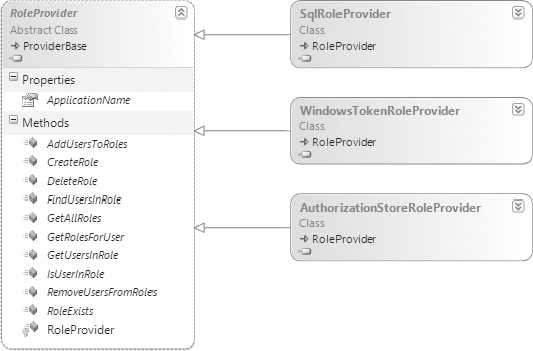
By default, ASP.NET 4.5 offers three providers for the role management system. These providers are defined in the following list:
These three classes for role management inherit from the RoleProvider base class, as illustrated in Figure 14-10.
The role management system in ASP.NET uses SQL Server Express Edition files by default (just as the membership system does). The connection to the SQL Server Express file uses SqlRoleProvider, but you can just as easily configure your SQL Server 2005, 2008, or 2012 server to work with the role management system through SqlRoleProvider. The procedure for setting up your full-blown SQL Server is described in the beginning of this chapter.
Looking at the SqlRoleProvider instance in the machine.config.comments file, you will notice the syntax as defined in Listing 14-7. The machine.config.comments file provides documentation on the machine.config and shows you the details of the default settings that are baked into the ASP.NET Framework.
LISTING 14-7: A SqlRoleProvider instance declaration
<configuration>
    <roleManager enabled="false" cacheRolesInCookie="false"
        cookieName=".ASPXROLES" cookieTimeout="30" cookiePath="/"
        cookieRequireSSL="false" cookieSlidingExpiration="true"
        cookieProtection="All" defaultProvider="AspNetSqlRoleProvider"
        createPersistentCookie="false" maxCachedResults="25">
        <providers>
            <clear />
            <add connectionStringName="LocalSqlServer" applicationName="/"
                name="AspNetSqlRoleProvider"
                type="System.Web.Security.SqlRoleProvider, System.Web,
                Version=4.0.0.0, Culture=neutral, PublicKeyToken=b03f5f7f11d50a3a"
                />
            <add applicationName="/" name="AspNetWindowsTokenRoleProvider"
                type="System.Web.Security.WindowsTokenRoleProvider, System.Web,
                Version=4.0.0.0, Culture=neutral, PublicKeyToken=b03f5f7f11d50a3a"
                />
            </providers>
        </roleManager>
</configuration>
As stated, this is part of the default <roleManager> declaration that is baked into the overall ASP.NET Framework (note again that you can change any of these defaults by making a new declaration in your web.config file). As you can see, role management is disabled by default through the enabled attribute found in the <roleManager> node (it is set to false by default). Also, pay attention to the default Provider attribute in the <roleManager> element. In this case, it is set to AspNetSqlRoleProvider. This provider is defined in the same code example. To connect to the Microsoft SQL Server 2012 instance that was defined earlier (in the membership system examples), you can use the syntax shown in Listing 14-8.
LISTING 14-8: Connecting the role management system to SQL Server 2012
<configuration>
    <connectionStrings>
        <add name="LocalSqlServer"
            connectionString=
            "Data Source=127.0.0.1;Integrated Security=SSPI;Initial Catalog=aspnetdb;" />
    </connectionStrings>
    <system.web>
        <roleManager enabled="true" cacheRolesInCookie="true"
            cookieName=".ASPXROLES" cookieTimeout="30" cookiePath="/"
            cookieRequireSSL="false" cookieSlidingExpiration="true"
            cookieProtection="All" defaultProvider="AspNetSqlRoleProvider"
            createPersistentCookie="false" maxCachedResults="25">
            <providers>
                <clear />
                <add connectionStringName="LocalSqlServer" applicationName="/"
                    name="AspNetSqlRoleProvider"
                    type="System.Web.Security.SqlRoleProvider, System.Web,
                    Version=4.0.0.0, Culture=neutral,
                    PublicKeyToken=b03f5f7f11d50a3a" />
            </providers>
        </roleManager>
    </system.web>
</configuration>
With this in place, you can now connect to SQL Server 2012. Next is a review of the second provider available to the role management system.
The Windows operating system has a role system built into it. This Windows security group system is an ideal system to use when you are working with intranet-based applications where you might have all users already in defined roles. This, of course, works best if you have anonymous authentication turned off for your ASP.NET application, and you have configured your application to use Windows Authentication.
Some limitations exist when you are using WindowsTokenRoleProvider. This is a read-only provider because ASP.NET is not allowed to modify the settings applied in the Windows security group system. This means that not all the methods provided via the RoleProvider abstract class are usable when working with this provider. From the WindowsTokenRoleProvider class, the only methods you have at your disposal are IsUserInRole and GetUsersInRole.
To configure your WindowsTokenRoleProvider instance, you use the syntax defined in Listing 14-9.
LISTING 14-9: A WindowsTokenRoleProvider instance
<configuration>
    <system.web>
        <authentication mode="Windows" />
        <roleManager defaultProvider="WindowsProvider"
            enabled="true" cacheRolesInCookie="false">
            <providers>
                <add name="WindowsProvider"
                    type="System.Web.Security.WindowsTokenRoleProvider" />
            </providers>
        </roleManager>
    </system.web>
</configuration>
Remember that you have to declare the default provider using the defaultProvider attribute in the <roleManager> element to change the assigned provider from the SqlRoleProvider association.
The final role provider available to you from a default install of ASP.NET is AuthorizationStoreRoleProvider. This role provider class enables you to store roles inside of an Authorization Manager policy store. These types of stores are also referred to as AzMan stores. As with WindowsTokenRoleProvider, AuthorizationStoreRoleProvider is a bit limited because it is unable to support any AzMan business rules.
To use AuthorizationStoreRoleProvider, you must first make a connection in your web.config file to the XML data store used by AzMan, as shown in Listing 14-10.
LISTING 14-10: Making a connection to the AzMan policy store
<configuration>
    <connectionStrings>
        <add name="LocalPolicyStore"
             connectionString="msxml://~\App_Data\SampleStore.xml" />
    </connectionStrings>
</configuration>
Note that when you work with these XML-based policy files, storing them in the App_Data folder is best. Files stored in the App_Data folder cannot be pulled up in the browser.
After the connection string is in place, the next step is to configure your AuthorizationStoreRoleProvider instance. This takes the syntax defined in Listing 14-11.
LISTING 14-11: Defining the AuthorizationStoreRoleProvider instance
<configuration>
    <connectionStrings>
        <add name="MyLocalPolicyStore"
            connectionString="msxml://~\App_Data\datafilename.xml" />
    </connectionStrings>
    <system.web>
        <authentication mode="Windows" />
        <identity impersonate="true" />
        <roleManager defaultProvider="AuthorizationStoreRoleProvider"
            enabled="true"
            cacheRolesInCookie="true"
            cookieName=".ASPROLES"
            cookieTimeout="30"
            cookiePath="/"
            cookieRequireSSL="false"
            cookieSlidingExpiration="true"
            cookieProtection="All" >
            <providers>
                <clear />
                <add name="AuthorizationStoreRoleProvider"
                    type="System.Web.Security.AuthorizationStoreRoleProvider"
                    connectionStringName="MyLocalPolicyStore"
                    applicationName="SampleApplication"
                    cacheRefreshInterval="60"
                    scopeName="" />
            </providers>
        </roleManager>
    </system.web>
</configuration>
Next, this chapter reviews the single personalization provider available in ASP.NET.
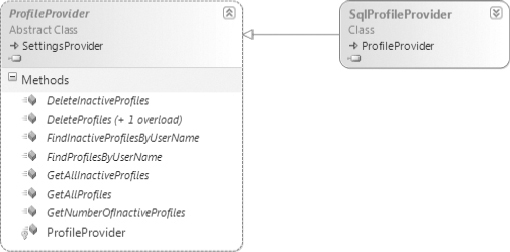
As with the membership system found in ASP.NET, the personalization system (also referred to as the profile system) is another system that is based on the provider model. This system makes associations between the end user viewing the application and any data points stored centrally that are specific to that user. As stated, these personalization properties are stored and maintained on a per-user basis. ASP.NET provides a single provider for data storage. This provider enables you to use the ASP.NET personalization system to connect to Microsoft’s SQL Server 2005, 2008, and 2012, as well as to Microsoft SQL Server Express Edition.
This single class for the personalization system inherits from the ProfileProvider base class, as shown in Figure 14-11.
As with the other providers covered so far, SqlProfileProvider connects to a Microsoft SQL Server Express Edition file by default. Although this is the default, you can change the connection to work with SQL Server 2005, 2008, or 2012. For example, if you are connecting to a SQL Server 2012 database, you define your connection in the web.config file and then associate your SqlProfileProvider declaration to this connection string. Listing 14-12 presents this scenario.
LISTING 14-12: Connecting the SqlProfileProvider to SQL Server 2012
<configuration>
    <connectionStrings>
        <add name="LocalSqlServer"
            connectionString="Data Source=127.0.0.1;Integrated Security=SSPI" />
    </connectionStrings>
    <system.web>
        <profile>
            <providers>
                <clear />
                <add name="AspNetSqlProfileProvider"
                    connectionStringName="LocalSqlServer" applicationName="/"
                    type="System.Web.Profile.SqlProfileProvider, System.Web,
                    Version=4.0.0.0, Culture=neutral,
                    PublicKeyToken=b03f5f7f11d50a3a" />
            </providers>
            <properties>
                <add name="FirstName" />
                <add name="LastName" />
                <add name="LastVisited" />
                <add name="Age" />
                <add name="Member" />
            </properties>
        </profile>
    </system.web>
</configuration>
Remember that to store profile information in your SQL Server database, you have to configure this database so the proper tables, stored procedures, and other items are created. This task was discussed earlier in the chapter.
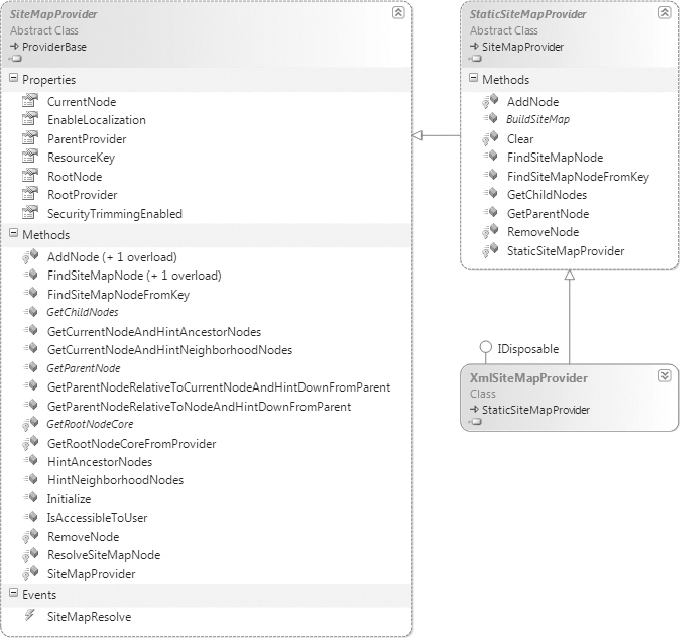
Similar to the personalization provider just discussed, ASP.NET 4.5 provides a single provider to work with sitemaps. Sitemaps are what ASP.NET uses to provide you with a centralized way of maintaining site navigation. By default, the definition of a web application’s navigation is located in a structured XML file. The sitemap provider lets you interact with this XML file, the .sitemap file, which you create for your application. The provider available for sitemaps is System.Web.XmlSiteMapProvider, which enables you to use the ASP.NET navigation system to connect to an XML-based file.
This single class for the sitemap system inherits from the StaticSiteMapProvider base class, which is a partial implementation of the SiteMapProvider base class, as shown in Figure 14-12.
This is the first provider introduced so far that does not connect to a SQL Server database by default. Instead, this provider is designed to work with a static XML file. This XML file uses a particular schema and is covered in considerable detail in Chapter 17.
Listing 14-13 shows the code required to configure XmlSiteMapProvider.
LISTING 14-13: Defining an XmlSiteMapProvider instance in the web.config file
<configuration>
    <system.web>
        <siteMap defaultProvider="MyXmlSiteMapProvider" enabled="true">
            <providers>
                <add name="MyXmlSiteMapProvider"
                    description="SiteMap provider that reads in .sitemap files."
                    type="System.Web.XmlSiteMapProvider, System.Web, Version=4.0.0.0,
                    Culture=neutral, PublicKeyToken=b03f5f7f11d50a3a"
                    siteMapFile="AnotherWeb.sitemap" />
            </providers>
        </siteMap>
    </system.web>
</configuration>
The XmlSiteMapProvider allows only a single root element in the strictly designed web.sitemap file. The default filename of the XML file it is looking for is web.sitemap, although you can change this default setting (as you can see in Listing 14-13) by using the siteMapFile attribute within the provider declaration in the web.config file.
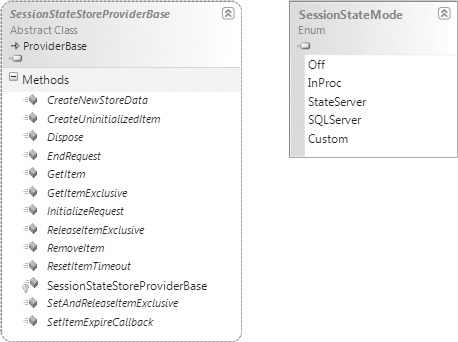
The available modes of storing session state for your users include InProc, StateServer, SQLServer, or even Custom. Each mode has definite pros and cons associated with it, and you should examine each option thoroughly when deciding which session state mode to use.
This provider model is a bit different from the others discussed so far in this chapter. The SessionStateModule class is a handler provided to load one of the available session state modes. Each of these modes is defined here:
Figure 14-13 shows these three modes for session state management.
Next, this chapter reviews each of the three modes that you can use out of the box in your ASP.NET 4.5 applications.
The InProcSessionStateStore mode is the default mode for ASP.NET. In this mode, the sessions generated are held in the same process as that being used by the ASP.NET worker process (aspnet_wp.exe or w3wp.exe). This mode is the best performing, but some problems exist with this mode as well. Because the sessions are stored in the same process, whenever the worker process is recycled, all the sessions are destroyed. Worker processes can be recycled for many reasons (such as a change to the web.config file, the Global.asax file, or a setting in IIS that requires the process to be recycled after a set time period).
Listing 14-14 shows an example of the configuration in the web.config file for working in the InProc mode.
LISTING 14-14: Defining the InProc mode for session state management in the web.config
<configuration>
    <system.web>
        <sessionState mode="InProc">
        </sessionState>
    </system.web>
</configuration>
As you can see, this mode is rather simple. The next method reviewed is the out-of-process mode — also referred to as the StateServer mode.
In addition to the InProc mode, the StateServer mode is an out-of-process method of storing session state. This method does not perform as well as one that stores the sessions in the same process as the ASP.NET worker process. This makes sense because the method must jump process boundaries to work with the sessions you are employing. Although the performance is poorer than it is in the InProc mode, the OutOfProcSessionStateStore method is more reliable than running the sessions using InProcSessionStateStore. If your application’s worker process recycles, the sessions that this application is working with are still maintained. This capability is vital for those applications that are critically dependent upon sessions.
Listing 14-15 shows an example of using OutOfProcSessionStateStore.
LISTING 14-15: Running sessions out of process using OutOfProcSessionStateStore
<configuration>
    <system.web>
        <sessionState mode="StateServer"
            stateConnectionString="tcpip=127.0.0.1:42424">
        </sessionState>
    </system.web>
</configuration>
When using the StateServer mode, you also must define where the sessions are stored using the stateConnectionString attribute. In this case, the local server is used, meaning that the sessions are stored on the same machine, but in an entirely separate process. You could have just as easily stored the sessions on a different server by providing the appropriate IP address as a value for this attribute. In addition to the IP address, note that port 42424 is used. This port is required when using the StateServer mode for sessions. Chapter 21 covers changing the port for the StateServer.
The final provider for session state management available to you in ASP.NET is the SqlSessionStateStore. This method is definitely the most resilient of the three available modes. With that said, however, it is also the worst performing of the three modes. Setting up your database appropriately is important if you use this method of session state storage. Again, Chapter 21 shows you how to set up your database.
To configure your application to work with SqlSessionStateStore, you must configure the web.config file as detailed in Listing 14-16.
LISTING 14-16: Defining SqlSessionStateStore in the web.config
<configuration>
    <system.web>
        <sessionState mode="SQLServer"
            allowCustomSqlDatabase="true"
            sqlConnectionString="Data Source=127.0.0.1;
            database=MyCustomASPStateDatabase;Integrated Security=SSPI">
        </sessionState>
    </system.web>
</configuration>
Next, you review the providers available for the web events architecture.
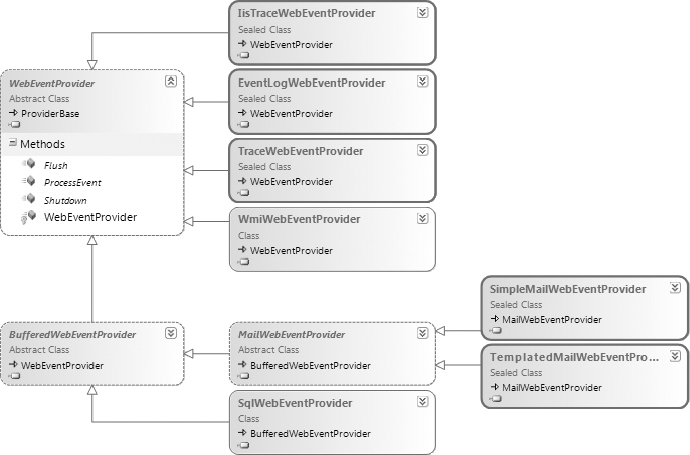
Among all the available systems provided in ASP.NET 4.5, more providers are available for the health monitoring system than for any other system. The health monitoring system enables ASP.NET application administrators to evaluate the health of a running ASP.NET application and to capture events (errors and other possible triggers) that can then be stored via one of the available providers. These events are referred to as web events. A large list of events can be monitored via the health monitoring system, and this means that you can start recording items such as authentication failures/successes, all errors generated, ASP.NET worker process information, request data, response data, and more. Recording items means using one of the providers available to record to a data store of some kind.
By default, ASP.NET 4.5 offers several possible providers for the health monitoring system. This is more than for any of the other ASP.NET systems. These providers are defined in the following list:
These seven providers for the ASP.NET health monitoring system inherit from either the WebEventProvider base class, or the BufferedWebEventProvider (which, in turn, inherits from the WebEventProvider), as shown in Figure 14-14.
What is the difference between the WebEventProvider class and the BufferedWebEventProvider? The big difference is that the WebEventProvider writes events as they happen, whereas the BufferedWebEventProvider holds web events until a collection of them is made. The collection is then written to the database or sent in an e-mail in a batch. If you use the SqlWebEventProvider class, you actually want this batch processing to occur rather than having the provider make a connection to the database and write to it for each web event that occurs.
Next, this chapter looks at each of the seven more prominent available providers for the health monitoring system.
Traditionally, administrators and developers are used to reviewing system and application errors in the built-in Windows event log. The items in the event log can be viewed via the Event Viewer. You find this GUI-based tool for viewing events by selecting Administration Tools in the Control Panel and then selecting Event Viewer.
By default, the health monitoring system uses the Windows event log to record the items that are already specified in the server’s configuration files or items you have specified in the web.config file of your application. If you look in the web.config.comments file in the CONFIG folder of the Microsoft .NET Framework installed on your server, you see that the EventLogWebEventProvider is detailed in this location. Listing 14-17 presents the code.
LISTING 14-17: The EventLogWebEventProvider declared in the web.config.comments file
<configuration>
    <system.web>
        <healthMonitoring heartbeatInterval="0" enabled="true">
            <bufferModes>
                <!-- Removed for clarity -->
            </bufferModes>
            <providers>
                <clear />
                <add name="EventLogProvider"
                    type="System.Web.Management.EventLogWebEventProvider,
                    System.Web,Version=4.0.0.0,Culture=neutral,
                    PublicKeyToken=b03f5f7f11d50a3a" />
                <!-- Removed for clarity -->
            </providers>
            <profiles>
                <!-- Removed for clarity -->
            </profiles>
            <rules>
                <add name="All Errors Default" eventName="All Errors"
                    provider="EventLogProvider" profile="Default" minInstances="1"
                    maxLimit="Infinite" minInterval="00:01:00" custom="" />
                <add name="Failure Audits Default" eventName="Failure Audits"
                    provider="EventLogProvider" profile="Default" minInstances="1"
                    maxLimit="Infinite" minInterval="00:01:00" custom="" />
            </rules>
            <eventMappings>
                <!-- Removed for clarity -->
            </eventMappings>
        </healthMonitoring>
    </system.web>
</configuration>
As you can see from Listing 14-17, a lot of possible settings can be applied in the health monitoring system. Depending on the rules and event mappings you have defined, these items are logged into the event log of the server that is hosting the application. Looking closely at the <rules> section of the listing, you can see that specific error types are assigned to be monitored. In this section, two types of errors are trapped in the health monitoring system — All Errors Default and Failure Audits Default.
When one of the errors defined in the <rules> section is triggered and captured by the health monitoring system, it is recorded. Where it is recorded depends on the specified provider. The provider attribute used in the <add> element of the <rules> section determines this. In both cases in the example in Listing 14-17, you can see that the EventLogProvider is the assigned provider. This means that the Windows error log is used for recording the errors of both types.
Sometimes when errors occur in your applications, you as an administrator or a concerned developer want e-mail notification of the problem. In addition to recording events to disk using something such as the EventLogWebEventProvider, you can also have the error notification e-mailed to you using the SimpleMailWebEventProvider. As it states in the provider name, the e-mail is a simply constructed one. Listing 14-18 shows you how you would go about adding e-mail notification in addition to writing the errors to the Windows event log.
LISTING 14-18: The SimpleMailWebEventProvider definition
<configuration>
    <system.web>
        <healthMonitoring heartbeatInterval="0" enabled="true">
            <bufferModes>
                <add name="Website Error Notification"
                    maxBufferSize="100"
                    maxFlushSize="20"
                    urgentFlushThreshold="1"
                    regularFlushInterval="00:01:00"
                    urgentFlushInterval="00:01:00"
                    maxBufferThreads="1" />
            </bufferModes>
            <providers>
                <clear />
                <add name="EventLogProvider"
                    type="System.Web.Management.EventLogWebEventProvider,
                    System.Web,Version=4.0.0.0,Culture=neutral,
                    PublicKeyToken=b03f5f7f11d50a3a" />
                <add name="SimpleMailProvider"
                    type="System.Web.Management.SimpleMailWebEventProvider,
                    System.Web, Version=4.0.0.0, Culture=neutral,
                    PublicKeyToken=b03f5f7f11d50a3a"
                    from="website@company.com"
                    to="admin@company.com"
                    cc="adminLevel2@company.com" bcc="director@company.com"
                    bodyHeader="Warning!"
                    bodyFooter="Please investigate ASAP."
                    subjectPrefix="Action required."
                    buffer="true"
                    bufferMode="Website Error Notification"
                    maxEventLength="4096"
                    maxMessagesPerNotification="1" />
            </providers>
            <profiles>
                <!-- Removed for clarity -->
            </profiles>
            <rules>
                <add name="All Errors Default" eventName="All Errors"
                    provider="EventLogProvider" profile="Default" minInstances="1"
                    maxLimit="Infinite" minInterval="00:01:00" custom="" />
                <add name="Failure Audits Default" eventName="Failure Audits"
                    provider="EventLogProvider" profile="Default" minInstances="1"
                    maxLimit="Infinite" minInterval="00:01:00" custom="" />
                <add name="All Errors Simple Mail" eventName="All Errors"
                    provider="SimpleMailProvider" profile="Default" />
                <add name="Failure Audits Default" eventName="Failure Audits"
                    provider="SimpleMailProvider" profile="Default" />
            </rules>
            <eventMappings>
                <!-- Removed for clarity -->
            </eventMappings>
        </healthMonitoring>
    </system.web>
</configuration>
In this example, the errors that occur are captured and not only written to the event log, but are also e-mailed to the end users specified in the provider definition. One very interesting point of the SimpleMailWebEventProvider is that this class inherits from the BufferedWebEventProvider instead of from the WebEventProvider as the EventLogWebEventProvider does. Inheriting from the BufferedWebEventProvider means that you can have the health monitoring system build a collection of error notifications before sending them on. The <bufferModes> section defines how the buffering works.
The aforementioned SimpleMailWebEventProvider does exactly what its name states — it sends out a simple, text-based e-mail. To send out a more artistically crafted e-mail that contains even more information, you can use the TemplatedMailWebEventProvider. Just like the SimpleMailWebEventProvider, you simply define the provider appropriately in the <healthMonitoring> section. Listing 14-19 presents the model for this definition.
LISTING 14-19: The TemplatedMailWebEventProvider definition
<providers>
    <clear />
    <add name="EventLogProvider"
        type="System.Web.Management.EventLogWebEventProvider,
        System.Web,Version=4.0.0.0,Culture=neutral,
        PublicKeyToken=b03f5f7f11d50a3a" />
    <add name="TemplatedMailProvider"
        type="System.Web.Management.TemplatedMailWebEventProvider,
        System.Web, Version=4.0.0.0, Culture=neutral,
        PublicKeyToken=b03f5f7f11d50a3a"
        template="../mailtemplates/errornotification.aspx"
        from="website@company.com"
        to="admin@company.com"
        cc="adminLevel2@company.com" bcc="director@company.com"
        bodyHeader="Warning!"
        bodyFooter="Please investigate ASAP."
        subjectPrefix="Action required."
        buffer="true"
        bufferMode="Website Error Notification"
        maxEventLength="4096"
        maxMessagesPerNotification="1" />
</providers>
The big difference between this provider declaration and the SimpleMailWebEventProvider appears in bold in Listing 14-19. The TemplatedMailWebEventProvider has a template attribute that specifies the location of the template to use for the e-mail that is created and sent from the health monitoring system.
In many instances, you may want to write to disk when you are trapping and recording the web events that occur in your application. The EventLogWebEventProvider is an excellent provider because it writes these web events to the Windows event log on your behalf. However, in some instances, you may want to write these web events to disk elsewhere. In this case, a good alternative is to write these web events to SQL Server instead (or even in addition to the writing to an event log).
Writing to SQL Server gives you some benefits over writing to the Windows event log. When your application is running in a web farm, you might want all the errors that occur across the farm to be written to a single location. In this case, writing all web events that are trapped via the health monitoring system to a SQL Server instance to which all the servers in the web farm can connect makes sense.
By default, the SqlWebEventProvider (like the other SQL Server-based providers covered so far in this chapter) uses SQL Server Express Edition as its underlying database. To connect to the full-blown version of SQL Server instead, you need a defined connection as shown in Listing 14-20.
LISTING 14-20: The LocalSqlServer defined instance
<configuration>
    <connectionStrings>
        <add name="LocalSqlServer"
            allowCustomSqlDatabase="true"
            connectionString="Data Source=127.0.0.1;Integrated Security=SSPI" />
    </connectionStrings>
</configuration>
With this connection in place, the next step is to use this connection in your SqlWebEventProvider declaration in the web.config file, as illustrated in Listing 14-21.
LISTING 14-21: Writing web events to SQL Server 2012 using the SqlWebEventProvider
<configuration>
    <system.web>
        <healthMonitoring>
            <!-- Other nodes removed for clarity -->
            <providers>
                <clear />
                <add name="SqlWebEventProvider"
                    type="System.Web.Management.SqlWebEventProvider,System.Web"
                    connectionStringName="LocalSqlServer"
                    maxEventDetailsLength="1073741823"
                    buffer="true"
                    bufferMode="SQL Analysis" />
            </providers>
        </healthMonitoring>
    </system.web>
</configuration>
Events are now recorded in SQL Server 2012 on your behalf. The nice thing about the SqlWebEventProvider is that, as with the SimpleMailWebEventProvider and the TemplatedMailWebEventProvider, the SqlWebEventProvider inherits from the BufferedWebEventProvider. This means that the web events can be written in batches as opposed to one by one. You trigger these batches by using the buffer and bufferMode attributes in the provider declaration. It works in conjunction with the settings applied in the <bufferModes> section of the <healthMonitoring> declarations.
One method of debugging an ASP.NET application is to use the tracing capability built into the system. Tracing enables you to view details on the request, application state, cookies, the control tree, the form collection, and more. You output web events to the trace output via the TraceWebEventProvider object. Setting the TraceWebEventProvider instance in a configuration file is shown in Listing 14-22.
LISTING 14-22: Writing web events to the trace output using TraceWebEventProvider
<configuration>
    <system.web>
        <healthMonitoring>
            <!-- Other nodes removed for clarity -->
            <providers>
                <clear />
                <add name="TraceWebEventProvider"
                    type="System.Web.Management.TraceWebEventProvider,System.Web"
                    maxEventLength="4096"
                    maxMessagesPerNotification="1" />
            </providers>
        </healthMonitoring>
    </system.web>
</configuration>
Remember, even with the provider in place, you must assign the provider to the particular errors you want to trap. You do so through the <rules> section of the health monitoring system.
The IisTraceWebEventProvider is the same, except that the tracing information is sent to IIS rather than to the ASP.NET tracing system.
The last provider built into the health monitoring system is the WmiWebEventProvider. This provider enables you to map any web events that come from the health monitoring system to Windows Management Instrumentation (WMI) events. When you pass events to the WMI subsystem, you can represent the events as objects.
By default, the WmiWebEventProvider is already set up for you, and you simply need to map the web events you are interested in to the already declared WmiWebEventProvider in the <rules> section of the health monitoring declaration. This declaration is documented in the web.config.comments file in the CONFIG folder of the Microsoft .NET Framework installed on your server and is shown in Listing 14-23 (the WmiWebEventProvider appears in bold).
LISTING 14-23: The WmiWebEventProvider definition in the web.config.comments file
<configuration>
    <system.web>
        <healthMonitoring>
            <!-- Other nodes removed for clarity -->
            <providers>
                <clear />
                <add name="EventLogProvider"
                    type="System.Web.Management.EventLogWebEventProvider,
                    System.Web,Version=4.0.0.0,Culture=neutral,
                    PublicKeyToken=b03f5f7f11d50a3a" />
                <add connectionStringName="LocalSqlServer"
                    maxEventDetailsLength="1073741823" buffer="false"
                    bufferMode="Notification" name="SqlWebEventProvider"
                    type="System.Web.Management.SqlWebEventProvider,
                    System.Web,Version=4.0.0.0,Culture=neutral,
                    PublicKeyToken=b03f5f7f11d50a3a" />
                <add name="WmiWebEventProvider"
                    type="System.Web.Management.WmiWebEventProvider,
                    System.Web,Version=4.0.0.0,Culture=neutral,
                    PublicKeyToken=b03f5f7f11d50a3a" />
            </providers>
        </healthMonitoring>
    </system.web>
</configuration>
Remember, the wonderful thing about how the health monitoring system uses the provider model is that it permits more than a single provider for the web events that the system traps.
A wonderful feature of ASP.NET 4.5 is that it enables you to actually encrypt sections of your configuration files. You are able to encrypt defined ASP.NET sections of the web.config file as well as custom sections that you have placed in the file yourself. This is an ideal way of keeping sensitive configuration information away from the eyes of everyone who peruses the file repository of your application.
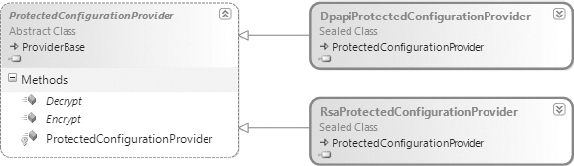
By default, ASP.NET 4.5 provides two possible configuration providers out of the box. These providers are defined as follows:
These two providers used for encryption and decryption of the configuration sections inherit from the ProtectedConfigurationProvider base class, as illustrated in Figure 14-15.
Next, this chapter takes you through each of these providers.
The DpapiProtectedConfigurationProvider class enables you to encrypt and decrypt configuration sections using the Windows Data Protection API (DPAPI). This provider enables you to perform these encryption and decryption tasks on a per-machine basis. This provider is not good to use on a web farm. If you are using protected configuration on your configuration files in a web farm, you might want to turn your attention to the RsaProtectedConfigurationProvider.
If you look in the machine.config on your server, you see a definition in place for both the DpapiProtectedConfigurationProvider and the RsaProtectedConfigurationProvider. The RsaProtectedConfigurationProvider is set as the default configuration provider. To establish the DpapiProtectedConfigurationProvider as the default provider, you might use the web.config file of your application, or you might change the defaultProvider attribute in the machine.config file for the <configProtectedData> node. Changing it in the web.config file is shown in Listing 14-24.
LISTING 14-24: Using the DpapiProtectedConfigurationProvider in the web.config file
<configuration>
    <configProtectedData defaultProvider="DataProtectionConfigurationProvider">
        <providers>
            <clear />
            <add name="DataProtectionConfigurationProvider"
                type="System.Configuration.DpapiProtectedConfigurationProvider,
                System.Configuration, Version=4.0.0.0,
                Culture=neutral, PublicKeyToken=b03f5f7f11d50a3a"
                description="Uses CryptProtectData and CryptUnProtectData Windows
                APIs to encrypt and decrypt"
                useMachineProtection="true"
                keyEntropy="RandomStringValue" />
        </providers>
    </configProtectedData>
</configuration>
The provider is defined within the <configProtectedData> section of the configuration file. Note that this configuration section sits outside the <system.web> section.
The two main attributes of this provider definition are as follows:
The default provider for encrypting and decrypting configuration sections is the RsaProtectedConfigurationProvider. You can see this setting in the machine.config file on your application server. Listing 14-25 presents code from the machine.config file.
LISTING 14-25: The RsaProtectedConfigurationProvider declaration in the machine.config file
<configuration>
    <configProtectedData defaultProvider="RsaProtectedConfigurationProvider">
        <providers>
            <add name="RsaProtectedConfigurationProvider"
                type="System.Configuration.RsaProtectedConfigurationProvider,
                System.Configuration, Version=4.0.0.0, Culture=neutral,
                PublicKeyToken=b03f5f7f11d50a3a"
                description="Uses RsaCryptoServiceProvider to encrypt and decrypt"
                keyContainerName="NetFrameworkConfigurationKey" cspProviderName=""
                useMachineContainer="true" useOAEP="false" />
            <add name="DataProtectionConfigurationProvider"
                type="System.Configuration.DpapiProtectedConfigurationProvider,
                System.Configuration, Version=4.0.0.0, Culture=neutral,
                PublicKeyToken=b03f5f7f11d50a3a"
                description="Uses CryptProtectData and CryptUnProtectData
                Windows APIs to encrypt and decrypt"
                useMachineProtection="true" keyEntropy="" />
        </providers>
    </configProtectedData>
</configuration>
The RsaProtectedConfigurationProvider uses Triple-DES encryption to encrypt the specified sections of the configuration file. This provider has only a few attributes available to it.
The keyContainerName attribute is the defined key container that is used for the encryption/decryption process. By default, this provider uses the default key container built into the .NET Framework, but you can easily switch an application to another key container via this attribute.
The cspProviderName attribute is used only if you have specified a custom cryptographic service provider (CSP) to use with the Windows Cryptographic API (CAPI). If so, you specify the name of the CSP as the value of the cspProviderName attribute.
The useMachineContainer attribute enables you to specify that you want either a machine-wide or user-specific key container. This attribute is quite similar to the useMachineProtection attribute found in the DpapiProtectedConfigurationProvider.
The useOAEP attribute specifies whether to turn on the Optional Asymmetric Encryption and Padding (OAEP) capability when performing the encryption/decryption process.
This chapter covered the basics of the provider model and what providers are available to you as you start working with the various ASP.NET systems at your disposal. Understanding the built-in providers available for each of these systems and how you can fine-tune the behaviors of each provider is important.
This provider model allows for an additional level of abstraction and permits you to decide for yourself on the underlying data stores to be used for the various systems. For example, you have the power to decide whether to store the membership and role management information in SQL Server or in Oracle without making any changes to business or presentation logic!
The next chapter shows you how to take the provider model to the next level.