WHAT’S IN THIS CHAPTER?
WROX.COM CODE DOWNLOADS FOR THIS CHAPTER
Please note that all the code examples in this chapter are available as a part of this chapter’s code download on the book’s website at www.wrox.com on the Download Code tab.
Many web applications must be customized with information that is specific to the end user who is presently viewing the page. In the past, the developer usually provided storage of personalization properties for end users viewing the page by means of cookies, the Session object, or the Application object. Cookies enabled storage of persistent items so that when the end user returned to a web page, any settings related to him were retrieved to be utilized again by the application. Cookies are not the best way to approach persistent user data storage, because they are not accepted by all computers and because a crafty end user can easily alter them.
As you will see in Chapter 19, ASP.NET membership and role management capabilities are ways that ASP.NET can store information about the user. How can you, as the developer, use the same mechanics to store custom information?
ASP.NET 4.5 provides you with an outstanding feature — personalization. The ASP.NET personalization engine provided with this latest release makes an automatic association between the end user viewing the page and any data points stored for that user. The personalization properties that are maintained on a per-user basis are stored on the server and not on the client. These items are conveniently placed in a data store of your choice (such as Microsoft’s SQL Server) and, therefore, the end user can then access these personalization properties on later site visits.
This feature is an ideal way to start creating highly customizable and user-specific sites without building any of the plumbing beforehand. In this case, the plumbing has been built for you! This chapter shows you how the personalization feature is yet another way that the ASP.NET team is making developers’ jobs easier and more productive.
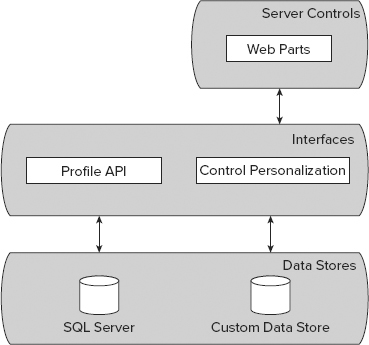
The personalization model provided with ASP.NET 4.5 is simple and, as with most items that come with ASP.NET, is an extensible model as well. Figure 18-1 shows a simple diagram that outlines the personalization model.
From this diagram, you can see the three layers in this model. Look at the middle layer of the personalization model — the Personalization Services layer. This layer contains the Profile API. This Profile API layer enables you to program your end users’ data points into one of the lower-layer data stores.
Although certain controls built into ASP.NET can utilize the personalization capabilities for storing information about the page settings, you can also use this engine to store your own data points. As with Web Parts, you can use these points within your ASP.NET pages.
Below the Personalization Services layer, you’ll find the default personalization data provider for working with Microsoft’s SQL Server starting from version 2000, as well as Microsoft’s SQL Server Express Edition. You are not limited to just this one data store when applying the personalization features of ASP.NET 4.5; you can also extend the model and create a custom data provider for the personalization engine.
Now that you have looked briefly at the personalization model, you can begin using it by creating some stored personalization properties that you can use later within your applications.
The nice thing about creating custom personalization properties is that you can do it so easily. After you create these properties, you gain the capability to have strongly typed access to them. You can create personalization properties that are used only by authenticated users, and also some that anonymous users can utilize. These data points are powerful, mainly because you can start using them immediately in your application without building any underlying infrastructures to support them. As an example of working with the ASP.NET personalization system, this chapter starts by showing you how to create some simple personalization properties. Later, you learn how to use these personalization properties within your application.
When adding a personalization property, you must decide what data items from the user you are going to store. For this example, create a few items about the user that you can use within your application; assume that you want to store the following information about the user:
ASP.NET has a heavy dependency on storing configurations inside XML files, and the ASP.NET 4.5 personalization engine is no different. You define and store all these customization points concerning the end user within the web.config file of the application, as shown in Listing 18-1 (Web.config in the code download for this chapter).
LISTING 18-1: Creating personalization properties in the web.config file
<configuration>
  <system.web>
      <profile>
        <properties>
          <add name="FirstName" />
          <add name="LastName" />
          <add name="LastVisited" />
          <add name="Age" />
          <add name="Member" />
        </properties>
      </profile>
      <authentication mode="Windows" />
  </system.web>
</configuration>
In the <system.web> section of the web.config file, you create a <profile> section to work with the ASP.NET 4.5 personalization engine. Within this <profile> section of the web.config file, you create a <properties> section, where you can define all the properties you want the personalization engine to store.
From this code example, you can see that defining simple properties using the <add> element is rather easy. This element simply takes the name attribute, which takes the name of the property you want to persist.
You start out with the assumption that accessing the page you will build with these properties is already authenticated using Windows authentication (you can read more on authentication and authorization in the next chapter). Later in this chapter, you look at how to apply personalization properties to anonymous users as well. The capability to apply personalization properties to anonymous users is disabled by default (for good reasons).
After you have defined these personalization properties, using them is just as easy as defining them. The next section looks at how to use these definitions in an application.
Now that you have defined the personalization properties in the web.config file, you can use these items in code. For example, you can create a simple form that asks for some of this information from the end user. When the user submits the form, the data is stored in the personalization engine.
In order to make this work, you should set up a new website (we will cover web applications and why personalization properties are a bit harder to work with there later in this chapter) and add Listings 18-1 and 18-2 to it. Also go to the site properties and disable Anonymous and enable Windows Authentication (which should be the default setting anyway). This allows ASP.NET to store personalization information for the current user. Anonymous users will also be covered later in this chapter.
As with the Authentication features, ASP.NET uses SQL Server Express by default as a data store, so it needs to be set up.
Listing 18-2 shows how to access the profile information set up in Listing 18-1.
LISTING 18-2: Using the defined personalization properties
VB
<%@ Page Language="VB" %>
    <script runat="server">
 Protected Sub Button1_Click(ByVal sender As Object, ByVal e As System.EventArgs)
  If Page.User.Identity.IsAuthenticated Then
    Profile.FirstName = TextBox1.Text
    Profile.LastName = TextBox2.Text
    Profile.Age = TextBox3.Text
    Profile.Member = Radiobuttonlist1.SelectedItem.Text
    Profile.LastVisited = DateTime.Now().ToString()
        Label1.Text = "<p>Stored information includes:</p><p>" &
        "First name: " & Profile.FirstName &
        "<br />Last name: " & Profile.LastName &
        "<br />Age: " & Profile.Age &
        "<br />Member: " & Profile.Member &
        "<br />Last visited: " & Profile.LastVisited & "</p>"
  Else
    Label1.Text = "You must be authenticated!"
  End If
 End Sub
</script>
<html xmlns="http://www.w3.org/1999/xhtml">
<head runat="server">
  <title>Storing Personalization</title>
</head>
<body>
  <form id="form1" runat="server">
    <p>First Name:
    <asp:TextBox ID="TextBox1" Runat="server"></asp:TextBox></p>
    <p>Last Name:
    <asp:TextBox ID="TextBox2" Runat="server"></asp:TextBox></p>
    <p>Age:
    <asp:TextBox ID="TextBox3" Runat="server" Width="50px"
    MaxLength="3"></asp:TextBox></p>
    <p>Are you a member?
    <asp:RadioButtonList ID="Radiobuttonlist1" Runat="server">
      <asp:ListItem Value="1">Yes</asp:ListItem>
      <asp:ListItem Value="0" Selected="True">No</asp:ListItem>
    </asp:RadioButtonList></p>
    <p><asp:Button ID="Button1" Runat="server" Text="Submit"
      OnClick="Button1_Click" />
    </p>
    <hr /><p>
    <asp:Label ID="Label1" Runat="server"></asp:Label></p>
  </form>
</body>
</html>
C#
<%@ Page Language="C#" %>
<script runat="server">
  protected void Button1_Click(object sender, EventArgs e)
  {
   if (Page.User.Identity.IsAuthenticated)
   {
    Profile.FirstName = TextBox1.Text;
    Profile.LastName = TextBox2.Text;
    Profile.Age = TextBox3.Text;
    Profile.Member = Radiobuttonlist1.SelectedItem.Text;
    Profile.LastVisited = DateTime.Now.ToString();
    Label1.Text = "<p>Stored information includes:</p><p>" +
        "First name: " + Profile.FirstName +
        "<br />Last name: " + Profile.LastName +
        "<br />Age: " + Profile.Age +
        "<br />Member: " + Profile.Member +
        "<br />Last visited: " + Profile.LastVisited + "</p>";
   }
   else
   {
    Label1.Text = "You must be authenticated!";
   }
  }
</script>
You work with personalization properties similarly to the way you worked with the Session object in the past, but note that the personalization properties you are storing and retrieving are not key based. Therefore, when working with them you do not need to remember key names.
All items stored by the personalization system are type cast to a particular .NET data type. By default, these items are stored as type String, and you have early-bound access to the items stored. To store an item, you simply populate the personalization property directly using the Profile object:
Profile.FirstName = TextBox1.TextTo retrieve the same information, you simply grab the appropriate property of the Profile class as shown here:
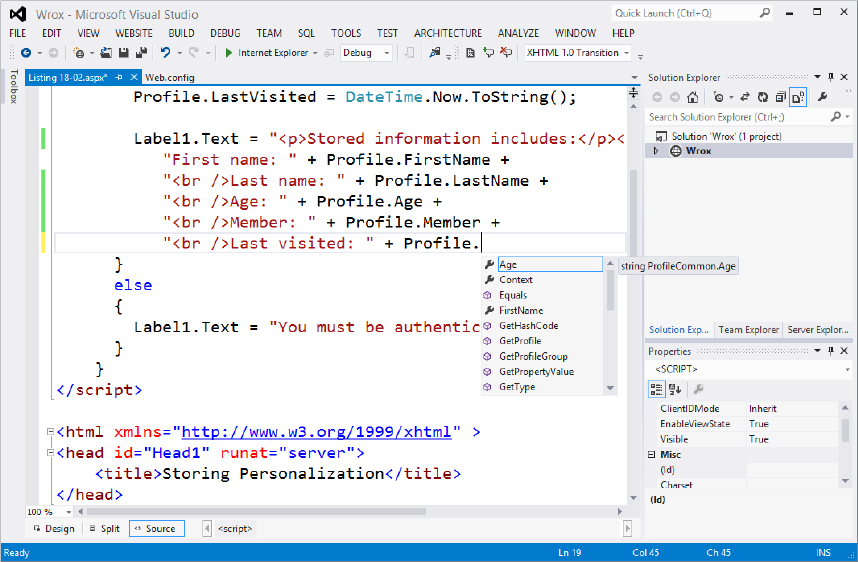
Label1.Text = Profile.FirstNameThe great thing about using the Profile class and all the personalization properties defined in the Code view is that this method provides IntelliSense as you build your pages. When you are working with the Profile class in this view, all the items you define are listed as available options through the IntelliSense feature, as illustrated in Figure 18-2.
All these properties are accessible in IntelliSense because the Profile class is hidden and compiled dynamically behind the scenes whenever you save the personalization changes made to the web.config file. After you save these items in the web.config file, these properties are available to you throughout your application in a strongly typed manner.
When run, the page from Listing 18-2 produces the results shown in Figure 18-3. You may need to activate Windows authentication in your website settings and disable anonymous authentication.
In addition to using early-bound access techniques, you can also use late-bound access for the items that you store in the personalization engine. Listing 18-3 shows the late-bound access technique.
LISTING 18-3: Using late-bound access
VB
Dim myFirstName As String
myFirstName = Profile.GetPropertyValue("FirstName").ToString()
C#
string myFirstName;
myFirstName = Profile.GetPropertyValue("FirstName").ToString();
Whether it is early-bound access or late-bound access, you can easily store and retrieve personalization properties for a particular user using this capability afforded by ASP.NET 4.5. All this storage and retrieval is done in the personalization engine’s simplest form — now take a look at how you can customize for specific needs in your applications.
Items you have stored about a particular end user somewhere in the beginning of the application can be retrieved later for use on any other page within the application. Because different sections of your web applications store different personalization properties, you sometimes end up with a large collection of items that you need to store and make accessible.
To make it easier not only to store the items, but also to retrieve them, the personalization engine enables you to store your personalization properties in groups, as shown in Listing 18-4.
LISTING 18-4: Creating personalization groups in the web.config file
<configuration>
   <system.web>
      <profile>
        <properties>
          <add name="FirstName" />
          <add name="LastName" />
          <add name="LastVisited" />
          <add name="Age" />
          <group name="MemberDetails">
           <add name="Member" />
           <add name="DateJoined" />
           <add name="PaidDuesStatus" />
           <add name="Location" />
          </group>
          <group name="FamilyDetails">
           <add name="MarriedStatus" />
           <add name="DateMarried" />
           <add name="NumberChildren" />
           <add name="Location" />
          </group>
         </properties>
      </profile>
      <authentication mode="Windows" />
   </system.web>
</configuration>
From the code in Listing 18-4, which is placed within the web.config file, you can see that two groups are listed. The first group is the MemberDetails group, which has four specific items defined; the second group — FamilyDetails — has three other related items defined. You define personalization groups using the <group> element within the <properties> definition. You specify the name of the group using the name attribute, just as you specify the <add> element. You can define as many groups as you deem necessary or as have been recommended as good practice to employ.
You can also see from Listing 18-4 that some items are not defined in any particular group. Mixing properties defined from within a group with those that are not is possible. The items not defined in a group in Listing 18-4 can still be accessed in the manner illustrated previously:
Label1.Text = Profile.FirstNameNow, concerning working with personalization groups, you can access your defined items in a logical manner using nested namespaces:
Label1.Text = Profile.MemberDetails.DateJoined
Label2.Text = Profile.FamilyDetails.MarriedStatus
From this example, you can see that two separate items from each of the defined personalization groups were accessed in a logical manner. When you study the defined properties in the web.config file of your application, you can see that each of the groups in the example has a property with the same name — Location. This is possible because they are defined using personalization groups. With this structure, getting at each of the Location properties by specifying the appropriate group is now possible:
Label1.Text = Profile.MemberDetails.Location
Label2.Text = Profile.FamilyDetails.LocationBy default, when you store personalization properties, these properties are created as type System.String. Changing the type to another type altogether through configuration settings within the web.config file is quite easy, however. To define the name of the personalization property along with its appropriate type, you use the type attribute of the <add> element contained within the <properties> section, as shown in Listing 18-5.
LISTING 18-5: Defining types for personalization properties
<properties>
  <add name="FirstName" type="System.String" />
  <add name="LastName" type="System.String" />
  <add name="LastVisited" type="System.DateTime" />
  <add name="Age" type="System.Int32" />
  <add name="Member" type="System.Boolean" />
</properties>
The first two properties, FirstName and LastName, are cast as type System.String. This is not actually required. Even if you omitted this step, they would still be cast as type String because that is the default type of any property defined in the personalization system (if no other type is defined). The next personalization property is the LastVisited property, which is defined as type System.DateTime and used to store the date and time of the end user’s last visit to the page. Beyond that, you can see the rest of the personalization properties are defined using a specific .NET data type.
This approach is preferred because it gives you type-checking capabilities as you code your application and use the personalization properties you have defined.
As you can see from the earlier examples that show you how to define types for the personalization properties, defining and type casting properties to particular data types that are available in the .NET Framework are quite simple. You can easily define items such as System.Integer, System.String, System.DateTime, System.Byte, and System.Boolean within the web.config file. But how do you go about defining complex types?
Personalization properties that utilize custom types are just as easy to define as personalization properties that use simple types. Custom types enable you to store complex items such as shopping cart information or other status information from one use of the application to the next. Listing 18-6 first shows a class, ShoppingCart, which you use later in one of the personalization property definitions (ShoppingCart.cs and ShoppingCart.vb in the code download for this chapter).
LISTING 18-6: Creating a class to use as a personalization type
VB
<Serializable()> _
Public Class ShoppingCart
  Private PID As String
  Private CompanyProductName As String
  Private Number As Integer
  Private Price As Decimal
  Private DateAdded As DateTime
      Public Property ProductID() As String
    Get
      Return PID
    End Get
    Set(ByVal value As String)
      PID = value
    End Set
  End Property
      Public Property ProductName() As String
    Get
      Return CompanyProductName
    End Get
    Set(ByVal value As String)
      CompanyProductName = value
    End Set
  End Property
      Public Property NumberSelected() As Integer
    Get
      Return Number
    End Get
    Set(ByVal value As Integer)
      Number = value
    End Set
  End Property
      Public Property ItemPrice() As Decimal
    Get
      Return Price
    End Get
    Set(ByVal value As Decimal)
      Price = value
    End Set
  End Property
      Public Property DateItemAdded() As DateTime
    Get
      Return DateAdded
    End Get
    Set(ByVal value As DateTime)
      DateAdded = value
    End Set
  End Property
End Class
C#
using System;
[Serializable]
public class ShoppingCart
{
  private string PID;
  private string CompanyProductName;
  private int Number;
  private decimal Price;
  private DateTime DateAdded;
public ShoppingCart() {}
public string ProductID
  {
    get {return PID;}
    set {PID = value;}
  }
public string ProductName
  {
    get { return CompanyProductName; }
    set { CompanyProductName = value; }
  }
public int NumberSelected
  {
    get { return Number; }
    set { Number = value; }
  }
public decimal ItemPrice
  {
    get { return Price; }
    set { Price = value; }
  }
public DateTime DateItemAdded
  {
    get { return DateAdded; }
    set { DateAdded = value; }
  }
}
This simple shopping cart construction can now store the end user’s shopping cart basket as the user moves around on an e-commerce site. The basket can even be persisted when the end user returns to the site at another time. Be sure to note that the class requires a Serializable attribute preceding the class declaration to ensure proper transformation to XML or binary.
Listing 18-7 shows how you would specify from within the web.config file that a personalization property is this complex type, such as a ShoppingCart type.
LISTING 18-7: Using complex types for personalization properties
<properties>
  <add name="FirstName" type="System.String" />
  <add name="LastName" type="System.String" />
  <add name="LastVisited" type="System.DateTime" />
  <add name="Age" type="System.Int32" />
  <add name="Member" type="System.Boolean" />
  <add name="Cart" type="ShoppingCart" serializeAs="Binary" />
</properties>
Just as the basic data types are stored in the personalization data stores, this construction enables you to easily store custom types and to have them serialized into the end data store in the format you choose. In this case, the ShoppingCart object is serialized as a binary object into the data store. The serializeAs attribute can take the values defined in the following list:
In addition to defining the data types of the personalization properties, you can also define their default values directly in the web.config file. By default, the personalization properties you create do not have a value, but you can easily change this using the defaultValue attribute of the <add> element. Listing 18-8 shows how to define default values.
LISTING 18-8: Defining default values for personalization properties
<properties>
  <add name="FirstName" type="System.String" />
  <add name="LastName" type="System.String" />
  <add name="LastVisited" type="System.DateTime" />
  <add name="Age" type="System.Int32" />
  <add name="Member" type="System.Boolean" defaultValue="false" />
</properties>
From this example, you can see that only one of the personalization properties is provided with a default value. The last personalization property, Member in this example, is given a default value of false. This means that when you add a new end user to the personalization property database, Member is defined instead of remaining a blank value within the system.
Making personalization properties read-only is also possible. To do it, you simply add the readOnly attribute to the <add> element:
<add name="StartDate" type="System.DateTime" readOnly="true" />To make the personalization property a read-only property, you give the readOnly attribute a value of true. By default, this property is set to false.
A great feature in ASP.NET enables anonymous end users to utilize the personalization features it provides. This is important if a site requires registration of some kind. For example, many e-commerce sites allow anonymous end users to shop a site and use the site’s shopping cart before the shoppers register with the site.
By default, anonymous personalization is turned off because it consumes database resources on popular sites. Therefore, one of the first steps in allowing anonymous personalization is to turn on this feature using the appropriate setting in the web.config file. You must also make some changes regarding how the properties are actually defined in the web.config file and to determine whether you are going to allow anonymous personalization for your application.
As shown in Listing 18-9, you can turn on anonymous identification using the <anonymousIdentification> element to enable the personalization engine to identify the unknown end users.
LISTING 18-9: Allowing anonymous identification
<configuration>
    <system.web>
        <anonymousIdentification enabled="true" />
    </system.web>
</configuration>
To enable anonymous identification of the end users who might visit your applications, you add an <anonymousIdentification> element to the web.config file within the <system.web> nodes. Then within the <anonymousIdentification> element, you use the enabled attribute and set its value to true. Remember that, by default, this value is set to false.
When anonymous identification is turned on, ASP.NET uses a unique identifier for each anonymous user who comes to the application. This identifier is sent with each and every request, although after the end user becomes authenticated by ASP.NET, the identifier is removed from the process.
For an anonymous user, information is stored by default as a cookie on the end user’s machine. Additional information (the personalization properties that you enable for anonymous users) is stored in the specified data store on the server.
To see the use of anonymous identification in action, turn off the Windows Authentication for your example application and, instead, use Forms Authentication. Listing 18-10 demonstrates this change.
LISTING 18-10: Turning off Windows Authentication and using Forms Authentication
<configuration>
    <system.web>
        <anonymousIdentification enabled="true" />
        <authentication mode="Forms" />
    </system.web>
</configuration>
With this code in place, if you run the page from the earlier example in Listing 18-2, you see the header presented in Listing 18-11.
LISTING 18-11: Setting an anonymous cookie in the HTTP header
HTTP/1.1 200 OK
Server: Microsoft-IIS/8.0
Date: Sun, 30 Dec 2012 21:02:33 GMT
X-AspNet-Version: 4.0.30319
X-SourceFiles: =?UTF-8?B?QzpcVXNlcnNcQ2hyaXN0aWFuXERvY3VtZW50c1xWaXN1YWwgU3R1ZGlvIDIwMTJcV2ViU2l0ZXNcV3JveFxMaXN0aW5nIDE4LTAyLmFzcHg=?=
X-Powered-By: ASP.NET
Set-Cookie: .ASPXANONYMOUS=HduG02IdzgEkAAAAMzA4NzIxZDUtZDk4ZC00ODQyLTk3ZDItY2RhNzI5N2NiODZjq7SGklbzPMq49DZkIgxpDBBXlk7ZD2mP5lC5e4xcPFY1; expires=Sun, 10-Mar-2013 07:42:33 GMT; path=/; HttpOnly
Cache-Control: private
Content-Type: text/html; charset=utf-8
Content-Length: 1419
Connection: Close
From this HTTP header, you can see that a cookie — .ASPXANONYMOUS—is set to a hashed value for later retrieval by the ASP.NET personalization system.
Cookies are used by default under the cookie name .ASPXANONYMOUS. You can change the name of this cookie from the <anonymousIdentification> element in the web.config file by using the cookieName attribute, as shown in Listing 18-12.
LISTING 18-12: Changing the name of the cookie
<configuration>
  <system.web>
    <anonymousIdentification
      enabled="true"
      cookieName=".ASPXWenzWebApplication" />
  </system.web>
</configuration>Also, by default, the cookie stored on the end user’s machine is stored for 100,000 minutes (which is almost 70 days). If you want to change this value, you do it within this <anonymousIdentification> element using the cookieTimeout attribute, as shown in Listing 18-13.
LISTING 18-13: Changing the length of time the cookie is stored
<configuration>
  <system.web>
    <anonymousIdentification
      enabled="true"
      cookieTimeout="1440" />
  </system.web>
</configuration>
In this case, the cookieTimeout value was changed to 1440 — meaning 1,440 minutes (or one day). This setting would be ideal for something like a shopping cart where you do not want to persist the identification of the end user too long.
Although anonymous identifiers are stored through the use of cookies, you can also easily change this method. Cookies are, by far, the preferred way to achieve identification, but you can also do it without the use of cookies. Other options include using the URI or device profiles. Listing 18-14 shows an example of using the URI to place the identifiers.
LISTING 18-14: Specifying how cookies are stored
<configuration>
  <system.web>
    <anonymousIdentification
      enabled="true"
      cookieless="UseUri" />
  </system.web>
</configuration>
Besides UseUri, other options include UseCookies, AutoDetect, and UseDeviceProfile. The following list reviews each of the options:
ASP.NET uses a globally unique identifier (GUID) to make the anonymous identifiers unique. You can also now grab hold of this unique identifier for your own use. To retrieve the GUID, the Request object has been enhanced with an AnonymousID property. The AnonymousID property returns a value of type String, which you can use in your code, as shown here:
Label1.Text = Request.AnonymousIDIn working with the creation of anonymous users, be aware of an important event that you can use from your Global.asax file for managing the process: AnonymousIdentification_Creating.
By using the AnonymousIdentification_Creating event, you can work with the identification of the end user as it occurs. For example, if you do not want to use GUIDs for uniquely identifying the end user, you can change the identifying value from this event instead.
To do so, create the event using the event delegate of type AnonymousIdentificationEventArgs, as shown in Listing 18-15.
LISTING 18-15: Changing the unique identifier of the anonymous user
VB
Public Sub AnonymousIdentification_Creating(ByVal sender As Object, _
  ByVal e As AnonymousIDentificationEventArgs)
        e.AnonymousID = "Bubbles " & DateTime.Now()
End Sub
C#
public void AnonymousIdentification_Creating(object sender,
  AnonymousIDentificationEventArgs e)
{
    e.AnonymousID = "Bubbles " + DateTime.Now;
}
The AnonymousIdentificationEventArgs event delegate exposes an AnonymousID property that assigns the value used to uniquely identify the anonymous user. Now, instead of a GUID to uniquely identify the anonymous user as
d13fafec-244a-4d21-9137-b213236ebedbthe AnonymousID property is changed within the AnonymousIdentification_Creating event to
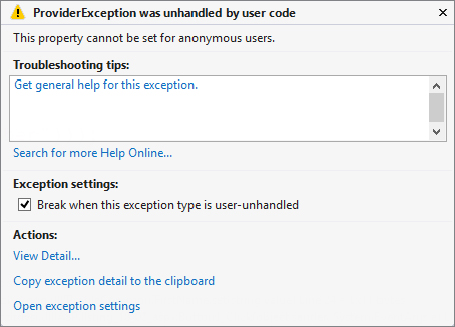
Bubbles 12/31/2012 2:07:33 PMIf you have tried to get the anonymous capability working, you might have received the error shown in Figure 18-4.
To get your application to work with anonymous users, you must specify which personalization properties you want to enable for the anonymous users visiting your pages. You can also do this through the web.config file by adding the allowAnonymous attribute to the <add> element of the properties you have defined within the <properties> section (see Listing 18-16).
LISTING 18-16: Turning on anonymous capabilities for personalization properties
<properties>
  <add name="FirstName" type="System.String" />
  <add name="LastName" type="System.String" />
  <add name="LastVisited" type="System.DateTime" allowAnonymous="true" />
  <add name="Age" type="System.Integer" />
  <add name="Member" type="System.Boolean" />
</properties>
In this example, the LastVisited property is set to allow anonymous users by setting the allowAnonymous attribute to true. Because this property is the only one that works with anonymous users, the rest of the defined properties do not store information for these types of users. If you are still checking if the user is authenticated in your code, be sure to comment that out for these examples to work.
Taking into account everything said so far about anonymous users, you should be very careful about how you approach anonymous user profile storage. Storing profile information about anonymous users can dramatically populate the data store you are using. For example, in my examples, I used Microsoft’s SQL Server Express Edition, and I stored profile information for one authenticated user and then for a single anonymous user. This puts information for both these users in the aspnet_Profile and the aspnet_Users tables.
Figure 18-5 shows the two users listed in the aspnet_Users table.
In this figure, the anonymous user is the first line in the table, and you can see that this user has a rather cryptic name, which is the Request.AnonymousID presented earlier. The other big difference between the two users appears in the IsAnonymous column in the table. The anonymous user has a setting of true for this column, whereas the authenticated user has a setting of false. Because your database can fill up quickly with anonymous user information, you should weigh which information you really must store on these types of users.
When an ASP.NET page is invoked, ASP.NET creates a class (ProfileCommon) by inheriting from the ProfileBase class, which it uses to strongly type the profile properties that were defined in the web.config file. This created class, meant to deal with the user’s profile store, gets and sets profile properties through the use of the GetPropertyValue and SetPropertyValue methods from the ProfileBase class.
As you would expect, ASP.NET provides you with the hooks necessary to get at specific Profile events using the ProfileModule class. The ProfileModule class is what ASP.NET itself uses to create and store profile information in the page’s Profile object.
The ProfileModule class exposes three events that you can use to handle your user’s profile situations. These events — MigrateAnonymous, Personalize, and ProfileAutoSaving — are focused around the area of authentication. Because you just saw how to work with anonymous users in your applications, this section now looks at how to migrate these users from anonymous users to authenticated users, because you are most likely going to want to move their profile properties as well as change their status.
When working with anonymous users, you must be able to migrate anonymous users to registered users. For example, after an end user fills a shopping cart, he can register on the site to purchase the items. At that moment, the end user switches from being an anonymous user to a registered user.
For this reason, ASP.NET provides a Profile_MigrateAnonymous event handler that enables you to migrate anonymous users to registered users. The Profile_MigrateAnonymous event requires a data class of type ProfileMigrateEventArgs. You place it either in the page that deals with the migration or within the Global.asax file (if it can be used from anywhere within the application). Listing 18-17 shows the use of this event.
LISTING 18-17: Migrating anonymous users for particular personalization properties
VB
Public Sub Profile_MigrateAnonymous(ByVal sender As Object, _
  ByVal e As ProfileMigrateEventArgs)
   Dim anonymousProfile As ProfileCommon = Profile.GetProfile(e.AnonymousID)
   Profile.LastVisited = anonymousProfile.LastVisited
End Sub
C#
public void Profile_MigrateAnonymous(object sender,
  ProfileMigrateEventArgs e)
{
   ProfileCommon anonymousProfile = Profile.GetProfile(e.AnonymousID);
   Profile.LastVisited = anonymousProfile.LastVisited;
}
In this example, you create an instance of the ProfileCommon object and populate it with the profile from the visiting anonymous user. From there, you can use the instance to get at all the profile properties of that anonymous user, which means that you can then populate a profile through a movement from the anonymous user’s profile information to the authenticated user’s profile system.
Listing 18-17 shows how to migrate a single personalization property from an anonymous user to the new registered user. In addition to migrating single properties, you can also migrate properties that come from personalization groups, as shown in Listing 18-18.
LISTING 18-18: Migrating anonymous users for items in personalization groups
VB
Public Sub Profile_MigrateAnonymous(ByVal sender As Object, _
  ByVal e As ProfileMigrateEventArgs)
    Dim au As ProfileCommon = Profile.GetProfile(e.AnonymousID)
    If au.MemberDetails.DateJoined <> "" Then
       Profile.MemberDetails.DateJoined = DateTime.Now().ToString()
       Profile.FamilyDetails.MarriedStatus = au.FamilyDetails.MarriedStatus
    End If
    AnonymousIdentificationModule.ClearAnonymousIdentifier()
End Sub
C#
public void Profile_MigrateAnonymous(object sender,
  ProfileMigrateEventArgs e)
{
    ProfileCommon au = Profile.GetProfile(e.AnonymousID);
    if (au.MemberDetails.DateJoined != String.Empty) {
      Profile.MemberDetails.DateJoined = DateTime.Now.ToString();
      Profile.FamilyDetails.MarriedStatus = au.FamilyDetails.MarriedStatus;
    }
    AnonymousIdentificationModule.ClearAnonymousIdentifier();
}
Using this event in the Global.asax file enables you to logically migrate anonymous users as they register themselves with your applications. The migration process also enables you to pick and choose which items you migrate and to change the values as you want.
Besides working with anonymous users from the Global.asax file, you can also programmatically personalize the profiles retrieved from the personalization store. You do so through the use of the Profile_Personalize event. Listing 18-19 demonstrates an example use of this event.
LISTING 18-19: Personalizing a retrieved profile
VB
Public Sub Profile_Personalize(sender As Object, args As ProfileEventArgs)
  Dim checkedProfile As ProfileCommon
  If User Is Nothing Then Return
  checkedProfile = CType(ProfileBase.Create(User.Identity.Name), ProfileCommon)
  If (Date.Now.IsDaylightSavingTime()) Then
    checkedProfile = checkedProfile.GetProfile("TimeDifferenceUser")
  Else
    checkedProfile = checkedProfile.GetProfile("TimeUser")
  End If
  If Not checkedProfile Is Nothing Then
    args.Profile = checkedProfile
  End If
End Sub
C#
public void Profile_Personalize(object sender, ProfileEventArgs args)
{
  ProfileCommon checkedProfile;
  if (User == null) { return; }
  checkedProfile = (ProfileCommon)ProfileBase.Create(User.Identity.Name);
  if (DateTime.Now.IsDaylightSavingTime()) {
    checkedProfile = checkedProfile.GetProfile("TimeDifferenceUser");
  }
  else {
    checkedProfile = checkedProfile.GetProfile("TimeUser");
  }
  if (checkedProfile != null) {
    args.Profile = checkedProfile;
  }
}
In this case, based on a specific parameter (whether it is Daylight Savings Time or something else), you are able to assign a specific profile to the user. You do this by using the ProfileModule.Personalize event, which you would usually stick inside the Global.asax page.
When you are working with the profile capabilities provided by ASP.NET, the page automatically saves the profile values to the specified data store at the end of the page’s execution. You can set this capability, which is turned on (set to true) by default, to false through the use of the automaticSaveEnabled attribute in the <profile> node in the web.config file, as shown in Listing 18-20.
LISTING 18-20: Working with the automaticSaveEnabled attribute
<profile automaticSaveEnabled="false">
   <properties>
      <add name="FirstName" />
      <add name="LastName" />
      <add name="LastVisited" />
      <add name="Age" />
      <add name="Member" />
   </properties>
</profile>
If you have set the automaticSaveEnabled attribute value to false, you will have to invoke the ProfileBase.Save() method yourself. In most cases, though, you are going to leave this setting on true. After a page request has been made and finalized, the ProfileModule.ProfileAutoSaving event is raised. You can also work with this event, as shown in Listing 18-21. You would place this event in the Global.asax file.
LISTING 18-21: Using the ProfileAutoSaving event to turn off the auto-saving feature
VB
Public Sub Profile_ProfileAutoSaving(sender As Object,
 args As ProfileAutoSaveEventArgs)
  If Profile.PaidDueStatus.HasChanged Then
    args.ContinueWithProfileAutoSave = True
  Else
    args.ContinueWithProfileAutoSave = False
  End If
End Sub
C#
public void Profile_ProfileAutoSaving(object sender, ProfileAutoSaveEventArgs args)
{
  if (Profile.PaidDueStatus.HasChanged) {
    args.ContinueWithProfileAutoSave = true;
  } else {
    args.ContinueWithProfileAutoSave = false;
  }
}
In this case, when the Profile_ProfileAutoSaving event is triggered, you can then work within this event and change some behaviors. Listing 18-21 looks to see whether the Profile.PaidDueStatus property has changed. If it has changed, the auto-saving feature of the profile system is continued; if the Profile.PaidDueStatus has not changed, the auto-saving feature is turned off.
As convenient as the access to profile properties is, by default, only ASP.NET Web Site Projects (WSP) support this feature. More common, however, are ASP.NET Web Application Projects (WAP). If you are using one of those, the shortcut access to profile properties is not available. When working with WSP, ASP.NET automatically creates proxy classes that expose all profile properties; this is not the case with WAP.
However, there is a more or less easy way to emulate such a shortcut access: Just create your own profile class. Former ASP.NET team member Jon Galloway has more details in his excellent writeup at http://weblogs.asp.net/jgalloway/archive/2008/01/19/writing-a-custom-asp-net-profile-class.aspx, but here are the basic steps.
First, you need to create a class that derives from ProfileBase. In here you add properties for the profile options you would like to have. Even support for anonymous access is available by using the SettingsAllowAnonymous attribute. Listing 18-22 shows a sample implementation for a shortened version of the profile properties used throughout this chapter.
LISTING 18-22: Using profile properties within Web Application Projects
VB
Imports System.Web.Profile
Imports System.Web.Security

Namespace Wrox
    Public Class UserProfile
        Inherits ProfileBase

        Public Shared Function GetUserProfile(username As String) As UserProfile
            Return CType(Create(username), UserProfile)
        End Function

        Public Shared Function GetUserProfile() As UserProfile
            Return CType(Create(Membership.GetUser().UserName), UserProfile)
        End Function

        <SettingsAllowAnonymous(False)> _
        Public Property FirstName() As String
            Get
                Return MyBase.GetPropertyValue("FirstName").ToString()
            End Get

            Set(value As String)
                MyBase.SetPropertyValue("FirstName", value)
            End Set
        End Property

        <SettingsAllowAnonymous(False)> _
        Public Property LastName() As String
            Get
                Return MyBase.GetPropertyValue("LastName").ToString()
            End Get

            Set(value As String)
                MyBase.SetPropertyValue("LastName", value)
            End Set
        End Property

        <SettingsAllowAnonymous(True)>
        Public Property LastVisited() As DateTime
            Get
                Return CType(MyBase.GetPropertyValue("LastVisited"), DateTime)
            End Get

            Set(value As DateTime)
                MyBase.SetPropertyValue("LastVisited", value)
            End Set
        End Property

    End Class
End Namespace
C#
using System.Web.Profile;
using System.Web.Security;

namespace Wrox
{
    public class UserProfile : ProfileBase
    {
        public static UserProfile GetUserProfile(string username)
        {
            return Create(username) as UserProfile;
        }

        public static UserProfile GetUserProfile()
        {
            return Create(Membership.GetUser().UserName) as UserProfile;
        }

        [SettingsAllowAnonymous(false)]
        public string FirstName
        {
            get { return base["FirstName"] as string; }
            set { base["FirstName"] = value; }
        }

        [SettingsAllowAnonymous(false)]
        public string LastName
        {
            get { return base["LastName"] as string; }
            set { base["LastName"] = value; }
        }

        [SettingsAllowAnonymous(true)]
        public DateTime LastVisited
        {
            get { return base["LastVisited"] as DateTime; }
            set { base["LastVisited"] = value; }
        }
    }
}
Then, you need to make sure in web.config that the profile properties come from the class you just created. The setting shown in Listing 18-23 shows how to do this.
LISTING 18-23: Referencing the profile class in web.config
<profile defaultProvider="AspNetSqlProfileProvider" inherits="Wrox.UserProfile">
</profile>
Finally, the API shown in Listing 18-19 provides access to the profile properties.
As shown in Figure 18-1 earlier in the chapter, the middle tier of the personalization model, the personalization API layer, communicates with a series of default data providers. By default, the personalization model uses Microsoft SQL Server Express Edition files for storing the personalization properties you define. You are not limited to just this type of data store, however. You can also use the Microsoft SQL Server data provider to enable you to work with Microsoft SQL Server 7.0 or higher. Besides the Microsoft SQL Server data provider, the architecture also enables you to create your own data providers if one of these data stores does not fit your requirements.
The Microsoft SQL Server data provider does enable you to work with your SQL Server Express Edition files. The SQL Server data provider is the default provider used by the personalization system provided by ASP.NET. When used with Visual Studio 2012, the IDE places the ASPNETDB.MDF file within your application’s App_Data folder.
As you look through the machine.config file, notice the sections that deal with how the personalization engine works with this database. In the first reference to the LocalSqlServer file, you find a connection string to this file (shown in Listing 18-24) within the <connectionStrings> section of the file.
LISTING 18-24: Adding a connection string to the SQL Server Express file
<configuration>
  <connectionStrings>
    <clear />
    <add name="LocalSqlServer"
     connectionString="data source=.\SQLEXPRESS;Integrated Security=SSPI;
     AttachDBFilename=|DataDirectory|aspnetdb.mdf;User Instance=true"
     providerName="System.Data.SqlClient" />
  </connectionStrings>
</configuration>
In this example, you see that a connection string with the name LocalSqlServer has been defined. The location of the file, specified by the connectionString attribute, points to the relative path of the file. This means that in every application you build that utilizes the personalization capabilities, the default SQL Server provider should be located in the application’s App_Data folder and have the name of ASPNETDB.MDF.
The SQL Server Express file’s connection string is specified through the LocalSqlServer declaration within this <connectionStrings> section. You can see the personalization engine’s reference to this in the <profile> section within the machine.config file. The <profile> section includes a subsection listing all the providers available to the personalization engine, as shown in Listing 18-25.
LISTING 18-25: Adding a new SQL Server data provider
<configuration>
  <system.web>
    <profile>
      <providers>
        <add name="AspNetSqlProfileProvider"
          connectionStringName="LocalSqlServer" applicationName="/"
          type="System.Web.Profile.SqlProfileProvider, System.Web,
            Version=4.0.0.0, Culture=neutral,
            PublicKeyToken=b03f5f7f11d50a3a" />
      </providers>
    </profile>
  </system.web>
</configuration>
From this, you can see that you add a provider by using the <add> element. Within this element, the connectionStringName attribute points to what was declared in the <connectionString> attribute from Listing 18-24.
You can specify an entirely different Microsoft SQL Server Express Edition file other than the one specified in the machine.config file. Create a connection string that points to a new SQL Server Express file that is a templated version of the ASPNETDB.MDF file. At this point, you can use <connectionString> to point to this new file. If you change these values in the machine.config file, all the ASP.NET applications that reside on the server will then use this specified file. If you make the changes only to the web.config file, however, only the application using this particular web.config file uses this new data store. Other applications on the server remain unchanged.
You will likely find working with the personalization framework using the SQL Server Express files quite easy. But when you work with larger applications that require the factors of performance and reliability, you should use the SQL Server personalization provider along with SQL Server starting from version 7.0 (and also including 2000, 2005, 2008, and 2012). If this data store is available, you should always try to use this option instead of the default SQL Server Express Edition files.
If you worked with the SQL Server personalization provider using SQL Server Express files as explained earlier, you probably found it easy to use. The personalization provider works right out of the box, without any setup or configuration on your part. Using the SQL Server personalization provider with a full-blown version of SQL Server, however, is a bit of a different story. Although working with it is not difficult, you must set up and configure your SQL Server before using it.
ASP.NET 4.5 provides a couple of ways to set up and configure SQL Server for the personalization framework. One way is through the ASP.NET SQL Server Setup Wizard, and the other is by running some of the SQL Server scripts provided with the .NET Framework 4.5.
To use the ASP.NET SQL Server Setup Wizard to set up your SQL Server for the ASP.NET 4.5 personalization features, open the aspnet_regsql.exe tool by invoking it from the Visual Studio 2012 Command Prompt. At the prompt, type in aspnet_regsql.exe to open the GUI of the ASP.NET SQL Server Setup Wizard. If you step through the wizard, you can set up your SQL Server instance for many of the ASP.NET systems, such as the personalization system.
Another option for setting up and configuring SQL Server for the personalization framework is to use the same SQL scripts that these tools and wizards use. If you look at C:\WINDOWS\Microsoft.NET\Framework\v4.0.xxxxx\, from this location you can see the install and remove scripts — InstallPersonalization.sql and UninstallPersonalization.sql. Running these scripts provides your database with the tables needed to run the personalization framework. Be forewarned that you must run the InstallCommon.sql script before running the personalization script (or any of the new other ASP.NET system scripts).
After you have set up your SQL Server database for the personalization system, the next step is to redefine the personalization provider so that it works with this instance (instead of with the default Microsoft SQL Server Express Edition files).
You accomplish this step in the web.config file of your application. Here, you want to configure the provider and then define this provider instance as the provider to use. Listing 18-26 shows these additions plus the enlarged <profile> section of the web.config file.
LISTING 18-26: Connecting the SqlProfileProvider to SQL Server
<configuration>
  <connectionStrings>
    <add name="LocalSql2012Server"
     connectionString="data source=127.0.0.1;Integrated Security=SSPI" />
  </connectionStrings>
  <profile defaultProvider="AspNetSql2012ProfileProvider">
    <providers>
      <clear />
      <add name="AspNetSql2012ProfileProvider"
        connectionStringName="LocalSql2012Server" applicationName="/"
        type="System.Web.Profile.SqlProfileProvider, System.Web,
         Version=4.0.0.0, Culture=neutral,
         PublicKeyToken=b03f5f7f11d50a3a" />
    </providers>
    <properties>
      <add name="FirstName" />
      <add name="LastName" />
      <add name="LastVisited" />
      <add name="Age" />
      <add name="Member" />
    </properties>
  </profile>
</configuration>
The big change you make to this profile definition is to use the defaultProvider attribute with a value that is the name of the provider you want to use — in this case, the newly created SQL Server provider AspNetSql2012ProfileProvider. You can also make this change to the machine.config file by changing the <profile> element, as shown in Listing 18-27.
LISTING 18-27: Using SQL Server as the provider in the machine.config file
<configuration>
  <system.web>
       . . .
       <profile enabled="true" defaultProvider="AspNetSql2012ProfileProvider">
       . . .
       </profile>
       . . .
  </system.web>
</configuration>
This change forces each and every application that resides on this server to use this new SQL Server provider instead of the default SQL Server provider (unless this command is overridden in the application’s web.config file).
You are not limited to using a single datastore or provider. Instead, you can use any number of providers. You can even specify the personalization provider for each property defined. This means that you can use the default provider for most properties, as well as allowing a few of them to use an entirely different provider (see Listing 18-28).
LISTING 18-28: Using different providers
<configuration>
  <system.web>
    <profile
        defaultProvider="AspNetSqlProvider">
        <properties>
           <add name="FirstName" />
           <add name="LastName" />
           <add name="LastVisited" />
           <add name="Age" />
           <add name="Member" provider="AspNetSql2012ProfileProvider" />
        </properties>
    </profile>
  </system.web>
</configuration>
From this example, you can see that a default provider is specified — AspNetSqlProvider. Unless another provider is specified, this provider is used. The only property that changes this setting is the Member property. The Member property uses an entirely different personalization provider. In this case, it employs the Access provider (AspNetSql2012ProfileProvider) through the use of the provider attribute of the <add> element. With this attribute, you can define a specific provider for each and every property that is defined.
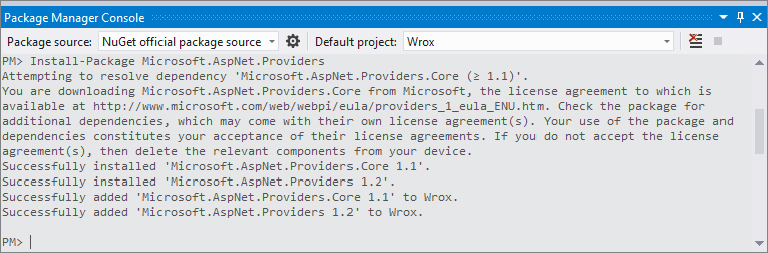
ASP.NET 4.5’s profile feature is tied to Microsoft SQL Server. To be exact, it’s the profile provider that has this dependency. To make the API more flexible and easier to use with other database systems, Microsoft provides so-called Universal Providers. Unfortunately, they are not part of the standard distribution of ASP.NET, but are available as a separate package on NuGet. The package name is Microsoft.AspNet.Providers (careful: Older versions of the package were called System.Web.Providers), and the NuGet package homepage is at http://nuget.org/packages/Microsoft.AspNet.Providers. When you start the NuGet Package Manager from within Visual Studio (using the Tools ⇒ Library Package Manager ⇒ Package Manager Console entry), you can install the package to the current project by executing the following command:
Install-Package Microsoft.AspNet.ProvidersFigure 18-6 shows a typical console output of the installation. Afterwards, the System.Web.Providers.dll assembly is part of your project.
To actually use the new assembly, you once again need to configure ASP.NET via web.config. The trick is to use a provider defined in the System.Web.Providers assembly so that ASP.NET can pick up the data and work with any supported database. The list of supported databases is currently focused on Microsoft’s Azure cloud offering, but it’s possible that more databases will be added at a later point. Listing 18-29 shows a sample configuration.
LISTING 18-29: Using Universal Providers in web.config
<configuration>
  <connectionstrings>
    <add connectionstring=". . ." name="DefaultConnection" />
  </connectionstrings>
  <system.web>
    <profile defaultprovider="DefaultProfileProvider">
      <providers>
        <add name="DefaultProfileProvider" applicationname="/"
             type="System.Web.Providers.DefaultProfileProvider"
             connectionstringname="DefaultConnection" />
     </providers>
    </profile>
  </system.web>
</configuration>When you put into production an ASP.NET application that uses profile information, you quickly realize that you need a way to manage all the profile information collected over the life cycle of the application. As you look at the ASP.NET MMC snap-in or the ASP.NET Web Site Administration Tool, note that neither of these tools gives you a way to delete a specific user’s profile information or even to cleanse a database of profile information for users who haven’t been active in a while.
ASP.NET 4.5 gives you the means to manage the profile information that your application stores, through the use of the ProfileManager class available in .NET.
You can use the ProfileManager class to build in the administration capabilities to completely manage the profile information that is stored by your application. In addition to being able to access property values, such as the name of the provider being used by the personalization system or the name of the application in question, you also have a large number of methods available in the ProfileManager class to retrieve all sorts of other information concerning your user’s profile. Through the ProfileManager class, you also have the capability to perform actions on this stored profile information including cleansing the database of old profile information.
Table 18-1 details the properties of the ProfileManager class.
| PROPERTIES | DESCRIPTION |
| ApplicationName | Gets or sets the name of the application to work with |
| AutomaticSaveEnabled | Gets or sets a boolean value indicating whether the profile information is stored at the end of the page execution |
| Enabled | Gets or sets a boolean value indicating whether the application is able to use the personalization system |
| Provider | Gets the name of the provider being used for the personalization system |
| Providers | Gets a collection of all the providers available for the ASP.NET application |
You can see that these properties include a bit of information about the personalization system and the providers available to it that you can integrate into any management system you build. Next, this chapter looks at the methods available for the ProfileManager class.
A good number of methods are available to the ProfileManager class that help you manage the profiles of the users of your application. Table 18-2 briefly describes these methods.
| METHODS | DESCRIPTION |
| DeleteInactiveProfiles | Enables you to delete any profiles that haven’t seen any activity for a specified time period |
| DeleteProfile | Enables you to delete a specific profile |
| DeleteProfiles | Enables you to delete a collection of profiles |
| FindInactiveProfilesBy UserName | Provides you with all the inactive profiles under a specific username according to a specified date |
| FindProfilesByUserName | Provides you with all the profiles from a specific username |
| GetAllInactiveProfiles | Provides you with all the profiles that have been inactive since a specified date |
| GetAllProfiles | Provides you with a collection of all the profiles |
| GetNumberOf InactiveProfiles | Provides you with the number of inactive profiles from a specified date |
| GetNumberOfProfiles | Provides you with the number of total profiles in the system |
As you can see from this list of methods, you can do plenty to manage the profile information that is stored in your database.
Next, this chapter looks at building a profile manager administration page for your ASP.NET application. This example builds it as an ASP.NET page, but you can just as easily build it as a console application.
To create a simple profile manager for your application, create a single ASP.NET page in your application with the code in Listing 18-30. You use this page to manage the profiles that are stored in the database for this particular application.
This page includes a number of controls, but the most important is a DropDownList control that holds all the usernames of entities that have profile information in the database. You might see the same username a couple of times depending on what you are doing with your application. Remember that a single user can have multiple profiles in the database.
Using the DropDownList control, you can select a user and see information about his profile stored in your data store. From this page, you can also delete his profile information. You can actually perform many operations with the ProfileManager class, but this is a good example of some basic ones.
Listing 18-30 presents the code for the profile manager.
LISTING 18-30: The Profile Manager page
VB
<%@ Page Language="VB" %>
<script runat="server">
Protected Sub Page_Load(ByVal sender As Object, ByVal e As System.EventArgs)
If (DropDownList1.Items.Count = 0) Then
WriteDropdownList()
WriteUserOutput()
End If
End Sub
Protected Sub DeleteButton_Click(ByVal sender As Object,
ByVal e As System.EventArgs)
ProfileManager.DeleteProfile(DropDownList1.Text.ToString())
DropDownList1.Items.Clear()
WriteDropdownList()
WriteUserOutput()
End Sub
Protected Sub SelectButton_Click(ByVal sender As Object,
ByVal e As System.EventArgs)
WriteUserOutput()
End Sub
Protected Sub WriteUserOutput()
Dim outputInt As Integer
Dim pic As ProfileInfoCollection = New ProfileInfoCollection()
If DropDownList1.Text <> "" Then
pic = ProfileManager.FindProfilesByUserName( _
ProfileAuthenticationOption.All, _
DropDownList1.Text, 0, 1, outputInt)
End If
DetailsView1.DataSource = pic
DetailsView1.DataBind()
End Sub
Protected Sub WriteDropdownList()
Dim outputInt As Integer
Dim pic As ProfileInfoCollection = New ProfileInfoCollection()
pic = ProfileManager.Provider.GetAllProfiles( _
ProfileAuthenticationOption.All, 0, 10000, outputInt)
For Each proInfo As ProfileInfo In pic
Dim li As ListItem = New ListItem()
li.Text = proInfo.UserName.ToString()
DropDownList1.Items.Add(li)
Next
Label1.Text = outputInt.ToString()
End Sub
</script>
<html xmlns="http://www.w3.org/1999/xhtml" >
<head id="Head1" runat="server">
<title>ProfileAdmin Page</title>
</head>
<body>
<form id="form1" runat="server">
<div>
<b>Profile Manager<br />
</b>
<br />
Total number of users in system:
<asp:Label ID="Label1" runat="server"></asp:Label><br />
<br />
<asp:DropDownList ID="DropDownList1" runat="server">
</asp:DropDownList>
<asp:Button ID="SelectButton" runat="server"
OnClick="SelectButton_Click"
Text="Get User Profile Information" /><br />
<br />
<asp:DetailsView ID="DetailsView1" runat="server" CellPadding="4"
ForeColor="#333333" GridLines="None"
Height="50px">
<FooterStyle BackColor="#1C5E55" Font-Bold="True" ForeColor="White" />
<EditRowStyle BackColor="#7C6F57" />
<PagerStyle BackColor="#666666" ForeColor="White"
HorizontalAlign="Center" />
<HeaderStyle BackColor="#1C5E55" Font-Bold="True" ForeColor="White" />
<AlternatingRowStyle BackColor="White" />
<CommandRowStyle BackColor="#C5BBAF" Font-Bold="True" />
<RowStyle BackColor="#E3EAEB" />
<FieldHeaderStyle BackColor="#D0D0D0" Font-Bold="True" />
</asp:DetailsView>
<br />
<asp:Button ID="DeleteButton" runat="server"
Text="Delete Selected User's Profile Information"
OnClick="DeleteButton_Click" />
</div>
</form>
</body>
</html>C#
<%@ Page Language="C#" %>
<script runat="server">
  protected void Page_Load(object sender, EventArgs e)
  {
    if (DropDownList1.Items.Count == 0)
    {
      WriteDropdownList();
      WriteUserOutput();
    }
  }
  protected void DeleteButton_Click(object sender, EventArgs e)
  {
    ProfileManager.DeleteProfile(DropDownList1.Text.ToString());
    DropDownList1.Items.Clear();
    WriteDropdownList();
    WriteUserOutput();
  }
  protected void SelectButton_Click(object sender, EventArgs e)
  {
    WriteUserOutput();
  }
  protected void WriteUserOutput()
  {
    int outputInt;
    ProfileInfoCollection pic = new ProfileInfoCollection();
    if (DropDownList1.Text != "") {
        pic = ProfileManager.FindProfilesByUserName
          (ProfileAuthenticationOption.All,
          DropDownList1.Text.ToString(), 0, 1, out outputInt);
    }
    DetailsView1.DataSource = pic;
    DetailsView1.DataBind();
  }
  protected void WriteDropdownList()
  {
    int outputInt;
    ProfileInfoCollection pic = ProfileManager.Provider.GetAllProfiles
      (ProfileAuthenticationOption.All, 0, 10000, out outputInt);
    foreach (ProfileInfo proInfo in pic)
    {
      ListItem li = new ListItem();
      li.Text = proInfo.UserName.ToString();
          DropDownList1.Items.Add(li);
    }
    Label1.Text = outputInt.ToString();
  }
</script>As you look over the code of the profile manager page, note that the ProfileManager class is used to perform a couple of different operations.
The ProfileManager class’s GetAllProfiles() method is used to populate the DropDownList control that is on the page. Here is the constructor of this method:
GetAllProfiles(
  authenticationOption,
  pageIndex,
  pageSize,
  totalRecords)
The GetAllProfiles() method takes a number of parameters, the first of which enables you to define whether you are using this method for all profiles in the system, or just the anonymous or authenticated users’ profiles contained in the system. In this example, all the profiles are retrieved with this method. This is accomplished using the ProfileAuthenticationOption enumeration. Then, the other parameters of the GetAllProfiles() method require you to specify a page index and the number of records to retrieve from the database. There is not a get all option (because of the potential size of the data that might be retrieved); so instead, in this example, you specify the first page of data (using 0) and that this page contains the first 10,000 records (which is basically a get all for this application). The last parameter of the GetAllProfiles() method enables you to retrieve the count of the records if you want to use that anywhere within your application or if you want to use that number to iterate through the records. The profile manager page uses this number to display within the Label1 server control.
In return from the GetAllProfiles() method, you get a ProfileInfoCollection object, which is a collection of ProfileInfo objects. Iterating through all the ProfileInfo objects in the ProfileInfoCollection enables you to pull out some of the main properties for a particular user’s profile information. In this example, just the UserName property of the ProfileInfo object is used to populate the DropDownList control on the page.
When the end user selects one of the users from the drop-down list, the FindProfilesByUserName() method is used to display the profile of the selected user. Again, a ProfileInfoCollection object is returned from this method as well.
To delete the profile of the user selected in the DropDownList control, simply use the DeleteProfile() method and pass in the name of the selected user like so:
ProfileManager.DeleteProfile(DropDownList1.Text.ToString())
DropDownList1.Items.Clear()
WriteDropdownList()
WriteUserOutput()
After you delete the profile from the system, that name will not appear in the drop-down list anymore (because the DropDownList control has been redrawn). If you look in the database, particularly at the aspnet_Profile table, you see that the profile of the selected user is, in fact, deleted. However, also notice that the user (even if the user is anonymous) is still stored in the aspnet_Users table.
If you want to delete not only the profile information of the user but also delete the user from the aspnet_Users table, you invoke the DeleteUser() method from the Membership class:
ProfileManager.DeleteProfile(DropDownList1.Text.ToString())
Membership.DeleteUser(DropDownList1.Text.ToString())
DropDownList1.Items.Clear()
WriteDropdownList()
WriteUserOutput()
This use of the DeleteUser() method also deletes the selected user from the aspnet_Users table. You could have also achieved the same thing by using the other constructor of the DeleteUser() method:
Membership.DeleteUser(DropDownList1.Text.ToString(), True)
DropDownList1.Items.Clear()
WriteDropdownList()
WriteUserOutput()
The second parameter used in this operation of the DeleteUser() method deletes all data related to that user across all the tables held in the ASPNETDB.mdf database.
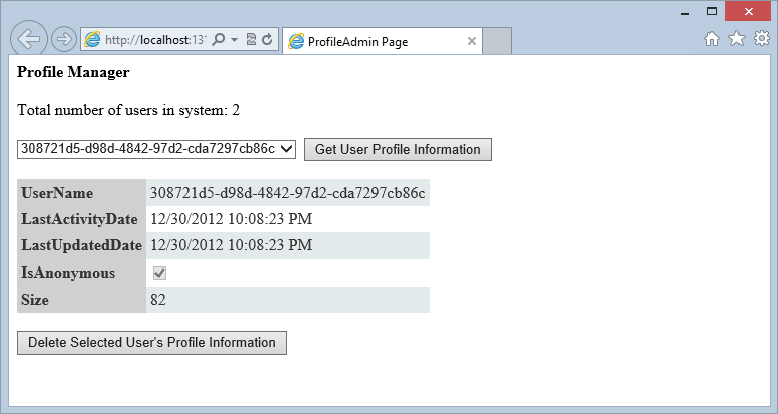
When you compile and run the profile manager page, you see results similar to those shown in Figure 18-7.
From this screen, you can see that this page is dealing with an anonymous user (based upon the GUID for the username). You can also see that the IsAnonymous column is indeed checked. You can then delete this user’s profile information by selecting the appropriate button on the page.
The personalization capabilities provided by ASP.NET 4.5 make it incredibly easy to make your web applications unique for all end users, whether they are authenticated or anonymous. This system enables you to store everything from basic data types provided by the .NET Framework to custom types that you create. This system is more versatile and extensible than using the Session or Application objects. The data is stored via a couple of built-in personalization providers that ship with ASP.NET. These providers include ones that connect with either Microsoft’s SQL Server Express Edition files or Microsoft SQL Server.
You can also use the ProfileManager class to manage your system’s profile information. This includes the capability to monitor and delete profiles as you deem necessary.