WHAT’S IN THIS CHAPTER?
WROX.COM CODE DOWNLOADS FOR THIS CHAPTER
Please note that all the code examples in this chapter are available as a part of this chapter’s code download on the book’s website at www.wrox.com on the Download Code tab.
Throughout this book, we’ve mentioned “Classic” ASP. You may not have had the privilege of using this great technology. However, if you have, developing ASP.NET Web Pages using the Razor syntax may bring back some of those fond memories. But this technology is much different. Throughout this chapter, you get a chance to see how using Web Pages with Razor can offer a more powerful solution than “Classic” ASP.
The previous chapter discussed ASP.NET MVC. At that point, you had the chance to use the ASP.NET WebForm view engine. You also had a few peeks at using another view engine option, the Razor view engine. The Razor view engine uses the same Razor syntax that Web Pages uses. If your application becomes too complex for ASP.NET Web Pages, it makes the most sense to begin moving pieces to ASP.NET MVC with the Razor view engine.
Although the ASP.NET MVC Razor view engine is not covered in this chapter, you’ll get a good feel for how the Razor syntax works. You’ll be able to use the syntax with the MVC principles you learned in the previous chapter.
ASP.NET Web Pages are a fairly new technology that Microsoft introduced to develop dynamic web applications using ASP.NET, but not necessarily needing Microsoft Visual Studio 2012. Instead, you can develop ASP.NET Web Pages using a basic text editor like Notepad or the preferred method, using an IDE such as ASP.NET WebMatrix.
Unlike a static HTML page, a dynamic page allows the end user to interact with web forms, manipulate and save data, and interact with third-party services such as social media services.
Similar to ASP.NET MVC, Web Pages allows extensibility in several areas. One way to extend Web Pages is to create and consume helpers. Helpers are very similar to ASP.NET Server Controls in that most helpers encapsulate reusable markup. As you see throughout this chapter, several helpers are built into Web Pages. You can include others by using NuGet (discussed further in Appendix G) or through custom development.
Before you begin building a web page using Razor, you need to know more about using the Razor syntax. In ASP.NET Web Forms, you define inline code by using a script block such as:
<script runat="server">
    // Insert code here
</script>
The Razor syntax is slightly different. You can still define inline code. However, rather than using a script block in the preceding format, you can define script blocks as shown in Listing 35-1.
LISTING 35-1: The Razor script block for VB and C#
VB
@Code
    'Place Code Here
End Code
C#
@{
<!-- Insert code here -->
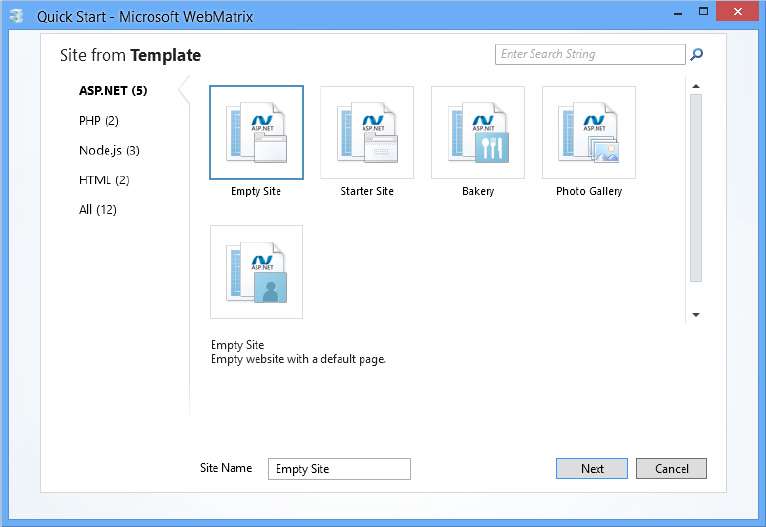
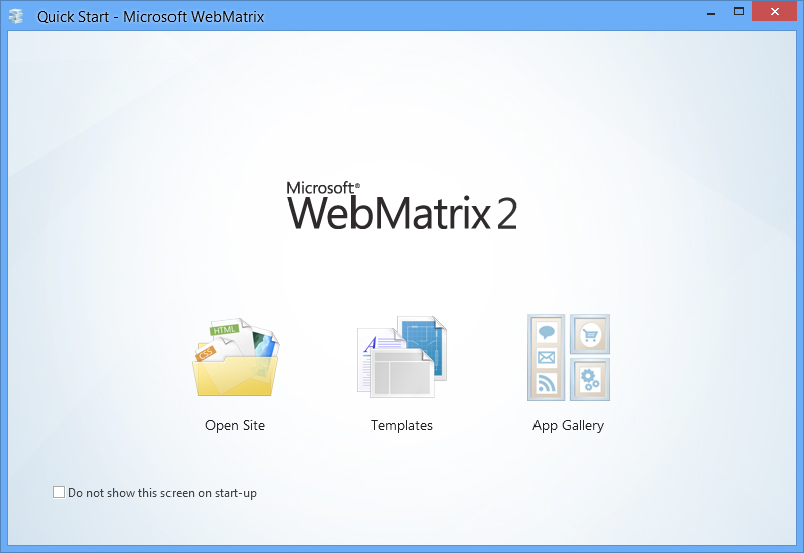
}Before jumping into specific features and helpers within Web Pages, create an HTML page that you can begin using. To do this, use WebMatrix. When you open WebMatrix, you are prompted for an action as shown in Figure 35-1.
From this screen, you can see that you have four options. You can open an existing site, use a site template, or load an application using the application gallery. You can also choose to never show this quick menu again and instead load WebMatrix with file browser capabilities. You can also open an existing site, use a site template, or load an application using the application gallery.
The site template list, as shown in Figure 35-2, includes several web templates for ASP.NET, PHP, node.js, and HTML. The ASP.NET templates are for sample applications using Web Pages.
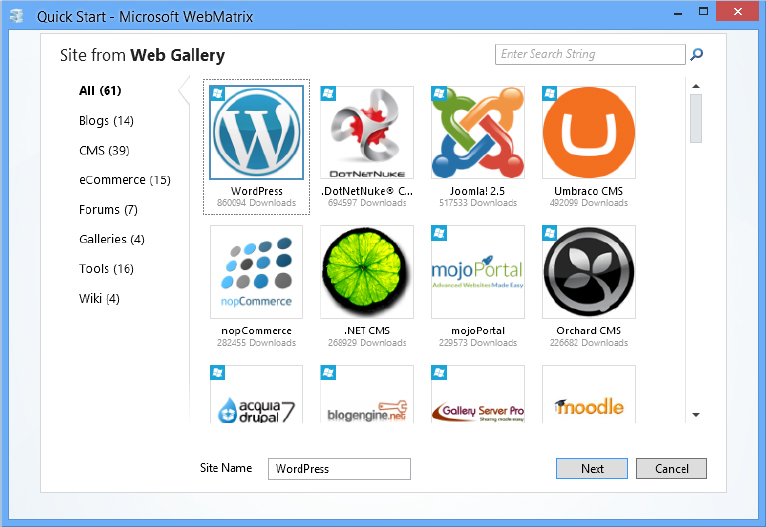
The application gallery, as shown in Figure 35-3, includes many prebuilt applications that you can load. Most of the applications contained in the gallery use ASP.NET or PHP.
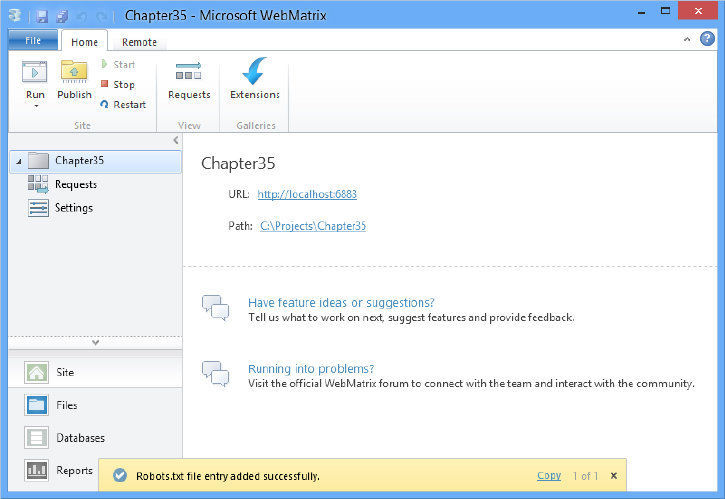
For this exercise, choose to use an existing site. When you do, you are faced with three options as shown in Figure 35-4.
The application spins up within WebMatrix and an empty robots.txt file is added, as shown in Figure 35-5.
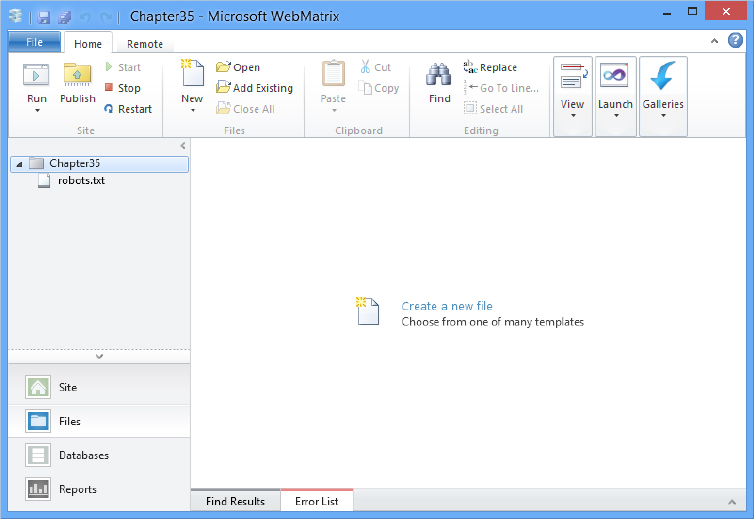
The next step in building your Web Pages application is to switch over to the Files view. You’ll notice in Figure 35-6 that even though you are using WebMatrix to build this application, you can open your application in Visual Studio 2012 at any point.
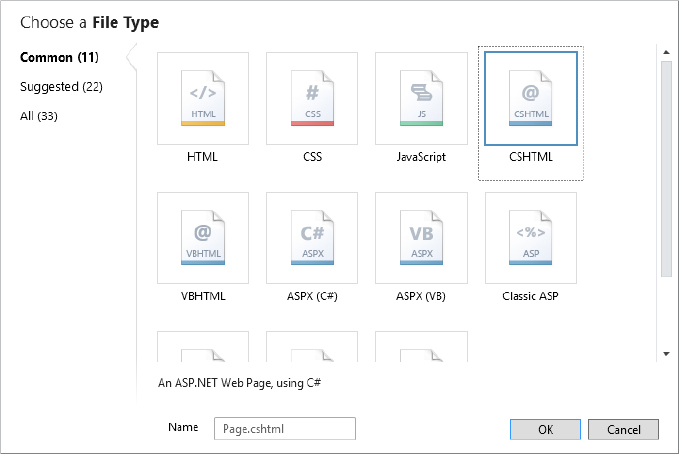
So, at this point you’ve created your Web Pages application, you’re in WebMatrix, and you’re about to add a file to your application. As you can see in Figure 35-6, it’s very easy to add a file. Choose the option to create a new file. You are then asked to choose a particular file type, as shown in Figure 35-7. Although you’ll be creating HTML in the next step, choose one of the two Razor formats for Web Pages — .cshtml for a C# Web Page or .vbhtml for a VB Web Page.
Name your file addtask.cshtml for C# or addtask.vbhtml for VB. This creates a file very similar to the following snippet:
@{

}
<!DOCTYPE html>
<html lang="en">
    <head>
        <meta charset="utf-8" />
        <title></title>
    </head>
    <body>
    </body>
</html>As you can see in the previous code snippet, a basic Razor code block is included at the top of your page. The rest of the page contains HTML for a basic page.
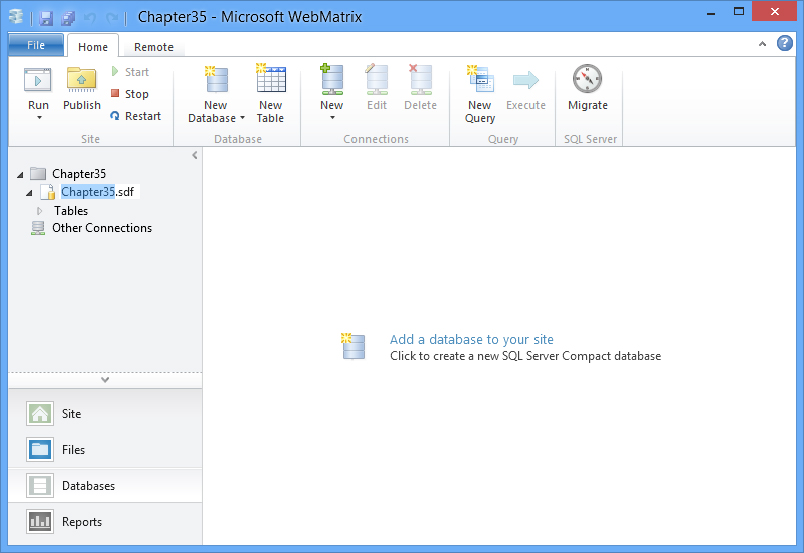
Much like ASP.NET Web Forms, Razor has the capability of connecting to a database and interacting with data. Furthermore, WebMatrix has capabilities to create a database from within the application. If you look back to Figure 35-6, you’ll see a Databases tab in the lower left-hand corner of WebMatrix. When the Databases tab is opened, you’ll be able to create a database in a similar fashion as when you added the addtask file earlier in this chapter. WebMatrix offers three built-in options for a database. The default option is SQL Server CE (Compact Edition). This database extension ends in .sdf. You can also create a SQL Server database or a MySQL database. For your application, leave the default option and create your database as shown in Figure 35-8.
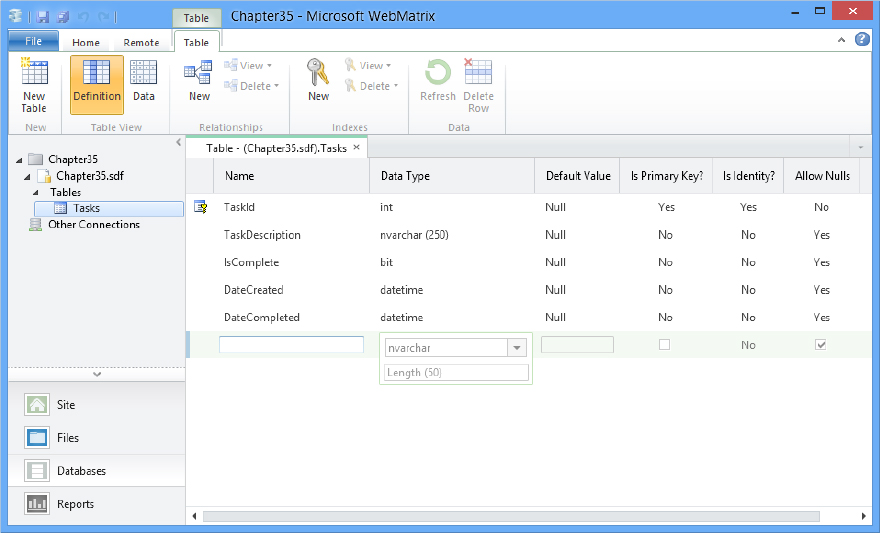
After the database is created, add a table to store your tasks. The table is going to be fairly straightforward — define the table as shown in Figure 35-9.
So, now that your data structure is in place, it’s time to go back to your addtask Web Page. You’ll add the form elements you’ll need to add a task. In this case, you only need a textbox and submit button to add tasks. The HTML for addtask looks like Listing 35-2 (addtask.vbhtml or addtask.cshtml in the code download for this chapter).
LISTING 35-2: The body of the addtask page of your application
<!DOCTYPE html>
<html lang="en">
    <head>
        <meta charset="utf-8" />
        <title>Add a Task</title>
    </head>
    <body>
        <form action="" method="post">
            <p>
                <label for="taskDescription">Task:</label>
                <input type="text" id="taskDescription" name="taskDescription" />
            </p>
            <input type="submit" value="Add Task" />
        </form>
    </body>
</html>
The next step in is to add in the connection to the database and add the tasks to the database, as shown in Listing 35-3.
LISTING 35-3: Adding data into the database using the addtask page
VB
@Code
    Dim taskDescription = ""

    If (IsPost) Then
        taskDescription = Request.Form("taskDescription")

        Dim db = Database.Open("Chapter35-VB")
        Dim insertCommand = "INSERT INTO Tasks (TaskDescription, DateCreated) Values(@0, @1)"
        db.Execute(insertCommand, taskDescription, DateTime.Now)
        db.Close()
        Response.Redirect("~/")
    End If
End Code

<!DOCTYPE html>
<html lang="en">
    <head>
        <meta charset="utf-8" />
        <title>Add a Task</title>
    </head>
    <body>
        <form action="" method="post">
            <p>
                <label for="taskDescription">Task:</label>
                <input type="text" id="taskDescription" name="taskDescription" />
            </p>
            <input type="submit" value="Add Task" />
        </form>
    </body>
</html>
C#
@{
    var taskDescription = "";

    if(IsPost){
        taskDescription = Request.Form["taskDescription"];

        var db = Database.Open("Chapter35");
        var insertCommand = "INSERT INTO Tasks (TaskDescription, DateCreated) Values(@0, @1)";
        db.Execute(insertCommand, taskDescription, DateTime.Now);
        db.Close();
        Response.Redirect("~/");
    }
}
You’re not completely done with this page. You’ll revisit the page in just a little bit to add last-minute tweaks.
Your next step in the project is to list all of the tasks. Because this is the primary purpose of the application, the task listing will appear on your default page. Add the default.cshtml or default.vbhtml file to your application so you can begin adding the necessary code to display the tasks. You’re not expecting that your data will grow to a size where you’ll need data paging, so you’ll add two items to your default page. The first item is the output generated from a WebGrid helper, and the second item is a hyperlink to allow the user to add additional tasks to the list. The completed default page’s source code is shown in Listing 35-4.
LISTING 35-4: Listing the tasks entered on the default page
VB
@Code
    Dim db = Database.Open("Chapter35-VB")
    Dim tasks = db.Query("SELECT * FROM Tasks WHERE IsComplete = 0 or IsComplete IS NULL")
    Dim grid = New WebGrid(tasks)
End Code
<!DOCTYPE html>
<html lang="en">
    <head>
        <meta charset="utf-8" />
        <title></title>
        <style type="text/css">
            .grid { margin: 4px; padding: 2px; border: 1px solid #666; }
            .grid td, th { border: 1px solid #fff; padding: 5px; }
            .head { background-color: #36648B; }
            .head a { color: #FFF; text-decoration-style: none; }
            .alt { background-color: #F0F8FF; }
        </style>
    </head>
    <body>
        <h1>Open Tasks</h1>
        <div>
            @grid.GetHtml(
                tableStyle:= "grid",
                headerStyle:= "head",
                alternatingRowStyle:= "alt",
                columns:= grid.Columns(
                    grid.Column("TaskDescription","Task")
                )
            )
        </div>
        <p>
            <a href="addtask.vbhtml">Add More Tasks</a>
        </p>
    </body>
</html>
C#
@{
    var db = Database.Open("Chapter35");
    var tasks = db.Query("SELECT * FROM Tasks WHERE IsComplete = 0 or IsComplete IS NULL");
    var grid = new WebGrid(source: tasks);
}
<!DOCTYPE html>
<html lang="en">
    <head>
        <meta charset="utf-8" />
        <title></title>
        <style type="text/css">
            .grid { margin: 4px; padding: 2px; border: 1px solid #666; }
            .grid td, th { border: 1px solid #fff; padding: 5px; }
            .head { background-color: #36648B; }
            .head a { color: #FFF; text-decoration-style: none; }
            .alt { background-color: #F0F8FF; }
        </style>
    </head>
    <body>
        <h1>Open Tasks</h1>
        <div>
            @grid.GetHtml(
                tableStyle: "grid",
                headerStyle: "head",
                alternatingRowStyle: "alt",
                columns: grid.Columns(
                    grid.Column("TaskDescription","Task")
                )
            )
        </div>
        <p>
            <a href="addtask.cshtml">Add More Tasks</a>
        </p>
    </body>
</html>
Like most helpers in the Razor syntax, the WebGrid helper enables you to set a custom set of properties within code. In this case, you’re setting three style properties and adding a custom list of columns. The list of columns contains only the task description itself. The first parameter of the column is the SQL column name. The second is the friendly column header to be added to the rendered HTML.
Let’s revisit the addtask page. Currently, you have no restrictions on the data that you’re allowing to be inserted into your database table. So, you can have someone type in more than 250 characters or leave the field blank. Obviously, this isn’t going to give you the experience you’re anticipating. So, you have to update the AddTask page to include validation. The validation you’re going to add includes a ValidationSummary helper, which is very similar to the ValidationSummary Web Form control discussed in Chapter 6. You’re also going to add validation to the taskDescription element.
In your source code, you’ll need to define your validation rules. In this case, set the task as being required and force a length of 250 characters or less. Use Validation.RequireField and Validation.Add to accomplish these tasks. Validation.Add accepts the element name in the first parameter and a validation type in the second parameter. The validation types that are available include:
Much like Web Forms, you’ll also need to check to see if the page is valid. Call Validation.IsValid to ensure this. Also, to show that you can use individual errors rather than just supplying the summary, you’ll display the user-friendly error message by using the ValidationMessage helper. Listing 35-5 shows the addtask page with the validation implemented.
LISTING 35-5: Updating the addtask page with validation
VB
@Code
    ' Variables
    Dim taskDescription = ""

    ' Validation
    Validation.RequireField("taskDescription", "A task is required.")
    Validation.Add("taskDescription", Validator.StringLength(250))

    ' If the page has been posted back and if it's valid, insert the data and redirect
    If (IsPost) Then
        If (Validation.IsValid())
            taskDescription = Request.Form("taskDescription")

            Dim db = Database.Open("Chapter35-VB")
            Dim insertCommand = _
              "INSERT INTO Tasks (TaskDescription, DateCreated) Values(@0, @1)"
            db.Execute(insertCommand, taskDescription, DateTime.Now)
            Response.Redirect("~/")
        End If
    End If
End Code

<!DOCTYPE html>
<html lang="en">
    <head>
        <meta charset="utf-8" />
        <title>Add a Task</title>
    </head>
    <body>
        <form action="" method="post">
            <div>
                @Html.ValidationSummary()
            </div>
            <p>
                <label for="taskDescription">Task:</label>
                <input type="text" id="taskDescription" name="taskDescription" />
                @Html.ValidationMessage("taskDescription")
            </p>
            <input type="submit" value="Add Task" />
        </form>
    </body>
</html>
C#
@{
    // Variables
    var taskDescription = "";

    // Validation
    Validation.RequireField("taskDescription", "A task is required.");
    Validation.Add("taskDescription", Validator.StringLength(250));

    // If the page has been posted back and if it's valid, insert the data and redirect
    if(IsPost){
        if (Validation.IsValid()) {
            taskDescription = Request.Form["taskDescription"];

            var db = Database.Open("Chapter35");
            var insertCommand =
              "INSERT INTO Tasks (TaskDescription, DateCreated) Values(@0, @1)";
            db.Execute(insertCommand, taskDescription, DateTime.Now);
            Response.Redirect("~/");
        }
    }
}One of the most useful features on Razor is the template capabilities that it has. Usually this is referring to the data templates that we can create. However, Razor also includes website templates in the form of layouts. Layouts are very similar to the master page found in ASP.NET Web Forms. You can use RenderBody to render everything from one file inside of the layout container. You can also use RenderSection to specify the content to be rendered inside of a certain area. Listing 35-6 shows an example of both of these helpers in the _layout.cshtml or _layout.vbhtml page.
LISTING 35-6: An example layout page derived from the _layout.cshtml file
@{
    var sidebarStyle = "#Sidebar { float: right; margin: 0; width: 15%; " +
                       "padding: 5px; background-color: #f2f2f2; border: 1px solid #999; } " +
                       "#MainContent { float: left; width: 80%; }";
}
<!DOCTYPE html>
<html lang="en">
    <head>
        <meta charset="utf-8" />
        <title>@Page.Title</title>
        <style>
            body { font-family: Arial; font-size: 11pt; }
            header { background-color: #3E5CA2; color: #fff; }
            footer { clear: both; text-align: center; font-size: 9pt; }
            @if (IsSectionDefined("Sidebar")) {
                @sidebarStyle
            }
        </style>
    </head>
    <body>
        <header>
            <h1>My Honey-Do List</h1>
        </header>
        @if (IsSectionDefined("Sidebar")) {
        <aside id="Sidebar">
            @RenderSection("Sidebar")
        </aside>
        }
        <section id="MainContent">
            @RenderBody()
        </section>
        <footer>
            Copyright 2013. All Rights Reserved.
        </footer>
    </body>
</html>
Now that the layout page is created, you’ll update both the addtask page, as shown in Listing 35-7, and the default page, as shown in Listing 35-8, so that they use the new layout page. Notice that if the Sidebar section is not defined within the content page, the section of markup within the if statement shown in Listing 35-6 is ignored.
LISTING 35-7: The updated addtask page using the new layout template
VB
@Code
    Layout = "~/_layout.vbhtml"
    Page.Title = "Add a task"

    ' Removed the code below to simplify this example
    ' . . .
End Code
C#
@{
    Layout = "~/_layout.cshtml";
    Page.Title = "Add a task";
    // Removed the code below to simplify this example
    // . . .
}
LISTING 35-8: The updated default page using the new layout template
VB
@Code
    Layout = "~/_layout.vbhtml"
    Page.Title = "My Tasks"

    Dim db = Database.Open("Chapter35-VB")
    Dim tasks = db.Query("SELECT * FROM Tasks WHERE IsComplete = 0 or IsComplete IS NULL")
    Dim grid = New WebGrid(tasks)
End Code

<style type="text/css">
    .grid { margin: 4px; padding: 2px; border: 1px solid #666; }
    .grid td, th { border: 1px solid #fff; padding: 5px; }
    .head { background-color: #36648B; }
    .head a { color: #FFF; text-decoration-style: none; }
    .alt { background-color: #F0F8FF; }
</style>
<h1>Open Tasks</h1>
<div>
    @grid.GetHtml(
        tableStyle:= "grid",
        headerStyle:= "head",
        alternatingRowStyle:= "alt",
        columns:= grid.Columns(
            grid.Column("TaskDescription","Task")
        )
    )
</div>
@Section Sidebar
<p>
    <a href="addtask.vbhtml">Add More Tasks</a>
</p>
End Section
C#
@{
Layout = "~/_layout.cshtml";
Page.Title = "My Tasks";
// Removed the code below to simplify this example
// . . .
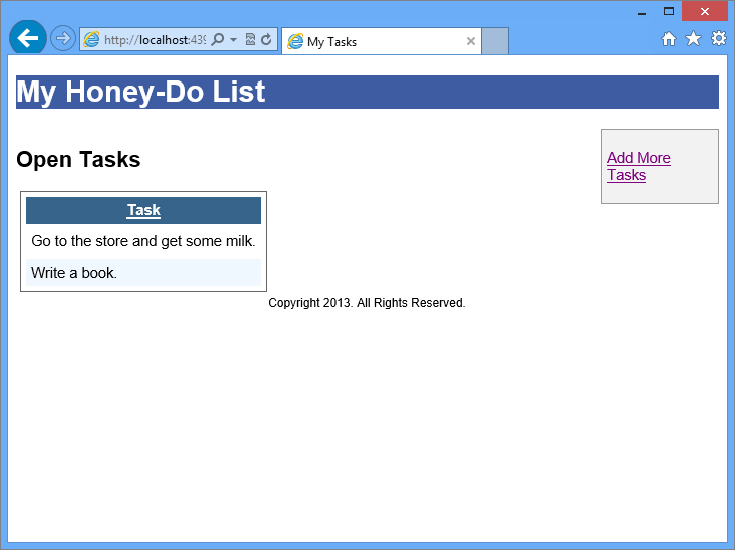
}An example of the page using the new layout is shown in Figure 35-10.
The previous Web Page sample used several built-in helpers. You used WebGrid to display data and you used ValidationSummary and ValidationMessage to display data exception information. You also used RenderBody and RenderSection to display information from other Web Page files. This is just the beginning. Several helpers are built into Web Pages that you can use.
You can use several core helpers to add base functionality to your application. These include:
The WebSecurity helper allows users to authenticate within your application. It also enables you to define roles and assign them to users. This is very similar to the way that ASP.NET handles membership and role management.
You can initiate the use of WebSecurity by adding a file called _AppStart.cshtml or _AppStart.vbhtml. Within the code block in the file, add the following:
WebSecurity.InitializeDatabaseConnection("Chapter35", "UserProfile", "UserId",
    "Username", true);
The first parameter is the name of the existing database to initialize the membership and role management. The next three parameters are for the user table, the primary key field of the user table, and the username field of the user table.
The next step to using WebSecurity is to create a registration page. You can find a great example of a registration page in the Starter Site template. Within this template, you find other example web pages including, but not limited to, a login and logout web page.
You can also create a user from within source code. Before creating the user, you want to ensure that the user doesn’t exist:
WebSecurity.UserExists("username") == falseAfter verifying that the user doesn’t exist, you can create a new user:
WebSecurity.CreateUserAndAccount("username","password")So, at this point you have set up your database to create users and created a new user using the CreateUserAccount method. Now that your user has been created, it’s time for you to log in the user. Again, it’s a good idea to see how the login page was implemented in the Starter Site template. When you’re ready to log in the user, you can check the credentials by using:
WebSecurity.Login("username","password")After the user logs in to the site, you’ll likely want to say hello to the user. You can display the username of the user by using:
if (WebSecurity.IsAuthenticated())
{
    @WebSecurity.CurrentUserName;
}
This code snippet first checks to see if the user is authenticated. If the user is authenticated, the current username is displayed.
The final method that you’ll explore is logging your users off the site. You can accomplish that by using:
WebSecurity.Logout()The OAuthWebSecurity helper allows the use of both OAuth and OpenID authentication within your site. In other words, if you’ve ever visited a website that asks you to log in using Facebook, Google, Microsoft, Twitter, or Yahoo! before continuing, that site is using either OAuth or OpenID. Google and Yahoo! use OpenID and so their implementation is fairly simple. The other three require an application or client ID and an application or client secret to complete the authentication. These three use the OAuth standard.
As shown previously, you’ll need to initialize the database. Immediately after the InitializeDatabaseConnection, you can add one or more of the following:
OAuthWebSecurity.RegisterGoogleClient("displayName");
OAuthWebSecurity.RegisterYahooClient("displayName");
OAuthWebSecurity.RegisterFacebookClient("appId","appSecret");
OAuthWebSecurity.RegisterMicrosoftClient("clientId","clientSecret");
OAuthWebSecurity.RegisterTwitterClient("consumerKey","consumerSecret");The ReCaptcha helper makes use of the popular ReCaptcha images to help secure web forms and to ensure that the user submitting the form is a human and not an automated system. The ReCaptcha helper is part of the Web Page Helpers library that you can download from NuGet.
You can set up the ReCaptcha for usage by including the Microsoft.Web.Helpers in the _AppStart.cshtml or _AppStart.vbhtml page. In a code block on that page, add the following:
ReCaptcha.PublicKey = "your-public-key";
ReCaptcha.PrivateKey = "your-private-key";
In the page that you’d like to use the CAPTCHA image, you can add the following in your HTML markup:
@ReCaptcha.GetHtml()In the same page, within a code block, you’ll also need to add:
if (ReCaptcha.Validate()) {
    // Do something because the ReCaptcha was validated
}The WebMail helper allows e-mail to be sent in an HTML format. Unlike several other helpers, the WebMail helper does not render markup. Instead, it’s used to simplify the process to send an e-mail message through source. An example of using the WebMail helper is shown in Listing 35-9.
LISTING 35-9: Sample usage of the WebMail helper
@{
    // . . .
    // Set the common WebMail properties
    WebMail.SmtpServer = "SMTP Server";
    WebMail.SmtpPort = 25;
    WebMail.UserName = "Username";
    WebMail.Password = "Password";
    WebMail.From = "From Email Address";

    // Send the email
    WebMail.Send(to: "To Email Address",
                 subject: "Subject",
                 body: "<strong>Body</strong>");
    // . . .
}Caching is an extremely important part of ASP.NET. So, it’s no surprise that Web Pages also has a caching mechanism. The WebCache helper does just that. It’s very, very similar to the way items are cached in ASP.NET Web Forms. Listing 35-10 demonstrates the WebCache helper.
LISTING 35-10: Using the WebCache helper to cache the current time
VB
@Code
    Dim toCache = WebCache.Get("cacheTimestamp")

    If (toCache = Nothing) Then
        toCache = DateTime.Now
        WebCache.Set("cacheTimestamp",toCache,1,False)
    End If
End Code
C#
@{
    var toCache = WebCache.Get("cacheTimestamp");

    if (toCache == null) {
        toCache = DateTime.Now;
        WebCache.Set("cacheTimestamp",toCache,1,false);
    }
}Besides the helpers already covered, several others add functionality to Web Pages. The more popular ones include WebImage, FileUpload, Video, Bing, Maps, and various social helpers.
The WebImage helper enables you to manipulate an image by passing in a stream or path. The WebImage helper has several methods to resize the image and manipulate it in other ways. To obtain an image that is posted from a form, you can use something similar to:
WebImage photo = WebImage.GetImageFromRequest();The FileUpload helper allows file upload capabilities on a web page. The helper has several properties that change the rendered markup based on the values. For instance, if you wanted to show three upload boxes and allow more boxes to be shown if the visitor so chooses, you can add the control to the page like the following:
@FileUpload.GetHtml(initialNumberOfFiles:3, allowMoreFilesToBeAdded:true,
includeFormTag:true, uploadText:"Upload")As HTML5 becomes more and more popular, there will be less of a use for the Video helper. However, a lot of web applications still use Windows Media, Flash, or Silverlight to display videos. The Video helper allows markup to be rendered based on the properties specified. For instance, if you wanted to show a Welcome video using Silverlight in a 600×400 frame, you could use something like the following:
@Video.Silverlight(
    path: "Videos/Welcome.xap",
    width: "600",
    height: "400",
    bgColor: "black",
autoUpgrade: true)Another common feature that several web applications have is to contain a search box to allow the site, as well as the Internet, to be searched. Of course, for the site search to work, your web application must be publicly accessible and Bing must have indexed your site at least once. If those two conditions have been met, you can configure the site search functions by adding the following to the _AppStart.cshtml or_AppStart.vbhtml file:
Bing.SiteUrl = "your-site.com";
Bing.SiteTitle = "Search This Site";
Then, to render a search box on a page, add the following in the desired location in your markup:
@Bing.SearchBox()The Maps helper enables you to display a map from Bing, Google, MapQuest, or Yahoo! To display a map of 1 Redmond Way, Redmond, Washington, on Google, you would add the following to the desired location in your markup:
@Maps.GetGoogleHtml("1 Redmond Way, Redmond, WA", width: "600", height: "400")The ability to integrate with social media is crucial for today’s web applications. To ease the pain of this task, several helpers have been added to accomplish many common tasks. These include:
The Facebook helper currently has a single purpose. That purpose is to display a like button on a web page. It can be as simple as using @Facebook.LikeButton() or as complex as directing the user to like a page other than the current one:
@Facebook.LikeButton(href: "http://wrox.com", action: "recommend",
    buttonLayout: "button_count", showFaces: true, colorScheme: "dark")
The Twitter helper has two methods. One is to help link to a user’s Twitter profile and display the results inside of a standard Twitter widget. The second is to obtain Twitter search results and display them inside of a standard Twitter widget. You can use both by doing the following:
@Twitter.Profile("jgaylord")
@Twitter.Search("Razor Syntax")
The LinkShare helper renders social media icons and allows a page to be shared with a custom page heading. The helper renders icons for Delicious, Digg, Facebook, Reddit, StumbleUpon, and Twitter. An example of its usage is:
@LinkShare.GetHtml("Social Sharing Example")The Gravatar helper connects to the Gravatar website and shows a gravatar based on a username. A gravatar is an image representation for a username. These are commonly used on forums, chat rooms, and comment forms. To display author Jason Gaylord’s Gravatar, for example, you use:
@Gravatar.GetHtml("jason@jasongaylord.com")The GamerCard helper displays a copy of an Xbox gamer card. The gamer card includes your player icon, recently played games, and your reputation score. An example of displaying a gamer card is shown here:
@GamerCard.GetHtml("Major Nelson")Creating custom helpers is actually much easier than you would think. You can use the task application you started earlier in this chapter or create a new Web Pages application. Start by adding a new folder to the application called App_Code.
Within the App_Code folder, create a new file named AmazonBooks.cshtml (within your C# application) or AmazonBooks.vbhtml (within your VB application). This single file will host three different helper methods. The name of this file is crucial because this will be your helper name. So, you want to be sure that if you’re using a name such as AmazonBooks that an AmazonBooks helper doesn’t already exist.
In your Amazon file, add the code as shown in Listing 35-11.
LISTING 35-11: The Amazon helper for your Web Page application
VB
@Helper TextAndImage(isbn As String)
    Dim src = "http://rcm.amazon.com/e/cm?lt1=_blank&bc1=000000&" & _
        "IS2=1&bg1=FFFFFF&fc1=000000&lc1=0000FF&o=1&p=8&l=as4&" & _
        "m=amazon&f=ifr&ref=ss_til&asins=" & isbn

@<iframe src="@src" style="width:120px;height:240px;" scrolling="no"
    marginwidth="0" marginheight="0" frameborder="0"></iframe>
End Helper


@Helper TextOnly(isbn As String, title As String)
    Dim src = "http://www.amazon.com/gp/product/" & isbn & "/" & _
        "ref=as_li_ss_tl?ie=UTF8&linkCode=as2&camp=1789&" & _
        "creative=390957&creativeASIN=" & isbn
    Dim img = "http://www.assoc-amazon.com/e/ir?l=as2&o=1&a=" & isbn

@<a href="@src">@title</a>@<img src="@img" width="1" height="1"
     border="0" alt="" style="border:none !important; margin:0px !important;" />
End Helper


@Helper ImageOnly(isbn As String)
    Dim src = "http://www.amazon.com/gp/product/" & isbn & "/" & _
        "ref=as_li_ss_il?ie=UTF8&linkCode=as2&camp=1789&" & _
        "creative=390957&creativeASIN=" & isbn
    Dim img = "http://ws.assoc-amazon.com/widgets/q?_encoding=UTF8&" & _
        "Format=_SL110_&ASIN=" & isbn & "&MarketPlace=US&" & _
        "ID=AsinImage&WS=1&ServiceVersion=20070822"

@<a href="@src"><img border="0" src="@img"></a>@<img
    src="http://www.assoc-amazon.com/e/ir?l=as2&o=1&a=@isbn" width="1"
    height="1" border="0" alt=""
    style="border:none !important; margin:0px !important;" />
End Helper
C#
@helper TextAndImage(string isbn) {
var src = "http://rcm.amazon.com/e/cm?lt1=_blank&bc1=000000&" +
        "IS2=1&bg1=FFFFFF&fc1=000000&lc1=0000FF&o=1&p=8&l=as4&" +
        "m=amazon&f=ifr&ref=ss_til&asins=" + isbn;

<iframe src='@src' style="width:120px;height:240px;" scrolling="no"
    marginwidth="0" marginheight="0" frameborder="0"></iframe>
}

@helper TextOnly(string isbn, string title) {
var src = "http://www.amazon.com/gp/product/" + isbn + "/" +
        "ref=as_li_ss_tl?ie=UTF8&linkCode=as2&camp=1789&" +
        "creative=390957&creativeASIN=" + isbn;
var img = "http://www.assoc-amazon.com/e/ir?l=as2&o=1&a=" + @isbn;

<a href='@src'>@title</a><img src='@img' width="1" height="1"
     border="0" alt="" style="border:none !important; margin:0px !important;" />
}

@helper ImageOnly(string isbn) {
var src = "http://www.amazon.com/gp/product/" + isbn + "/" +
        "ref=as_li_ss_il?ie=UTF8&linkCode=as2&camp=1789&" +
        "creative=390957&creativeASIN=" + isbn;
var img = "http://ws.assoc-amazon.com/widgets/q?_encoding=UTF8&" +
        "Format=_SL110_&ASIN=" + isbn + "&MarketPlace=US&" +
        "ID=AsinImage&WS=1&ServiceVersion=20070822";

<a href='@src'><img border="0" src='@img'></a><img
    src="http://www.assoc-amazon.com/e/ir?l=as2&o=1&a=@isbn" width="1"
    height="1" border="0" alt=""
    style="border:none !important; margin:0px !important;" />
}
As you can see in Listing 35-11, you have three helper methods in your AmazonBooks helper. Each method renders a different format of a book listing with a link to the page on Amazon. You can now consume this by using it in any page as shown here:
@AmazonBooks.ImageOnly("1118311825")The ISBN that has been passed in for this example is the 10-digit ISBN number for this book.
In this chapter, you have received a taste of Razor syntax and ASP.NET Web Pages. You started by learning about ASP.NET WebMatrix. You reviewed the different ways to create a web application in WebMatrix, including from a folder, template, or application from the application gallery. Then, you learned how to jump between the configuration for your application, files, and databases. You created a SQL Server CE database and table within that database.
Next, you saw the power of Razor syntax. You learned how to connect to a data source using Razor and how to interact with the data from the source. The web pages that you created were moved around to use a layout page. You also used several built-in helpers for Razor including the following:
Finally, you learned how to create a custom helper and build upon Razor. Though this chapter didn’t cover everything that Razor, Web Pages, or WebMatrix have to offer, you should have a good understanding of how Razor works and how ASP.NET Web Pages uses Razor. You should also have a good idea of how Razor could be useful when using the RazorViewEngine for ASP.NET MVC.