Perspective is an integral technique for realistically representing objects in a three-dimensional way. There are many types of perspective; the most complex involve architectural spaces that encapsulate large spaces. However, the vanishing points and lines that characterize these representations of perspective are not applicable to all subjects, especially those consisting of objects that are too small for the convergence of the vanishing lines to be seen.
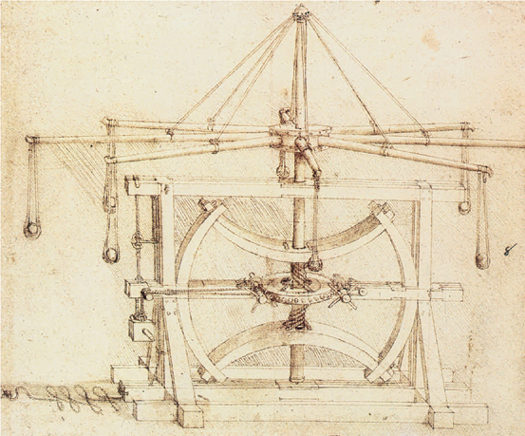
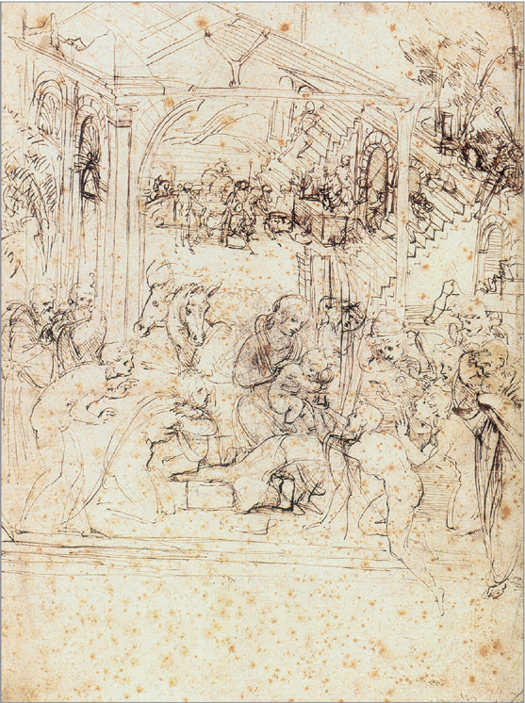
Leonardo da Vinci (1452-1519). Catapult. Ambrosian Library. Linear perspective was developed during the Renaissance in Italy, in architectural and technical drawings such as the one of this machine thought up by Leonardo da Vinci.
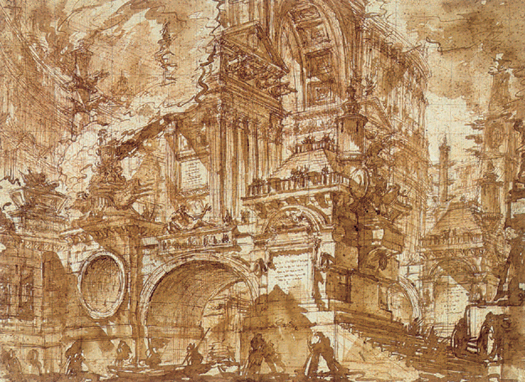
Giovanni Battista Piranesi (1720-1778). An Ancient Port. J. Paul Getty Museum. Architectural drawing requires the use of linear perspective more than any other kind of drawing.
The simple representation of some objects in front of others already creates the sensation of spatial depth. In addition, when drawing similar objects of different sizes, the larger objects appear closer than the smaller ones. These intuitive representations of depth are adequate ways to render a subject and its surroundings. However, when it is a matter of organizing views with elements that feature straight edges, linear perspective becomes important; it is impossible to make a drawing look realistic without executing the general rules that determine the angle and direction of these straight lines.

Linear, or scientific perspective is based on the idea that the lines outlining space could extend beyond the drawing paper infinitely—objects get smaller the further they are from the viewer.

Perspective implements the way we naturally perceive space. Nature “hides” perspective and the artist reveals it.
To better understand the meaning of representation in perspective, it is useful to clarify concepts that, though simple enough, are better understood when seen in a drawing. These concepts are elementary, but, on many occasions, are only clear in an example.
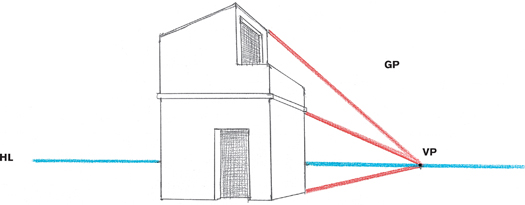
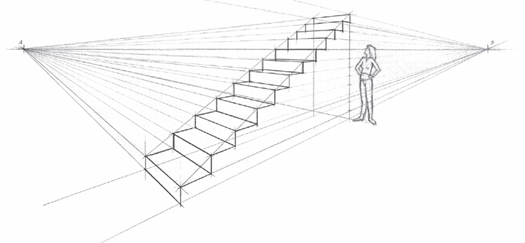
Diagram of the perspective view of a building, showing the following concepts: geometrical plane (GeoP), ground plane (GP), ground line (GL), point of view (PV), horizon line (HL) and vanishing point (VP).

In this diagram the positions of the building relative to the ground plan and the point of view are clearly visible.
This is the “floor” of the drawing. It is a fact that all representations of perspective are distributed on a horizontal plane. This is the geometrical plane and, like the horizon, can be explicit or implicit (visible or invisible).
This is the plane on which the represented objects appear. Ideally, it is the intersection of a vertical plane (like a wall in front of the observer) and the visual cone, at whose tip lies the point of view.
A view of the representation of perspective with the vanishing point, the horizon line, and the ground plane marked.
This is the line at which the geometrical plane and the ground plane intersect. The ground line, like every line that belongs to the ground plane, always appears in its “true dimension:" frontally and with no reduction in size due to perspective.
This is the place from which the artist observes the scene: the vertex of the visual cone. It is truly a point and is equivalent to looking with just one eye. In a drawing, the vanishing point always reveals the position of the point of view.
Engraving from the book Leçons de perspective positive (1576) by Jacques Androuet du Cerceau. Perspective of a single vanishing point located in the geometrical center of the drawing.
The horizon is the central idea of representation in perspective. The horizon line is, as its name indicates, a horizontal line, visible or invisible, explicit or implicit. It determines the position of all the objects, figures, or panoramas represented in the drawing. The horizon is also the place towards which any vanishing lines travel, to one or more points situated on this horizon. Even though the horizon is not a drawn line, a drawing should always suggest or imply its location.

The horizon line only appears explicitly and unmistakably in seascapes (or on plains without geographical interruptions).
Many landscapes partially reveal the horizon line without explicitly showing it; it is easy to deduce its height in relation to the other elements in the drawing.
In many themes, the horizon line does not appear anywhere and an exercise of abstraction is necessary to deduce its height (always defined by the cut or convergence of the vanishing lines found in the theme).
The height of the horizon coincides with the position of the artist before their subject. A ground-level view requires the horizon line to be placed towards the top edge of the paper. Contrarily, a bird’s eye view would place the horizon line towards the bottom edge of the paper. In a still life, the horizon often coincides with the top edge of the table on which the objects are spread out.
Often, the horizon line is not visible in the representation, but can be deduced from the vanishing lines marked by buildings, furniture, or pieces of buildings, such as cornices or moldings. The point at which two or more of these lines intersect indicates the height of the horizon. This does not apply to non-objective drawings, nor to drawings whose shapes do not abide by traditional methods of representation.
When objects, geographical irregularities, or buildings hide the horizon, the drawing’s vanishing lines inform the placement of the horizon line. This height coincides with the height of the observer’s point of view.
Vanishing lines are straight lines that intersect at a point on the horizon called the vanishing point. Vanishing lines are prominent in drawings that feature straight lines and edges. But vanishing lines can also be found implicitly in the drawing. The banks of a river, for example, are not at all straight, but the artist can trace a pair of vanishing lines to outline their line of perspective, erasing them afterwards.
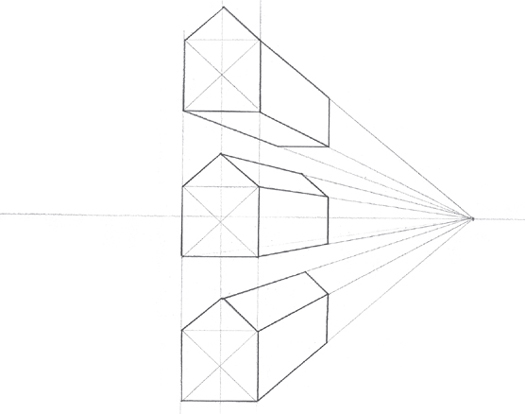
Parallel lines seem to converge in the distance, in the way that railway lines seem to do. A vanishing a point is point at which parallel vanishing lines meet. This trick is the basis of conical illusion, an illusion that captures the way we perceive space. The number of vanishing points determines the kind of perspective: frontal (one vanishing point), or oblique (two or more vanishing points).
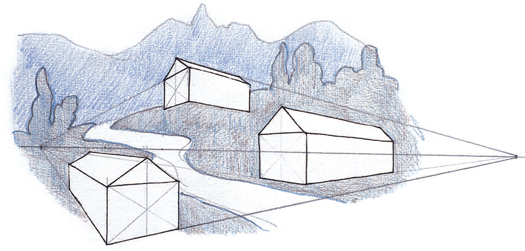
Some items in landscapes can suggest vanishing lines. A path drawn in perspective does not have to be completely straight to reveal the presence of these lines.
The vanishing lines are clearly visible in all the elements of the drawing that contain straight lines parallel to the geometrical plane (to the “floor” of the perspective).
Vanishing lines are the straight lines that converge at vanishing points. Any straight line in the subject that is parallel to the earth (to the geometrical plane) can be a vanishing line. In a frontal perspective, all vanishing lines converge on a single vanishing point; in an oblique perspective, the vanishing lines converge on two or three different vanishing points.

The vanishing point is the place where the vanishing lines converge. The point of convergence lies on the horizon line.

All items with faces and straight edges are shown in perspective by the convergence of these faces or edges at the vanishing point, which rests on the horizon.
PERSPECTIVE AND LANDSCAPES
Landscapes without buildings, while still subject to the laws of perspective, are rarely represented with linear perspective. The artist has to use their intuition and capacity of observation to resolve these kinds of drawings.
Parallel perspective refers to a representation that does not rely on a vanishing point, and, therefore, does not employ vanishing lines. Because these parallel lines do not converge on any horizon, the vertical dimensions of the subject do not decrease as the object recedes into the distance. This perspective, also called axonometric projection due to its positioning of three spatial axes, is useful for creating an intuitive, clear and explicit drawing of all the elements of the scene.
Leonardo da Vinci, Sketch for a composition. Louvre Museum. In this drawing Leonardo used parallel perspective, a perspective with no vanishing points.
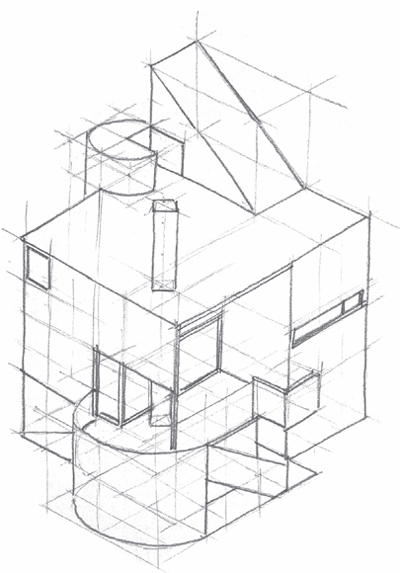
Graphic blocking in in architectural drawing usually employs axonometric projection that is often isometric.
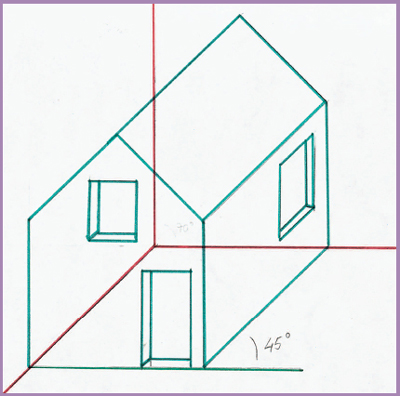
Here, the horizontal and vertical dimensions (widths and heights) are proportional to the ground plane. The lines perpendicular to the ground plane (depth) appear in a diagonal tilted at 45º from the horizontal line and their dimensions shrink to two thirds of their original size. Expressed in terms of spatial axes, cavalier perspective results from keeping two of these axes (those that create the dimensions of height and width) at 90º, whilst the third axis forms an angle that is usually at 135º from the other two. Cavalier perspective can be used to draw a flat object three dimensionally.
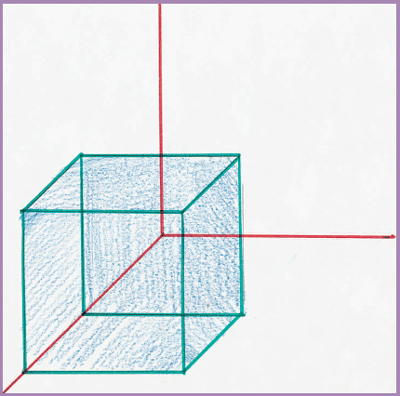
Isometric perspective does not represent frontal faces, and the three axes of the drawing form angles of 120º. Each axis’ reduction is identical (by a factor of 0.82) and affected by the perspective, meaning there is no “true” dimension. It is characteristic of representations of architectural interiors. Today it is widely used for computer-generated scenes.
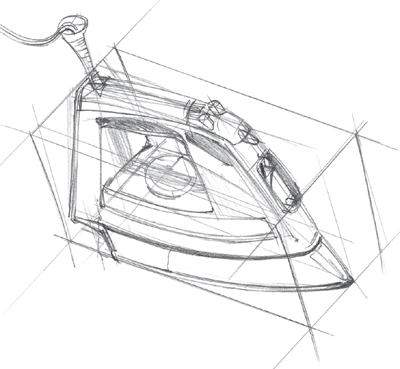
Sketches for industrial engineering and elaborate diagrams of mechanical parts rely heavily on isometry.

Engraving from Sebastiano Serlio’s Second Book of Perspective (1545). Unlike conical perspective, isometric perspective has no vanishing point.

Cavalier perspective, like all axonometric projection, foregoes vanishing points: all the oblique lines are parallel.
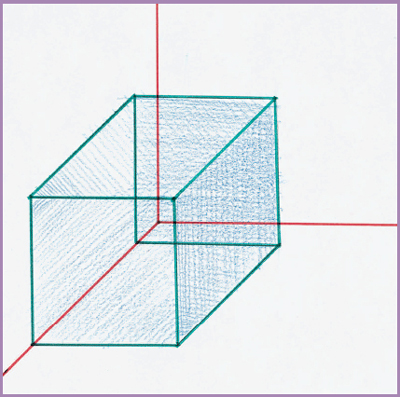
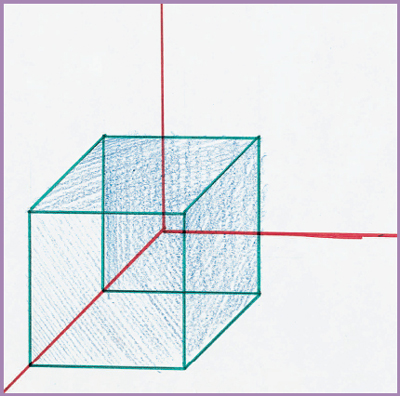
With no reduction in size, a cube in cavalier perspective looks deformed.
Conventional two-thirds reduction in dimensions in perspective.
50% reduction in dimensions in perspective.

The isometric representation of a cube results in equal dimensions of all its faces. Isometry is based on three coordinate axes that form equal angles (of 120º).
CAVALIER PERSPECTIVE
This is a simplified version of cavalier perspective that respects all dimensions, and does not involve any reduction at all. The axes of breadth and height remain at 90º, whilst the angle of the depth axis varies depending on the drawing. This results in a distorted view of the subject. Cavalier perspective is also known as “military perspective,” and its name comes from its use in representing fortifications.
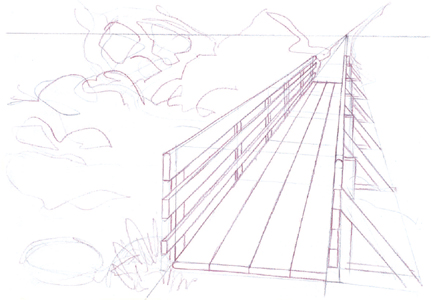
This is the traditional perspective of drawing and painting: perspective with vanishing points. A conical projection forms this perspective. The image is projected on a plane (the ground plane) that penetrates the “visual cone,” the tip of which attracts the viewer’s eye, and the base of which contains the scene of the drawing. This means that the projection lines are not parallel, but that they converge. With conical perspective, these converging lines are equivalent to vanishing lines and the observer’s eye lines up with the vanishing point.
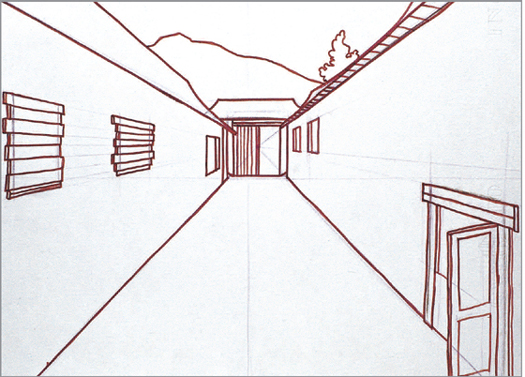
A frontal view of the subject produces frontal perspective, that which contains just one vanishing point. The vanishing point is directly in front of the point of view.
This is the perspective that results when one of the sides of the object is parallel (in a frontal view) to the ground plane. The vanishing point, always located on the horizon line, coincides with the point of view, which naturally places it more or less in the middle of the paper. For this very reason, frontal perspective fails when the object is drawn far from the vanishing point; in this case, it would be more logical to represent the object with oblique perspective.
The frontal nature of perspective with just one vanishing point does not require that this point stay in the center of the paper: it may move, but too much displacement will distort the image.

Frontal perspective is applied to items that are at any height above or below the horizon line.
Since we do not usually see things from a completely frontal view, perspective in most cases will be oblique, representing an angled, or side view. Therefore, lines or faces perfectly parallel to the ground line will not appear. The vanishing lines of oblique perspective converge towards two different vanishing points located on the horizon line. Thus, perspective with two vanishing points can be understood as the combination of two frontal perspectives.
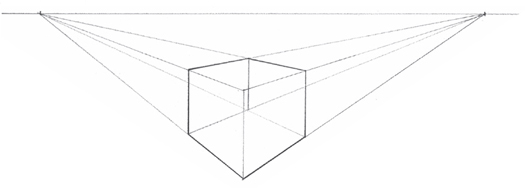
Oblique perspective is equivalent to a “displaced” view of the object: we see it from the side, obliquely. This perspective combines two points of view, thereby giving the drawing two vanishing points.
Oblique is usually the most natural perspective, the one that best fits the way subjects may be positioned (provided that these subjects are geometrical or can be reduced to geometrical shapes without any deformity).
THREE VANISHING POINTS
When viewing objects from below, or above (bird’s eye view), a third vanishing point located either well above or well below the horizon factors into the drawing. These perspectives are not very common, but must be treated correctly.
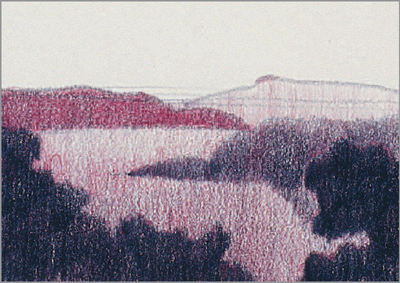
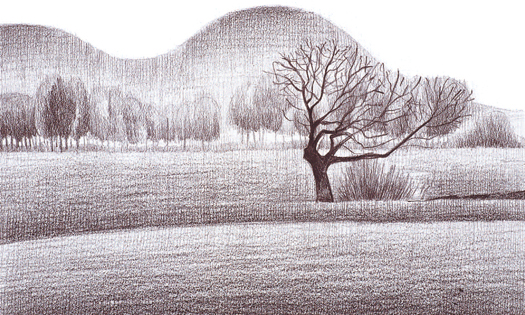
This is the most characteristically artistic way to represent space. Progressively shading an object’s contours and details and creating an atmosphere that comes between the object and the viewer creates depth and spaciousness. Aerial perspective is highly effective in subjects that include considerable distances, particularly landscapes. Simply blotting out a middle-ground means that the foreground appears farther away from the background.
Objects in the foreground must sharply contrast those in the background. A contrast in the foreground relies on black and white, whereas a contrast in the background will employ varying shades of gray. This muffled contrast creates depth. This is useful in drawing subjects in nature, and emphasizing contrast in a work reinforces the perspective.

Aerial perspective is based on the steady reduction of the contrast and clarity of a shape’s contours to make them appear farther away in space.

Contrast is always sharper in the foreground than in the background. This basic principle of aerial perspective is especially clear in landscapes.
Aerial perspective is also useful in still life drawings; the contrast between clear and misty shapes, or between sharp and blurred profiles, creates the feeling of air placed between the objects, and of atmosphere and space.
Objects that are drawn with defined contours appear much closer to the viewer than those drawn less precisely. This general rule is useful in creating linear drawings that exhibit little to no contrast between light and dark tones. Creating depth by varying contours applies to many subjects, but is especially helpful in creating landscapes.

Thomas Gainsborough (1727-1788), A Lady Walking in a Garden with a Child. J. Paul Getty Museum. The loss of definition and contrast, along with the carefree treatment of the background, creates a feeling of atmosphere and distance: the intended effect of aerial perspective.
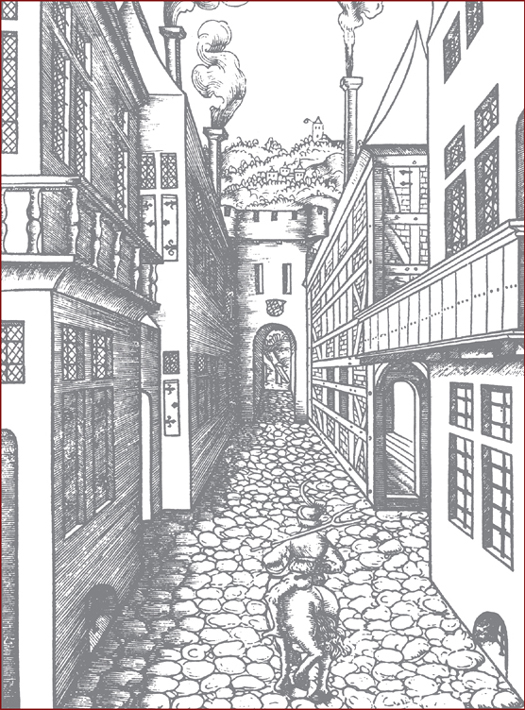
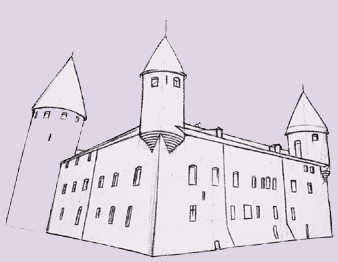
In urban views or panoramas that feature buildings, conical perspective is effective and easy to achieve. This town scene clearly suggests a frontal perspective, meaning one with a single vanishing point. The lines suggested by the cornices, windows, and eaves lead to this vanishing point and situate the vanishing line at the correct level.
THE SUBJECT
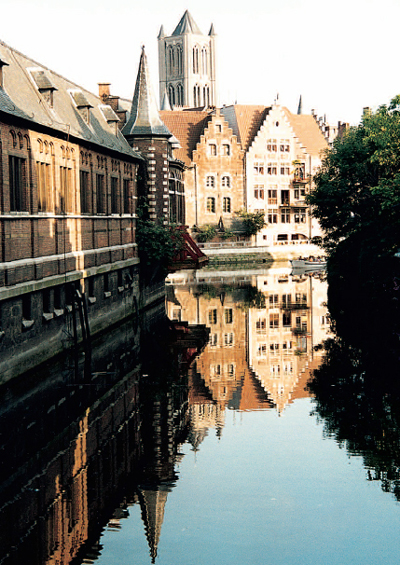
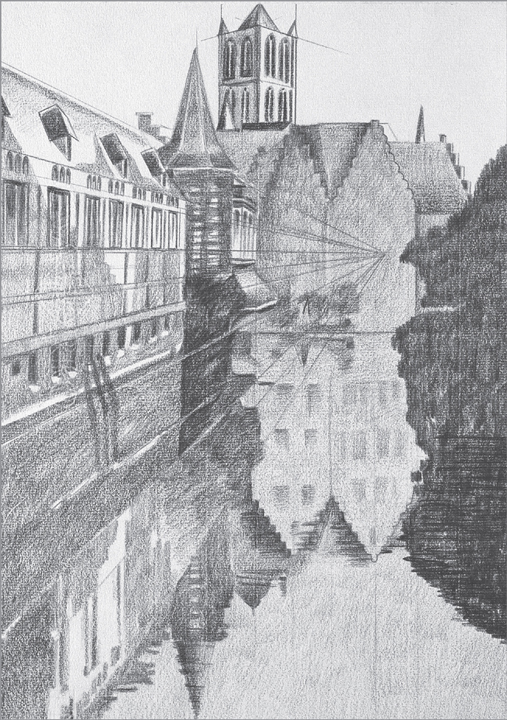
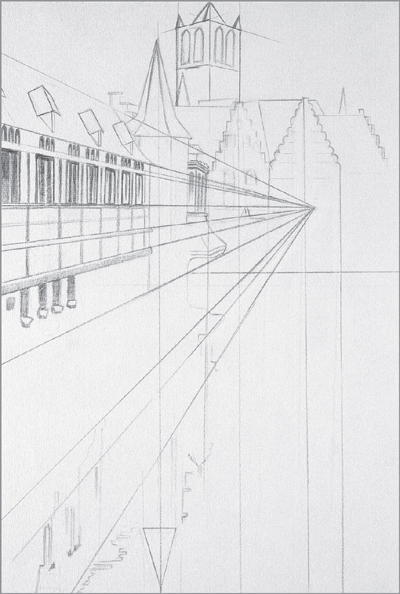
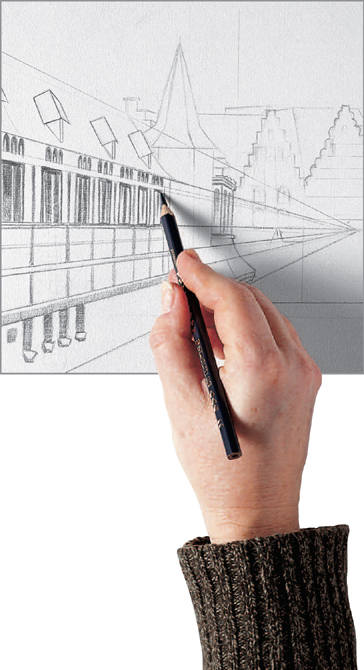
This is an urban view observed from a leveled viewpoint, which allows the representation of the overall perspective to dominate.

1. Fundamental vanishing lines, those that establish the position of the vanishing point and the horizon line, form the basis of the scene. Use a pencil that is not too soft, such as a 1B or 2B, to avoid marking the lines in excess.

2. From the vanishing lines, construct the geometrical boxes that will form the buildings. Pay attention to their various sizes, so that everything fits inside the space of the drawing.
3. Use the vanishing lines drawn before to align the rows of windows and architectural details, which can then be shaded with a charcoal pencil.
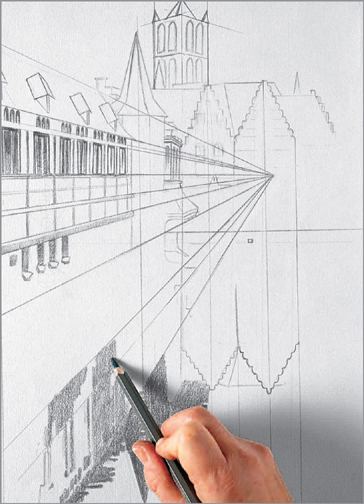
4. The lower vanishing lines correspond to the perspective of the reflections, which follows the same laws as the perspective of any other object. Shade them in with a charcoal pencil.
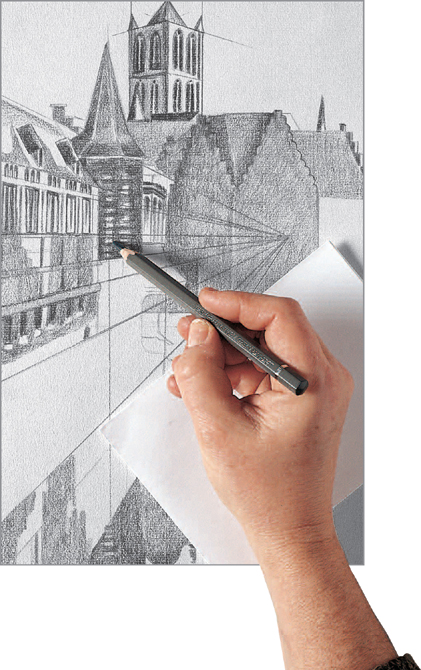
5. Little by little, fill in the whole scene with the relevant details, light, and shadows. Because of the network of vanishing lines drawn beforehand, the light, shadow, and details should be correct and consistent with the rest of the drawing.

6. The architecture and its reflection in the water are now fully represented. All the significant details have been properly assessed and a coherent drawing, nuanced in a correct perspective, is complete. Work by Gabriel Martín.
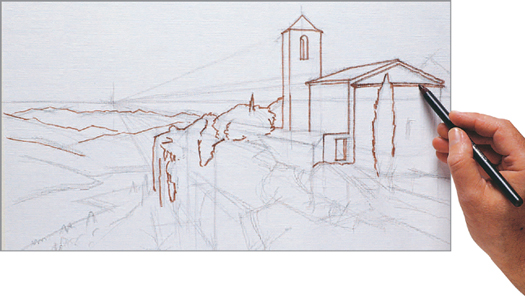
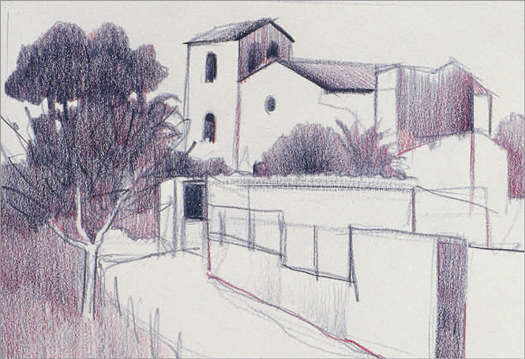
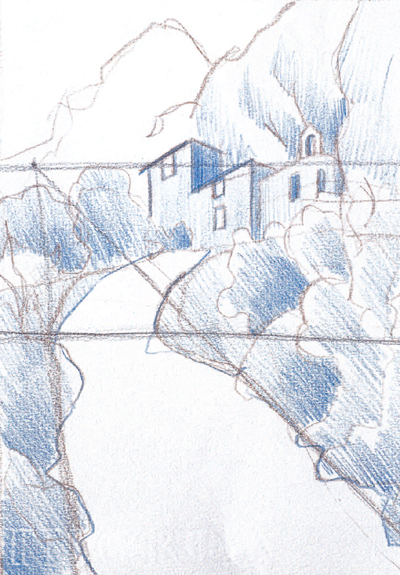
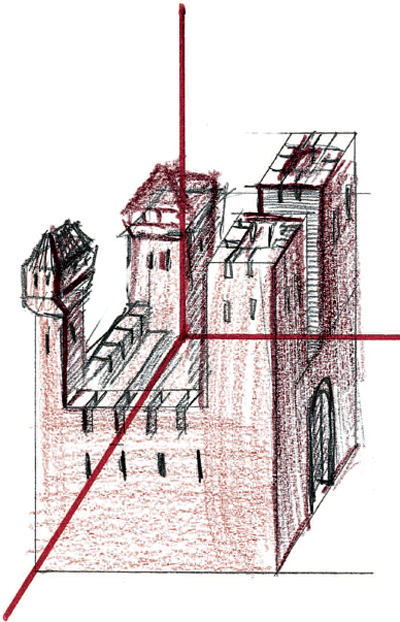
When the theme that you want to draw does not clearly present the vanishing lines that determine a conical perspective, the artist must infer such lines, along with the other elements of perspective. This subject hints at vanishing lines, but the architectural items are very rustic and irregular, qualities which obscure the underlying geometry of their shapes.
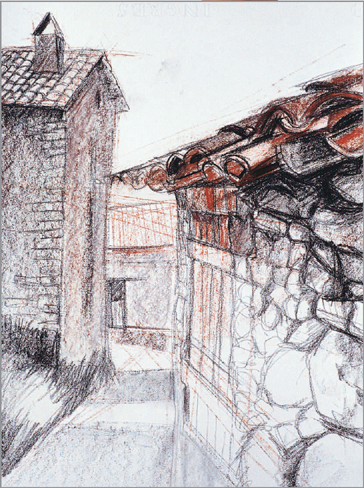
THE SUBJECT
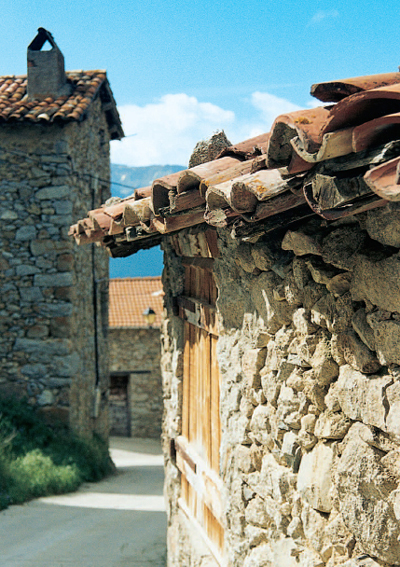
Here, the buildings are very irregular and the vanishing lines are not pronounced, although it is not hard to detect them from the tilt of the roofs and facades.
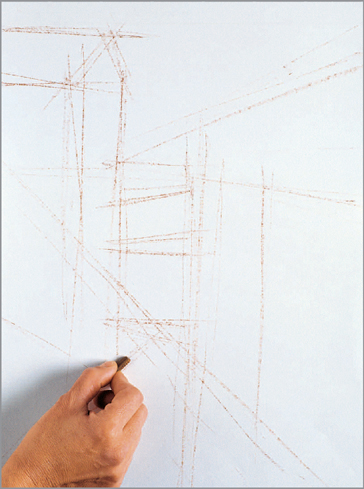
1. The main vanishing lines project from the roof and window of the house in the foreground. They converge at a point very close to the edge of the paper.
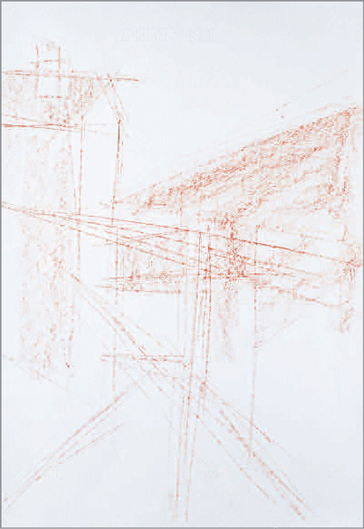
2. The other buildings pose no problems, as they appear in a frontal view and one simply has to mark their heights and proportions.

3. Once the whole drawing has been sketched out in sanguine, a stick of thickened charcoal can define the real contours of the items in the scene.
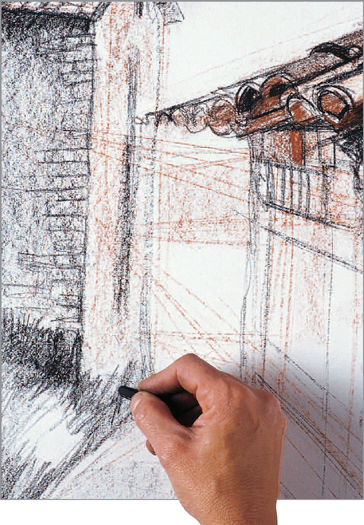
4. Applying the tip of the stick to the paper, draw in the tiles, taking care that their position is consistent with the actual subject’s. Broad strokes create general shading.
5. The combination of thickened charcoal and sanguine suits this motif very well, as the texture of the material (stones, wood, etc.) is rich and nuances the shadows.
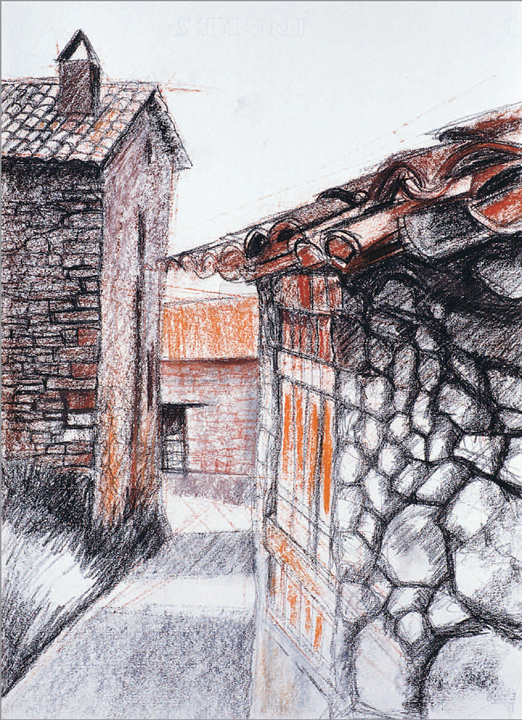
6. Finally, the artist Esther Olivé de Puig concludes the drawing, having properly organized its perspective as well as the wealth of details that characterizes its walls and roof.