2
GROWING
FUNDAMENTALS
Basic Gardening Supplies
A container system utilizes supplies available from any garden shop. I prefer five-gallon containers for my flowering weed and one-gallon containers for my vegetative weed. These containers can be found at most hardware stores and are less expensive than dedicated plant pots. The five-gallon pails allow for adequate root development and also come with convenient wire handles that fold down against the side of the container when not in use. Drill a series of quarter-inch holes at the bottom of the plant containers for drainage. If you make the holes any wider than that, your drainage stones will roll out. Containers can be white or black. Black is good for root development, while white is better at reflecting light away from the pots so that heat does not build up in the containers. If your room is air-conditioned, heat buildup won’t be an issue. I prefer black pots and an air-conditioned grow room. Place plastic trays under every plant pot. Use the deepest trays you can find to prevent water from overflowing onto the floor. Some plastic buckets come with lids that are deep enough to use as trays.
You’ll also need a water drum in your grow room. A 30-gallon plastic tank/garbage container holds just the right amount of water for gardens of up to 15 budding plants and 15 to 18 clones. Plastic garbage cans are available at any hardware store. Also pick up a fish tank bubbler to introduce air into the standing water. The bubbler can be purchased at either hydroponics or pet stores. Just drop it into the tank and plug it in. The bubbler runs all the time and does not require a timer.
For starting seeds and clones, I prefer using soil instead of soilless mix because there is enough nutrition in the soil for at least a month, and it is available to the plants with no danger of overfeeding or burning them with too much fertilizer. The best soil comes from hydroponics or gardening stores, but you can also use a brand-name product such as Miracle-Gro soil, which will have all of the necessary trace elements as well as nitrogen, phosphorous, and potassium in the soil. When you find a good soil stick with it.
Always use sterilized soil for your indoor garden to avoid bringing in pests and diseases. When your crop is harvested or your clones are transplanted, do not reuse the leftover soil or drainage rocks. Dump the soil and rocks into a garbage bag and buy fresh soil and drainage rock for the next crop. Toss the garbage bag into a local dumpster, making certain to remove all leaves and branches that might identify the garbage as pot. Place any pot leaves and branches in paper bags, and after they have dried, burn them in your fireplace if you have one. If you don’t have a fireplace, save the leaf debris until you have enough to fill a garbage bag, and dispose of it any way you can. Burn it or bury it or scatter it in the woods. If you burn it, pick a time and place when the fewest people will be around to notice how good it smells.
For growing cannabis in the budding phase, I prefer soilless mediums such as Pro-Mix because it is sterile, light, and clean to use, and it drains well in plant pots. Soilless mixes are often closer than soil to the optimal pH of 7. Regular soil is very messy when wet and is hard to clean up compared with soilless mixes, which don’t leave sludge behind after a wet cleanup. I like to use soilless mixes for blooming plants because I can “push” the plants with a large amount of fertilizer (when necessary) and then clear out the fertilizer with water that drains quickly. Use the most porous soil mix available, and in the case of Pro-Mix use the brand labeled “High Porosity.” The soil substitute mixes are often in large bags that weigh about 30 pounds, but smaller half-size soil mixes are also available. You’ll also need to buy lava rock or sterilized gravel for drainage at the bottom of each pot.
You’ll need two types of fertilizer to bolster plant growth, one for each growth stage: bloom fertilizer to encourage big, healthy buds, and vegetative fertilizer to sponsor healthy growth going into the bud stage. Liquid fertilizers are more expensive, but I prefer them because they mix better than powdered fertilizers. I prefer Heavy Harvest by Nutrilife, but I have also used General Hydroponics plant food. When you find a good fertilizer, keep using it, because once you learn the mixing ratio it is easy to follow. Most good fertilizers contain a few trace elements (micronutrients) in addition to the basic ingredients of N, P, and K. If you buy premium plant food, as opposed to the cheapest plant foods, you’ll get trace elements in a proper ratio to the basic elements. Vegetative plant food formulas are usually higher in nitrogen while flowering formulas are higher in potassium. I don’t recommend the use of “bloom boosters” and “bud blasters” or any of the miracle growth aids sold in garden shops and hydroponics stores with the promise of increased plant yields. Invariably, these growth aids just add to the fertilizers you are already using and toxify the plant with too much of a good thing. When preparing a fertilizer solution use the mixing directions on the package as a guide, but use your salts meter to determine the precise ratio of fertilizer to water. (I’ll cover more on fertilizing in chapter 3.)
Starting from Seed
A successful marijuana garden starts with good seeds. They can be purchased in Canada at retail outlets, by mail order, or over the Internet. To find the necessary seeds, look up “cannabis seeds” on the Internet and watch the search results pour in. If you order seeds by mail, do not have them sent to where your pot will be grown. Have them sent to a friend, relative, or mail drop address. In some parts of Canada (certainly in major cities) you can find walk-in retail stores that sell seeds.
It is still illegal under U.S. federal law to grow or possess marijuana or to sell seeds. Some states have overruled the federal marijuana laws on possessing and selling marijuana but marijuana seeds are still a gray legal area. Although some U.S. cannabis dispenseries are reported to sell cannabis seeds, they are not generally allowed to be sold in the U.S. at this time. So to obtain seeds in America you will have to shop around a little harder than in Canada. You can try asking about seeds at your local medical marijuana compassion clubs or cannabis dispensaries. (Do not expect positive results over the phone.) Often the attendant there can direct you to someone that can help you even if they are unable to sell you the seeds themselves. Cannabis magazines like High Times or Cannabis Culture have advertisements for mail order seeds, and online sites may offer to mail cannabis seeds into the U.S., or you could try to find seeds or clones from a contact in the weed-growing underworld. Your local hydroponics shops can probably direct you to someone with seeds or clones if they don’t think you’re a narc. Your pot supplier can be the greatest help of all in finding a seed or clone source, although he will ultimately be disappointed to lose your business. Whatever your plan, I do not advise carrying seeds in your clothing or luggage or anywhere on your person when traveling through immigration or customs in any country.
Do not take seeds from a bag of pot you purchased to start your garden. These seeds are often hermaphrodites that grow unwanted male parts along with the desired female parts and are guaranteed to give you the same or worse “seedy bush” weed as the bag that they came from. Seeds from purchased weed might also be from an outdoor variety that does not grow well indoors. What you want for your indoor marijuana garden is a hybrid Sinsemilla plant. Sinsemilla, a Spanish word, means “without seeds.” Seeds can take up half of your marijuana crop and thereby reduce your return by 50 percent. They lower the potency of your pot, and seed pods make the pot taste bitter. The best seeds are large and waxy, though all cannabis seeds will produce marijuana. Visit your local seed store or website to select the seeds that best suit your requirements and tastes.
When you have secured your seeds and are ready to start the growing process, gather:
saucer
cotton balls or paper towels
sterilized potting soil
potting containers
pencil
Then,
Place seeds on a saucer in thoroughly moistened cotton balls or paper towels for several days until a white root comes out. Keep the cotton balls or paper towels thoroughly moist but not soaked, adding water daily if necessary.
Fill one-gallon containers with soil-based growing medium or seed-starting soil.
Water soil.
Using a pencil-sized object, poke a hole about a half inch deep in the soil.
Place the seed in the hole with the root facing down.
Gently fill in the gaps around the seeds with loose soil and continue to add soil until the seeds are completely covered with a thin layer of dirt.
Let the seeds germinate in darkness or low light, waiting until they sprout before placing them under full light.
Water seedlings daily if necessary to keep the soil damp. Only wet the top inch or so of soil but do not let the soil medium dry out. Use a spray bottle type to mist the seedlings when they sprout to prevent water from knocking over the tender plants. If the seedlings do fall over, don’t lift them up or stake them upright. They will stand again on their own after a few days of lying down.
After a month or so, when the soil-borne nutrition is all used up by the growing plants, begin adding fertilizer at about half strength. I feed my vegetating plants about every two weeks. For more information on fertilizing, see chapter 3.
Determining Sex
After one to two months of vegetative growth, when cannabis plants are about 1’ tall, they can be placed in the budding room under 12 hours of light per day. Within two weeks the male flower pods first appear at the trunk of the male plants, usually where a branch is growing. A female plant will show similar shaped flower pods on the main stem but these flower pods quickly develop white pistils (hairs) that do not appear on males. The 1 mm to 2 mm round flower pods of male plants will sometimes resemble a female flower for a brief time, showing two protruding spear-shaped leaves that look like flower pistils, but by the time they are one month old, none of the male seed pods show clusters of white pistils like female flowers do. If left unattended the male plants will form clusters of tiny white or yellow flowers that eventually release a pollen that fertilizes the white female flower pistils to create seeds and propagate the species. When that happens the female plant spends all of its energy producing seeds and produces very little smokable bud. To avoid the complications of sexing your plants, you can sometimes buy feminized seeds that are the result of fertilizing a female plant with a hermaphrodite male. The resultant seeds from a feminized plant are purely female but are not reliable for breeding because of their tendency to produce hermaphrodites. For more on breeding, see chapter 4.
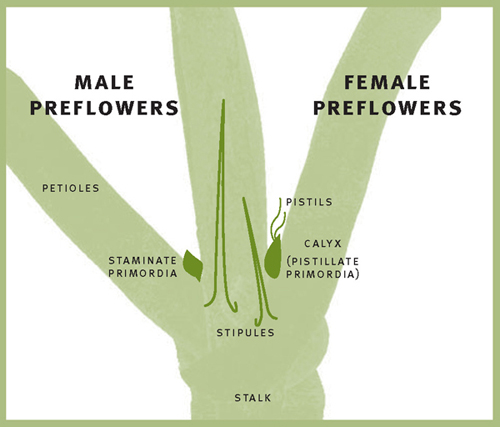
Female flowers develop clusters of white pistils (hairs) that protrude from their seed pods
Cloning Plants
The simplest way to start your garden is with cannabis seeds, but once your garden is under way, plant clones are essential to keep your marijuana garden rotating from crop to crop with the least amount of cost and effort. Here is a step-by-step method for cloning. It is simple and consistent. You’ll need:
sterilized soil
one-gallon plastic or clay plant containers (about 8” wide and 8” deep)
bottle of Rootone or equivalent root growth stimulant
sterilized razor blade
To start cloning,
Prepare containers by filling them with soil.
Select a cutting. You want a healthy piece, not some scraggly piece. Slice it off at a 45 degree angle with a razor blade.
Remove the leaves and small side branches from the base of the cutting using the razor blade, leaving a nice cluster of leaves at the top of the cut.
Dip the cut end in rooting solution and shake off the excess powder or gel.
Make a hole in the prepared soil; make the hole wider than the plant’s stem so the rooting hormone won’t be scraped off.
Place the cutting into the hole and gently pack the medium around it.
Using plain water, soak the cuttings in the soil.
Place cuttings under low light until roots develop.
There’s really no need to prepare extra clones for insurance, as I find that well over 98 percent of my healthy cuttings survive the cloning process.
Basic Care During Vegetative Growth
Vegetative growth is the time prior to flowering when a plant grows its leaves and branches. This phase lasts approximately two months and requires 18 to 24 hours of light per day. A healthy vegetating plant will be dark green. The stems will be thick, and the plant will stand upright in a typical Christmas tree shape. The branches will be rubbery and strong, and the leaves will not tear easily.
Cuttings do not require plant food/fertilizer until their roots develop about three to four weeks after being planted, and you should use a weak mix for the first feeding. I never exceed a reading of 8 on my salts meter when mixing fertilizer for my young cuttings. If the young plants react well to the fertilizer, keep feeding them approximately every two weeks. You’ll have to determine what the best schedule is for your own plants, which might be different from mine based on your growing climate, the porosity of the soil mix, and the vigor of the cannabis strain you choose. Choose a fertilizer high in nitrogen, also known as vegetative formula, for this phase of leafy growth.
A vegetating plant does not mind if you turn the lights off for a few hours. As long as there are at least 18 hours of light per session, the plant will experience vigorous growth. If lights are accidentally left off for a few hours or even days, there is no lasting harm to a vegetating cannabis plant. If heat buildup becomes a problem in the grow room during vegetative plant growth, turn the lights off for six hours per day and begin an 18-hour-per-day growth regimen that will allow the room to cool down during the off-light cycle. Don’t worry about triggering your vegetating plants into budding when turning the light cycle down to 18-hour days. It takes at least two weeks of 12 hours of light per day to trigger a vegetative plant into blooming.
Water vegetative plants twice a week or more often if needed with pure water from your water container. Let tap water stand in the container for a day before using it to water the plants. This will allow the chlorine in the water to evaporate. Chlorinated tap water won’t really hurt your plants, but it is better to let the chlorine escape and to let the water reach room temperature before using it on the plants. Very cold water can shock the plant and stunt growth.
Trimming during the vegetative state is good for making bushy plants, but never trim a plant once it is budding and in flower. When your plants have reached the end of their vegetative growth period, take a cutting from each plant before transplanting it and moving it to the budding room. This keeps your garden stocked with new plants as needed.
Transplanting Seedlings and Clones
When the cuttings or seedlings have completed the vegetative stage and are about two months old and two feet tall, they are ready to be transplanted and moved to the budding room. You’ll need:
five-gallon planting containers with ¼” drainage holes in the bottom.
lava rock or commercially sterilized gravel
Pro-Mix or another commercial growing medium, preferably soilless
water or a mild quarter-strength bloom fertilizer formula
After you have the materials,
Prepare the receptor plant pot so that it is half full of soilless mix.
Position your donor plant pot directly over the receptor plant pot.
Place a finger on either side of the seedling or clone’s main stem and turn the donor pot upside down. The seedling or clone should easily slip out into your hand. If the donor plant does not easily slip out of a plastic pot, squeeze all around the pot to break the seal of the soil against the sides of the container and then try again. For a clay pot turn it upside down and tap the sides and bottom with a rubber mallet until the donor plant slides out into your palm or receptor pot.
Flip your palm over and place the seedling or clone and its root ball into the receptor pot.
Add soil or mix around the root ball until it fills the receptor pot to a couple of inches below the top.
Water the plant to settle the soil around the roots, using pure water or a mild quarter-strength bloom fertilizer formula.
Move the transplanted seedling or clone to the budding room.
Basic Care During Flowering Growth
Flowering growth lasts about two months and follows two months of vegetative growth. Some cannabis plants require two and a half or three months of flowering to reach maturity, while others can shave a few days off the two-month flowering time and be ready after six or seven weeks of flowering. It all depends on the genetics of the plant you choose to grow.
Flowering growth requires 12 hours of light per day followed by 12 hours of uninterrupted darkness. Even a small light left on during the 12-hour night period can stop a plant from flowering and send it back into its vegetative cycle. Fertilizers that have a lot of potassium are essential in this part of the plant’s development. Most of the heavy bud growth occurs during the final two weeks of blooming, and if you harvest even a week or two early you’ll get skimpy buds that are half the weight and half the flavor of a fully developed bud. If you run out of smoke near the end of the budding cycle it is better to buy some weed than cut down your budding plants a week or two early.
Plants in bud stretch during the first few weeks of the 12-hour light regimen, sometimes growing twice as tall as they started before they are finally harvested. Once plants are over three feet tall, support them by tying them to bamboo stakes. If a plant grows too tall during its blooming cycle and comes too close to thelamps, bend it, don’t trim it. Squeeze the stalk at the bend and slowly force it so that it is horizontal to the floor, being careful not to snap the branch off. Once the plant is bent, leave it alone to recover — which it will. Trimming a budding plant stops any further growth along the limb. If you must trim a budding plant for any reason, trim a side branch but not the main stem. Trimming the main stem will stop or slow growth in the entire plant, while trimming a branch stops growth only in that branch. So, if you must try a sample of your weed, cut a branch, not the trunk.
When feeding your plants during flowering growth, keep an eye on the white flowering tips. If the pistils (white hairs) of the flowers begin to turn brown within a few days of feeding, it is an obvious sign of overfertilizing. Too much water or fertilizer and most insecticides will cause the white pistils to turn brown. Cannabis plants are very sensitive during flowering and should be monitored closely.
co2 Injection
I don’t recommend co2 injection for personal growers due to the constant exposure to hydroponics stores for co2 tank refills. co2 injection is a needless expense. It might increase the yield slightly, but it also requires closing the vent fans in your room, which leads to heat buildup that damages your plants. Having stated all these negatives, though, a properly set-up co2 injection system can encourage vigorous growth and promote bushy plants that grow to maturity about a week faster than normal.
Hydroponics
You might hear a lot about hydroponics as being the best way of growing indoors these days. It is not. The same is true of aeroponics and flood and drain systems. The problem with all of these hydroponics systems is that they pump water and nutrients into the plants, and then the water returns to a common tank to be used again. That means all the plants share the same used water, so any water-borne viruses, diseases, or bacteria are shared by all plants. If one plant happens to pick up a bad infection, it will spread like wildfire through the entire garden.
My hydroponics garden once contracted a case of rust, and it spread to every plant. I had to start my garden over again from seeds. Similarly, root rot spread through my hydroponics garden one time, and it wiped out my plant crop and continued to infect my future plants even though I sterilized the entire garden, pots, lines, and pumps. I scrubbed walls and floors with bleach. I changed to a whole new strain of plants. And still the plants in my garden developed slimy root rot and died. I realized then I’d have to throw everything away and start with all new seeds, pots, and equipment. That is when I decided not to take a chance with hydroponics ever again, even though I had several decades of success using such growing methods. I went back to individual container growing, in which excess water and nutrients evaporate instead of returning to a common water trough, and I never had root rot or rust problems again. If one of my plants did happen to contract a disease, I could simply remove it from the garden without contaminating all the other plants.