Chapter 20. Recovering from disaster
In your career as a Cisco network administrator, you’re going to encounter some situations where large portions of the network—or the whole network—inexplicably stop working. In the last chapter, you learned some troubleshooting techniques to deal with specific technologies that aren’t functioning.
But when you’re dealing with a disaster scenario, you may not have the luxury of performing in-depth troubleshooting. You need to get the network up and running again, as fast as you can! The goal of recovering from disaster isn’t to get everything back to exactly the way it was; it’s to get everything working as best you can with what you have. To put it in health terms, you’re not trying to win a fitness competition; you’re just trying to get your vital signs within the normal range.
Having said that, the exercises in this chapter are for you to use only as necessary when the needs of your organization demand that you do whatever it takes to get the network up and running. This is one of the last chapters of the book, and the exercises in this chapter are to be used as a last resort.
Here are the basic steps you’ll follow to recover from a disaster:
- Narrow the problem to a set of IOS devices. It’s unlikely that all or even most of your network devices would malfunction at the same time. Chances are it’s just one or a few that are causing the problem.
- Reload the devices one by one. Although we IT folks often frown upon the “reboot first” troubleshooting advice, it’s sometimes warranted. In this case, we’re assuming your organization has told you to do whatever it takes to get the network back up.
- If the problem persists, you may have to delete the startup configuration of one or more devices and reconfigure them from scratch. This is the most painful and least desirable option, but as a Cisco network administrator, it’s one you need to be prepared for.
Let’s get started!
20.1. Narrow the scope to a subset of devices
Whenever you’re dealing with a large-scale network outage, there’s one troubleshooting step you must perform no matter how many people are screaming in your ear to fix the network. You must narrow the problem to a set of IOS devices. For example, if everyone in an office has lost all network connectivity, you’ll need to consider every switch everyone’s connected to, as well as every router in that office. On the other hand, if the network outage is confined to a department or section of the office, you may be able to narrow the problem to one or two switches.
If the network outage affects multiple offices simultaneously, chances are slim that the issue lies in a specific group of routers and switches. It’s much more likely that there’s an issue with the WAN connections among your different sites. In that case, there’s not much you can do other than contact your carrier and perform old-school troubleshooting with them.
A word of caution, though: if you’re not able to narrow the problem to a subset of devices, don’t proceed with the rest of the steps. The worst thing you can do is to start messing with devices at random. Making sweeping changes in the hopes of getting the network up and running will inevitably make the problem worse or cause a new one that will come back to bite you later.
20.2. Reloading the device
Once you’ve narrowed the problem to a subset of devices (or, if you’re fortunate, just one device), the next step is to reload it, which is Cisco parlance for rebooting it.
Reloading a switch or router isn’t unlike rebooting a computer. It’s a catchall, “try this first” technique that has a reputation for working much of the time. Some technology purists don’t like the idea of rebooting as a first step. But in an organization with a crippling network outage, you don’t have time to follow a scientific troubleshooting process. Getting the network working is what’s most important.
A reload does one very useful thing: it gets your device back to the startup configuration. If you (or someone else) have changed anything in the running configuration without saving it, a reload will reverse that change and could even fix the problem. A reload can also flush the ARP and MAC address tables, clear Port Security entries, reset routing protocols, reestablish trunks and EtherChannels, and clear out a host of other things—any of which could fix the problem.
Going back to my earlier word of caution, it’s important to remember that the effects of a reload can stretch beyond the device you’re reloading, at least momentarily. Hence, it’s possible that reloading a switch or router will cause the network problem to get worse before things settle down again. For example, if you were to reload an OSPF router, other OSPF routers connected to it would momentarily have to reroute their traffic down a different path. If no other path was available, those routers would have no choice but to drop the traffic.
Reload any device or switch in your lab using the following enable command:
Reload
The device will ask you for a confirmation and will then immediately reboot:
Router1#reload
Proceed with reload? [confirm]
You should immediately see output indicating a pending reload:
*Nov 12 03:14:34.142: %SYS-5-RELOAD: Reload requested by admin on console. Reload Reason: Reload Command.
20.2.1. Scheduling a reload
In the case of a network problem that can wait until everyone has gone home (including you), you have the option of scheduling a reload to occur later. You can schedule a reload to occur either at a specific time or after a specified number of minutes. This is especially handy if your organization requires you to postpone the reload until some unholy hour when you’d rather be sleeping.
On any device in your lab, schedule a reload to occur in 15 minutes from now:
Reload in 15
Once again, you’ll be prompted for a confirmation:
Switch2#reload in 15
Reload scheduled for 22:01:04 UTC Fri Nov 11 2016 (in 15 minutes) by admin on console
Proceed with reload? [confirm]
Switch2#
Nov 11 21:46:06.073: %SYS-5-SCHEDULED_RELOAD: Reload requested for 22:01:04 UTC Fri Nov 11 2016 at 21:46:04 UTC Fri Nov 11 2016 by admin on console.
You can specify the reload time in minutes or in both hours and minutes. For example, if you wanted to reload the device in 1 hour, 15 minutes, you’d issue the command reload in 1:15. As an aside, using the reload in command can keep you from locking yourself out when making changes on a remote device. For example, if you’re working on a router in an office that you’re not in physical proximity to, you can schedule a reload for a few minutes out and then make your changes. If your changes cause you to lose connectivity, you have to wait a few minutes for the router to reload. Once it reloads, it’ll forget your changes, and then you can then connect back and try again.
But what if your changes do work? In that case, you need to cancel or abort the reload.
On the same device on which you scheduled a reload, use the following command to cancel the reload:
Cancel reload
IOS will immediately halt the countdown and won’t reload the device:
Switch2#reload cancel


***
*** --- SHUTDOWN ABORTED ---
***

Nov 11 21:46:38.721: %SYS-5-SCHEDULED_RELOAD_CANCELLED:  Scheduled reload cancelled at 21:46:38 UTC Fri Nov 11 2016
If you’re reasonably certain you know which device is causing the problem, and a reload doesn’t fix it, it may indicate that the problem is in the startup configuration, which a reload won’t fix.
For this reason, it’s a good idea to keep copies of your working startup configurations. If one of your IOS devices isn’t working properly even after a reload, you can compare the startup configuration on the device to your copy. Remember that when a router or switch boots, IOS copies the startup configuration into the running configuration, so after a reboot, both should be identical. If you find any discrepancies between the running configuration and your backup, you can fix them and hopefully solve the problem.
But if you don’t have a good backup of the startup configuration, then you have what I call the nuclear option—deleting the startup configuration.
20.3. Deleting the startup configuration
Deleting the startup configuration on an IOS device means that you must reconfigure the device from scratch. This isn’t something you just do willy-nilly. Before venturing down this path of effectively starting over, you should be convinced that it would take longer to untangle the messed-up configuration than it would to start from scratch. In other words, this isn’t for the faint of heart!
Deleting the startup configuration is the easy part, and the process is the same for both routers and switches. If you followed the lab setup guide and have done all the exercises in this book, you have a pretty good idea of what starting from scratch entails. I won’t rehash all of that here. Just keep in mind that deleting the startup configuration means almost nothing will work until you configure it.
Choose a device on which to delete the startup configuration. To be on the safe side, you’ll take a backup of the configuration. Display the device’s startup configuration by issuing the following enable mode command:
show startup
Copy the entire contents and paste it into your favorite text editor.
Delete the startup configuration using the following enable mode command:
Delete nvram:startup-config
After entering the command, IOS will prompt you for the filename and a confirmation. Press Enter twice.
You should see the following:
Router1#delete nvram:startup-config
Delete filename [startup-config]?
Delete nvram:startup-config? [confirm]
[OK]
Non-volatile Random Access Memory (NVRAM) is where IOS devices store the startup configuration as well as the VLAN database. The preceding command doesn’t delete everything in NVRAM, just the startup configuration file. Because IOS uses the running configuration for its minute-by-minute operations, deleting the startup configuration has no effect until you reload the device.
Once you reload the device, it will have no management IP address. That means the only way to access it is via the serial console, as you did in the lab setup.
Referring to the lab setup appendix as needed, connect your computer to the serial console of the device from which you just deleted the startup configuration.
Reload the device using the reload command.
Once it comes back up, you should be able to get into enable mode without a password:
Router>enable
Router#
Notice that the old hostname of Router1 is gone, and now the prompt just reads Router. At this point, you’re free to reconfigure the router from scratch.
20.4. Resetting the password
Another interesting problem crops up more often than you might think: not being able to log into a device because you don’t know the password. It’s not a disaster, but it can get in the way of fixing an actual disaster if there ever is one. The process for resetting the password is different for routers and switches, but in both cases you must use the serial console (as you did in the lab setup) to reset it.
Personally, I’ve never had to reset a password because I forgot it. But I have acquired secondhand devices that had a password set, which prevented me from logging in. This is the most likely scenario you’ll run into: you acquire a device from someone else and don’t know the password.
It’s important to note that resetting the password in the way I’m about to show you wipes out the startup configuration. As a rule, you shouldn’t perform these steps on a production device that’s working properly. This is just for two extremes: the devices you don’t care about and the devices you must get into right away!
The process for resetting the password differs slightly on routers and switches. In both cases, you must get into Read-only Memory Monitor (ROMMON) mode. ROMMON mode allows you to bypass the normal boot process so that the device doesn’t read from the startup configuration but instead drops you into a default startup configuration. From there, you have free rein to make any changes you want, including creating usernames and passwords. After you make your changes, you’ll save the new startup configuration, overwriting the old one and finally rebooting.
The difference between resetting the password on a router and a switch is that you have to push the Mode button on the front of the switch to get it into ROMMON mode, whereas on the router you have to send a special break command using your terminal emulation program. Given that you’ll have to connect to the serial console of the switch anyway, pushing the lone button on the front of the switch shouldn’t be a big deal. In fact, it’s much easier to get into ROMMON on a switch than a router, so let’s start with the hardest task first.
20.4.1. Resetting the password on a router
The first step is to reboot the router, which in this case will involve toggling the power switch or just pulling the power and plugging it back in. Again, because you’ll be rebooting and wiping out the configuration, you’ll need to connect to the serial console of the router before starting.
With a serial console connected to the router of your choice, reboot the router by power-cycling it. Watch the boot process carefully.
You should see the normal boot output:
System Bootstrap, Version 12.3(8r)T8, RELEASE SOFTWARE (fc1)
Technical Support: http://www.cisco.com/techsupport
Copyright (c) 2004 by cisco Systems, Inc.
PLD version 0x10
GIO ASIC version 0x127
c1841 processor with 393216 Kbytes of main memory
Main memory is configured to 64 bit mode with parity disabled
You’ll need to interrupt the boot process by sending a break signal from your terminal emulation program. Not all terminal emulators can do this, but PuTTY can. Refer to figure 20.1 to send a break signal to the router.
Figure 20.1. Sending a break signal using PuTTY
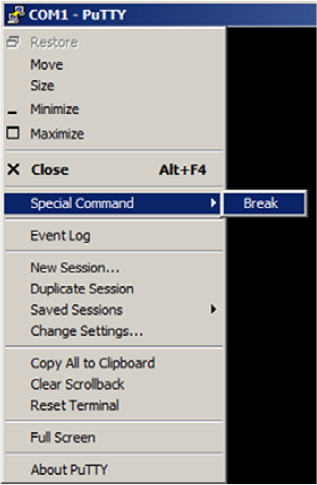
Send a break signal from your terminal emulator. In the PuTTY menu, select Special Command and Break.
You should see what looks like an error, followed by a prompt:
*** Address Error (Load/Fetch) Exception ***
Access address = 0x1
PC = 0x1, Cause = 0x10, Status Reg = 0x3041e803
rommon
If you see the rommon prompt, then you’ve successfully interrupted the boot process and gotten into ROMMON mode! The next step is to change the configuration register to ignore the startup configuration. The configuration register controls several things about the router’s operation, including whether it reads the startup configuration or ignores it.
At the rommon prompt, type confreg 0x2142 and press Enter.
After issuing the command, you should see a message telling you to reboot:
rommon 1 > confreg 0x2142
You must reset or power cycle for new config to take effect
Type reset and press Enter:
rommon 2 > reset
The router will reboot, and if all went well, after several moments you should see the following:
         --- System Configuration Dialog ---
Would you like to enter the initial configuration dialog? [yes/no]:
At this point, you can answer no to the initial configuration dialog to get to the usual IOS prompt or yes to let IOS guide you through some basic configuration settings. Regardless of which you choose, you’re not finished yet!
Get into global configuration mode and create a username and password:
Router(config)#username ben privilege 15 secret cisco
Change the enable password:
Router(config)#enable secret cisco
Feel free to make any other changes you like, such as setting the hostname. Before you wrap up, change the configuration register to 0x2102:
Router(config)#config-register 0x2102
This will tell ROMMON to install the startup configuration (which you’re about to save) when it boots up.
Finally, save the running configuration and reload the router:
Write memory
Reload
The order of operations here is important. You must save the configuration after changing the configuration register back. If all went well, the router will boot into IOS with the changes you just made.
20.4.2. Resetting the password on a switch
The process for resetting the password on a switch is almost identical to that of the router, except for how you get into ROMMON mode.
Power cycle the switch, and during the boot process, press the Mode button on the front of the switch. The switch should drop you into ROMMON mode. The steps from this point on are the same as for the router, so I’ll just summarize them here.
In ROMMON, change the configuration register to 0x2142 using the command confreg 0x2142.
Reboot the switch.
When it boots up, make your changes, set the configuration register back to 0x2102 using the global configuration command config-register 0x2102.
Save the running configuration, and then reboot the switch to enjoy your new configuration!
20.5. Commands used in this chapter
In a disaster scenario, your focus is going to be on getting things up and running again, so there are a limited number of commands at your disposal. Table 20.1 lists those commands and when to use them.
Table 20.1. Commands used in this chapter
|
Function |
Command |
Configuration mode |
Description |
|---|---|---|---|
| Reloading the device | Reload in 15 | N/A | Schedules a reload 15 minutes from now |
| Reloading the device | Reload cancel | N/A | Cancels a scheduled reload |
| Deleting the startup configuration | Delete nvram:startup-config | N/A | Deletes the startup configuration from NVRAM |
| Resetting the password | confreg 0x2142 | ROMMON | Configures ROMMON to ignore the startup configuration |
| Resetting the password | config-register 0x2102 | Global | Configures ROMMON to load the startup configuration at boot time |