Search Techniques & Methods
Eearly all types of modern metal detectors are ergonomically designed for balance and comfort in order to minimise arm strain. How you use your machine is therefore down to whichever technique you feel most comfortable with. Some people swing their detectors in a wide sweeping arc, while others simply sweep from side to side in straight lines as they move forward. But, whatever style you adopt, the most important thing to remember is that you must keep the search coil as close to the ground as possible at all times. Never swing the detector as if it were a pendulum, as this will limit the detector’s depth-seeking capability to the centre point where the search coil comes closest to the ground only, rather than across the whole sweep of the arc.
It is also important that you sweep the search coil slowly; going too fast will dramatically reduce your find-rate.
Search Techniques
If you are searching a field for the first time and want to assess it as a potentially good or poor site, or have only a limited amount of time available due to seeding about to take place, it might be a good idea to adopt an explorative search technique.
One effective method used by many detectorists is known colloquially as the “Union Jack” system (Fig. 1.). This involves simply detecting across a field from corner to corner both ways to create an “X” and then searching around the outside perimeter. The idea behind this is to quickly ascertain whether the field contains any “hotspots” or productive areas that might be worth concentrating on. This is particularly useful in the case of some Roman sites, which can be very localised and contain finds limited to a small area.
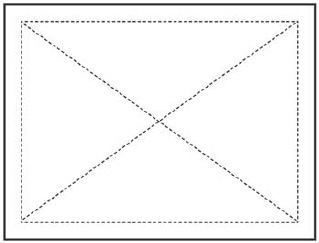
Fig. 1. “Union Jack” search system.
If you do find a small but productive area, you can then adopt a more methodical search pattern in order to maximise your find rate. This can range from the extreme of pegging out the ground with lines and pins, to simply using some large stones or dead branches as markers. Intensive searching involves slowly sweeping the ground in small straight overlapping lines and then covering the same area in the same way from a 90 degree angle (Fig. 2.). This technique is known in the hobby as “criss-crossing”. It is very effective when a scattered hoard has been located and the plough has spread the coins over a distance from their original burial spot.
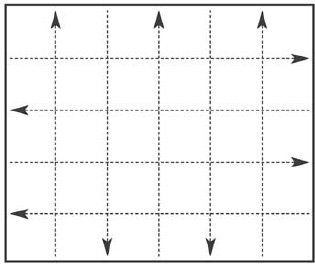
Fig. 2. “Criss-crossing”.
Digging
When a target has been located and pinpointed by the search coil, take great care not to thrust your spade or trowel into the ground at the spot indicated. Start digging about 6 inches away from where the detector has pinpointed a target and dig towards the point of maximum signal strength. Many detectorists have scratched and effectively ruined a good coin or artefact with the blade of their trowel by not following this simple rule.
Another point to remember, when digging, is that you should always fill the holes in afterwards, whether you are digging on anything from a grassed common to a roughly-ploughed field. Many landowners make this a condition when granting permission to detectorists to search their land, but it is also simply good manners. On pastureland, holes left unfilled can be dangerous to livestock, as well as annoying for the landowner! Always make a point of leaving your site in the condition that you found it.
Soil Conditions
Soil conditions play a major part in achieving good results with a metal detector. To gain optimum performance from your machine the ideal conditions are flat compacted soil, which is also reasonably moist. This is often the case with pastureland but conditions on plough soil will vary according to the time of year.
Not many detectorists will venture onto land that has just been freshly ploughed as the deep furrows make detecting extremely difficult as well as physically uncomfortable. Try waiting until the farmer has levelled off the soil with a harrow. If you are lucky, the farmer may even allow you to continue detecting after the field has been drilled when conditions for detecting are even better still.
Moisture in the soil is important, as this will improve the conductivity of buried metal objects and the depth at which they can be located. To see this for yourself, try detecting on soil in very dry conditions and then see the difference when you return to the site after plenty of rain has fallen. Many detectorists swear that their depleted sites came “back to life” after weeks of rain.
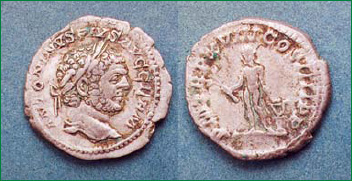
Fig. 3. Roman silver denarius found at a depth of over 9 inches on moist, well-compacted soil.
Mineralisation & Discrimination
Mineralisation can be caused either by natural elements in the soil or by contamination due to human habitation. For example, many large Roman sites had iron workings, which serviced the needs of troops and their horses etc. As a result, the sites tend to be littered with iron scraps of all descriptions, particularly nails and dross from the furnaces. This can cause annoyance as well as a lot of unnecessary digging.
Most modern metal detectors are equipped to counter this problem by means of a “discrimination” facility. If you encounter iron contamination on any site then try adjusting the discrimination by turning it up by a few increments until you reach a point where the iron is rejected. Don’t be tempted to use full discrimination as this will force the machine to reject good finds that have low conductivity levels such as gold rings, hammered coins etc.
If mineralisation is encountered, better depth is often gained by turning down the detector’s sensitivity level, even to as low as the half-way mark.