PROJECT 18
Modern Art Robot
Use a DIY vibration motor to make experimental robotic art
 Tools
Tools
 Wire strippers
 Wire cutter
Materials
 One 3V DC motor
 One 3V battery pack with on/off switch and battery
 Ordinary and double-sided sticky tape
 Assorted trash, including a cork
 Colored felt tip pens
 Paper
Paper
Is art made by a machine really art? Can art made by a robot ever be described as creative, imaginative, funny, or truthful? These might seem like strange things to think about in the context of craft and DIY electronics, but as robots advance, these questions are being asked more and more by engineers as well as philosophers.
In Project 17, we made our own DIY vibration motor. This robot moves in the same way but for a very different purpose. Our Modern Art Robot uses the unpredictable, funny movements of a vibration robot and adds felt tip pen legs that make marks. You can use this robot to make very silly or very serious pieces of art.
This robot is my take on a common robot called a Scribble Bot, popularized by a magical place in San Francisco called the Exploratorium.
Preparing Your Materials
Make sure that you’ve got all your tools and materials ready. Then go on a trash hunt. For this make, you’ll need a cork and some kind of container to make your Modern Art Robot’s body.

I’m using a plastic tub for my robot body, but you can use an empty tin can, a plastic cup, an egg box, or anything fairly light that you find in the trash. Just make sure that it doesn’t have any sharp edges on which you can cut yourself. Once you’ve found your robot body and a cork, clean them thoroughly and give them a good dry.
Next, you’ll need to choose the implements your robot will make its first art with. A good first choice is to use a few colors of felt tip pens, but you can use pencils, chalk, or markers.
The last thing to prepare before you start making is the motor.
Preparing the Motor
To prepare your motor, use your wire strippers to expose about ½ inch of wire on each of the leads coming from your 3V DC motor. These bits of exposed wire are what you’ll use to make a connection to the 3V battery holder.

To use your wire cutter, put one of your wires inside one of the holes on the wire cutter, closing it about ½ inch from the end of the wire. With your other hand, hold the wire on the component side. Don’t hold the motor itself because you might damage the connection.
Keep the wire strippers shut, and pull them toward the cut end of the wire. If you’ve chosen the correct sized hole, this action will cut and remove the unwanted plastic coating. I found that the 1.0-mm hole on my wire cutters worked perfectly for my 3V DC motor wire, but your motor’s wire might need a slightly smaller or slightly bigger hole size.
Connecting Your 3V Battery Holder
Take the exposed wire on the positive side of your DC motor and push it through the positive hole on your battery holder until most (but not all) of the bare wire is through the hole, just like the wire on the left of the picture.

Pinch the wire with your fingers so that it bends back on itself, making a loop. Wind the loose end of the bare wire tightly around the bit of bare wire that is close to the battery holder hole so that it makes a secure connection. When you’re done, it should look like the wire on the left of the picture. Repeat this step using the exposed wire on the negative side of your DC motor and the negative hole on your battery holder.
Insert a 3V battery, and briefly switch on the power to check that your circuit works. The end of the DC motor should spin around.
Attaching Your Circuit to Your Robot Body
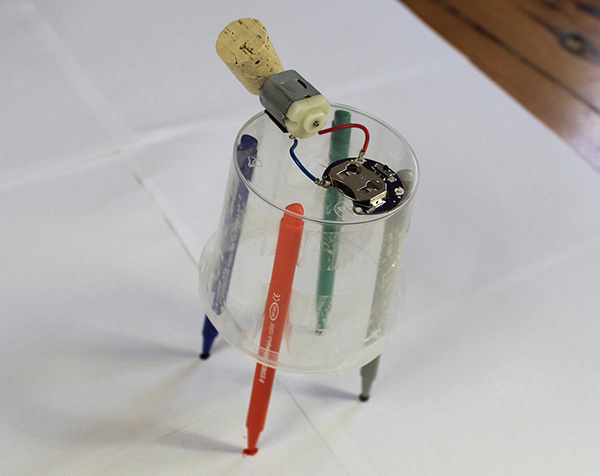
Take your cork and push one end of it onto the exposed shaft of the DC motor. Then use double-sided sticky tape to put your circuit in place on the top of your robot body. This cork adds an unbalanced weight to the DC motor, making your Modern Art Robot wiggle around when the battery is turned on.

Make sure that you place the DC motor close to the edge of your robot body, with the cork hanging off the side. Your cork will need enough room to spin around.
Your finished robot body should look like the one in the picture. Test it works by turning on the power. The cork should spin around, and the robot body should vibrate and wiggle. Turn off the power—it’s time to add the art!
Making the Legs of Your Modern Art Robot
Turn your robot on its side, and get out four felt tip pens and some ordinary sticky tape. Stick one of the pens inside the robot body, aligning the top of the pen with the top of the inside of the robot’s body. Use two or three bits of sticky tape to make sure that your robot’s leg is secure.
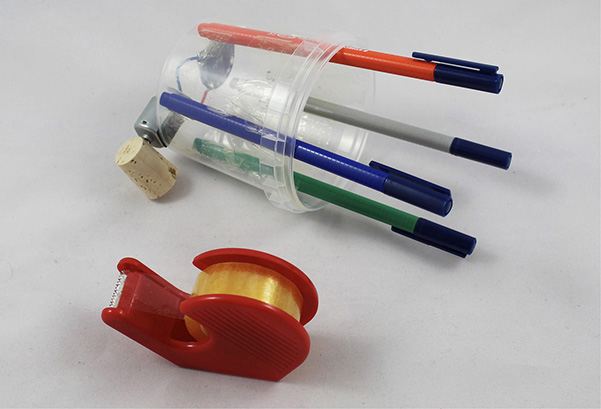
Next, stick a second pen on the opposite side of the body to the first pen in the same way as the first, and then stick the other two pens in between. Once you’ve given it all four legs, your robot body should look like the picture.
Stand your Modern Art Robot up on its four legs, and check that the weight of the motor doesn’t make your robot fall over when it’s running around. Switch the power on without taking the lids off the pens and give it a try.
If your robot falls over, make sure that the four legs are taped at the same height, with the tops aligned inside the robot body. You should also check that the spacing of the legs is even.
Preparing Your Canvas
You have finished your Modern Art Robot, but now you need to find a place to create art! To prevent the robot from falling off a table and drawing all over a beautiful carpet, find a wooden or tiled floor, and then lay down something for your robot to draw on.
Your Modern Art Robot will work best on a large piece of paper, so find some poster-sized paper or a big roll of paper or stick a few sheets of normal-sized paper together.
To avoid scribbling all over your floor, limit your robot’s range by walling it in with some cardboard or wood. You can even put your robot inside a large cardboard box.
When you have prepared your canvas, remove the lids from your felt tip pen legs, and place your Modern Art Robot onto your paper.
Making Your First Piece of Art
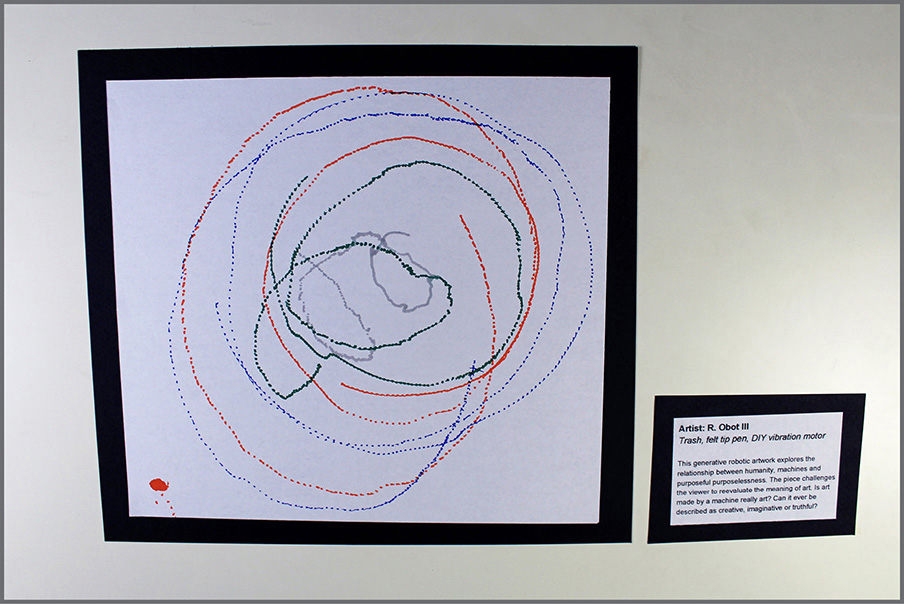
When your Modern Art Robot is finished and your canvas is ready, switch your robot on. The felt tip legs of your creature will support its jittery, wiggly body, making lines, circles, dots, and unpredictable patterns all over the surface of your first canvas.
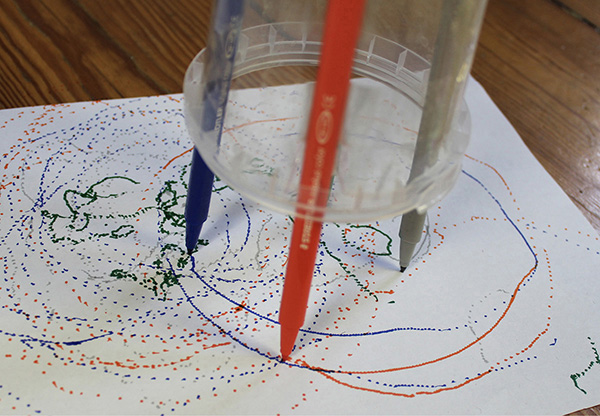
Take a moment to play with your robot. Give it a gentle poke or a little turn. What happens? Can you influence the way it travels by moving the paper?
Once you think you can understand the way your Modern Art Robot moves, you can start to work with it to influence the art it makes. Think about the outcome you want, and then experiment with a number of different variables to find out the best way to collaborate with your robot’s movements.
 How to Experiment with Your Robot’s Movement
A variable is a thing that you can change. When a scientist does an experiment, they start off by trying to think about all the different things they can change. Then the scientist tries to keep every single variable exactly the same apart from one, which they will change to see what effect it has. This way of working is the basis of what scientists call a fair experiment.
You can use this idea to work out the different things you can do to your Modern Art Robot. What effect does having six pens have? How about three? What about if you change the position of your cork, swap the cork for another weight, or remove the cork entirely? You could try making your robot draw on different surfaces, or you could play around with the power by using a run-down battery or even two batteries in series.
Once you have figured out some ways of influencing your robot, you can collaborate with it to design a piece of art. You might choose to use a smaller bit of paper that is absolutely covered in dots and lines and colors, or you might want to use a massive piece of paper with only a few dots. Keep trying and making marks until you have some designs that you like.
Displaying Your Artwork
Once you have a few pieces of art that you like, you can hold an extremely exclusive modern art viewing party. To prepare for your party, cut out your favorite designs, and stick them onto some card. This will frame your art and also make it more sturdy so that you can hang it on a wall in an art gallery (or perhaps your bedroom).
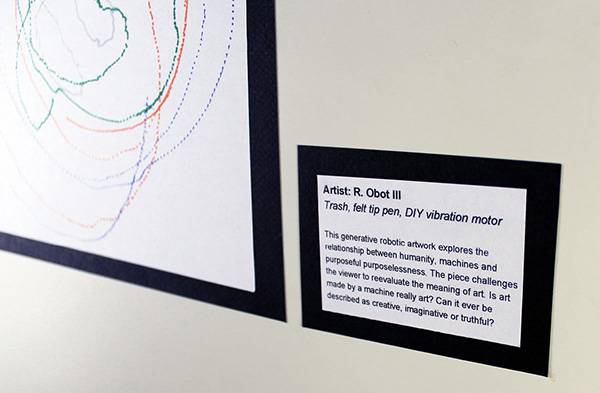
Next, you’ll need to come up with a description. When you visit an art gallery, there are usually little notices next to each piece of art that tell you who made it and what it is made of. You will also often find a few sentences that tell you what the art is about.
Sometimes these descriptions give historical context, sometimes they tell you about what the artist was feeling, and sometimes they are just pretentious and confusing. Feel free to make your Robot Modern Art description as informative or ridiculous as you like.
 Fix It
Not working? Don’t worry! Follow these steps to figure out why, and fix it.
1. Check your power.
 Is your battery the right way around? Flip it over and see what happens.
 Has it run out of juice? Try another battery.
 Is your battery connecting into your circuit? Make sure that your battery fits snugly into the holder and that the wires are connecting firmly to the correct side of the battery.
2. Check your components.
 Is your DC motor working? It’s a good habit to check each component before you add it into a circuit.
 Is your DC motor securely fixed in place? Loose connections mean that your circuit won’t work.
 Does your DC motor have an unbalanced weight? If you don’t have an unbalanced weight on the shaft of your DC motor, then your robot won’t wiggle.
3. Check your wiring.
 Is your DC motor connected the right way around? The positive wire of your DC motor (the red wire) should be attached to the positive hole on your battery holder, and the negative wire of your DC motor (the black wire) should be attached to the negative hole on your battery holder.