PROJECT 5
Spy Bird
Make a beautiful origami bird that flashes secret messages when you flap its wings

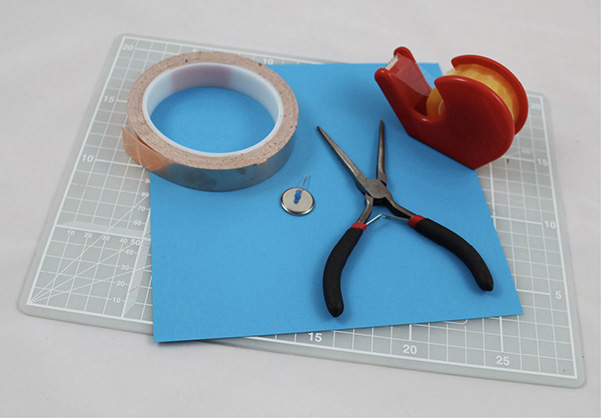
 Tools
Tools
 Sharp scissors
 Needle-nose pliers
Materials
 Paper, ideally 8-inch-square origami paper
 Sticky tape
 Copper tape
 One 3-mm LED
 One 3V battery
When our spy bird’s wings touch, the hidden LED in the folds of its head lights up so that we can silently signal messages. Use spy bird with an existing secret code such as Morse code to send secret messages to your friends. You can also make up your own flashing-light language to share your thoughts with your best friend without everyone else knowing what you’re saying.
In this project, we’ll be boosting our origami skills by learning a new fold, the reverse fold. The first time you do this fold it can seem difficult, but after a couple of tries, it becomes super simple. This project has four reverse folds, so you’ll be a pro at using them by the time you’ve finished Spy Bird! We’ll also be using ordinary LEDs instead of stickers for the first time.
Preparing Your Materials
Make sure that you’ve got all your tools and materials ready. Then prepare your paper for folding.
If you are using ordinary paper instead of origami paper, you’ll need to fold and trim it into a square first. To do this, lay your paper out landscape style so that the long edges are at the top and bottom. Fold the top right-hand corner of your page down toward you so that the right-hand short edge of the paper lines up with the long edge at the bottom. Neatly cut off the rectangular bit of paper sticking out from the edge of the folded triangles, and then unfold your paper to reveal your square.
Put your square of paper in front of you at an angle so that it looks like a diamond. Take the bottom corner and fold it to the top corner so that the crease runs from the left corner to the right corner. Make a sharp crease. You’re now ready to start folding your spy bird.
Folding Your Spy Bird
You should now have a triangle with the longest edge nearest you. Fold this triangle in half by taking the left corner and folding it to the right. Make a sharp crease.

You now have a triangle with two short edges and one long edge. The short edge to the left should be closed, and the short edge at the bottom should be open, like two flaps. Take the corner of the top flap, and fold it all the way up to the top corner. Make a sharp crease.
Take the point of the new triangle you just made, and fold it to the left-hand edge. Make an extra sharp crease, and then unfold the last fold. Look at the picture to see what you should be aiming for.
For our next step, we’re going to learn a new origami fold called a reverse fold.
 How to Make a Reverse Fold
There are lots of different types of fold in origami. We’ve already learned how to do a valley fold and a mountain fold, and now we’re going to learn another important fold, the reverse fold.
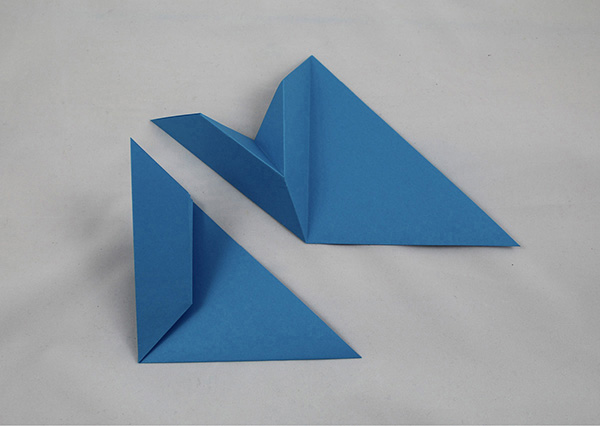
To make a reverse fold, you have to fold and crease the paper and then unfold it again. You then refold and crease the paper using the same crease line but reversing one of the outer creases and the center crease so that it tucks inside itself.
Take the last fold you made and unfolded on your spy bird. Instead of pulling the point over toward the edge of your triangle, open up the flap of paper and push the point inside, along the same crease line.
If you have done your first reverse fold correctly, you should have an upside down triangle tucked inside two layers of a trapezoid. Look at the picture to check that you’re on the right track. The folded paper in the lower-left corner is what you should end up with. The bit of paper in the upper-right corner is what your reverse fold should look like on the inside.
Folding Your Spy Bird’s Head
Flip your spy bird over and repeat all the steps you just completed on the other side. The reverse fold gets a lot easier the second time you do it!
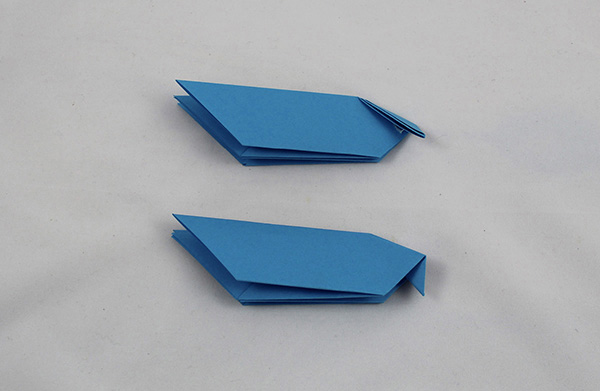
If you have done your reverse folds correctly, you should have two upside-down triangles tucked inside your paper.
You now have a trapezoid with four sides: two longer parallel sides and two shorter sides. One of the shorter sides has lots of open flaps, and one of the shorter sides has two closed flaps.
We’re going to make another reverse fold on the side with the two closed flaps. This will make our bird’s head. Put the trapezoid in front of you with the longest edge near you and the short edge with the closed flaps to your right. Take the point at the bottom right and fold it up so that you make a small triangle as in the picture. Make a sharp crease and unfold.
Reverse fold this new little triangle into the center of your folded paper. It should look like a bird’s head, as you can see in the picture.
Folding Your Spy Bird’s Wings and Tail
Take the top and bottom flaps at the left of your spy bird and fold them up. These are your wings. Your spy bird is starting to take shape. We just need to make one more reverse fold, and then we can start making the circuit.
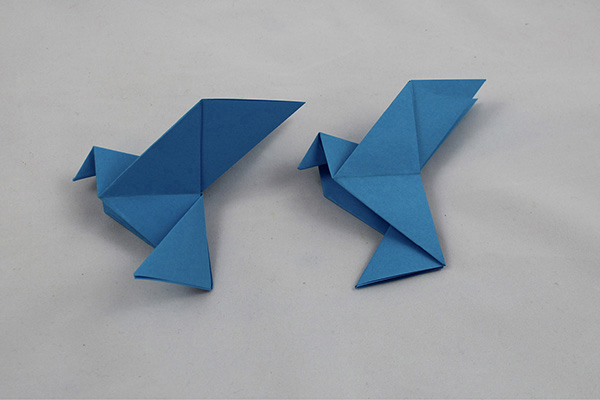
Take the tail end of the spy bird and fold the point down along the edge created by the body of the bird. Make an extra sharp crease, and then unfold the tail fold. Open up the underneath of the body a little, and push the tail inside the body using a reverse fold so that it looks like the picture.
You’re done with the folding! I think it looks a little bit like a hummingbird in flight. Which bird do you think it looks most like?
Our next step is the circuit, but first we’re going to prepare an ordinary LED for use in this paper circuit project.
 How to Use an LED in a Paper Circuit
Until now, we’ve used LED stickers, which are super simple and reliable. Now I want to introduce you to ordinary LEDs. The letters LED stand for light-emitting diode. Like all diodes, LEDs only let electricity flow in one direction. This is why the LED stickers have positive and negative sides, unlike the vibration motor and push button, which don’t mind which way around you put them.
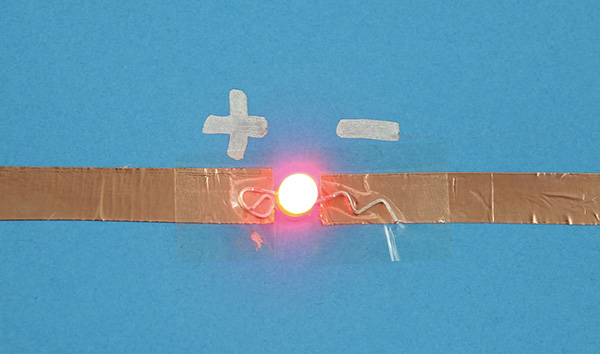
Ordinary LEDs don’t have + or – signs, but they do have two different legs that tell us which way around to put them. The longer leg is the positive side, and the shorter leg is the negative side. Here’s how to prepare an ordinary LED for use on paper.
Using needle-nose pliers, carefully bend the shorter leg of the LED flat. Then use the pliers to make the wire into a zigzag shape. Be careful not to break the wire by bending the same joint backward and forward too many times.
Next, use your needle-nose pliers to curl the longer leg of the LED into a spiral. Twist this spiral slightly so that it will lie flat on your paper. When you’re done, the LED should look like the picture.
Planning Your Negative Path
When your spy bird’s wings touch, you want the LED to light up so that you can silently signal messages using a secret code. To do this, you need the circuit to be completed only when the wings touch.
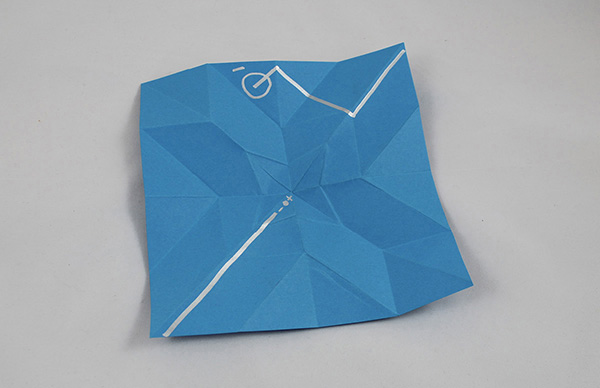
We’re going to put our LED inside the fold of the head, on the left. Use a pencil to mark where the positive (front, curly) and negative (back, zigzag) legs of the LED are going to go. Trace from the negative leg of the LED up along the inside edge of the left wing, right to the top. Then trace down from the top inside edge of the right wing down to the bottom. When these two edges touch and separate, they will act like a momentary switch, turning the LED on and off.
Unfold the bird to carry on drawing the negative path. Don’t worry—now that the bird has been folded, it will be very easy to fold it back up again.
Make a turn with your pencil, and trace straight down toward the edge. Turn left and finish the path in the middle of a circle, just as in the picture. This will be where the battery goes.
Planning Your Positive Path
Start the positive path with a battery circle. Then take your path toward the central crease of the bird. When you get close to the central crease, turn and take your path to the edge of the paper. When your bird is folded, this edge will connect with the underside of your bird’s body, which is where we want our path to go.
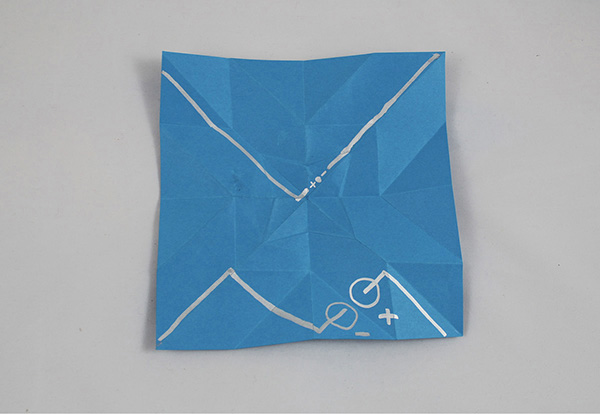
To help us draw this bit of the path, fold your square back into a triangle. Now you can take your positive path over the end of the tail and across the underside of the body to reach the front of the head. The sketches of your paths should look like the picture.
Check that the paths you’ve drawn make sense by tracing the positive and negative paths with your finger. The positive side of the battery should be connected to the positive bit of your LED, and the negative side of the battery should be connected to the negative bit of your LED via your wing-tip switch.
When you’re happy that your planned path makes sense, you can start making it!
Finishing Your Spy Bird
Use copper tape to follow the paths you planned, starting from where the negative side of the LED will go and heading up the left wing before stopping. Start again at the top of the right wing, and then follow your path to the negative side of the battery.
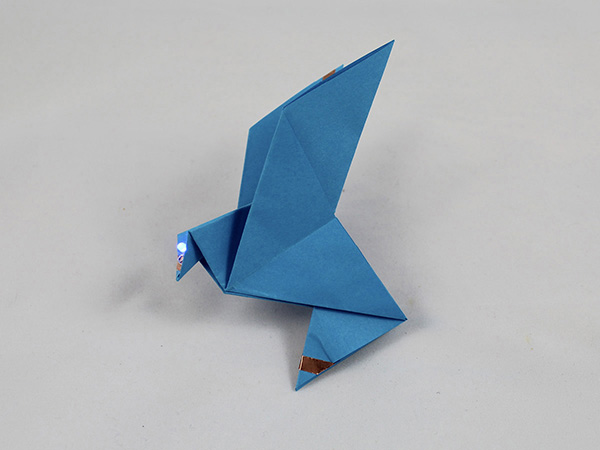
Fold your opened square back into a triangle, and then you can take your positive path from the battery, over the end of the tail, and across the underside of the body to reach the front of the head, where your LED will go. Make sure that you leave a small gap between the positive and negative paths where the LED will sit.
Stick the LED over the positive and negative paths with sticky tape. The legs of the LED should be flat against the copper tape. Refold your bird, and then slot your 3V battery into its body.
Hold your bird by the bit of the body with the battery inside, and touch the wings together. Working? Hooray! Use Morse code to send secret messages to your friends, or make up your own light language to share your signals.
 Fix It
Not working? Don’t worry! Follow these steps to figure out why, and fix it.
1. Check your power.
 Is your battery the right way around? Flip it over and see what happens.
 Has it run out of juice? Try another battery.
 Is your battery connecting into your circuit? Make sure that both the negative path and the positive path are connected to the correct side of the battery and that the positive and negative paths are not touching.
2. Check your components.
 Is your LED the right way around? Remember that the positive side of the battery should be connected to the positive bit of your LED, and the negative side of the battery should be connected to the negative bit of your LED via your wing-tip switch.
 Are all your components securely stuck in place? Loose connections mean that your circuit won’t work.
 Are any of your components on top of an unbroken bit of copper tape? Electricity likes to take the easiest route possible, so if you put a component on top of an unbroken bit of copper tape, the electricity will go through the copper tape instead of the component.
3. Check your wiring.
 Do your positive and negative paths touch? If they are touching, your circuit won’t work.
 Are all your paths complete? If your copper tape path has rips or tears in it, the electricity may not be able to get through.
 Have you made your path by sticking one bit of copper tape on top of another? Even if your glue is conductive, this can lead to a faulty circuit.