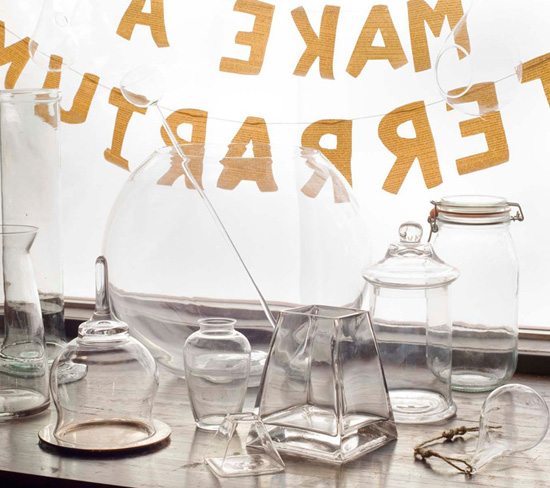
CLOCKWISE FROM BACK LEFT: tall, skinny vase, large bubble bowl, stemmed votive glass (inside bubble bowl), large teardrop (hanging in backdrop), French canning jar, lidded apothecary jar, small teardrop, large and small pyramid vases, small bud vase, cloche on tray, science jar.
A helpful primer on all things terrarium, this comprehensive section covers material choices, plant care information, and general terrarium-making techniques and tips. Before you embark on a terrarium project, take some time to read about the many types of glass containers, the various substrates, and the complementary materials including stones, shells, crystals, moss, lichen, architectural plants, and miscellaneous embellishments. Besides your own patch of nature and local shops, the resource section (page 188) contains a list of places to purchase materials. Always check local, state, and federal regulations before collecting any natural materials—and take only what you need.
It all begins with the container. A terrarium needs to be clear glass, not only so you can admire the contents but also so any plants inside can absorb needed light. Aside from these obvious practicalities, the glistening and reflective qualities of the glass itself are an essential part of the beauty of the modern terrarium.
Terrarium glassware can be found in a nearly infinite variety of sizes and shapes. Good terrarium containers can be repurposed canning and pickle jars, cookie jars, old bottles, glass cloches and cake trays, wine and beer glasses, and many other types of household glassware.
Glass can readily be found in places ranging from your own kitchen cabinets or recycling bins to thrift stores, yard sales, florists, boutiques, crafting shops and websites, and kitchenware and home décor stores.
Simple glass receptacles are usually best for showcasing the kinds of terrariums in this book. Fussier or more ornate glass can sometimes distract from the subtleties of form that are found in natural materials.
It’s sometimes practical to first pick the glassware—the most prominent part of your design—and let it guide your choice of materials. But there’s nothing wrong with starting with your materials and simply seeing where they take you. The pleasure of the whole process often lies in that experimentation.
When applicable, container dimension details in this book are recorded as height x width x depth. Don’t worry if you aren’t able to find containers with the exact dimensions of those shown. You will likely be making substitutions anyway—which is ok!—and might just discover an even better glass container and materials mix while you’re at it.
In terms of size, nearly anything can work, from the tiniest spice jar on up. The size of the container matters—not only for the plants and other materials inside but also when your living space is limited. Consider where the terrarium will go, then measure the “footprint” of the glass you intend to use to make sure it will fit. This is particularly important if you need to place your terrarium on a narrow ledge, sill, or shelf.
If space isn’t an issue, you can let your imagination run wild. It’s fun to start with a big, spacious container if you haven’t made a terrarium before: the options for materials are greater, and temperatures within the terrarium will be more moderate and air flow better. There’s also a greater margin for error if you forget to water your terrarium or if it sits in too hot a spot one afternoon. By the same token, the smaller the terrarium, the smaller the margin of error—the plants will have less root space so lack of water can be more problematic, and a small enclosure will heat up faster if accidentally left in direct sun.
Your own personal aesthetic is the best guide to finding an inspiring form for your terrarium. Whether you like the look of a curvy glass teardrop, a modern glass cube, a recycled glass jam jar, or something else entirely, there are numerous styles and shapes to choose from.
Should the container be open or closed? Fifteen minutes of direct summer sun on a closed terrarium can be lethal to a living plant within it—even a succulent—so be sure to keep a lidded terrarium’s top off unless it’s out of any direct sun. A closed, lidded terrarium also keeps humidity inside. If you plan to maintain a closed terrarium, choose plants that will relish this humidity and stagnant air. Try ferns, tropical houseplants, and mosses. Avoid placing air-plants, orchids, or succulents in this environment, as they are not likely to thrive for long without fresh, buoyant air.
Soil, sand, or gravel is the substrate, or foundation, of the terrarium. Choosing the right foundation is important, not only from a visual perspective (setting up a pleasing contrast or harmony with the other terrarium materials) but also for achieving conceptual accord. Whether your terrarium is inspired by the forest, the sea, the desert, or some fantastical world, the substrate you choose will play a supporting role.
Plants have to grow in something, after all. Most potted plants come with enough soil in their pots to thrive in your terrarium but if you’re starting with cuttings or very small plants—or if the plants’ roots have filled up the pot and there’s little soil left for the roots—you may find you need to add a bit more planting mix. The plants you select will determine the type of planting mix (if any) you need.
DIY MIXES
Dry mix for cacti and succulents.
Most succulent plants, including cacti, require a fast-draining soil mix containing lots of horticultural-grade sand and grit. A typical cactus and succulent mix would be composed of two-fifths sterilized compost (screened garden compost or commercial compost), one-fifth horticultural-grade sand, and two-fifths grit (usually horticultural pumice, perlite, or gravel or lava fines). You can also just buy small, pre-mixed bags of cactus and succulent potting soil.
Mixes for moisture-loving plants.
Many houseplants such as begonias and peperomias appreciate good drainage as well but a high-quality commercial potting mix works fine. Most quality blends consist of approximately one-third compost, one-third peat or coir, and one-third pumice or perlite. Avoid potting soil with added wetting agents or fertilizers and always be sure to follow the particular plant’s specific care recommendations about watering. Carnivorous plants need an acidic, very moisture-retentive soil mix. For these plants, blend equal parts peat moss and horticultural-grade sand.
CLOCKWISE FROM TOP LEFT: pure quartz sand, hematite sand, Monterey beach sand, garnet sand.
Given the variations in local geology around the world it only makes sense that different sands and minerals are commercially available depending on where you live. That said, it is possible to order almost anything from almost anywhere. See what’s available at local craft and terrarium shops, decorative rock stores, pet and aquarium shops, landscaping suppliers, and sand, gravel, and stone retailers. If local resources are limited, start widening your search on the internet.
Naturalistic terrariums look best with subtly colored sands, such as glistening white quartz sand, warm-toned speckled Monterey beach sand, sparkly gray-black hematite sand, and reddish-purple garnet sand, as well as a range of other beautiful sands. Never harvest beach sand, as salt is lethal to plants. And beware of artificially dyed and colored sands, which can look harsh and, well, artificial.
Since your container may not be exactly the same dimensions as the containers pictured, be mindful when adding sand. Use your judgment and eye. Sometimes it helps to roughly approximate the ratio of materials to one another when purchasing materials and purchase a little more sand than you think you’ll need. Large containers can absorb a surprising amount of sand and it’s better to be generous than to skimp on materials.
IN THE SANDBOX
Garnet sand.
A fine-grained, dark, reddish-purple almandine garnet sand sometimes sold as Emerald Creek Garnet.
Hematite sand.
A fine-grained, glistening, gray-black sand composed mainly of iron oxide, sometimes sold as Spectralite.
Monterey beach sand.
A slightly coarser sand of quartz, feldspar, and granitic rock with a warm tan color, composed of a diversity of colored granules. Buy it washed, screened, and kiln-dried so it is safe for plants.
Pure quartz sand.
A fine-grained, creamy-white silica sand that is readily available.
Gravel, pebbles, and stone from all over the world are available online but start your search locally. Depending on where you live, your own garden could yield interesting and worthy rock specimens. Keep your eyes open and poke around a bit. Remember that the stone needs to look as lovely dry as it does wet.
You may be able to obtain materials such as Monterey beach pebbles, small white pebbles, and crushed lava rock at gravel and rock yards or at garden and terrarium-making shops. Look for river rocks and polished rocks at rock yards, as well as gem marts where jade and specialty speckled rocks can also be found.
ON THE ROCKS
Crushed lava rock.
A readily obtained, rusty reddish-brown, rough granular volcanic rock.
Monterey beach pebbles.
A warm, tan-colored blend of small pebbles made up primarily of multicolored quartz, feldspar, and granitic rock.
Petrified wood and agate shards.
Beautiful multicolored fossilized remains of wood (usually infused with silicate such as quartz) and agate which form when the materials are buried under sediment and preserved.
River rocks.
Smooth, matte, or polished rocks in a wide range of colors and sizes: black river rock (gray to black, various sizes); green river rock (pale green, large); Mexican river rock (gray, dark grayish-black, or ivory with a reddish cast, small); white river rock (ivory-white, large).
Speckled rocks.
These rocks resemble birds’ eggs—there are many types, usually one-off finds among bins of other rocks.
Tiny mixed polished stones.
Often available in mixes of various colors and types or in consistent batches of the same color and type of mineral. Easy to purchase by the handful, bag, or pound.
White pebbles.
Small, somewhat smooth, ivory white stones with a tumbled look.
CLOCKWISE FROM TOP LEFT: petrified wood and agate shards, mixed river rocks, Monterey beach pebbles, polished black river rocks, green river rocks, Mexican river rocks, white pebbles (center).
The possibilities of materials permutations are truly endless. When selecting materials for terrariums, keep scale in mind—but don’t be afraid to use large materials that stick out of the bowls and vases. Many materials look best when not contained but rather spilling out: flower stalks rising above rims, twigs overreaching their boundaries, special stones or pieces of handmade art dangling from twine. Feel free to experiment.
As always, check local, state, and federal regulations before collecting materials—and take only what you can use.
Seashells are a lovely addition to a terrarium—their sensuous forms and subtle colors and textures are a delight to admire up close. The best shells are the empty ones you find on a trip to the beach: instead of stuffing them into a box in your basement, arrange them in a terrarium where they can be appreciated every day. If you don’t have any found shells, you can buy beautiful nautilus, conch, or mixed shells (as well as sea urchins and sea fans) at your local terrarium shop, online, or at shell purveyors. Be aware that it’s the rare perfect, whole shell that is sustainably harvested: chances are, if it’s intact, it was harvested with a living sea creature inside.
MATERIALS ON WOOD, CLOCKWISE FROM TINY MIXED SHELLS (IN TRAY, TOP): green sea urchins, mixed white seashells, small purple shells, tiny bronze shells (in bowl), red abalone. Materials on sea fan, clockwise from nautilus shell (top left): fig shells, striped fox shell, small white limpets, peach-striped snail shell, small sand dollars.
Bronze shells.
Small, univalve shells often sold by the handful or by the pound.
Fig shells.
Somewhat fragile, pear-shaped shells with a yellowish or whitish background marked with reddish-brown. They are often found in sandy, offshore areas of the Indo-Pacific Ocean.
Limpets.
Small, rock-dwelling animals that affix themselves to shoreline rocks. Shell color and shape varies by species from white to brown to tortoise shell patterns.
Mixed shells.
A diverse mix of subtly-colored, small seashells from various univalve species. Many blends of tiny seashells can be found, both on the beach if you’re lucky or purchased by the scoopful.
Nautilus.
Smooth, coiled shell, lined with mother of pearl, found in tropical waters of the Indo-Pacific Ocean. Coloration varies with species. Sometimes sold cut, with the beautifully chambered interior visible.
Red abalone.
Flattened, oval-shaped shells with an iridescent interior often found on rocks near the ocean shores. The outer shell of red abalone has reddish-brown striping.
Sea fan.
Fan-shaped, dried corals found throughout the oceans of the world, particularly in the tropics and subtropics. Natural colors range from creamy whites to pinks, reds, and black, although they are also dyed in dozens of colors.
Sea urchins.
Small, spiny, round ocean animals. Depending on species, shell colors include black and dull shades of green, brown, pink, purple, and red.
Small sand dollars.
The skeletons of several species of sea urchin are usually found in sandy, shallow water of the southeastern United States, Australia, and the Caribbean.
Snail shell.
A peach-striped shell which, along with a variety of beautiful miscellaneous shells, can be found or purchased online.
Striped fox shell.
A soft-orange-striped shell.
CLOCKWISE FROM TINY QUARTZ CRYSTALS (IN SILVER BOWL OF HEMATITE SAND): aragonite, celestine, tiny mixed polished stones, citrine point, large quartz crystal point, cut Mexican geode, pyrite stones, selenite rose, selenite shards (small and large), vanadinite on barite, spirit quartz (center).
With their magnificent forms and jewel-tone colors, crystals are beautiful additions to miniature landscapes. Their crystalline structure and the way they are cut often helps capture light and create a sparkle and reflectivity that can bring the whole terrarium to life. In addition to the natural beauty and diversity of the crystals themselves, it can be interesting to learn about the metaphysical and healing properties assigned to the different minerals.
Every part of the world has its own geological specialties and some crystal is locally abundant and not to be found elsewhere. Find out if there is any crystal type local to your area that will be a significant addition to your terrarium. Or just purchase the crystal you find most beautiful or symbolically valuable.
Agate or carnelian agate.
A fine-grained, waxy-looking microcrystalline quartz (silica), often with bands or stripes. Carnelian agate is usually reddish-orange.
Aragonite.
A carbonate mineral that can be white, red, yellow, orange, green, blue, or brown.
Celestine or celestite.
A delicate, icy-looking crystal composed of strontium sulfate.
Citrine points.
Color varies from pale yellow (rare, natural citrine) to reddish-yellow (much more common, usually commercially heat-treated).
Clear calcite crystals.
A clear crystal formed of common elements of sedimentary rock, particularly limestone.
Double cube pyrite in matrix.
Unusual cubic pyrite crystals are comprised of crystals of iron sulfide in a sedimentary limestone or sandstone matrix. They are found in Northern Spain.
Geodes or Mexican geodes.
Rocks with cavities lined with often-crystalline minerals such as quartz and sometimes calcite crystals that can be clear, white, or very colorful. Geodes are often cut in half so the beautiful, crystalline interiors can be seen.
Glass pebbles.
Clear glass pebbles (usually melted mineral) are readily found in garden centers and decorative rock shops.
Herkimer diamonds.
Double-terminated quartz formations named for their brilliance and diamond-like form. First mined in Herkimer, New York, but since discovered in other locations around the world.
Quartz crystal points.
Shard-shaped pieces of quartz (silicon dioxide) that are colorless and translucent. Quartz is the second-most abundant mineral on the Earth’s crust and there are many colored varieties. Tiny quartz crystal pieces can also be bought by the handful, bag, or pound.
Raw pyrite stones or iron pyrite.
An iron sulfide with a rough, sparkly gold surface. Also known as “fool’s gold.”
Raw fluorite rocks or fluorspar.
Composed of calcium fluoride and occurring in a range of colors such as pink, purple, blue, yellow, green, red, brown and white, or clear.
Rose quartz.
A pale pink to rose-red quartz with a milky opacity.
Selenite rose.
A beautiful natural material comprised of selenite crystals (gypsum) infused with sand that forms a silky-surfaced, apricot-colored rosette with lighter, whiter edges. Usually found in arid environments.
Selenite pieces or shards.
A glassy, crystallized form of gypsum composed of hydrous calcium sulfate. The shards can vary greatly in size and can be clear to slightly opaque.
Spirit quartz.
A lovely pinkish-purple-tinted type of quartz found in South Africa.
Vanadinite.
Typically bright red to orange and sometimes gray to brown, vanadinite is composed of lead chlorovanadinite and is a dense, brittle mineral, usually found in the form of hexagonal crystals. Due to the lead content, it is important to exercise care when handling vanadinite, particularly for children. Vanadinite crystals are sometimes found on white barite, often originating in Morocco.
SO MANY UNIQUE MATERIALS, SO LITTLE TIME: hand-dyed and hand-spun wool, gold thread, a manzanita (Arctostaphylos manzanita) branch, a tiny bird, Grandma’s brooch, maple (Acer species) samaras, a sheep jaw bone, glass bubbles, a ceramic deer figurine, ammonite (fossilized nautilus shell), a dove egg, found feathers (pheasant, blue heron, and turkey), bracket fungus, small bones, a decoration made from an old book.
The tiny world tucked within a terrarium is partly a representation of your creative efforts but also—at least when you’re working with natural materials—an expression of the essential beauty or charm of the materials themselves.
Some of these materials—pieces of tree root and wood, seedpods, stones, old bottles and marbles, animal bones, teeth, and feathers—can be found in your own garden. Search among your own possessions, perhaps even family hand-me-downs or heirlooms, to find a plethora of materials such as unworn items of jewelry, tiny ornaments, old marbles or game pieces, and china animals. You might find silk flowers, costume jewelry, and little decorative birds at craft stores, thrift shops, and garage sales. And still more materials, from kitsch to exquisite handmade crafts, are waiting to be discovered while traveling.
Once you start making terrariums, you often develop an eye for idiosyncratic materials. A walk past a thrift shop—much less your neighbor’s recycling bin—might never be the same! And the same goes for walks on the beach, in the garden, and in the woods—ideas can be found everywhere and the repertoire is limitless.
NATURAL MATERIAL IDEAS
 Driftwood, twigs, and branches
 Gnarled and cleaned rose roots
 Seedpods of maples (known as “samaras” or “helicopters”), magnolias, and other trees and flowers
 Emu, chicken, and dove feathers
 Small and large animal bones and teeth
 Deer antlers
 Bracket fungus (also known as “conks”)
 Dried bugs
 Ornamental grass flower stalks
NON-NATURAL MATERIAL IDEAS
 Fish hooks
 Small and medium clear glass bubbles
 Handmade paper decorations and old books
 Variously sized old bottles
 Small decorative birds and silk flowers
 Gold and silver hoop earrings and sparkly old brooches
 Old theater light bulbs
 Vintage bronze beads and French flower beads
 Porcelain trinkets, brass candleholders, and hand-carved Mexican houses
 Jute twine, gold thread, and vintage string
A vast selection of beautiful plants are well suited to life in various types of terrariums—whether damp and shady, dry and desert-like, or anything in between. Choosing a plant that is compatible to the terrarium can make the difference between a terrarium that looks great for just two months and one whose living occupants flourish for years before they need to be transplanted or replaced.
Unless you need an extra large feature plant for a more expansive container, you’ll probably be looking for plants in 2- to 4-inch pots. Opt for plants that are filling their pots with a healthy network of roots and inspect plants carefully for insects (they usually congregate around new growth) before introducing them into a terrarium. It can be challenging to eradicate insects once they are colonizing a terrarium plant.
The living plant materials incorporated in terrariums in this book are succulents, airplants, carnivorous plants, mossballs planted with small houseplants, mosses, and lichen. There are four main variables involved in caring for a terrarium with living plants:
 Light
Light
 Moisture
 Fertilization
 Humidity/air circulation
Terrariums that flourish over time usually contain slow-growing plants appropriate to the medium in which they’re planted, the humidity of the container, the site in which they’re set, and the level of care you’re able to provide.
A fairly open terrarium planted with succulents, airplants, or mosses can last indefinitely if well cared for. But don’t fret if some component dies—go with the flow. If the dead material looks good, just leave it. Sometimes a light green moss will turn honey-golden and look lovely. Succulents, however, rarely look good when they pass to the other side—and airplants are famous for taking a long time to show signs of stress so they can seem to die overnight.
You get to decide how it will be in your terrarium, whether you’re a careful planner and want to select just the right plants and environment or just want to make something beautiful and see what happens. But sometimes, you just have to try it and see what happens.
Succulent plants have fleshy leaves or stems that allow them to survive prolonged periods of drought in their native habitats. In an ideal world, you’d obtain the full botanical name (genus and species) of any plant you add to a terrarium so you can learn how best to care for it. But in truth, most of the succulents commonly sold in mixed, unlabeled trays in shops are fairly straightforward in their requirements.
Most succulent and cactus plants appreciate plenty of water in summer, less in winter, and always like to dry out between waterings, whatever the time of the year. A general summer watering rule—for succulents growing indoors in bright, indirect light or a morning of sunlight and normal household temperatures—is about 1/4 to 1/2 cup every 7 to 10 days for a 2-inch plant and about 1/2 to 3/4 cup every 7 to 10 days for a 4-inch plant. In winter, water the same amount but every 10 to 14 days, or when the soil dries out to the touch. Always feel the soil before watering. If it’s time to water and the soil surface feels dry to the touch, then water. Beware, however, of overwatering, as a terrarium has no drain holes. Once you’ve added water, you can’t take it out.
Succulents usually grow in summer and rest in winter but exceptions do exist—a few succulent plant species thrive on the opposite schedule and rest in summer instead of winter. Generally, succulent plants can be fertilized with a weak solution of balanced fertilizer during the growing season (usually, spring and summer).
Most succulent plants prefer full sun but not all of them—haworthias and gasterias often grow in the shade of taller plants or rocks that help shield them from the strongest rays of the sun. It’s also important to remember that a terrarium concentrates heat, which can burn plants. Keep an eye on your plants and watch for elongated growth (indicating insufficient light); brown or crisp foliage, especially tips (indicating burning); shriveled leaves (indicating insufficient water); or rotten roots (caused by overwatering).
Normal household temperatures are fine for most succulents. And while sealed terrariums are not suitable habitats for succulents, as moisture and heat tend to build up within, succulents are fairly adaptable to the lower air circulation of a terrarium with a small opening. Just be sure to keep the terrarium out of direct summer sunlight and provide proper drainage.
FAIRY WASHBOARD PLANT (Haworthia limifolia) IS AN INTENSELY TEXTURED SUCCULENT.
These pineapple relatives are known as airplants because they do not root into soil. Instead, these denizens of warm climates cling to trees, rocks, telephone wires, or anything that keeps them suspended where they can receive abundant humidity, breezes, and sunshine, along with occasional drenching rain. Even though they look similar, there are many kinds, with different floral and foliar shapes and colors, and sometimes, even slightly different requirements. Learning the proper names of any airplant you add to your terrarium will help you care for it so that it doesn’t just survive but actually thrives. In general, however, airplants are adaptable and basic care instructions will keep them healthy.
The best airplants for terrariums are tillandsias. They can be placed just about anywhere indoors for a month or so without harm. But to keep a tillandsia healthy over the long term, you need to provide fresh air, bright natural light, and humidity or moisture. An ideal situation for a tillandsia is to be suspended so it receives maximum bright yet indirect sunlight, air circulation, humidity (such as in a bathroom or sometimes steamy kitchen), and fertilization. Some species, particularly those with a silvery cast to the foliage, can tolerate direct sun and some drought, as long as they are positioned in a humid area or properly soaked from time to time.
To water: submerge tillandsias every 1 to 2 weeks for an hour or up to 8 hours or so (overnight). Misting is helpful in very dry conditions but cannot make up for regular soaking. Some tillandsias are especially sensitive to hard water, chemicals, or pollution in water. Distilled, bottled, or rainwater is sometimes recommended when misting or soaking.
Fertilize by misting recently soaked plants with a dilute solution of high nitrogen fertilizer such as 30-10-10. Choose a fertilizer with a non-urea–based nitrogen, as urea cannot be absorbed by airplants (urea-free formulas are often available through orchid retailers). You can also add fertilizer directly to the soaking water.
THE BULBOUS AIRPLANT (Tillandsia bulbosa) IS ALMOST FLOATING IN THIS TERRARIUM.
A WELL-KNOWN CARNIVOROUS PLANT—THE VENUS FLYTRAP (Dionaea muscipula).
Carnivorous plants such as pitcher plants (Sarracenia species), Venus flytraps (Dionaea muscipula), and angry bunny plants (Utricularia sandersonii), are mystique-evoking creatures of the highest order. They obtain nutrients through the insects they trap, thus potentially eliminating the fertilization requirement of their care. However, if there are no flies or other insects in your home, you might drop an occasional insect into the trap.
Carnivorous plants prefer very bright light when grown indoors. But, unless the terrarium is very large and open, even these sun-loving plants can burn in hot sun so be careful to pull terrarium out of direct sun in summer.
Since carnivorous plants grow naturally in bogs, their roots must be kept wet at all times. Drip water over potting soil at least once a week, depending on the light and temperature conditions in which the terrarium sits.
Some carnivorous plants are especially sensitive to hard water, chemicals, or pollution in water. Distilled, bottled, or rainwater is sometimes recommended for watering.
Often overlooked is the fact that carnivorous plants need a winter rest period—something they do not receive in the typical home. After about two years indoors, they typically stop flowering and begin to decline. If the plants are suited to your climate, plant them outdoors or, at the very least, give them a period of winter dormancy in a cool garage or near a cool basement window before returning the terrarium to its customary spot at the start of the growing season.
A VARIETY OF PLANTS IN MOSSBALLS ON THE LUSH SHELVES OF ARTEMISIA.
Mossballs are made using a Japanese bonsai technique in which plants’ roots are meticulously wrapped in a ball of soil and moss. Mossballs are a wonderful way to display houseplants like cane-type begonias, peperomias, and ferns. It’s generally best to select plants with similar requirements to the moss they’re planted in so that both plants will thrive together. Mossballs are an easy, elegant way of bringing a lush, tropical, or foresty look into a terrarium while—if cared for well—skirting problems with mold and rot.
Care is easy: about once a week, remove the mossball from terrarium and thoroughly soak under tap. Then let the mossball sit, half submerged, for 10 to 15 minutes before returning it to the terrarium. Most plants in mossballs like to dry out slightly between waterings so lightly squeeze the mossball to test for moisture and water just as it begins to feel dry. Add a quarter-strength dilute solution of balanced fertilizer to the soaking water during spring and summer when plants are growing.
The soft, cushiony, textural component of moss and lichen provides a beautiful contrast with the sharper elements in a terrarium. The addition of vibrant colors is also invaluable: ranging from the naturally bright green of moss and yellowish-green of lichen to dyed and preserved reindeer moss which is available in shades like chartreuse, cream, pink, or black.
Approximately 12,000 species of moss exist, growing in nearly every part of the world, mostly in shady, damp, low-lying areas. If you order moss online, it could be a locally abundant species native to the vendor’s area—or a species shipped from somewhere else. If you’d like to use native moss or would just rather harvest your own, be sure to obey all local, state and federal laws regarding the collection of natural materials. If you’re harvesting, even from your own yard, make sure it is not a rare or endangered species. And take only what you need. Outdoors, mosses are often slow-growing and can take years to grow back so be careful to only remove chunks so that the remaining pieces can regrow.
Lichen is actually a symbiosis between a fungus and algae. The most common living lichens used in terrariums are the beard lichens (Dolichousnea longissima and Usnea species), most of which grow in humid environments. Lichen is usually collected from tree branches and rocks, and typically sold freshly harvested or dyed and preserved. As with moss, obey all collection laws and be sure to avoid rare or endangered species.
Although some species of moss and lichen resent being in urban environments, most require little care beyond consistent moisture and humidity. Test moisture level with your fingers and mist whenever moss or lichen begins to feel dry—approximately one spritz per week. Mosses and lichens—particularly lichens—can be sensitive to pollution and chemicals. Most prefer acidic conditions so if your tap water has high pH (hard or alkaline water), you may wish to use distilled, bottled, or rain water. Some species dry out and easily spring back to life upon receiving water but others are less tolerant of such fluctuations.
Provide moss and lichen with bright but indirect light: it can be a challenge to maintain them for long in a terrarium that receives direct sun or too much shade. Moss and lichen will sometimes expire if their particular water and light needs are not met. Some mosses dry to an exquisite honey-green color. Others turn brown and, if you don’t like the look, you may want to replace it. Dyed reindeer moss needs no special care, as it is not a living material.
FLUFFS, PUFFS, CLUMPS, AND MATS
Beard lichen (Usnea species) and old man’s beard lichen (Dolichousnea longissima).
This soft, greenish-tan strand lichen is today mostly found in the forests of the Pacific Northwest of the United States. It is very sensitive to pollution.
Feather moss (Ptilium species).
Also known to gardeners as plume moss or boreal forest moss, this common type of northern hemisphere mountain moss forms dense, light green mats on rocks, rotten wood, and peaty soil.
Mood moss (Dicranum species).
Called mood moss by florists but known to gardeners by various epithets (depending on species) including rock cap moss, broom moss, and fork moss. These shade-loving mosses are harvested all over the country but in nearly all species are lush, velvety green, and densely clumping.
Reindeer moss (Cladonia rangiferina).
Actually a species of ground-dwelling lichen native to the eastern seaboard of the United States and some points west. Reindeer moss forms pillowy colonies in sandy woodland and forest margins. For the floral industry, it is dyed and preserved as pink, chartreuse, cream, black, and many other colors.
CLOCKWISE FROM PINK REINDEER MOSS: mood moss, chartreuse reindeer moss, cream reindeer moss, black reindeer moss, old man’s beard lichen, feather moss.
Each of the terrarium types covered in this book tends to use a slightly different palette of materials. Planting techniques are also different—plants that go into dry and wet terrariums are planted directly into sand or soil, while plants in mix-it-up terrariums are kept in their pots and simply slipped into moss or lichen nests.
Dry terrariums typically have sand or pebble foundations and contain succulent plants that appreciate drying out between watering. The succulents’ root balls are planted directly in the sand. Most of the dry terrariums are accompanied by instructions to scrape away the top layer of soil before planting so the potting soil does not show on the surface of the sand or pebbles. When you scrape away the top surface of soil, you are replacing it with a mulch of sand or gravel so that the plant ends up at the same level at which it was growing in its pot. The goal is to avoid planting too deeply or shallowly, as either condition can cause problems over time.
A wet terrarium contains carnivorous plants planted in potting soil, mosses, or lichen; or moisture-loving houseplants planted in mossballs. Mold and rot issues are averted—and the concomitant fussing with layers of charcoal (a material often used in terrariums)—by keeping houseplants’ roots within mossballs rather than planted in potting soil without drain holes.
These terrariums blend succulent and dry-loving plants with woodsy, moisture-loving plants. This may be done successfully by keeping the succulent plants in their own pots so that they drain properly in spite of being planted in moss or lichen.
Living plants are not imperative to a satisfying terrarium. If you’re not willing or able to care for living plants, create one with dried plants and other materials. Dry seedpods and flowerheads, preserved lichen, dried moss, and twigs need no care and look beautiful with stones, sand, wood, shells, and a multitude of other natural and non-natural materials.
Making a terrarium is a pretty low-tech endeavor but you’ll want to gather any necessary materials before you start. A few tools will come in handy:
 A small jar for pouring sand into the terrarium
 Old chopsticks or another kind of stick for shifting hard-to-reach items
 A small, soft pastry or paintbrush for contouring sand and brushing any wayward sand out of plant crevices
 A work tray to contain materials
 Watering tools: a small spritzer bottle for moss and lichen, a turkey baster or narrow jar for precision watering, and a measuring cup for other plants
 A bowl for soaking your airplants (or just use a sink basin)
The day before making your terrarium, thoroughly water plants so the roots hold together but are not too wet. Soak airplants for 1 to 8 hours and spritz any living mosses and lichens. Allow foliage to dry completely before working on the composition, as sand and other materials will stick to even slightly damp leaves.
Make sure to inspect all plants that you plan to add to the terrarium. First, check for any sign of insects on the plants, particularly on the new growth tips. Wash leaves carefully if any are spotted. If the infestation looks serious, replace the plant with a disease-free specimen. Also, remove any shriveled or damaged leaves.
Always clean the terrarium glass inside and out before beginning to plant. When you’re ready to get started, set up a work area on newspaper or in a tray. If you are making a suspended terrarium, you can either hang it before assembling or set it somewhere while working on it. If you do the latter, first hook the twine or thread through the glass and make sure the length is suitable. Set the glass on a soft washable pillow or on a stand of some kind so that it stays in the position in which it will hang.
The two step-by-step designs that follow helpfully illustrate some essential terrarium-making techniques.
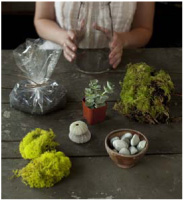
NO. 1 Assemble your materials
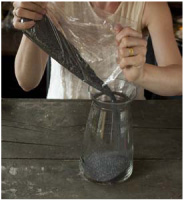
NO. 2 Pour sand into terrarium

NO. 3 Give container a shake or two to level sand
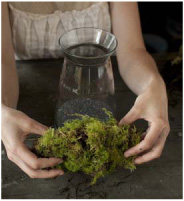
NO. 4 Loosen moss clump, without actually separating pieces
NO. 5 Drop loosened moss clump down into container and arrange so fluffy pieces are facing up and out
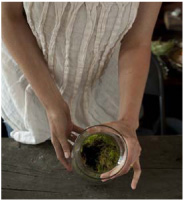
NO. 6 Form a hole in moss toward the center for potted plant
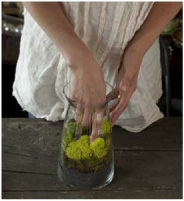
NO. 7 Add small pieces of reindeer moss

NO. 8 Arrange rocks by sliding them down the sides of the terrarium
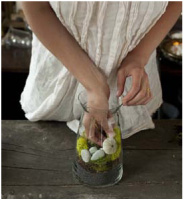
NO. 9 Add sea urchins against glass
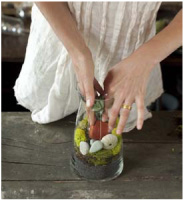
NO. 10 Slip potted plant into hole in center of moss
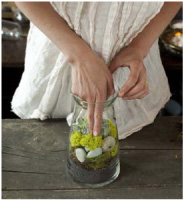
NO. 11 Add remaining reindeer moss to conceal pot
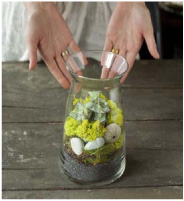
NO. 12 Voila—done!
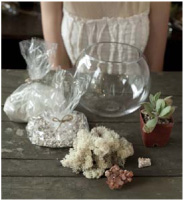
NO. 1 Assemble your materials
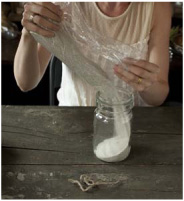
NO. 2 Pour sand into mason jar (not terrarium) to add later
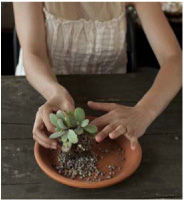
NO. 3 Remove plant from pot and scrape off top layer of pebbles or soil
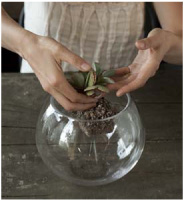
NO. 4 Lower plant into terrarium
NO. 5 Settle and arrange plant in terrarium
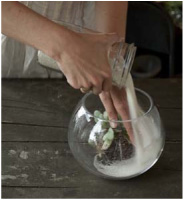
NO. 6 Pour sand from mason jar into terrarium, using your hand to keep sand off plant and direct flow of sand to outer edges
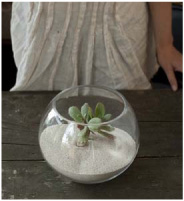
NO. 7 With sand filled in around potting soil, give terrarium a single gentle shake to smooth surface and lift plant until potting soil level is just below surface
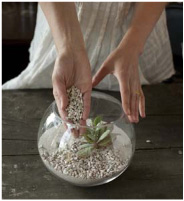
NO. 8 Add pebbles to your liking over a section of sand, maybe with a handful scattered on the other side
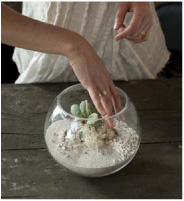
NO. 9 Add small bunches of reindeer moss between plant and pebbles
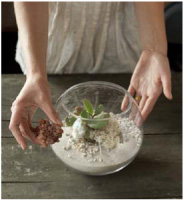
NO. 10 Place first stone

NO. 11 Place second stone
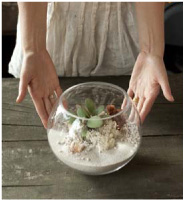
NO. 12 Voila—another terrarium planted!
Life and death.
Though it may be hard to imagine while making it, a terrarium probably isn’t destined to live forever. Some last for years; others are temporary installations, whether due to attrition, plants outgrowing their allotted spaces, or your own changing sensibilities. Some plants can be a bit technically challenging to switch (unless they’re left in their pots) but most elements can be swapped out as the mood strikes. Tiny worlds can be vulnerable places and death happens. It’s part of life.
Let go.
When making your terrarium, take a slightly laissez-faire approach: drop things in and see how they land. If you like it, leave it. If you don’t, take a brush or chopstick and move it around until it does something you like. It’s a bit like planting bulbs in the garden—let things fall out of your hands and just tweak them if you don’t like how they land.