The principles of defence are of course as old as warfare itself, and they include such aspirations as the maximum early warning, the maximum protection and the maximum firepower.
On the Western Front in 1915 early warning implied a well-organised system of listening posts, sentries and look-outs, using either periscopes or direct line of sight from protected loopholes. Then if they perceived a threat they would alert their comrades by firing their weapons and shouting, or perhaps also using gongs, klaxons, bells and whistles. At night there would be extra patrols in no man’s land, as well as tripwires and flares. In the case of gas attack the sentries might have some canaries or white mice to monitor the breathability of the air, while against the noises made by enemy mining an alert officer with a stethoscope in a deep dug-out could be a very prudent precaution.
At more ‘strategic’ levels, every army corps and perhaps even every division would conduct frequent intelligence analyses of what the enemy confronting them was up to. Precisely what units were in the line, and when would they be relieved? What patterns of shelling, raiding and digging did they display? What could be discovered from air photos, sniper reports, POW interrogations or other more exotic sources of intelligence such as spies or phone-taps? On the Western Front the constant asking of all these questions often gave higher commanders good advance warning of major offensives, although it was not always so easy to convert foreknowledge into a successful defence of front-line trenches. Thus it was common for a warning to activate the movement of reinforcements towards a threatened point, only for them to arrive some hours after the enemy had launched his initial assault. They would be essential for holding the second line, but not necessarily the first.
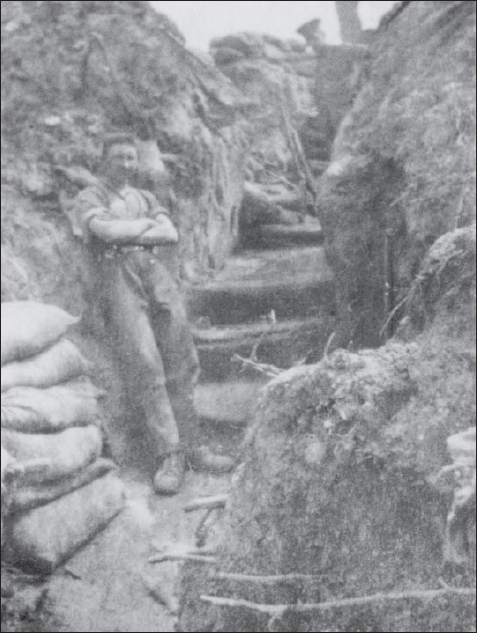
In the case of protection, the Western Front quickly taught its inhabitants to disperse and dig in whenever possible, although they often later found to their cost that they had done neither to an adequate extent. Too many of the early photographs of this war – which may admittedly have often been taken in non-combat circumstances – show soldiers religiously following pre-war manuals by bunching dangerously close together in perilously shallow trenches. Yet it is also true that many photographs taken later in the war, when bunching was no longer an issue, still show trenches that are too shallow and too little maintained with revetments or other essential features. For safety a trench should have been at least 8ft deep, and preferably with overhead cover. Dugouts with all-round protection, up to 10ft deep, were better still; while deep dormitories 30–40ft below ground level were the best of all excavated defences. By the same token it was found that even armoured telephone cables had to be dug at least 6ft below the surface to avoid breakages under any sort of concentrated artillery bombardment.
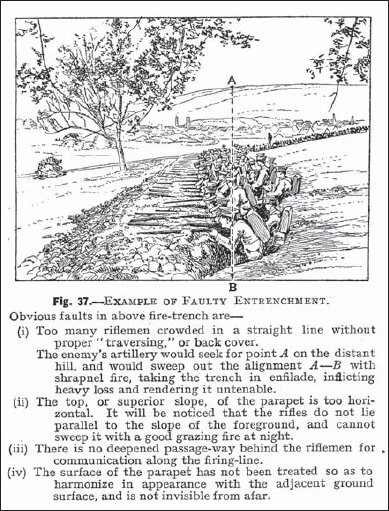
Example of faulty entrenchment. (The Museum of Lancashire: Solano manual, 1914 – p. 72, Fig. 37)
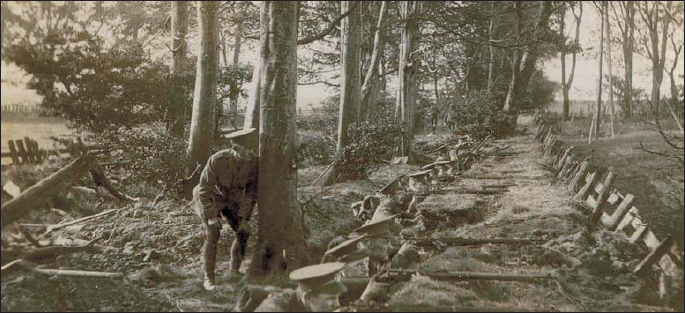
A typical photograph of how the armies of all nations prepared themselves for what they imagined trench warfare would be like. These are men of G Company, 4/S.Lancs Regiment, in training at Loch Gelly, Dunfermline, Scotland, in September 1914. They are excessively bunched in a shallow practice trench, which appears to have no parapet, parados or traverses. Captain Avery, lurking behind a far from bullet-proof tree, is even more vulnerable than his men. Given this type of training, it should scarcely have come as any surprise that losses were excessively high in the early battles on the Western Front. (Museum of the Queen’s Lancashire Regiment)

The London Rifle Brigade bring forward hot food in back-pack containers, in a communication trench near Ploegsteert Wood about 1917. Note the signal rockets to call down artillery if the trench is attacked, and the exposed telephone cables that are virtually crying out to be cut by shrapnel. To be secure from most shell fire, they should have been buried at least 6ft below ground level. (Imperial War Museum, Q 11743)
In places where the water table was high, such as at Neuve Chapelle or in many parts of the Ypres salient, it was not practicable to dig very deeply downwards into the earth without complex pumping apparatus to keep the dugouts dry. Shelters therefore had to be built upwards, above ground level, in what the Indian Army had traditionally referred to as ‘sangars’. At first these were made out of sandbags, earth and stones; but by the end of 1916 both sides – especially the Germans – were building them of concrete. At first concrete was used mainly for small lookout posts or machine-gun positions fronting the enemy; but they soon came to be backed up by much bigger command posts, dressing stations, telephone exchanges and shelters, with their doors facing away from the enemy. This surely represented a completely new generation in the history of field fortification, and before very long the use of concrete pillboxes would become universal, regardless of the level of the water table.
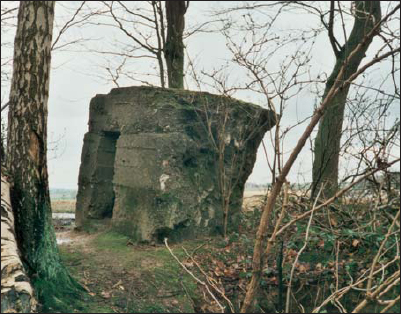
German concrete observation post (c. 1917) at the corner of Bois Quarante, Ypres. Essentially a one-man sentry-box in the front line. (Pete Turnbull)
Concrete was often associated with existing buildings, since it was used to reinforce the entrances to cellars being used as bombproof shelters, or to protect observation posts built inside abandoned residences as camouflage. By 1917 the Germans were often exploiting the existing shape of brick buildings to camouflage the construction of whole large blockhouses inside them; for example many of the strongpoints on the Ypres battlefield were located inside moated farmhouses. These had the extra advantage that their outer brickwork would act as a burster wall for added protection. Despite the greater difficulties of camouflaging construction work in the open field, the Germans were also placing numerous concrete fortifications in exposed sites, several of which near Ravine Wood were systematically raided by the British for intelligence-gathering purposes on 20 February and 7 April. Sniper’s posts made of both concrete and iron were encountered (and blown up), as well as concrete machine-gun emplacements with earth and logs covering the roof. Throughout the spring the Germans continued to build more, and bigger, concrete works throughout the Ypres and Messines area, gradually improving their technique and camouflage arrangements with sandbags, fascines or simply mud. Early unreinforced concrete designs, or works reinforced with large steel elements, such as girders or rails, were found to be fragile under heavy shelling, with excessive danger to occupants from flakes of concrete flying around under heavy concussions. Much thinner steel rods or wire meshes were found to be preferable as reinforcement, especially for the roofs of blockhouses, although the concrete for those still had to be cast as a monolithic whole, on the site itself. However, a great use was also made of large unreinforced concrete bricks, pre-cast in a factory to the rear. When cemented together these bricks were useful as outer layers surrounding inner reinforced walls, or as burster courses on top of the roofs. In any case they later came to be cast with holes to receive steel rods, thereby allowing unreinforced concrete to be converted to a standard almost as good as reinforced. By late 1917 the British were manufacturing some similar systems of their own.
Block-built German pillbox (c. 1917) at Bois Quarante, Ypres. The advantage of this method of construction was that the concrete blocks forming the walls and underlying roof could be pre-fabricated at a central factory well behind the lines, and then tied together on site with reinforcing steel rods. Only the upper roof needed to be poured out on site to make a monolithic block. (Pete Turnbull)
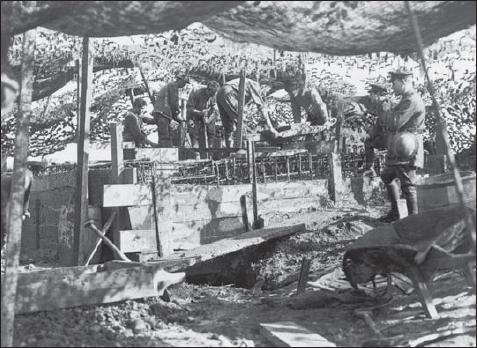
Australians building a concrete pillbox at Wytschaete in March 1918, the high water mark of allied use of concrete before Ludendorff’s spring offensive. Note the camouflage net concealing the work before a permanent earth roof can be installed. The metal reinforcement rods give a clear idea of how the work was built up. (Imperial War Museum, E 2346)
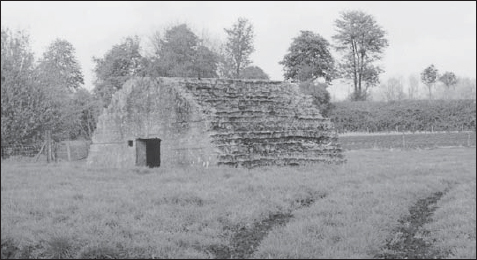
Concrete British shelter near Langhof, Ypres, built over a curved corrugated or ‘elephant iron’ frame, to give it a characteristically ‘softer’ profile than the more harshly angular German pillboxes. Because the British started to take concrete seriously far later in the war than the Germans did – in late 1917 rather than late 1916 – their concrete structures exercised a considerably less important influence on the battlefield. (Paddy Griffith)
In matters of concrete the British often seemed to think on a smaller scale than the Germans, although they made efforts to catch up in the winter of 1917/18 in anticipation of Ludendorff’s spring offensive. Some senior officers were even starting to say that concrete works near the surface were preferable and safer than the deep dugouts that had been the fashion in 1917. The British particularly favoured reinforced concrete shelters built over semicircular elephant iron inner linings, which gave them a distinctively curved outline, in contrast to the harshly angular lines of German MEBUs. In mid-1918, however, they moved to hexagonal designs for a new 13-mile-deep GHQ defence line covering the channel ports, which was almost a British copy of the Hindenburg Line itself. They also deployed the Moir pillbox, which was a prefabricated circular machine-gun nest with an internal diameter of just 6ft, but with an ingeniously rotating steel shutter near the roof through which the machine gun could be fired. Unfortunately it arrived en masse only in the autumn of 1918, when the need for allied defences had largely passed. A number of other types of prefabricated steel structure were tried by both sides – including even a completely mobile German pillbox – but they were all always doomed to enclose only a relatively small space.

Two cross-sections of German dugout designs based on corrugated tin frames covered with layers of earth, rubble and concrete. These dugouts are not particularly deep. (Museum of the Queen’s Lancashire Regiment: German 1916 manual on field positions – p. 19, Fig. 8)
Apart from the trenches, pillboxes, dugouts and shelters which gave the troops personal protection from fire, the principle of protection included many other features such as barbed wire fences of increasing depth and complexity; booby traps, fougasses and obstacles such as innundations, or even areas contaminated by persistent gas. The shell craters caused by enemy bombardments could themselves quickly become almost impassable obstacles in their own right, especially when they were filled with rainwater, persistent gas or wire entanglements, so one could sometimes almost say that the more an enemy line was bombarded, the more secure it became! Shell holes could certainly be defended as ready-made firing positions, needing only a makeshift shelter in one side of the inside wall of the crater, and perhaps a communication trench to the next crater. The British manuals are full of instructions on how a group of craters can be converted into an improvised fortress, and similar practices were common in other armies. The occupation of shell holes in this way had the great advantage that they were a random feature of the battlefield which did not show up on aerial photographs as readily as a regular line, and so they tended to be less vulnerable to accurate artillery fire than a purpose-built trench. Unlike most trench systems, however, they tended to lack an underpinning network of truly shellproof dugouts into which their garrisons could retire for a safe night’s sleep.
Also of great benefit could be the tactical use of the reverse slope, which had already been well known to Wellington in the Peninsular War. By 1917 the ideal was to line the crest of the hills you were defending only with light outposts, artillery observers and snipers. The main bulk of your forces would be deployed well behind the crest, where it was hidden from the enemy’s artillery observers and where, if the enemy did manage to advance over the crest, it could suck him into a battle on favourable ground that was well commanded by friendly guns. Such reverse slope positions could not by any means be provided on every occasion, and even the most carefully designed defences would sometimes have to be laid out on the forward slope, as the Germans found in much of the Somme battle, at Vimy Ridge and even in parts of Third Ypres.
When it comes to the maximisation of firepower, the siting of weapons is pre-eminent: so much so, in fact, that Solano’s pre-war British manual had affected to believe that the only serious purpose of entrenchment was to allow the infantryman not only to fire his rifle, but especially to lurk in waiting before leaping forward in a bayonet charge: ‘The spade is only a means to enable him (the soldier) to use his bayonet as quickly and effectively as possible.’ By 1915 all armies did at least accept that on quiet days anyone using direct fire from a trench deserved some pretty complex protection in the shape of camouflage, steel loopholes or periscopic sights; although at moments of crisis they also demanded that riflemen should mount their firesteps and fire over the top of the parapet, exposing at least their heads to enemy retaliation and thereby at least partially abandoning the whole point of fortification.
A British trench system of late 1914 or early 1915
It draws heavily on the advice of pre-war textbooks at a time when enemy shelling is still relatively light. The trees have not yet been blown away and the dugouts are not yet protected by many layers of overhead cover, nor are they dug very deep. The trench garrison is still far too strong for its own safety, and they are far too happy to show their heads above the parapet. In any case the trenches themselves are too shallow to offer protection to a man standing at full height – an unfortunate characteristic that would continue in most trenches of all nationalities throughout most of the rest of the war.
A) Pegging dug into the spoil raised as the trench parapet, to hold the revetments in place. A similar arrangement would also support the parados. Any trench that lacked solid revetments was liable to collapse under heavy rainfall, as would be the case on all too many occasions throughout the war.
B) The variegated colours of improvised sandbags, using furnishings or clothing pillaged from local civilian houses.
C) Vickers machine gun sited to fire obliquely along the main defensive line, rather than directly to the front. In later times it would be dug in more deeply into a fortified embrasure or even a concrete pillbox.
D) Logs and earth protecting the roof of a dugout against light shell fire. In later times, to resist heavier bombardments, there would be many more layers including additional materials such as corrugated iron or even concrete. Within the dugout note storm lantern, rum jar, jam tin hand grenades
E) Where else would a soldier throw his daily litter but in front of his trench? This practice helped to show the enemy exactly where the trench was sited – although normally that would be easy enough to spot in any case. On the positive side, the litter covering the frontal face of a trench could be exploited as disruptive camouflage to conceal snipers’ embrasures (See H).
F) A sniper’s loophole in use (See H).
G) Troops coming forward along communication trenches are forced to crouch, due to the low height of the parapet.
H) A sniper’s timber-lined box loophole as envisaged in pre-war manuals. The frontal aperture is covered with wire mesh that can take several different types of camouflage – e.g. it can be made to blend in with the mass of litter discarded in front of the parapet.
In the case of artillery it was soon learned that it had to be pulled back to dead ground behind the front line, where it became physically blind and had to receive its firing data either from observers further forward (including in aircraft) or from barrage-planners working from the map somewhere well to the rear. The vital role of accurate mapping came to be fully appreciated by all, since without it there could be no accurate artillery fire against enemy rear areas, especially when it came to CB fire. Equally the siting of forward observation posts quickly rose to a position of great importance, and perhaps the second questions asked by anyone occupying a section of trench for the first time was ‘are we overlooked?’ or ‘where are the enemy artillery observers who can see us?’ This was in many ways even more important in the long run than the very first question, which was ‘can enemy snipers hit us here?’
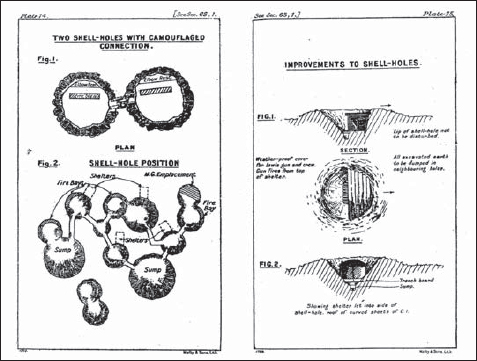
Diagrams showing how a group of shell holes could be transformed into a miniature fort, including arrangements for drainage and even rudimentary overhead cover. (The 1925 British General Staff Manual of Fieldworks – plates 74 and 75)
Men of the 4/S.Lancs Regiment in trench ‘S4’ opposite Bois Quarante, Ypres, in 1915. Note the wide variation in trench depth, with the parapet in places being supplemented by sandbags in an attempt to minimise targets for enemy snipers. There is also apparently a lack of drainage. The protruding tree roots, however, remind us of the difficulties of digging into a wood. (Museum of the Queen’s Lancashire Regiment)
In the case of machine guns, it was bad practice to spread them out along the line, all firing forward at 90 degrees to that line. Instead, it was essential for them to fire sideways, so that each gun position was not only protected from frontal fire by earthworks, but also from infantry attack by the fire of another gun, also firing sideways. That way criss-crossing lines of fire would leave no section of the front uncovered. Care also had to be taken to set the guns on fixed lines so they could maintain a planned network of fire in any weather or at night, or in woods. In more general terms it was always best to lay out a trench line as a wriggly snake rather than as a straight ruler, since the wriggles would maximise the opportunities for flanking fire, so that each position could be supported by another. In this way the 20th century created its own modernised version of the classical bastioned trace that had been used in European fortress architecture since the Renaissance.

The optimum siting of machine guns in a defensive line, obliquely, to provide interlocking fields of fire. This arrangement meant that any attacker would be forced to pass through at least two streams of bullets, from which casualties would inevitably be very high. If the streams of fire could also be organised to graze the forward edges of belts of barbed wire, as in the illustration, the attacker’s task would be made all but impossible unless the machine guns could somehow be suppressed. (Illustration by Peter Dennis, © Copyright Osprey Publishing Ltd)
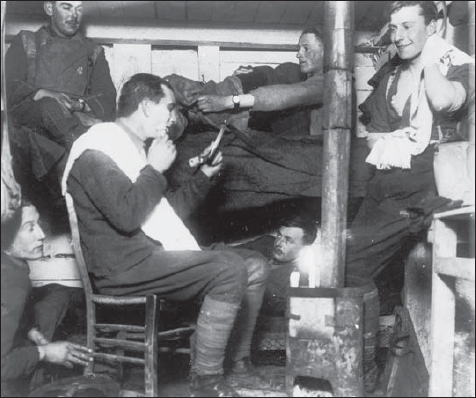
Another vital principle of defence, albeit too often forgotten, was the habitability of fieldworks. Not only did they have to be defensible, but they needed proper latrines and drainage, unlike those reported by George Culpitt of the 10th Royal Welch Fusiliers, who said that on the Somme in late 1916:
The trenches except in a very few places were nothing more than deep ditches, 2–3ft deep in mud and water, and although it was decidedly more dangerous to go along the top than in the trench, it was the usual way as it was not wet and uncomfortable.
Ideally – but in practice all too rarely – trenches would be decked with duckboards above the level of the dank open drain that could usually be found on the trench floor. They also needed good ease of movement and access for resupply; as well as secure sleeping quarters with overhead cover and preferably well-ventilated cookers, stoves and braziers that would not asphyxiate the inhabitants with carbon monoxide fumes. Dugouts would also be furnished with seats, tables and cupboards either pillaged from local buildings or improvised out of ammunition boxes. They would have rubber gas blankets over the doors, and increasingly elaborate pumping systems to keep the floors dry. The method of disposal for ‘household waste’ was normally just to throw all empty food tins over the forward parapet, which created a colourful mosaic of litter to mark the line of defence to the enemy, as well as offering opportunities for camouflaging loopholes.
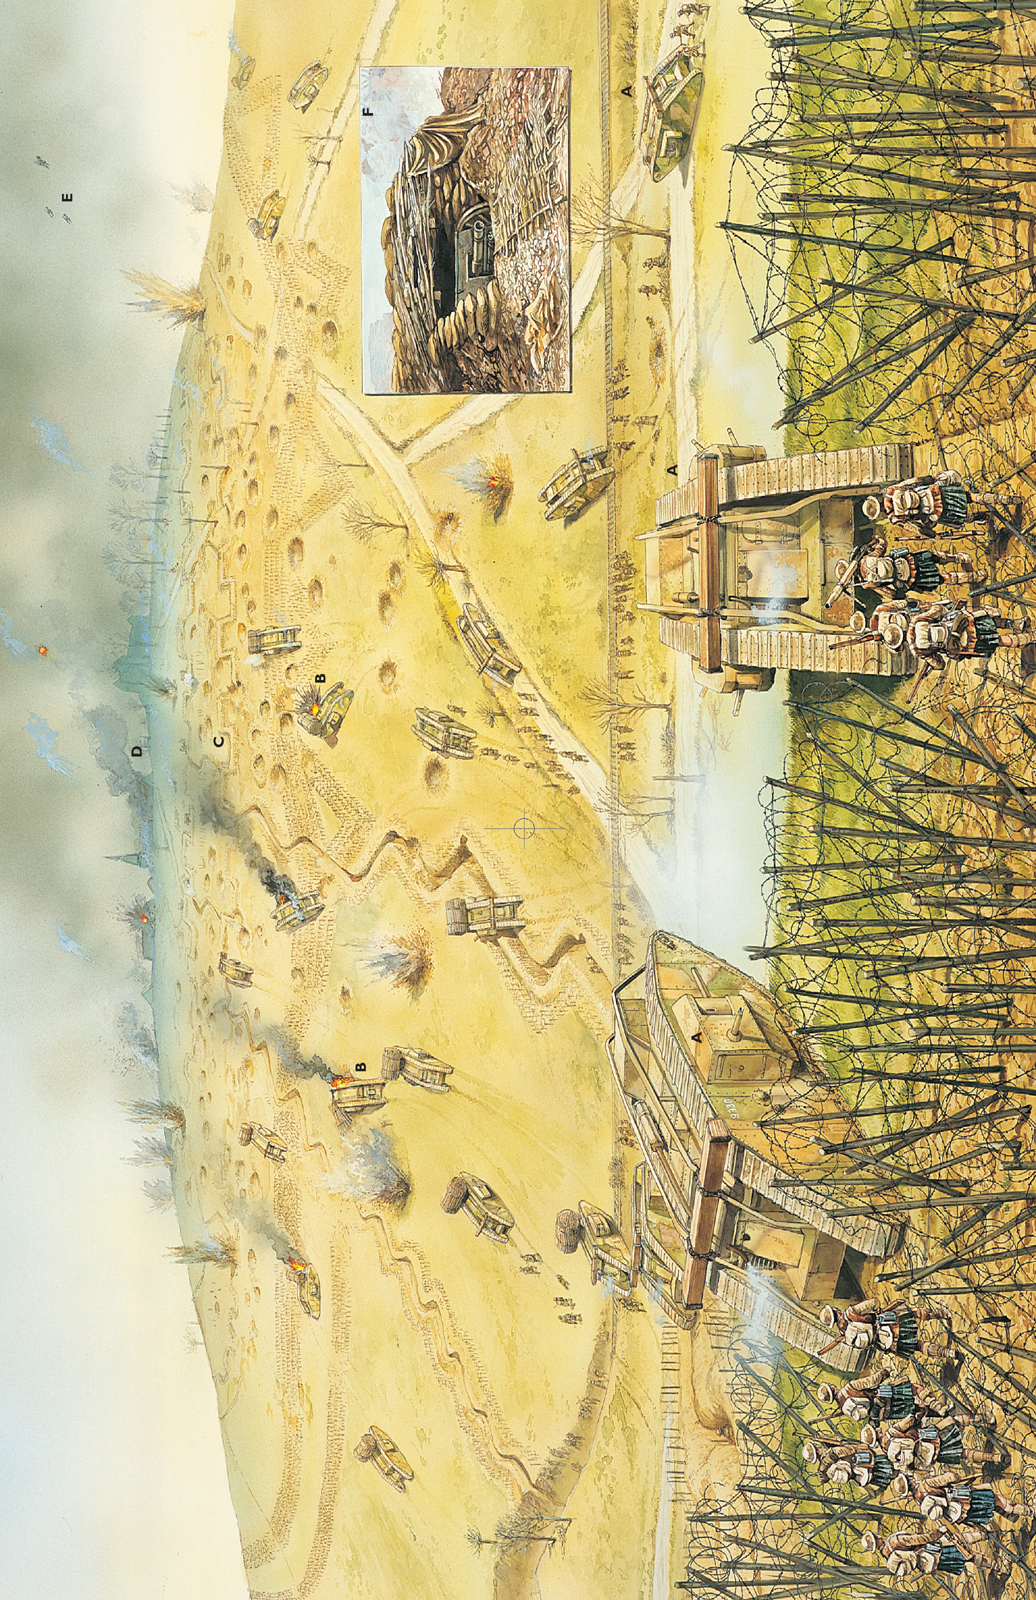
The battle of Cambrai, 20 November 1917
The Hindenburg Line had been prepared over the winter of 1916–17 as a ‘state-of-the-art’ fortification arranged in depth. Apart from trenches and deep dugouts it featured particularly wide and tall belts of wire, which acted as a powerful deterrent to would-be attackers. In fact it would be breached only once before the autumn of 1918, in the battle of Cambrai on 20 November 1917. Byng’s British Third Army used an innovative surprise artillery bombardment with predicted fire to neutralise the defences, while a mass of tanks rolled forward to help the infantry advance by crushing the wire. Shown here is the attack at about 0930 hours (Zero plus 185 minutes) on Flesquières village, which was a strongpoint in the second line of defence, and therefore an especially difficult target to tackle on the first day of a battle. The front line has already been captured in the initial assault at dawn, and the British are now moving on to take the next ridgeline beyond it.
A) Mark IV tanks crushing the wire – a task they could do far more efficiently than shrapnel, and also a little better than HE shells even when fitted with the new 106 percussion fuse. In some cases at Cambrai the tanks also used grapnels to pull away the wire.
B) Tanks coming under field-gun fire as they approach the German defences. Note that some still carry fascines for crossing trenches, while others have already used theirs to cross the first defensive line.
C) The front trench of the German second line. Note that the British barrage had been concentrated upon it earlier, leaving the craters that can be seen, but it has now passed beyond.
D) The British barrage is falling on the German support positions on the far side of the crest line. Note the plentiful use of smoke shells as well as HE.
E) A significant element in the British attack at Cambrai was air superiority and the use of aircraft in the ground attack role.
F) a typical emplacement for a German 77mm field gun, including matting in front of the muzzle to prevent tell-tale scorching of the earth.
Hygienic British officers in a dugout (note the stove and nice beds). (Imperial War Museum, Q 10623)
When we turn to the question of siting the defences, the first question to be asked was whether or not there was any choice in the matter. In many circumstances during the ‘race to the sea’ in 1914 the armies were pretty much forced to dig into whatever particular location they happened to find themselves. If anyone was responsible for choosing the site, it might be the high command using thick fingers on small maps, with little concern for the specific local conditions in each sector of the line. It was in this way that the front lines at both Verdun and Ypres came to be set out as huge salients around those towns, allowing the Germans to site their artillery on the outer perimeter, firing in concentrically from three sides. This would give them a great advantage in the battles that were to come, since the allied artillery inside those salients always had to fire outwards in a much less concentrated manner.
On a smaller scale the ebb and flow of the fighting in the early weeks of the war often determined which side held the high ground, the well-drained land and the sites with good road and rail communications in their immediate rear. All of these things were matters of intense importance to the fighting soldier, since they would determine many aspects of his daily comfort and security over the course of all the months and years that lay ahead. The troops were always quick to notice defects in the siting of their lines, and to criticise their commanders accordingly; but it is by no means clear that those commanders really had very much choice. It is true that when the Germans initially fell back from the Marne they chose to halt on the first major obstacle they came to, which was the long ridge of the Chemin des Dames. Elsewhere they always enjoyed some political latitude to keep retreating until they found a hill to occupy, whereas the allies were politically loth to abandon any inch of liberated ground. However, it is also true that because the allies’ strategy was usually offensive, they would normally try to keep advancing over less easily defensible ground until they were halted in front of a significant obstacle. This meant that they were almost inevitably doomed to make their biggest attacks uphill, as they did on the Somme in 1916 and at Vimy, Arras and Third Ypres in 1917.
Once the general trace of the Western Front had been selected and the frontline trenches dug, the main question shifted to the organisation of the lines in depth. As we have seen, there was an ever-growing realisation that increased depth meant increased security, especially for the Germans. During five months on the Somme they were gradually forced back over the crest and down the reverse slope on the far side, even though their rearmost lines still held out to the end of the battle. Yet this process was highly unsatisfactory to the German planners – notably to General Fritz von Lossberg, a General Staff troubleshooter who would fly so high that he would eventually be second in the line of succession to replace Ludendorff in October 1918. The problem was that the pace of the German retreat was imposed upon them by the relentless enemy attacks, and so the new retrenchments had to be improvised at relatively short notice. By the autumn of 1916 they had therefore resolved to build their next depth positions rather more deliberately and carefully, in the form of the Hindenburg Line. This was to be a massive fall-back position backing up the whole of the front from the area of Lille to Pont à Mousson behind the St Mihiel salient. It was to be built (mainly by the slave labour of French civilians and Russian POWs) on ground so far behind the front that it could be guaranteed to be free from enemy observation or attack during the construction process. A major attack would not be launched upon it until November 1917 at Cambrai, apart from the completely botched and unsuccessful attack at Bullecourt in April by the Australians of Gough’s Fifth Army on the extreme right flank of the battle of Arras.
Meanwhile other German sectors of the front, such as Champagne or the area around Arras, were receiving similar fortification that would pay dividends as early as April 1917. In particular in the early summer around Ypres General Sixt von Arnim deliberately and carefully built his own depth defences behind the existing front line. As in the Hindenburg Line itself, he envisaged a total battlefield depth of anything up to 7–15 miles, and an increasing reliance upon small dispersed strongpoints rather than upon fixed trench lines. As the noted trench raider and literary figure Ernst Jünger said of the Somme in his book The Storm of Steel (p. 110):
One battalion after another was crowded up into a front line already over-manned, and in a few hours pounded to bits.
It was a long while before the folly of contesting worthless strips of ground was recognised. It was finally given up and the principles of a mobile defence adopted. The last development of this was the elastic distribution of the defence in zones.

A group of studious German officers in a tin-roofed dugout, who clearly do not subscribe to the view that it is un-military to read! They are members of 1st company, 27th Infantry Regiment, at Wailly in spring 1915. Being members of the Magdeburg Division, they naturally have a Magdeburg local newspaper. (Imperial War Museum, Q 51074)
The new ‘zones’ to which Jünger referred were firstly a thinly manned ‘outpost zone’, in what had previously been the area of the the overcrowded front and support lines. Then came a main defence zone up to two or even three miles deep, followed after a space by a rearward defence zone of similar depth, which in turn was followed by a main artillery line and areas for the assembly of counterattack forces. In each of the two defence zones each outpost would include smaller counter-attack elements, forerunners of the ‘stormtroops’ of 1918, tasked to recapture any of the neighbouring strongpoints that fell to the enemy.
As part of this new philosophy for ‘elastic defence’ each post was intended to be independent and self-defending. Its garrison tended to be thinned out and a good proportion of them, especially detached machine-gun teams, would be dispersed into shell holes and craters in no man’s land, or in the open spaces between trench lines, for increased safety from allied artillery. They would hope to suck an attacker into the middle of a web of small but interlocking fire positions, thereby destroying the coherence of the attack and preparing the way for the ‘elastic’ counter-attack. This was the deliberate pattern once the Nivelle Offensive of April 1917 had become fully commited within the German line. Equally, when the British attack at Cambrai on 20 November had advanced some five miles into the Hindenburg positions, most of the ground won was successfully re-taken ten days later by a major set piece counter-attack.
The exact place of the counter-attack in German planning was always an important item on their agenda, especially since there could be no ‘mobile’ or ‘flexible’ defence without it. However, there was never any crystal-clear policy for exactly how it should be employed, and they constantly experimented with placing their main counter-attack forces (‘Eingrief divisions’) at different distances from the front line. At Arras on 9 April they were too far back to intervene immediately to throw back the initial British assault, although by the same token they escaped the effects of the bombardment, so they were still available to block any further break-out. By the middle period of Third Ypres in October the Eingrief reserves were at first placed too close to the front line, and were quickly crushed by the initial barrages; but when they were moved further to the rear, they still found that their forward movements could be broken up by the superior British artillery. There was apparently no real solution to this problem, and the Germans were saved only by the deteriorating weather and the shockingly poor British engineering organisation for keeping the front line supplied.
Rather more effective was the technique of evacuating the whole of the front-line defences, with the exception of a few stay-behind machine-gun teams, just before the enemy unleashed his main bombardment and attack. This was spectacularly successful on the Chemin des Dames against the Nivelle Offensive of 16 April, when the attacker’s bombardment was wasted against mainly unoccupied positions, and his infantry had to pick a difficult path through a devastated area, to emerge beyond the reach of their own guns in the middle of a fresh, strong and active German web defence. This represented an extreme example of defence in depth and it would be used not only on several later occasions in World War I, but on still more again in World War II.
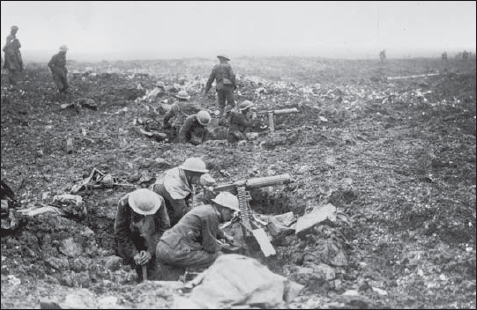
Two Canadian machine guns sited in shell holes on Vimy Ridge, April 1917. As the war went on, the best available cover above ground was increasingly to be found in shell holes rather than formal trenches. (Imperial War Museum, CO 1146)