GNOME 3 is the latest and greatest version of GNOME since it was released for the first time in 1999. GNOME 3 delivers a breakthrough desktop user experience compared to its previous versions. While providing smooth user interface with fluid animations, it uses a different metaphor of how a modern desktop would work by introducing GNOME Shell as its new user experience (UX). However, the traditional user experience still persists as a fallback whenever the hardware configuration is not supported.
GNOME is known for its simplicity and has been chosen as the default desktop environment in many popular Linux distributions. It is also one of the first free types of software that has user interface guidelines, hence securing itself as usable and user friendly.
During its evolution, the architecture also changed and was extended, making it one of the most advanced freely available desktops in the world. With that, it requires more and more advanced technology to be available in the system to be able to maximize the usage of the hardware and at the same time give users an enjoyable time when using computers.
Before we go any further, a proper installation of GNOME as well as the development environment should be available in our computer. And as a starter, we will talk about the installation in a few popular Linux distributions. Specifically, we will cover these topics in this chapter:
- Understanding the system requirements
- The basic GNOME 3 architecture that we will cover in this book
- Installing GNOME 3 and the SDK on various Linux distributions
So let's get started.
GNOME 3 provides two sets of User Experience (UX) that target different types of installed hardware—GNOME Shell and GNOME Panel/Fallback. These two UX have different requirements, but they share the basic ones:
- 800 MHz CPU power (at least 1 GHz for optimal performance)
- 512 MB of RAM (at least 1 GB for optimal performance)
- More than 2 GB of available hard drive storage (more, if you want to install more applications)
This is the latest addition in GNOME 3, and provides slick user experience. This UX requires 3D acceleration through an OpenGL-capable video card properly installed in your system. On a safer note, most of the video cards from Intel, ATI, and nvidia brands would work nicely.
However, even though you know that you have a video card that is capable of doing OpenGL, make sure that your video card is really activated with the proper drivers, otherwise the system will not let you use this UX.
Note
You can check whether your video card would work with this UX by checking the h-node page at http://www.h-node.org/videocards/catalogue/en and check whether it has the works with 3D acceleration verdict stated there.
This is the good old GNOME desktop, which provides a basic and less attractive user experience. The system will fall back into this UX whenever it cannot activate the OpenGL. This UX is similar to the older versions of GNOME, but the user interface is modified a bit so that it will look similar to a state of GNOME Shell user interface. For example, the main UI is totally different but the lock screen is pretty similar in both.
Fortunately, only a few parts of this book will make use of the GNOME Shell UX in great depth, so we can safely work with GNOME Panel/Fallback UX in order to follow this book.
As we are doing software development on top of these requirements, obviously we will need more computing power, RAM, and storage. Fulfilling at least the following requirements would make our development time enjoyable:
- Multicore 2 GHz CPU
- 4 GB of RAM
- 500 GB of hard drive storage, preferably SSD
The good news is that we can easily develop GNOME 3 applications using virtualization. By installing the Linux distributions in virtual machines, we can switch between them and tackle the issues found there so that we can make sure that our applications will be built smoothly in GNOME 3 regardless of the distributions. In case of GNOME Shell, you need to make sure that you have enabled the 3D acceleration option in your favorite virtual machine program.
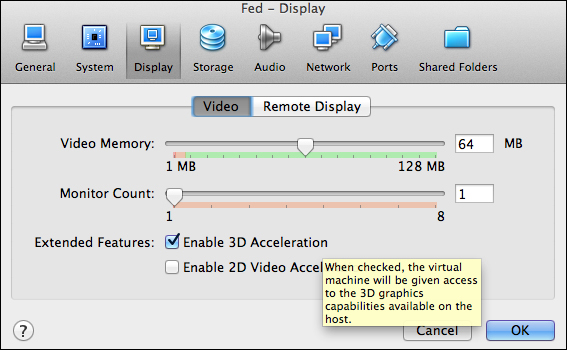
For example, in VirtualBox, we can go to the Settings dialog of a virtual machine, click on the Display option, and then tick on the Enable 3D Acceleration option. Remember, though, that you will not be able to activate this option if your host machine is not capable of doing 3D acceleration by itself.