The three pieces of Chapter Two fall into a different category than those of the first chapter, and a modification of the rules is necessary to accommodate them. The queen, for example, is an enormously powerful piece and for her to give mere check is a gross underuse of her potential. We insist, therefore, that the queen give only checkmate. In fact check is not allowed. (If we allowed check in this section, we’d also have to let Black move his king to safety and that is contrary to the whole concept of Chess Mazes.)
To assist the queen in giving mate, we’ve provided her (in most cases) with helpers, other white pieces that can support the queen, take away escape squares, or pin enemy pieces. The queen’s helpers are not allowed to move, give checkmate (or check), nor can they be captured. They are frozen to their placement in the diagram, unable to move or be removed.
The king on his own is unable to threaten the opposing king. He needs assistance from a line piece. Then, by moving off the line he can give a discovered attack. So the king gets helpers, and these never move, never give check, nor can they be captured. But unlike the queen’s helpers these can give checkmate. We make it a requirement as it is the only way to give mate in a King Maze.
The pawn is a pitiful creature, so weak that it cannot even give check without exposing itself to capture. The pawn needs support. Rather than provide aid in the form of other pieces, we decided simply to add more pawns. That way you can move any or all of your pawns.
Plus, pawn promotion is possible as well. With that much power on the board even the lowly pawn can give checkmate. So again, check is out and checkmate is in.
With respect to promoted pawns we have to stipulate that once a pawn becomes a piece, it cannot move off its promotion square. It becomes the near equivalent of a helper in a king or queen maze. But a promoted pawn can still do plenty of damage even if it can no longer move. It can checkmate (never check), provide support, take away escape squares, and pin opposing forces.
And if you mistakenly promote a pawn on a square where it is en prise, then yes, it can be captured. Placing a pawn en prise is bad news, regardless of whether it is still a pawn or a promoted piece. It’s one of your maze men and you must make every effort to preserve the guys you started out with.
We’ll review the rules once again, taking note that the major adjustment will come at Rule Three.
Rule One: In king and queen mazes there is only one moving man, the white maze piece. Helping units may not move. In Pawn Mazes any or all of the pawns can be moved.
Rule Two: Black never moves, except for Rule Four.
Rule Three: Checking the king is not allowed. The maze is solved only when White gives checkmate to the enemy king. The final position must conform to the normal rules of chess, in short a legal checkmate.
Rule Four: If White places his maze piece or pawns on squares where they can be captured, we let Black move and take them off.
We emphasize again that helping pieces may not be taken, even if they happen to be en prise in the diagram position. On the other hand if a maze piece is en prise in the initial position, White better use his first move to save his piece from capture. If he doesn’t, Black can take it.
Rule Five: Only the shortest solution counts.
With the rules in place we can now look at chess mazes in action.
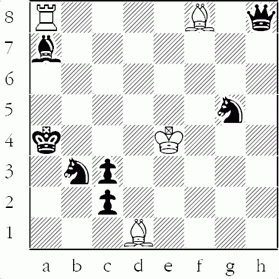
A Queen Maze

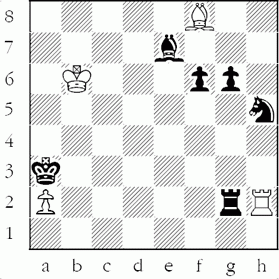
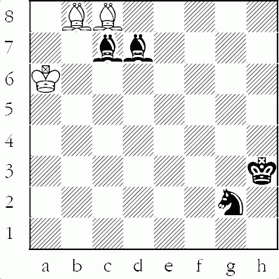
Clearly the white rooks need to be released from captivity, which means the enemy blocks on c7 and e7 must be removed. After that’s done you can search out the mating square. 1.Qa8 1.Qa1 and 2.Qxa3 looks equally good, but unfortunately the first move is check. 2.Qxa3 3.Qg3 4.Qxc7 5.Qxe7 6.Qe4#

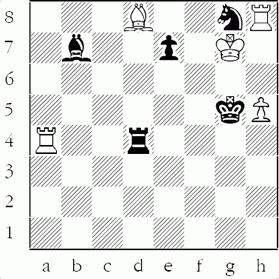
Another Queen Maze

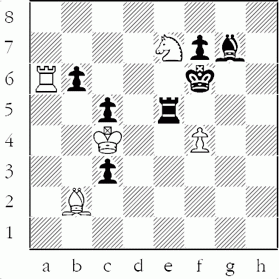
The rook and light-squared bishop have pinning functions, while the dark squared bishop supports the mate.
What’s the function of the white king? Partly decoration, but mainly to stop the alternative solution 1.Qa7 2.Qxc5 3.Qh5 etc.
1.Qc7 2.Qxc5 3.Qh5 Note that 3.Qxg1 check is banned. 4.Qxe2 5.Qxe6 6.Qxf6 7.Qh8#
When we come to Pawn Mazes we observe a significant difference between the pawn and the other pieces. The solutions for bishop, rook, knight, queen, and king mazes are carved in stone, both the moves themselves and the order in which the moves must be played. This does not quite hold for Pawn Mazes. True, the moves given for Pawn Mazes are the ones that have to be played, but the move order can vary. You have some leeway with the sequence.
Very often when pawns are marching down the board to make queens, it makes no difference which pawn advances first. However, we caution you not too be too casual about move order. There are moves which simply have to be played before others, else pawns would find themselves en prise, unable to advance, or construct a mate.
This is less confusing than it sounds as you’ll see from the examples. However, our first sample Pawn Maze, an early composition, was meant to exclude alternative move orders.
This was designed to be a foolproof confidence builder, which even the lowliest beginner can’t mess up.
Early Pawn Maze
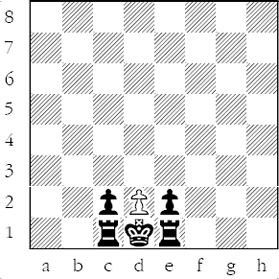
1.d4 2.d5 3.d6 4.d7 5.d8/Q#

But one of my students did manage to bungle it, and after the first move 1.d3 I should have became suspicious: 2.d4 3.d5 4.d6 5.d7 6.d8/K

So much for foolproof. Let’s look at something more complex.

The first three moves are forced: 1.gxf3 2.hxg3 3.fxe4 Why capture with the h-pawn on move two instead of 2.fxg3? Here’s where your visualization skills come into play. If the f-pawn takes it is impossible to construct mate at the end. That’s right, you often have to foresee the finale to make the correct captures.
After 3.fxe4
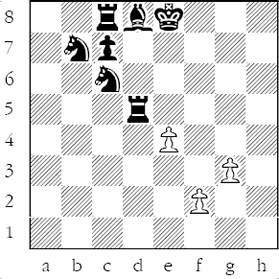
Now White has some legitimate choices. He can take on d5 or advance either f or g-pawn. We’ll finish off all the captures, promoting at c8. 4.exd5 5.dxc6 6.cxb7 7.bxc8/Q With the bishop in pin the remaining pawns can safely advance and they can do so in various move orders. 8.f4 9.f5 10.f6 11.g4 12.g5 13.g6 14.g7 15.g8/Q#
Another Pawn Maze
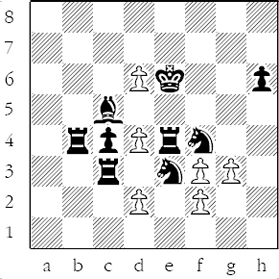
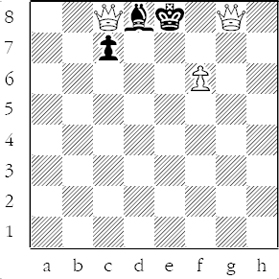
With two d-pawns en prise, the first move is forced, 1.dxc5 Now there are choices in rook captures: e4 or c3. Of course both will have to be taken, but here we’ll finish off the queenside rooks, 2.dxc3 3.cxb4 White has an unimpeded b4-pawn which can advance, but we’ll hold it in reserve and clean up the kingside, 4.fxe4 The removal of the e4-rook is necessary before taking the knights, which can now be done in either order. 5.fxe3 6.gxf4 But not 6.exf4; you can’t build a mating position. (Remove the black pawn at h6 and you can.) The first six captures readily suggest themselves, and the position can be reached in your head without difficulty. The next step, more difficult, is to construct the mating position. We’ll give a hint – three knight promotions.

7.e5 Guards d6 so the c-pawn can advance. 8.b5 9.b6 10.b7 11.b8/N 12.c6 13.c7 14.c8/N 15.e4 Controls d5 and f5 preparatory to the final promotion. 16.d7 17.d8/N#

We move along to a King Maze:

A King Maze reminiscent of the ‘foolproof’ Pawn Maze presented earlier. Here the white queen, already placed on the board gives mate, after the king eliminates blocks on d3. 1.Kb6 2.Kc5 3.Kd4 4.Ke3 5.Kf2 6.Kxf1 7.Kf2 8.Kg3 9.Kg4 10.Kxg5 11.Kxf4 12.Ke5 13.Kd6 14.Kxd7
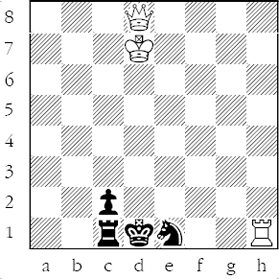
To avoid giving check the king must keep to the d-file. 15.Kd6 16.Kd5 17.Kd4 18.Ke3#

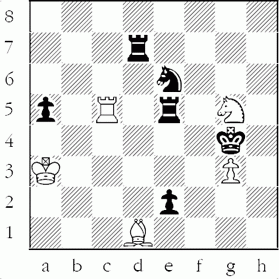
Another King Maze

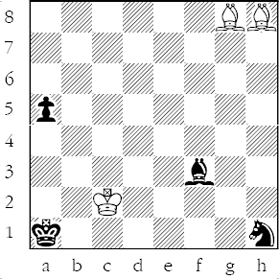
Mate on the long diagonal. White must clear the line while securing d4. 1.Kb5 2.Kc4 3.Kxc3 4.Kd2 5.Ke1 6.Kf1 7.Kxg1 8.Kh2 9.Kh3 10.Kh4 11.Kg5 12.Kg6 13.Kxf7 14.Kxg7
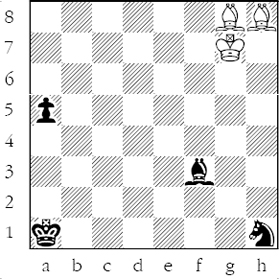
All that’s left is a diagonal march to reach c2. 15.Kf6 16.Ke5 17.Kd4 18.Kc3 19.Kc2#
Multiple Moves
We return to over the board chess and the theme of multiple moves by the same piece. As previously noted, the board generally has to thin out before one piece can take over the show.
Our first example, a queen and knight ending, is taken from Capablanca’s first international tournament. Capablanca concludes the game with eight consecutive queen moves.
Capablanca vs. Janowsky
San Sebastian 1911
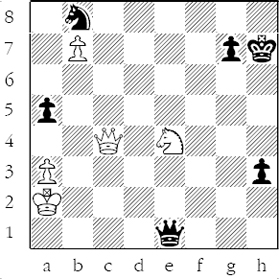
59.Qd3 Threatening 60.Ng5+ Kh6 61.Nf7+ Kh5 62.Qf5+ Kh4 63.Qg5# Another mate arises if Black plays 59...h2 60.Ng5+ Kh6 61.Nf7+ Kh5 62.Qf5+ Kh4 63.Qf4+ Kh3 64.Ng5+ Kg2 65.Qf3+ Kg1 66.Nh3#.

And 59...Qh4 is answered by 60.Ng5+ Kh6 61.Nf7+ Kh5 62.Qf5+ g5 63.Ne5.
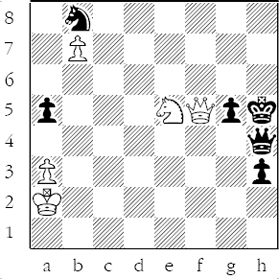
Black must give up his queen to avoid mate at g6 or h7.
Returning to the game:
59...g6 Janowsky lets the h-pawn go, making g7 available to the king. 60.Qxh3+ Kg7 61.Qf3
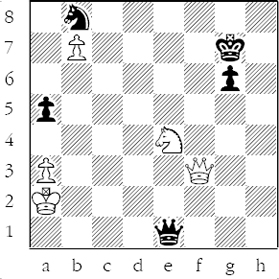
Threatens 62.Qf6+ Kh7 (if 62...Kh6 63.Qh8#) 63.Ng5+ and mate shortly. Another idea is to land the queen on e5 with check. This can arise after 61...Kh7 62.Qf7+ Kh6 63.Qf4+ Kh7 64.Qh2+ Kg7 65.Qe5+
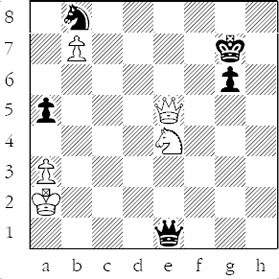
Black drops the queen to discovery, or the knight with check, or gets mated.
61...Qc1 Gets off the e-file, guards g5, and threatens 62...Qc2+ The refutation is rather surprising. 62.Qf6+ Kh7 If 62...Kg8, rather than take the g-pawn, it is simpler to play 63.Qe6+ Kg7 64.Qe7+ Kh6 65.Qf8+ transposing to the game. 63.Qf7+ Kh6 63...Kh8 64.Qf8+ Kh7 65.Nf6#. 64.Qf8+ Kh5 65.Qh8+ Kg4 66.Qc8+ 1-0
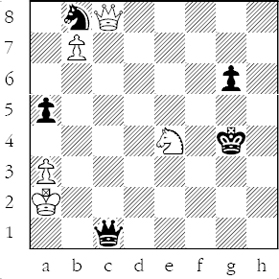
More of queens and knights, here in a semi-ending, with rooks on the board as well. A good example of queen infiltration.
Aronian vs. Karjakin
Wijk aan Zee 2007
After 39....Ke6
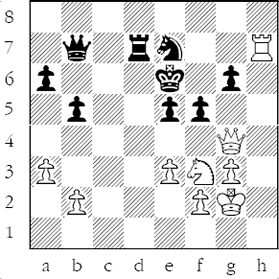
40.Qg5 The queen penetrates from the side of the board. 40...Qe4 41.Qh6 f4 42.Qf8 The basic threat is 43.Qf7+ Kd6 44.Qf6+ pushing the king away from the knight. 42...Nc6 The knight tries to run but White’s next (an attack on the rook) draws him back to e7. 43.Qc8 Ne7 44.Qe8 Same threat as before (Qf7+) but now the knight can’t move. 44...Kd6 45.Qf8 The king tries to run but to no avail. A seventh move by the white queen is threatened, 46.Qf6+, so Black has to defend with his queen. 45...Qd5 46.e4
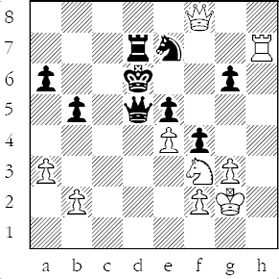
Now the knight is able to enter the fray: 46...Qg8 47.Qxg8 Nxg8 48.Rxd7+ Kxd7 49.Nxe5+. 46...Qe6 47.Ng5 1-0

47...Qg8 48.Qf6+ wins.
Early opening lessons teach us to develop our pieces and avoid excessive pawn moves. But if the center is closed and the opposing forces are not in contact with one another, then it may be possible to delay development and to squeeze in quite a few pawn moves. That’s what Morozevich managed to do in the opening that follows: eight pawn moves out of the first ten.
Morozevich vs. Lputian
Sochi 2007
French Defense
1.e4 e6 2.d4 d5 3.Nc3 Bb4 4.e5 Ne7 5.a3 Bxc3+ 6.bxc3 c5 7.h4 Nbc6 8.h5 Qa5 9.Bd2 Bd7 10.h6

For the continuation, go back to Chapter One, rook moves.
In the next example, We pick up the action at White’s 57th turn.
M. Carlsen vs. Morozevich
Morelia/Linares 2007
After 56...Bxh4
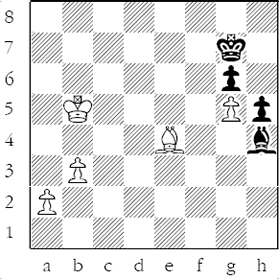
After Black takes at g5, it becomes a race to queen, so it’s not surprising that of White’s next ten moves, nine are with the pawns. 57.a4 Bxg5 58.a5 Kf6 59.a6 Be3 60.Kc6 g5 61.b4 Ke5
62.b5 In the race to promote, the bishop is expendable. 62...Kxe4 63.b6 g4 64.a7 g3 65.a8/Q Kf3 Black can resign here but from inertia we get a few more moves. 66.b7 Bf4 67.Qf8 Ke4 68.Qe8+ 1-0

Extended king moves may be termed excursions, jaunts, or more usually king marches. A negative example is the king hunt. We saw such a king hunt earlier, in the comments to Capablanca vs. Janowsky.
Here’s another conducted by Steinitz in an exhibition game.
Steinitz vs. Rock
London 1863
Evans Gambit
1.e4 e5 2.Nf3 Nc6 3.Bc4 Bc5 4.b4 Bxb4 5.c3 Ba5 6.0-0 Nf6 7.Ba3 Bb6?
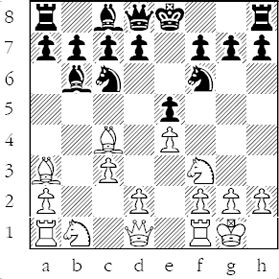
To make a5 available to the knight should White play Qb3, but it leads to trouble. First 7...d6 and then castling looks to be O.K. 8.d4 exd4 9.Qb3 d5? 10.exd5 Na5 Programmed into his seventh move. 11.Re1+ Be6
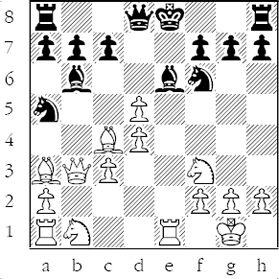
12.dxe6!! Queen sacrifice; the hunt begins. 12...Nxb3 13.exf7+ Kd7 14.Be6+ Kc6 15.Ne5+ Kb5 16.Bc4+ Ka5 17.Bb4+ Ka4 18.axb3# 1-0

Since White doesn’t need his queen rook or queen knight to give mate, the story goes that at the start of the game, Steinitz gave odds of a1-rook and b1-knight. It’s just a concoction.
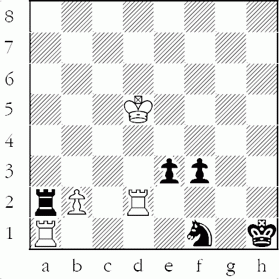
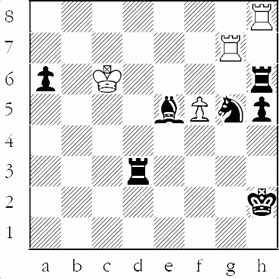
In endgame we often see the king trying to lose a move, looking to place his opponent in zugzwang. Puzzle King Sam Lloyd created a clever example in one of his problems.
Sam Lloyd 1856
White Mates in 14

There’s a set mate if Black moves his light-squared bishop, 1...Ba6 2.Bxg2#. But if the bishop is allowed to move with check, say 1.Kd5? Bc4+ all bets are off, 2.Kxc4 f1/Q+
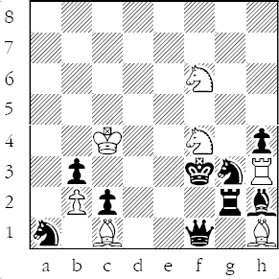
White’s goal is to land his king on h4 while the black bishop (the only other piece Black can move) is on h2. Then Bh2-g1 results in Rxg3 mate. But how does he do that? If 1.Ke5 Bg1 2.Kd6 Bh2 3.Ke7 Bg1 4.Kf8 Bh2 5.Kg7 Bg1 6.Kh6 Bh2 7.Kg5 Bg1 8.Kxh4 and now 8...Bh2 finds the bishop protecting his knight.
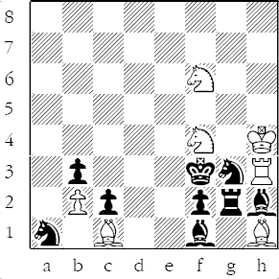
The king has to lose a move and that means stepping on a light square without being checked by the f1-bishop. There is only one such square, a8.
Returning to the original position:
1.Kc5 Bg1 2.Kb6 Bh2 3.Ka7 Bg1 4.Ka8
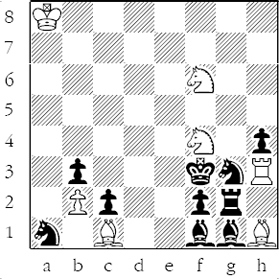
He’s done it. Now when the king arrives on h4 the tempos fall into place. 4...Bh2 5.Kb8 Bg1 6.Kc7 Bh2 7.Kd6 Bg1 8.Ke7 Bh2 9.Kf8 Bg1 10.Kg7 Bh2 11.Kh6 Bg1 12.Kg5 Bh2 13.Kxh4
The king has arrived on time. 13...Bg1 14.Rxg3#.
There are other reasons why a player may chose to march his king around the board. The most common are to escape enemy checks and to support passed pawns. We see both in the following example, perhaps the granddaddy of all king marches. In fact there are four separate marches in all by the black king.
M. Tchigorin vs. E. Delmar
New York 1889
We pick up the action at Black’s 54th move.

54...Kg6 The start of the first king march, heading eventually to h3. 55.Kh3 Kh5 56.Rf1 Qd3 57.Qf2 Rg6 58.Kh2 Qc4 59.Rb1 Kg4 60.Kg1 Qd3 61.Re1 Rg8 62.Qb2 Ra8 63.Qc1 Ra2 64.Qf4+ Kh3
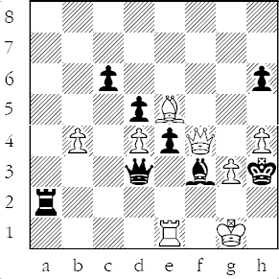
On the verge of getting mated Tchigorin is able to use the position of the black king to get the queens off the board. The march of the black king stalls for a while as other factors come into play. 65.Qf5+ Bg4 66.Qf1+ Qxf1+ 67.Kxf1 Ra3 68.Bf4 Rd3 69.Kf2 Rf3+ 70.Kg1 Rb3
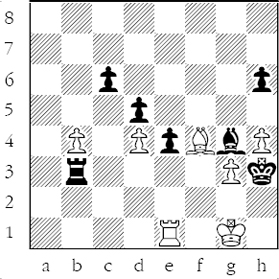
Black could have preserved his h-pawn, but he intends to exchange it for the two white kingside pawns. 71.Bxh6 Rxg3+ 72.Kf2 Rf3+ 73.Kg1 Kxh4 74.Re3 Rf7 75.Rc3 Bd7 76.Kg2 Rf6 77.Bd2 Bc8 78.Be1+ Kg5 Black’s forces have been pushed back and Tchigorin takes the opportunity to exchange his weak b-pawn. 79.b5 Bb7 80.bxc6 Bxc6 81.Rg3+ Kh5 82.Bd2 Bb7 83.Rg5+ Kh4 84.Rg7 Rb6 85.Bg5+ Kh5 86.Be3 Rb3 87.Kf2 Kh4
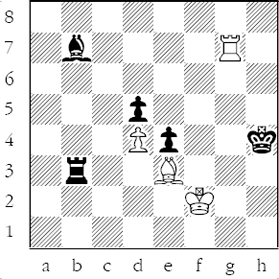
88.Rh7+ In the tournament book Steinitz suggests 88.Rg6, with the idea of maintaining the rook on the g-file, confining black’s king to the h-file. But to Tchigorin at the board, facing 88...Rb2+ confining white’s king to the back row, with the black king lurking at h4, this did not look too cozy. Hence the decision to drive the king off and with this the second king march begins. 88...Kg4 89.Rg7+ Kf5 90.Rg5+ Ke6 91.Rg6+ Kd7 92.Rh6 Bc6 93.Rh7+ Kc8 94.Rg7 Kb8
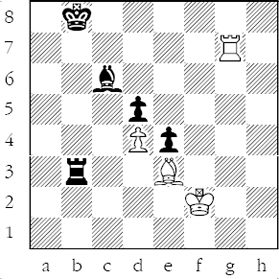
End of the second march. The third will bring the king to a2. 95.Rg1 Kb7 96.Rc1 Bb5 97.Rc2 Bc4 98.Rc1 Kb6 99.Re1 Kb5 100.Rd1 Kb4 101.Bd2+ Ka3 102.Bc1+ Ka2

The fourth and final march will shift the king to the center files where it can support the passed e-pawn. 103.Be3 Kb2 104.Re1 Rb8 105.Bf4 Rh8 106.Re3 Bd3 107.Rg3 Kc3 108.Be3 Rf8+ 109.Kg2 Rf5 110.Bf2 Kc2 111.Re3 Kd2 112.Rg3 Rf6 113.Kg1 Be2 114.Ra3 Bd3

115.Ra2+ Kd1 116.Kg2 Rg6+ 117.Kh2 Rf6 118.Kg2 Rf3 119.Ra1+ Kd2 120.Ra2+ Bc2 121.Ra1 Rb3
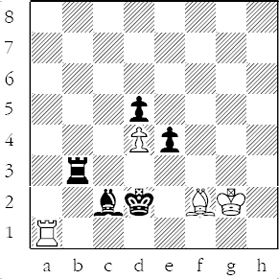
“After long and very clever maneuvering Black has secured the well-supported advance of the king pawn without being harassed by checks, and he must win in the end.” (Steinitz) 122.Bh4 e3 123.Kf3 Be4+ 124.Kf4 Rb1 125.Ra2+ Bc2 126.Ke5 Rh1 127.Bd8 Rh5+ 128.Kd6 Kd3 129.Kc5 e2 130.Ra3+ Ke4 131.Ra7 Rh1 132.Ba5 Kf3
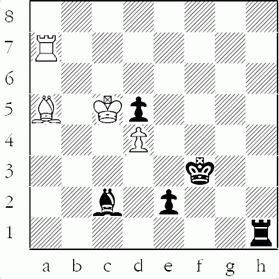
“The position is very singular and instructive. If 133.Kxd5 Ra5+ followed by 134...Rxa5 and wins; or if 133.Rf7+ Ke3 134.Re7+ (or 134.Kxd5 Bb3+ and wins) 134...Be4 winning easily.” (Steinitz) 133. Bd2 Be4 134.Ra3+ Kf2 135.Ra2 e1/Q 0-1

Tchigorin has to give the bishop 136.Bxe1+ Kxe1, and eventually the d4-pawn.
Having accumulated still more information (this time we won’t categorize it) you are certainly ready to start solving the Mazes of Chapter Two.
We add a cautionary note. The Mazes here tend to run longer than those of the previous chapter and will require greater visualization skills to grasp the final mating position. Still, if you’ve come this far you should be up to the task. So it’s time to take the plunge and solve some more Chess Mazes.
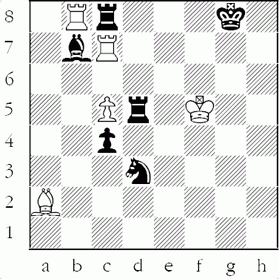
#109
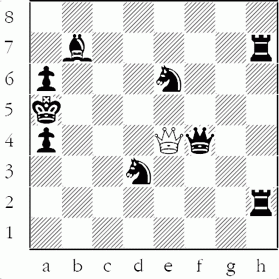
#110

#111
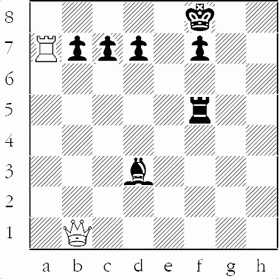
#112
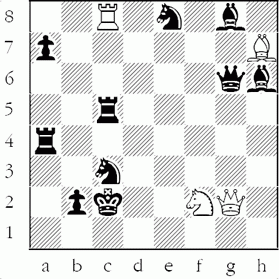
#113
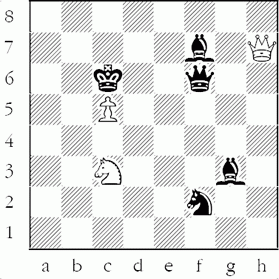
#114

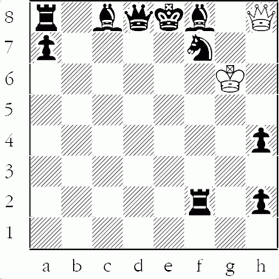
#116
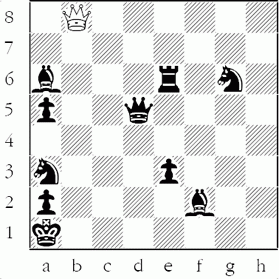
#117

#118

#119
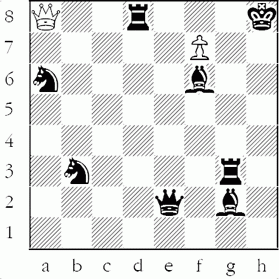
#120
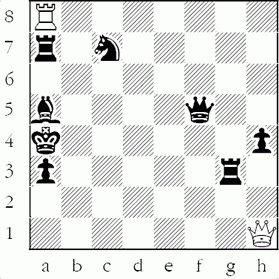
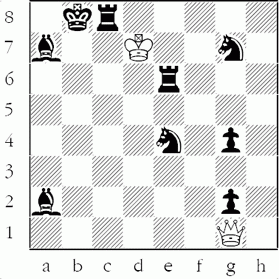
#122

#123
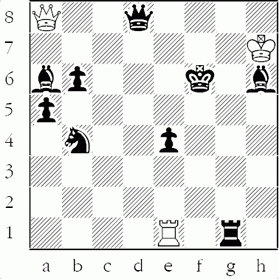
#124

#125

#126
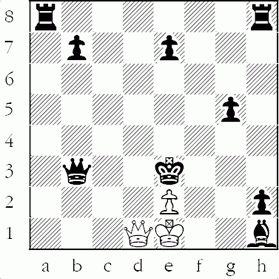
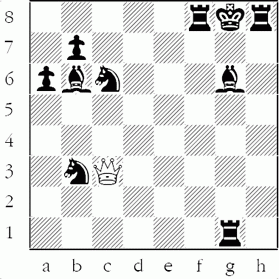
#128
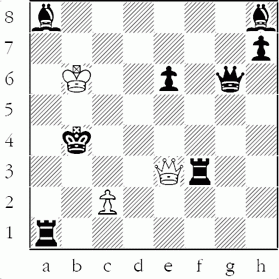
#129
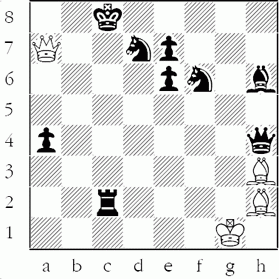
#130
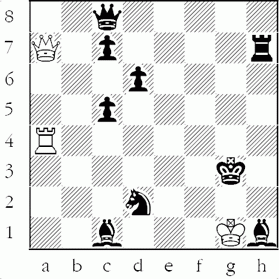
#131
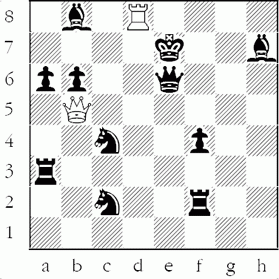
#132
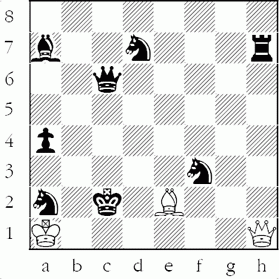
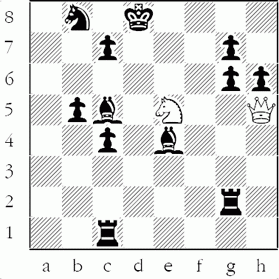
#134

#135
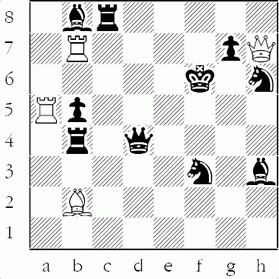
#136
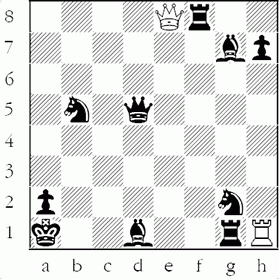
#137
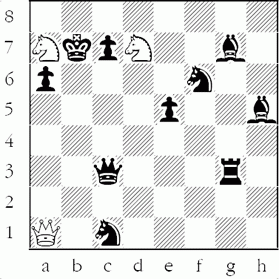
#138
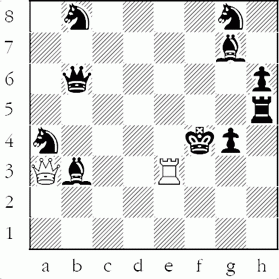
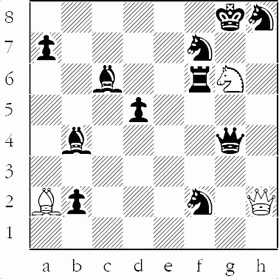
#140
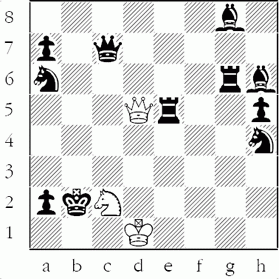
#141
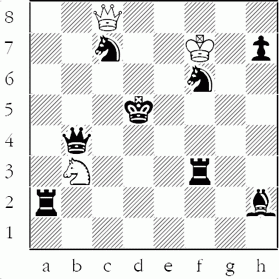
#142
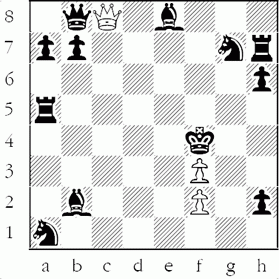
#143
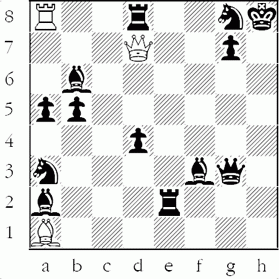
#144

#145

#146
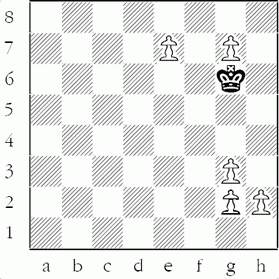
#147

#148
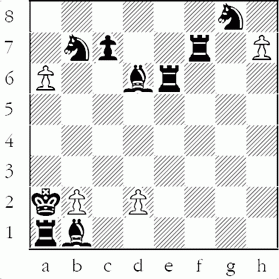
#149
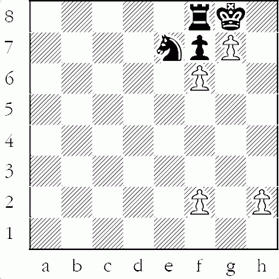
#150
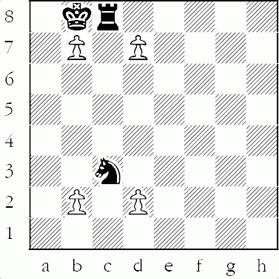
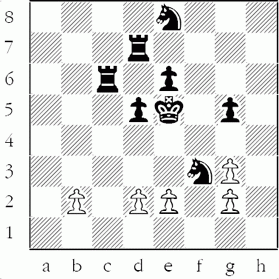
#152
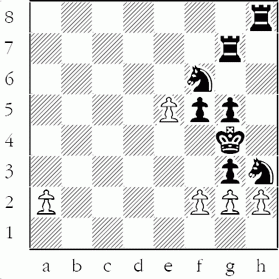
#153
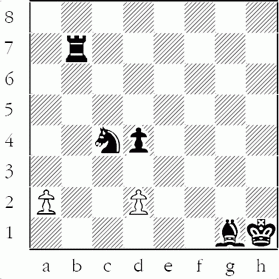
#154
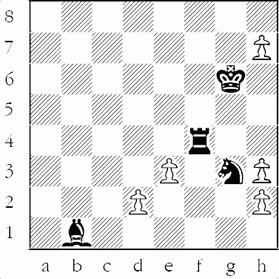
#155

#156

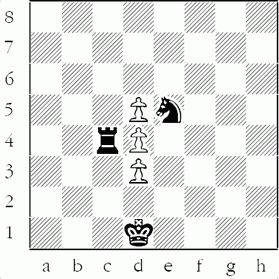
#158

#159
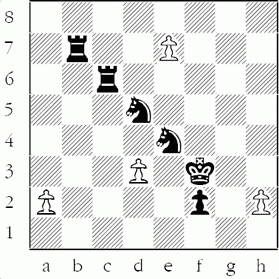
#160
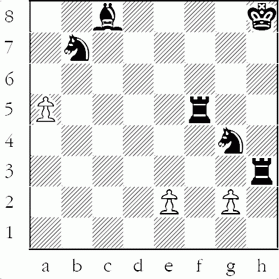
#161
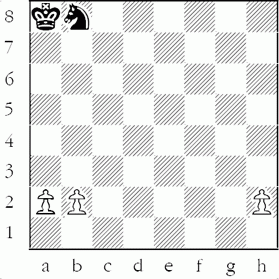
#162
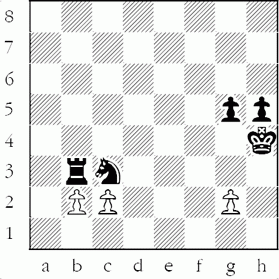

#164

#165
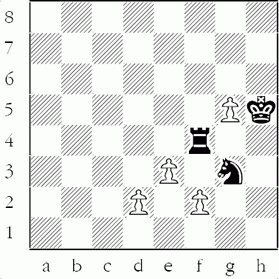
#166
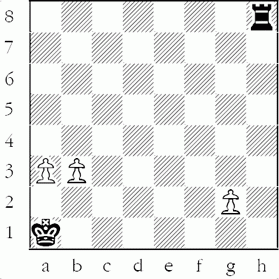
#167

#168
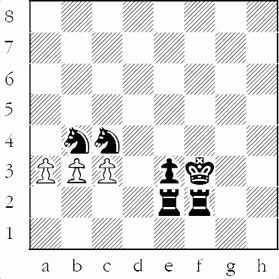
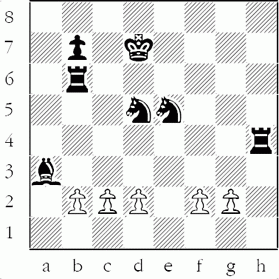
#170

#171
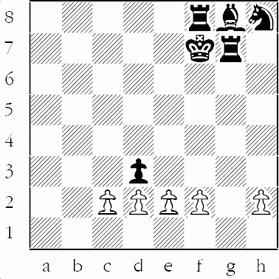
#172
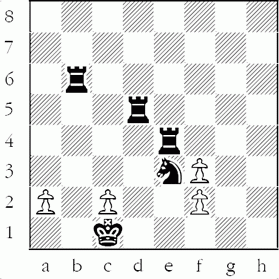
#173
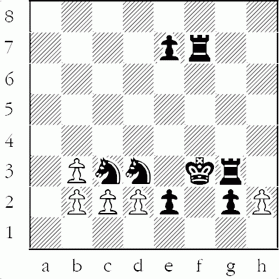
#174

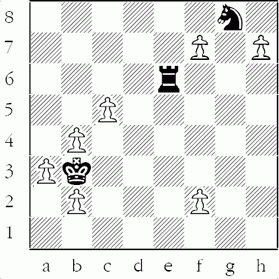
#176
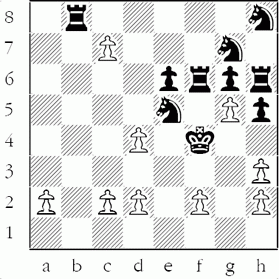
#177
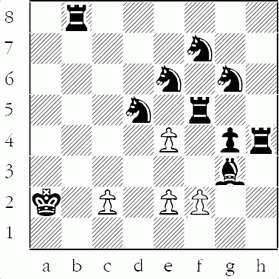
#178

#179
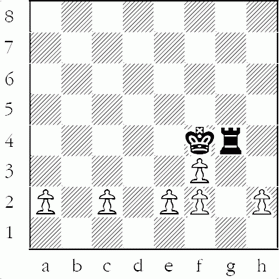
#180
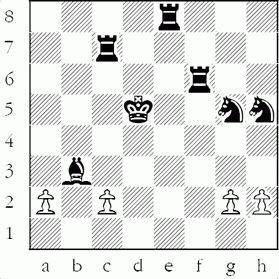
#181
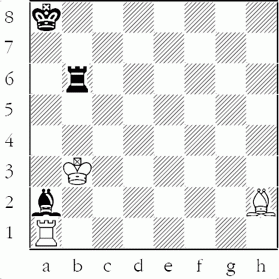
#182
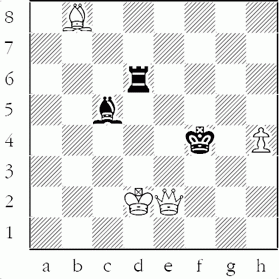
#183
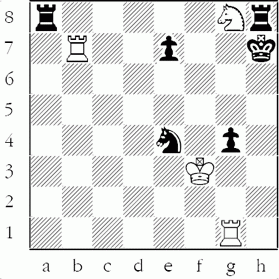
#184
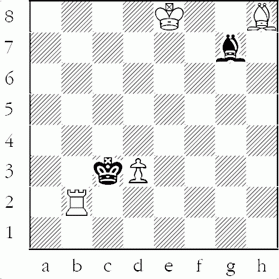
#185
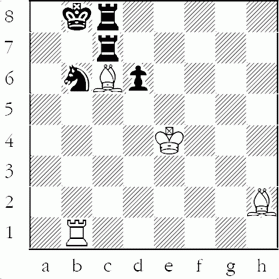
#186
#188

#189
#190

#191
#192

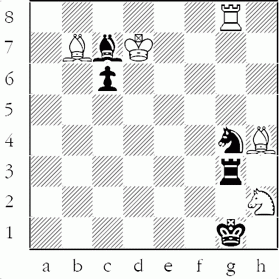
#194
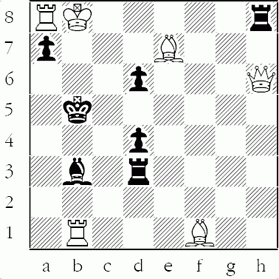
#195
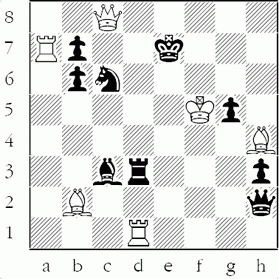
#196
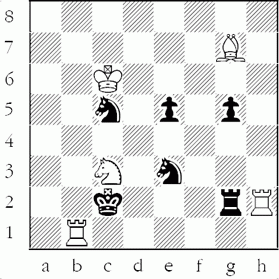
#197

#198
#200
#201

#202
#203
#204
#206
#207
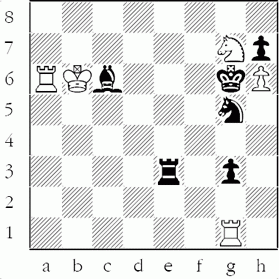
#208
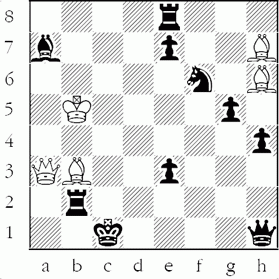
#209

#210
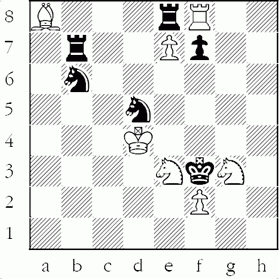

#212
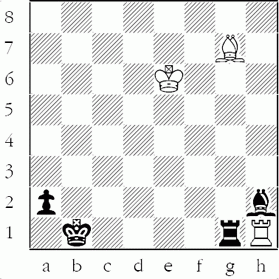
#213

#214
#215

#216
