Chapter 4: Bags
Bags, like scarves and shawls, can be very freeing to knit. Unless you’re knitting something like an eyeglass case or mobile phone holder, achieving the exact gauge or fit is not crucial. And there are so many types of bags, each with a unique function, yet wide-ranging in style: practical totes to hold work or knitting projects, dressy evening bags to carry lipstick and keys, tiny bags for mobile phones or MP3 players, fashionable handbags, and the list goes on.
Bag Designs
Bags present infinite design possibilities. You can knit them up in all kinds of yarns, in all shapes and sizes. Let your bag’s function determine what style to make and what fiber to use.

Bags Made from Rectangles
The easiest bags are made out of rectangles. You just knit a rectangle twice as long as you want your bag to be, fold it in half, and stitch up the side seams. If you want a fold-over flap, you knit it a little longer and include an eyelet buttonhole at the top. If you work a row of eyelets across the top edges, you can turn your rectangular bag into a drawstring bag: Just weave a crochet chain or knitted cord through the eyelets and pull. Or knit a row of eyelets across one top edge and sew buttons to the opposite edge. You can make a fuller rectangular bag that stands up on its own by knitting a gusset.

Round Bags
You can knit a bag in the round similarly to the way you knit a hat in the round. The result can be like a bucket, with a flat bottom, or like a feed bag, with a curved bottom.

Which Yarn Is Best?
Knitted bags and handles stretch when you put things in the bag, so yarns that are inelastic but durable, such as cotton, silk, linen, or blends that include these fibers, make excellent choices for these projects. To create a wool bag, try knitting in a tight fabric of stockinette or linen stitch to minimize stretching. You can also add a lining to your bag to eliminate stretching worries and protect your knitting.

Felted Bags
You don’t have to worry about wool stretching when you felt it. Felting is an excellent option for knitted bags because it produces a stiff and almost impenetrable fabric. The best fibers for felting are wool, mohair, alpaca, and angora. Superwash wool is not a good choice, however, because it has been specially treated to not shrink and felt. Wool/mohair blends felt beautifully.

Handles
Unless you’re making an envelope-type bag or clutch, you will most likely want to attach or knit a handle onto your bag. Again, consider the stretch factor. If you knit loosely in elastic yarn, your handle will stretch as soon as you put something in the bag.
You can knit tubular handles in the round, work the handle and side gussets as one continuous piece, crochet handles, or work decorative ribbed or cabled handles. Take the opportunity to experiment.

Rectangular Bag: Master Pattern
This bag is easy to make, with or without the side panel, which is called a gusset. The instructions include three sizes in four gauges: a small bag for carrying a mobile phone or other small items, a medium bag that makes a great short-handled purse, and a large bag that’s big enough to carry paperwork. You can make a new size by casting on fewer or more stitches and knitting fewer or more rows.

Specifications
Sizes
S (M, L)
Dimensions without gusset (Width × Height): 4 × 5 (10 × 8, 12 × 14) inches
Dimensions with gusset (Width × Height × Depth): 4 × 5 × 1 (10 × 8 × 4, 12 × 14 × 4) inches
Materials
Desired yarn, in the amount specified in Table 1
1 pair straight needles in size needed to obtain gauge
Stitch holders (for flat version of the gusset handle)
1 set of double-pointed needles in size needed to obtain gauge (for tubular handle)
Table 1. Approximate Yardages for Rectangular Bags
|
Gauge (in Stockinette Stitch) |
Small Bag |
Medium Bag |
Large Bag |
|
2 sts/in. |
20–25 yd. |
85–100 yd. |
200–300 yd. |
|
3 sts/in. |
25–30 yd. |
125–150 yd. |
250–350 yd. |
|
4 sts/in. |
30–40 yd. |
150–175 yd. |
350–500 yd. |
Tapestry needle
Notes On the Samples
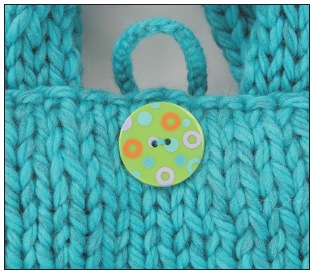
The turquoise gusseted bag is worked in Cascade Lana Grande (Color #6024, 100% wool, 87 yd./100g ball, 2 sts per inch). The gussets are worked separately from the tubular handles. This bag is lined with matching fabric and reinforced with thick interfacing. The button loop is a crochet chain.
The large pink and brown rectangular bag is worked in Cascade Luna (Colors #705 and #709, 100% cotton, 87 yd./50g hank, 4 sts per inch). The side gussets and handle are worked as one piece, with the gussets in seed stitch and the handle knit as a tube. The stripe pattern is 14 rows A, 14 rows B.
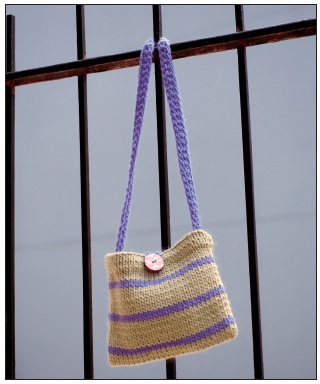
The medium green and purple striped rectangular bag is worked in Brown Sheep Lamb’s Pride Bulky (Colors #M-184 and #M-100, 85% wool/15% mohair, 125 yd./113g skein, 3 sts per inch). It is a flat bag, lined with matching fabric. The handle is worked in single crochet. The button loop is a crochet chain. The stripe pattern is 8 rows A, 2 rows B.
How to Make the Rectangular Bag
Cast On: All Rectangular Styles
1 CO sts (in A, if working stripe patt) as specified for your size and gauge in Table 2.
2 Beg with a knit row, work hem in St st for 1 inch, ending with a RS row.
3 Next row (WS): Knit across for hem folding ridge (still using A, if working stripe patt).
4 Go to the appropriate directions under “Work Bag Body,” below.
Table 2. Cast On for Flat Rectangular Bag
|
Gauge (in Stockinette Stitch) |
No. of Sts to CO |
|
2 sts/in. |
8 (20, 24) sts |
|
3 sts/in. |
12 (30, 36) sts |
|
4 sts/in. |
16 (40, 48) sts |
|
6 sts/in. |
24 (60, 72) sts |
Work Bag Body
At this point, you choose whether to make your rectangular bag flat or gusseted.
Flat Rectangular Bag Body
You do not make gussets for this style of bag, which is basically a long piece of flat knitting folded in half.
1 Beg with a knit row, work in St st (and beg stripe patt, if desired, still using A) until piece measures 10 (16, 28) inches from folding ridge, ending with WS row (and completing a full A stripe, if working stripe patt).
Note: If you want to make a flap, add the desired length of the flap to the measurement in step 1 and work until that length before working hem.
2 Next row (RS): Purl across for hem folding ridge.
3 Beg with a purl row, work in St st for 1 inch (still using A, if working stripe patt), ending with a RS row.
4 BO purlwise.
5 Go to the finishing instructions for your bag style under Finish the Rectangular Bag.
Gusseted Rectangular Bag Body
Gussets give this bag extra shape.
1 Beg with a knit row, work in St st (and beg stripe patt, if desired, still using A) until piece measures 5 (8, 14) inches from folding ridge for first side, ending with a RS row.
2 Next row (WS): Knit across row to create ridge along base.
3 Beg with a knit row, work in St st for 1 (4, 4) inches for base, ending with a RS row.
4 Next row (WS): Knit across for ridge along other side of base.
5 Beg with a knit row, work in St st until piece measures 5 (8, 14) inches from last ridge, ending with a RS row.
6 Next row (WS): Knit across for hem folding ridge.
7 Beg with a knit row, work in St st for 1 inch (still using A, if working stripe patt), ending with a RS row.
8 BO purlwise.
9 Go to desired gusset style under “Make Gussets,” below.

Make Gussets
You can make the handle and side gussets as one continuous piece or as two pieces sewn together.
Separate Gussets (Make 2)
You can work the gussets in one color, in stripes, or in another stitch pattern, as long as you achieve the specified gauge.
1 CO sts as specified for your size and gauge in Table 3.
2 Beg with a knit row, work in St st until piece measures 5 (8, 14) inches, ending with a RS row.
3 Next row (WS): Knit across for folding ridge.
4 Beg with a knit row, work in St st for 1 inch, ending with a RS row.
5 BO purlwise.
6 Go to Gusseted Bag Finishing.
Table 3. Cast On for Gusset or Gusset/Handle Combination
|
Gauge |
No. of Sts to CO |
|
2 sts/in. |
3 (8, 8) sts |
|
3 sts/in. |
3 (12, 12) sts |
|
4 sts/in. |
4 (16, 16) sts |
|
6 sts/in. |
6 (24, 24) sts |

Gusset/Handle Combination: Flat Version (Make 2)
You knit two identical pieces and then sew or knit them together at the top of the handle to form this version.
Note: The flat version of the gusset/handle combination is not recommended for the smallest size at 2 and 3 stitches per inch because there are not enough stitches to work a proper handle. The tubular version works best for those gauges.
1 CO sts as specified for your size and gauge in Table 3.
2 Beg with a knit row, work in St st until piece measures 5 (8, 14) inches (that is, the length of one side gusset).
3 Work the remainder of the piece—which is the handle—in garter st. AT THE SAME TIME, narrow the handle by k2tog each end every other row until you have half the number of sts you started with.
4 Cont without shaping until the handle section is half the desired total length. Place sts on holder.
5 Go to Handle/Gusset Combination Bag Finishing.

Gusset/Handle Combination: Tubular Version
This gusset/handle combination is worked as one piece.
1 CO sts as specified for your size and gauge in Table 3.
2 Beg with a knit row, work in St st (or desired stitch pattern) until piece measures 51⁄2 (9, 15) inches.
3 Slip stitches to dpn and work handle section as knitted cord to desired length. (See here for knitted cord instructions.)
Note: If you are working on 8 or more sts, knit cord in the round using 4 dpns.
4 Slip sts back to single-pointed needle and work back and forth in rows in St st until this gusset side matches the first gusset side.
5 BO in patt st.
6 Go to Handle/Gusset Combination Bag Finishing.

Finish the Rectangular Bag
Flat Bag Finishing
1 Weave in ends, except those that can be used to sew seams.
2 Lightly steam on WS to block and reduce curling, if your yarn’s care instructions allow.
3 Fold piece in half with RS facing each other, matching CO edge to BO edge. Pin and sew side seams, including hem.
4 Turn RS out, fold hem to inside along folding ridge, and steam fold and side seams.
5 Pin hem in place and whipstitch all the way around.
6 Weave in any rem ends.
7 Make handle and sew it to corners. Go here.
8 Line the bag, if desired. Go here.
Gusseted Bag Finishing
1 Weave in ends, except those that can be used to sew seams.
2 Lightly steam all pieces on WS to block and reduce curling, if your yarn’s care instructions allow.
3 With RS facing, pin gussets to larger piece, lining up folding ridges, and sew seams, including the hem section.
4 Turn RS out, fold hem to inside, and steam fold and seams.
5 Pin hem in place and whipstitch all the way around.
6 Weave in any rem ends.
7 Make handle and sew it to corners. Or, if using two handles, as in the sample shown, sew them to the front and back panels. Go here for handle suggestions and instructions.)
8 Line the bag, if desired. Go here.
Handle/Gusset Combination Bag Finishing
1 Weave in ends, except those that can be used to sew seams.
2 Lightly steam all pieces on WS to block and reduce curling, if your yarn’s care instructions allow.
3 With RS facing, pin gussets to larger piece, excluding the hems, and sew gusset seams all the way around, starting at folding ridge, working around gusset from ridge to ridge.
4 Turn RS out and fold both hems to inside. Steam folds and seams. Pin and whipstitch hems in place.
5 For flat handle, use three-needle bind-off to join flat handle sts at top. (Go here for three-needle bind-off instructions.)
6 Weave in any rem ends.
7 Line the bag, if desired. (Go here for lining instructions.)
Round Bag: Master Pattern
Here is another way to make a bag. Knit in the round, this style requires less finishing and results in a softer shape. The small bag is tiny—good for a mobile phone or MP3 player. You could dress up the medium bag with beading or knit it in fancy yarn for an evening purse. It’s a good idea to work the large bag in a firm yarn and stitch pattern to minimize stretching.

Specifications
Sizes
S (M, L)
Dimensions (Circumference × Height): 6 × 31⁄2–41⁄2 (16 × 8–91⁄2, 27 × 12–131⁄2) inches
Note: Heights of the round bags vary due to differing row gauges and styles.
Materials
Desired yarn, in the amount specified in Table 4
1 set of double-pointed needles in size needed to obtain gauge
1 circular needle in size needed to obtain gauge (for large bag)
Row counter (optional)
Tapestry needle
Table 4. Approximate Yardages for Round Bags
|
Gauge (in Stockinette Stitch) |
Small Bag |
Medium Bag |
Large Bag |
|
2 sts/in. |
20–25 yd. |
85–100 yd. |
200–300 yd. |
|
3 sts/in. |
25–30 yd. |
125–150 yd. |
250–350 yd. |
|
4 sts/in. |
30–40 yd. |
150–175 yd. |
350–500 yd. |
|
6 sts/in. |
40–60 yd. |
175–225 yd. |
500–650 yd. |
Notes On the Samples
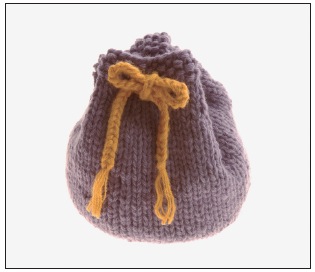
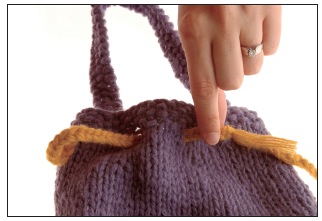
The medium-size violet drawstring round bag is worked in GGH/Muench Via Mala (Colors #31 and #34, 100% wool,
73 yd./50g ball, 3 sts per inch). It has a flat bottom and eight eyelets along the top for the crochet chain drawstring. The top edge of the bag and the handle are worked in seed stitch.
The small round pink bag is worked in GGH/Muench Savanna (Color #003, 43% alpaca/23% linen/19% wool/15% nylon, 88 yd./50g ball, 4 sts per inch). It has curved shaping for the base and a tiny garter stitch handle. A lazy daisy is embroidered on the front in two colors.
How to Make the Round Bag
Cast On: All Round styles
1 CO sts as specified for your size and gauge in Table 5.
2 Place marker (pm) and join rnd, taking care not to twist sts.
3 Work top edge according to one of the styles listed under “Make Edge,” below
4 Go to Make Bag Body: All Round Styles.
Table 5. Cast On for Round Bag
|
Gauge |
No. of Sts to CO |
|
2 sts/in. |
12 (32, 54) sts |
|
3 sts/in. |
18 (48, 81) sts |
|
4 sts/in. |
24 (64, 108) sts |
|
6 sts/in. |
36 (96, 162) sts |
Make Edge
For an easy, firm edge to your bag, choose garter stitch or seed stitch. The ribbed edge will cinch in a bit, and the hemmed edge will be neat, flat, and more substantial than the others.
Garter Stitch Edge
This edge produces a neat, flat border. When working in the round, you alternate purl and knit rounds for garter stitch.
1 Rnd 1: Purl.
2 Rnd 2: Knit.
3 Rep rnds 1 and 2 until edge measures approx 1⁄4 (1, 1) inch.
Ribbed Edge
If your stitch count is a multiple of 4 sts, you can work this edge as 2x2 rib.
1 Rnd 1: *K1, p1; rep from * to end of rnd.
2 Rep rnd 1 until edge measures approx 1⁄4 (1, 1) inch.

Seed Stitch Edge
This edge may have a larger gauge than the body of the bag because alternating knit and purl stitches every stitch and every row tends to create more space between the stitches. If you don’t want this effect, try using needles one or two sizes smaller for this edge.
1 Rnd 1: *K1, p1; rep from * to end of rnd.
2 Rnd 2: *P1, k1; rep from * to end of rnd.
3 Rep rnds 1 and 2 until edge measures 1⁄4 (1, 1) inch.
Hemmed Edge
This method forms a tidy edge. Work through step 2 in needles one or two sizes smaller than those used for the body of the bag.
1 Knit all rnds until piece measures 3⁄4 (1, 1) inch.
2 Purl next rnd to form folding ridge.
Note: For a picot edge, work the folding ridge as an eyelet row by repeating [k2tog, yo] around.
3 Knit same number of rnds as in step 1.
Make Bag Body: All Round Styles
1 Knit every rnd for 1⁄2 (1, 2) inches beyond edging.
Note: If you want a drawstring bag, work as instructed in step 1 for 0 (1⁄2, 1⁄2) inch and then work 6–12 eyelets, evenly spaced around, by [yo, k2tog]. Then continue knitting every round.
2 Inc rnd: Inc evenly around the number of sts specified for your size and gauge in the second column of Table 6. You should now have the number of sts specified for your size and gauge in the third column of Table 6.
3 Work without further shaping until piece measures approx 4 (8, 12) inches from CO edge, hemmed edge, or folding ridge for flat-bottom bag or until piece measures approx 3 (7, 11) inches for curved-base bag.
4 Go to desired base shaping under “Shape the Base,” below.
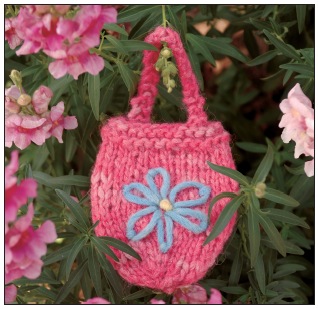
Table 6. Increase for Bag Body
|
Gauge |
No. of Sts to Inc Evenly Around |
New St Count |
|
2 sts/in. |
2 (4, 6) sts |
14 (36, 60) sts |
|
3 sts/in. |
3 (6, 9) sts |
21 (54, 90) sts |
|
4 sts/in. |
4 (8, 12) sts |
28 (72, 120) sts |
|
6 sts/in. |
6 (12, 18) sts |
42 (108, 180) sts |
Shape the Base
At this point, you choose whether to give your round bag a curved base or a flat base.
Curved Base Shaping
This base is rounded gradually, like a feed bag or the top of a hat.
1 1st dec rnd: *K5 (7, 8), k2tog; rep from * to end of rnd. You should have rem the number of sts specified for your size and gauge in Table 7.
Table 7. Number of Stitches Remaining After
First Decrease Round
|
Gauge |
No. of Sts Rem |
No. of Sts to Dec in 1st Dec Rnd |
|
2 sts/in. |
12 (32, 54) sts |
2 (4, 6) sts |
|
3 sts/in. |
18 (48, 81) sts |
3 (6, 9) sts |
|
4 sts/in. |
24 (64, 108) sts |
4 (8, 12) sts |
|
6 sts/in. |
36 (96, 162) sts |
6 (12, 18) sts |
2 Knit 1 rnd without shaping.
3 2nd dec rnd: *K4 (6, 7), k2tog; rep from * to end of rnd. You should have rem the number of sts specified for your size and gauge in Table 8.
4 Knit 1 rnd without shaping.
5 3rd dec rnd: Dec the number of sts specified for your size and gauge in Table 9.
6 Rep steps 4 and 5 until you have the number of sts specified for your size and gauge in the third column of Table 9.
7 Next rnd: K2tog to end of rnd, end k1 if necessary.
8 Rep step 7 0 (0, 1) time for 2 and 3 sts per inch and 0 (1, 2) time for 4 and 6 sts per inch.
9 Cut yarn, leaving a long tail. Pull tail through rem sts and secure.
10 Go to Finish the Round Bag: All Styles.
Table 8. Number of Stitches Remaining After Second Decrease Round
|
Gauge |
No. of Sts Rem |
No. of Sts to Dec in 2nd Dec Rnd |
|
2 sts/in. |
10 (28, 48) sts |
2 (4, 6) sts |
|
3 sts/in. |
15 (42, 72) sts |
3 (6, 9) sts |
|
4 sts/in. |
20 (56, 96) sts |
4 (8, 12) sts |
|
6 sts/in. |
30 (84, 144) sts |
6 (12, 18) sts |
Table 9. Decrease Every Other Round for Curved Base
|
Gauge |
No. of Sts to Dec per Dec Rnd, Final Dec |
No. of Sts Rem |
|
2 sts/in. |
2 (4, 6) sts |
6 (8, 24) sts |
|
3 sts/in. |
3 (6, 9) sts |
9 (12, 36) sts |
|
4 sts/in. |
4 (8, 12) sts |
12 (16, 48) sts |
|
6 sts/in. |
6 (12, 18) sts |
18 (24, 72) sts |
Flat Base Shaping
This base is round but flat, like the base of a bucket.
1 Purl 1 rnd for circular ridge at base.
2 Knit 1 rnd.
3 1st dec rnd: *K5 (7, 8), k2tog; rep from * to end of rnd. You should have rem the number of sts specified for your size and gauge in Table 7.
4 2nd dec rnd: *K4 (6, 7), k2tog; rep from * to end of rnd. You should have rem the number of sts specified for your size and gauge in Table 8.
5 Dec the number of sts specified for your size and gauge in Table 10 every rnd until you have rem the number of sts specified for your size and gauge in the third column of Table 10.
6 Next rnd: K2tog to end of rnd.
Note: If you have an uneven number of sts, k2tog as many sts as possible and k1 rem st.
7 Rep step 6 0 (1, 2) times for 2 sts/inch, 1 (2, 3) times for 3 and 4 sts/inch, and 2 (3, 4) times for 6 sts/inch.
8 Cut yarn, leaving a long tail. Pull tail through rem sts and secure.
9 Go to Finish the Round Bag: All Styles.

Table 10. Decrease Every Round for Flat Base
|
Gauge |
No. of Sts to Dec per Dec Rnd |
No. of Sts Rem |
|
2 sts/in. |
2 (4, 6) sts |
2 (4, 6) sts |
|
3 sts/in. |
3 (6, 9) sts |
3 (6, 9) sts |
|
4 sts/in. |
4 (8, 12) sts |
4 (8, 12) sts |
|
6 sts/in. |
6 (12, 18) sts |
6 (12, 18) sts |
Finish the Round Bag: All Styles
1 Weave in ends.
2 Lightly steam on WS to block, if your yarn’s care instructions allow.
3 Turn RS out. For hemmed edges, fold hem to inside along folding ridge, steam fold, pin hem in place, and whipstitch all the way around.
4 Make handle and sew it to the corners. (Go here for handle suggestions and instructions.) For drawstring version, weave a strand of yarn in and out of eyelets to determine the desired length for the drawstring. Work drawstring as a knitted cord, crocheted chain, or braided yarn, or use ribbon, rawhide, rope, or other cord. See Appendix A for knitted cord and crochet chain instructions.
Create Handles
You can dress up your bag with unique handles. You can buy premade handles at a craft store, but knitting them is more fun. Be sure to work a handle that is strong enough to support the bag and that will stand up to wear and tear.
How to Make the Handles
Garter Stitch Handle
This is the most basic handle, and it works well for a shoulder bag. Try working it in stripes to liven it up. Instructions are for three widths: 1⁄2 (1, 2) inches.
1 CO sts for your size and gauge according to Table 11.
2 Knit every row to desired length.
3 BO knitwise.
4 Go to Finish and Attach Handles.
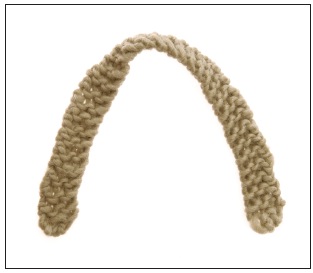
Table 11. Cast On for Garter Stitch Handle
|
Gauge |
No. of Sts to CO |
|
2 sts/in. |
— (2, 4) sts |
|
3 sts/in. |
2 (3, 6) sts |
|
4 sts/in. |
2 (4, 8) sts |
|
6 sts/in. |
3 (6, 12) sts |
Ribbed Handle
This is a flat handle. Instructions are given for three widths: 1 (2, 3) inches.
1 CO sts for your size and gauge according to Table 12.
2 Row 1 (RS): K1, *p1, k1; rep from * to end of row.
Note: If you want to work this as a seed stitch handle, CO the same number of sts and rep row 1 to desired length.
3 Row 2 (WS): P1, *k1, p1; rep from * to end of row.
4 Rep rows 1 and 2 to desired length.
5 BO in rib.
6 Go to Finish and Attach Handles.

Table 12. Cast On for Ribbed Handle
|
Gauge |
No. of Sts to CO |
|
2 sts/in. |
3 (5, 7) sts |
|
3 sts/in. |
3 (7, 9) sts |
|
4 sts/in. |
5 (9, 11) sts |
|
6 sts/in. |
5 (11, 17) sts |
Knitted Cord Tubular Handle
This technique results in a sturdy and attractive handle. Instructions are given for five circumferences: 1 (11⁄2, 2, 3, 4) inches. You need two dpns suitable for your yarn. For a tighter fabric, go down a needle size. For more than 8 sts, knit in the round using 4 dpns.
1 CO sts for your size and gauge according to Table 13.
2 Row 1 (RS): Knit across sts with second dpn but do not turn work.
3 Slide the sts back to the other end of the dpn, ready to work a RS row again. Knit across, pulling working yarn tightly across back to join the tube.
4 Rep step 3 until handle is desired length.
5 BO knitwise.
6 Go to Finish and Attach Handles.

Table 13. Cast On for Knitted Cord Tubular Handle
|
Gauge |
No. of Sts to CO |
|
2 sts/in. |
2 (3, 4, 6, 8) sts |
|
3 sts/in. |
3 (4, 6, 9, 12) sts |
|
4 sts/in. |
4 (6, 8, 12, 16) sts |
|
6 sts/in. |
6 (9, 12, 18, 24) sts |
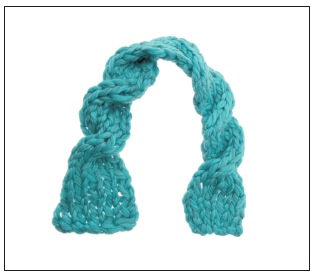
Drop Stitch Handle
This lacy handle includes instructions for three widths: 1 (2, 3) inches.
1 CO sts for your size and gauge according to Table 14.
2 Row 1 (RS): Knit.
3 Row 2 (WS): Knit.
4 Row 3: K1, *yo twice, k1; rep from * to end of row.
5 Row 4: Knit across, dropping the yo loops as you go.
6 Rep rows 1–4 to desired length, ending with row 1 or 2.
7 BO knitwise.
8 Go to Finish and Attach Handles.

Table 14. Cast On for Drop Stitch Handle
|
Gauge |
No. of Sts to CO |
|
2 sts/in. |
2 (4, 8) sts |
|
3 sts/in. |
3 (6, 9) sts |
|
4 sts/in. |
4 (8, 12) sts |
|
6 sts/in. |
6 (12, 18) sts |
Basic Cable Handle
This simple 6-stitch front cross cable makes a wonderful handle. The width is 1 to 3 inches, depending on gauge. To make it, you need a cable needle (cn).
1 CO 6 sts.
2 Rows 1 and 5 (RS): Knit.
3 Rows 2, 4, and 6: Purl.
4 Row 3: Slip first 3 sts to cn and hold at front, k3 from left needle, k3 from cn.
5 Rep rows 1–6 to desired length, ending with row 5.
6 BO purlwise.
7 Go to Finish and Attach Handles.
Braided Handle
Here is a fun handle. Instructions are given for a handle that is 11⁄2–21⁄2 inches wide, depending on gauge. You need two stitch holders.
1 CO 9 sts.
2 Row 1 (RS): K1, *p1, k1; rep from * to end of row.
3 Row 2 (WS): P1, *k1, p1; rep from * to end of row.
4 Rep rows 1 and 2 until piece measures approx 2 inches, ending with a WS row.
5 Next row (RS): K1, p1, k1; put rem 6 sts onto holder.
6 Working on first 3 sts only, cont in rib patt until piece is 1–2 inches beyond desired length. Braiding will shorten it. Cut yarn, leaving a 6-inch tail. Put these 3 sts on second holder.
7 Slip center 3 sts to needle and beg with RS row, work in patt through same row, and cut yarn as for first set of sts. Slip these sts onto holder.
8 Slip last 3 sts to needle and work in patt through same row as other two sets of sts.
9 Cut yarn, leaving a 6-inch tail.
10 Lay handle RS up with connected end at top. Braid the sections: Lay right piece over center, lay left piece over center, right over
center, and so on, ending with left piece.
11 Slip all sts to needle, ready to beg a WS row.
12 Rejoin yarn and work in patt for approx 2 inches.
13 BO in patt.
14 Go to Finish and Attach Handles.

Braided Cable Handle
This makes a firm and attractive handle. The width of this handle is 11⁄2 to 3 inches, depending on gauge. To make it, you need a cable needle (cn).
1 CO 8 sts.
2 Beg with a knit row, work 2 rows St st.
3 Row 1 (RS): [Slip next 2 sts to cn and hold at back, k2 from left needle, k2 from cn] twice.
4 Rows 2 and 4 (WS): Purl.
5 Row 3: K2, [slip next 2 sts to cn and hold at front, k2 from left needle, k2 from cn], k2.
6 Rep rows 1–4 to desired length, ending with a WS row.
7 Next row (RS): Knit.
8 BO purlwise.
9 Go to Finish and Attach Handles.
Crocheted Handle
Here’s an easy handle for crocheters. Use a crochet hook suitable to your yarn.
1 Crochet a chain to the desired handle length.
2 Turn and work one SC into each chain to end.
3 Ch1.
4 Turn and work 1 SC into each SC from row before.
5 Rep steps 3 and 4 to desired width.
6 Cut yarn, leaving a 6-inch tail. Pull tail through last loop and secure.
7 Go to Finish and Attach Handles.

Finish and Attach Handles
1 Weave in ends.
2 Steam to block and neaten the handles, if your yarn’s care instructions allow, taking care not to mash ribs or cables.
3 Sew handle ends neatly and firmly to the inside edges of the bag. If you must have the stitches go all the way through the knitting, consider attaching a decorative button on the front to conceal the stitches.
Line a Knitted Bag
Lining your knitted bag is easy. The lining will protect your knitting and enable the bag to safely hold all kinds of items. Choose a lining fabric that complements your yarn colors. These instructions are designed for the rectangular flat and gusseted bags presented earlier in the chapter.

Specifications
Sizes
S (M, L)
Flat rectangular bags (Width × Height): 4 × 5 (10 × 8, 12 × 14) inches
Gusseted rectangular bags (Width × Height × Depth): 4 × 5 × 1 (10 × 8 × 4, 12 × 14 × 4) inches
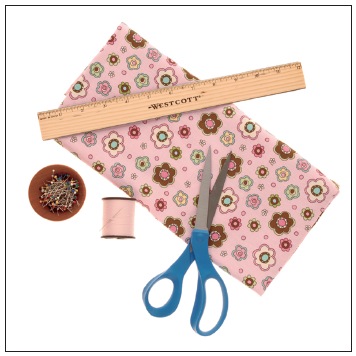
Materials
Fabric for lining
Interfacing, if a more rigid lining is desired
Note: You can add an additional lining of thick interfacing between the knit fabric and the lining fabric. Cut the interfacing as you do the lining fabric, hold it together with the corresponding lining pieces, and sew as instructed. You can purchase interfacing in different thicknesses at a fabric store.
Scissors or pinking shears
Pins
Ruler or tape measure
Sewing machine (optional)
Needle and thread
How to Make the Lining
Flat Rectangular Bag Lining
1 Cut a piece of lining fabric 5 × 12 (11 × 18, 13 × 30) inches.
2 Fold the fabric with RS facing each other along the width so that it measures 5 × 6 (11 × 9, 13 × 15) inches. Pin the sides tog.

3 Using a sewing machine or a needle and thread, sew side seams, leaving a 1⁄2-inch seam allowance on each side.
4 Insert the lining into the bag, wrong sides tog, so that the fold is touching the bottom and the side seams run along the bag’s sides.
5 Reach down into the bag and tack the corners in place. Then tack along each side seam twice, about 1⁄3 and 2⁄3 of the way up.
Note: This will keep the lining from pulling the top of the bag down when you put things in it.
6 Fold over the top edge of the lining all the way around so that the folded edge runs neatly along the top edge of the bag, about 1⁄2 inch down from the edge. Pin in place.
7 Using a needle and thread, neatly whipstitch the folded top edge of the lining to the bag.

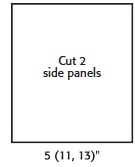
Gusseted Rectangular Bag Lining
1 Cut two pieces of lining fabric 5 × 6 (11 × 9, 13 × 15) inches for the front and back panels.
2 Cut a piece of lining fabric 2 × 17 (5 × 29, 5 × 43) inches for the base and gussets.

3 Pin the long edges of the gusset/base strip around three edges (the gusset sides and base) of the panels, with RS facing each other.
4 Using a sewing machine or a needle and thread, sew seams along pinned edges, leaving 1⁄2-inch seam allowance.
5 Insert the lining into the bag with WS together, matching up corners and seams.
6 Reach down into the bag and tack the corners in place. Then tack along each side seam twice, about 1⁄3 and 2⁄3 of the way up.
Note: This will keep the lining from pulling the top of the bag down when you put things in it.
7 Fold over the top edge of the lining all the way around so that the folded edge runs neatly along the top edge of the bag, about 1⁄2 inch down from the edge. Pin in place.
8 Using a needle and thread, neatly whipstitch the folded top edge of the lining to the bag.

Felting
The felting process involves exposing a piece of knitting to moisture, heat, and friction in order to shrink it and transform it into a dense, firm, and very strong fabric. Felting requires a carefree attitude because the outcome is not always predictable.
How Felting Works
You may have accidentally felted a sweater by washing it in the machine in hot water. When you expose something knit in wool or another animal fiber to wet heat and agitate it, it is likely to shrink and become matted. The fibers open up and become interlocked, creating that dense fabric of felt.
Felting is not an exact science; it’s more like a science experiment. Many variables can affect the outcome: water temperature, water hardness, how much agitation occurs, how the fibers were treated before felting, what the fiber blend is, how long the fibers are exposed to heat and moisture, and the amounts of soap and water used. Be prepared for any outcome and be willing to experiment.
The Best Yarns for Felting
The best yarns for felting are 100% wool or other animal fibers, such as alpaca, angora, mohair, and llama. You can also try using blends of these fibers. (Superwash wools have been treated so that they will not shrink, so don’t use them.) Synthetics are not good felters, but you can try to felt a wool/synthetic blend, as long as it isn’t more than 10%–15% synthetic.
Fibers that have been bleached, such as bright whites, and bright colors that have been treated with bleach to take the dye are also not always the best for felting. It is not recommended to use different yarn types in the same piece because they will felt differently. And you need to be careful when felting together multiple colors as they can bleed. No matter what yarn you choose, you should felt a knitted swatch first to get a sense of whether and how it will work.

Equipment Needed for Felting
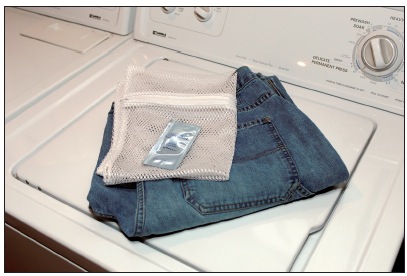
Felting is easiest and fastest when done in a washing machine. If you don’t have a washing machine, you can felt in a bucket or in a bathtub or sink. Don’t use a front-loading machine, though, as you must open the machine to check on your item every few minutes.
A zippered mesh laundry bag or pillowcase will protect your washer from the wads of fuzz that come off in the process. You also need bleach-free laundry soap, or mild dish soap if you’re felting by hand. A tablespoon is plenty. Because agitation and friction are important factors in felting, a pair of jeans or a canvas sneaker to throw in the machine with your item can be helpful, too.
How to Knit for Felting
You need to knit the item you want to felt larger than you want it to be—to account for the shrinking—and to knit it at a loose gauge, using needles that are 2mm larger than the size specified for the yarn. For example, if your yarn calls for a size 6 (4mm) needle, you’d knit your item with a size 10 (6mm) needle. A tightly knit fabric can end up too rigid, but only experimentation with swatches will tell.
Experiment with Swatches First
Felting is unpredictable; you’re taking a risk when you put that handknit item into the washing machine. However, you can get at least some sense of the outcome beforehand by swatching. So before you spend the time knitting a bag that is twice the size you want it to be, test felt a swatch in the same yarn first. Be sure to measure the swatch before and after to get a sense of how much shrinkage occurs when you felt it.

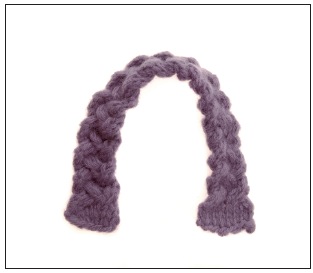
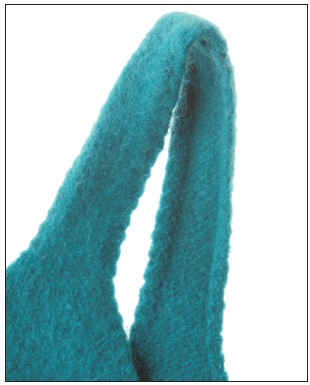
Tutorial: Felted Bag
A knitted bag is a perfect project for experimenting with felting. A bag at any size is useful in some way, so even if your handbag ends up a change purse, you can still use it. This felted bag is easy to knit, and the handles are integrated right into the body, so finishing is a snap.

Specifications
Sizes
One size
Dimensions: Circumference × Height (including handle): Approximately 31 × 25 inches before felting and approximately 22 × 16 inches after felting
Note: The final size of the bag depends on how much it shrinks during the felting process.
Materials
1 skein each Brown Sheep’s Lamb’s Pride Worsted (85% wool, 25% mohair, 190 yd./113g skein) in #M-78 Aztec Turquoise (A), and #M-120 Limeade (B)
1 set straight needles in size 101⁄2 (6.5mm) or size needed to achieve gauge
1 circular needle (16–24 inches long) in size 101⁄2 (6.5mm) or size needed to achieve gauge
1 set of double-pointed needles in size 101⁄2 (6.5mm) or size needed to achieve gauge
Row counter
Stitch holder
Tapestry needle
Zippered lingerie bag or zippered pillowcase
Laundry soap
Pair of jeans or canvas sneaker
1 button in size desired

Gauge
14 stitches and 20 rows to 4 inches over stockinette stitch on size 101⁄2 (6.5mm) needles
Pattern Stitches
m1R (make 1, right slanting, knit side)
Use the left needle to pick up the horizontal strand from back to front between the last stitch worked on the right needle and the next stitch to be worked on the left needle. Then knit into the front of the picked-up loop.
m1L (make 1, left slanting, knit side)
Perform as for M1R, only pick up the horizontal strand from front to back. Then insert the right needle into the back of the picked-up loop and knit it.
How to Make the Bag
Test a swatch
Remember that felting is not a science. The same yarn on the same needles will felt differently at different temperatures or for different amounts of time. This swatch test should give you a very general idea of what to expect.
1 Using the yarn you have chosen (read here about feltiing before making your choice) and needles 1.5mm to 2mm larger than your yarn specifies, knit a 6-inch swatch.
2 Treat the swatch as directed in Felt the Bag.
3 If you are not pleased with your swatch at this point, experiment with additional swatches for more or less time
in the water, or try drying the swatch in the dryer for 10 minutes to see what happens.
4 When you are pleased with the quality of the felting, let it dry and then measure the swatch again.
5 Calculate the percentage the swatch has shrunk. For example, if your 6-inch square swatch becomes a 41⁄2-inch square swatch after felting, it has shrunk 25%. This should give you a sense of how big your bag will come out.
6 Proceed to Knit the Bag Handles.

Knit the Bag Handles
1 With straight needle and A, CO 11 sts.
2 Row 1 (RS): Knit.
3 Row 2 (WS): K2, p7, k2.
4 Rep rows 1 and 2 until piece measures 7 inches, ending with a WS row.
5 Next row (RS): K2, m1R, k to last 2 sts, m1L, k2—13 sts.
6 Next row (WS): K2, p to last 2 sts, k2.
7 Rep last 2 rows, inc 1 st as established each end every RS row to 41 sts, ending with a WS row.
8 Cut yarn, leaving a 6-inch tail, and put sts on holder.
9 Rep steps 1–7 for second handle. (Don’t cut yarn; leave sts on needle.)
10 Go to Knit the Bag Body.
Knit the Bag Body
1 Still working with yarn A, use circ needle to knit across the 41 sts for the second handle (from straight needle), CO 13 sts, knit across the 41 sts for first handle, CO 13 sts—108 sts.
2 Place marker (pm) and join rnd, taking care not to twist sts. Beg working edge as foll.
3 Rnd 1: P2, k37, p 17, k37, p15.
4 Rnd 2: Knit.
5 Rnd 3: P1, k39, p15, k39, p14.
6 Rnd 4: Knit.
7 Rnd 5: K41, p13, k41, p13.
8 Rnd 6: Knit.
9 Change to B and knit every rnd, knitting as many complete rnds as possible with rem B.
10 Go to Shape the Base.

Shape the Base
Note: Change to dpns when circ needle becomes too large.
1 Change to A.
2 1st dec rnd: *K10, k2tog; rep from * to end of rnd—99 sts.
3 Knit 1 rnd without shaping.
4 2nd dec rnd: *K9, k2tog; rep from * to end of rnd—90 sts.
5 Knit 1 rnd without shaping.
6 Dec 9 sts evenly around, as established.
7 Rep last 2 rnds until 54 sts rem.
8 Next rnd: Dec 9 sts evenly, as established, every rnd until 18 sts rem.
9 Next rnd: K2tog to end of rnd—9 sts.
10 Cut yarn, leaving a long tail. Pull tail through rem sts and secure.
11 Go to “Finish Before Felting,” below.
Finish Before Felting
1 Weave in ends.
2 Join and sew together CO edges of handles firmly, but without overlapping.
3 Go to Felt the Bag.
|
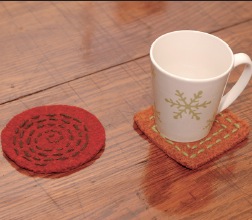
TIP Fun with Felted Swatches Before you venture into a large felting project, you should experiment with swatches knit in different animal fibers and even varied stitch patterns. You can use the swatches later as coasters. Embellish them with embroidery after felting for a more finished look. If a swatch is large enough, you can whipstitch it onto the outside of your felted bag as a pocket. You can also sew six swatches together into a cube to create a stuffed baby toy or paperweight.
|
Felt the Bag
Although felting is easiest and fastest when done in a washing machine, you can also felt in a bucket or in a bathtub or a sink.
Machine Felting
1 Place the knitted bag into a zippered pillowcase or lingerie bag and close.
Note: You’ll keep the knitted bag in the zippered bag through the whole process, except to check it during the cycle.

2 Set the washer to the warm or hot wash/cold rinse cycle (small load), start filling the washer, and add approx 1 tablespoon mild dish soap.
3 When the washer is almost done filling, add a pair of jeans or a canvas sneaker and the zippered bag containing your knitted bag.
4 After the machine begins the wash cycle, stop it and check your bag every so often to see how it’s doing. (At the very beginning, don’t worry if it looks as though it’s grown.)
5 Stop when the bag looks felted or when the wash part of the cycle is through, whichever comes first. The knitted bag should have a dense feel, and the stitches should be barely visible, if visible at all. If the bag is felted enough at this point, go to step 7.
6 If the bag is not felted enough after one wash cycle (not including rinse and spin), put it through the wash cycle again, as many times as needed, until it is.
7 Put the bag back into the washer and let it rinse and spin. The cool water locks the fibers and rinses the soap. Spinning removes excess water.
8 Take the bag out of the washer and form it to the desired shape while it is still wet. Stuff it with plastic bags to help shape it, if desired, and set it on a towel to air dry.
9 Go to “Finish After Felting,” on the next page.

Hand Felting
1 Fill a bucket, sink, or tub partway with hot or warm water and add 1 tablespoon mild dish soap.
2 Add your bag to the water and agitate it with your hands or a wooden spoon.
Note: When felting by hand, there is no need to put your knitted bag inside a zippered pillowcase or lingerie bag.
3 Keep checking to see if it has felted. Some yarns felt quickly, and others take a couple tries.
4 Stop when the bag looks felted. It should have a dense feel, and the stitches should be barely visible, if visible at all. If the bag is felted enough at this point, go to step 6.
5 If the bag is not felted enough and the water is cooling, squeeze the excess water from the bag and refill the sink or tub with hot water and soap. Agitate the bag in the water again. Do this as many times as needed until it is shrunk and has a dense fabric.
6 Rinse the knitted bag in cool water. Squeeze out the excess water and roll the bag in a towel to get even more water out.
7 Form your knitted bag to the desired shape while it is still wet. Stuff it with plastic bags to help shape it, if desired, and set it on a towel to air dry.
8 Go to Finish After Felting.

Finish After Felting
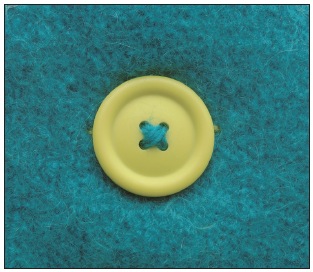
1 When your bag is completely dry, make a buttonhole by cutting a slit on one side of the bag at the base of the handle strap—about 11⁄2 inches below where the shaping begins—that is about 1⁄4 inch shorter than the diameter of your button.
2 Finish the buttonhole using buttonhole stitch in contrasting yarn. (Go here for directions on finishing a buttonhole with buttonhole stitch.)
3 Sew the button on the inside of the opposite handle to correspond with the buttonhole.