Chapter 13. Print Output
The preceding chapter considered the issues of color management and how to maintain color consistency between digital devices, while this chapter deals with the process of creating prints from your images. Photographers reading this book will probably own a color desktop printer and the print quality that you can get from the latest inkjets has improved enormously over the last decade. It is therefore important to have a good understanding of the Photoshop Print and system print dialog interfaces and how to configure the settings to obtain the best quality prints. There are other important issues to address here too, such as how to use soft proofing to anticipate as best you can how the colors will actually be reproduced in the final print.
Rather than go into all the details about different print processes, the different ink sets and papers that you can choose from, I have pared this chapter down to concentrate on just the essentials of inkjet printing. These other topics have been elaborated upon in a joint book I wrote with Jeff Schewe called
Adobe Photoshop CS4 for Photographers: The Ultimate Workshop, which is also due to be updated soon after this book comes out in print. However, one of the most important things you need to do before making a print is to sharpen the image before sending it to the printer. So to start with we are going to look at print output sharpening.
Print sharpening
Earlier in Chapter 4, I outlined how you can use the Detail panel sharpening sliders in Camera Raw to capture sharpen different types of images. This pre-sharpening step is something that all images require. The goal in each case is to prepare an image according to its image content so that it ends up in what can be considered an optimized sharpened state: the aim is to essentially sharpen each photograph just enough to compensate for the loss of sharpness that is a natural consequence of the capture process.
Output sharpening is a completely different matter. Any time you output a photograph and prepare it for print – either in a magazine, on a billboard, or when you send it to an inkjet printer – it will always require some additional sharpening beforehand. Some output processes may incorporate automatic output sharpening, but most don't, so it is therefore essential to always include an output sharpening step just before you make any kind of print output. The question next is how much should you sharpen? While the capture sharpening step is tailored to the individual characteristics of each image, the output sharpening approach is slightly different. It is a standard process and one that is dictated by the following factors, namely: the output process (i.e. whether it is being printed on an inkjet printer or going through a halftone printing process), the paper type used (whether is glossy or matte) and finally, the output resolution.
Judge the print, not the display
It is difficult, if not impossible to judge just how much to sharpen for print output by looking at the image on a display. Even if you reduce the viewing size to 50% or 25%, what you see on the display bears little or no resemblance to how the final print will look. The ideal print output sharpening can be calculated on the basis that at a normal viewing distance, the human eye resolves detail to around 1/100th of an inch. So if the image you are editing is going to be printed from a file that has a resolution of 300 pixels per inch, the edges in the image will need a 3 pixel Radius if they are to register as being sharp in print. When an image is viewed on a computer display at 100%, this kind of sharpening will look far too sharp, if not down right ugly (partly because you are viewing the image much closer up than it will actually be seen in print), but the actual physical print should appear nice and sharp once it has been printed from the ‘output sharpened’ version of the image. So, based on the above formula, images printed at lower resolutions require a smaller pixel radius sharpening and those printed at higher resolutions require a higher pixel radius sharpening. Now, different print processes and media types also require slight modifications to the above rule, but essentially, output sharpening can be distilled down to a set formula for each print process/ resolution/media type. This was the basis for the research that was carried out by the late Bruce Fraser and Jeff Schewe when they devised the sharpening routines used for Photokit Sharpener (see sidebar) and also elaborated upon in
Real World Image Sharpening with Adobe Photoshop, Camera Raw, and Lightroom (2nd Edition), also by Bruce Fraser and Jeff Schewe (ISBN: 978-0321637550).
A demo version of Photokit Sharpener is available on the DVD and there is also a special discount coupon available at the back of this book which entitles you to a 10% discount. Photokit Sharpener provides Photoshop sharpening routines for capture sharpening, creative sharpening and output sharpening (inkjet, continuous tone, halftone and multimedia/Web). The Camera Raw sharpening sliders are based on the Photokit Sharpener methods of capture sharpening, so if you have the latest version of Photoshop or Lightroom, you won't need Photokit Sharpener for the capture sharpening. If you have Lightroom 2, you will find that the output sharpening for inkjet printing is actually built in to the Lightroom print module. Therefore, if you don't have Lightroom 2, you'll definitely find the Photokit Sharpener output sharpening routines useful for applying the exact amount of output sharpening that is necessary for different types of print outputs and at different pixel resolutions.
High Pass filter edge sharpening technique
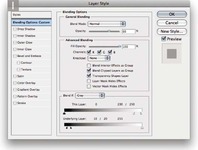
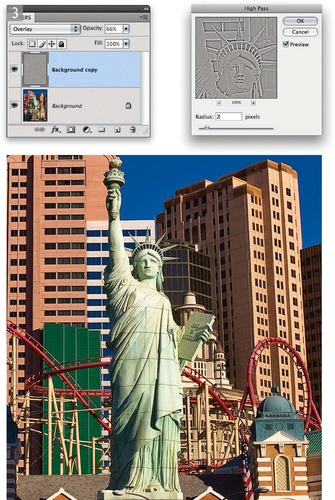
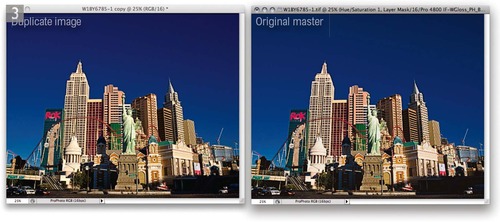
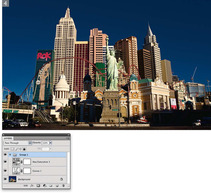
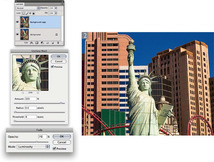
The technique that's described on pages 682–683 shows an example of just one of the formulas used in Photokit Sharpener for output sharpening. In this case I have shown Bruce Fraser's formula for sharpening a typical 300 pixel per inch glossy inkjet print output. You will notice that it mainly uses the High Pass filter combined with the Unsharp Mask filter to apply the sharpening effect. If you wish to implement this sharpening method, do make sure you have resized the image beforehand to the exact print output dimensions and at a resolution of 300 pixels per inch.
 |
| 2. |
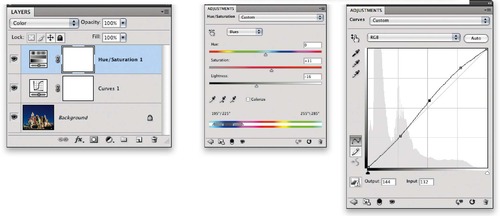
Next, apply the Unsharp Mask filter to the layer using an Amount of 320, Radius of 0.6 and Threshold of 4. Then choose Edit
 Fade, change the blend mode to Luminosity and reduce the opacity to 70%. Fade, change the blend mode to Luminosity and reduce the opacity to 70%.
|
The View menu contains a ‘Gamut Warning’ option that can be used to highlight colors that are out of gamut. The thing is, you never know if a highlighted color is just a little or a lot out of gamut. Gamut Warning is therefore a fairly blunt instrument to work with, which is why I suggest you use the soft proofing method described here.
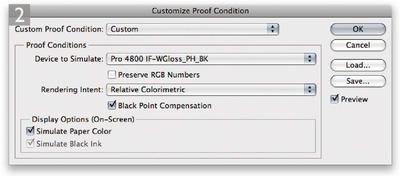
The Customize Proof Condition is also important because when it is active and applied to an image, the Photoshop Print dialog can reference the soft proofed view as the source space. This means you can use the Customize Proof Condition to select a CMYK output space and the Photoshop Print dialog allows you to make a simulated print using this proof space.
Soft proof before printing
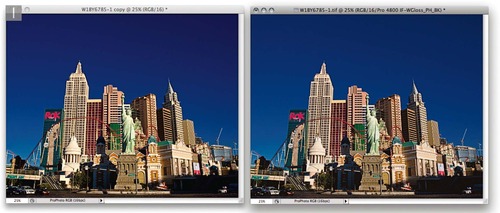
Color management can do a fairly good job of translating the colors from one space to another, but for all the precision of measured targets and profile conversions, it is still essentially a dumb process. When it comes to printing, color management can usually get you fairly close, but it won't be able to interpret every single color or make aesthetic judgements about which colors are important and which are not, plus some colors you see on the computer display simply can't be reproduced in print. This is where soft proofing can help. If you use the Customize Proof Condition dialog as described here, you can simulate pretty accurately on the display how the print will look when printed. Soft proofing shows you which colors are going to be clipped and also allows you to see in advance the difference between selecting a Perceptual or Relative Colorimetric rendering intent. All you have to do is to select the correct profile for the printer/paper combination that you are about to use, choose a rendering intent and make sure ‘Black Point Compensation’ plus the ‘Simulate Paper Color’ (and by default simulate black ink) are checked.
Making a print
The print menu items can be accessed via the File menu and are fairly straightforward. We now have just two Photoshop Print options File
 Print… (
 ), which takes you directly to the Photoshop Print dialog and the File
 Print One Copy command (
 ). You can use ‘Print One Copy’ should you wish to make a print using the current configuration for a particular image, but wish to bypass the Photoshop Print dialog.
 Print… (
 ), which takes you directly to the Photoshop Print dialog and the File
 Print One Copy command (
 ). You can use ‘Print One Copy’ should you wish to make a print using the current configuration for a particular image, but wish to bypass the Photoshop Print dialog.
The big news is that the print workflow has been refined in CS5 to make the print process more consistently repeatable as well as more consistent between operating systems. To start with, the operating system ‘Page Setup’ option has been removed from the File menu and is now accessed solely within the Photoshop Print dialog via the Print Settings button, from where you can now manage all the remaining operating system print driver settings.
The net result is that by incorporating both the Mac and PC operating systems into the Photoshop Print dialog, this also makes the process of scripting and creating actions more reliable. Previously, the vagaries of the operating system print dialogs meant that it was not always possible to write print output actions that could work reliably on another system. With these new improvements to the Photoshop Print workflow, the Photoshop print process can be made more consistent.
Photoshop Print dialog
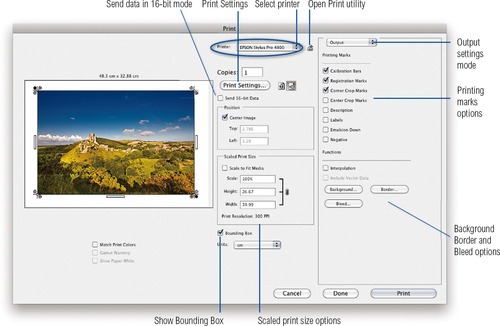
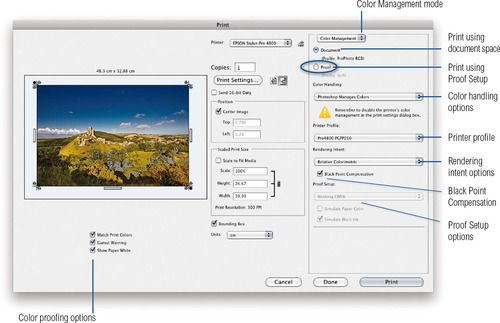
When you choose ‘Print…’ from the File menu, Photoshop takes you to the Photoshop Print dialog (Figure 13.1), where we shall start by looking at the printer selection, print scaling and output settings.
Printer selection and print scaling
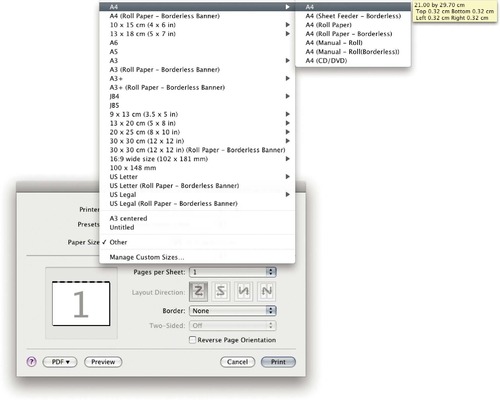
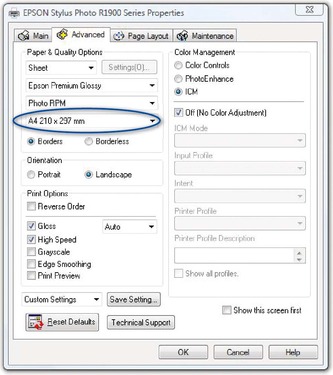
If you have just the one printer connected to your computer network, this should show up in the Printer list by default (circled in Figure 13.1). If you have more than one printer connected you can use this menu to select which printer you wish to print to. Below this are the Print Settings and print orientation buttons. This is where you click to open the operating system print driver dialog for Mac or PC and select a paper size to match the paper or media you wish to print to. So for example, if you look at Figure 13.2, you see the Mac OS dialog where you can select the printer model and appropriate paper size. Ditto, Figure 13.3 shows a Windows Vista dialog, where in the Advanced panel section you can go to the paper size menu (circled) and do the same. Once you are done, you can click on the Save or OK button to return to the Photoshop Print dialog.
When the ‘Show Bounding Box’ option is enabled in the Photoshop Print dialog, you can position the image anywhere you like, by dragging inside the box, or scale it by dragging the bounding box handles. In the Position section you can choose to center the photo, or position it precisely by entering measurements for the Top and Left margins. In the Scaled Print Size section, if the image overflows the currently selected page size, you can choose ‘Scale to Fit Media’. This automatically resizes the pixel resolution to fit the page and the Print Resolution PPI adjusts. You can also enter a specific Scale percentage, or Height and Width for the image, but I don't advise you to do this unless you absolutely must. It is always much better to resize the image in Photoshop first and print using a 100% scale size.
Output settings
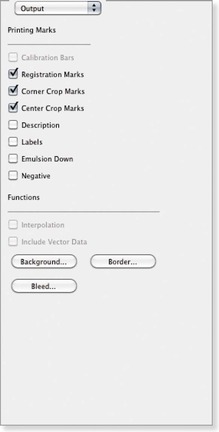
To adjust the Output settings, make sure that ‘Output’ is selected from the top menu (see the close-up view in Figure 13.4). Here, you can select any extra items you wish to see printed outside the image area. When ‘Calibration Bars’ is checked, this prints an 11-step grayscale wedge on the left and a smooth gray ramp on the right. If you are printing CMYK separations, tint bars can also be printed for each plate color and the Registration Marks can help a printer align the separate plates. The Corner and Center Crop Marks indicate where to trim the image and the Bleed button (Figure 13.5) determines how much the crop marks are indented. Checking the Description box prints any text that was entered in the File
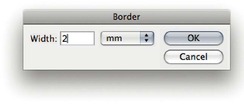
 File Info box Description field and check the Labels box if you want to have the file name printed below the picture. Click on the Background… button to print with a background color other than paper white. For example, when sending the output to a film writer, you could choose black as the background color. Click on the Border… button (Figure 13.6) to set the width for a black border, but just be aware that the border width can be unpredictable. If you set too narrow a width, the border may print unevenly on one or more sides of the image.
 File Info box Description field and check the Labels box if you want to have the file name printed below the picture. Click on the Background… button to print with a background color other than paper white. For example, when sending the output to a film writer, you could choose black as the background color. Click on the Border… button (Figure 13.6) to set the width for a black border, but just be aware that the border width can be unpredictable. If you set too narrow a width, the border may print unevenly on one or more sides of the image.
 |
| Figure 13.5 |
To apply some of the Output options mentioned here, you must be using a PostScript print driver and you should also allow enough border space surrounding the print area to print these extra items. For example, when the ‘Include Vector Data’ option is unchecked, it will rasterize the vector layer information, such as type at the image file resolution. However, if it is checked, it rasterizes the vector information (such as type) much crisper at the full printer resolution, provided that you are outputting from a PostScript RIP.
Image data is normally sent to the printer in 8-bit, but some more recent inkjet printers such as the Canon ipf5000 are now enabled for 16-bit printing (providing you are using the correct plug-in and the ‘Send 16-bit data’ box is checked). There are certain types of images that may theoretically benefit from 16-bit printing and where using 16-bit printing may avoid the possibility of banding appearing in print, but I have yet to see this demonstrated. Let's just say, if your printer is enabled for 16-bit printing, Photoshop now allows you to send the data in 16-bit form.
Color Management
Now let's look at the Color Management settings for the Photoshop Print dialog (Figure 13.7). The source space can be the document profile (which in this case was ProPhoto RGB) and if you click on the Proof button it defaults to using the current CMYK workspace or can use whatever Custom Proof Condition you might have set (see page 685).
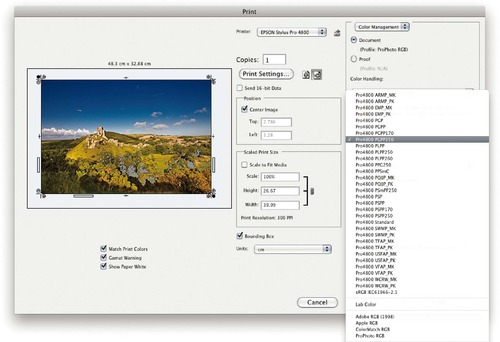
Next we come to the Color Handling section. If printing from an RGB image, there are two options. The ‘Printer Manages Colors’ option can be used if you want to skip to the Photoshop Print dialog settings and let the printer driver manage the color output. However, if you want the most print control, you should really select the ‘Photoshop Manages Colors’ option (as shown in Figure 13.7). When this option is selected you can use the Photoshop Print dialog to manage the print pipeline. First of all you will need to mouse down on the Printer Profile menu, where you'll see a list of profiles. Here you need to select the printer profile that matches the printer/paper you are about to print with. It used to be the case that canned profiles were frowned upon as being inferior, but with the latest Epson printers at least, the printers themselves are very consistent in print output and the canned profiles work well, so you would be advised to use their own brand profiles for the papers that their printers support. In Photoshop CS5, selecting the printer in Print Settings also filters the ICC profiles that are associated with the printer, so these now appear at the top of the profile list (see Figure 13.8). Also, the printer selection and profiles are sticky per document, so once you have selected a printer and associated print settings, these are saved along with everything else in the document.
 |
| Figure 13.8 |
The Color Management Color Handling options no longer include an option for printing with ‘No Color Management’. This is due to the fact that updating the Mac code to Cocoa 64-bit has made it problematic to retain the ‘No Color Management’ print route. This option was required for producing neutral target prints intended for reading and generating ICC profiles. However, do check out
labs.adobe.com for news of a future ‘no color management’ print utility.
The Rendering Intent can be set to Perceptual, Saturation, Relative Colorimetric or Absolute Colorimetric. For normal RGB printing the choice boils down to two settings. Relative Colorimetric is the best setting to use for general printing as it will preserve most of the original colors. Perceptual is a good option to choose when printing an image where it is important to preserve the detail in saturated color areas, or when printing an image that has a lot of deep shadows, or when printing to a smaller gamut output space, such as a fine-art matte paper. Whichever option you choose, I advise you to leave ‘Black Point Compensation’ switched on, because this maps the darkest colors from the source space to the destination print space. Black Point Compensation preserves the darkest black colors and maximizes the full tonal range of the print output. The Print dialog preview can be color managed by checking the ‘Match Print Colors’ option. Admittedly, the preview could be made a bit bigger, but it does at least give you some indication of how a photograph will print and you will notice that as you pick a printer profile or adjust the rendering intents, you can preview on-screen what the printed colors will look like. When proofing an RGB output in this way you can also check the ‘Show Paper White’ option to see an even more accurate simulation, one that takes into account the paper color of the print media. There is even a ‘Gamut Warning’ option, but as I pointed out on page 684, this isn't as useful as using the soft proofing method described earlier to gauge your print output.
When you use soft proofing to simulate a print output your initial response can be ‘eek, what happened to the contrast?’ This can be especially true when you also include ‘Simulate Paper Color’ in a soft proof setup. If we assume that you are using a decent display and that it has been properly calibrated, the soft proof view should still represent an accurate prediction of the contrast range of an actual print, compared with the high contrast range you have become accustomed to seeing on an LCD display. One solution is to look away as you apply the soft proof preview so that you don't notice the sudden shift so much in the on-display appearance.
Proof Setup in the Print dialog
Earlier, in the ‘Soft proof before printing’ section (page 684), I described using the soft proof setup to predict how an RGB photograph might actually print via an inkjet or when printed in CMYK or other print output space. If the soft proofing is active for a document window and you check the Proof button in the Photoshop Print dialog (circled in Figure 13.7), this can become the new source space to print from (providing you also have ‘Current Custom Setup’ selected in the Proof Setup section below). You can therefore use a custom CMYK setting in the Customize Proof Condition dialog and then use this as the source space when printing to any profiled printer output. Alternatively, you can check the Proof button in the Photoshop Print dialog and select ‘Working CMYK’ in the Proof Setup menu. ‘Simulate Black Ink’ is always checked by default, but you can also include ‘Simulate Paper Color’ when creating a proof print.
When ‘Simulate Paper Color’ is selected, the whites may appear duller than expected. This does not mean the proof is wrong, rather it is the presence of a brighter white border that leads to the viewer regarding the result as looking inferior. To get around this try adding a white border to the outside image you are about to print. When the print is done, trim away the outer ‘paper white’ border so that the eye does not get a chance to compare the dull whites of the print with the brighter white of the printing paper used.
Proof print or aim print?
Basically, if you are in a situation where someone asks you to produce RGB inkjet prints that simulate the CMYK print process, you can use the ‘Proof’ option to create what are sometimes referred to as ‘cross-rendered aim prints’. This is not quite the same thing as a certified contract proof print, but a commercial printer will be a lot happier to receive prints made in this way, rather than prints made direct from an RGB image using the full color gamut of your inkjet printer. As I say, these will not be official ‘contract proof’ prints, but even so, they are accepted by many repro houses as a welcome guide to how you anticipate the final print image should look.
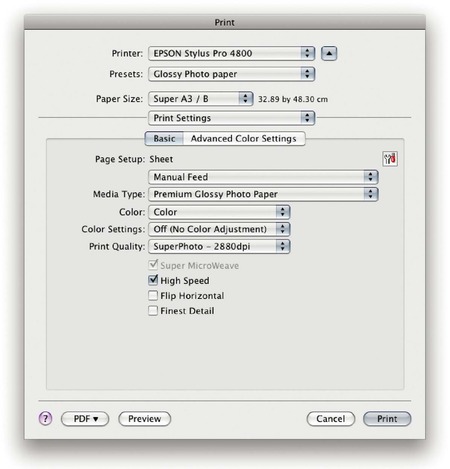
In the Print Settings, a higher print resolution will produce marginally betterlooking prints, but take longer to print. The ‘High Speed’ option enables the print head to print in both directions. Some people prefer to disable this option when making fine quality prints, but with the latest inkjet printers the ‘High Speed’ option shouldn't give you inferior results.
Configuring the Print Settings (Mac and PC)
The following dialogs show the Mac and PC Print Settings dialogs for the Epson 4800 inkjet printer (Figures 13.9 and 13.10). In both the examples shown here, I wished to produce a landscape-oriented print on a Super A3 sized sheet of Epson glossy photo paper using the best quality print settings and with Photoshop handling the color management.
 |
| Figure 13.10 This shows the Windows Vista Print Settings for the Epson 4800 printer. Again, you will need to use the Media Type menu to select the correct paper to print with. For the Print Quality, select a high quality setting, such as the Max Quality setting selected here. For the Color settings mode you will need to look for the advanced or custom options. In this dialog I needed to check the Custom button, which enabled the menu below, where I could select the ‘Off (No Color Adjustment)’ option. If you look back at the Figure 13.3 example, you'll notice that for the Epson R1900 printer I had to go to the Advanced panel mode, click the ICM button and check the ‘Off (No Color Adjustment)’ option. Lastly, click on the OK button to return to the Photoshop Print dialog from where you can click on the Print button to make a print. |
The system print settings dialog options will vary a lot from printer to printer. As well as having Mac and PC variations, you might have a lot of other options available to choose from and the printer driver for your printer may look quite different. However, if you are using Photoshop to manage the colors, there are just two key things to watch out for. You need to make sure you select the correct media setting in the print settings and that you have the printer color management turned off. This will mean selecting ‘No Color Adjustment’ in the Print Settings or Color Management sections and ignoring any of the other options you might see such as: ‘EPSON Vivid’ or ‘Charts and Graphs’.
Saving the print presets
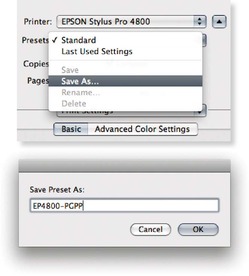
Once you have established the operating system print dialog settings shown here for a particular printing setup, it makes sense to save these settings as a preset that can easily be accessed every time you want to make a print using the same printer and paper combination. To do this, apply all the required page setup and print settings, then pull down the Print Presets menu (see Figure 13.11), choose ‘Save As…’ and give the setting an appropriate name.
Print output scripting
Up till now it has not been possible to make the combination of the Photoshop Print dialog and system print dialog settings a scriptable process. In the past, the Page Setup… settings had to be configured first,
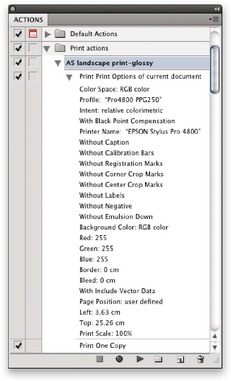
before the Photoshop Print dialog, and that made scripting rather difficult and error-prone. In Photoshop CS5 all the system print settings come after the Photoshop Print dialog. This means it is now possible to record a Photoshop action in which you select the printer model, the media size, type and orientation plus the system print settings, followed by the Photoshop Print dialog settings. Once recorded, you can use this action to make print outputs with the click of a button (Figure 13.12). You can also convert such actions into Droplets (as shown in Figure 13.13), where you can simply drag and drop a file to a droplet to make a print (I'll be discussing actions and droplets later in Chapter 15).
 |
| Figure 13.12 |
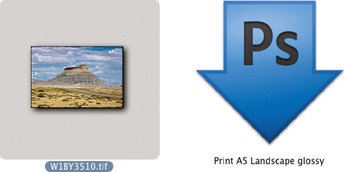 |
| Figure 13.13 You can automate the print process further. If you convert an action like the one shown in Figure 13.12 into a droplet, you can make it possible to simply drag and drop files to the droplet to initiate the desired print output. This allows you to bundle the printer model selection, the page setup, the media type and Photoshop print settings all into the one droplet/action. |
Ensuring your prints are centered
We would all love Photoshop printing to be simpler, but unfortunately there are no easy solutions and this is not necessarily all Adobe's fault either. The problem is that you have a multitude of different printer devices out there and in addition to this, you have different operating systems, each of which has its own protocols as to how the system print dialogs should be organized.
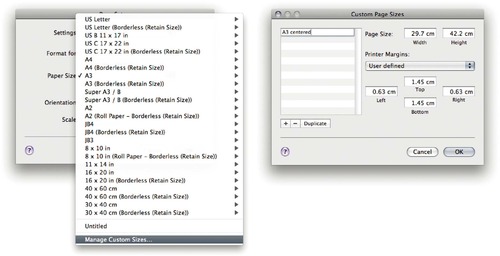
Making sure a print is centered is just one of several problems that require a little user intervention. If you center a print in the Photoshop Print dialog, but it doesn't print centered, this is probably due to the default margin settings being uneven. The reason for this is that some printers require a trailing edge margin that is wider than all the other margins. However, as I have shown below in Figure 13.14, you can overcome this by creating your own custom paper sizes and margin settings.
Custom print profiles
As I have mentioned already, the profiles that are shipped with the latest inkjet printers, and especially those for the Epson models, can be considered reliable enough for professional print quality work (providing you are using the manufacturer's branded papers). If you want to extend the range of papers you can print with, then you will either have to rely on the profiles supplied by these paper companies or consider having a custom printer profile built for each paper type.
One option is to purchase a complete calibration kit package such as the X-Rite Eye-One Photo with ProfileMaker software. The other alternative is to get an independent color management expert to build a profile for you. There are quite a few individuals who are able to offer these services, such as Andrew Rodney, who is based in the US (www.digitaldog.net). If you refer to the back of this book, you'll see that a company called
colourmanagement.net are also offering a special coupon to readers that entitles you to a discount on their remote printer profiling services.
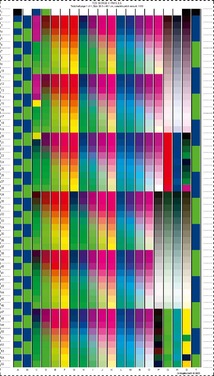
Remote profiling is a simple process. All you have to do is to follow the link to the provider's website, download a test target similar to the one shown in Figure 13.15 and follow the instructions closely when preparing a target print for output. The system print dialog settings used to produce the target print should also be saved so that these exact same print settings can be used again when you then follow the steps outlined on pages 690–695.
You then send the printed target to the supplied address, where the patch readings are used to build an ICC profile that represents the characteristics of a particular paper type on your individual printer. You'll then usually receive back an ICC profile via email.
I don't have room to go into too much detail here, but on the Mac system at least, if you are familiar with using the ColorSync Utility, you can go to the Devices section, select a canned profile, click on the Current Profile name, choose ‘Other…’ and select a custom profile to replace it with. This will promote a custom profile to appear in the filtered profile list for that printer.
The important points to bear in mind are that you must not color manage the target image when printing. The idea is to produce a print in which the pixel values are sent directly to the printer without any color management being applied. With previous versions of Photoshop you could do all this directly within the Photoshop Print dialog. However, Photoshop CS5 no longer has a ‘No Color Management’ print option, but as I mentioned earlier on page 692, you should look out for a special ‘no color management’ print utility coming soon from Adobe that will allow you to print out non-color managed print targets for custom profiling.
