The All-Stars
We start with a group of poses that are helpful for a number of joints. They reappear in each of the later chapters. Taken together, these All-Stars make up an excellent assortment of asana for people who have mild generalized arthritis or who want to avoid acquiring any significant joint limitations in the future. For those who would like a Sanskrit name for this group, we can suggest Mukhya Artha (Primary Purpose) or Sarva Artha (All Purpose).
Purpose: To establish well-aligned posture and stillness that will apply to all standing poses.
Contraindications: Severe imbalance, plantar fasciitis.
Props: None.
Avoiding pitfalls: Because one’s posture is habitual, extra care is needed to refine this most basic standing pose. Use a mirror to observe your alignment from the side and front. Common errors: pushing the pelvis too far forward, flattening the lower back, slumping the chest. Try to maintain a vertical plumb line through your whole body, from ankles to knees to hips to shoulders to ears. Respect the natural curves of the spine.

1. Stand with your feet hip-width apart and parallel, legs straight, arms hanging at your sides.
2. Balance the weight as evenly as you can between the four corners of your feet (see page 235): the inner heel, the mound of the big toe, the little toe mound, and the outer heel.
3. Lift the inner arches by raising your toes, then retain the arch lift as you lower your toes.
4. Take a breath to enliven your body.
5. Firm your leg muscles and bring the tops of your thighs back until they are over your ankles. You are pushing your hips back behind you, but actually this does not distort your posture.
6. Widen your hips and thighs by abducting them away from each other without changing your feet or lower legs.
7. Keep your thighs back and your pelvis wide, then curl your tailbone down to lengthen your spine.
8. Firm and lift your lower abdominal muscles.
9. Stretch upward from your pelvis through your torso and neck, so that your whole spine is long. If your lower back feels too arched, pull back through the sides of your waist.
10. Use the muscles between your shoulder blades to gently draw your shoulders back.
11. Balance your head lightly over the top of your spine. Look straight ahead. Let your arms hang by your sides. Be fully present in all parts of your body; create both a solid foundation and an upward expansion. Embody the dignity of the mountain this pose is named for. How long you hold the pose is up to you.
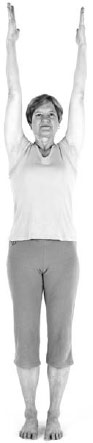
TADASANA URDHVA HASTASANA (Mountain Pose with arms reaching up)
1. Inhale and lift your arms out to the side and up to your ears. Make a sweeping movement that stretches your ribs and sides. As you move, the tops of the arms stay close in to the shoulder joints, but the hands and forearms reach out.
2. Exhale as you lower the arms back to your sides.
3. Repeat this several times, following the natural rhythm of your breath.
TADASANA URDHVA BADDHA HASTASANA (arms up, hands clasped)
1. Repeat the sweeping movement as above to raise your arms.
2. Interlace your fingers and turn the palms up.
3. Extend strongly and equally down into the earth and up to the sky.
4. Set the humeri firmly into the shoulder sockets and the elbows as straight as possible.
5. Breathe easily and fully.
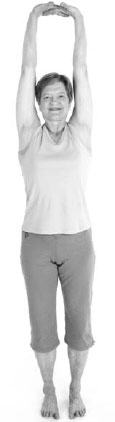
This pose provides a full stretch of the shoulders, arms, and hands.
Purpose: To learn pelvic and leg alignment and stretch Achilles tendons and plantar fasciae; to extend and flex the hips and knees.
Contraindications: Achilles tendonitis or bursitis, torn meniscus, plantar fasciitis or anterior cruciate ligment.
Props: A yoga mat and wall.
Avoiding pitfalls: Make sure the pelvis stays square to the wall, the feet parallel, the forward knee over the ankle, and the back thigh lifted away from the floor. Bear your weight equally over the four corners of the feet and lift the arches.
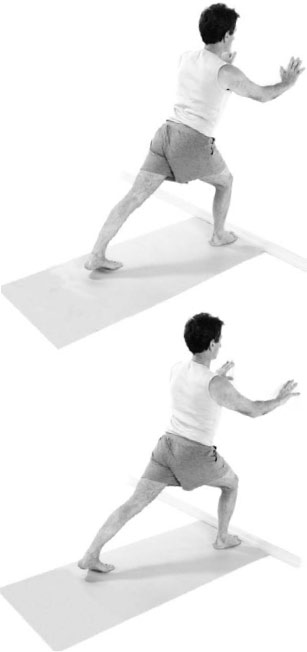
1. Stand facing a wall and place your hands on the wall at a comfortable height, elbows bent.
2. Step the left foot back, keeping both feet and your pelvis facing directly toward the wall.
3. Bend the forward right knee over the ankle. The back heel will be up off the floor.
4. Roll your upper arms and shoulders back.
5. Take a deep breath as you lift your spine up and firm the leg muscles.
6. Lean slightly toward the wall and widen your upper thighs and buttocks apart.
7. Curl the back of the pelvis down and the front part up, drawing your belly in and up.
8. Firmly anchor in your pelvis, bring your shoulders and head back directly over your hips, and shift more weight onto the back foot to lower the heel toward the floor. Hold the back thigh lifted away from the floor.
9. Maintain a balance of strength and expansion.
10. To intensify: Place the toes of the front foot up the wall.
11. Step your left foot as far back as you can while maintaining your hips facing squarely toward the wall.
12. Isometrically pull your hands down the wall (without moving them) to lift your chest. Look up.
13. If you feel steady enough, lift your arms up alongside your head as in Tadasana Urdhva Hastasana. Reach up vigorously!
14. Exhale and return to Tadasana, then repeat on the other side.
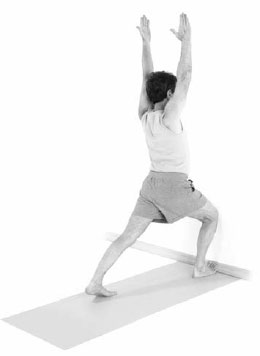
The iliopsoas muscle, a deep hip flexor, often contributes to lumbar stiffness. This pose stretches it.
Purpose: To extend the spine and stretch the chest and hamstring muscles. The partial inversion in the full pose also strengthens the arms and thoracic spine.
Contraindications: Acromioclavicular dysfunction, rotator cuff tear, thoracic outlet syndrome, spondylolisthesis, severe osteoporosis, carpal tunnel syndrome, Dupuytren’s contracture.
Props: A yoga mat, blanket, wall, and tabletop.
Avoiding pitfalls: Retract the shoulder blades firmly onto the back ribs; do not let the upper arms sag downward. Roll the biceps upward to maintain outward rotation of the upper arms. Balance the hands and feet on their four corners. Keep the knees bent if you are stiff, in order to be able to tip the pelvis so the spine can lengthen.

1. Kneel on a blanket with your shins hip-width apart.
2. Walk your hands forward far enough so that your spine and arms stretch forward at a diagonal. Your hips remain over your knees, your head between your arms.
3. Lift onto your fingertips as shown. This helps to keep your arm muscles active.
4. Arch your sitting bones back and up and apart.
5. Firm your belly and extend forward through your spine and arms.
6. Adjust your upper arms well back and into the shoulder joints.
7. Lift your upper arms with elbows straight.
8. Breathe and soften on the inside as you continue reaching forward with your arms.
9. Walk your hands back to come out of the pose.
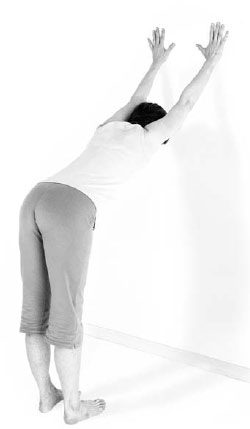
1. Place your hands on the wall above eye level, with your index fingers pointing up and your arms shoulder-width apart.
2. Place your feet hip-width apart and parallel.
3. Straighten your arms and move your chest a little toward the wall.
4. Move your upper arms more securely back into the shoulder joints.
5. Keep your elbows straight and your upper arms light but active.
6. Bend forward through your trunk until there is one long diagonal line from hands to hips. You can step back as needed.
7. Elevate your sitting bones and separate them, which will make an arch in your lower back.
8. Draw in your belly and lengthen the tailbone back.
9. Let the thoracic spine soften downward without your arms collapsing.
10. If your hamstring muscles allow, do the pose with straight legs. If your hamstrings are tight, your knees can bend slightly to allow the pelvis to tilt properly. Find the degree of effort in extending yourself that feels good, using your breath.
11. After several breaths, come back up as you inhale, and step toward the wall.
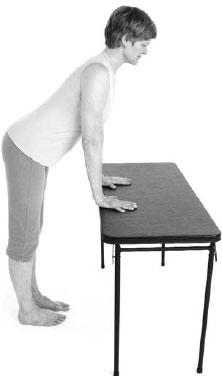
1. Place your hands shoulder-width apart on a tabletop, with your index fingers pointing forward.
2. Tighten the muscles of your arms and secure your arms into the shoulder joints as you gently lower your chest.
3. Inhale, become light inside your torso.
4. Step back enough to fully extend your arms and bend forward with your entire trunk, bending your knees slightly to ensure that you can lengthen your spine. Stretch your arms fully.
5. Arch your sitting bones upward and separate them.
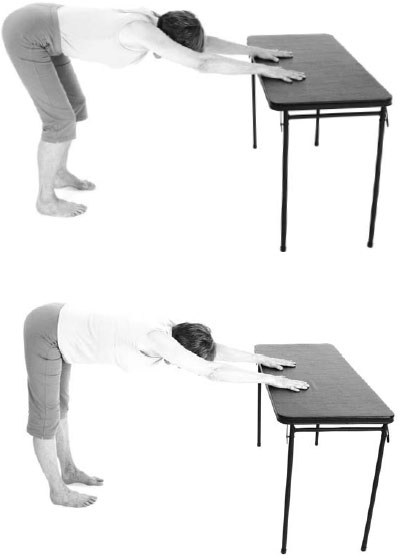
6. Lengthen the tailbone back and firm your lower belly.
7. Lower your upper chest toward the floor without dropping your arms.
8. Stretch fully from your core out through your arms, legs, and spine. If you can, straighten your legs.
9. To come out of the pose, step toward the table and return to Tadasana.

1. Come down onto your hands and knees on the mat. Walk your knees back a bit farther than your hips. Place your hands at the front of the mat, shoulder-width apart, with your fingers separated and the index fingers pointing forward.
2. Firm your arm muscles, press your fingers down, and soften your chest down over the tops of the arms so that the upper arms connect solidly into the shoulder sockets.
3. Secure your shoulder blades in toward your spine.
4. Raise your heels, putting the plantar surface of your toes on the mat, and make space in the sides and front of your entire torso.
5. Inhale, lift up your knees and hips, elevating the sitting bones back, up, and apart.
6. As you exhale, extend your arms and spine, pulling your legs back still farther. If your hamstring muscles are very tight, bend your knees to allow your pelvis to tilt properly, and gradually work to straighten your knees.
7. Create a slight concavity in the lumbar and thoracic spine by reaching upward with the sitting bones.
8. As you become more flexible, you will be able to pull the thighs back with straight knees, and eventually lower your heels.
9. Once you have created the full pose, extend with sensitivity through all parts of the body, from the core to the periphery. Charge the body with your intention to open and stretch.
10. To release, bring your knees to the floor.
Purpose: To strengthen and stretch the hips, legs, and spine.
Contraindications: Imbalance, plantar fasciitis, anterior cruciate tear, patellofemoral arthralgia, Dupuytren’s contracture.
Props: A yoga mat, a wall, and a block.
Avoiding pitfalls: The back leg may collapse, the front knee may misalign. Use a block for the hand that goes to the floor if your hips are stiff.
1. Stand with your back to a wall, raise your arms to shoulder height, and step your feet apart the same width as your outstretched arms.
2. Turn the right foot and leg parallel to the wall but do not turn the torso.
3. Inhale, firm your legs and lengthen up through the spine. As you exhale, bend your right knee until it is over the ankle. Point the knee toward the second toe.
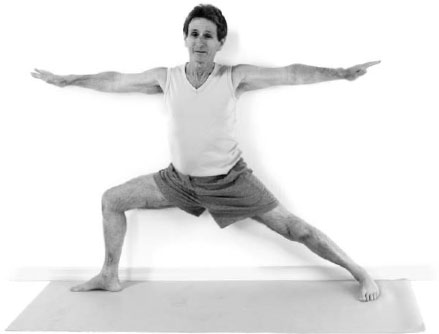
4. As you inhale again, incline your torso over your right hip and rest your right forearm on your thigh. Your left hand rests on your hip.
5. Stabilize the right leg in this position.
6. Anchor the left foot. Move your left thigh back toward the wall, revolving the entire thigh slightly inward at first, toward the midline.
7. Curl your tailbone toward the left heel, tighten your lower belly, and now rotate your left knee outward to face away from the floor. These actions will increase your power and stability.
8. From the pelvis, at the center of the pose, stretch in all directions, pulling your shoulders back toward the wall. Revolve your head to look up.
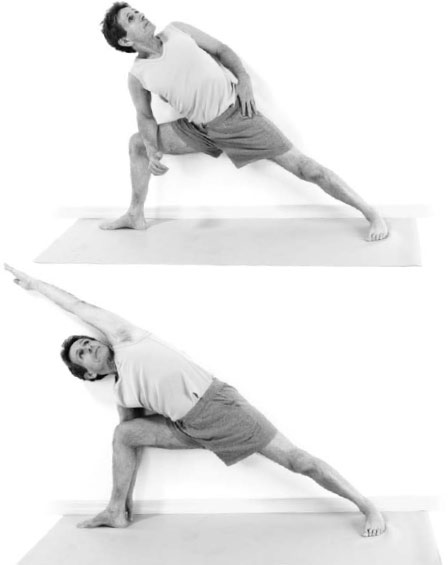
TO INTENSIFY:
9. Place your right fingertips or palm on the floor or on a block between your right foot and the wall. Extend your left arm up alongside your left ear, as in Tadasana Urdhva Hastasana, continuing the diagonal line of your left leg.
10. Notice the balance of strength and expansion in this exhilarating pose.
11. Inhale as you come back up. Repeat on the other side. You can stand in Tadasana before you repeat the pose on the other side if you wish, to rest and feel the effects.
Purpose: To strengthen and stretch the legs, hips, and spine.
Contraindications: Imbalance, pubic fracture.
Props: A yoga mat, a wall, and a block.
Avoiding pitfalls: The wider your stance, the more freedom you will have in the hips, but do not go so wide as to lose stability. The knees may want to bend and the upper body tends to shift forward. Keep your legs straight, and your torso lined up directly above your legs and parallel to the wall behind you.
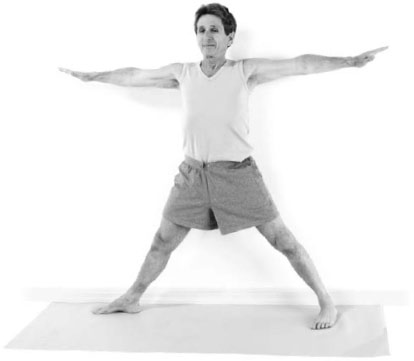
1. Stand with your back to the wall, raise your arms to shoulder height, and step your feet apart the same width as your outstretched arms. Turn the right foot and leg parallel to the wall, but face your torso straight out from the wall. Internally rotate the left foot thirty degrees toward the right.
2. With your arms remaining outstretched, incline your torso to the right without bending it. Your hips will shift to the left.
3. Inhale, firm your legs to keep them straight, and lengthen out through the spine. Exhale and shift your hips more to the left. Extend your torso out over your right leg, bending at the hips, not the waist.
4. Distribute your weight more or less equally on both feet.
5. Keep both sides of the torso long and parallel. Avoid collapsing down, but extend the spine horizontally as you widen your thighs. Curl your tailbone down and lift your belly in and up.
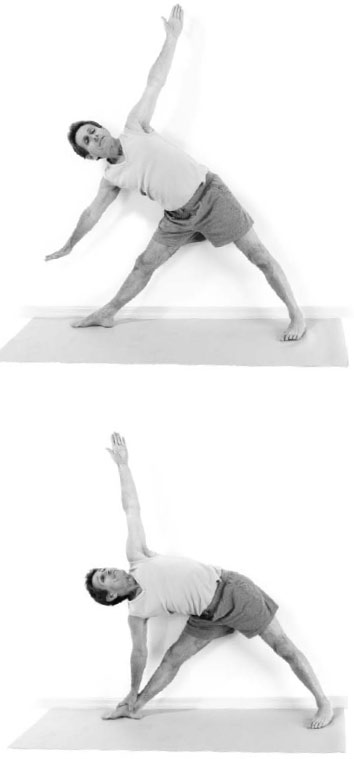
6. Place your right hand down on your ankle or on a block. Stretch the left arm straight up. If you are unsteady, lean your hip and one or both shoulders lightly against the wall.
7. Roll your left shoulder, left ribs, and left waist back and up, remaining steady in your legs. Gaze up at your left thumb.
8. Radiate energy out through all your limbs and your spine. Stretch side to side as well as head to tail.
9. Inhale and come back up, with your arms still outstretched.
10. Repeat on the other side. You can stand in Tadasana before repeating the pose on the other side if you wish. This pose builds stamina and focus, as well as stretching the hips and legs.
Purpose: To stretch the adductors, hamstring muscles, gluteus maximus, and spine, and invert the upper body. This wide-open standing pose helps to develop stamina and self-assurance.
Contraindications: Imbalance, ankle sprain.
Props: A yoga mat and two blocks.
Avoiding pitfalls: Balance the weight on the four corners of the feet; avoid tipping your hips back. Breathe with ease and fullness. Even when the arms are hanging down, pull them up into the shoulder sockets.
1. Extend your arms out to the sides at shoulder height. Step your feet apart to the width of both outstretched arms. Make sure the feet are parallel. Press the four corners of each foot down, but lift your arches.
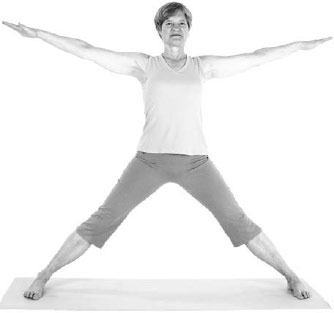
2. Inhale, firm your legs, and stretch up through the spine. Exhale, bend forward, retaining the long spine, and reach straight down to touch the floor or two blocks. You may bend your knees if the hamstring muscles are very tight. It is important to tip the pelvis forward from your hips, not by rounding your waist.
3. Once your hands are on the floor or the blocks, inhale, extend your legs and sitting bones back, and draw your spine forward. Exhale and release your spine and neck. Repeat this breathing/extending movement several times. Then hang forward and down, totally releasing your neck and head but keeping your arms pulled up into the shoulder sockets.
4. To intensify: Move your shoulder blades in toward the spine and toward your lower back. Take hold of both ankles and pull your entire torso farther down. Breathe as you stretch your back fully.
5. To come out of the pose, step your feet a bit closer to each other, bring your hands to your hips, then inhale and stretch your head and chest forward to come up strongly, retracting your shoulder blades as you do so.
6. Step your feet together into Tadasana.
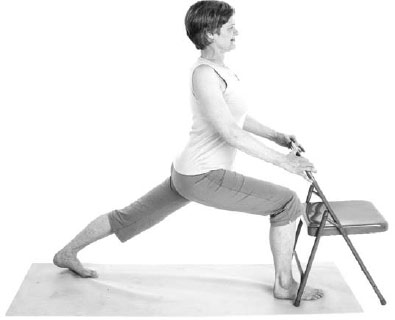
Purpose: To extend the hip, strengthen the quadriceps, stretch the iliopsoas, pectoralis, latissimus dorsi, and teres major muscles, and promote balance.
Contraindications: Hyperlordosis, spondylolisthesis, spondylolysis, severe lumbar stenosis.
Props: A yoga mat and a chair.
Avoiding pitfalls: Set the pelvis carefully, squarely facing the back of the chair, and keep it that way as you perform the pose. Do not let the back leg droop. Align the front knee with the second toe.
1. Stand facing the back of your chair.
2. Bend the right knee as you step the left foot back. Movement stops when the right shin is vertical.
3. Attentively find the balance between the four corners of the right foot, and the two front corners of the left foot.
4. Lean forward a bit toward the chair, fully stretch your back leg, and firm the muscles from foot to hip.
5. Retain the forward lean, widen the upper thighs and pelvic bones, then lengthen your tailbone down and draw the lower belly in and up to stabilize your pelvis.

6. Bring your torso upright and retract your shoulders back until they are just above your hips.
7. Let go of the chair when ready, and stretch your arms up near your ears. Breathe fully and confidently as you maintain this pose.
Purpose: To strengthen thigh abductors and shoulder adductors, and widen the thighs and pelvis without widening the lower legs. To repair and maintain the hip joints.
Contraindications: Severe hypertension, colostomy, hemorrhoids.
Props: A chair and a belt.
Avoiding pitfalls: Take care in the placement of your legs. Press into the sides of the upper shins firmly enough with your hands to balance the strong outward push with your thighs. Keep breathing!
1. Sit on a firm chair with your legs parallel and hip-width apart.
2. With both hands on one hip and thigh, manually turn the thigh in and broaden the hip to the side.
3. Perform the same action on the other side as well. This adjustment sets your foundation and allows for the actions that follow to be most effective. In Anusara Yoga this is called “Manual Inner Spiral.”See Appendix III for more information about the Inner Spiral.
4. Lean forward and place your hands on the outside of the legs just below your knees. If you have shoulder or arm pain, place a belt to encircle your legs just below the knees instead of using your arms.
5. Widen and retract your sitting bones. Lean forward from your hips, not your waist. Firm all your thigh muscles and inhale as you lengthen out through your spine.
6. As you exhale, push your hands strongly in toward the midline, and press out equally strongly with your thighs. The resisted isometric movement will widen your pelvis, relieving compression in the hips and sacroiliac joints.
Once you are familiar with this action, you can apply it to many poses even without the actual opposing forces.
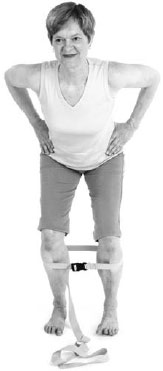
1. Place the belt around your upper shins to maintain alignment of the lower legs.
2. Bend your knees and lean forward slightly, hands on your hips.
3. Strongly widen your thighs, from the hips to the knees, and breathe, keeping your spine long.
4. After several deep breaths, release the action and stand back up.
This pose offers a good opportunity to practice intense effort without holding your breath or becoming agitated. Trust the process of building strength and awareness.
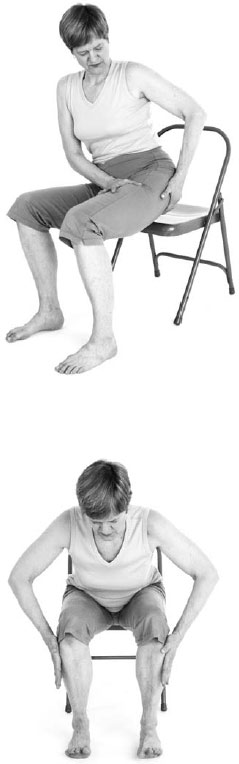
Purpose: To rotate the spine, mobilize its joints, and learn how to stabilize the pelvis while twisting.
Contraindications: Herniated cervical or lumbar nucleus pulposus, spondylolisthesis, spondylolysis, total hip replacement.
Prop: A chair.
Avoiding pitfalls: Avoid overworking the arms and neck to achieve the twist. Keep the pelvis and legs stable and aligned as instructed.
1. Sit sideways in a firm chair without arms, with your right side close to the chair back. Set your legs hip-width apart and parallel, with your knees vertically over your ankles.
2. Firm your leg muscles, manually widen your buttocks and upper thighs as in Pressure Cooker above, then sit tall with awareness of your spine as your central core.
3. Reach your tailbone lightly downward and lift your lower belly to lengthen and stabilize the lower spine.
4. Inhale, lengthen through your whole torso, and retract your shoulder blades together behind you so that the actions of your arms will affect your torso and spine.
5. Exhale, turn to the right, and take hold of the chair in a way that helps you turn more deeply.
6. Coordinate your actions with your breath, inhaling as you lengthen your spine and exhaling as you turn farther. Use the rhythm of your breath to coax more movement through your body.
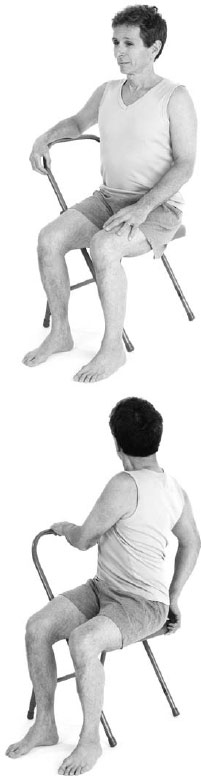
7. To keep your hips and pelvis aligned, pull your left thigh back into the hip socket. This will counteract the normal tendency for the pelvis to turn with the spine. The more strongly you use your arms, the more important it is to retract the shoulders and upper arms to distribute the force of the twist.
8. Return to the center. Prepare to twist to the left by turning to the other side of the chair.
Purpose: To extend the hip and stretch all four of the quadriceps one leg at a time.
Contraindications: Prepatellar bursitis, knee effusion, hyperlordosis.
Props: A chair, one or two folded blankets, and a pad.
Avoiding pitfalls: Keep the pelvis squared to the direction you are facing, do not let one hip go back or forward. Line up each leg from hip to knee to ankle.
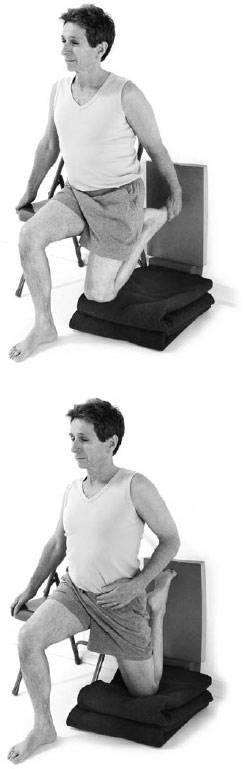
1. Place the back of a chair against a wall, and a folded blanket on the floor beside it. If you have a pad, put it along the wall. Sit on the front left corner of your chair and manually broaden your thighs and hips, as in the Pressure Cooker.
2. Step your right foot forward on the floor until it is under your bent knee and facing straight forward. Bend the left knee, rest it on the folded blanket, and raise your foot up the wall. Use more padding under your knee as needed. Try to align the thigh vertically, with the knee directly under or behind the hip.
3. Firm the muscles of both legs, and widen your sitting bones and upper thighs.
4. Lengthen your tailbone down and pull your belly in and up. The stretch will be more intense the closer your knee is to the wall, and the more you pull the tailbone down.
5. Breathe, and stretch up through your spine as well. Be patient! This stretch will pay off over time.
6. Lean to the right side to free the left leg and change sides.
Purpose: To stretch the hip and outer thigh (iliotibial band), expanding range of motion in a position that keeps the spine elongated.
Contraindications: Cerebrovascular disease, severe hypertension, colostomy, gastric reflux, medial meniscal tear, lateral collateral ligamentous sprain, severe joint effusion.
Props: A yoga mat and a wall, a blanket under your head for comfort if needed.
Avoiding pitfalls: Hold the pelvis flat on the floor and evenly placed left to right. Keep the foot of your crossover leg flexed to protect your knee. You may find that you are tighter on one side than the other; move farther away from the wall when crossing over with the tighter side.
1. Sit on the floor parallel to a wall. The closer you are to the wall, the more challenging the pose. Start with your hips about twelve inches away from the wall and move closer to the wall later as it becomes feasible.
2. “Walk up”the wall as you move your torso out from it until your feet are up the wall, and your torso is perpendicular to it. You may have a blanket under your head if you wish.
3. Cross your right foot over the left knee and flex your right ankle, pulling the toes, especially the fourth and fifth toes, straight back toward your knee.
4. Take a breath, expand yourself inside, and curl your sitting bones down, which will arch your lower back away from the floor.
5. Slide your left foot down the wall. Keep going until you can no longer maintain the square and flat-to-the-floor alignment of your pelvis.
6. Stay in this position. Continue to pull your sitting bones down and apart.
7. Firm your lower abdomen and stretch out through your spine. Patiently give the hip and thigh time to stretch.
8. To release and change sides, slide the left foot back up the wall.
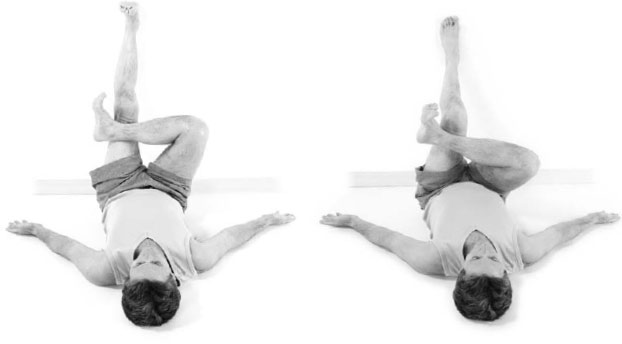
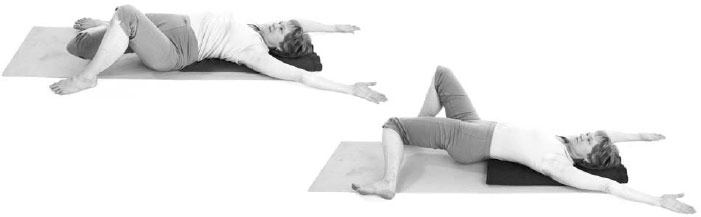
Purpose: To internally rotate the hips, one at a time, to stretch the side of the body, and to encourage full relaxed breathing.
Contraindications: Total hip replacement (prosthetic hip should not overly adduct), colostomy, herniated lumbar disc.
Props: A yoga mat, possibly a blanket under your head for comfort.
Avoiding pitfalls: Be sure to start with your legs wide apart, and adjust the position of your arms for comfort.
1. Lie on your back with your knees bent and feet about twenty-four inches apart.
2. Rest your arms on the floor at a comfortable angle to the side and above shoulder height, palms facing up.
3. Inhale to prepare, and as you exhale, tilt your right knee down and in toward your left foot. The left knee remains pointed upward.
4. Firm your leg muscles, widen the back of the pelvis, then keeping the width, lengthen the tailbone along the same diagonal line as your thigh bone, toward the right knee.
5. Stretch your right arm along the floor and away from your thigh for a full connected stretch of the whole right side of your body.
6. Breathe fully, allow the ribs and waist area to spread, then release and repeat on the other side.
Purpose: To extend and strengthen the back of the body and open the chest and shoulders, extending the spinal range.
Contraindications: Absolute—Chiari malformations; Relative—sacroiliac joint derangement, scoliosis, facet syndrome, spinal stenosis, vertebral fracture, severe osteoporosis (risk of fracture).
Props: A yoga mat and a blanket.
Avoiding pitfalls: Keep the legs and feet parallel. Relax your neck, throat, and jaw as you breathe. If your neck is stiff, begin with a folded blanket under your shoulders and upper arms as shown. Avoid squeezing the buttocks too tightly.
1. Lie on your back with the tops of your shoulders on the top edge of the folded blanket and your head on the mat. Bend your knees, place your feet hip-width apart, parallel, and about six to eight inches from your hips.
2. Place your arms alongside your body, palms facing up. Take a few breaths, inflate your inner body, and soften any shoulder tension.
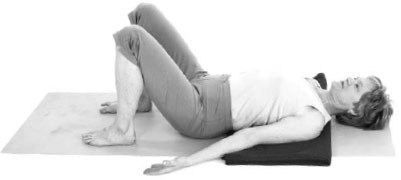
3. Inhale. Curl your sitting bones down and apart to ensure that the pelvis stays wide.
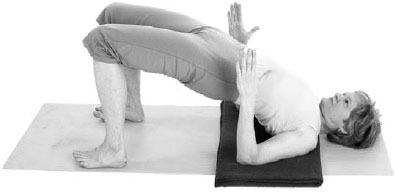
4. Exhale. Raise your hands until your elbows are bent ninety degrees. Point your fingers up.
5. Lift your hips, spine, and chest as you inhale, then roll each shoulder under so that your weight is on the tops of your shoulders.
6. Point your knees straight forward. Lift and extend your tailbone toward your knees.
7. You can clasp your hands underneath you for more support, pressing the arms down to lift more. Interlace your fingers but separate the wrists.
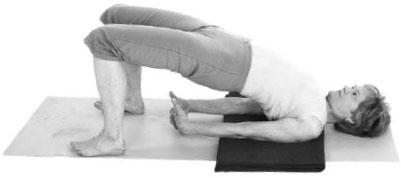
8. Contract the buttocks, firmly lengthening them away from your waist without squeezing tightly.
9. Stretch the sides and the center of the body down from your throat out through the legs, unfolding your own power.
10. Exhale softly as you come down.
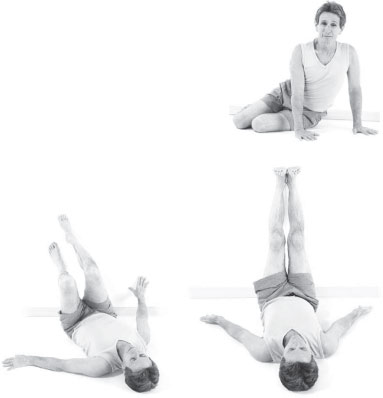
Purpose: To stretch hamstrings, paraspinal and quadratus lumborum muscles, reduce spondylolisthesis and lordosis, and improve pelvic alignment. This pose increases poise and equanimity, while coordinating and loosening core joints.
Contraindications: Gastroesophageal reflux, hamstring sprain.
Props: A yoga mat, a belt, and a blanket.
Avoiding pitfalls: Keep the muscles of both legs firm and active, and the pelvis steady as the leg changes position. Relax your neck, face, and shoulders. Breathe smoothly.
1. Lie on your back with your knees bent, feet flat. Arrange the blanket so that the lower edge comes to the small of your back, with your buttocks on the floor.
2. Relax and experience your body being fully supported by the floor.
3. As you inhale, move your sitting bones down toward the floor and apart, which will arch your lower back.
4. Contract your abdomen in and up and lengthen your tailbone toward your heels without flattening your lower back.
5. With your pelvis thus stabilized, raise your right leg and hook a belt around the foot. Hold one end of the belt with each hand.
6. Gradually straighten the leg, firming the muscles on all sides and elevating your heel.
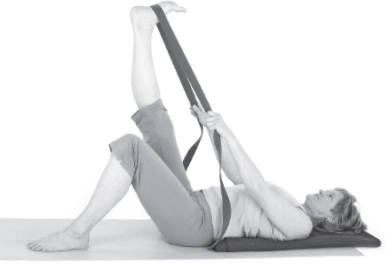
7. Adjust the angle of the leg so that you can straighten your knee. Use your thigh muscles strongly to fully extend it.
8. If your right leg stretches up to ninety degrees, then straighten the left leg to be flat on the floor for more challenge.
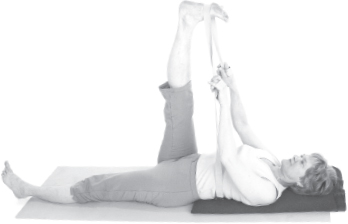
9. Extend through both legs fully, even if it means backing off with your right leg.
10. The main action is to push your right thigh away from your upper body (which keeps your lower back slightly arched) against the resistance of the belt (which pulls the foot the other way). Note: the goal is not to force the right leg or foot toward your head.
11. Once you have the actions, scan your body for unnecessary tension and release it.
12. Return to lying flat with both legs stretched out on the floor. Take note of any changes in sensation.
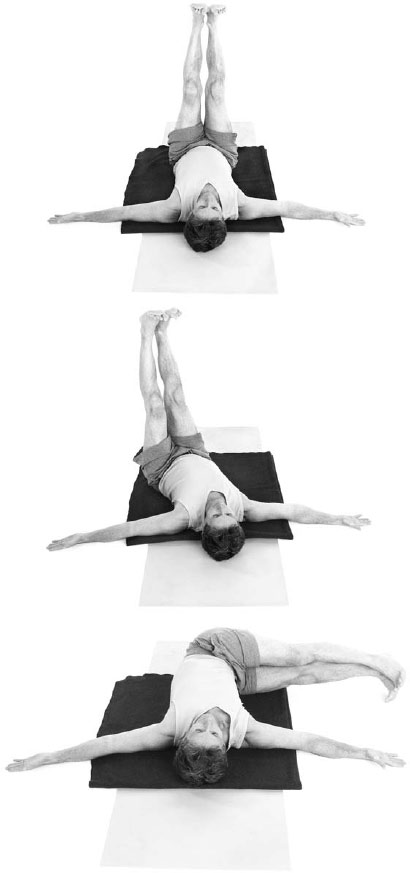
Purpose: To mobilize the joints of the spine, strengthen transverse and oblique abdominal muscles, stretch the front of the shoulder, and strengthen the back.
Contraindications: Total hip replacement, colostomy, herniated nucleus pulposus.
Props: A yoga mat, blanket optional for comfort.
Avoiding pitfalls: Keep your muscles firm; do not do a floppy version of this pose. Align your spine down the center of your mat.
1. Lie on your back with your arms spread wide at shoulder height, palms up, and knees bent.
2. With knees bent, raise your thighs toward vertical, with the shins horizontal.
3. Firm your arm muscles, retract the upper arms back into the shoulders, and press the arms down onto the floor. The shoulders are the stable part of this pose while your legs and hips move.
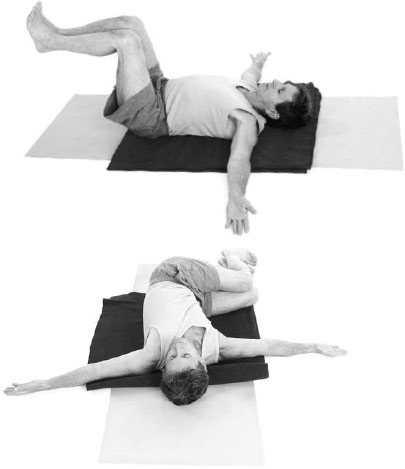
4. Prepare for the twist by first widening your sitting bones, then firming your lower abdomen.
5. Gradually lower both legs to the right, with the thighs at a ninety-degree angle to the torso if possible. Stretch through the lower back.
6. Press your right arm down into the floor and lower the left shoulder until it is flat on the floor.
7. Stretch your left thigh and left arm away from each other to intensify the twist.
8. As you get more comfortable (and more flexible), you will be able to straighten your knees in the initial position and throughout this pose. When preparing to twist with the legs straight, offset your hips to the left before twisting to the right.
There is a lot to keep track of in this pose, but the gains in range of motion, strength, coordination, and grace are worth it!
Purpose: To strengthen the core abdominal muscles and the shoulders.
Contraindications: Colostomy, iliostomy, extreme hypertension.
Prop: A yoga mat.
Avoiding pitfalls: Avoid rounding your upper back toward the ceiling, raising the hips too much or not enough, or dropping the head too low. The body makes one straight line in the plank.
1. Lie facedown on the floor.
2. Raise your head and chest up by supporting yourself on your forearms. Place the elbows under the shoulders with hands extending forward.
3. Firm the muscles of your arms.
4. Inhale and lower your upper chest down a little over the arms.
5. Exhale, contract your belly muscles, and lift your hips up to the same height as your shoulders. Knees remain on the floor.
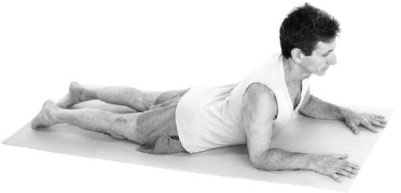
6. Hold yourself up just above the floor for several slow breaths, then release down.
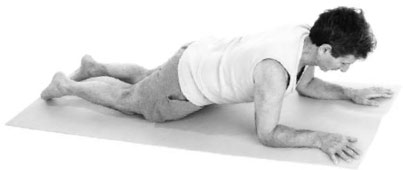
1. Perform instructions 1 through 4 as above.
2. Extend your legs back and tuck your toes under. Inhale to lengthen.
3. Exhale and lift your pelvis and legs up. Stretch and connect into one long line from shoulders to heels, suspended away from the floor.
4. Take several slow breaths, then release down.
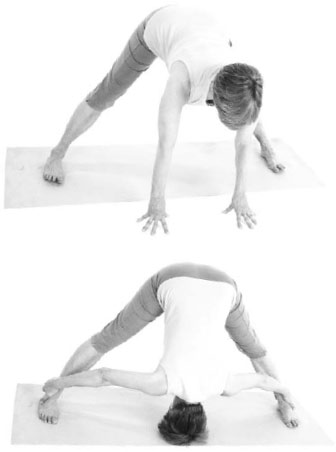
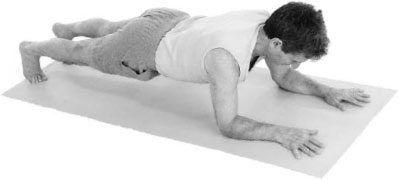
1. On your hands and knees, walk your hands forward about one hand’s length.
2. Steady your arms, with elbows straight, while softening and lowering the upper chest.
3. Inhale as you lift your knees up and straighten out your whole body into one long plank from feet to head. Be careful to get the right height for your pelvis and your head (the heaviest and least-supported parts, respectively)—not too low or too high. A friend or mirror can tell you.
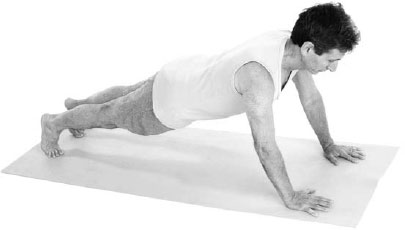
4. Hold your belly firm and your legs active.
5. Reach the tailbone back toward your heels.
6. Be steady for several breaths, then release down with exhalation.
Purpose: To strengthen and extend the upper back and neck. Contraindications: Fused ankylosing spondylitis, Chiari malformation, bridging spondylitis, cervical spinal stenosis.
Props: A yoga mat and a blanket.
Avoiding pitfalls: Keep your shoulders back and do not overuse your arms. If you get up into the pose and find your shoulders around your ears and your chest collapsed, come down and start over. This pose is about expanding the inside of you, and supporting yourself with the muscles of your spine.
1. Lie on your stomach with a blanket placed under you for comfort.
2. Lift one leg up an inch and pull it back. Repeat with the other leg. This creates a good length in the lower back.
3. Briefly turn the front of your legs in toward the midline, so that the heels, thighs, and pelvis widen in the back.
4. Pull your tailbone toward your heels and toward the floor. This stabilizes your lower back, enabling you to stretch forward more strongly. The legs will rotate back to center so that the backs of the knees face straight up.
5. Lift up onto your forearms briefly to pull your upper body forward away from your legs.
6. Lie back down and put your hands to the sides of your chest, with your fingers pointing outward a bit and your forehead on the floor.
7. Lift your shoulders away from the floor, keeping them square across.
8. Inhale; lengthen forward through your whole torso. Expand from the inside.
9. Contract your upper back muscles and move the shoulder blades in toward the spine.
10. Curl up with your head and chest, keeping your shoulders back.
11. Press carefully down through your arms to lift more, but keep your arms bent and the upper arms and shoulders back.
12. Keep your pelvis on the floor while maintaining these actions. Use your breath to expand forward from the inside.
13. Stay up for several breaths, then soften and release down.

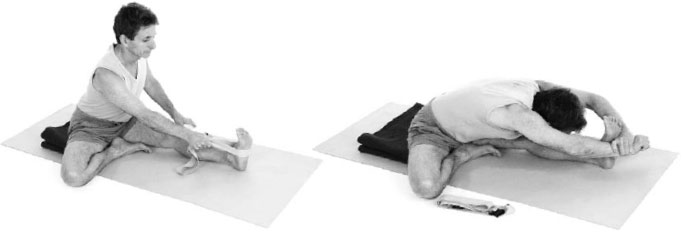
Purpose: To stretch hamstring, glutei, and quadratus lumborum muscles; to relax the back and improve hip flexion.
Contraindications: Colostomy, hamstring spasm or sprain.
Props: A yoga mat and optional blanket and belt.
Avoiding pitfalls: Keep the straight leg firm and press the back of the knee down. Move the upper body forward more than down. Bend forward from the hips as symmetrically as possible. Aim the navel toward the inner thigh of the straight leg.
1. Sit with your legs outstretched on the floor in front of you, with a folded blanket placed under your hips to make the forward tilt of the pelvis easier.
2. Bend your right knee out to the side and place your right foot against the inside edge of your left upper thigh.
3. Manually reach under your hips and widen the pelvis and upper thighs by pulling the skin and muscles back and out to the side. This will help you to tilt your pelvis forward.
4. Tighten the quadriceps of the straight leg, pressing the knee and thigh down to the floor, stretching the heel away from you. Evenly stretch your toes up and back toward you to complete the stretch of the back of that leg.
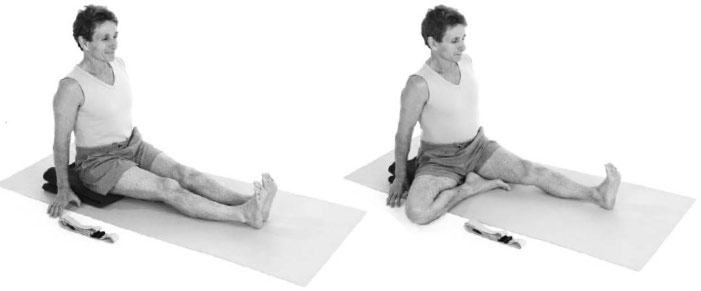
5. Press both sitting bones down and back. Inhale and extend up through the spine.
6. Exhale, with hands touching the floor, and turn toward your extended left leg.
7. Place a belt around your left foot and hold it with your right hand. The left hand on the floor will help you to lift that side of your torso.
8. Inhale again and stretch up again.
9. Exhale and bend forward toward your foot. Keep your arms pulled back into the shoulders even though they are also reaching forward. This will help you to extend the spine, refraining from rounding or collapsing it.
10. Shift your belly toward the left and try to even up the ribs, left and right, as you stretch forward toward your foot.
11. Use your breath to remain calm and avoid agitation.
12. If your flexibility allows, stretch forward fully over the extended leg, grasping the foot with both hands, or the wrist as shown.
13. Repeat on the other side.
Forward bends are quieting, once you get past the initial challenges of tightness. They encourage humility and patience with oneself.
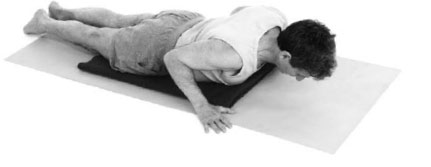
Purpose: To passively flex the lumbar and extend the thoracic spine and flex the hips. To prepare for relaxation.
Contraindications: Colostomy, prepatellar bursitis, total knee prosthesis.
Props: A yoga mat and a blanket or two, possibly washcloths for the knees.
Avoiding pitfalls: If your knees are stiff, put folded washcloths behind your knees to create space and reduce compression there.
1. Come onto your hands and knees on a folded blanket.
2. If your feet or ankles are stiff, position yourself with your feet half on and half off the edge of the blanket. Place a folded washcloth behind each knee.
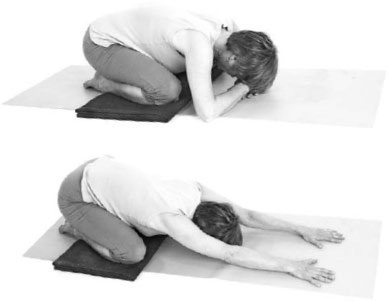
3. Widen your knees.
4. Fold your hips back toward your heels.
5. Reach forward with your chest and rest your forehead on your folded hands or on another blanket. An alternative stretch is to extend your arms forward on the floor.
6. Breathe deeply. Reduce effort and surrender tension in your body and mind.
Purpose: To relax, assimilate, cease effort, and consolidate gains from all the poses you have done. This pose is essential in making a safe and meaningful transition between the practice of the poses and the rest of your life.
Contraindication: Late pregnancy. Otherwise, dying is perfectly safe.
Props: A yoga mat, two or three blankets, possibly eye cover.
Avoiding pitfalls: After the initial setup, avoid fussing and fidgeting; become settled. Mr. Iyengar says this is the most difficult pose.
1. Make sure the space is quiet and safe from distractions.
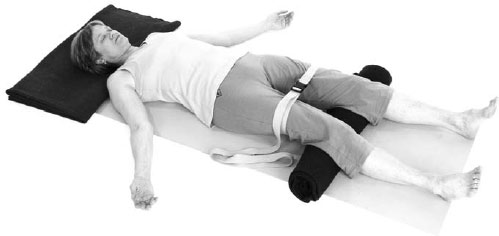
2. You might like to have a folded blanket under your neck and head, a rolled blanket under your knees, and a third to warm you. An eye cover may help to relax your face and retreat from all outer stimuli. (See page 215 for use of belt.)
3. Lie on your back with arms at your sides, about twelve inches from your body with your palms up.
4. Adjust your hips by turning your legs inward to widen the back of the pelvis, then let the feet roll apart as you relax.
5. Lengthen the buttocks away from your waist if you feel any compression in the lower back.
6. Tuck your shoulder blades gently in toward the spine to open the front of the chest.
7. Make sure that your neck is long and your chin and forehead are level. Then guide your attention through your whole body systematically from head to toe and back again, letting each part relax deeply.
8. Do not fret if your mind produces thoughts; just watch them unemotionally without jumping into the content. Be a compassionate witness. You might notice yourself reviewing an event, thinking of a person, making a plan. Try not to follow the pull of the thoughts, but passively observe them come and go. Trust in the process of letting go.
9. After five to ten minutes of quiet rest, take a few deeper breaths, stretch your arms and legs gently, bend your knees, and softly roll to the side. Take your time getting up, to respect whatever effects, changes, and benefits you may feel from your yoga practice. Remember your highest intention and affirm your process of growth and healing.
