As we start our exploration of different categories of bird photography, it seems natural to begin with the most common type, the portrait. Here I define a bird portrait as one where the bird is static and basically not showing any signs of action or noticeable behaviour.
This definition illustrates the problem with portraits – total inaction. It results in you having to work much harder at producing an interesting image than with any other type of bird photography. Let’s face it, a simple close-up picture of a bird can be quite boring. The challenge, then, is to make an interesting image from a static subject, often one that has been photographed hundreds of times before.
Of course, there is absolutely nothing wrong with a straightforward close-up picture of a bird, and for many people this is an achievement in itself. Getting close enough for frame-filling images is often very difficult, and it is only natural for us to want to capture the beauty of a bird in this way. If we weren’t fascinated by birds we wouldn’t photograph them, and getting close-up pictures of a range of birds, showing the characteristics of each species, is something that many photographers are happy doing. There is nothing wrong with this approach at all, but this book is about much more than that – it’s about creating interesting and artistically satisfying images.
When faced with an attractive, brightly coloured, possibly rare bird sitting on a branch in front of you, the quality of the resulting images will be most determined by which of your own traits comes to the fore – the birder or the photographer. Sitting back in your armchair reading this book, it is easy to imagine that it will be the photographer in you who wins out. In the excitement of the moment, however, your eagerness to bag such a prize will often take over, and the aesthetic quality of the image will suffer. I’ve done this enough times myself – particularly when I first started. Nowadays, however, I’m much more likely to remain calm, think about the photograph first, then press the button. This really is the key to a good portrait – think first, and take the picture second. The more experienced you get, the quicker your brain kicks in, so that after a while choosing a nice composition becomes intuitive. If all this fails and you just end up with a rather dull picture of that lovely bird, then don’t beat yourself up about it; just appreciate what you’ve got and with the picture in front of you try and think what you can do next time to improve it.
I have come up with a novel way of levelling the playing field when evaluating a bird photograph without being influenced by the species of bird – I call it the ‘sparrow test’. Take any bird photograph of a rare or colourful bird and in your mind’s eye replace it with a very common, dull-coloured species – it doesn’t have to be a sparrow (I found that didn’t work very well with wildfowl pictures!). If the picture still works, the chances are it’s good photographically, as well as a record of the subject.
THE GLAMOUR SHOT
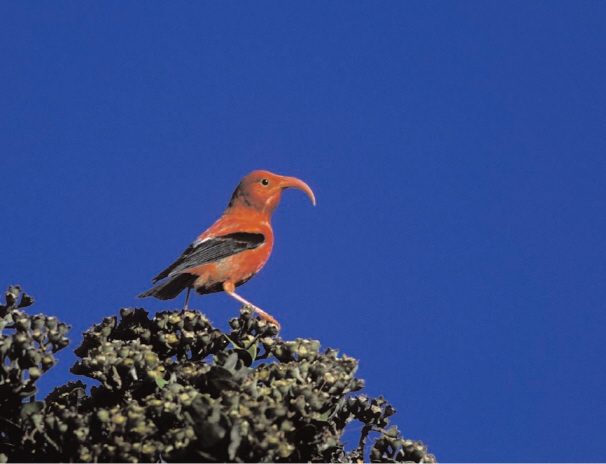
The picture opposite of the Iiwi is a good example of what I call a ‘glamour shot’. The picture is all about the subject itself, not the aesthetics of the overall photograph. In this way it has much in common with ‘glamour photography’, where the target audience is very much interested in the subject (i.e. beautiful, scantily clad bodies) and has very little or no interest at all in any artistic considerations. Compare this with artistic nude photography, where the emphasis is on shape and form, and you’ll get my drift.

 IIWI
IIWI
(Vestiaria coccinea)
Canon EOS 1V, 600mm lens + 1.4x converter, 1/500th sec @ f5.6, Fuji Provia 100
Big Island, Hawaii
As well as being rather gorgeous, the Iiwi is a Hawaiian endemic that has not been photographed that often. It is certainly not the rarest of the Hawaiian honeyeaters, but with its bright red feathers and that magnificent curved pink bill it is certainly iconic. It was one species I really did want to photograph. This was not an easy task, and my wife and I spent a total of eight hours perched on rough volcanic rock hoping for the bird to put in an appearance. We had noticed a few Iiwis around the area, but chasing them around proved a pointless exercise, so we chose a suitable bush and settled down to wait. Five hours on the first day resulted in nothing but cramp, but on the second day (our last day on Big Island) a further three hours’ vigil was rewarded when a group of three adults did show up, for a grand total of three minutes. During that time I managed to fire off two 36-exposure rolls of film (with a very rapid change of roll!). I was delighted to get the shot.
This was bird photographer as hunter. My technique was simple: get bird in frame and shoot – nothing fancy, just get the picture. Granted, the shot is technically well executed, but at the end of the day, from a purely photographic point of view, it’s just a bird on a bush – it’s the species that counts, not the picture. This certainly doesn’t pass the ‘sparrow test’, but I really did enjoy taking it. If the birds had hung around and been easier to photograph, I know I would have made better pictures, but you can only take what’s on offer.
BAD BACKGROUNDS
Probably the most common reason why a portrait is bad is that it has a bad background. A portrait such as this results when the birder comes to the fore and you simply concentrate on the bird and ignore everything else.
I have seen countless portraits with bad backgrounds, whether it be twigs sticking out all over the place (sometimes even in front of a bird) or out-of-focus birds in the background that distract from the subject. Interestingly, in landscape photography it is the opposite problem – it is the foregrounds that tend to be overlooked, because the photographer concentrates on the main subject in the picture. Just as a landscape picture can be made great by an interesting foreground, a bird photograph can be made great by an uncluttered or relevant background.
So why did I take the picture of a potoo shown below? That’s a good question. I had visited South America on several occasions and had never even seen a potoo, let alone had the chance to photograph one. It was a species I had always admired when I saw it in field guides, and I longed to see it. Like owls, potoos are usually nocturnal, so your only chance of seeing one during the day is to spot it roosting. Because the birds do a rather good impersonation of a tree trunk, this is not easy.
As soon as I saw the bird, high up on a forest tree, I just had to take a shot there and then. My enthusiasm for the bird got the better of me and I got the shot I deserved – pretty awful. Fortunately for me, because the bird was at its daytime roost it wasn’t going anywhere. I came to my senses, wandered around the area and found a much better vantage point from which I could create a far nicer image, as you see in the second picture.
Another interesting point about this picture is that it demonstrates the use of a vertical format instead of the more usual horizontal format. In this instance the upright format was much better suited to the subject and its surroundings. The upright format is usually referred to as ‘portrait’ mode.
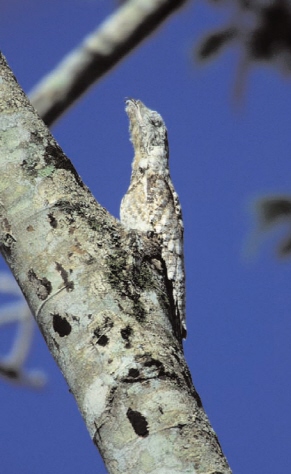
 GREAT POTOO
(Nyctibius grandis)
Canon EOS 1V, 600mm lens + 1.4x converter, 1/500th sec @ f5.6, Fuji Provia 100
Manu Region, Peru
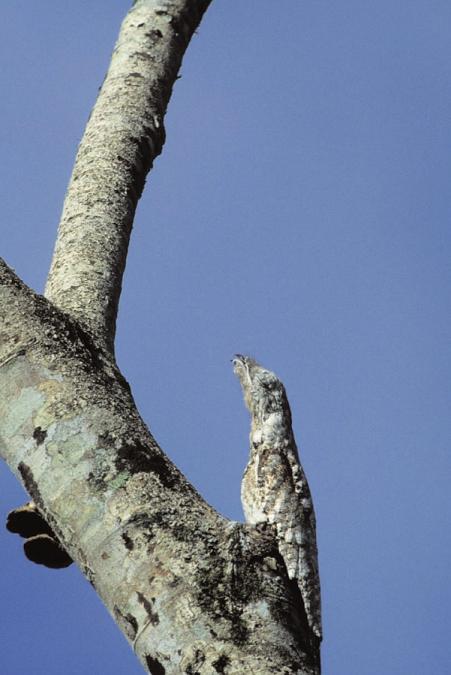
 GREAT POTOO
(Nyctibius grandis)
Canon EOS 1V, 600mm lens + 1.4x converter, 1/500th sec @ f5.6, Fuji Provia 100
Manu Region, Peru
BACKGROUNDS THAT ENHANCE THE PICTURE
This picture of a male Smew is all about the fantastic background, and it was the background that I was attracted to when I was visiting Pensthorpe Waterfowl Park in May one year. I usually photograph waterfowl in the winter, but I had just bought a new 600mm f4 lens and wanted to give it a thorough shakedown, so I went to a place where I knew there would be lots of birds to point it at.
Pensthorpe has a large collection of exotic wildfowl. During the winter these act like a mass decoy – the wild ducks then stay on for some free food and quickly get used to people milling about. When winter is over wild ducks are far fewer in number, but the collection birds would do fine as test targets for my new lens. Spring brought one big bonus – the shrubs surrounding some of the lakes were in flower. In this case a group of bright yellow-flowered bushes was producing amazing reflections on the far side of the lake. The reflections were so nice that they would have made a decent abstract picture on their own.
The area of yellow water was not huge and I needed the big telephoto to isolate it. I set it up on a tripod and simply waited for something to swim into view. One of the first ducks to put in an appearance was this male Smew, one of my favourite ducks. Its simple black and white colouring stood out perfectly against the yellow background. If you took this background away and replaced it with plain blue water the result would be extremely dull.

 SMEW
SMEW
(Mergellus albellus)
Canon EOS 1V, 600mm f4 lens + 1.4x converter, 1/1,000th sec @ f5.6, Fuji Provia 100
Norfolk, UK
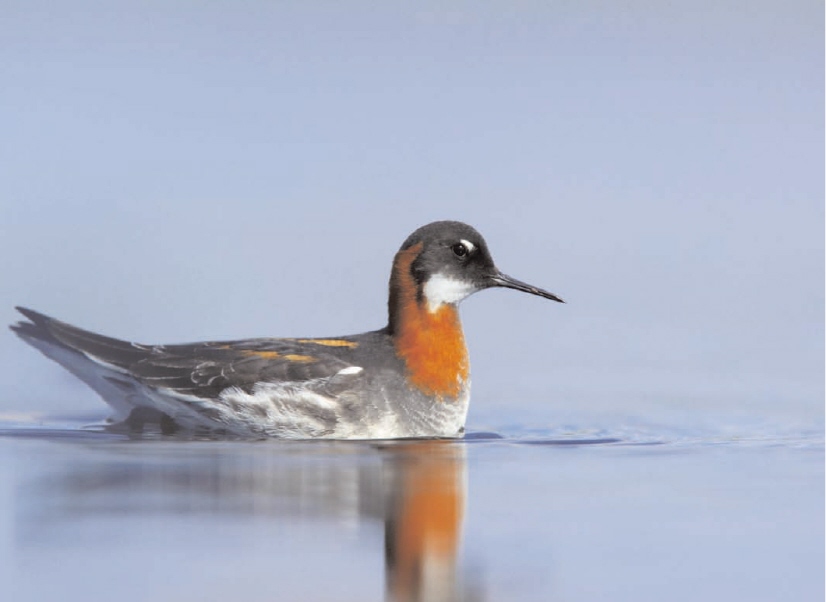
 RED-NECKED PHALAROPE
(Phalaropus lobatus)
Canon EOS 1Ds Mark II, 400mm f4 lens + 1.4x converter, 1/1,000th sec @ f8, digital ISO 400
Shetland Isles, UK
LOW ANGLE
Shooting at eye level with a bird adds great impact to the simplest of portraits. It works really well with birds on the water, as this picture of a Red-necked Phalarope demonstrates. Red-necked Phalaropes are very confiding birds and as long as you move around slowly they seem to ignore you altogether, sometimes even coming too close for your long lens.
I had taken some ‘normal’ portraits of this lovely species while kneeling down by the side of the small loch on which the birds were swimming around. I then decided to try and get lower, and to do this I slowly dropped onto my stomach and hand-held the camera in front of me to get the angle I wanted. The bird just carried on, taking no notice of my antics whatsoever.
This is not the best way of going about getting low enough, however, especially if you are over six feet tall like me. It’s better to prepare for the shot by fitting a right-angled finder to your camera. This fits over the eyepiece and enables you to look through the viewfinder from the top of the camera body instead of the back. This puts much less strain on your neck muscles, although using the right-angled finder does take a bit of getting used to.
If you do this sort of photography in public places, you will no doubt attract attention and get all sorts of strange looks, even from other photographers. You will also get rather grubby – but then you have to suffer a bit for your art. Apart from these non-photographic issues, there are two compositional considerations to be aware of when using this technique. The first of these is to ensure that the water or ground is parallel with the bottom of the picture. This may appear obvious, but it is particularly important when you are down at ground level. The second thing to consider is the background, particularly on water. When shooting slightly downwards on the subject you can isolate it against the water. When shooting at a very low angle this isn’t the case, and you must keep a lookout for birds and other obstacles in the background that will spoil the picture. It’s definitely worth the effort, though, and you will end up with something just that little bit different from most portraits.
FULL FLASH
Like many wildlife photographers, I’m not a great lover of using flash as the main light to illuminate a subject, because it’s very difficult to produce natural-looking images. In the middle of a particularly dark stretch of Peruvian rainforest just after dawn, however, I needed all the help I could get. I was photographing the spectacular cock-of-the-rock males at a lek site, and was perched on a platform that was rather flimsily built on the top of a slope that dropped away steeply to a river far below. The lek was very active around dawn, but at this time it was just too dark for natural light photography (I was still using film in those days), so even fill flash was impossible.
One of the problems with using flash as the main light is that the exposure of any element within the picture is dependent on how far that element is from the flashgun. The closer it is, the more light it receives as the light from any flashgun drops off rapidly. In practical terms, this means that you must compose the image with the main subject (in this case the bird) as the closest thing to you, otherwise anything in the frame closer than the bird will be horribly overexposed and ruin the shot.
In a dense rainforest understorey this is easier said than done, but I did notice one particular branch onto which the males would occasionally hop during their display that had no other branches or leaves in front of it, once I’d positioned myself in the right place. Of course, the other effect of flash fall-off is that everything behind the main subject is underexposed, and this often creates a very dark or even black background that can look unnatural. In the case of the picture opposite, however, the dark background has covered up a multitude of sins, because the background was, in reality, a complete mess of intertwining branches and leaves that looked pretty unattractive. Also, I think the dark background rather suits the subject, as a rainforest is indeed a dark environment. A plain background such as this also emphasizes the subject and produces a nice graphic image. Contrast this image with the completely different cock-of-the-rock image (which was taken with natural light much later in the day, but from exactly the same place).
BACKLIGHT
In most cases I try to photograph a bird with the sun behind me, because this provides an even light on the bird and in my eyes produces the best results. I’ve experimented with side lighting and feel the harsh shadows it produces often spoil a picture, so I try and avoid this (although there are exceptions, of course).
Backlit images, however, can be very attractive, as in the case of the bee-eater shot. I define a backlit image as one where the details of the bird remain clearly visible. This separates it from a silhouette, where the details of the bird are lost and often completely black. It is a simple composition, a bird on a stick, but the backlight raises it above what would be a rather average image if the sun had been behind me. This shot was taken quite late in the day, when the sun was low in the sky. In the morning I had been photographing bee-eaters from a hide facing west. This gave lovely light early in the day, but as the sun moved around through the day, normal photography became impossible. I revisited the hide about an hour and a half before sunset in the hope that the birds would still be active and land on the perch that had been set up specially for them.
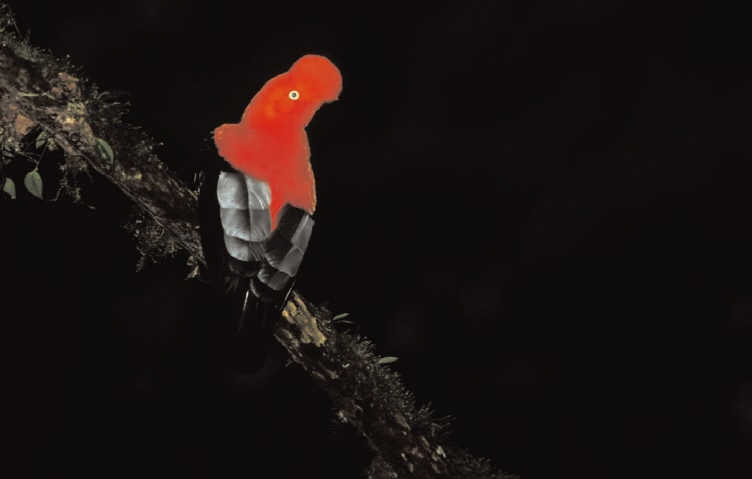
 ANDEAN COCK-OF-THE-ROCK
(Rupicola peruviana)
Canon EOS 1N, 300mm f2.8 lens, 1/200th sec @ f2.8, Metz flashgun with flash extender, Fuji Provia 100
Manu Region, Peru
I waited and waited, until finally a male landed on the perch and I got the shot I was after. The surroundings were just right for this sort of shot, with the forest that formed the distant background in shade as the sun went down behind it. The bird itself is softly lit, but what makes the picture successful is the brightly lit feathers, particularly on the back and tail. I thought that the exposure was going to be very tricky, but plain old aperture priority mode worked fine. If taking backlit pictures like this, the main thing to check after you have taken the picture is that the ‘rim light’ highlights around the bird are not overexposed. Once these are OK, the rest falls into place.
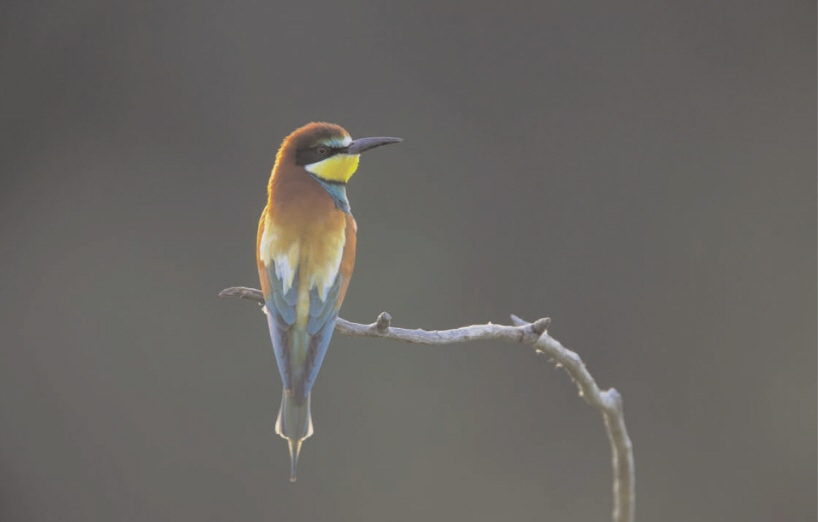
 EUROPEAN BEE-EATER
(Merops apiaster)
Canon EOS 1Ds Mark II, 500mm f4 lens + 1.4x converter, 1/250th sec @ f5.6, digital ISO 400
Hungary
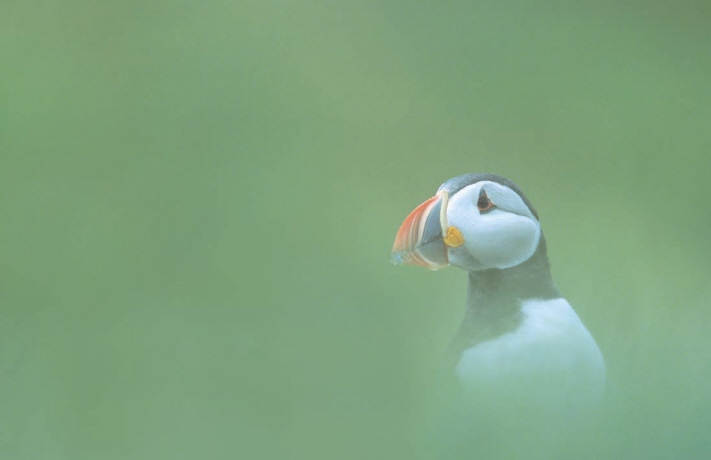
 PUFFIN
(Fratercula arctica)
Canon EOS 1N, 600mm f4 lens + 1.4x converter, 1/640th sec @ f5.6, Fuji Provia 100
Northumberland, UK
USING THE SURROUNDINGS
For this section I have used two pictures of Puffins to illustrate how utilizing the immediate surroundings can produce completely different images of a very familiar and much-photographed species.
The first (above) was taken on the Farne Islands, a great location for photographing seabirds and Puffins in particular. Many thousands of Puffin pictures have been taken here, and I was really looking for something a little different. The weather conditions were perfect for Puffin portraits, because although it was very bright there was a covering of high white clouds that reduced the contrast. This is very important when photographing on the Farnes, as although the islands are wonderful, the earliest you can land on them is around 10 a.m., by which time the best light has gone, and on a sunny day the light is very harsh.
Puffins are unpredictable birds. There may be hundreds sitting around close together on the rocks and outside their burrows on one day, and only a few scattered about on the next, even if the weather is the same. On this occasion there weren’t many birds around, which actually made it easier to get pictures as I didn’t have to contend with other birds getting in the way. There was a fair amount of grass growing just above the rocks, close to the sea, and although the green colour was quite nice, lots of grass stalks sticking up can often be intrusive and spoil a picture. This particular Puffin was standing on a bare patch of ground with the grass a little way behind it. I got down low to use the much closer foreground grass to frame the shot and hide the bare ground. By using a very long lens and wide open aperture I was able to keep the depth of field to a minimum, which rendered both the foreground and background grass a soft green and resulted in one of my favourite Puffin portraits. The position of the bird in the picture is also important, as I have placed it clearly to one side and it is looking into the picture. Had the bird been positioned in the middle or looking out of the picture it really wouldn’t have worked at all.
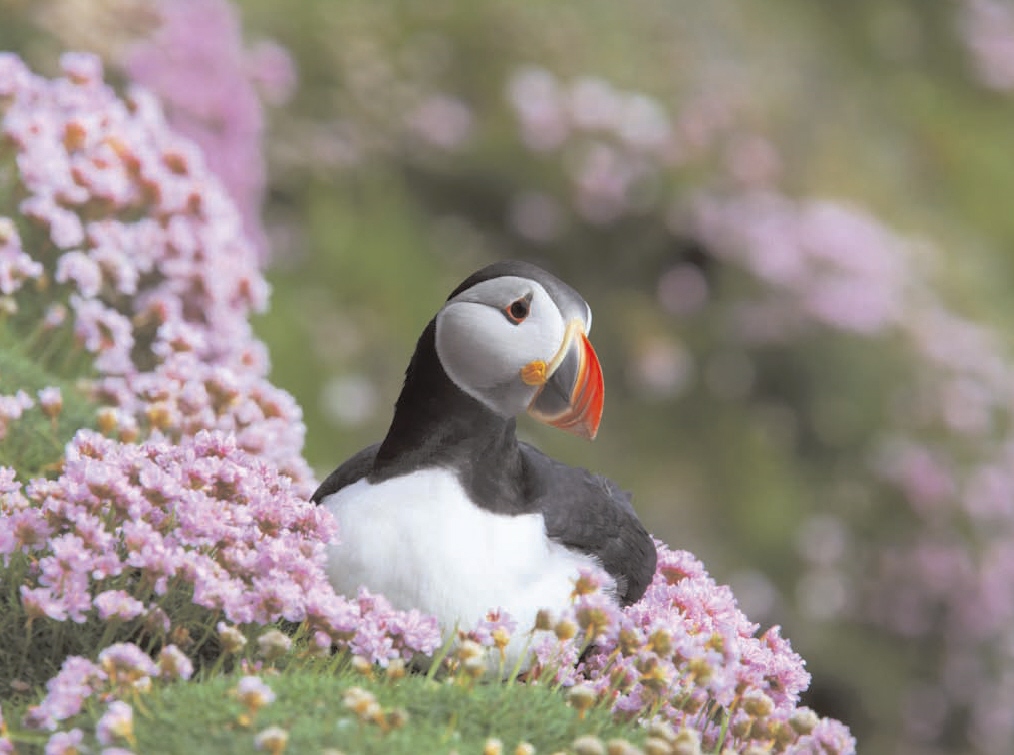
 PUFFIN
(Fratercula arctica)
Canon EOS 1Ds Mark II, 400mm f4 DO lens + 1.4x converter, 1/1,000th sec @ f10, digital ISO 400
Shetland Isles, UK
The second picture of a Puffin couldn’t be more different. It shows the bird sitting quietly on a cliff edge surrounded by the pink blooms of Thrift. This is a classic image – in fact, many would call it a cliché because it’s been done many times before. I never let such comments put me off, though. As a professional wildlife photographer I can never worry about what other photographers are doing – I just decide what I want to do and do it. If it has been done a thousand times before, then so be it. The important thing from my perspective is that I hadn’t done it before and I like the shot. And I do like this shot very much. I had planned this picture before I arrived in the Shetlands, and after finding a suitable flower-covered bird cliff I settled down and waited.
Unfortunately, this was one of those days when Puffins were not sitting around in numbers, and I had to wait for several hours for a couple of birds to arrive in a suitable spot. This one was high on top of a very dangerous cliff, and I had to lean out over a dry-stone wall to get the angle I wanted. I’m sure some photographers have turned up, seen loads of Puffins sitting around in the flowers and thought how easy a shot like this would be to get. I was not that lucky, but I find that perseverance (some might say bloody-mindedness) is usually the key to success.
Unlike the bird in the first image, here the Puffin is pretty much in the middle of the picture, but the key difference is that it shares the picture with the flowers, which play an equally important role (in fact, without them I would not have taken the picture). The bank of flowers on the left of the image counterbalances the central Puffin and effectively pulls it to one side, leaving it looking into the open area to the right.
TWO’S COMPANY
Making a portrait with more than one bird in the frame is much more difficult than doing so with just a single bird. Firstly, there is the question of depth of field, which when using long lenses is very shallow indeed. Due to this factor, both birds need to be on the same plane (the same distance from the camera), so that they will both be in focus. Secondly, a good composition requires some symmetry between the two birds to make the picture work. In the case of the picture opposite, the birds are both looking in the same direction and are sitting close together. Although the male kestrel is pretty much central, it is anchored in the picture by the female on the left, which results in an attractive composition.
When I took the picture I was perched on top of an old, very dirty grain silo. It was in the old tiled roof of this building that the birds nested. Someone had thoughtfully provided a perch for the birds, and this had been securely fixed to the roof. With little else suitable around, this proved very popular with the birds and this pair made the most of it – the birds were regularly seen perched on it side by side. The problem was that it was a rather dull, overcast day and the light (such as it was) was coming from behind the birds. Even on a cloudy day I will try and position myself with the sun behind me, but balanced on top of a building as I was, I couldn’t move around. To overcome this, I used fill flash to balance the light and bring out the feather detail in the birds. Fortunately, they were quite close to my hiding place, which meant that I could use a relatively short lens. I stopped down to f8 to give me more depth of field. Stopping down often results in too much detail in the background, which can be distracting, but here the ground was far below so I could get away with it. I couldn’t stop down any further as I was already shooting at a mere 1/60th second. The 100–400mm lens was an IS (Image Stabilization) lens. This was a great help in the low light situations, particularly because it was impossible to use a tripod in the very cramped conditions I was shooting in.
This is quite a complicated picture from a technical point of view, but in the end one that works very well.

 LESSER KESTRELS
(Falco naumanni)
Canon EOS 1D Mark II, 100–400 mm lens @ 283 mm, fill flash @ -2 2/3rd stops, 1/60th second @ f8, digital ISO 400
Extremadura, Spain

Both pictures:
 NIGHTINGALE
(Luscinia megarhynchos)
Canon EOS 1Ds Mark II, 500mm f4 lens + 1.4x converter, 1/250th sec @ f7.1, digital ISO 400
Hungary
REFLECTIONS
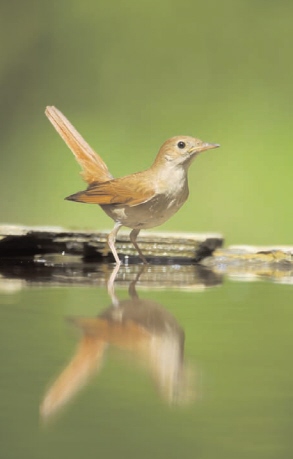
In these portraits of a Nightingale, the key element in each is the reflection of the bird in the water. They are of the same bird and were taken around 20 minutes apart at a drinking pool in the middle of a Hungarian forest. There are two clear differences between the shots, the most obvious being the orientation, one being in landscape format and one in portrait. In the landscape format the bird is placed to one side of the frame, effectively looking into the empty space on the right. Had the bird been in the centre, it wouldn’t have looked as nicely balanced. I have mentioned this about other pictures in this chapter, but it is well worth repeating, because having the bird smack in the centre is a common compositional weakness that occurs in many bird pictures. The interesting thing about this compositional ‘rule’ is that it doesn’t apply when you turn your camera through 90 degrees and shoot in portrait mode. This can be clearly seen in the ‘upright’ Nightingale image, where the bird is pretty central.
The second main difference between the two images lies in the quality of the reflection. In the portrait-mode picture the reflection is very soft, but in the landscape-mode picture it is sharp enough for the bird to be clearly seen. In both cases, however, the reflection adds greatly to the overall impact of the picture – even the blurred reflection adds balance and to my mind works well.
When photographing a bird with a reflection, I always think it works best if there is either equal space above and below the bird and its reflection, or alternatively more space above the bird than below its reflection. If you have more space below the bird’s reflection than above the bird’s head, the picture just doesn’t look right.
A good, sharp reflection can be very fleeting – the slightest movement of the bird causes a ripple that destroys the reflection, as does the least breath of wind. The reflection’s quality can change from second to second in these circumstances, so you have to be very alert.
BREAK ‘THE RULES’
The portrait of a cock-of-the-rock on its lek site in a Peruvian rainforest (opposite) is completely different from the one taken with flash in the same location (shown on page 43), and it’s worth comparing the two. In this case there was just enough light to make a natural light exposure, but using flash on this bird simply would not have worked, as all of the out-of-focus foliage in the foreground would have been lit up like a Christmas tree and dreadfully overexposed.
The main point of including this picture is to show how a picture can work, even if it breaks normal compositional rules. Actually, I think the picture works very well and shows the bird in its typical cluttered, busy, rainforest understorey environment. It was only by careful positioning that I managed to find a gap in the vegetation to enable me to photograph the bird at all. When I finally got into position I noticed that the group of leaves on the left of the image was on roughly the same plane as the bird, so I included it in my composition. These in-focus leaves balance the picture and make it work.
In this final section in the portrait chapter, I’d like to mention two points that apply throughout this book when discussing the rights and wrongs of composition. Firstly, the compositional ‘rules’ or advice provided in this book will help you to improve your bird photography. They should, however, always be treated simply as basic blocks on which to build your own photographic style and approach. Breaking the rules may often help you achieve original pictures, and by having a good grounding in ‘normal’ composition aesthetics, you’ll know when and why to go outside them. Secondly and equally importantly, if you’ve taken a picture that you like and are satisfied with, don’t be put off if others disagree.

 ANDEAN COCK-OF-THE-ROCK
(Rupicola peruviana)
Canon EOS 1N, 300mm f2.8 lens, 1/30th sec @ f2.8, Fuji Provia 100
Manu Region, Peru