Capturing bird flight with the camera has always been one of the great challenges of bird photography. It is also one of my favourite types of bird photography – as soon as I picked up a camera, I set out to freeze a fraction of a second in a bird’s life as it hurtled through the air.
It proved much more difficult than I had anticipated, particularly given the primitive equipment and relatively short lens I was using. This was way before the introduction of any type of autofocus, when a sharp image of a bird in flight was a rare treasure to be held up and admired by all. To make it even more difficult, the only decent film available was a paltry 64 ISO (or ASA as it used to be known at the time). With the introduction of autofocus and 100 ISO film, the success rate boomed and more and more good flight pictures hit the market, although these were mainly of large, slow-flying species at first. When film was replaced with digital capture, just about everyone was taking flight shots and a new breed of photographer hit the scene – the digital blaster.
The problem with taking flight shots using film was that even with autofocus systems there was a lot of wastage, and wastage meant money. Using Provia film processed and mounted by a professional lab cost around 25p per slide, so taking thousands of pictures in the hope of getting a couple of sharp ones could get very expensive. With digital, however, each picture costs nothing, and with cameras now shooting at 10 frames a second you can capture countless moments that are over too quickly to see. Major competitions have now been won by that one-in-a-thousand sharp shot – with luck surely playing a much bigger role than skill. Having said that, some of the results of this approach have been wonderful photographs. As always with these things, there is an alternative view and you could argue that if the autofocus systems were good enough, you wouldn’t need to take so many pictures to realize your aim in the first place.
So digital and autofocus have without doubt reduced the skill level required when facing up to the challenges of capturing a bird in flight. What these technologies won’t help you with, however, is producing an aesthetically pleasing image. This is up to you, the photographer. Remember, the craft is all about the operation of the camera, while the art is what you point it at and no technology can help you with that. When locking on to a bird as it flies swiftly by, you still need to think about the overall picture and make your composition pleasing for a flight shot to be successful – but you have to make these decisions in a fraction of a second.
STARTING OUT
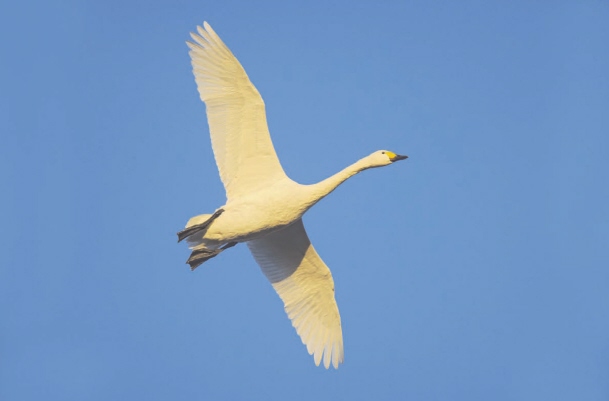
If photographing birds in flight is something you haven’t done before, do start with something easy. In practice this means something big and slow like the Bewick’s Swan featured opposite, which was photographed at the Wildfowl and Wetland Trust’s Slimbridge reserve. Because of the bird’s large size, you don’t have to get too close to it to get a good-sized image, and also the further away the bird is the easier it is to track as it flies across your line of sight. It helps to photograph your subject on a bright, sunny day against a clear blue sky. This above all other factors allows your autofocus system to lock onto the bird, as with this clear background there is nothing to distract it.
The picture works well, except for one common problem with this type of shot, which is the shadow of the bird’s body on the far wing. This shot was actually taken quite late on a winter’s day, so the sun is fairly low in the sky, which minimizes the shadow, but even in these conditions it remains a problem. Unless the bird has banked away from you, allowing the underside to be completely lit by the sun (this would give a completely different picture), there will always be a shadow.
Because this is the first example in this chapter, we might as well get a few very relevant practical technique issues out of the way. Firstly, exposure: when photographing birds in flight, always use manual exposure. Set your exposure for the bird and the background will take care of itself. A blue sky varies in tone considerably, being darkest directly overhead and brightest on the horizon. The bird doesn’t vary in tone, and if you let your camera work out the exposure for the overall scene it will usually get it wrong. White birds are particularly tricky, as you have to be extra careful not to overexpose the white feathers, which would completely ruin the picture. Secondly, watch how you set your autofocus system. There are usually two modes, tracking and fixed point. In Canon SLRs these are known as A1 Servo and Single Shot – you need the tracking option (A1 Servo). If you try and use Single Shot you’ll be very unlikely to get any sharp pictures, as the camera will not track the bird at all.
 BEWICK’S SWAN
(Cygnus columbianus bewickii)
Canon EOS 1Ds Mark II, 400mm f4 lens + 1.4x converter, 1/1,000th sec @ f6.3, digital ISO 400
Gloucestershire, UK
Finally comes the question of whether to use a tripod or not. For me this depends largely on what lens I am using. I have two main lenses that I use for flight photography, my 400mm f4 DO lens (weighing 2kg) and a 500mm f5 lens (weighing 4kg). There are exceptions, but generally the 500mm is mounted on a tripod using a Wimberley Head (see equipment chapter), as it is just too heavy to carry around and use for any length of time. The 400mm I like to use hand-held. It gives me more freedom of movement, which is essential for fast-moving subjects.
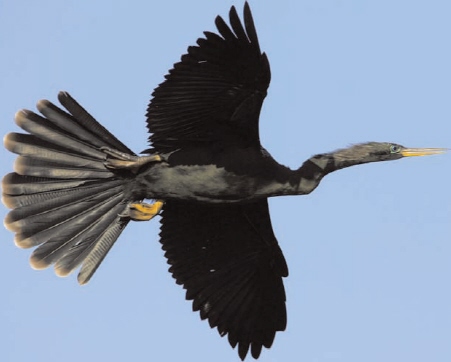
ANHINGA
(Anhinga anhinga)
Canon EOS 1D Mark II, 500mm lens + 1.4x converter, tripod, 1/1,000th sec @ f8, digital ISO 200
Florida, USA
SKY BACKGROUNDS
Now we’ve established the basics, let’s ramp up the degree of difficulty and try more challenging subjects. Venice Rookery in Florida is a world-famous location for breeding waterbirds and provides excellent opportunities for flight shots. Florida is one of the easiest places in the world to photograph birds, because they are generally nowhere near as shy of people as their European counterparts and are very approachable. In addition, the light is very bright, which allows you to shoot at high shutter speeds – a tremendous help when trying to freeze the action.
On my first visit to the rookery (at the end of January) many of the birds were in the early stages of nest building and were quite active, often flying around gathering nest material or simply looking to find a suitable nest site. Anhingas are rather primitive birds and not the world's greatest flyers, but after watching them for a while I noticed that they would often spread out their tail feathers to help them balance as they flew by. I decided this would make a good picture. On a clear blue day (much more common in Florida than in Britain), I framed the male bird shown above as he flew by, much closer than I had anticipated. To be honest, I’d have been fine without the 1.4x converter, but was very pleased that I managed to frame him nicely with so little spare room to work with. When shooting against a blue sky, it is good to fill the frame with the bird if you can, as the sky contains nothing of interest that will add to the picture.
The picture opposite is essentially the same as the previous two (i.e. a bird in flight against a blue sky), but is more difficult to take. This is because the bird is considerably smaller than the other subjects, and also because it is a very fast flyer and will change direction in a flash, as many pictures I have of a clear blue sky with no bird in it will testify. You have to be very close to such a small bird to fill the frame. This makes life very difficult indeed, because the bird travels much faster across your viewfinder than a larger bird giving the same size image. This is because, even if travelling at the same speed, the larger bird will be much further away and much easier to keep in your camera’s viewfinder. Large birds also tend to be less agile in flight than small ones, so they tend to keep a relatively steady course.
Swallows, swifts and martins are truly birds of the air, and I find they provide an irresistible challenge as they tear by above me. On this occasion I was visiting Hailuoto Island in the Gulf of Bothnia off the coast of Finland, when I came across a large number of newly arrived House Martins (below) flying around a lighthouse building, where it would appear they were prospecting for nest sites. Now I hadn’t gone all the way to Finland to photograph House Martins, but you have to make the most of any opportunity that arises and I set to work. When photographing really fast birds like these I tend to use the Canon EOS ID Mark II body. Although it has only half the megapixels of the 1Ds, being able to shoot at eight frames per second and having a burst rate of over 20 frames are real advantages in this situation.
Hand-holding gave me total freedom of movement to track the birds in my camera. This would have been much harder to achieve had I been using a tripod, even if fitted on a Wimberley head.
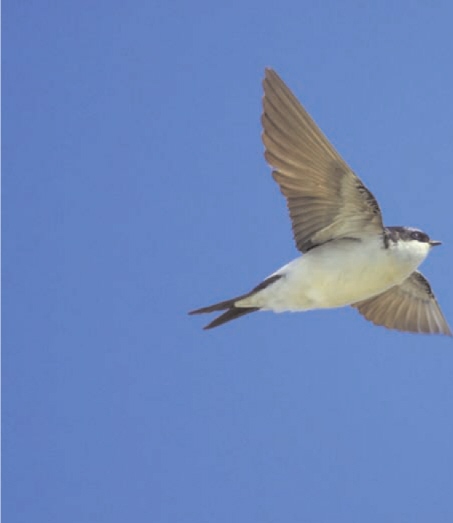
HOUSE MARTIN
(Delichon urbica)
Canon EOS 1D Mark II, 400mm lens + 1.4x converter, hand-held, 1/2,000th sec @ f5.6, digital ISO 400
Hailuoto Island, Finland

SHELDUCK
(Tadorna tadorna)
Canon EOS 1Ds Mark II, 400mm lens + 1.4x converter, handheld, 1/1,000th sec @ f6.3, digital ISO 400
Gloucestershire, UK
NON-SKY BACKGROUNDS
Photographing against a background other than the sky complicates matters for the autofocus system, because the background now provides alternative targets for it to focus on, unlike the featureless blue sky in the previous pictures. In addition to this, it is just as important to make sure that the background does not distract from the main subject. In the picture of a Shelduck in flight featured opposite, photographed at Slimbridge reserve in the UK, the soft tones of the shrubs in the blurred background add to the overall effect of the image, rather than detracting from the bird. Once again, though, the suitability of the background is something that has to be decided almost instinctively, since you will have only a fraction of a second to decide.
To give my camera the best chance of locking on to a flying bird, I tend to set all of the autofocus sensor points to ‘on’. This means that I have the maximum chance of getting the bird sharp. Using just the central sensor is recommended by some people, but I find this is less successful with all but the slowest birds. It is very difficult to keep the single sensor on the bird’s head, and as soon as it is off the head the camera starts searching around for something else to focus on, causing you to miss the shot. This is particularly the case when you are hand-holding a camera, as I was when I was photographing this Shelduck.
Notice also that the bird is flying into the picture. By this I mean that there is more open space in front of the bird than behind it. This gives the most pleasing results in most cases and is relatively easy to achieve – if you get the head in the centre (and it’s the head you want to be pin-sharp), the composition tends to be about right if the bird is large enough in the frame.
HEAD-ON
All of the flight shots shown so far were taken as the bird flew across the camera, which is by the far the most common situation. In the image below, however, the bird is coming straight at the camera, head-on, and this position can add a great deal of drama to any flight photograph. Framing is a little easier in this situation, because you pick up the bird early, simply wait until it fits nicely in the picture and press the button. In this case the wings are lifted to form a lovely ‘V’ shape that greatly adds to the overall impact of the image.
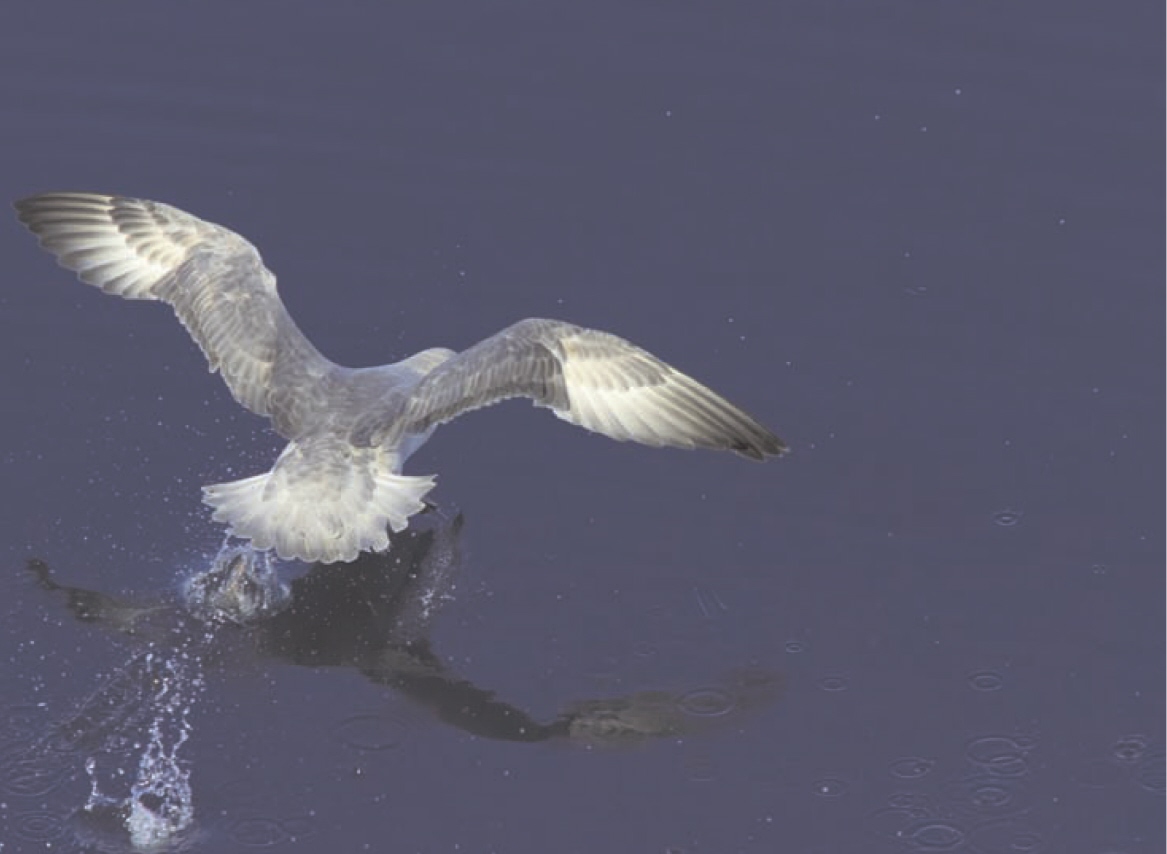
We came across this largest of gulls while walking around Noss Nature Reserve, which is an island just off the coast of Lerwick, the capital of the Shetland Isles. It was a cool, overcast day, and as we followed the footpath around the island, we noticed a pair of Great Black-backed Gulls on the edge of a cliff. To be honest, they spotted us before we saw them, and the male headed over towards us in a determined fashion. We stood our ground as he came closer and closer. Although he looked very threatening it was all bluff, and he banked away at the last minute. Having satisfied himself that he had done his duty, he promptly returned to his mate at the nest site and let us continue our walk unmolested.
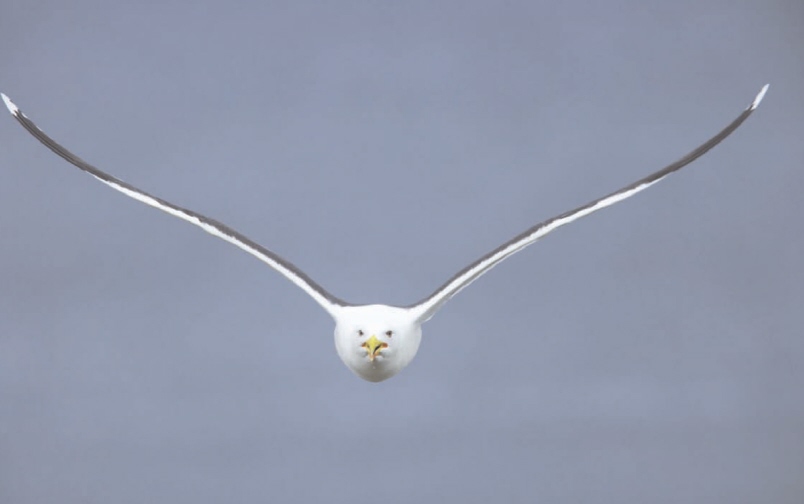
GREAT BLACK-BACKED GULL
(Larus marinus)
Canon EOS 1Ds Mark II, 400mm lens + 1.4x converter, handheld, 1/1,250th sec @ f5.6, digital ISO 400
Shetland Isles, UK
Photographing birds against the sky in overcast conditions is usually a waste of time, because the background is both very bright and rather boring. In this case I was slightly higher than the bird as he approached from the cliff edge, and this enabled me to get into a position where I could use the sea as a background, which worked very well to produce a diffuse backdrop. Despite the dull conditions, I was still able to shoot at 1/1,250th of a second, because I had to effectively underexpose by a full stop to avoid blowing out the white highlights of the bird.
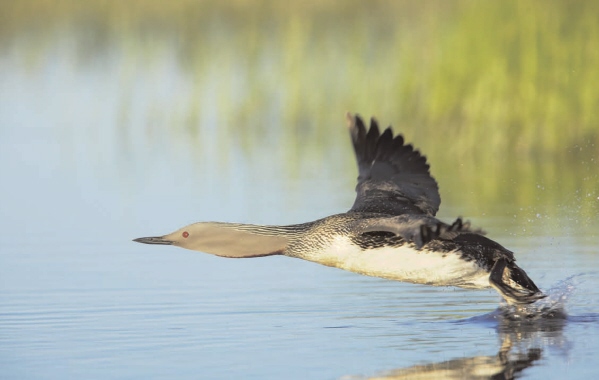
RED-THROATED DIVER (Gavia stellata)
Canon EOS 1Ds Mark II, 400mm lens + 1.4x converter, tripod, 1/600th sec @ f5.6, digital ISO 400
Finland
TAKE-OFF
Generally speaking, there are two methods employed by birds to get airborne: running and jumping. The runners are represented here by the gorgeous Red-throated Diver above, shown as it legs its way across its breeding pond in an open marsh surrounded by pine forest, deep in the heart of Finland. Pictures of birds running across water like this add a whole new dimension to flight photography, and the impact of such shots can clearly be seen here. You can almost feel the strain as the bird uses every muscle to drive itself over the water to reach enough speed to get up in the air.
Although I was using the 400mm lens for this shot, I was using a tripod too, as I was sitting in a small hide by the side of the pond. The hide is in place all summer long so the birds are very used to it. On this occasion I had been in the hide for around six hours – a tripod for even the smallest of lenses is very useful in such scenarios, because holding a camera for this length of time would be nigh on impossible. My feet were also in several centimetres of water, so a secure place for my camera was essential. Exposure was quite tricky, as the bright white belly of the bird was not visible until it started running, and without allowing for this the shot would have been ruined. Knowing my subject was thus crucial in getting it right.
The surroundings were nigh-on perfect, with soft evening light and calm conditions. Red-throated Divers breed on very small ponds, and this one was barely big enough to provide the runway length required for take-off. To get airborne the bird had to swim to one end of the pond, turn around, then run for all it was worth. Observing this behaviour enabled me to prepare for the shot. As a wildlife photographer I’ve spent far more time watching birds than I did as a birdwatcher. By carefully studying the behaviour of birds you can anticipate their actions, something that is essential for capturing moments like this, which are over in a fraction of a second. In fact, it’s freezing such fleeting moments and being able to study them at leisure afterwards that makes this type of photography so rewarding.
In contrast to the Red-throated Diver with its run-up, the Mallard pictured on the right practically explodes from the water as it takes to the air. This is a much more difficult action to capture because it involves just one sudden movement. At least when a bird runs across the water you can try and follow it as it goes. With shots like those of the Mallard, if you don’t get it the first time there are no second chances – it’s gone.
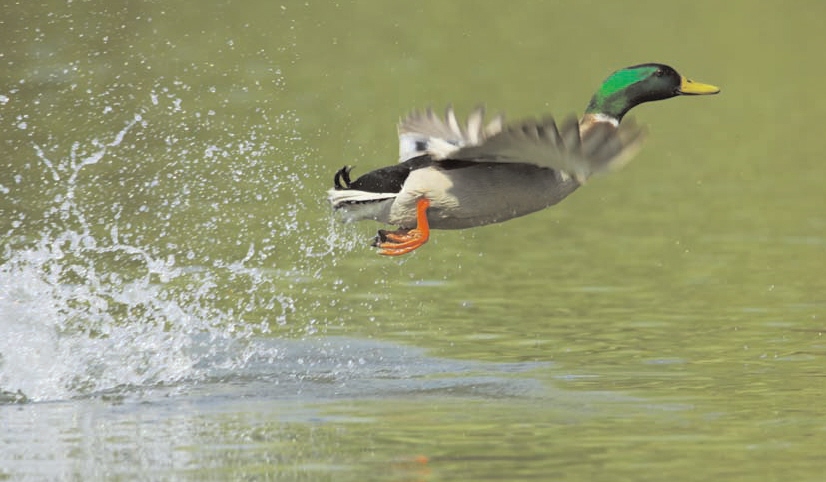
MALLARD
(Anas platyrhynchos)
Canon EOS 1D Mark II, 500mm lens + 1.4x converter, tripod, 1/1,000th sec @ f8, digital ISO 400
St Albans, UK
I was set up on a lake in St Albans photographing Grey Herons nesting on an island in the middle of the lake when a group of Mallards landed in front of me. It was early in the year and they were very active – a couple of males in the group took off almost as soon as they landed. Knowing that the others were likely to follow, I quickly focused on one male, and sure enough within a few seconds he leapt into the air to take flight. Wildlife photographers spend a lot of time waiting around for a particular shot, so when something drops into your lap unexpectedly like this you have to take advantage of the situation and react quickly.
Previously in this chapter we’ve talked about the bird ‘flying into’ the frame and how this generally makes for the best composition. In this shot, however, the bird is flying out of the frame – exiting stage right. The picture still works, though, but why?
In this case there is sufficient interest in the left side of the frame to balance the composition, so it works as a picture. The huge splash of water that occupies the left of the picture is a key element and adds a sense of movement and dynamism to the final image. If this wasn’t there and if the area contained only plain water, the left side of the picture would effectively be ‘dead’ space and the overall composition would not work.
AMERICAN
OYSTERCATCHER
(Haemotopus palliatus)
Canon EOS 1D Mark II, 500mm f4 lens + 1.4x converter, tripod, 1/1,000th sec @ f8, digital ISO 200
Florida, USA
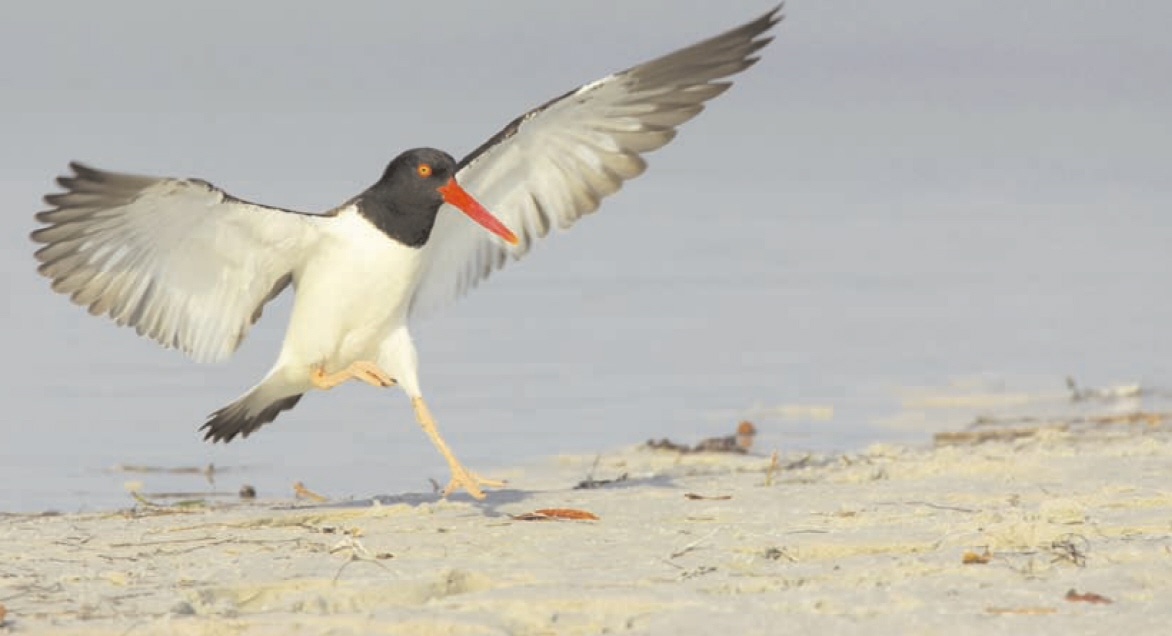
LANDING
What goes up must come down, and birds are no exception. It is capturing the moment of touchdown that we deal with next.
This American Oystercatcher has its left foot just an inch or so above the ground, a split second before landing on the white sand beach. When photographing a bird taking off you have the advantage of it being in front of you to start with, and all you need to do is wait for it to take off. When photographing a bird landing you can’t just focus on an empty bit of ground and hope for something to drop in – you have to anticipate the event by careful observation. This is best achieved by finding an area where birds are regularly landing. This was the case when it came to the American Oystercatcher picture. I was on the beach on a rising tide, and the mudflats where many wading birds were feeding were slowly but surely being covered by the sea. There was one spit of sand that was just a few centimetres higher than the surrounding area and quickly became the only bit of dry land around. This was attracting a lot of birds that were flying in to wait until the tide receded, when they could resume feeding.
It wasn’t necessary to set up a hide. I simply walked out slowly and carefully onto the spit before kneeling down and setting up my camera on the Wimberley head mounted on my tripod. The birds ignored me completely. In fact, as the tide rose further a few started to settle down and sleep just a metre or so away. I concentrated on framing the bird in the camera as it flew in to the spit, picking it up as far away as possible. As the bird came closer and closer and prepared to land, I started shooting. Using this technique gives the autofocus system the best chance of locking onto the bird and tracking it, so when you press the shutter you have the greatest chance of taking a sharp image.
This image is also a very good example of why manual exposure is so essential. Without it the white underside of the bird would have been overexposed – despite the bright surroundings on a sunny day the meter would still have got it wrong.
There are times when using manual focus to capture a bird landing is far more successful than using the camera’s autofocus system. This was certainly the case when I was attempting to capture a bee-eater landing on its perch in Hungary (opposite).
Bee-eaters are relatively small, fast-flying birds (they catch insects on the wing), and I was in a small hide set up near a nesting hole. My camera was of course mounted on a tripod and this, combined with the rather restricted view that is inevitable in a hide, combined to make it very difficult to pick up the bird in the camera as it flew in. Even when I managed to pick up the bird early, it proved impossible to track because it dipped low, then shot up to the perch to land. Ideally I would have stood outside the hide near the perch. Using my hand-held 400mm lens, I would have had the freedom of movement to track the bird in flight and get the shot I was after.
Unfortunately, wild birds (particularly in Europe – I wasn’t in Florida now) tend to steer clear of people, and the bird would not have come anywhere near me. So what should I do?
In this situation I knew exactly where the bird was going to land – on the perch that we had so thoughtfully provided for it. All I had to do was focus on the perch and wait. Because the bird was landing quite infrequently, it was the waiting that was the most difficult bit. You couldn’t relax because you had to be ready to shoot if the bird appeared. The nice thing about bee-eaters is that they make a very distinctive call, and as the bird approached the perch it would call out (presumably to its mate in the nest hole). This alerted me to its presence, and my shutter finger hovered over the button as I peered expectantly through the viewfinder. As soon as the bird appeared, I pressed the shutter release and made one of my favourite bee-eater shots, beating the autofocus technology hands down – a good day indeed!
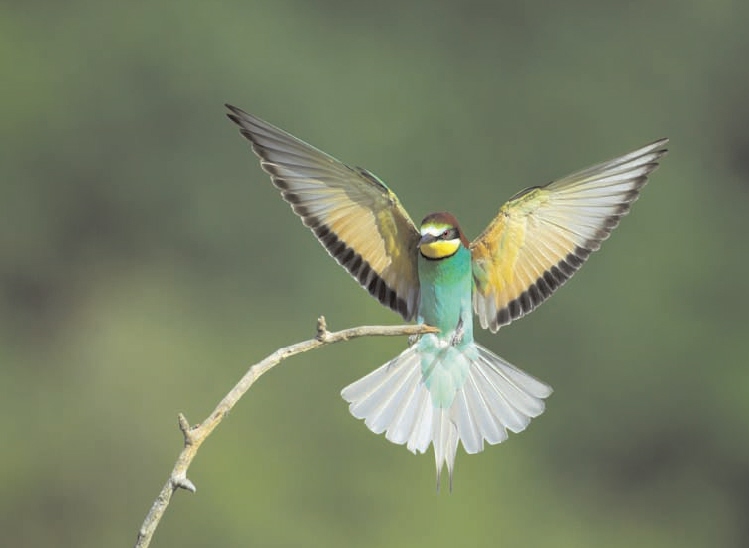
EUROPEAN
BEE-EATER
(Merops apiaster)
Canon EOS 1D Mark II, 500mm lens, tripod, 1/2,000th second @ f5.6, digital ISO 400
Hungary
FULMAR
(Fulmarus glacialis)
Canon EOS 1D Mark II, 400mm f4 lens + 1.4x converter, hand-held, 1/2,000th sec @ f8, digital ISO 400
Spitsbergen, Norway
FLYING AWAY
It must be said that taking pictures of birds flying away from you rarely works, and it is not something I do often. However, some pictures like this do work.
We were on a ship cruising slowly through the broken ice around Spitsbergen high above the Arctic Circle, looking (rather unsuccessfully) for Polar Bears. There were a number of Fulmars flying around the ship, and I was passing the time photographing them flying low over the water and the ice. After a while I wandered up to the bow of the ship, and from this point I noticed that occasionally a Fulmar sitting quietly on the clear water between the ice flows would wait until the last second before running across the water to take off as the ship approached.
I thought this would make a slightly different picture than normal, so I positioned myself right on the bow and waited. Needless to say, nothing now happened for some time, but eventually I spotted a Fulmar sitting on the water in front of us, which seemed determined to stay put. With a 2,000-ton ship bearing down on it, this was never a strategy that was going to be successful. At the last moment, it launched itself across the sea as fast as it could go. That was the moment I had been waiting for.
Despite the viewpoint, the image works mainly because of the positioning of the bird in the picture. Although the bird is flying away from us, it is at such an angle that it is still flying into the empty space to the right of the picture. The contrast between the relatively pale plumage of the bird and the dark blue water helps, as does the bird’s reflection and the two splash points in the sea.
FLOCKS
Photographing bird flocks in flight can result in very evocative pictures, capturing whole scenes, rather than just isolating single birds. Spectacular as such images can be, they are in fact very easy to take. The relative distance from the camera gives you more depth of field to work with, and the wall of birds is easy for your autofocus system to handle. The difficult bit is being there when something like this happens. When I took the shot below I was visiting the east Kent coast on a rare sunny winter’s day specifically to photograph the Brent Geese which a fellow photographer had told me were there in good numbers. I had arrived not long after dawn and the geese were feeding close inshore, as the beaches were pretty deserted at this hour. As the sun got up, so did the local population on this Sunday morning, and dog walking proved to be a popular pastime. Now birds are not particularly fond of people wandering up and down the beach, but they will not tolerate dogs at all. Consequently the geese flew across the sea wall and onto the adjoining fields.
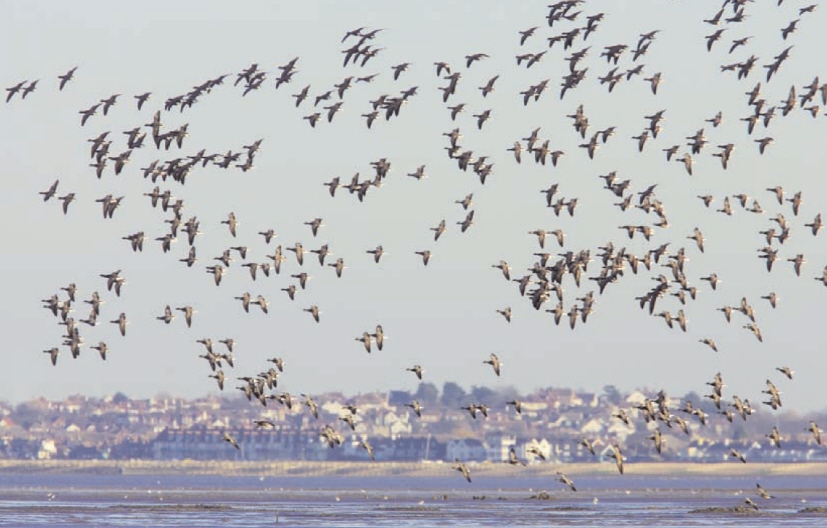
BRENT GEESE
(Branta bernicula)
Canon EOS 1D Mark II, 400mm f4 lens + 1.4x converter, hand-held, 1/500th sec @ f8, digital ISO 400
Kent, UK
As the tide went out and the mud flats were revealed, the birds took off as one and flew over the ‘danger area’ of the dog-infested beach and out onto the mud to feed. Fortunately I was some distance away at the time and was able to frame a large part of the flock as it wheeled around to land. The background shows the seaside town of Whitstable in the distance. I think it really adds a sense of place to the picture, showing a typical winter coastal scene in southern England. I have also captured the very front of the flock to the left-hand side of the frame, with no birds disappearing out of the picture. This gives the flock a pleasing shape. It is also important in a shot like this to keep the horizon straight.
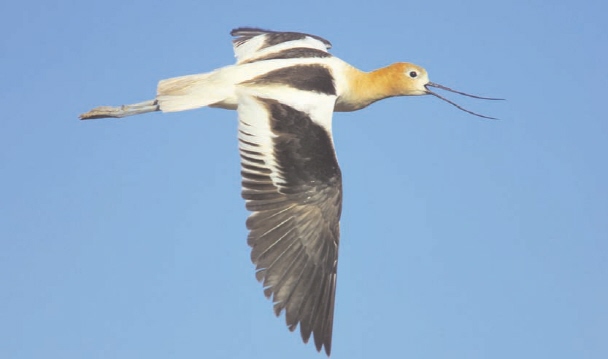
AMERICAN AVOCET
(Recurvirostra americana)
Canon EOS 1D Mark II, 400mm f4 lens + 1.4x converter, hand-held, 1/1,600th sec @ f5.6, digital ISO 200
Oregon, USA
FLIGHT PLUS
In this section we look at taking the flight shot and adding something else to provide additional interest to a picture. In the case of the American Avocet portrayed above, the bird is clearly calling as it flies by. This is one of the easiest behaviours to capture in a flying bird because birds frequently call while on the wing – the sound travels a great distance when the bird is high in the sky.
The picture was taken at Klamath National Wildlife Refuge on the border between California and Oregon in the west of the United States. The American Avocet is a particularly good species to demonstrate the impact that catching the bird in flight can add to a picture, because its long, curved bill shows up very well when it calls. The bird in this picture fills the frame and is pretty central, although there is a little more space in front of it than behind it.
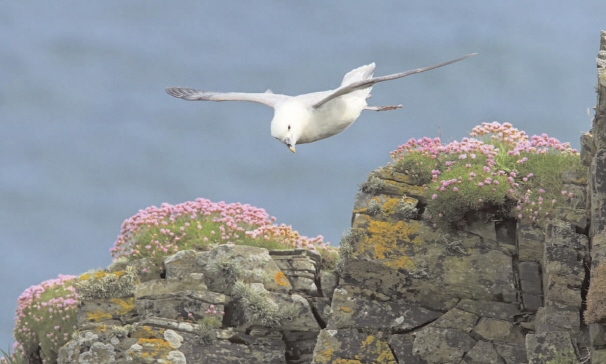
FULMAR
(Fulmarus glacialis)
Canon EOS 1Ds Mark II, 400mm f4 lens + 1.4x converter, handheld, 1/1,000th sec @ f9, digital ISO 400
Shetland Isles, UK
The other way to add something extra to a flight shot is to include additional elements in the picture. Normally the background tends to be very plain and out of focus, such as sea or sky. This is often good, as an uncluttered background shows the bird to its best advantage. In the picture above, however, I have included some elements of the bird’s cliff-edge habitat, which lift the image above a straightforward picture of a Fulmar in flight.
While visiting Sumburgh Head on the very south of the Shetland Isles, I was watching the Fulmars use the updraft along the cliffs to bounce around in the air with seemingly little effort. In windy conditions such as this, Fulmars can take off easily – they simply throw themselves off the nest site and sort themselves out when airborne. Landing, though, is another matter and they will often make several attempts, circling around back out to sea each time before coming in for another go. This particular bird had already made a couple of attempts at landing and I noticed that it took the same route as it came back each time. There was one part of this route where it came around the corner of the cliff, just over a very attractive lichen-covered rock that was covered with the pink blooms of Thrift. The timing was quite tricky, but after a few attempts I managed to get the shot I wanted.
The key to the success of this image is the positioning of the bird in relation to the cliff. If the background was just the sea, then the bird would be too high in the frame, but in this picture the rocks hold equal interest to the bird, so the bird is positioned to show off the rocks to the best advantage. When using long lenses the depth of field is minimal – I had to try and get the bird just above the rocks so that both elements were in focus. I stopped down to f9 to increase the depth of field, but couldn’t go any lower because I needed 1/1,000th of a second to freeze the bird and keep it sharp. This was a surprisingly tricky image to create, but it is one of my favourite Fulmar pictures.
PORTRAIT MODE
So far all of the pictures in the flight section have been in landscape format, but the image of a Black-browed Albatross on the right is in portrait format. It is a difficult shot to take, but does suit some subjects very well.
Many Black-browed Albatrosses were following our ship across the infamous Drake Passage as I was returning back to South America after a trip to Antarctica. Some follow ships for miles, shearing back and forth across the waves without even flapping their wings. Calm weather may be good for the ship’s passengers, but it is not good for birds that use the wind to stay aloft. It was pretty rough weather that found me standing on the stern of our small ship as it battled through the waves, rolling from side to side – not the most stable platform for photography.
Albatrosses often fly with their wings at 90 degrees to the ocean as they bank to make the most of the wind. This is the classic albatross image, but it is not best suited to the normal landscape mode picture. I decided to capture the bird in portrait mode. It is awkward to hold the camera and telephoto lens in this position, and tracking the bird is tricky because your horizontal field of view is very narrow.
As you can see from the exposure of 1/2,000th of a second at f8, it was very bright. As is usual with birds that contain a fair amount of white plumage, this would have been at least a full stop underexposed compared with the camera’s meter reading. I could have shot at 1/4,000th of a second at f5.6, but I reckoned that 1/2,000th of a second was fast enough for a sharp image, and that f8 would give me that extra little bit of depth of field.
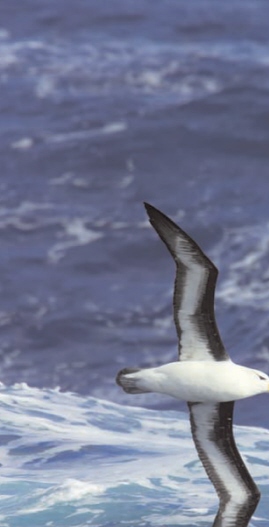
BLACK-BROWED
ALBATROSS
(Diomedea melanophris)
Canon EOS 1D Mark II, 400mm f4 lens + 1.4x converter, hand-held, 1/2,000th sec @ f8, digital ISO 400
Antarctica