In this chapter I explore the idea of pushing the art of bird photography just that little bit further. This varies from the simple concept of zooming in on one part of the subject, to capturing movement and using birds as small elements in a landscape.
Some of the themes in this chapter take ideas covered in previous chapters, but push them further, resulting in pictures that go beyond what would be described as ‘normal’ bird photography. To some this may be going too far, but I sometimes find the conventions surrounding nature photography somewhat limiting, and I enjoy the challenge of trying out new ideas. There are many bird photographers who are very happy with producing beautiful images of birds that show every feather detail, and have no interest in anything that would be considered ‘arty’. I’ve even met people who think that silhouettes are a step too far. On the other side of the fence are those who seem to believe that any traditional composition is no longer worthy of consideration, and that anything ‘new’ must be good just because it is different – a surprising number of people who hold such views seem to pop up as judges in photo competitions. The danger here lies in the triumph of originality over quality. Appreciation of any art form is subjective, and with the sheer numbers of excellent images being produced nowadays the temptation to be overawed by something a little different is considerable, but not all these images warrant this reaction.
So are you arty or traditional? Actually, I don’t consider this to be a valid question. Any photograph you take has artistic considerations, whatever type of image you are making. A better question might be: is it editorial or interpretive? Editorial pictures demonstrate a species or particular behaviour, and interpretive ones attempt to capture the mood or impression of the subject rather than the absolute detail. There are photographers firmly in one camp or the other – I prefer to have a foot in both.
HEAD SHOTS
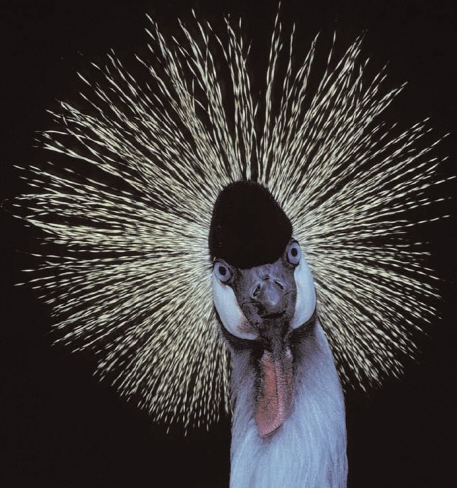
Let’s start with expanding on the portrait just a little. Opportunities to get really close to birds to enable ‘head shots’ are not that common, but if they do arise they can result in pictures with a high impact, as in the shot opposite of a Crowned Crane, taken in a bird park in East Anglia. Working in a bird park is ideal for this type of shot because the captive birds are very used to people and often allow a close approach, although you still have to move carefully and slowly to avoid scaring the subject. Photographing captive birds rather than birds in the wild can be a controversial subject among bird photographers, but this type of image would be almost impossible to make in the wild – and if you are considering purely the aesthetics of a picture, then it really doesn’t matter where it was taken.
When I saw this Crowned Crane walking slowly around the grounds, I was immediately drawn to the head with that magnificent circular ‘crown’. This was the most startling part of the bird, so I decided to concentrate my composition on the head. It was late in the day and the light was fading, so flash was required. I could have used fill flash, but the background was a bit messy and I wanted no distractions around the bird’s head. I therefore used full flash to render the background completely black. This would give me the graphic image I wanted, and by using a small aperture I would record no background detail, but achieve a good depth of field.
A simple head shot can thus produce a real eye-grabbing image. This direct, front-on view elicits an emotional response from the viewer more than any other view, and the angle of the bird’s head gives the bird a quizzical look and adds a lot of character to the picture. There is a ‘connection’ between subject and viewer, and this ‘unnatural’ image is a very powerful one. After all, who said that every bird photograph had to look natural? The key point here is that this is about producing an interesting image, which does not necessarily mean representing everything in an entirely ‘natural’ way.
INCLUDING THE ENVIRONMENT
Having gone in ultra close for the first image in this chapter, I’m now going to the other end of the spectrum and showing birds as part of the wider environment in which they live. In this type of picture the landscape around the birds plays as important a role as the birds themselves. It is not just a shot taken where you couldn’t get close enough to your subject, resulting in the subject appearing small in the frame – although I have seen some pictures described as ‘bird in its environment’ that were clearly the result of this. A really successful picture of this type has to be driven by the surroundings and not the bird.

 CROWNED CRANE
(Balearica regulorum)
Canon EOS 1N, 300mm f2.8 lens, tripod, flash, 1/200th sec @ f22, Fuji Provia 100
East Anglia, UK
I was visiting Fowlsheugh, an RSPB reserve south of Aberdeen on the east coast of Scotland. Many seabirds breed on the cliffs at the Fowlsheugh Reserve, and when I visited in late May the cliff tops were covered in the soft pink flowers of Thrift. Walking along the clifftop, I came across an area where the Thrift was growing among rocks that were covered in yellow lichens, the combination of the two making a very colourful scene. There were a few Kittiwakes collecting nesting material close by. I had settled down to try and photograph them when a pair of Oystercatchers (opposite, above) flew in and landed on the cliff edge. They looked superb in this setting, and I decided to try and include plenty of rocks and plants in my picture. I placed the Oystercatchers at the top of the frame, which enabled me to get as much of the colourful foreground in the picture as possible. To ensure this was reasonably sharp I stopped down to f16 and took the shot.
Both Oystercatchers were facing the same way, and this dictated their horizontal positioning in the frame, with the lead bird being much further away from the right frame edge than the rear bird is from the left-hand edge. This is important to the overall balance of the picture, which requires any space available to be in front of the birds, rather than behind them.
This shot concentrated on the immediate surroundings of the Oystercatchers, picking up as much detail in the surrounding environment as possible. In the shot of the Puffins (opposite, below), the environment is a much broader view of the entire landscape in which the birds live. It could in fact be equally described as a landscape with birds in it. This type of shot is actually a lot harder to accomplish than it looks, because you will not be able to obtain the broad view of the landscape behind the birds with a long telephoto lens. When using a wide-angle lens you must get very close to your subject, but of course birds have a habit of flying away if you approach them too close.
Hermaness National Nature Reserve is located on the north-west tip of Unst, the most northerly inhabited island in the Shetland Isles. In the summer it is home to some 25,000 pairs of Puffins that nest on the high cliffs, as well as other seabirds. While I was taking a rest during a walk around the reserve, I noticed a few Puffins standing around on the very edge of the cliff. They were at one side of a deep bay, so that the other side of the bay and the offshore islands that supported huge Gannet colonies could be used as a backdrop – if only the Puffins would allow me to get close enough. The other slight drawback was that the Puffins were not right on top of the cliff near the path, but further down, which made for a rather precarious approach high above the sea below. I decided that the best way to approach the birds was to make my profile as small as possible, and slowly crawl on my belly towards them. The birds would look at me occasionally as I edged towards them, and when they did so I froze until they looked away again. It took ages to get close enough for a shot, but eventually I managed to frame the picture as I had envisioned it while still safely on the footpath.
Seabirds are pretty tolerant birds and are thus ideal subjects for this type of picture. They still require a careful approach – the last thing you want to do is disturb your subject. Once you’ve got the shot you want, it is important to continue to respect the bird and put just as much care into retreating from it. I’m happy to say that when I got back to the safety of the pathway at the top of the cliff, the two Puffins were still exactly where I first saw them.
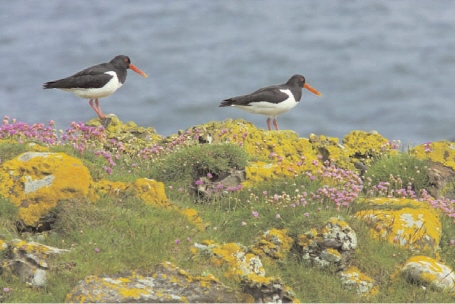
 OYSTERCATCHERS
(Haematopus ostralegus)
Canon EOS 1D Mark II, 400mm lens + 1.4x converter, hand-held, 1/320th sec @ f16, digital ISO 400
Scotland, UK
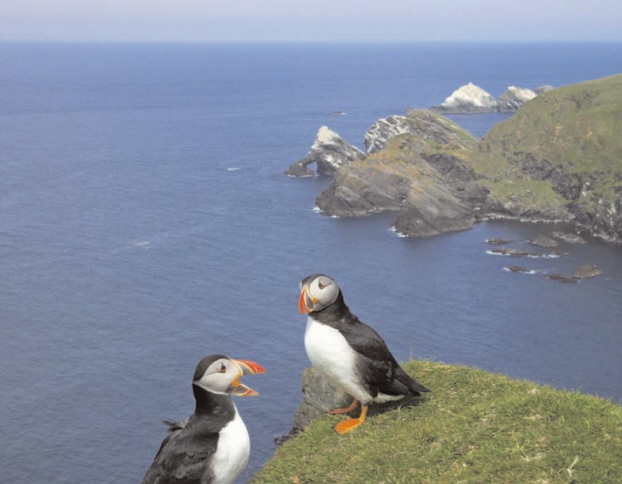
 PUFFINS
(Fratercula arctica)
Canon EOS 1Ds Mark II, 28–135mm zoom lens @ 53mm, hand-held, 1/400th sec @ f16, digital ISO 400
Shetland Isles, UK
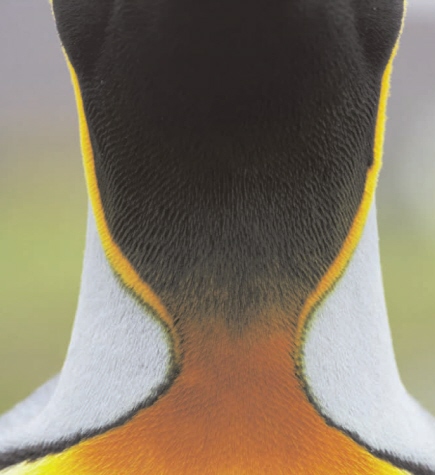
 KING PENGUIN
(Aptenodytes patagonicus)
Canon EOS 1Ds, 100–400mm zoom lens @ 400mm, hand-held, 1/250th sec @ f11, digital ISO 400
South Georgia
ABSTRACT
Some of the most artistically satisfying images of birds can be obtained when you see beyond the limitations imposed by the shape and location of the bird itself, and use your understanding of shape and form to produce an abstract picture that works more as a piece of art than a bird photograph. To some this may sound a little pretentious, but photography is an art form and it is no more pretentious to try and achieve an artistic goal with a camera than it is with a paintbrush. The art is the vision in your head, the craft is using the equipment (be this a camera or a paintbrush) to realize this vision. By far the most important piece of equipment in an abstract image is not the camera, or the lens, but the photographer’s brain.
Salisbury Plain was the setting for the abstract of a King Penguin on the left, although I should point out that penguins haven’t colonized Wiltshire and that the Salisbury Plain in question is not the one with the stone circle, but a location on the island of South Georgia that is home to a huge colony of King Penguins. I spent a couple of full days photographing these lovely birds, and as usual was looking for a new angle. When first visiting a new location or photographing a new bird, there are so many ‘normal’ pictures to take, covering portraits, behaviour, family life, and so on. These keep the photographer very busy, but as this type of photography is so familiar it can be done in a semi-automatic sort of mindset. This is not a criticism, because an experienced person in any occupation will be familiar with this. When creating abstracts, however, you really do need to stop and smell the flowers.
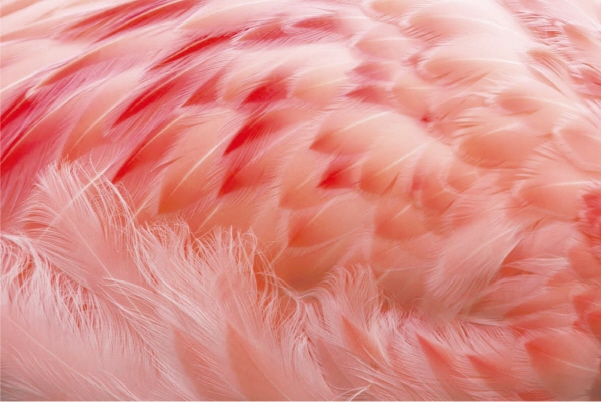
 ANDEAN FLAMINGO
(Phoenicopterus andinus)
Canon EOS 1Ds, 400mm f4 lens + 1.4x converter, hand-held, 1/320th sec @ f8, digital ISO 400
Gloucestershire, UK
While sitting a short distance from some King Penguins away from the main, rather crowded colony, a number of them would approach me out of curiosity, sometimes coming to just a metre away. One particular bird would throw its head back at regular intervals and call, a sound not unlike the braying of a donkey. When it did so, the characteristic orange and yellow of the neck was shown off to best advantage, so it was this that I concentrated on capturing. I decided to exclude the head and make the abstract you see opposite.
In the second image (above), it is not immediately apparent what the viewer is looking at. Exactly what it is, though, is not really the point. It is the overall impact of the subtle blends of colour and texture that make it work. The fact that it is a species of flamingo – specifically an Andean Flamingo – is irrelevant. It could be mistaken for a flower close-up until you notice the feather detail. It could even be a dead museum specimen, but again this is not important. The result (at least to me) is a thing of beauty, unfettered by any reference to the shape or size of the bird.
At Slimbridge Wildfowl and Wetlands Trust in Gloucester, there is a captive colony of flamingos. In my experience they tend to spend a lot of their time in the large shed provided for their shelter, but early one morning a few of them were nonchantly walking around outside the shelter, sometimes coming quite close. The head of a flamingo is distinctive, so I took head shots to start with. It was a dull morning, but I knew that because I was shooting on digital I could bring out the colours to their best effect during post-processing. In fact, the overcast conditions would enable me to capture the subtle tones of the feathers much better than harsh sunlight, so I then concentrated on isolating the body of a bird and produced the image above.

 KING PENGUINS
(Aptenodytes patagonicus)
Canon EOS 1D, 400mm lens + 1.4x converter, tripod, 1/125th sec @ f16, digital ISO 400
South Georgia
PATTERNS
Images that contain patterns of repeated subjects are popular in all types of photography. There is a strange beauty to be found in the symmetry of one object repeated many times, and we use such patterns in our everyday lives to decorate our environment on things such as furnishings, clothing and so on. Bird photography is not something that immediately springs to mind when considering creating patterns in photography, but with careful observation they can be found. As with much of bird photography, finding the opportunity is often a lot harder than executing the shot. Although some do scream out at you, like the penguins above, others take a lot more searching out through careful observation.
This image of the King Penguin colony on Salisbury Plain on the island of South Georgia was taken less than 100 metres from the King Penguin neck picture. In some ways the two photographs of the same species could not be more different, one being the detail of an individual, the other a great mass of birds. Despite this they do have something in common, in that they both have a symmetry about them, and both are studies in the same range of colours. The gathering of King Penguins in huge colonies has to be one of the most spectacular sights in the world of birds. In February when I visited South Georgia, nearly all of the birds were in adult plumage. Earlier in the year the dark brown chicks are present throughout the colony – their presence would have produced an entirely different image.
The difficulty in photographing the colony on Salisbury Plain is that, as its name suggests, it is flat. Therefore capturing the patterns made by this avian gathering at ground level was not really possible. What I needed was some height. When scanning the edge of the colony I saw a small mound on the far edge. I made my way carefully to it, and climbed up it so that I could look down on the colony. It was only a few metres high, but it made all the difference. With a long lens I took the shot I had seen in my mind’s eye when I was at ground level. Using a tripod I was able to stop down to f16, which gave me a greater depth of field to get the penguins as sharp as possible.
The second picture on the theme of patterns (right) is different from the first, because there are far fewer birds in the frame and they come nowhere near to filling it. This is a far less spectacular image than that of the King Penguins, but much more difficult to spot in the field as potential for a pattern picture. The pattern of the sleeping birds across the frame is repeated more softly by their reflections in the water. The reflection isn’t perfect because of a light breeze, but it does add a considerable compositional element to the final image.
It was while I was driving around the dirt roads in the Merritt Island National Wildlife Refuge that I spotted the group of American Avocets roosting some distance away in one of the many lagoons in this superb reserve. It was high tide, so many of the wading birds had flown in from the nearby shore to rest in the shelter of the shallow lagoons. The birds are vulnerable while sleeping, so they tend to congregate towards the centre of the lagoon, where they feel safest from land-based predators. This gave me a bit of a problem because they were so far away, but by fitting a 2x converter to my 500mm lens I was able to get the image size I was looking for. Although the birds were in a straight line, I needed to position myself so that they were parallel with the back of my camera to ensure that they would all be in focus using such a long lens. As they were roosting they were unlikely to be going anywhere quickly, so I took my time finding the right position before taking a series of shots, the best of which is shown here.
The position of the birds in the frame is critical to the success of this image, and I deliberately left the top part of the frame empty as I wanted the line of birds and their reflections off the central horizontal. The bird on the right of the image is a bit close to the edge, but as it is looking into the picture I can get away with this. Had the bird’s head been up and looking right the picture wouldn’t have worked – I would have needed much more space on the right-hand side of the frame for it to work.
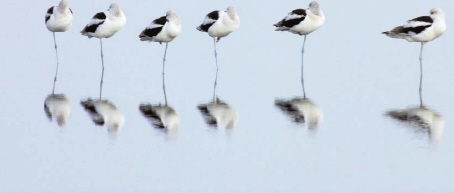
 AMERICAN AVOCETS
(Recurvirostra americana)
Canon EOS 1D Mark II, 500mm f4 lens + 2x converter, tripod, 1/250th sec @ f13, digital ISO 200
Florida, USA
FILL FLASH FOR EFFECT
Fill flash can be used to lift the details of a bird on a dull day; it can also be used creatively to produce images that have more impact than just a straightforward shot. Fill flash involves exposing for the subject normally, then using a flashlight to put additional light onto the subject. This differs from full flash, which provides the only light on the subject and is often used when there is insufficient light for a natural light exposure. Full flash therefore often produces a black or dark background as the flash falls off with distance, but fill flash does not, as the available natural light is sufficient to correctly expose the background.
This picture of an Arctic Tern could well be entitled ‘How to liven up a dull day’, because this was, in effect, how it came about. I was visiting the Farne Islands off the Northumberland coast in north-east England on an afternoon when the skies had filled with white cloud. I had planned to photograph Arctic Terns as they attacked the human visitors, and was hoping for clear blue skies. Photographing birds against white skies rarely works in my experience, but then I realized that by manually controlling the exposure I could make the sky whatever shade I liked. Making the sky darker added to the drama of the picture, and by using fill flash I was able to light the main subject separately. The birds swoop in very fast and the flash only froze the final position of this bird, leaving the wings blurred at the edges and adding movement to the scene.
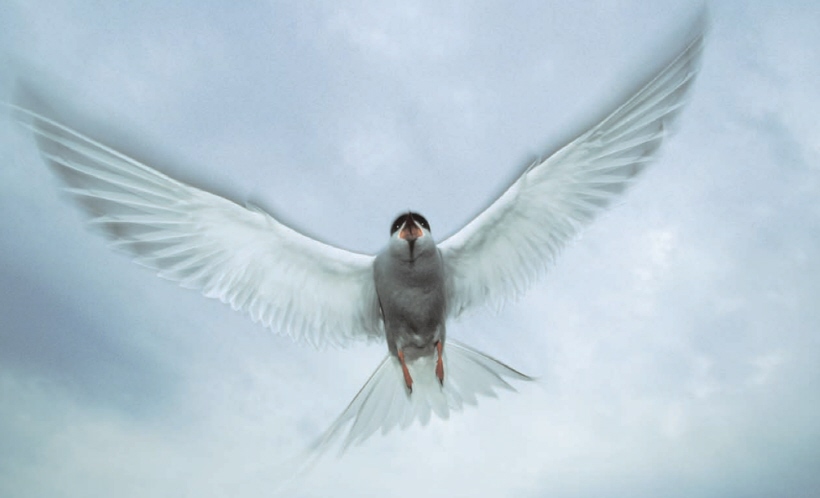
 ARCTIC TERN
(Sterna paradisaea)
Canon EOS 1N, 24mm lens, flash, hand-held, 1/200th sec @ around f16, Fuji Provia 100
Farne Islands, UK
When photographing a fast-moving subject like this with fill flash there are effectively two exposures made. The first is by the natural light and the second by the flashlight. Because I was using a relatively slow shutter speed of 1/200th second (the flash sync speed of the camera I was using), the wings of the subject are blurred. As the flash exposure was very short the image of the bird by flashlight is sharp. It is the combination of these two exposures on the one frame that gives the interesting effect. For the best results the sharp flash exposure should be at the end of the exposure, not at the start, so you need to ensure that you use second shutter sync on your flash set-up – the flash fires just before the shutter closes, so that the sharp image is effectively ‘on top’ of the blurred one.
Immediately after the sun sets, the sky in the west often has just enough light for a reasonable shutter speed to be used to accurately record the sky, but any bird set against it would be badly underexposed with no direct light on it. In these conditions it is possible to use fill flash to provide the light on the bird and use the ambient light for the sky. In most cases the bird will be some distance away and you will need a telephoto lens. Modern-day flashguns are very powerful, but when using one with a telephoto lens I always use a plastic fresnel lens attached to the flashgun, which concentrates the flash in a narrow band and more than doubles the distance that the light travels.
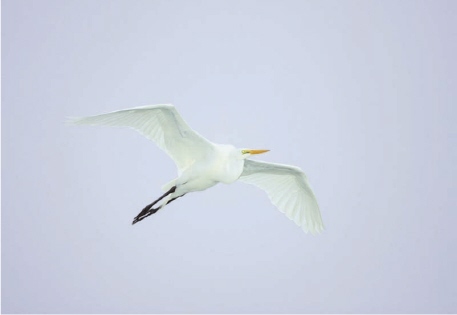
 GREAT WHITE EGRET
(Casmerodius albus)
Canon EOS 1D Mark II, 500mm f4 lens, flash, tripod, 1/250th sec @ f4, digital ISO 200
Florida, USA
The above picture of a Great White Egret was taken just after sunset at the Venice Rookery in Florida. The birds continue collecting nesting material and food even after sunset, so I thought this was an ideal opportunity to try out this fill flash technique. This species was an ideal subject, as its white plumage would stand out well against the pale blue/grey sky. It is also quite a slow flier, so I would be still be able to get a sharp image at the flash sync speed of only 1/250th second if I panned carefully with the bird. I manually set the ambient light exposure to capture the sky at a mid-tone, then dialled in flash compensation of minus one and a third stops to allow for the white bird.
In this image the underside of the bird is nicely lit and detailed. It has a slightly surreal look, as if the bird has been cut out and placed against the sky. The bird’s eye has reflected the flash more effectively than the feathers, which adds a slight spookiness to the picture.
MOVEMENT – SLOW PAN
We normally use fast shutter speeds to effectively freeze a moment in time, but to show movement we generally need to use a much slower shutter speed to allow some of that movement to be recorded, usually as a blur. One of the ways to do this is to track the bird during the movement by carefully following it in the viewfinder while making the exposure, a technique that is known as the slow pan.
The trick is to pan with the bird at exactly the same speed as it is travelling, and with practice this is not too difficult to achieve. In this picture of the Whooper Swan running across the water, the bird’s wings and feet are lost in a blur, but the head is relatively sharp. A clearly visible head always lifts an image, but is quite difficult to achieve. The key to achieving such a shot lies in keeping the pan smooth, with no movement other than in the direction in which the bird is moving. If your pan is faster or slower than the bird, the head will be blurred, while any vertical movement will blur the head even more.
Setting a shutter speed of around 1/15th of a second works well for large, relatively slow birds. To be able to use such a slow shutter speed, you’ll probably need an overcast day when the light is not too bright, or to shoot very early in the morning or late in the evening.
I also set the digital ISO to its minimum setting (typically ISO 50, referred to as simply ‘Low’ on many cameras), and the aperture is whatever I need to shoot at my required shutter speed. In this case this was f16, although I prefer f11 or larger to reduce the effect of any small specks of dust on the sensor that show up really badly at small apertures.
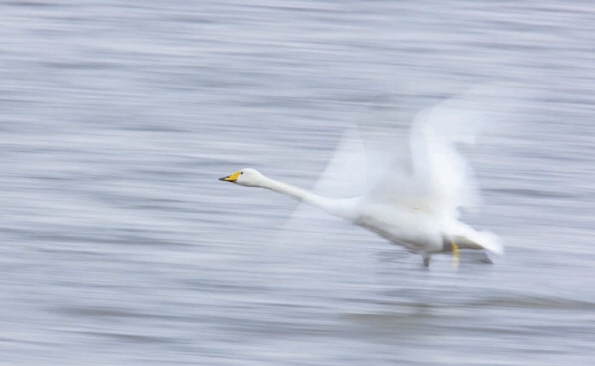
 WHOOPER SWAN
(Cygnus cygnus)
Canon EOS 1Ds Mark II, 500mm f4 lens + 1.4x converter, tripod, 1/15th sec @ f16, digital ISO 50
UK
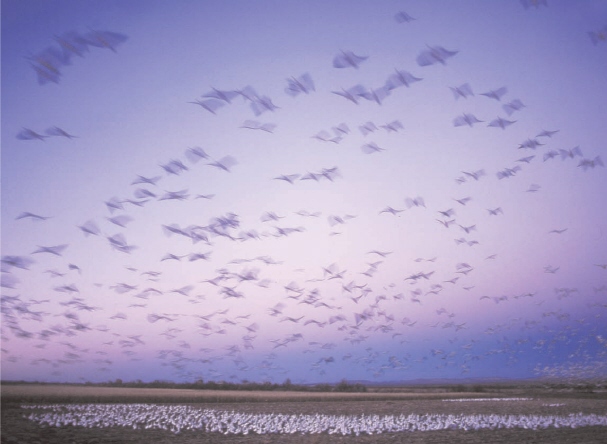
 SNOW GEESE
(Anser caerulescens)
Canon EOS 1N, 24mm lens, tripod, around 1/8th sec @ f11, Fuji Provia 100
New Mexico, USA
MOVEMENT WITHOUT PANNING
The other technique that is used to record movement is to again use a slow shutter speed, but instead of panning with the movement of the subject you keep the camera still. This results in a completely different effect from the slow pan, because the birds are recorded as blurs as they move across the film plane. How much blurring occurs is dependent on both how fast the birds are flying and how slow the shutter speed is. Conditions best for this type of photography are when there is low light, otherwise it is difficult to obtain a low enough shutter speed, even at small apertures. With digital cameras the situation is even worse, because using a small aperture such as f22 or f32 will show up every single small dot of dust on your sensor, which would probably not be visible at around f8 or f5.6. With the ability to switch the ISO speed so easily with digital cameras, it is a pity that you cannot set it to below 50 – a speed of 10 ISO or even lower would be very useful for this type of work. Camera manufacturers seem to be concentrating their efforts in the other direction, constantly seeking low-grain high-ISO images, but I’m sure that many photographers would find the ability to increase the range at the lower end very useful as well.
The above image of Snow Geese taking off is another from Bosque Del Apache. It was just after sunset and a couple of large flocks of geese were still on their feeding grounds. I knew these would soon leave to fly to their roost site, so I set up my camera with a wide-angle lens, ready for the action. It was the furthest of the two flocks that took off first, and as they flew over the nearest group they made a wonderful contrast with the flock on the ground, which came out sharp compared to the blurred movement of the geese in flight above them. When making images like this it is often a good idea to have a non-moving object in the frame to anchor the picture and emphasize the movement of the birds. In this case I was able to use the flock of geese on the ground, but a tree, reeds in a marsh or even a fence would add that extra element.
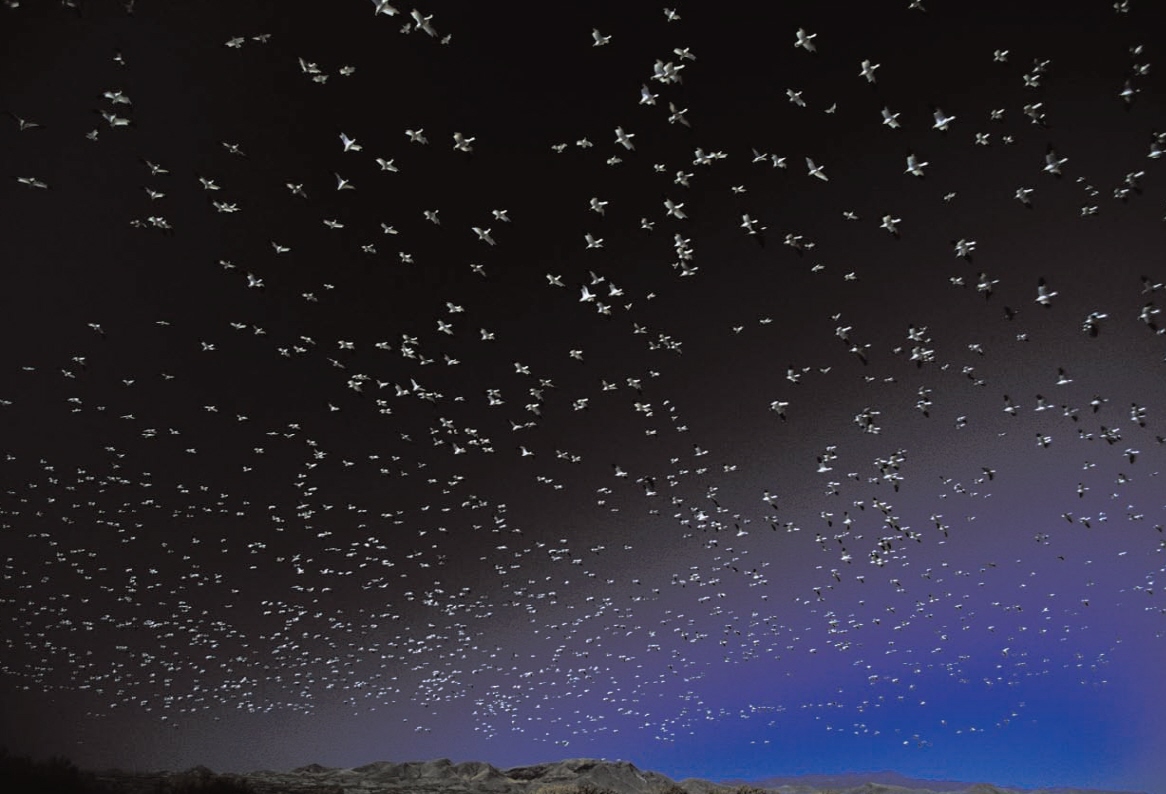
 SNOW GEESE
(Anser caerulescens)
Canon EOS 1N, 20mm zoom lens, polarising filter, hand-held, exposure unrecorded, Fuji Provia 100
New Mexico, USA
POLARISER
I have always loved the effect of a polarising filter on clear blue skies, and nearly always use one when photographing landscapes. In fact, to be honest I overuse the polariser in many of my landscapes and turn the sky far too dark. The agents trying to sell my work are not impressed with such abnormal skies, but I love the surreal effect of the almost blackness, although clearly this is not very commercial. A polarising filter is very good at making the fluffy white clouds stand out against a blue sky, so I thought it could well have the same effect on the fluffy white Snow Geese at Bosque Del Apache – and it did.
The geese were flying around our heads as usual at Bosque Del Apache on a bright, sunny day without a cloud to be seen. As they circled, the geese were coming very low over the dirt road on which we were standing, so I decided to try out something a bit different and fitted my camera with a 20mm lens and a polarising filter. You can see the effect of the polarising filter as you rotate it in its mount, and I set it to maximum effect. To enhance the effect even more I pointed my camera at 90 degrees from the sun, which made the sky look almost black. Exposure was very difficult indeed, because it would be extremely easy to overexpose the white birds against the blackened sky, but I used the dirt road as my mid-tone and underexposed one stop from that, which proved about right. With such a wide-angle lens it would have been easy to get the horizon crooked, so I concentrated on this and let the birds fly into the frame. I wanted the hills at the bottom of the frame to anchor the shot.
Does it look natural? No. Does this matter? You must make up your own mind, but the whole point of this shot was to produce a surreal image, something beyond a simple record of what was happening at the time and, above all, something that I, personally, was pleased with.
MINIMALIST
Bird photographers spend a lot of effort getting close enough to their subjects to make a large image, and close-up pictures of birds are very popular and commercial. It is possible, however, to take interesting pictures where the bird or birds make up a very small, but essential element of the overall image. I refer to these images as minimalist bird pictures, and it is important to distinguish them from the numerous bird pictures in which the main subject is simply too small in the frame. In a minimalist image, however small the bird is in the frame, not only is it important to the overall composition, but also the viewer’s eye is instantly drawn to it because it is at the very heart of the picture.
Bosque Del Apache provides another picture to demonstrate this approach. A stormy sky gave a dramatic backdrop, and I searched carefully around the horizon for an interesting scene. The shape of a distant hill attracted me, but because I wanted to include the amazing contrast between the black cloud and the sunlit clouds just below it, I had to turn the camera through 90 degrees into the portrait format to include both elements. This was the shot I wanted, but there were no birds to be found that I could use as the focal point of the composition. Bosque is, however, such a great place for birds that I thought a crane or Snow Goose was bound to fly by at some stage, so I held my position. I knew the cloud and sun combination wouldn’t last for long, so it was a relief when I spotted two cranes approaching in the distance. They seemed to be heading in the direction I wanted, but would they keep to their current course? I waited and waited, and at last they appeared exactly where I wanted them in the viewfinder and I got the shot.
The position of the cranes in the ‘empty’, plain area of the image is important – they would be lost against the dark shadows or the bright sky. They are actually one behind the other, but you can’t really tell this from the picture and they appear to be side by side. They were matching wingbeats, so both cranes have their wings in the same position, which adds to the composition. With the main subject being so small it is important that you don’t put it smack in the middle of the picture, because this doesn’t really work. Here I was restricted as to where I could put the cranes, but they are both above and to the right of the frame centre.
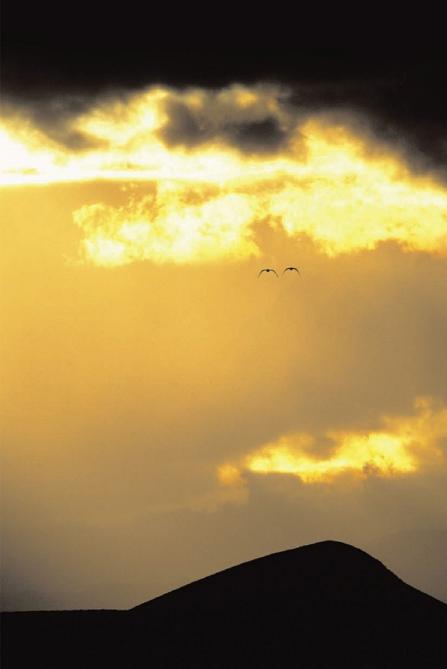
 SANDHILL CRANES
(Grus canadensis)
Canon EOS 1V, 500mm f4 lens, tripod, exposure unrecorded, Fuji Provia 100
New Mexico, USA
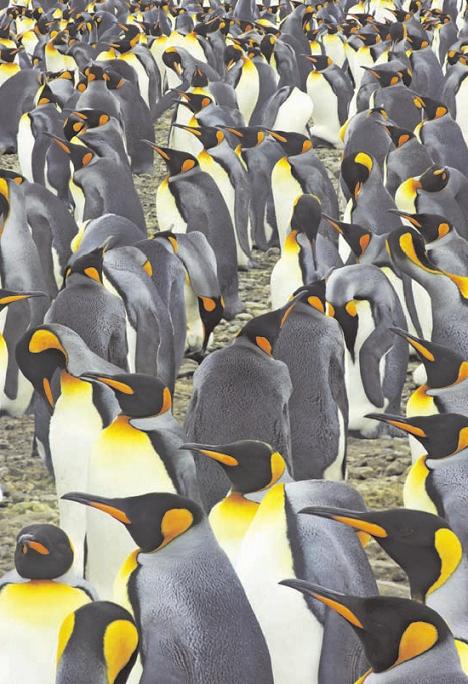
 KING PENGUINS
(Aptenodytes patagonicus)
Canon EOS 1D Mark II, 90mm tilt and shift lens, tripod, 1/125th sec @ f9, digital ISO 400
South Georgia
TILT AND SHIFT LENS
Tilt and shift lenses are very specialized lenses that I most often use for fields of flowers. Put very simply, the shift mechanism is used to control perspective and allows you to straighten vertical lines of, say, tall buildings, when you point your camera up to photograph them. I hardly ever use this, because it’s the tilt mechanism that interests me. This allows you to change the plane of focus by tilting the lens forwards or backwards until it matches the subject you are photographing.
With any lens the plane of focus is parallel to the back of the camera, so when photographing a flat subject like a field of flowers, unless you are hanging directly above the field (nice trick if you can do it), only a slim band of flowers will be in sharp focus. By using the tilt mechanism you can alter the plane of focus so that it is no longer parallel to the back of the camera, but parallel to the field you are photographing. This means that most of the flower field will be in focus. Now I’m sure that the technical explanation as to how this works is a lot more complicated than this, but let’s not worry too much about that – the point is that it works.
Having seen the massed ranks of King Penguins on South Georgia before I went to Antarctica, I decided that what a tilt and shift could do to a field of flowers it could do to a field of penguins, so I took it with me. When I reached Salisbury Plain in South Georgia, the penguins were stretched out before me as I had expected. I set up my Canon 90mm tilt and shift on the Canon EOS 1D Mark II body, which gave me an effective 117mm lens, and slowly approached the edge of the colony. I didn’t get too close, but as I waited patiently the penguins gradually filled the space in front of me and I was ready for my shot. The conditions were quite overcast so it wasn’t particularly bright, but using the tilt mechanism I was able to shoot the scene at f9 and get everything in focus, something that would have been impossible with a normal lens even if I had stopped down to f32, which would have led to an impossibly slow shutter speed anyway.
I wanted the penguins in the foreground to be large in the frame, but they were constantly on the move and the scene was changing by the second. When the penguins to the right of the frame paused and started looking around, I concentrated on them, taking the shot at a moment when they all briefly looked in the same direction. I can’t say I’ve used this very specialized lens often for bird photography, but when the circumstances dictate it can be useful for something a little different. After all, that’s what producing interesting pictures is all about.
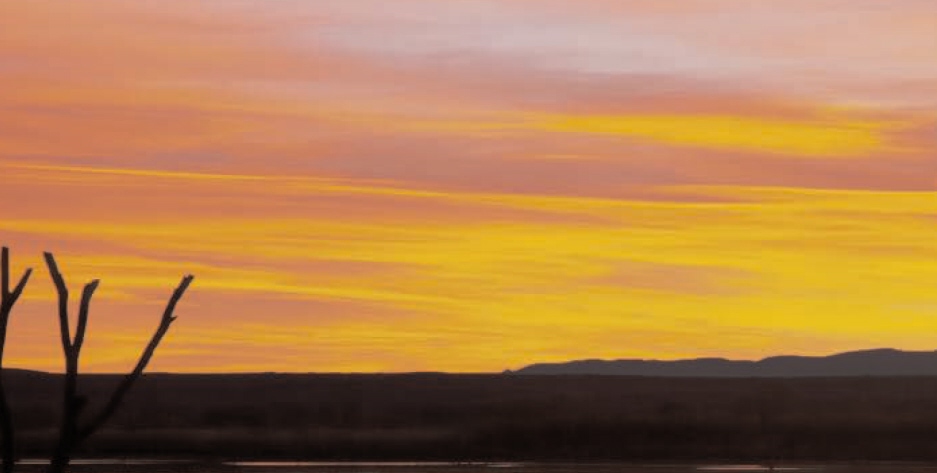
 SNOW GEESE AT ROOST SITE BEFORE DAWN
Canon EOS 1Ds Mark II, 24-105 lens @ 105mm, tripod, 1/20th sec @ f10, digital ISO 400
Bosque Del Apache, New Mexico, USA
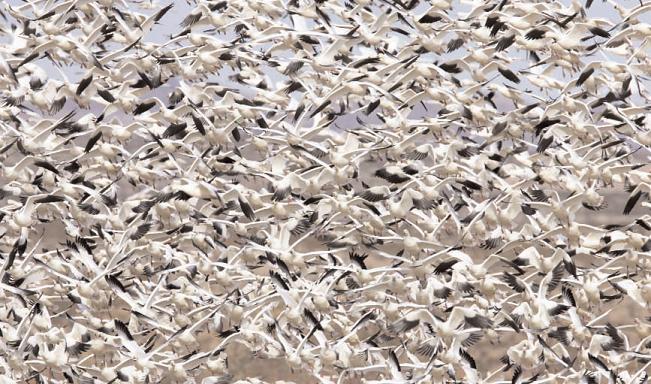
 SNOW GEESE LIFTING OFF FROM FEEDING GROUNDS
Canon EOS 1D Mark II, 500mm f4 lens + 1.4x converter, tripod, 1/1600th sec @f8, digital ISO 400
Bosque Del Apache, New Mexico, USA