Why make your own paper for origami? You may find, as I have, that what you require for a special origami project just does not exist! The right qualities of color, texture, thinness, durability and size are a lot to ask for in just one sheet of paper. Perhaps you need a sheet that is 25 inches (63.5 cm) square, all yellow on one side and all black on the other. Oh, and the paper must be matte finish and as thin and as strong as a new dollar bill. Or maybe you require a paper that is the color of an elephant, with a convincing texture like an elephant’s hide, and it must also be white on the other side so that the tusks will display well.
There are so many parameters that existing papers will not have for your special project, and so the only practical alternative is to make the paper you need yourself! I felt that way early on in my origami career and so I jumped right into the subject. Granted, I did not know much about papermaking, and the paper-makers who I met knew even less about origami’s requirements. So I had to discover for myself what to do about it, and I developed formulas and methods that make high quality papers for just about any origami project that I could develop. And the papers are archival, meaning that with reasonable care the paper will not become brittle with age and the colors will not fade; in other words, my creations will last for generations to enjoy.
You will benefit from my accumulated experience and can begin leagues ahead of my first start in hand papermaking. You also have another advantage that I did not—quality hand papermaking supplies and equipment are readily available.
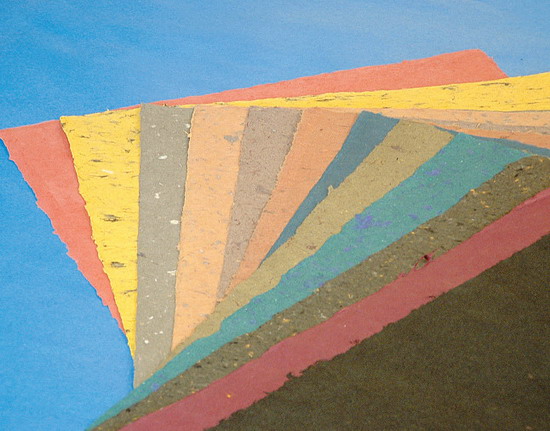
A small sample of Origamido handmade paper in a variety of colors.
TOOL AND MATERIALS
The basic equipment and materials you will need to get started in hand papermaking are:
Vat: A suitable tub to contain the pulp and water for sheet formation.
Papermaking mould: This is usually some sort of screen, sometimes with a frame, to lift a felted web of pulp out of the vat.
Felts: To lay the screened pulp upon for pressing to remove water.
Pulp: Plant fibers beaten in the presence of water that can be suspended in a vat of water for sheet forming. You can reconstitute existing paper with a kitchen blender or you can order specially prepared, ready-to-use pulps from a supplier. A professional pulp beating or refining machine should be purchased only if you become a habitual, high-volume papermaker. There are many good sources of quality prepared pulp for you to use.
Colorants: Many kinds of colorants can be used— dyes, paint, pigments—either before or after sheet forming. The most permanent colorants are pigments of insoluble inorganic powder oxides.
Pressing and drying system: These can be as simple as an absorbent cloth for pressing out excess water, and paper blotters for drying the handmade papers between. Hydraulic presses are readily available, and air-blown drying boxes can be inexpensively built. These are most efficient for large batches of paper.
PULP PREPARATION
The experts say, “The quality of the paper is made at the pulp stage.” This is so true. The selection and preparation of your fiber completely predicts its performance through all of the later stages and hence its ability to become good quality paper.
You can make your own paper pulp from scratch or you can buy prepared pulps in various stages of processing. If your paper fiber is to come directly from a plant, you must first separate the plant fibers with careful harvesting, cooking and chemical conditioning to remove non-cellulose constituents: lignins, starches, sugars, waxes, gums and fats. This is difficult and painstaking work that requires different techniques for different plants and usually calls for cooking the pulp source in a mildly caustic solution. This must be done carefully and the pulp should be rinsed thoroughly to rid it of any residue of caustic solution. The cooked pulp must then be beaten by hand or by machine. The degree of beating depends on how fine the paper is to be.
I sometimes like the aesthetic qualities of plant remnants left in the paper, especially when the paper is used as a background for a framed model of a living creature. It is also particularly satisfying to make origami animals from the fibers of the plants in their own habitat, as we did for the Arizona-Sonora Desert Museum in Tucson. There is some connection between the wildlife art and the creature’s actual habitat, which we hope is not lost on the viewer.
So, yes, it is possible to make suitable paper from plants that you harvest yourself, and there are several good books on the subject. If you want excellent paper without so much trouble, you can order partially preprocessed fiber called “half stuff,” or even totally beaten pulp that you can reconstitute with water, blend and color to your own specifications. Purchasing pre-beaten pulp is generally an attractive and much safer alternative to stripping bark and cooking plant parts in lye.
Most popular papermaking fibers are readily available from specialty suppliers; their contact information is listed in this book or found online. You can purchase dry pulp in sheet or shredded form, which is perfectly useful for origami papermaking, or as beaten pulp. The dried pulp stock can be reconstituted, colored and formed into sheets of paper. You will not, however, obtain the strongest, crispest sheets unless the pulp is properly beaten, and to properly beat the pulp you either need to beat it by hand or use special mechanical equipment. Commonly available fiber choices are cotton in linter (seed hair) and rag form; abaca (Musa textilis), a type of banana plant cultivated in the Philippines; true hemp (Canabis sativa); and flax (Linum usitatissimum).
When you purchase ready-to-use beaten pulp from specialty suppliers, you must know what to ask for. You would not ask a butcher for ground beef when planning to prepare a rib roast. The fiber choice, or blend, and the beating time are essential! I recommend that the novice try a blend of 80 percent abaca, of any kind, and 20 percent first-cut cotton linters, beaten for just one hour. This formula will produce a strong sheet that is easy to form with most student-style molds. This blend drains quickly and without holes, even in fairly thin sheets, and is also easy to color.
If you require thinner, stronger sheets, you must order your pulp “overbeaten.” This means that the beating cycle will be at least three hours long and up to twelve depending on the fiber species and the desired quality. Generally, the longer the beating time, the crisper the paper. You can go too far if the fiber is not up to the task. I suggest using abaca or raw flax for pulp that will be beaten longer than six hours. Shrinkage will be high, which means that thickness will be greatly reduced—a real plus, by measure of strength and thinness, for the complex folder—so sheet forming must be tested for true dry-state form. Colors will be more intense due to greater translucency. We test small patches of screened pulp for color, strength and thickness by drying them in our microwave oven for just a few seconds.
Regardless of the greater cost per pound, you should seriously consider ordering beaten pulp over dry. It will be stronger and take color better. The pulp will be shipped in sealed pails, usually in 5 gallon size, and contain approximately 2 pounds, dry weight, of beaten pulp.It would take many years to amortize the cost of a beater verses the small premium a professional charges to prepare your pulp for you. If, however, you find yourself making thousands of sheets of paper a year, get a beater!
Beating
If you decide to start with unbeaten pulp, the fiber, whether pre-processed or extracted on your own, must be hydrated and beaten to separate and fray the strands of cellulose. Beating may be done by hand or by machine. Whirling pulp in a blender is not beating it, but mostly just separating it. By beating the pulp, you are increasing the surface area while incorporating water molecules into the cellulose wherever the strands are mechanically separated. The more surface area you can produce, without making the fibers too short or weak, the more potential hydrogen bonding surfaces will result, making a strong, crisp sheet.
Traditionally, a Hollander is used to beat paper pulp. There are other kinds of beating machines but the Hollander is the most common in studios. It quickly flattens and frays the plant fibers, making them swell with water. It does this by grinding the fibers with dull metal blades against an adjustable bed-plate. The action can be adjusted by changing the distance between the blades and bedplate. The closer the bed to the blades, the more bruising and splaying; the more open the gap, the less the fibers are separated.

A Hollander paper pulp beating machine made by Valley Iron Works.
A typical beater cycle at our studio would include the following routine. First, the beater is loaded with the correct amount of water and prepared fiber (cooked or reconstituted from dry sheet). In the case of our Hollander beater, we use 6 gallons (23 liters) of water to 1 pound (0.5 kg), dry weight, of fiber, which is a ratio of 50:1. With the motor turned on, the fiber and water are given fifteen minutes to circulate freely in the trough. The gap between the blades and the bed-plate is left wide open so that the fibers have a chance to disperse in the water; this is called combing. Once dispersion is satisfactory, the bedplate is brought to bear against the revolving blades and the fibers are bruised, pulled apart and frayed; this is beating. For most of our blends, we beat the fiber for two hours. This produces a strong, crisp sheet with good tear resistance. For certain papers, such as paper for folding origami insects, the beating cycle can be as long as eight hours. This produces a paper that has very strong tensile strength and high shrinkage. We form these sheets tissue thin.
You can also use a pair of wooden mallets and beat the pulp by hand. Very strong paper can be made this way but it is tough work (I know, I used to do it) and not always successful. You must be very thorough, testing the pulp regularly and picking out any unbeaten bits before sheet forming can begin. The action is tough on one’s hands if not done with care. Never pound the mallets to the point of jarring your joints. Let the weight of the mallet do the work. Be relaxed. Beat about one cup, by volume, of pulp at a time. To test the degree of beating, use a small clear jar of water. Add a sample of beaten pulp. Vigorously mix the pulp and water. If the pulp disperses easily and finely, with no unbeaten clumps or rapid settling, the pulp is ready for papermaking. This is called the jar test, and it works as well for testing pulp beaten by any beating method.
BASIC PAPERMAKING STEPS
Papermaking, like cooking, proceeds well if you take the time to prepare your materials and your work area properly. You do not need complicated or expensive devices, just a little organization and a lot of care.
Each kind of paper has its own special requirements. Know them before you purchase and prepare your materials! I have taken care to detail as much information as possible to aid you, but do not be alarmed if your first batches of paper do not come out exactly as you envisioned. There are many variables at play, especially when processing a natural material, and you may need to approximate, substitute and experiment should you not be able to strictly follow a particular recipe. You will find, however, that your fist batches of paper seem quite miraculous on their own. The sheer surprise of finding crisp, dry, foldable sheets of paper in place of the wet, lumpy, fragile webs of pulp that you put in the drying box is addictive, and you will want to try again and again. Keep your first recipes simple and have fun.

Add the retention agent to the beaten pulp. Mix well.
Add inorganic pigment to the beaten paper pulp after the retention agent has reacted with the pulp. Mix well. Rinse the pulp, if desired, to remove superfluous pigment.
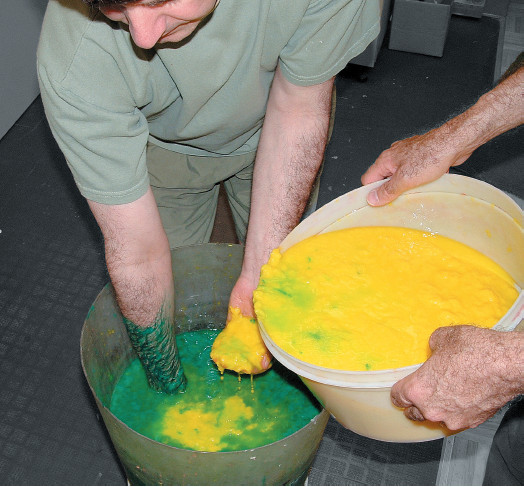
Mix two batches of colored pulps to produce a blend of colors.
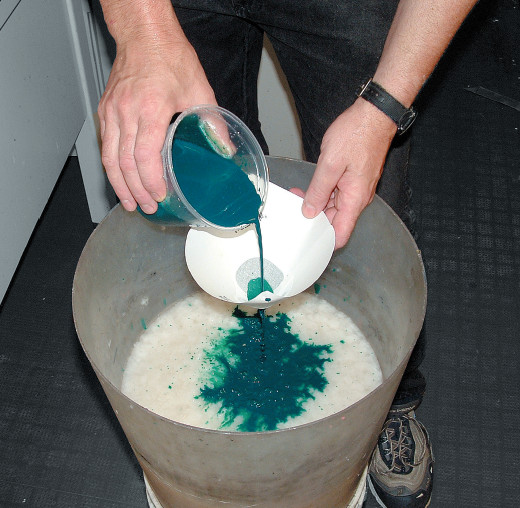
Step 1: Coloring
Once you have prepared and beaten your pulp, the first step is to add coloring. Permanent papers require special colorants that will not fade or adversely affect the fibers chemically. Many commercial papers are dyed with chemicals that will fade or change over time, especially when exposed to ultraviolet light sources, such as the sun. But pigments such as carbon black and iron oxide are permanent colorants. Various mixtures of oxides of iron provide permanent earth tones in hues of browns, reds and yellows. There are also many other excellent pigment choices for coloring paper and by blending them you can achieve almost any color you desire. Be sure to choose pigments that are environmentally safe, and non-toxic. Ask your supplier for appropriate Material Safety Data Sheets and follow those instructions carefully.
Pigment particles are usually insoluble in water, so chemical retention agents are useful to help bond the colorant to the plant fibers. The retention agent is a cationic substance that when added to the pulp applies a positive charge to sites along the fibers of that pulp. The pigment particles are commonly negatively charged, and so when added to the pulp/retention blend they are bonded, electrostatically, to the surface of the fibers. It is important to add the correct amount of retention agent and pigment based upon the dry weight of the pulp to get a successful coloring operation without wasting valuable pigment. Follow the supplier’s recipe carefully.
Another material you may want to add to your paper at the pulp stage is mica. Many of our animals— frogs, birds and butterflies—often seem more alive when we add powdered mica to the formula. The sparkle adds a quality of depth to the paper, and the paper often catches the spotlight in desirable ways when the works are being exhibited. Indeed, richly pigmented papers with inclusions of mica make the folded frogs actually appear wet. The grackles folded from our handmade papers shimmer like the real birds, and the paper butterfly’s wings sparkle with life.
Step 2: Sheet Forming
Once you have colored your prepared pulp, you are ready to form sheets of paper. The most common method of forming a sheet of paper is to use a screen with a frame or deckle, to scoop a prescribed volume of the prepared pulp from a suspension of water. To do this, pour your pulp into a vat of water. Next, dip your screen and deckle into the water and scoop up the pulp. Try to level the pulp on the screen and allow the water to drain. After the water drains through the pulp, the pulp is transferred from the screen onto a wet felt, pressed and dried to form a sheet of paper. We form larger sheets by pouring pulp slurry directly onto dammed screens, and we form even larger sheets by spraying the pulp slurry onto stretched fabric, such as a bed sheet, using a pattern pistol spray gun and an air compressor.

Add the colored pulp to the sheet-forming vat. Agitate well to disperse the fibers evenly.

Scoop the pulp suspension onto the screen. This is called “pulling a sheet.”

Raise and level to “gel” the fibers on the screen while water drains through the screen.
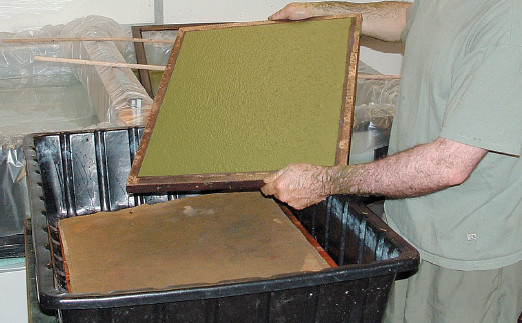
A pulp layer on the screen after the frame has been removed.
There are many methods for “pulling” a sheet of paper. The size of the paper determines the pulling method. The origami paper most of us are used to is 6 inches (15 cm) on each side. Many origami sculptures require paper perhaps five to ten times that area. Hand papermaking methods for one person can be exhausting if the deckle and frame (screen) is more than about 20 inches (50 cm) wide. Mechanized contraptions allow larger screens to be raised from the vat of pulp, and truly large sheets can be formed by pouring the pulp slurry onto a screen. At Origamido Studio, we have a glass table that measures 6 feet (1.9 m) on each side, and we also have a roll of felt 6 feet tall. This allows us to couch screened pulp, end to end, to cover the entire felt on the glass if we want to. This leaves ridges of double-thick pulp at the junctions, and while these can be pounded away, most of the larger sculptures we make are from papers that are sprayed, poured or constructed from smaller sheets after the paper is dried.
The type of fiber will influence the type of sheet one can easily form. Some pulps are so highly hydrated that their loose mash of fibers drains slowly. These often allow one to make paper that is extremely strong, and so it can be quite thin. Often this paper can be made too thin, in which case we double-dip the screen in order to lay down more pulp. Sometimes we couch two sheets together, one right on top of the other. This is great when the model requires duo paper—a sheet with two colors, one on each side. Each layer of pulp can be of a different color!
Commercial papermaking equipment never seems to be designed to make square paper. This bothers some of our students, but we do not mind. Handling the formed sheet before drying can cause it to stretch, and so when it is handled on the shorter edges, those deformities will be trimmed off anyway when the paper is made square. The excess paper allows us to select the best portion of the sheet for the desired square, then keep the margin sample for future reference. These scraps are often useful for our customers—artists, folders and other people who want to test the strength, heft, or folding qualities of a particular type of paper without destroying a nice expensive sheet.
The pouring method is useful but tricky. We have a screen that allows forming a piece of paper 30 by 40 inches (56 by 101 cm) by pouring the pulp slurry onto the screen and allowing it to drain through. The art of forming a perfect sheet is often selecting a series of felts, screens and underlayments to retard the flow of the draining so that the pulp will be of uniform thickness. Chemical agents can also be used to change the viscosity of the pulp slurry. Sometimes we insert a plastic sheet over the screen, then pull it from underneath the slurry, much like yanking a tablecloth from beneath a set table, so that the velocity of pouring the pulp at one location is negated. We often pour the slurry into a pan or bowl in the center of the screen to accomplish the same thing. Large paper is expensive, since imperfections are more likely in the larger area. The methods for handling, pressing, drying and storing the large sheets are more involved, and the equipment (felts, blotters, board and the like) is often more costly and requires more real estate for storage and use.
Step 3: Pressing
Once you have formed your sheet, it must be transferred to a piece of wet felt. The paper is then pressed to remove water, improve bonding (and resulting paper strength) and to make the mat of fiber thinner. This increased density also enables us to physically handle the paper in order to carefully remove it from felts so that we can place it onto blotters (or onto another drying surface, such as glass). De-watering by pressing is a physical process, and there are many techniques available to the hand papermaker for removing water. The simplest is to stack the pulp while on the felts, between boards, and then apply pressure. Another common method when forming large sheets is to cover the felt and pulp layer with a sheet of plastic, form a seal on the sides and, using a vacuum pump, remove the air from under the plastic sheet. The vacuum reduces the pressure between the table and the plastic, allowing the weight of the atmosphere to press the paper. Other papermaking presses utilize large rollers, crank-type jacks, hydraulic jacks and a variety of mechanical levers.

Transfer the wet pulp layer from the screen onto the wet felt.
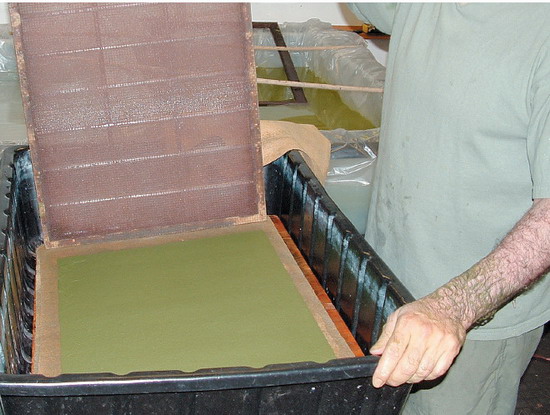
Lift the screen after transfering the pulp layer onto the wet felt.
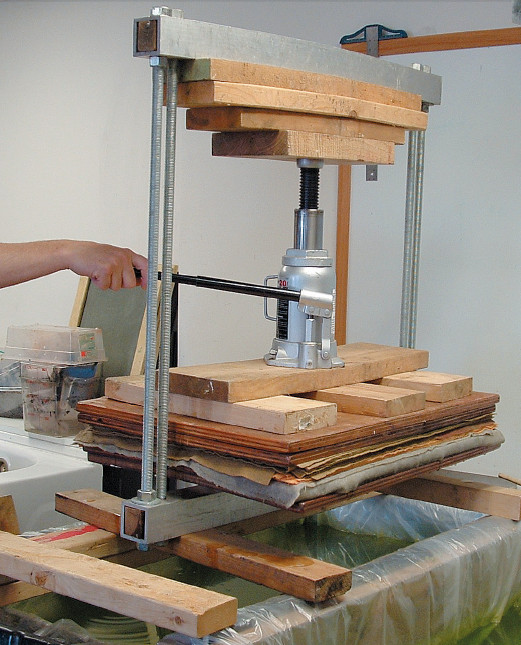
Press the wet felts (and layers of wet pulp between each felt) using a hydraulic “bottle jack.”
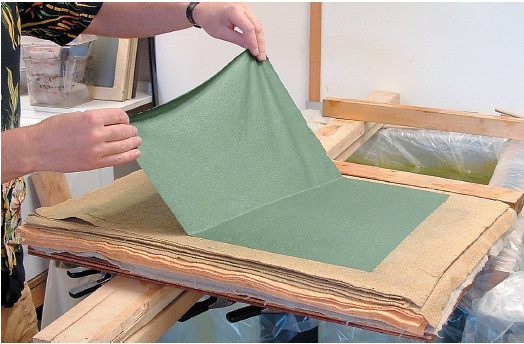
Remove the pressed pulp layers from the felt surface after pressing much of the water out of the paper.
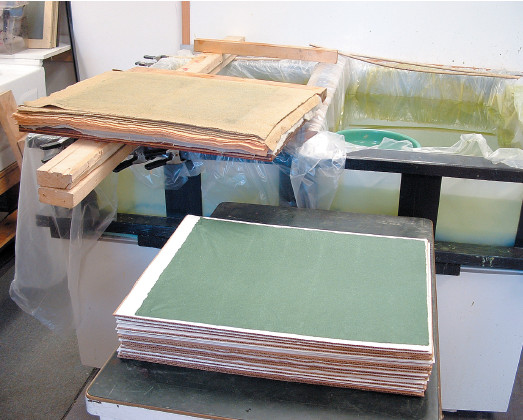
The pressed pulp is now strong enough to transfer onto dry blotters.

The paper dries between blotters and corrugated cardboard, forming a stack, or “drying post,” in the drying box.
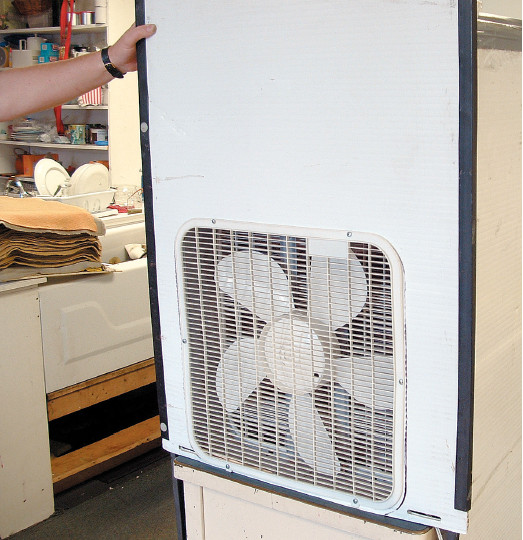
This is our portable drying box constructed of corrugated polyethylene and a 20-inch (50-cm) box fan. Air blows through the corrugations and speeds drying time. The paper is usually dry the next day.
Pressing improves the bond strength of the paper by providing a more intimate contact between hydration sites of the beaten, frayed fibers. Think of strands of cooked spaghetti. If you lay them on a pan and then allow them to dry, they may or may not stick together. If you press them together between boards (using wax paper) and then allow them to dry, they will bond to form a mat. The more pressure, the more contact and strength of the resulting mass.
Step 4: Drying
The simplest method of drying a sheet of paper is to just leave it alone. This is called “loft drying,” because freshly pressed sheets of handmade paper were often given a first drying by hanging them over ropes in a barn loft where hot air collects. This type of drying promotes the strength of the sheet because the fibers may be able to pull in together as they dry, forming a tighter knit. The trade off is that the sheet will dry wild, not flat. This is especially evident in sheets experiencing high shrinkage, such as paper made from overbeaten pulp. These papers can be made flat by wetting them once again and then re-pressing in a blotter-type dryer. Though this is an extra step, it is worthwhile if you will be applying an external size to your sheets. The size will re-wet the sheet and then you can dry it restrained.
When you want a flat sheet, you need to restrain it while it dries. The most common methods are to either hold or press it between blotters or brush it onto a drying surface, such as a piece of glass, a smooth board or a metal pan. Many commercial driers have heated, polished metal surfaces. When we produce paper at the Origamido Studio, we currently make between 100 and 200 sheets at a time, so we use a ventilated stack drying system. This method requires placing each wet pressed sheet of pulp between blotters; this sandwich is, in turn, placed between two sheets of corrugated cardboard. A stack of these sandwiches is built so that all of the corrugations run in the same direction through the stack, allowing air to be blown through the corrugation voids to quickly remove moisture wicking from the wet pulp into the cardboard. This removal of moisture will dry the sheets. We were able to construct a portable dryer by wrapping the ventilated stack with heavy plastic sheeting, duct-taped to the front of a standard 20-inch (50-cm) box fan. This worked well but it wasted too much plastic and tape. Eventually, we fashioned a portable two-piece collapsible corrugated polyethylene enclosure that we could adjust to any height of paper post. Nylon ratchet straps or rubber load ties (bungee cords) hold it snugly together, and we add weight to the top of the enclosure (and to the post of wet paper below) as the paper is drying. This is easily accomplished by stacking on the plywood panels and wet felts we removed after pressing the wet post. The drying box can be disassembled when the paper is dry, usually the next day. If the weather is humid, the drying process can take much longer.
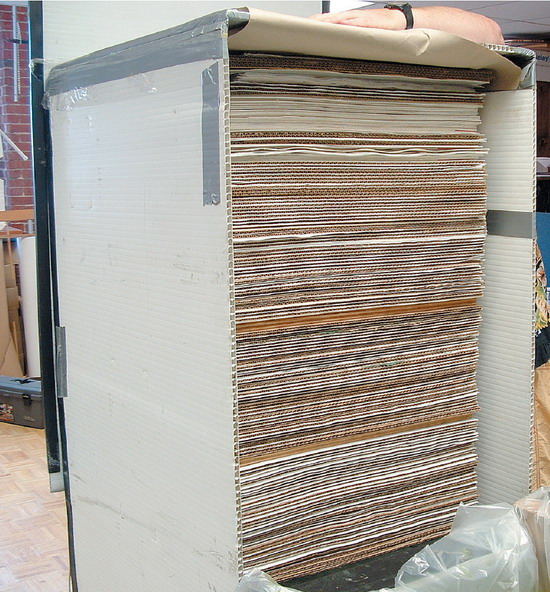
Exit end of the drying box, showing the post of corrugated cardboard, blotters and pressed (but still wet) paper.
Step 5: The Finished Sheet
You now have a sheet of handmade paper. Enjoy using it to fold your origami model!
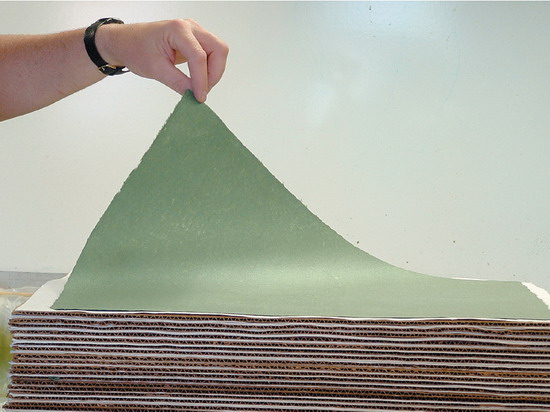
A dried sheet of handmade paper is peeled off the blotter.
MAKING DUO PAPER
Once you are able to make a sheet of paper, it is easy to make your own duo paper. Just follow the steps above to form a sheet of paper. After you have transferred a sheet to the wet felt, follow these steps:

1. We begin by couching a thin layer of the first (red) wet pulp onto the wet felt.

2. We then pull a sheet of the second color and couch it directly onto the first. In some cases, we apply a layer of methylcellulose to the first sheet before couching the second sheet onto the gel. This is usually not required but may be desirable for many reasons.

3. Pressing firmly, we transfer the wet pulp from the screen onto the first.

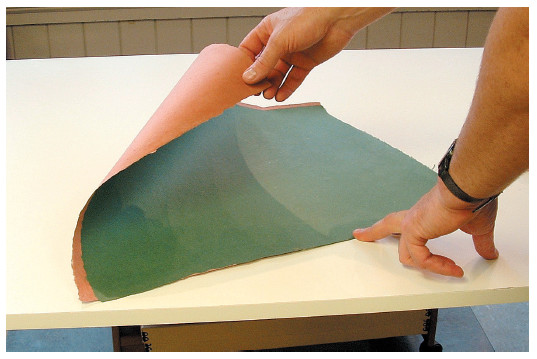
4. The second color shows in the photo after we remove the screen.

5. The doubled layer of wet pulp is stronger, and is then covered with felt, pressed and dried overnight between blotters in a fan box.
6. This sheet of duo paper is now ready to fold.
Now that you have an understanding of the papermaking process, experiment with the paper pulp recipes in the next chapter. Though it may take time to create paper that you are happy with, it will be well worth the effort.