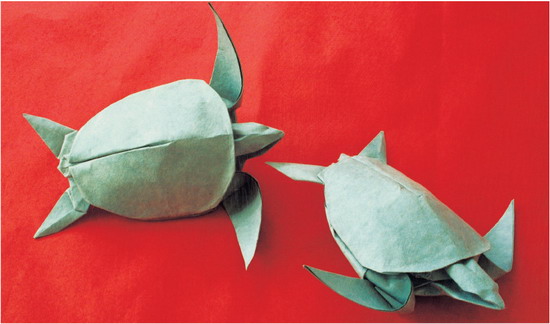
sea turtle
Designed by Michael G. LaFosse
One of my favorite natural history subjects is the turtle, and the sea turtle is the most elegant of them all. Imagine this huge yet graceful creature free to roam the reefs in every sea with few predators to fear. The New England Aquarium features a large ocean tank at its heart filled with hundreds of fish, yet visitors seem to enjoy watching the sea turtles more than any of the other creatures. I had the opportunity to dive in the great tank many years ago, and I will never forget these creatures’ smooth surfaces and flowing lines, which enable them to glide through the water. Their immense forms dominated everything else around, making it impossible to focus on detail—just shape and form. Since I had seen the sea turtles under a depth of water where colors are filtered out, I usually fold them from blue-green paper.
Origami sea turtles were usually designed with only the top shell in mind, but I wanted to design one with a plastron, or belly plate. The simpler the shape, the more skill required to animate the character of the model. The subtle grace you add to the curves will make the model speak to the viewer. This model was developed after I had created the Koi base, so my Sea Turtle and Humpback Whale are both derived from that base. Perhaps this versatile base will inspire you to create other sea creatures.
PAPER SUGGESTIONS
Paper choice, once again, is critical. Find paper that is stiff with sizing, pliable when moistened, yet able to hold a crease. Your sea turtle will be about half the length of the initial square. I suggest using 75 lb, 19-inch (48-cm) square cotton paper. You may practice dry-folding in tissue foil.

1. Fold in half, corner to corner.
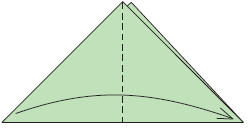
2. Fold the triangle in half, corner to corner.

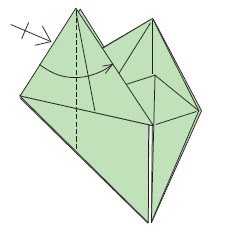
3. Swivel and squash to form a flap with three equal segments. The layer beneath will help you adjust the thirds.
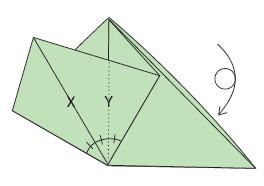
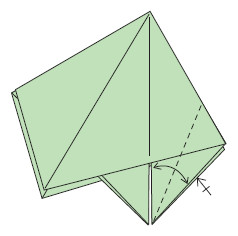
4. Check by folding at “X,” which should bring the right edge over the hidden line“Y.” Adjust if necessary. Turn the paper over, top to bottom.
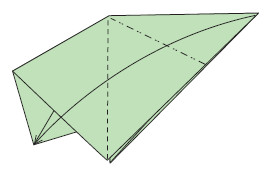
5. Repeat the same folding process on the other side. (If you are wet-folding, don’t expect the paper’s points to match.)
6. Fold and unfold, edge to center. Repeat on the back.
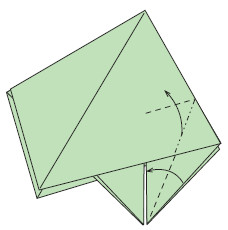
7. Move the right side of the top layer up while bringing the bottom right edge of the second layer to the vertical folded edge. Flatten the top layer only to the right of the centerline.
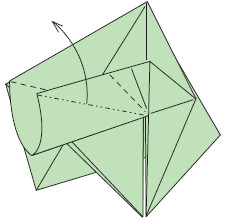
8. Form a mountain crease from the corner of the top left flap to the center of the paper. Swivel the flap up and flatten.
9. Repeat on the back.
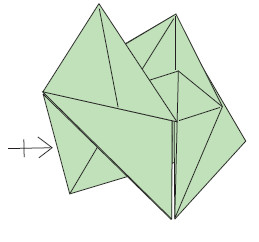
10. Valley-fold the left edge. Repeat on the back.

11. Rearrange the layers: top right to the left and back left to the right.
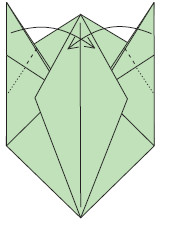
12. Your paper should look like this. Fold the top corners over so that they cross. Notice that the fold continues under the covering layer at the base of each point.

13. Turn the model over, left to right.

14. Bring each side to the centerline, allowing flaps to emerge from beneath each side.

15. Mountain-fold the bottom edges of the bottom corners to narrow the point. Inside-reverse-fold the left and right side of the top corners.
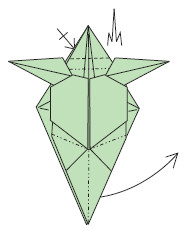
16. Crimp and sink the top point for the head. Mountain-fold the bottom point in half and flatten to the right for a rear flipper.

17. Belly view of the resulting hind flipper.

18. Valley-fold the bottom point in half and flatten to the right for a rear flipper. Note: Both rear flippers must point to the right. Valley-fold the base of the neck.
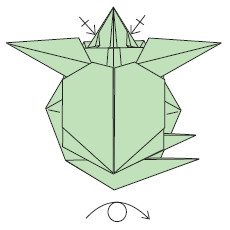
19. Narrow the base of the neck, pinching valleys and squashing. Turn over, left to right.

20. Form mountain and valley folds to create the upper dome of the shell. The mountain creases are valley-folded to meet at the center of the shell, making it cup. Round out the shape of the upper shell by tucking the corners beneath.

21. The end of the shell dart becomes the tail. Narrow the tail with inside-reverse folds. Fold the layers of paper at the shoulders tightly inside, making the front flippers curve gracefully.

22. Turn over, left to right.

23. Tuck in the base of the undersides of the front flippers. Mountain-fold the bottom corners of the plastron(belly plate).
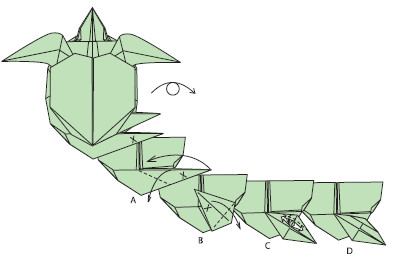
24. (A) Fold down the flipper, marked “X,” and squash-fold. (B) Fold over. (C) Stretch the top edge of the flipper and fold down. (D) The completed flipper. Turn the model over.
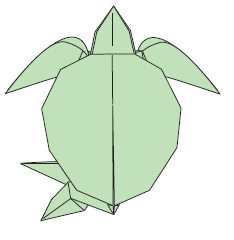
25. Top view.

26. Repeat shaping for the other rear flipper: Open the upper shell layer to expose the flip-per layers. (A) Fold down the flipper, marked “X,” and squash-fold. (B) Fold over. (C) Stretch the top edge of the flipper and fold down. (D) The completed flipper.

27. Fold the flipper across to the other side.

28. Pinch mountain creases in the head. Close-up view of the exposed flipper.
29. Fold up the edge marked “1,” and then fold over corner “2.” Repeat on the other flipper.
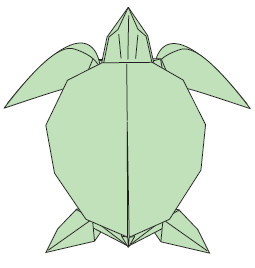
30. The finished Sea Turtle.